Week 8: Embedded programming
This week we followed the Embedded Programming (see video here)
This page is about the individual assignment.
- Understanding AVR ATtinyX4A
- Using the AVR open source tool chain
- Notes on the code Improvements
- Using the Arduino IDE and tool chain
- Lessons learned
- Next steps
This week I’m programming the board I designed and built on week 6.
The board is en extension of Neil’s “hello echo” board with an LED on pin PB2 and a input button on PA7 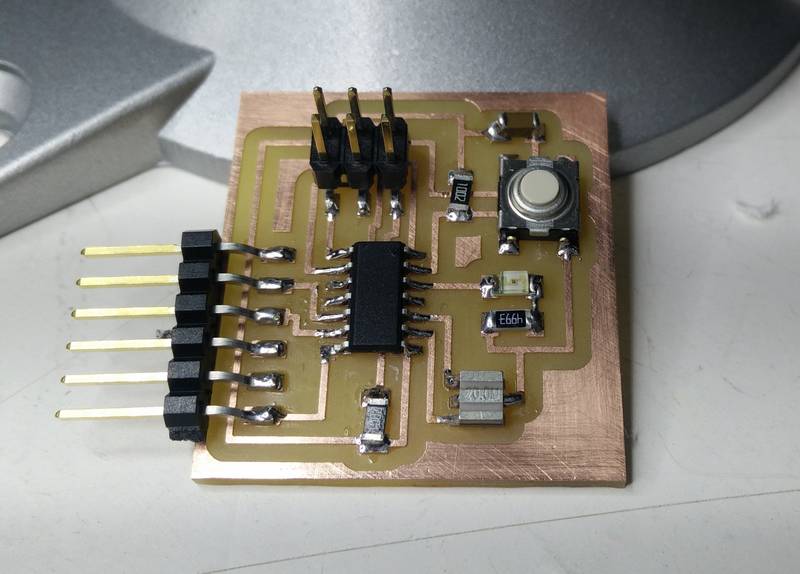
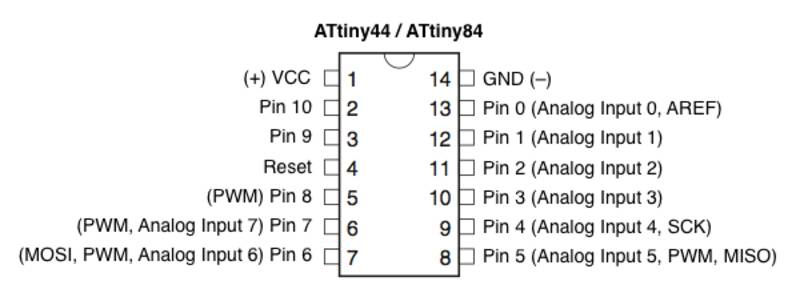
For this task we need to look back at the board pin layout. 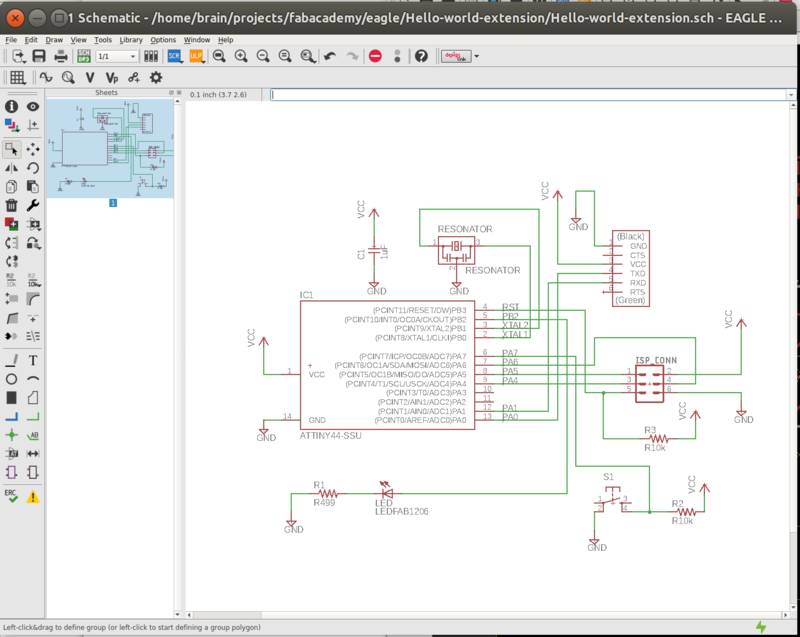
Understanding AVR ATtinyX4A
To understand how to program our microcontroller and the features available I started walking through the ATtinyX4A datasheet.

Some of the useful informations have been:
- Features overview: to understand the possibilities available with this microcontroller
- Pin layout, description and configuration: already needed in the design phase of our board to wire components and I/O
- I/O ports: to see how pins can be configured in different ways and how to access (read/write) their values in memory
- Clock: section to see how different frequency / voltage option are possible based on the performance and power consumtpion needs.
- Fuses: Related to clock is also connected the concept of “fuses” that are configuration bit that describe different modes of operation of the microcontroller. Here a useful fuses configurator tool.
- Memory: to understand the layout and purpose of different memory types.
- Interrupts: to execute asyncrounous functions. They can be both internal or external.
- A/D converter: to translate analog signals in digital format.
At the end of the reading I had already in mind some of the features I wanted to work with. Obviously digital and analog I/O of pins, storing state in the microcontroller, debug mode, interrupts and timing/delays, A/D conversion and power saving features.
I knew I could not explore all of this but gave me an idea of which order to start with.
A useful pin layout schema from http://www.pighixxx.com (copying it because the site is not available anymore): 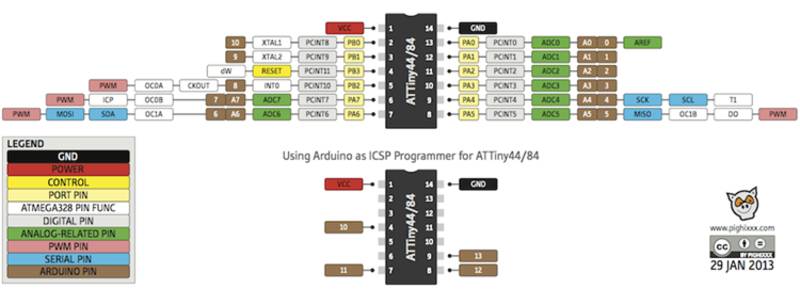
Using the AVR open source tool chain
I started developing with AVR open source tool chain. In this way we are programming in C and have low level access to the ATtiny features.
The toolchain in made of different tools as described here. Basically the GCC compiler targeting AVR, binary tools (linking, assemly, conversions), the avr-libc library (documentation here), and the avrdude tool for programming the board.
//compilation: generates .out file from sources, optionally linking process happens at this step
avr-gcc -mmcu=attiny44 -Wall -Os -DF_CPU=20000000 -I./ -o sample-project.out sample-project.c

//translate object files to different binary format: generates .hex file
avr-objcopy -O ihex sample-project.out sample-project.c.hex

//checks the binary size before uploading
avr-size --mcu=attiny44 --format=avr sample-project.out

//uploading the program to the board
avrdude -p t44 -P usb -c usbtiny -U flash:w:sample-project.c.hex
Code examples
After the Neil’s example if “Hello echo” I got stuck at the example of blinking an LED… only long time later I realized I had picked a wrong resistor from the inventory (R499k instead of a R499) in series with the LED.
This forced me to go in smaller incremental steps form the working example. I built several examples:
- Counting how many times a character on the serial inerface is received
- Counting how many times the input button is pressed
- Distinguish long or short input button pression
- Blinking and LED (here I finally realised I had the wrong resistor!)
- Storing a message from the serial port (short button press) and translating in morse code in the LED (long button press)
Example 2: count button presses
[...omitted..]
int main(void) {
  set_clock_divider_to_1();
  initialize_pins();
  put_string(&PORTA, SERIAL_PIN_OUT, "Starting serial press-key-counter test\n");

  static char chr;
  static char button_str[max_buffer] = {0};
  static int times_serial_key_pressed = 0;

  while (1) {
    get_char(&PINA, SERIAL_PIN_IN, &chr);
    if (chr) {
      put_string(&PORTA, SERIAL_PIN_OUT, "press-key: ");
      times_serial_key_pressed++;
      itoa(times_serial_key_pressed, button_str);
      put_string(&PORTA, SERIAL_PIN_OUT, button_str);
      put_string(&PORTA, SERIAL_PIN_OUT, " times\n");
    }
  }
}
Example 3: distinguish button pression length
Example 3: Detect button length pression (after fixing the LED)
[...omitted..]

int main(void) {
  set_clock_divider_to_1();
  initialize_pins();

  put_string(&PORTA, SERIAL_PIN_OUT, "Starting serial short-long-button-press test\n");
  put_string(&PORTA, SERIAL_PIN_OUT, "Short button pression < 400ms\n");

  static char button_str[max_buffer] = {0};
  static uint8_t times_short_button_pressed = 0;
  static uint8_t times_long_button_pressed = 0;

  for (;;) {
    //when button is pressed, input pin goes to ground
    loop_until_bit_is_clear(PINA, PINA7);
    set(PORTB, LED_PIN);

    uint8_t is_short_pression = 0;
    for (uint8_t i = 0; i < 40; i++) {
      _delay_ms(10);
      if (bit_is_set(PINA, PINA7)) {
        is_short_pression = 1;
        break;
      }
    }

    if (is_short_pression) {
      clear(PORTB, LED_PIN);
      put_string(&PORTA, SERIAL_PIN_OUT, "press-button SHORT: ");
      times_short_button_pressed++;
      itoa(times_short_button_pressed, button_str, 10);
    } else {
      loop_until_bit_is_set(PINA, PINA7);
      clear(PORTB, LED_PIN);
      put_string(&PORTA, SERIAL_PIN_OUT, "press-button LONG: ");
      times_long_button_pressed++;
      itoa(times_long_button_pressed, button_str, 10);
    }
    put_string(&PORTA, SERIAL_PIN_OUT, button_str);
    put_string(&PORTA, SERIAL_PIN_OUT, " times\n");
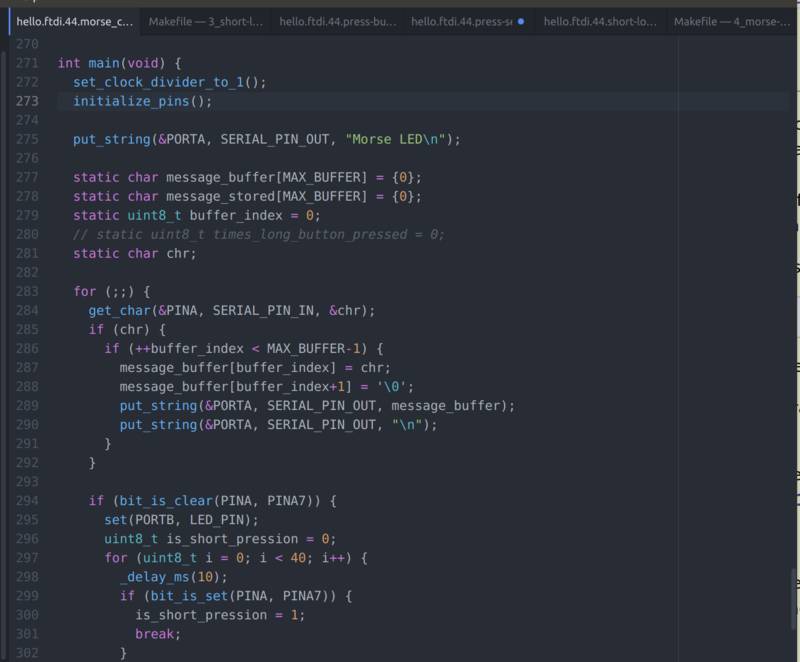
Example 5: morse code translation
For this example was challenging to fit the entire translation table in memory (in fact I’m still getting a warning from avr-size) so future optimization could be done to change its representation.
[...omitted..]

char* get_morse_code(char in_char) {
  switch (in_char) {
    case '0': return "_____";
    case '1': return ".____";
    case '2': return "..___";
    [...omitted..]
    case 'a': return "._";
    case 'b': return "_...";
    case 'c': return "_._.";
  }
}

[...omitted..]


void led_output_morse_code(char* morse_code) {
  for (uint8_t i = 0; morse_code[i] != 0; i++){
    set(PORTB, LED_PIN);
    switch (morse_code[i]) {
      case '.':
        MORSE_DIT();
        break;
      case '_':
        MORSE_DAH();
        break;
      default: //error
        MORSE_WORDS_GAP();
    }
    clear(PORTB, LED_PIN);
    MORSE_GAP();
  }
  MORSE_LETTERS_GAP();
}

void led_output_word_gap() {
  set(PORTB, LED_PIN);
  MORSE_WORDS_GAP();
  clear(PORTB, LED_PIN);
}

void led_output_morse_string(char* morse_string) {
  int index;
  index = 0;
  do {
    if ( morse_string[index] == ' '){
      led_output_word_gap();
    } else {
      char* morse_code = get_morse_code( morse_string[index]);
      led_output_morse_code(morse_code);
    }
    ++index;
  } while (morse_string[index] != 0);
  MORSE_WORDS_GAP();
}


int main(void) {
  set_clock_divider_to_1();
  initialize_pins();

  put_string(&PORTA, SERIAL_PIN_OUT, "Morse LED\n");

  static char message_buffer[MAX_BUFFER] = {0};
  static char message_stored[MAX_BUFFER] = {0};
  static uint8_t buffer_index = 0;
  // static uint8_t times_long_button_pressed = 0;
  static char chr;

  for (;;) {
    get_char(&PINA, SERIAL_PIN_IN, &chr);
    if (chr) {
      if (++buffer_index < MAX_BUFFER-1) {
        message_buffer[buffer_index] = chr;
        message_buffer[buffer_index+1] = '\0';
        put_string(&PORTA, SERIAL_PIN_OUT, message_buffer);
        put_string(&PORTA, SERIAL_PIN_OUT, "\n");
      }
    }

    if (bit_is_clear(PINA, PINA7)) {
      set(PORTB, LED_PIN);
      uint8_t is_short_pression = 0;
      for (uint8_t i = 0; i < 40; i++) {
        _delay_ms(10);
        if (bit_is_set(PINA, PINA7)) {
          is_short_pression = 1;
          break;
        }
      }

      if (is_short_pression) {
        clear(PORTB, LED_PIN);
        put_string(&PORTA, SERIAL_PIN_OUT, "Output...");
        led_output_morse_string(message_stored);
        put_string(&PORTA, SERIAL_PIN_OUT, "done\n");
      } else {
        loop_until_bit_is_set(PINA, PINA7);
        clear(PORTB, LED_PIN);
        put_string(&PORTA, SERIAL_PIN_OUT, "Store buffer: ");
        memcpy(message_stored, message_buffer, MAX_BUFFER);
        put_string(&PORTA, SERIAL_PIN_OUT, message_stored);
        put_char(&PORTA, SERIAL_PIN_OUT, '\n');
      }
    }

  }
}
Example 5: Morse code translation
All the examples are available for
Download C code Sources (.zip archive)
Notes on the code Improvements
The standard library has many functions and macro to help writing code like loop_until_bit_is_set(), bit_is_set(), _BV() that can be used instead of Neil’s code macro, so I did that in various places.
Serial communication read/write loop
I tried to simplify the following code in a for loop trying to account for the additional instructions execution delay but failed :(
void put_char(volatile unsigned char *port, unsigned char pin, char txchar) {
   [...omitted..]
   // unrolled loop to write data bits
   if bit_test(txchar,0)
      set(*port,pin);
   else
      clear(*port,pin);
   bit_delay();
   if bit_test(txchar,1)
      set(*port,pin);
   else
      clear(*port,pin);
   bit_delay();
   [...repeated 8 times..]
Memory consumption of standard library functions
For int to string converstion at a certain point I introduced a dependency on the standard library function sprintf()
sprintf(button_str, "%d", times_serial_key_pressed);
and relaized only later if the programm memory impact of this:
AVR Memory Usage
----------------
Device: attiny44

Program:    2240 bytes (54.7% Full)
(.text + .data + .bootloader)
Compared to using itoa()
itoa(times_serial_key_pressed, button_str);
which saves around 34% of the program memory
AVR Memory Usage
----------------
Device: attiny44

Program:     842 bytes (20.6% Full)
(.text + .data + .bootloader)
Why there are still not many comments in my code?
Not many people are aware that code comments can be considered a ‘bed smell’ in programming. It is a largely debated topic: read more here, here and here about the debate.
I personally belive that is true most of the times. In my experience maybe 90% of code comments can be removed and be replaced with better and more readable code. In fact I was able to start from Niel’s code and remove most comment with better variables names, function names or extracting new functions.
To give credit to the other perspective of the debate I realised that when writing embedded C code sometimes tricky solutions are needed to optimise for the compiler more often than of optimising for the reader.
That’s why you don’t see many comments, but this is just a little bit more that what I usually do in higher level languages.
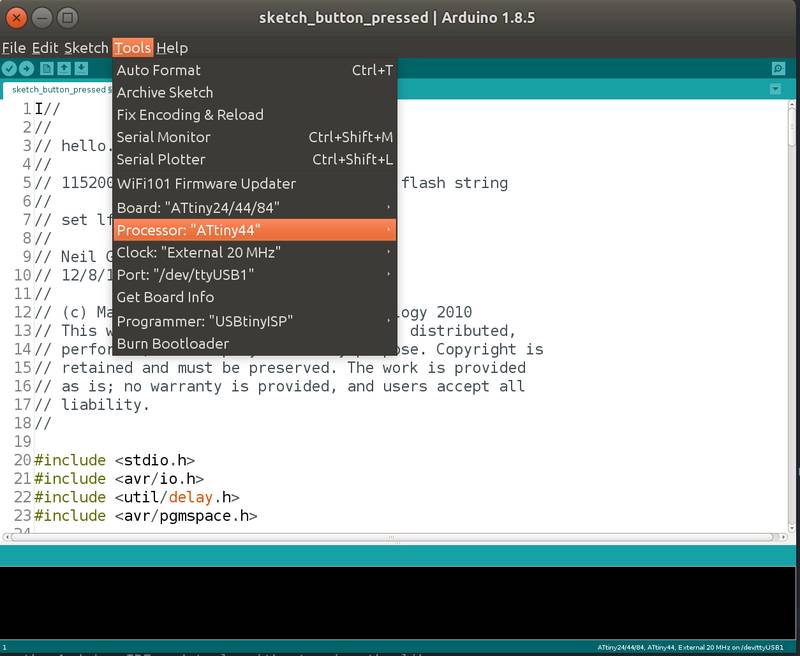
Using the Arduino IDE and tool chain
The Arduino toolchain provides a simplified experience and faster development of the microcontroller at expense of performance and power conumption of the device. It is a popular IDE, library and boards that can be separately adopted and are valuable for prototyping and making less steep the learning curve.
Setup instruction for adding ATtiny44 board/process and USBTinyISP programmer to the tool option are available here. It is also important to choose the correct Clock from the interface. In my case I struggled a bit in figuring out all the options available and get it right.
When programming the I/O using the Arduino library the pin layout is simplified. It is a single int that refers to the pin numbering as listed on an Arduino board so we need to map these to our ATtiny44.
I built several examples:
- Using the Arduino IDE and tools without using the library (hello echo)
- Implementing “hello echo” serial communication using the arduino library
- Detecting the button is pressed
- Blinking the LED
Examples: Arduino the basic arduino led blinking
Here is important to map the PB2 pin to the corresponding Arduino pin number
#define LED_PIN 8  //PB2

void setup() {
  pinMode(LED_PIN, OUTPUT);
}


void loop() {
 digitalWrite(LED_PIN, HIGH);
 delay(100);
 digitalWrite(LED_PIN, LOW);
 delay(100);
}
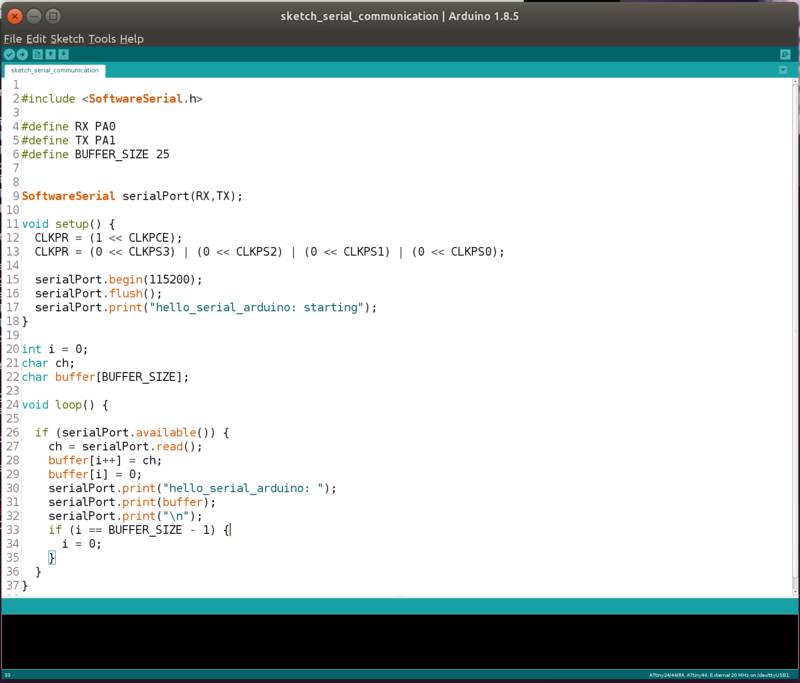
Examples: Using the Arduino library for serial communication
#include <SoftwareSerial.h>

#define RX PA0
#define TX PA1
#define BUFFER_SIZE 25

SoftwareSerial serialPort(RX,TX);

void setup() {
  CLKPR = (1 << CLKPCE);
  CLKPR = (0 << CLKPS3) | (0 << CLKPS2) | (0 << CLKPS1) | (0 << CLKPS0);

  serialPort.begin(115200);
  serialPort.flush();
  serialPort.print("hello_serial_arduino: starting");
}

int i = 0;
char ch;
char buffer[BUFFER_SIZE];

void loop() {

  if (serialPort.available()) {
    ch = serialPort.read();
    buffer[i++] = ch;
    buffer[i] = 0;
    serialPort.print("hello_serial_arduino: ");
    serialPort.print(buffer);
    serialPort.print("\n");
    if (i == BUFFER_SIZE - 1) {
      i = 0;
    }
  }
}
Examples: Using AVR C code with the Arduino IDE
Arduino IDE can be used seamlessly for AVR C code like in the Niel’s example taking advadage only of the tool chain iuntegration
#include <stdio.h>
#include <avr/io.h>
#include <util/delay.h>
#include <avr/pgmspace.h>

[... OMITTED NIEL's CODE ...]

int main(void) {
   static char chr;
   static char button_str[max_buffer] = {0};

   [... OMITTED NIEL's CODE ...]
   // set clock divider to /1
   // initialize pins

   put_string(&PORTA, SERIAL_PIN_OUT, "Starting press-button-test\n");
   static int times_button_pressed = 0;
   static int times_serial_key_pressed = 0;

   while (1) {
      loop_until_bit_is_set(PINA, PINA7);
      put_string(&PORTA, SERIAL_PIN_OUT, "press-button: ");
      times_button_pressed++;
      sprintf(button_str, "%d", times_button_pressed);
      put_string(&PORTA, SERIAL_PIN_OUT, button_str);
      put_string(&PORTA, SERIAL_PIN_OUT, " times\n");
      loop_until_bit_is_clear(PINA, PINA7);
   }
}
Download .ino sketch Sources (.zip archive)
Lessons learned
- Embedded programming is “hard” compared to traditional high level development that I’m more used to. Memory safety and optimizations are complex. Testing is harder and slows down the process.
- When debugging non working features always check the hardware, not only the software! :)
Next steps
- I still want to explore many features of the AVR microcontroller: using interrupts, analog pins and A/D conversion, storing state in the microcontroller for when the power is off, power saving and debug mode
- Learn better and get more familiar with the Arduino library and boards: a good foundations tutorial is available