Lights and sound control
In this page I’m going to show the design and creation of lights and sound control system for the Privacy Seed project.
Lights
One of the open questions about lighting the structure was about how to drive large number of RGB LED.
I investigated different options like Charlieplexing of custom built LED arrays, existing boards and different type of LED strips.
I ended up choosing the AdaFruit DotStar LED strips
DotStar LEDs are 5050-sized LEDs with an embedded microcontroller inside each LED. The PWM is built into each LED-chip so once you set the color you can stop talking to the strip and it will continue to PWM all the LEDs. These LEDs have 2 wires for sending data (clock pin and data pin acting like an SPI interface) making the timing control easier for any microcontroller.
DotStar LED strip test
As a first test of a small strip I wanted to understand how to simply interface with the strip using an Arduino board.
I took advange of the AdaFruit-DotStar library for Arduino and modified an existing small example.
Things to keep in mind:
- I had mistaken the pins with the SDA/SCL pins for the I2C protocol! :)
- Different pixel version come with different order of the RGB bytes. That need to be configured with the eg. DOTSTAR_BGR initialization parameter.
#include <Adafruit_DotStar.h>

#define RED 0xFF0000
#define GREEN 0x00FF00
#define BLUE 0x0000FF
#define ON 0xFFFFFF
#define OFF 0x000000

#define DATA_PIN    4
#define CLOCK_PIN   5

#define NUM_PIXELS 5 // Number of LEDs in strip

Adafruit_DotStar strip = Adafruit_DotStar(NUM_PIXELS,  DATA_PIN, CLOCK_PIN, DOTSTAR_BGR);

void setup() {
  strip.begin();
  strip.show();
}

int headIndex = 0;

void loop() {
  strip.setPixelColor((headIndex) % NUM_PIXELS, RED);
  strip.setPixelColor((headIndex - 1) % NUM_PIXELS, GREEN);
  strip.setPixelColor((headIndex - 2) % NUM_PIXELS, BLUE);
  strip.setPixelColor((headIndex - 3) % NUM_PIXELS, ON);
  strip.setPixelColor((headIndex - 4) % NUM_PIXELS, OFF);
  strip.show();

  headIndex++;
  delay(200);
}
Here is the first successful result! :)
From this test I verified the current requirements of the strip. Up to 60mA for ‘on’ pixels, and 10mA for ‘off’ pixels (5V). We should be able to power with one 2A source a long strip from the bottom to top of the structure. Longer strips tend to have a brown-out effect and require a power tap.
Here an example of a 5 meter strip brown-out effect: 
2-3 meter long strips from the bottom to top of the structure should be still OK.
On a 5 meter strip (145 pixels) I managed to drive from an Arduino leonardo power supply pins the following amount of pixels:
- 20 white pixles
- 40 red pixels
- 140 blue pixels
- 140 green pixels Therefore red pixels are the ones absorbing most power.
On the same 5 meter strip (145 pixels) I managed to drive with an external power supply the entire strip (consuming 1.44A) but with a very visible browning effect. Note that in this case both the arduino and the strip need to be powered from the same power supply.
On the 5m strip to make the browning effect non visible no more than 30 pixels should be ON. The browning effect deteriorates when increasing the leghth of the strip, how many pixels are ON, how far from the first pixel the ON ones are.
More color patterns
Random colouring (using the Arduino RNG)
for (int i = 0; i < NUM_PIXELS; i++){
  if (random(NUM_PIXELS) < NUM_PIXELS/10){
    strip.setPixelColor(i, random(0xFFFFFF));
  } else {
    strip.setPixelColor(i, OFF);
  }
}
strip.show();
DotStar driver board
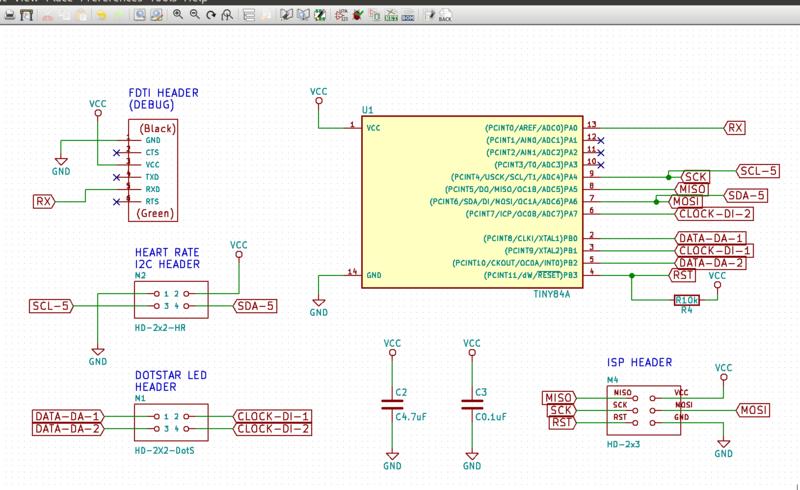
At this stage I wanted to create my own board based on ATTiny84A to control the DotStar LED strip.
I designed the board to be able to control two independent DotStar LED strips (via pins 2-3 and 5-6) and to be reachable as an I2C slave.
The idea in the future is that many of these board can control separate LED strips. The communication on the I2C bus is limited to the heart rate or very few additional information, while this board does the number crunching necessary to address hundreds of LED and draw light patterns and animations.
Here is the board schema, pcb and final result
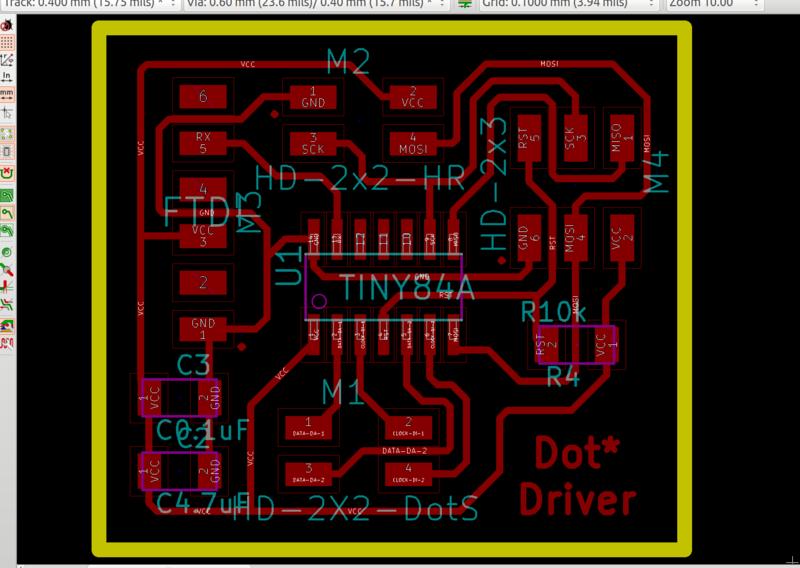
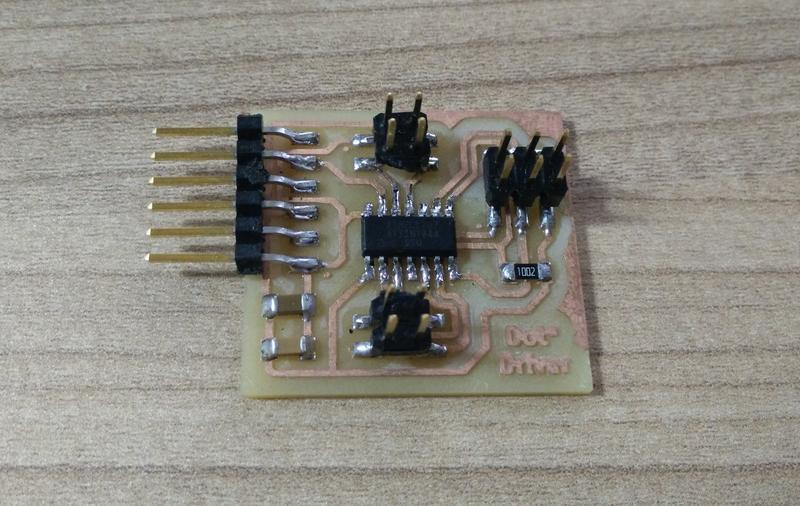
And the stuffed board
Download KiCAD project and GCode for Dot* driver board (.zip archive: KiCAD project, .png and .rml files)
DotStar driver with FastLED
TODO: DOCUMENT CODE …
Sound
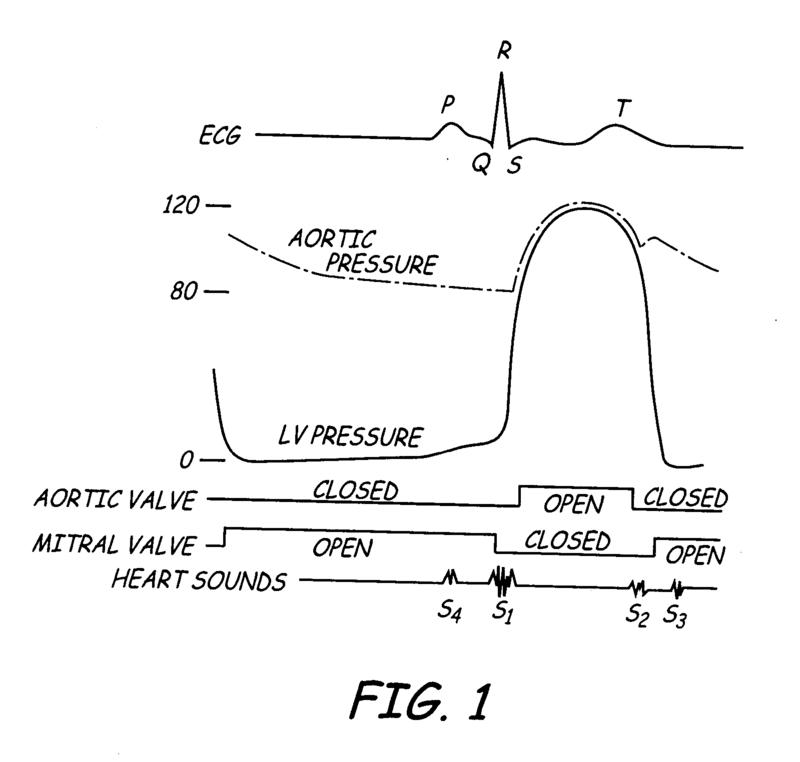
I haven’t done much progress on the sounde generation but I started investigeanting the sound properties of an heartbeat.
This diagrams show which hart movements are generating the sounds and which “shape” and time difference they have.
This diagam shows a spectral analysis of the heartbeat sound. It is important to notice that all sounds are low-frequency: 50 - 512 Hz. A bigger speaker than the one we have in the inventory is necessary to have an hi-fidelity immersive sound reproduction.

I foresee that to be able to work with a sound amplifier and generate algorithmically a sound wave will take quite a bit of time.
I will likely postpone this part of the project.
Lessons learned
- The DotStart strips are very easy to use with a dedicated library but the power consumption has to be well estimeted
Next steps
- Try the FastLED library - http://fastled.io/
- Performance: How many DotStar LEDs can I control from a single ATTiny or RaspberryPI ? At what refresh speed? Driving how many pins in parallel?
- Can I use conductive tape to connect LED strips cables?
- Integrating lights in the structure
- Generate a heartbeat sound