Week 17: Applications and Implications
Assignment requirements
The first checklist
Propose a final project that integrates the range of units covered.
The second checklist: Learning outcomes
- Define the scope of a project
- Develop a project plan
The third checklist: Have you answered these questions…
- what will it do?
- who has done what beforehand?
- what materials and components will be required?
- where will they come from?
- how much will it cost?
- what parts and systems will be made?
- what processes will be used?
- what tasks need to be completed?
- what questions need to be answered?
- what is the schedule?
- how will it be evaluated?
What will it do?
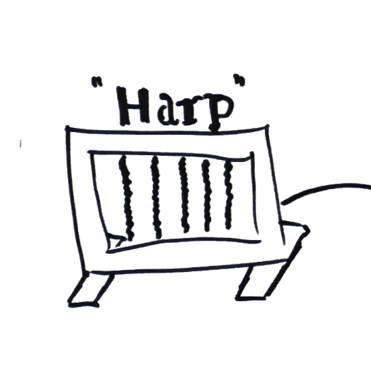
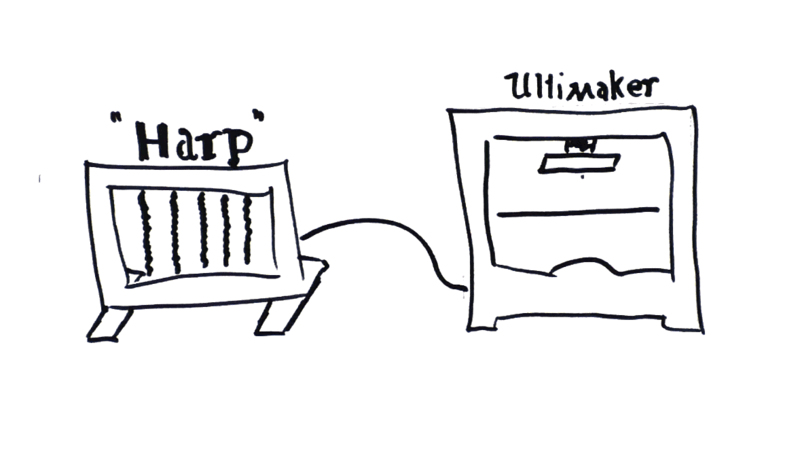
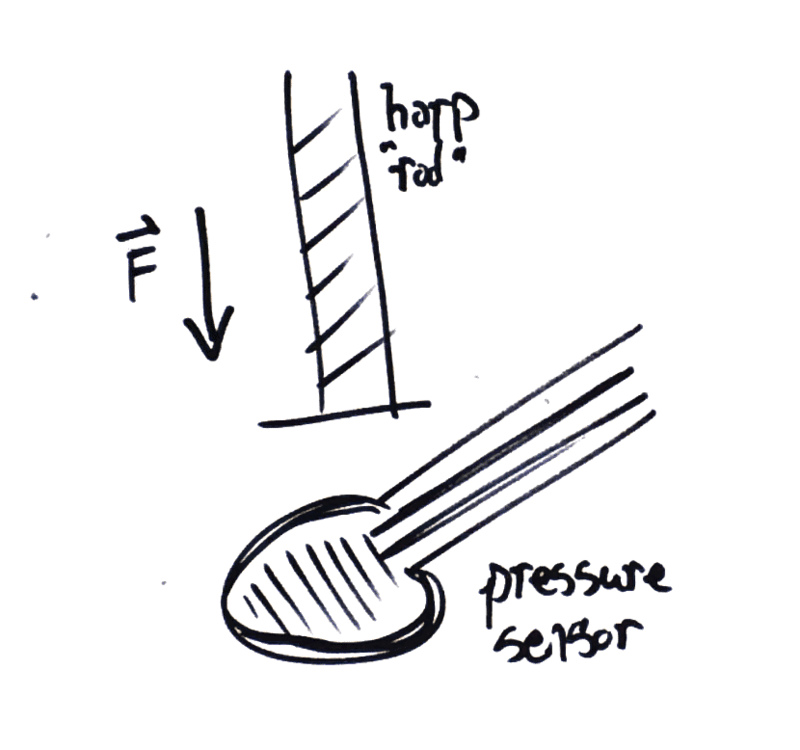
It is a 3D printer harp. It is a musical instrument interface. It will control the extruder head of a 3D printer to move in shapes that will create different different sound expressions. The proposed interface currently resembles a cristal baschet, an instrument whose sound is made by stroking glass rods. This will be a 3D printer "harp", where several rigid rods are stroked to generate the sound. Each rod will cause the printer to perform a unique expression, and the pressure applied when stroking the rod will control the sound by changing the speed at which the printer is moving. A pulsing LED will communicate the applied pressure.
What has been done beforehand?
- Machine motors that make noise, such as the Shopbot Happy Birthday. Though the Printer Harp will not make tones by oscillating the motors, it will use the sounds that are naturally generated by 3D printers.
- Industrial music also has a history of using machines (such as power tools) for sound, with a strong grounding in Italian futurist Luigi Russolo’s Art of Noises manifesto.
- The interface is similar to the cristal baschet.
What materials and components will be used?
The 3D printer will be a standalone printer, probably an Ultimaker Original. The interface will be made out of laser-cut plywood or MDF, and the rods will be 3D-printed PLA. The sensors will be resistive pressure sensors placed underneath each rod to detect how much force is being applied downwards when the rod is being stroked, these will be connected by a voltage divider with a resistor to a microcontroller. The control section has several possible configurations:
Electronic setup option 1: ATtiny using serial directly to the Arduino Mega on the Ultimaker
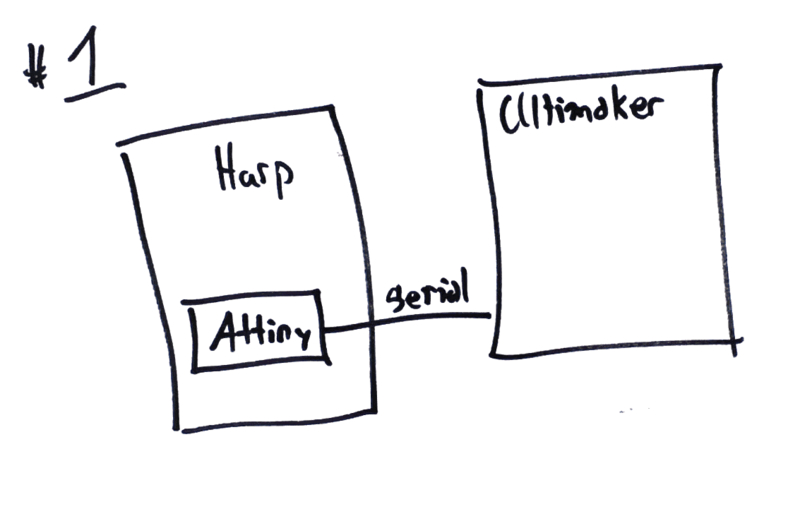
The sensors connect to the ATtiny, which uses software serial through two wires soldered onto the Ultimaker board to send the GCode.
Electronic setup option 2: Microcontroller and Raspberry PI to USB connection on printer

Many 3D printers use an FTDI connection to communicate to the world. A USB host is required for this. My microcontroller skills are not developed enough to do this in the time available. So a microcontroller, so an ATTiny manages the sensors, and sends the data to a Raspberry Pi, which manages the control logic and sends GCode to the printer through USB.
Electronic setup option 3: Arduino and USB Host Shield connect to printer through USB
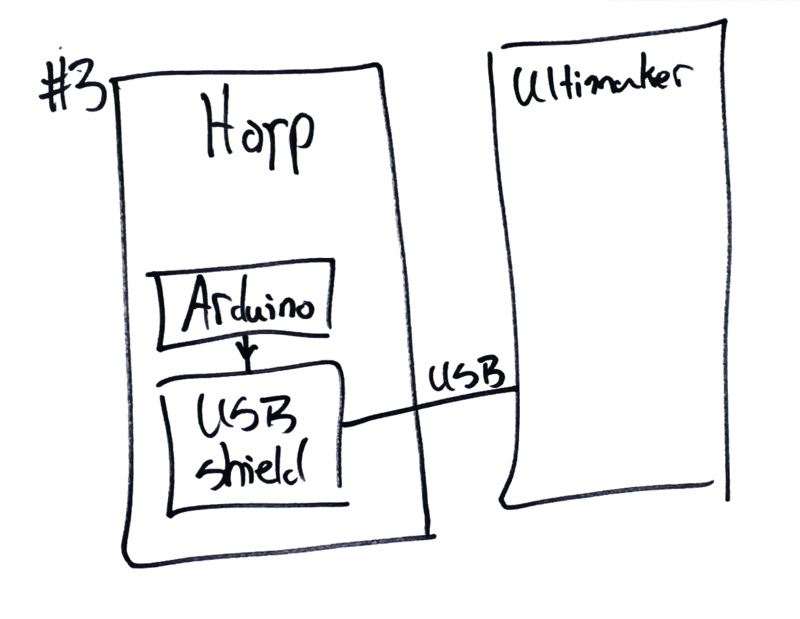
I won't be doing this. But I could use a USB Host Shield to communicate with an FTDI device. This would allow my device to talk to many different printers, rather setup 1, which requires soldering directly to a 3D printer's control board.
Where will the parts come from?
The printer will come from the lab. The wood or MDF will come from the local lumber shop, Houthandel Schmidt. The PLA will come from the lab. The microcontroller, PCB, and passive components will come from the lab, and the sensors will come from an electronics retailer, such as tinytronics.nl.
What will it cost?
I assume that I will use the basic configuration of the attiny wired to the Ultimaker. In this case:
- 3D printer, provided
- Wood or MDF, Emma says "Less than €10"
- PLA for the printed rods: negligible.
- Force sensor, 6 at €6 apiece: €36
- Attiny: €0.80
- Passive components and board, less than €10.
That means the cost is approximately €56, with the bulk of the cost going to the sensors. Add 10% for extras round to €60 for the project.
If other versions the electronics configuration were used, then it might require a Raspberry Pi 3 for €40, or an Arduino Uno (€23) with host shield (€24), increasing the cost by about €50.
What will be made?
The interface housing and rods will be made. The control circuitry will be made.
What processes will be used?
- 3D CAD for case design and 2D cutting for construction
- 3D printing for harp rod construction
- Microcontroller programming
- Circuit layout (2D) and PCB milling
- Soldering
Tasks and schedule
May 28 - Jun 3
This week all of the hardware and software assumptions will be tested and confirmed (can I accomplish what I want to accomplish?), and the materials will be all be designed in CAD.
- Test pressure sensor input
- Test sensor for live controlling gcode
- Directly controlling Ultimaker through TX and RX
- Write arduino version of python code I have used for testing
- Design interface and performance method
- CAD design frame
- CAD design rods
June 4 - June 10
This week, the materials will all be manufactured and tested.
- Explore and choose 3D-printer expressions.
- Manufacture performance interface
- Design/test basic circuit
- Design full circuit
- Manufacture circuit
- Test circuit
June 11 - June 17
- Most importantly: Overflow of tasks that were not completed
- Final documentation:
- Conceive and record video
- Conceive and design slide
- BOM for final page
How will it be evaluated?
It is a musical instrument. If I can generate a performance, then it will have been successful.