| Final Projects Presentation Fabacademy 2018 | |
|---|---|
| video of presentations Jun 13 | http://fab.academany.org/2018/lectures/fab-20180613.html |
| video of presentations Jun 15 | http://fab.academany.org/2018/lectures/fab-20180615.html |
| video of presentations Jun 20 | http://fab.academany.org/2018/lectures/fab-20180620.html |
| Assignment | Used software | Files/Downloads/links |
|---|---|---|
| final project | ||
| summary slide | Gimp | presentation.png |
| video clip | Kdenlive and Gimp | presentation.mp4 |
Licenses for this Projects
- All documentation is licensed with the Attribution-ShareAlike 4.0 International (CC BY-SA 4.0) License
- License for software is GPL
See my comments in the week about Invention, Intellectual Property, and Income
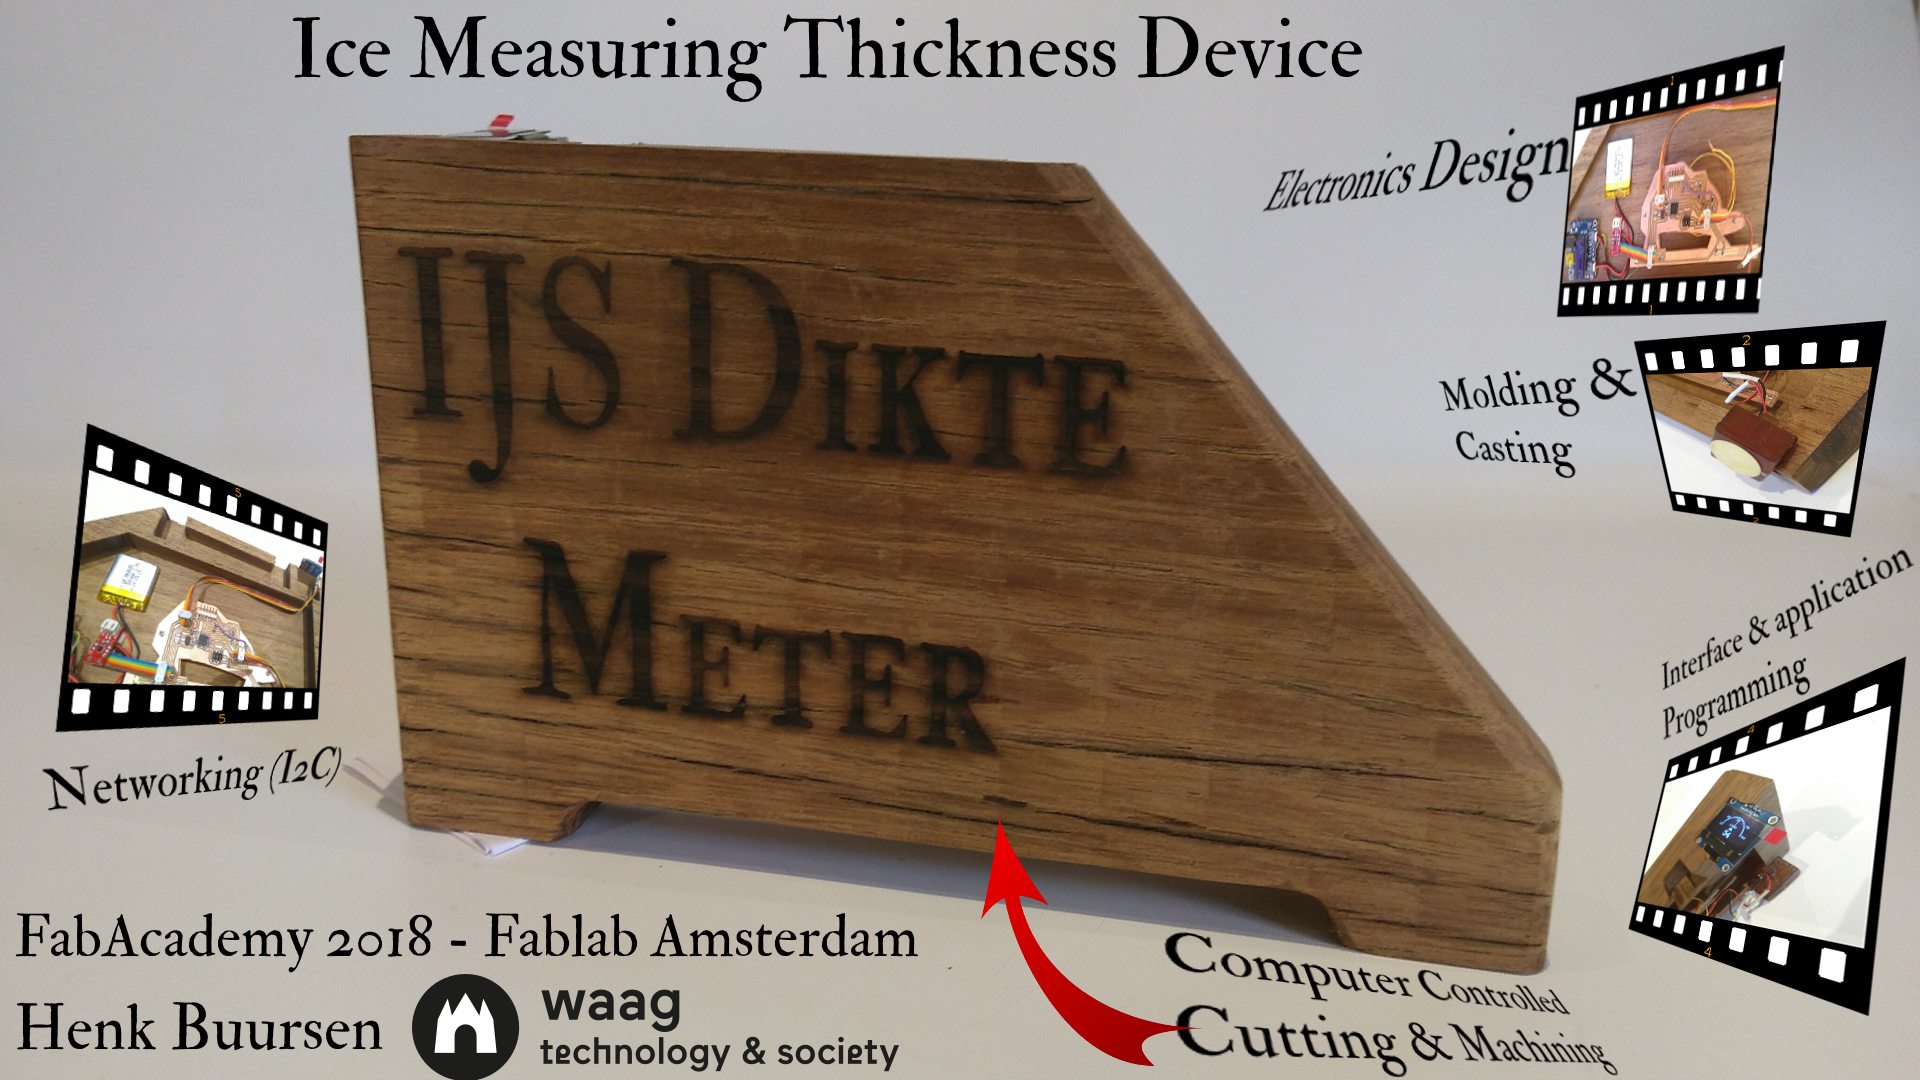
Slide representing my final project
Video representing my final project
In words
This is a presentation of my final project for fabacademy 2018. Over the last 5 months the ideas en how to realize the project changed over and over. At first i played with ultrasonic sound do do the measurements. As you could read, i succeeded to measure a thinknes of ice from 3 till 5cm. And that was not enough for the purpose i wanted to make the device. It should be able to measure at least till 15cm of ice.
On suggestion of Neal i changed to impuls hammering. Here the same process: at first i tried to make my own solenoid for generating the impuls. As seen on that page the impuls i could get out of a solenoid (my own made and a small one from adafruit) both didn’t generate enough information to make a usefull measurement.
In the end i made the prototype shown above. The input sensors are the 2 piezo’s on the bottom of the case. The piezo are mounted on a casted block of silicon to minimize the “contact noise” from the device itself. When you put the device on ice, the piezo’s make a flat contact with the ice layer. They will pickup the impuls when you hammer in front of the device. The first piezo is in the front and will pickup the impuls from hammering the ice. The 2nd piezo is on the other end of the device, 25 cm from the front piezo. It will pickup the same impuls, but miliseconds later.
The piezo’s are connected to gate A0 and A1 on the atmega, were the analogue signal is converted to a value between 0 and 1023. A0 and a1 have the possibility of ADC (analog-digital conversion).
The code i wrote for the atmega is doing the triggering and calculation. When piezo 1, connected to A0, is triggered and a analogRead on A0 receives the value 1023 (highest value), it will do peak detection to get the first peak after the initial hit. This peak is the first reflection from the underlayer of the ice. When detected this peak, it will start counting the time with milis(). Piezo 2 connected to A1, will do the same peak detection. When it receives the first peak, milis will have a value of in miliseconds. After calibrating (i need ice for that :) i can calculate the value of the miliseconds into the thickness of ice.
I collected the code to do this all in the week before the final presentation. It’s all on the code page for the final project. It’s not implemented yet in my final code.
So what is done and functional:
- one shelf of the casing
- laser engraving the case
- molding and casting of the piezo mounts.
- electronics design
- electronics production
- intergrating powermanagment in the project
- networking the MAX17043 board and oled screen through I2C.
- application and interface design for the oled display using U8glib. Gaugemeter when charging, peak measurements and initial splash screen.
- wiring the Project
- making slide and video presentation of the project.
What had to be done is milling the second shelf of the casing and finalizing the code.
About the documentation
During this Fabacademy i slowly understood the importance of documentation. Basically because i used it myself a lot. Also what to document evaluated during the academy. At the end i know better what to document. Be clear on setting, but also describe precise what went wrong, also when you make stupid mistakes. Specially for the final project it was a hassle to document while you go, because:
- a lot of pressure to finish on time
- the different processes went mostly in parallel
- a lot of choices were made during the process
I structured the documentation a bit at the end:
- Powermanagment had a big overlap with interface, electronics design and code. But for the project it was an important subject, so i gave it a separate page.
- Molding and casting was done the last days in a bit of a chaos to finalize the project in time. The steps i took to make it were small and divided over time, so that i almost forgot to write them down. Because its part of the casing and the process was pretty similar, the molding and casting is part of the page on CNC/shopbot.
- With interface i mean the visuals that are put on the oled display. It is the only part that doesn’t has an old-fashioned appearance from the outside. So i wanted it to be clear and simple. So only give the measurements when you operate the device, and show a gaugemeter while charging.
- The page on initial ideas is a summary over time with some ideas i had in the beginning and during the fabacademy. Its not stuctured but gives an idea how the project evolved more or less.