and program my board to do something with as many languages.
Group Assignment:
Compare performance and development workflow for other architectures.
Individual Assignment
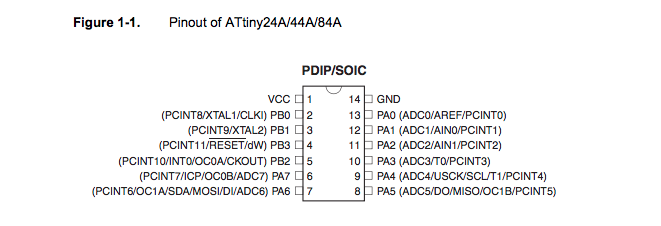
Before starting anything, I had to read the datasheet of the microcontroller I would be using so I can base my design accordingly. The one I was to use was the ATtiny44, the Datasheet would have a detailed explanation of all the components and possibilities of this microcontroller as well as the specs and dimensions that would be used in designing the PCB. It also explains the functions that it could handle and provide as well as some code examples. Also the limitations of the ATtiny44 are explained. Below are some of the information I want to highlight would be considered essentials for the task at hand.
First and foremost the Pinouts of the microcontroller to be able to design accordingly and know where to add the needed components.
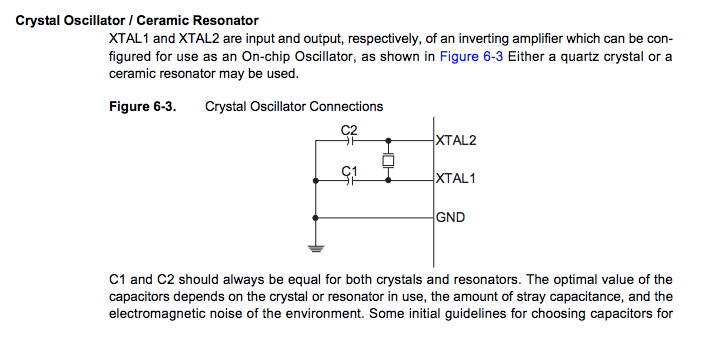
The clock is important as it will give the PCB a notion of time and allow the micriocontroller to go through timed cycles. Here is a diagram on how the clock should be linked to the ATtiny44.
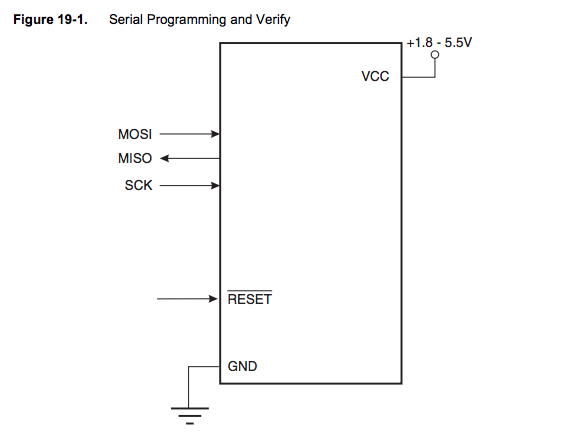
The datasheet also explains the different ways this microcontroller can be programmed. As we would be using an ISP serial programming the image below taken from the datasheet shows the pins needed for that process.
And another important piece of information are the absolute maximum ratings this specific microcontroller can handle as in voltage, current and temperature.
For the individual Assignment I was only able to program my board using two languages, C-language and the Arduino. What I came to understand was that even the Arduino language is actually based on the C language. In the end all languages are translated into a binary code, it is a matter of which is more user friendly, and more efficient. I preferred the C language because it showed me what really is going on 'under the hood' and that actually makes understanding the languages much better, and learning new languages would make more sense.
As for my board, I originally designed the PCB to have a button and LED. Now with the programming I did it in a way where when the button is pressed once, the letter 'G' is flashed in morse code. And when the button is double clicked, the LED would flash 'FabAcademy' in morse code. Now this was with the Arduino code, I couldn't figure out how to do it with the C language so I just made it as when the button is pressed, 'FabAcademy' would be flashed in morse code.
It is true that Arduino code is much more simplified and more efficient in terms of development, but knowing the C language, not only will you be learning the basis of the Arduino language and how it is structured, but it might even give more freedom in terms of programming.
Programing with the Arduino:
First we need to connect the Arduino to the PC
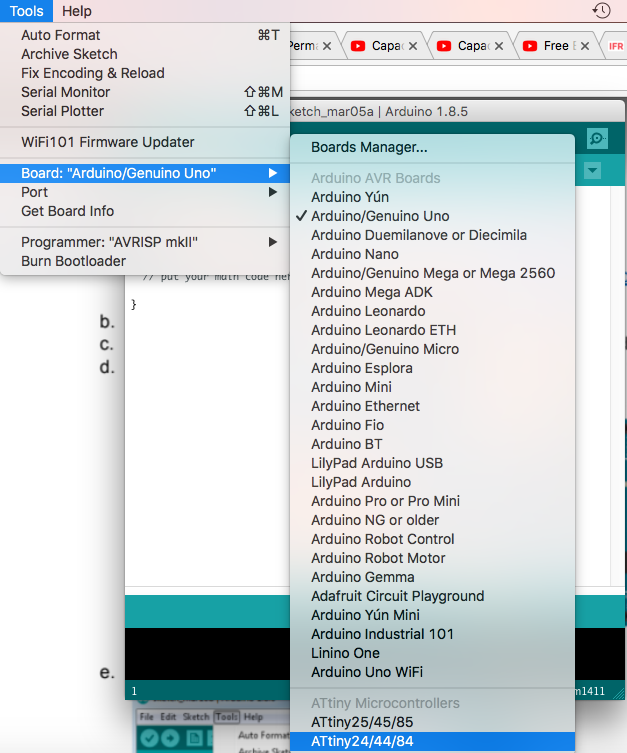
Then we need to download the Microcontroller file in boad manager, (Attiny44) in this case.
Then select the board the tool tab.
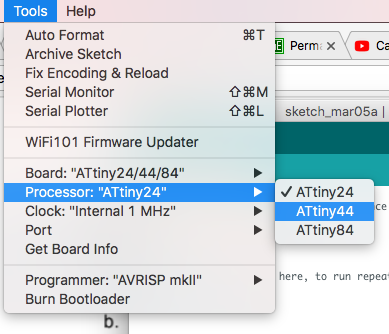
Select which Attiny Processor. (Attiny 44)
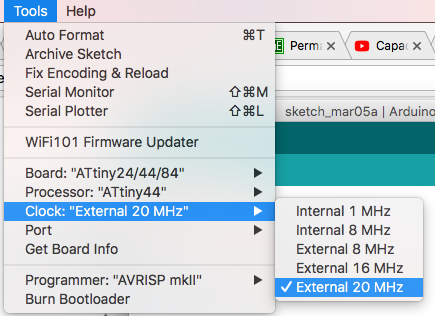
Select the Clock (Crystal SMD Frequency, 20 Mhz in this case)
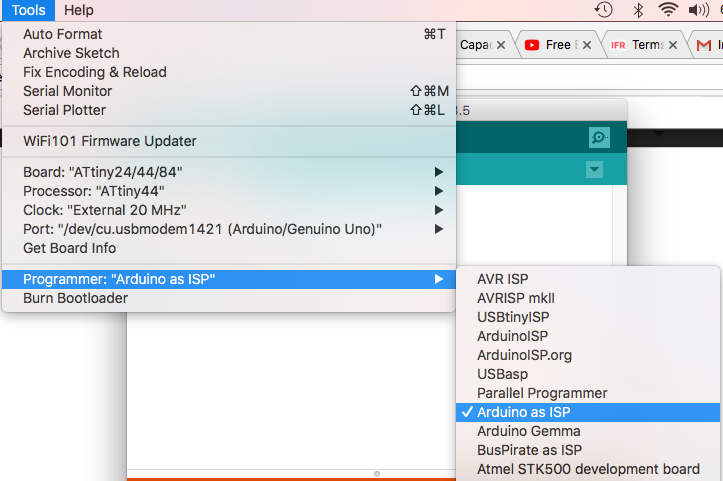
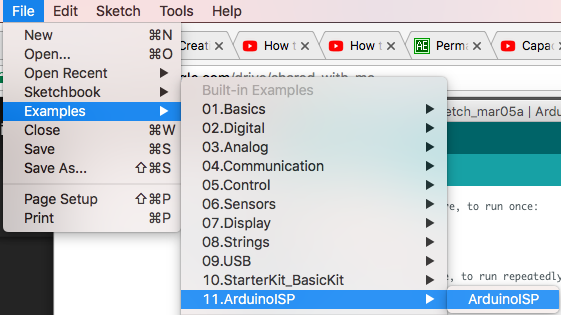
Now under tools, select Arduino as ISP in order to program our new PCB
Now under examples, we need to upload the ISP code to the Arduino
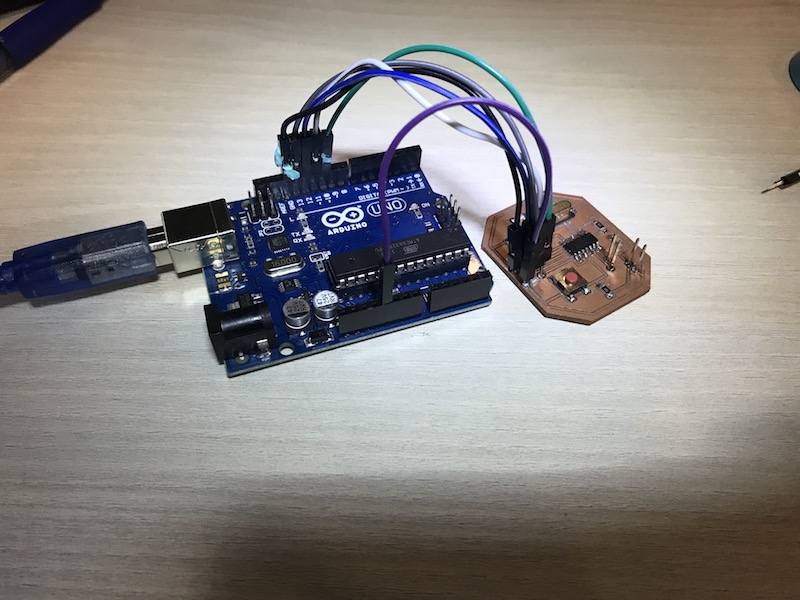
Now that the Arduino is serving as an ISP, it is time to connect our PCB to the Arduino
The connections are as follows:
GND to GND
VCC to 5V
SCK to pin13
MOSI to pin11
MISO to pin12
RST to pin10
And the plug the Arduino back to the PC
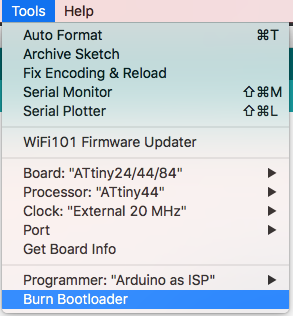
Now under the tools tab, Burn Bootloader
Now it is time to write the code on the Arduino IDEthat the the PCB is going to execute.
I have deigned this code to do two similar tasks based on the input. Since it is my first time programming an arduino I went with something simple and basic yet made the most out of it. Since I had one Button and one LED, I made the LED to flash different Morse codes.
If the button is pressed once the LED will turn on and flash the Letter "G" in Morse code
If the button is pressed twice within a frame of 200ms, the LED will turn on and flash the word "FabAcademy" in Morse code
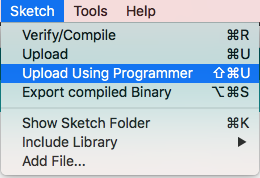
Then Check the Code and Upload it to the PCB through the Arduino Software
Upload the code using the 'Upload using programmer' tool under 'Sketch'
Once everything is set you could just plug in the VCC and the GND and your PCB is ready
Programing with the C-Language:
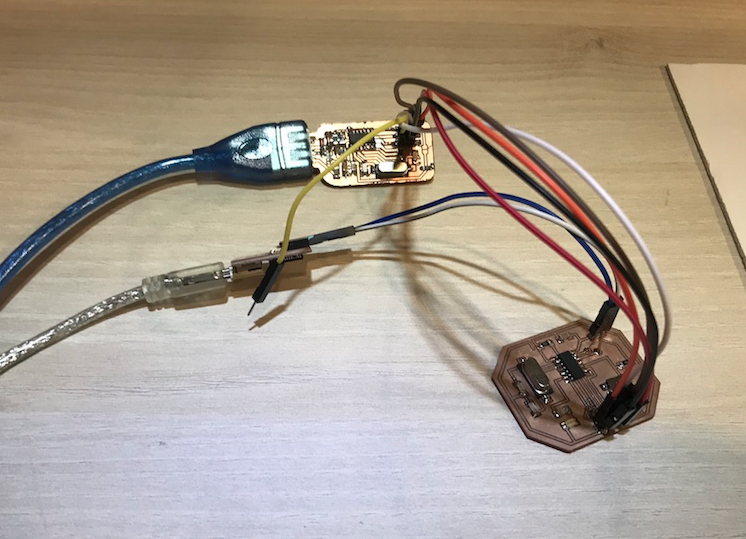
First we need to create the C-file, this code can either be written and uploaded through the Arduino, or could be written in a text file and uploaded through the FabISP through the terminal on Lynux where the latter is the case shown below
The Connections go as show in the picture below:
There are 4 crucial files that are needed in every C-code program flashing and they are as follows
First you need your C-code written and save in a '.c' format
/* Including Libraries
* Defining pins
* int main (void) {
* setup
* loop --> while (1) {
* }
* }
*/
#include <avr/io.h>
#include <util/delay.h>
//define frequency of the mcu
#define F_CPU 20000000UL
int main (void) {
//0-->input
//1-->output
//PA7-->Led
//PA3-->Button
DDRA = 0b10000000;
while(1){
if (bit_is_clear(PINA, PA3)){
PORTA = 0b00000000;
} else {
//for (int i = 0; i<25; i++){
PORTA = 0b10000000;
_delay_ms(100);
PORTA = 0b00000000;
_delay_ms(150);
PORTA = 0b10000000;
_delay_ms(100);
PORTA = 0b00000000;
_delay_ms(150);
PORTA = 0b10000000;
_delay_ms(300);
PORTA = 0b00000000;
_delay_ms(150);
PORTA = 0b10000000;
_delay_ms(100);
PORTA = 0b00000000;
_delay_ms(300);
PORTA = 0b10000000;
_delay_ms(100);
PORTA = 0b00000000;
_delay_ms(150);
PORTA = 0b10000000;
_delay_ms(300);
PORTA = 0b00000000;
_delay_ms(300);
PORTA = 0b10000000;
_delay_ms(300);
PORTA = 0b00000000;
_delay_ms(150);
PORTA = 0b10000000;
_delay_ms(100);
PORTA = 0b00000000;
_delay_ms(150);
PORTA = 0b10000000;
_delay_ms(100);
PORTA = 0b00000000;
_delay_ms(150);
PORTA = 0b10000000;
_delay_ms(100);
PORTA = 0b00000000;
_delay_ms(300);
PORTA = 0b10000000;
_delay_ms(100);
PORTA = 0b00000000;
_delay_ms(150);
PORTA = 0b10000000;
_delay_ms(300);
PORTA = 0b00000000;
_delay_ms(300);
PORTA = 0b10000000;
_delay_ms(300);
PORTA = 0b00000000;
_delay_ms(150);
PORTA = 0b10000000;
_delay_ms(100);
PORTA = 0b00000000;
_delay_ms(150);
PORTA = 0b10000000;
_delay_ms(300);
PORTA = 0b00000000;
_delay_ms(150);
PORTA = 0b10000000;
_delay_ms(100);
PORTA = 0b00000000;
_delay_ms(300);
PORTA = 0b10000000;
_delay_ms(100);
PORTA = 0b00000000;
_delay_ms(150);
PORTA = 0b10000000;
_delay_ms(300);
PORTA = 0b00000000;
_delay_ms(300);
PORTA = 0b10000000;
_delay_ms(300);
PORTA = 0b00000000;
_delay_ms(150);
PORTA = 0b10000000;
_delay_ms(100);
PORTA = 0b00000000;
_delay_ms(150);
PORTA = 0b10000000;
_delay_ms(100);
PORTA = 0b00000000;
_delay_ms(300);
PORTA = 0b10000000;
_delay_ms(100);
PORTA = 0b00000000;
_delay_ms(300);
PORTA = 0b10000000;
_delay_ms(300);
PORTA = 0b00000000;
_delay_ms(150);
PORTA = 0b10000000;
_delay_ms(300);
PORTA = 0b00000000;
_delay_ms(300);
PORTA = 0b10000000;
_delay_ms(300);
PORTA = 0b00000000;
_delay_ms(150);
PORTA = 0b10000000;
_delay_ms(100);
PORTA = 0b00000000;
_delay_ms(150);
PORTA = 0b10000000;
_delay_ms(300);
PORTA = 0b00000000;
_delay_ms(150);
PORTA = 0b10000000;
_delay_ms(300);
}
}
}
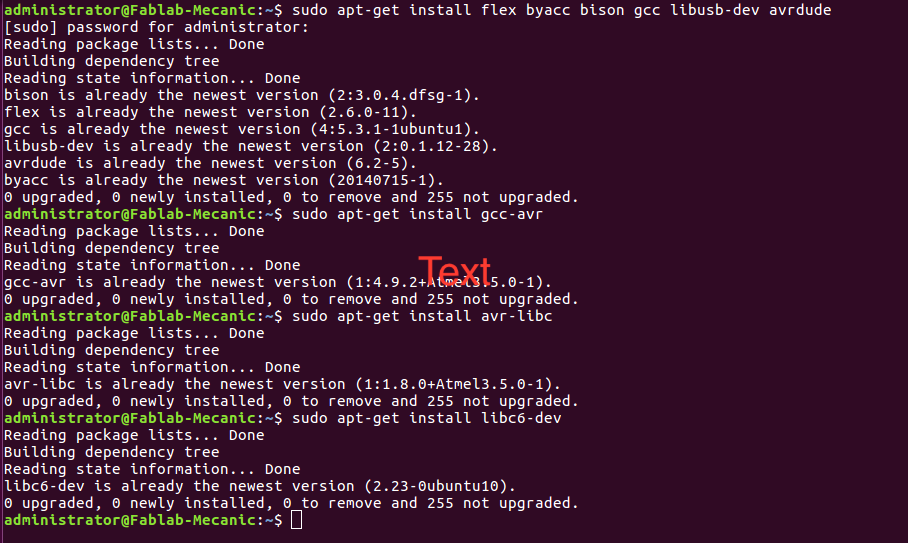
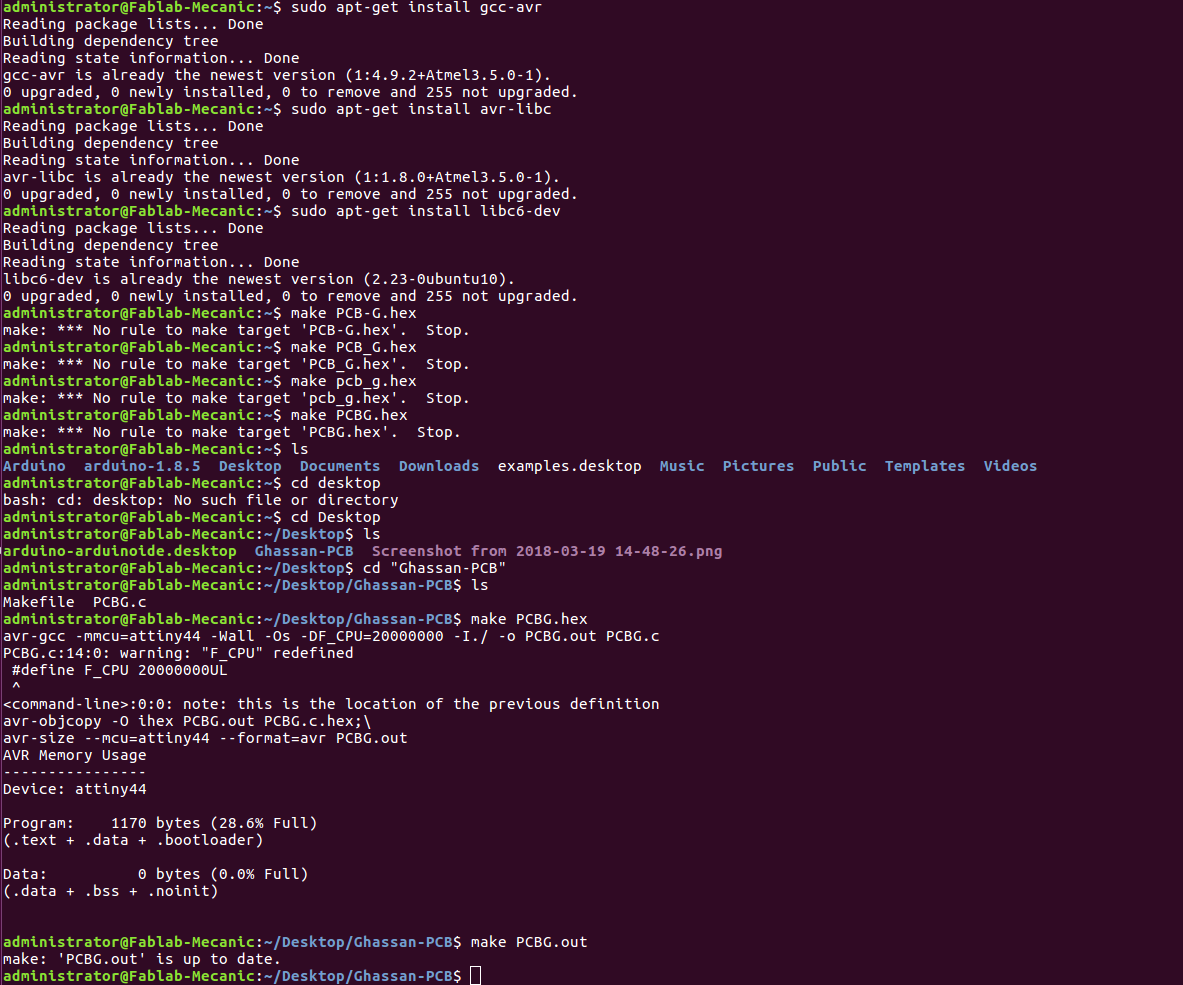
Now you need to install the necessary libraries through the Lynux terminal and install them, shown below
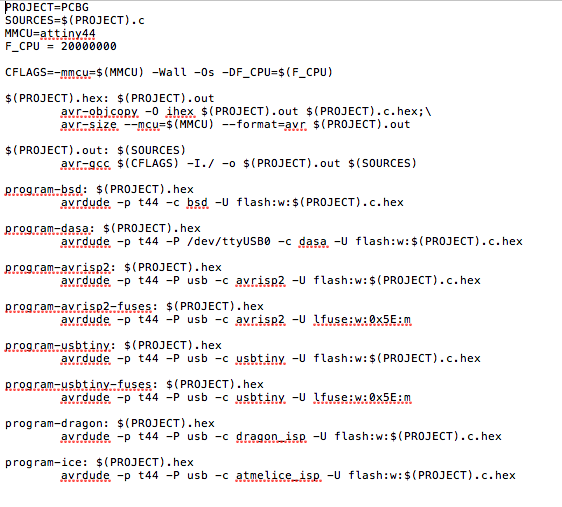
The Make file is basically the mediator between the Processor and the code written on the PC. The image below shows the contents of the MakeFile, it has a variety of executable codes once it determines the best for the connected processor. (This makefile was acquired from the fab archives, link found on the bottom of this page).
Make File screenshot:
The rest once you have the file, all the rest is on the Lynux terminal and using the MakeFile is as shown below
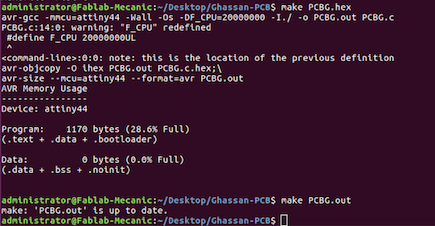
Next you need the Hex File
In order to use the hex file, you first have to access the directory of the makefile itself. and then use the below command to create it, and it goes as shown below.
make (name of your C code file).hex
Next you need the Out File
And then going with this order, the last file needed is the OUT file and is shown below.
make (name of your C code file).out
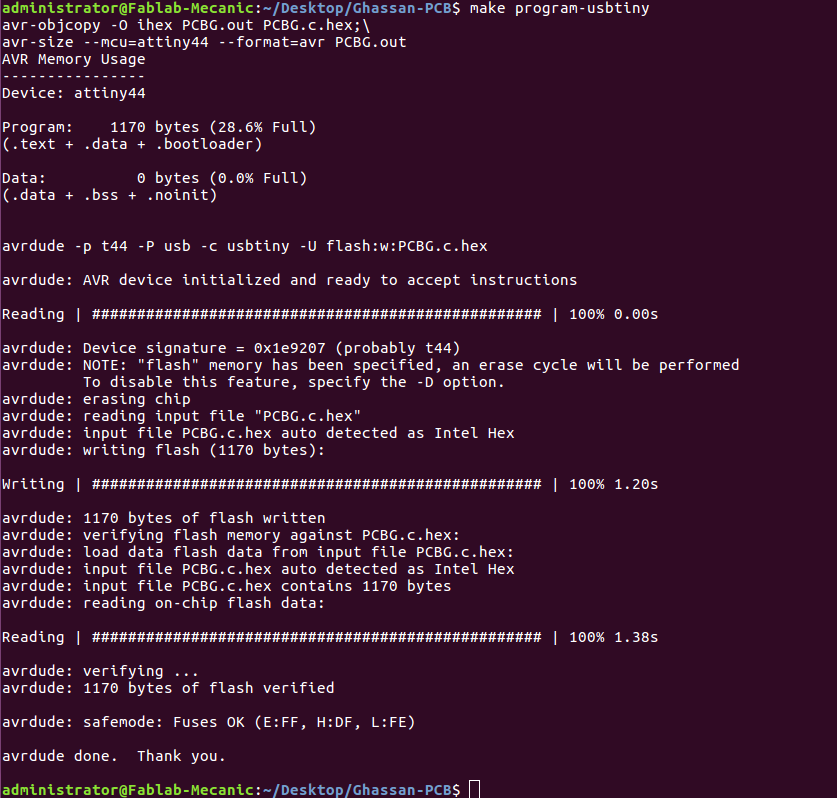
And finally type in the command 'make program-usbtiny' and the program is uploaded onto the PCB
And these are the two languges and techniques I used to upload the program to my PCB.
Group Assignment
When it comes to comparing the performance and development workflow of the different approaches one can take to program a PCB, there are a lot of factors that should be taken into consideration. I cannot say for all but as for the ones I used here is my assessment and comparison:
Arduino-Code
When it comes to programming, especially someone new to this, Arduino is the most straight forward approach to program a PCB, the fact that it could be considered as a 'joker' as in you can use it as an ISP.
The code that is written for the arduino is also basic as it encapsulates C-code in more userfriendly functions and terms that make it easier and more efficient to execute any desired code.
The backdraw of using the Arduino code is that since it is considered user friendly, is that it really is the most 'on the surface' code someone can use. Although it is true that it is a great way to start and one can achieve many milestones with it, more complex processes might require other codes.
C-Code
C-code is the most basic coding language, it can be applied and implemented to most of micro-processors. It is not as simple as Arduino-code but at the same time it is somewhat logical. without the Arduino IDE, C-code could be uploaded to an ISP and processor through the terminal on Lynux with the steps shown above.
C-code is pretty straight forward and closer to the 'end product' which is the binary code. as in when you want to specify a pin, instead of saying ex: PIN 11. You need to first specify the PORT as in A or B and it goes on depending on the microprocessor capacity and size. Then each PORT is comprized of 8 pins starting from 0 all the way to 7. And then each pin's function is specified as input or output, 0 or 1. so if you want to use Pin 2 as an output and the rest are inputs, you would have to set is as PORTA = 0b00100000. Then you go again and set each pin when you want to use it. It is somewhat confusing because you are using the same letters for different functions with different uses.
Even though I am not use C-code for my future projects, it was important to get to know the basics of C and the uses of it. I think it is crucial to understand C to set the basis for other coding languages.
Python-Code
Based on my experience, I only used the Python-code on Raspberry Pi 3, and on the Rasperian Operating system to be specific. It is my first experience with this and it is just great. The fact that I am 'inside' the microprocessor, having a very user friendly and efficient operation system as in only have the most basic functions that one might use, it is amazing. I am sure more experienced users would find a lot of downsides for it but so far I like it and it really was, in my humble opinion, the most efficient
I like to take it as biomimicry as in the processor is the brain and all connected circuits are extensions of this nervous systems. Being inside that processor and be able to execute any Python code and run it on the circuits with a command or pressign F5 is incredible. Instead of having to go through all the wiring and additional extensions. So it is basically an all in one for basic projects, but we all know these have downsides I just havent figured them out yet.
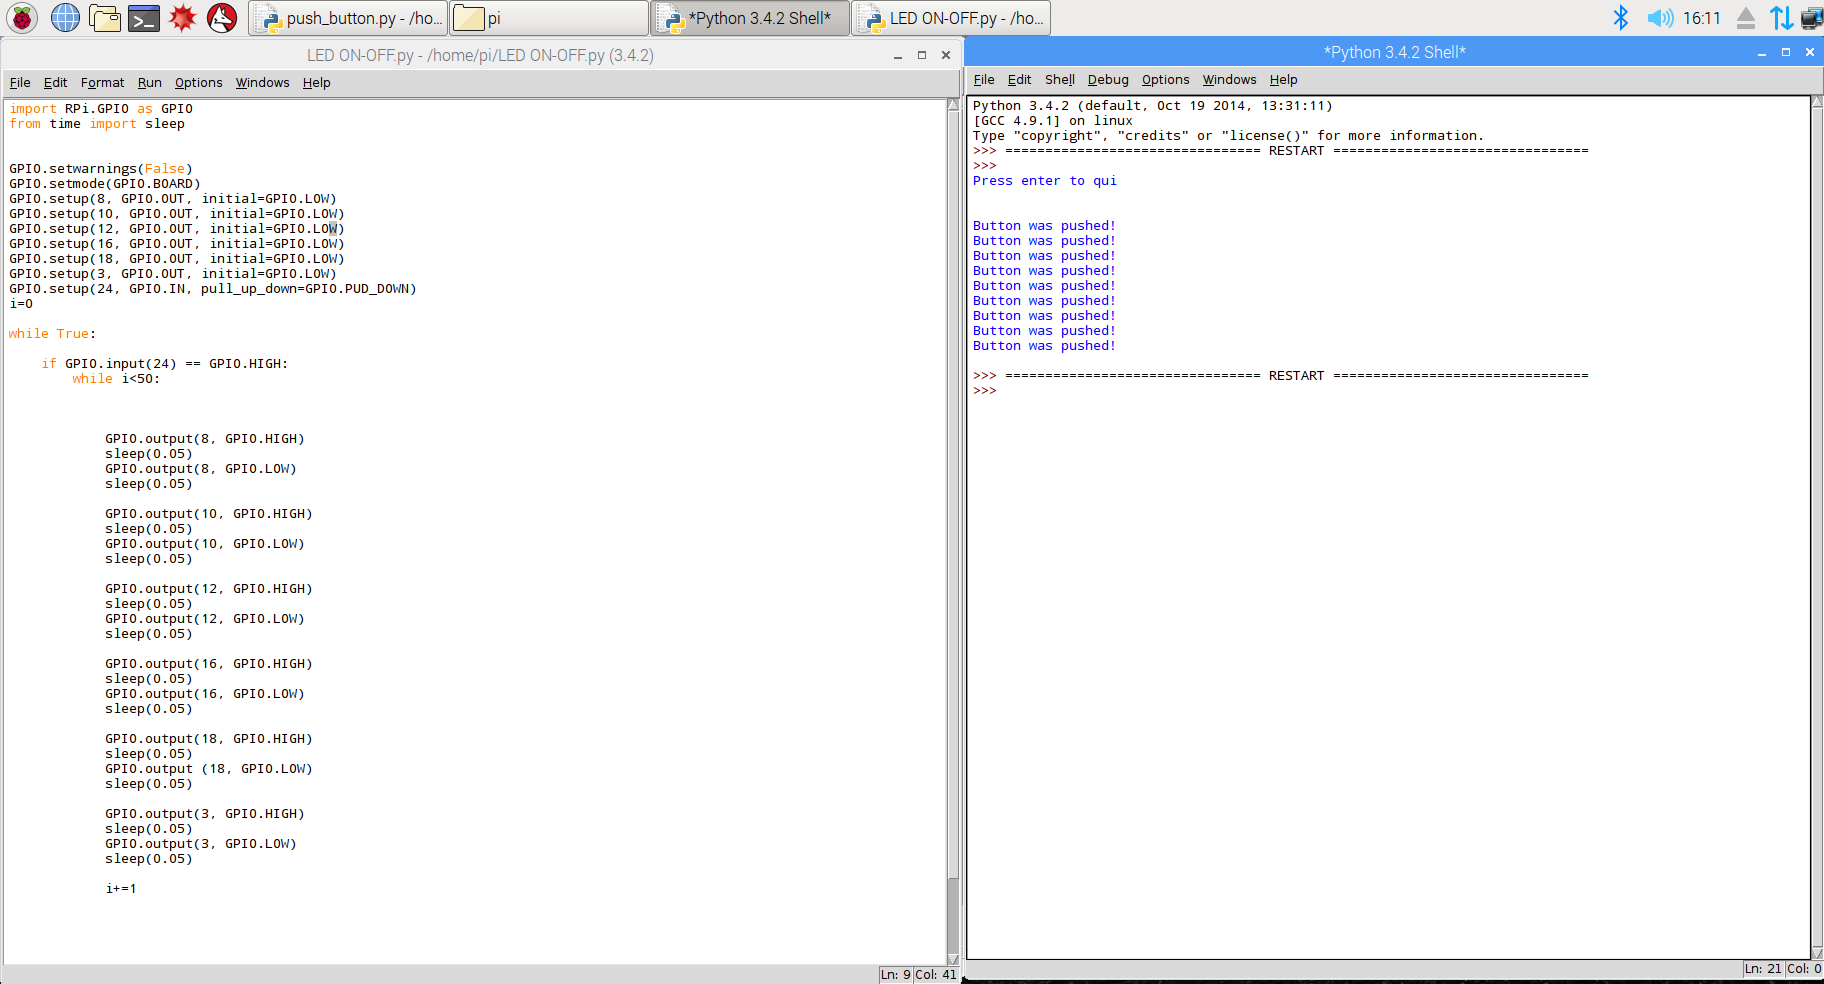
The Python-code and uploading goes as follows:
And thats it, you write the code and run it. It also have a screen that displays errors where you would easily pinpoint the source of any bug.
As for the Python code itself, it also is almost as basic as Arduino it just uses different functions and different approaches to achieve the desired outputs.
I learned through simple tutorials with basic searches on the web. Although there is always more that one way to achieve the desired output, it comes down to a matter of the most efficient one.
The code I used was basically a push button and 6 LEDs and had the LEDs flash quickly in a circular pattern and run the loop for any specified amount of times. The code is found below:
I could also add that Python sort of forces you to keep your command line in order as in it goes in in hierarichal order. Wich is something fairly important to keep in mind and take into consideration when writing any sort of code. Maybe not for the time being but for future references and when trying to go back to it for any adjustments and way easier for debugging.
Here is a short video of the result using Raspberry Pi: