Embedded Programming
Task:
- Compare the performance and development workflows for other architectures
Daniel's and Christoph's Part:
For this assignment, we had a look at the microcontrollers we work with, or have worked with in the past. So, the selection here is probably small, and might seem somewhat haphazard, but is just the product of two people doing different projects, with different requirements.
PIC18Fxxxx, PIC18FxxKxx
Those are relatively slow 8 bit microcontrollers. Their performance is quite easy to calculate (if you're working in assembler), as any and all instructions take 4 cycles of the processor clock. Said clock can be up to 64MHz, so they top out at 16M instructions per second. Any heavy calculations will take a lot of time with them, of course (you want to get a logarithm of a 16 bit value? That takes an amount of time you can see!), but it is enough to do a three-axis machine controller (One of Christoph's project at his old uni).
There are at least four possible development workflows for them, two of which we know: First, there is MPASM, the assembler Microchip provides for them. Developing in assembler is a lot of work, of course, but the assembler works fine and can often actually provide sensible error messages.
The main way of developing for them is MPLAB X and XC8, the IDE and c-compiler provided by Microchip. MPLAB X is built upon netbeans, so it's a rather fat, slow IDE that crashes now and then and can throw all kinds of interesting Java errors. It mostly works, though, and allows for comfortable debugging of the code you've written. The compiler works OK, but you have to pay for it to not drop in a whole lot of NOPs just to make you buy the pro version. Which is insanely expensive.
There are also a toolchain provided by Mikro Elektronika and the open source SDCC project, but none of us has found the time to do anything with those yet.
A noticeable detail about developing for those microcontrollers is that their datasheets are exceptionally well written and provide a lot of information, including working code examples.
ATMEGAxxx
Those are relatively old, slow 8 bit microcontrollers. Their performance is easy to calculate, too, since they need one cycle of their clock for any instruction. That clock can be up to 20MHz for some, so their overall performance is quite similar to the smaller PICs. They will draw about three times as much current at the same speed, though, so they make for better room heaters.
With development workflows, there are again different possibilities. The most obvious one is probably Atmel Studio (which is bound to vanish over time, now that Atmel was bought by Microchip). Atmel Studio is a behemoth of an IDE based on Visual Studio, so it only works on windows, eats up gigabytes of disk space and takes minutes to start. Or switch to debug mode. Or do anything. Neither of us has really done much with it, but when the installation did not crash, it kind of worked.
Then, there is the fully open source workflow of using AVRGCC and AVRdude. We used that... "workflow" for the Electronics Production and the first part of Electronics Design. It's rather horrid, and it feels like reinventing the wheel every time you want to do a simple step like flashing a board. So, while you can get results with it, it's a lot of extra work tools should do for you (like finding the programmer), and you won't be able to do any debugging with a debugger. The religious open source community seems to be in love with it, though, since it's a gcc port.
Probably the easiest way to develop for a selection of those processors is to use the Arduino IDE. It's a project mainly geared at beginners or non-programmers, and is made to be really easy to start out with. It's a primitive IDE, but it comes with a ton of libraries for all kinds of tasks and all kinds of hardware. And it compiles and flashes the chip, all at the press of a button. What it cannot do, though, is debugging.
dsPIC33EP...
Those are 16 bit microcontrollers that are... not really related to the smaller PICs. So, while programming them is quite similar, their underlying architecture is not. Their performance is easy to calculate, as they take a fixed amount of two clock cycles per instruction, that clock can be up to 140MHz, and they have a larger (and more math-optimized) instruction set than the smaller ones. So, they can be pretty powerful little processors.
The development and debugging workflow is comparable to the smaller PICs, with MPLAB X being the most obvious tool. They use a different compiler, of course (called XC-16), but development for both really feels about the same. As with the 8 bit ones, the datasheets are really well written and provide a lot of good information, including working code examples.
MSP430...
Those are 16 bit microcontrollers optimized for using as little energy as possible, mainly be having rather extreme sleep modes that wait for something to happen while not drawing any power. Their performance is a bit more difficult to characterize, as they take something between one and four clock cycles for one instruction. They go up to 25MHz, but then, being fast really is not what they are there for.
The usual development workflow for them is to use Code Composer Studio, the IDE provided by Texas Instruments. Code Composer Studio is built upon Eclipse, so it's a fat, slow and unstable IDE that can throw all kinds of interesting Java exceptions at you, but when it doesn't, it works, and it packs a lot of interesting features (with the right hardware tools, you can measure the power consumption you produced on a per-line-of-code basis).
An alternative is Energia, which is a 1:1 copy of the Arduino IDE made for those processors, with an equally huge amount of libraries pre-packed.
Downloads
| No downloads here |
Embedded Programming
Peters, Jimenas, Lukas and Tanjas Part:
Flash with Atmel Studio via Arduino bootloader.
With this way you can use the Arduino products with Atmel Studio.
First step:
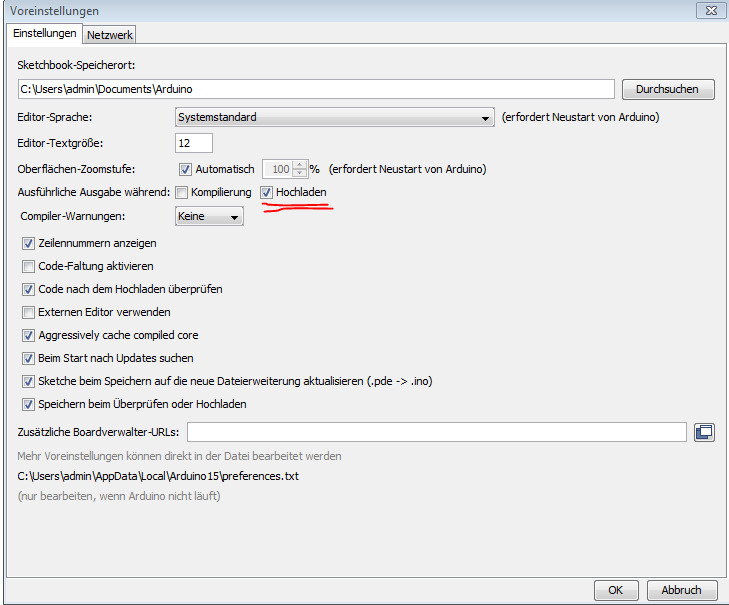
First, you have to set in the Arduino IDE under settings detailed output.
Second step:

Then you have to copy the blue highlighted line.
This line contains the destination information and settings of avrdude.
Paste the copied line into a text editor and put it in the format below.
Pay attention to the currently used COM port.
Example from my IDE:
A:\Programms\Arduino\hardware\tools\avr/bin/avrdude -CA:\Programms\Arduino\hardware\tools\avr/etc/avrdude.conf -v -patmega328p -carduino -PCOM17 -b57600 -D -Uflash:w:C:\Users\admin\AppData\Local\Temp\arduino_build_834149/sketch_mar20a.ino.hex:i


Convert a copied line to this format:
A:\Programms\Arduino\hardware\tools\avr/bin/avrdude.exe

-C"A:\Programms\Arduino\hardware\tools\avr/etc/avrdude.conf" -v -patmega328p -carduino -PCOM17 -b57600 -D -Uflash:w:"$(ProjectDir)Debug\$(TargetName).hex":i
Third step:
Then open Atmel Studio and go to Tools and then External Tools.
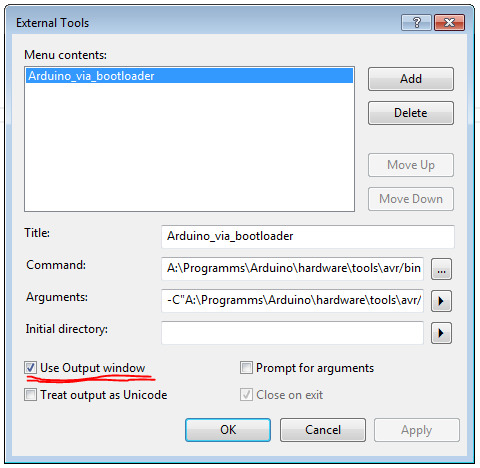
Under Title you can give the programmer a name.
Under Command, insert the target path of avrdude.(first line)
Under Arguments insert the arguments. (second line)
Set the checkbox "Use Output Window" to checked to see the returs in the Promt out Console.
Then write your program and compile it.
Under tools your newly created programmer should now stand.
Click on it and avrdude then uploads the hex file from Atmel Studio.
Below we have written a flashing program which uses the port PCB5.
#define F_CPU 16000000UL
#include <avr/io.h>
#include <util/delay.h>

int main(void)
{
    DDRB |= 0B00100000;
    while (1)
    {
        PORTB |= 0B00100000;
        _delay_ms(1000);
        PORTB &= 0B11011111;
        _delay_ms(1000);
    }
}
Why use Plan C ?
When using the digitalwrite function in the Arduino IDE.
Is this easy and already to use but also quite inaccurate.
If you use this function through the library many operations performed by this the output signal is very time instable.
With a delay of 1ms, the output signal will fluctuate by almost 12us.
With Plan C code I could hardly measure the noise at the output.

We are there in the ns area we can only see a slightly thickened falling flank on the scope.