final project -- weekly assignments -- about me -- fab academy
Week 00: Website, GIT
Phase 0: Building My Own Website
Websites are sent to your browser in a format called html, which is... basically, glorified text. There are literally millions of tutorials of vastly different quality out there to learn html and all the cruft that can be involved.
Since I initially started learning html from a (now very outdated) German tutorial, I have no beginners' course to link to here. There are a few things to consider, though:
- Content is what is being written (or painted), not how it looks. With the current capabilities of "simple" html and css, you can have the same page look radically different on different kinds of systems, or when printed. There is even some support for screenreaders that seems to more or less work...
- You can have a computer do some of the work for you - that is usually called content management systems. Either on your computer, or on the webserver. That can be practical, mostly of you want to split the task between people looking after the presentation (how it looks) and people who provide content.
- The less flashy your presentation is, the more people will be able to actually make use of it.
The general format is pretty simple: Text is just text, and <tags> say what it's supposed to look and behave like:
<html>
<head>
<title>Hello World!</title>
</head>
<body>
Hello new internet-world!
</body>
</html>
This really minimal example is basically a website, it just doesn't do much. It shows a bit of text, and it has a title, to be displayed in the handle of your browser tab. To do all of that, it tells your browser that it is, indeed, html (the <html> tag), sets general information about the file (the <title> tag, in the <head> tag) and displays a line of text (which is, in this simple case, just text, in the <body> tag).
All those tags just tell the browser "from now on, treat what I write as...", so they have a second form to tell the browser that their influence has to end - That is what all those </tags> with a slash are for.
The general appearance of your text will be pretty bland - It is, by now, unformatted. HTML has multiple sets of tools to change that, one of which is really important: CSS or cascading style sheets (not to be confused with cross site scripting, that is an entirely different beast). CSS allows you to define how any kind of formatting actually looks, and under which circumstances it will have a different look - It might be better to not have that second set of navigation links when printing a page. As a basic example,
<a style="color:hotpink" href="http://www.bing.com">Advertisement Galore!</a>
will result in a really pink link to a not very well known advertisement platform.
To make matters simpler, that formatting is usually put into its own file, and then just loaded into every page, so you don't have to type or copy all of that formatting into every element of your page. I did that, too, and you can of course have a look at the css file behind this whole site.
I don't use any kind of automation in making the individual pages, just a set of template files that I fill in whenever I need a new one - Those have the basic layout and the links at the top and bottom already defined. I also don't use any kind of fancy IDE for filling them in, just whatever text editor I have available when I work on them. Mostly, that has been sublime text, but it works with anything that can open text, like Apple's textedit or even windows notepad.
Also, someone absolutely wanted to have a screenshot of a text editor, so here is one:
Phase 1: Getting Into GIT
Basics
GIT is a powerful versioning tool and can do a lot more than the old subversion client we used at my old uni. So, I'm off into learning something new (and rather useful, it seems) here. As you can read this, I have done:
- I've read the nice, compact starter tutorial on Roger Dudler's Github page.
- I've cloned the fabacademy-repository of our lab using the commandline client that came with xcode. MacOS doesn't have a git client by default, but if you don't have xcode installed, it will offer to install the xcode command line utilities when you type in any git command. They're small and helpful... And they come with a command line git client.
- The gitlab server preferably uses SSH to know you are actually you when uploading stuff. To do that, you need an SSH key pair, and the public key part must be uploaded to the server. There is an excellent tutorial on how to do that in the gitlab web-interface itself that just works.
- I've dropped this bunch of files into the resulting directory.
- I've added my files to the repository: git add * adds everything git doesn't know about yet - Beware, though, that it will ignore hidden files like the .gitignore below.
- I've commited those changes: git commit -m "My fancy commit message" Does exactly that, with any changes since the last commit (So you can add multiple times). It will complain and throw you into the great pit of vi if you forget to add a commit message, so learning how to escape vi might be a good idea. From a git point of view, I'm done at this point - The local repository is current.
- I've pushed everything to the online repository: git push will upload any changes from the local repository to the online one. There are some more possibilities here, and you can easily have more than one repository to upload to.
- I've checked that the website is actually being displayed. That worked, so I'm done from that end. 2018 addition: The newer repository needs a build script to have stuff appear on the web. While not strictly a part of git, it is needed. I've copied one, added, committed and pushed it.
- I've added some configuration:
- git config --global user.name "Felis Humanis" tells git the name to call me - That is, the name that will appear when looking at the history of the repository
- git config --global user.email "email@example.com" sets the email associated with my commits
- git config --global core.editor "emacs" sets the editor git assumes to be standard to Emacs. Because we all use Emacs, right? ... Nano or sublime text will work just as well.
Down the ragit hole...
While the above points will be a good start to just do some simple stuff with git, there is a point when stuff just breaks. At that point, it helps to know the underlying model - How git actually works inside, because while boxes are great, thinking in black boxes not always is.
Git kind of lives in its own world (don't we all?), a world made up of (usually) four distinct spaces:
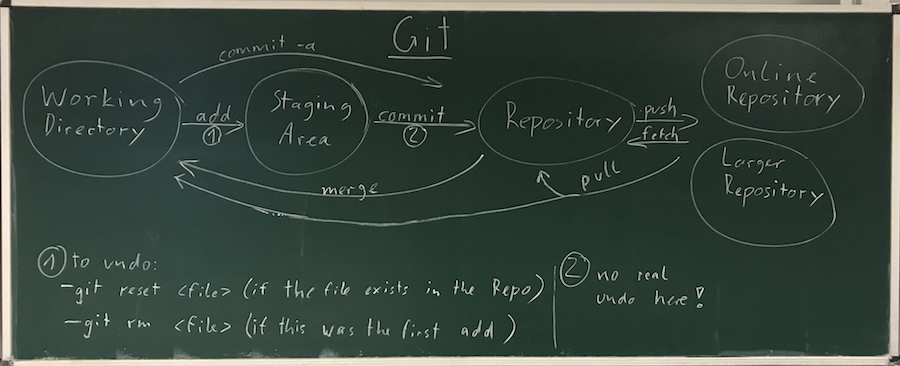
The "outside world" can either be an online repository (or a different copy of your repository, like on a thumbdrive) or a larger "master" repository - or both. The gitlab server we're working on here hosts a lot of those online repositories.
What the schematic doesn't show is how branches work. Branches are important the moment you start to work on larger projects, or working together with others. I don't nearly know enough about them myself to explain them.
final project -- weekly assignments -- about me -- fab academy
