Week 16: Final Project Development
Complete your final project
Please see Final Project Requirements for details.
Track and document your progress
Learning outcomes:
- Evaluate project plan
- Apply time management techniques
- Summarize and communicate the essence of a project
Have you answered these questions:
- What is the deadline? How much time do I have left?
- What tasks have been completed, and what tasks remain?
- How will I complete the remaining tasks in time?
- what has worked?
- what hasn't?
- what questions still need to be resolved?
- what have you learned?
My Process
Background
During Week 01 I laid out some possible final project options. These included a Fab Lab RFID tag scanner for automatically controlling access to spaces and machines for different users in a Fab Lab, an electronic Signal Jacket for safer cycling, and a Rock-o-Matic Smart Cradle which would hang above our bed and allow us to gently swing our newborn baby if he got fussy. Ideally the Rock-o-Matic could also detect fussiness and gently swing itself automatically. As I noted then, I think any of these 3 projects could be good, but over the course of the proceeding weeks, I mostly developed the cradle idea, getting so far as CNC milling a full scale cradle (see below).
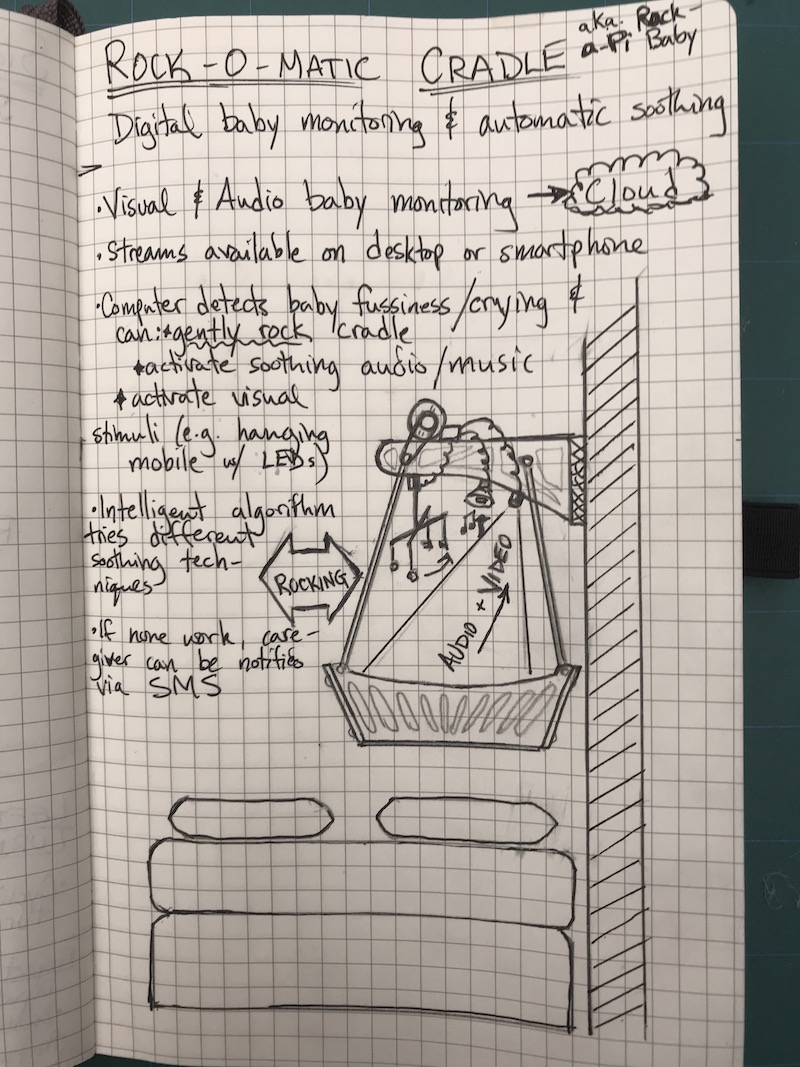
In Week 02 I did some CAD work starting to develop the form of the cradle. It was a great way to continue teaching myself Fusion 360. I was actually quite pleased with the aesthetic I achieved:

In Week 07, I further refined my CAD model and made both a scaled-down cradle out of cardboard, and a full-sized cradle body out of 12mm plywood. It was a highly instructive (and somewhat discouraging week). The full-sized version was clearly way too big to be practical. I found myself wishing I had done a full-scale version in cardboard (which actually would be possible on Dassault's large-bed Trotec laser cutter). It would have saved a bunch of time and headache. But that's a part of the process, and now I know for next time. Always prototype first whenever possible!


In Week 10, I made a board with an ADXL accelerometer for inputs. My thinking was that if the cradle were hanging in the air, one possible way to detect fussiness would be to detect accelerations of the baby moving around. The board didn't work that great, though it was a good exercise to complete. Also, at this point, I don't think I'll use an accelerometer to detect fussiness. I think a microphone would be a much more robust and reliable detection method. In my final project I may include a microphone to allow future extensibility of the project. We'll see how the next few weeks unfold.
In Weeks 11 and 12 I worked on controlling a DC motor with a microcontroller (MCU) chip with the goal of using this DC motor to rock the cradle. I managed to get an MCU controlling the DC motor via an H-bridge driving the motor forward or reverse at a variety of speeds using Pulse-Width Modulation. I wrote a python GUI to let a user control the motor by inputting a speed and direction on a computer and sending the commands to the board via a serial connection.

Here's a video of the motor being controlled. It would be easy enough to write another Tkinter script to run the motor in one direction at different speeds and connect this up to the rocking mechanism of the cradle:
17_interface_working from Greg Buckland on Vimeo.
So that's pretty much where I go to with my final project. Oh yeah, and our baby came during Wildcard Week, so I got to meet him and get a taste for parenting and what our life would be like.
Reassessment
At this point, it was important to re-assess whether a cradle was feasible and even desirable. Honestly, the hanging cradle idea was feeling a bit complex/infeasible. The version I made in Week 07 was so huge as to be impractical in our bedroom. And as Luciano Betoldi pointed out, a hanging cradle is feasible and a self-rocking cradle (standing on the round) is feasible, but a hanging and rocking cradle is a significantly challenging mechanical design problem (especially regarding safety - we don't want any nursery-rhyme fullfilments of "down will come baby, cradle and all"). So, I was at a bit of a cross-roads: should I pick one of my other projects (the RFID scanner or cycle jacket) and scramble to develop them, abandoning the work I've done to date on the cradle? Or should I push through and try to make the cradle even though I don't think it's practicable in our house? Or is there some third option that uses some of the work I've done and modifies it to a more feasible/usable project?
The key inspiration came when we bought our Stroller/Carseat Travel System for the baby. It is a combo system where the baby-carrier seat snaps into a base that's installed in the car and acts as a carset. When you arrive at your destination, the carrier unclips from the seat base and then clicks securely into the stroller for walking transportation. You can check out the model we bought here ; we're pretty happy with it so far.
The important thing to note is that the carrier seat has rockers on it's bottom so it can be placed on the floor (or other solid surface) and the baby can be gently rocked on the rockers. (The carrier handle can also be rotated to the back and used to prop up the rocker and prevent rocking motion.) The rocking motion is quite solid and well-profiled. So my new idea is to create a base station for your home that the carrier can be placed in. The base station will have a motorized rocking mechanism so that the baby can be rocked without the input of the parents, freeing the parents to tend to other tasks while the baby is rocked.
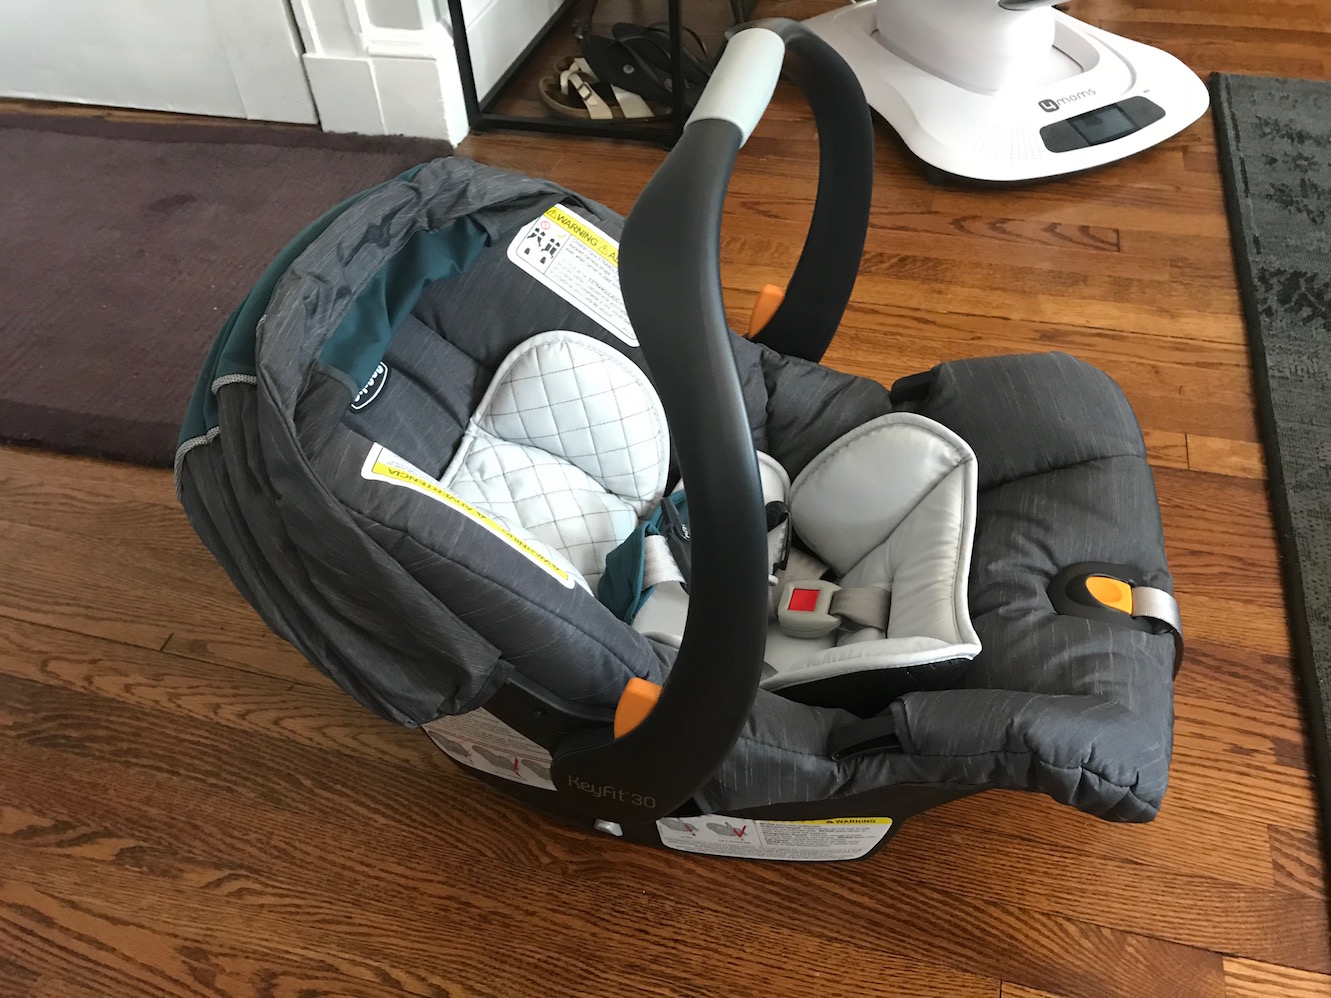
It is quite easy to rock with only a gentle application of upward force at the back of one rocker:
My plan is to create an actuator that can apply this upward force and gently rock the carrier seat. The (adult) user can control the speed/vigor of the rocking. Ultimately it may be extensible to detect fussiness and rock the baby to soothe it.
New Project Idea: Baby Carrier Rocker Base
The following is the required Q&A about my final project.
What will it do?
It will be a rocker base for an infant carseat carrier. When an infant carrier seat is placed in the base, the base can be set to rock it at different speeds and intensities. It may be made extensible such that sensors could be added to detect baby fussiness and rock them automatically when they fuss.
Who's done what beforehand?
I'm not really sure. I remember seeing something about a stroller that could rock automatically when it detected baby fussiness. My memory is that it came out of the favela in Rio De Janeiro, Brazil. But I haven't been able to find that project again. Maybe I need to look a little harder for that. That would be especially helpful for the "detecting fussiness" mode, if I decide to include such a mode.
What will you design?
I will design the rocker base itself. I will design the mechanical linkages/mechanisms that enact the rocking itself. I will design the electronics and the software that control the acuation.
What materials and components will be used?
I am thinking the base may be made of a cardboard frame with a natural fiber composite of some kind around it. I really love the idea that it could mainly be compostible/bio-compatible - for example using a resin like this one. I will probably use a Jameco gearhead DC motor as the main actuator, since that's what we have in the lab, and what I've been working with so far. The motor mount may be 3d printed or lasercut, and I will use some M3 screws to mount it in place. Linkages and rocking mechanism might be made of 3mm or 6mm plywood - an affordable, durable, and relatively environmentally benign material. The electronics will be milled out of FR1 copper-clad board and use an ATtiny MCU and assorted surface mount electronic compoenents (resistors, capacitors, LEDs, etc.) I will need to source a 12 volt, 500 mA power supply. Probably just a "wall wart" style. I will include a complete BOM on my final project page.
Where will they come from
They will be sourced online or locally where possible and/or out of the standard inventory of the Dassault Fab Lab where we are working.
How much will they cost?
The motor is $16. The resin for the base is probably a bit expensive ($10s of dollars). The power supply should be < $10 (e.g. this one). But I hope the overall BOM costs < $75 USD.
What parts and systems will be made?
I will buy the motor and the electronic components (e.g. the ATtiny MCU), but most of the rest of the parts and systems will be made in the lab.
What processes will be used?
2D and 3D CAD. Lasercutting and/or 3d printing for motor mount. Lasercutting and/or CNC machining for the structural substrate for the base. Composites (resin and fiber) for the shell of the base. Lasercutting for the linkages between motor and rocking actuator. Possible SLA 3D printing for gears and or drive linkages. Precision CNC milling for making electronics boards. Soldering and electronics testing. Software development (C, Arduino-IDE, Python) for creating a user interface. Possibly networking via a bluetooth or WiFi connection.
What questions need to be answered?
- DC motor or stepper?
- Base material? Composite wrapped around cardboard? plywood?
- how does mechanical linkage work?
- worm drive?
- 4 bar linkage? pantograph style?
- cam shaft/wheel?
- resin-printed gears?
- How does the user control it? Software interface? Smartphone App? Bluetooth? WiFi? Button/control panel on board unit?
How will it be evaluated?
I presume it will be evaluated based on the criteria listed under Final Project Requirements. I believe that the project I have laid out here can meet those requirements.
The following are also required questions for the documentation assessment:
What is the deadline? How much time do I have left?
All documentation for weekly assingments is due on Monday, June 11th, which gives me a little less than two weeks. The Final Project is due at my presentation date which is Monday, June 18th, which is a little less than 3 weeks. This is a short amount of time, but with focus and determination, I believe I can do it.
What tasks have been completed, and what tasks remain?
Completed:
- Cradle design, prototyping, and machining
- Decision to do carrier seat rocker instead of hanging cradle
- Motor controller board
- Application programming for serial motor control
Remaining:
- 3D CAD for carrier seat base
- 3d scan or download seat geometry (emailed manufacturer for design files on 2018-05-27)
- CAD for cardboard substrate and composite shell
- Design rocking mechanism(s) and drive linkages
- Motor Mount
- Drive System
- actuation/rocking-transfer mechanism
- Design and fab motor control board
- Motor driver output
- button input
- Bluetooth or Wifi connectivitiy?
- Microphone input for future extensibility?
- Test rocking actuation system
- Make seat base, assemble components, and package entire project
How will I complete the remaining tasks in time?
I will need to use supply-side time management, and not get caught up in little or trivial matters that can easily suck up hours and days of time. I will need to focus several dedicated hours per day to the task.
What has worked?
The process of orienting my weekly learning toward a final project has worked pretty well, with many of my weeks having relevance toward completion of my final project (see above for details). My motor controller board is working quite well.
What hasn't?
As noted above this is a substantial departure from my original project idea. The hanging smart cradle was a good idea, but too ambitious and also not really compatible with our home living space. I have also had a neverending cascade of SNAFUs at every step of the development process and lots of things "not working" at various points, but I have (so far) always managed to surmount them, and they have ultimately been a part of my learning process.
What questions still need to be resolved?
See above.
What have you learned?
What haven't I learned? There is so much that I am able to do know that I couldn't do 20 weeks ago. I have a much deeper and broader understanding of Fab Labs and the digital fabrication process. Especially in the realm of electronics design and production, I feel I have had a whole world opened up to me. I am excited to bring these learnings back to my own Fab Lab and increase our capacity to create, learn, and teach.