Computer-Controlled Machining
Have you:
[x] Explained how you made your files for machining (2D or 3D)
[x] Shown how you made something BIG (setting up the machine, using fixings, testing joints, adjusting feeds and speeds, depth of cut etc)
[x] Described problems and how you fixed them
[x] Included your design files and ‘hero shot’ photos of final object
Planetary Soda - 2021
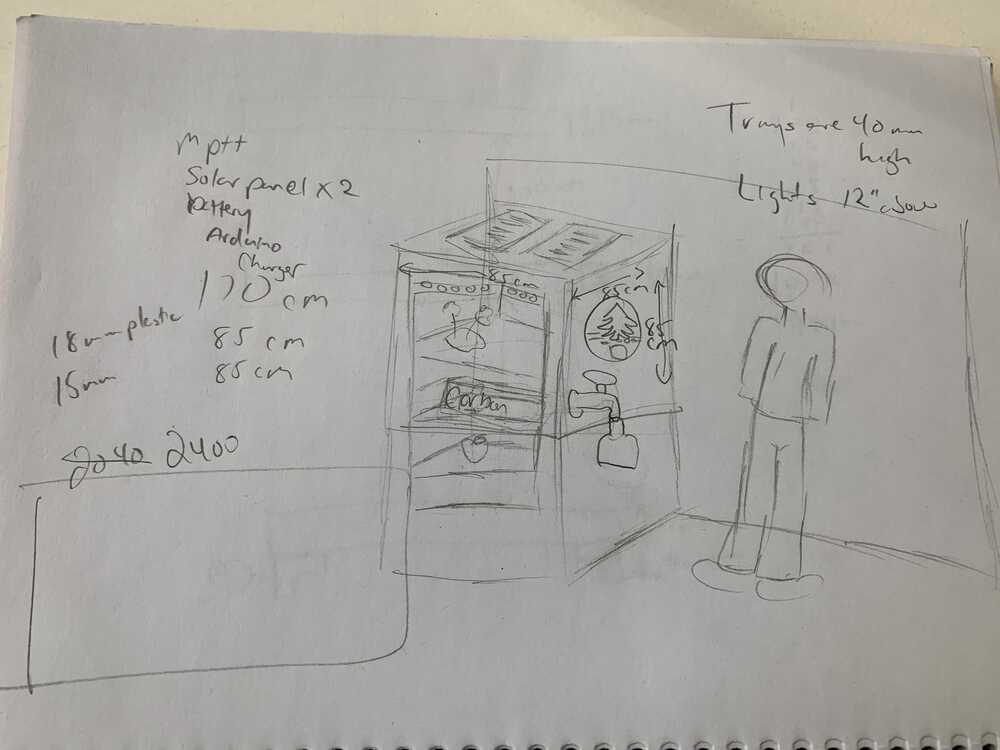
As part of MDEF, I worked with Guilherme Simoes on a cabinet to cultivate and to grow microgreens. After a trip to Instagreen in Poble Nou, we identified a work flow for creating our own carbonated beverages. We needed a structure in which we could cultivate the microgreen seeds. Once the greens were grown, we wanted to have a compartment for drying the greens. The greens would then be ground and added to a solution to create healthy yet fun beverages.
I started by prototyping a project on the lasercutter. Eduardo Chamorro suggested an online tool that would help in the rapid design of boxes. I used MakerCase to model the outside of the box. It works well for defining the exterior of the box that’s needed.
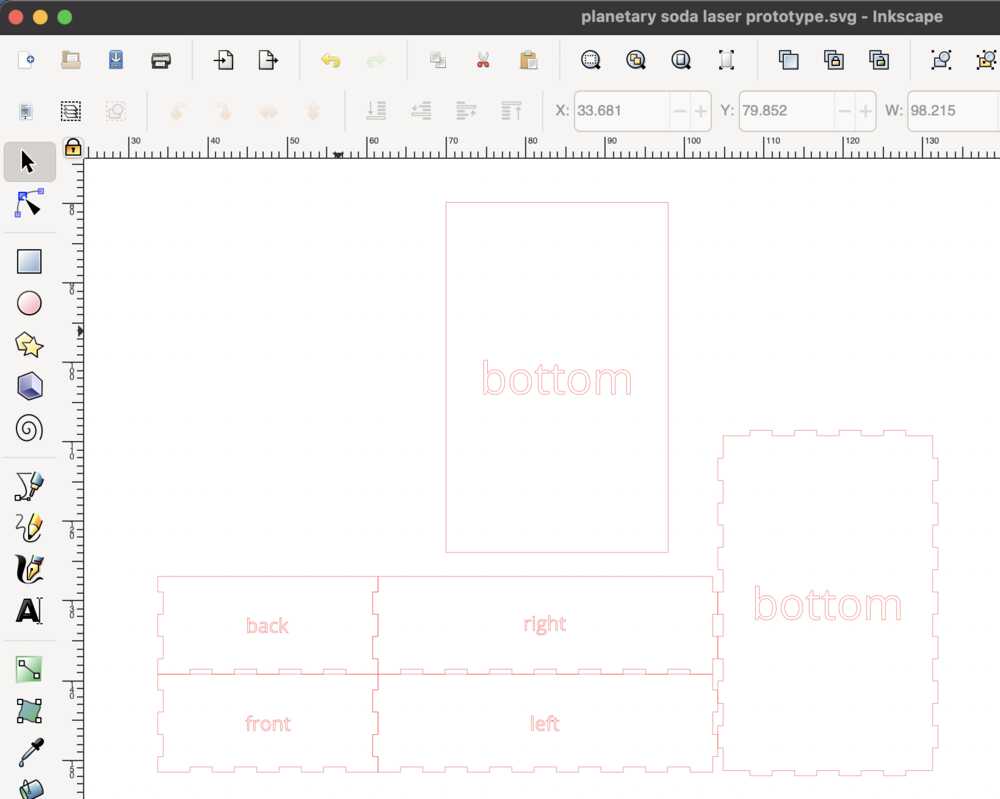
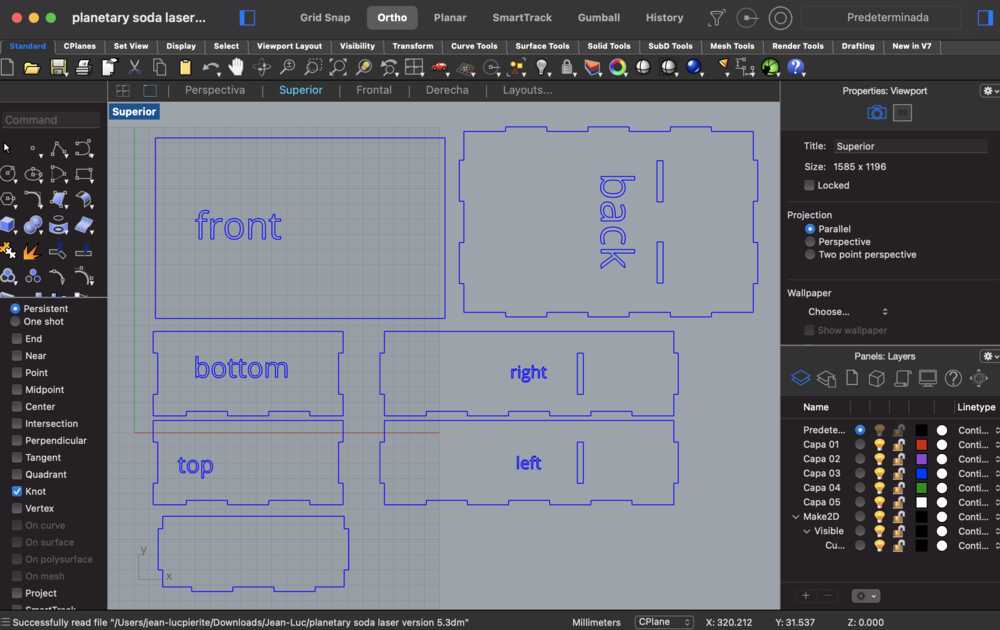
I exported the SVG output of the MakerCase model from the website. I then opened the model in Inkscape. I was able to add in parts for the front door and the shelf by modifying the paths of the back part and the top shelf. I then imported the SVG to Rhino 7 and exported to Rhino 5.
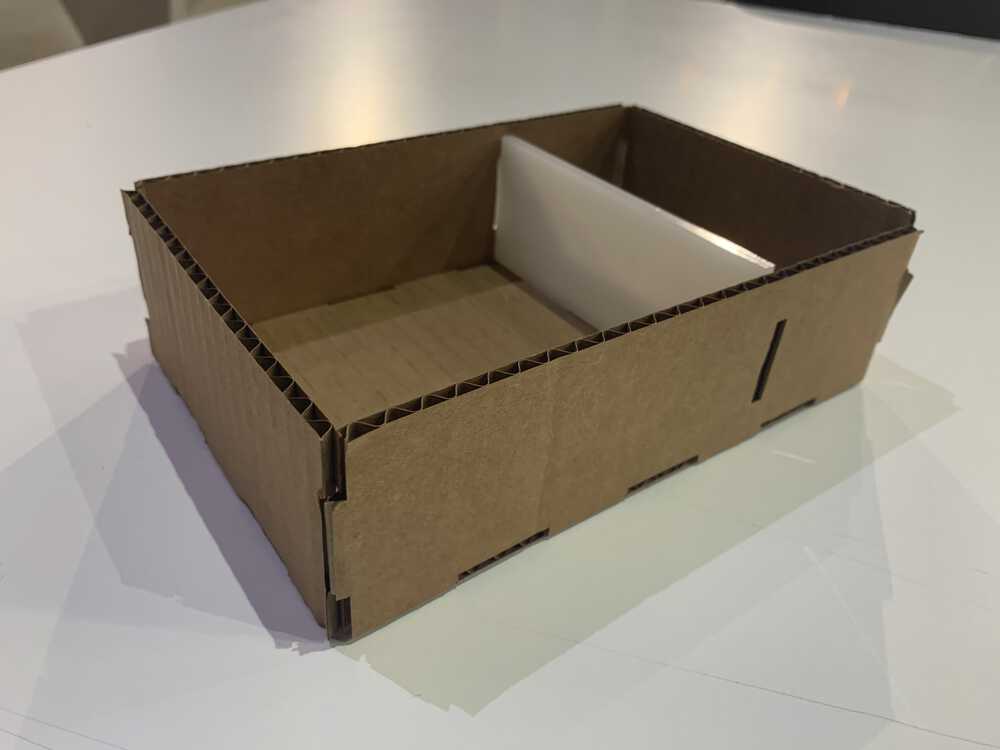
I cut the prototype on the Trotec lastercutter and was able to assemble the prototype. It worked well, but there were a couple of concerns. First, the joints seemed to be a bit unstable. Second and most importantly, I thought the prototype looked a bit boring.
I talked with Guilherme and we considered how this cabinet would work in two environments. First, educators would use this in a classroom setting to teach children about healthy eating habits. Second, a mother may want to have this type of cabinet in her kitchen. I went back to designing a new form.
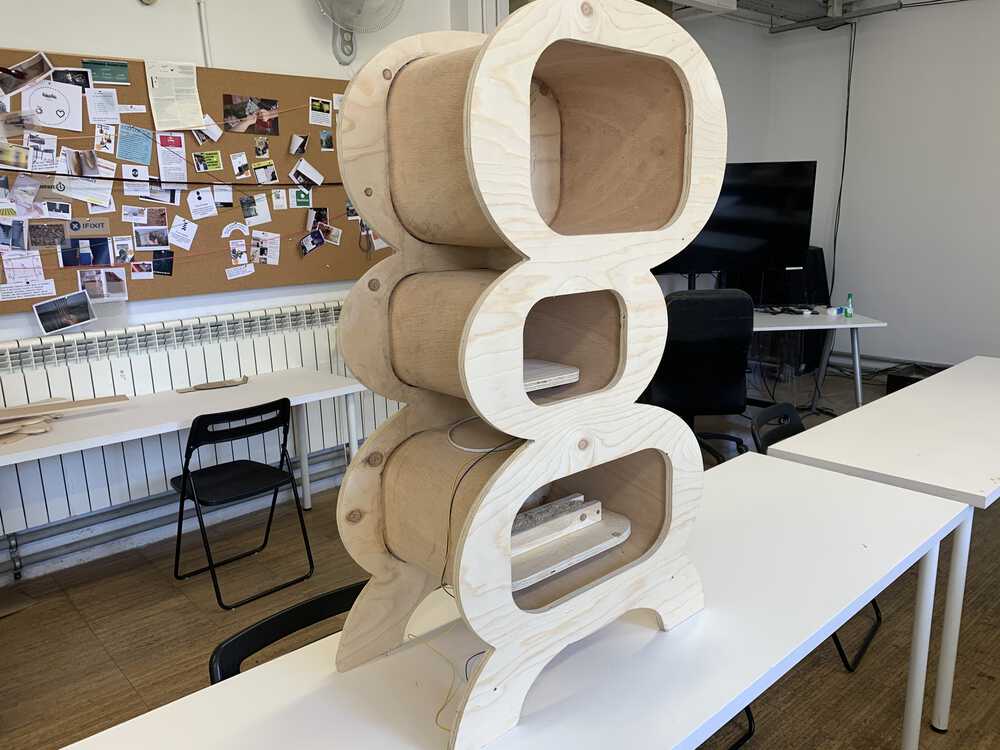
After some ideation, I started to think about the generative quality of my collaboration with Guilherme. Not only could this device make soda, but the processing of micro greens could ultimately produce biomaterials. Furthermore, I appreciated how a device like this in the home of Indigenous people such as my family could help in the cultivation of traditional medicines.
I began to play with the figure “8” in Inkscape. I did several boolean operations, and designed a form that would be structurally interesting and a bit gravity defying.
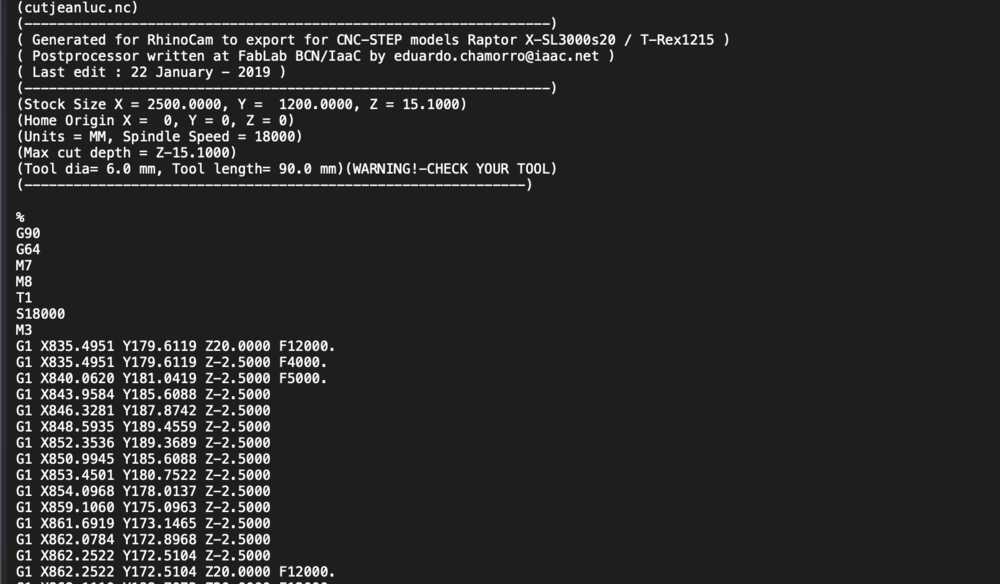
In order to generate toolpaths for my design, I used RhinoCAM. For the whole project, I used a 6mm downcut end mill. While cutting, the spindle rotates at 18000 RPM and the feed rate is 5000 mm/min. The cut direction is climb for the down cut.
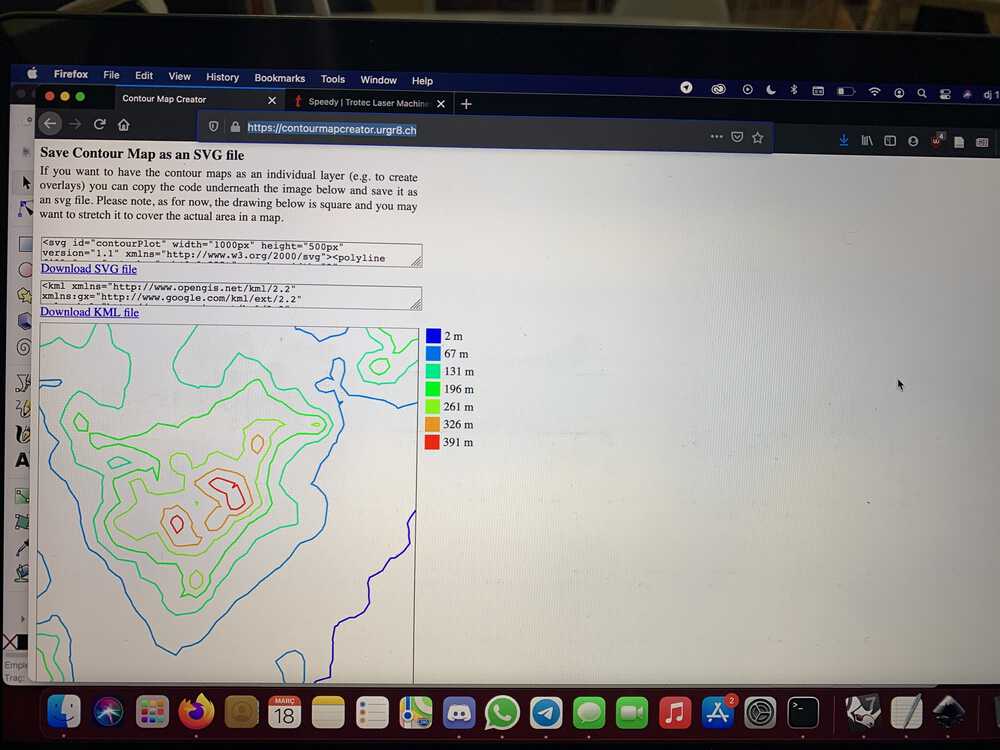
For the interior of the piece, I thought about how to embed the identity of Barcelona into the finished product. I found a counter map creator online and processed a topographical map of the local area. I then exported the SVG and added that to my project.
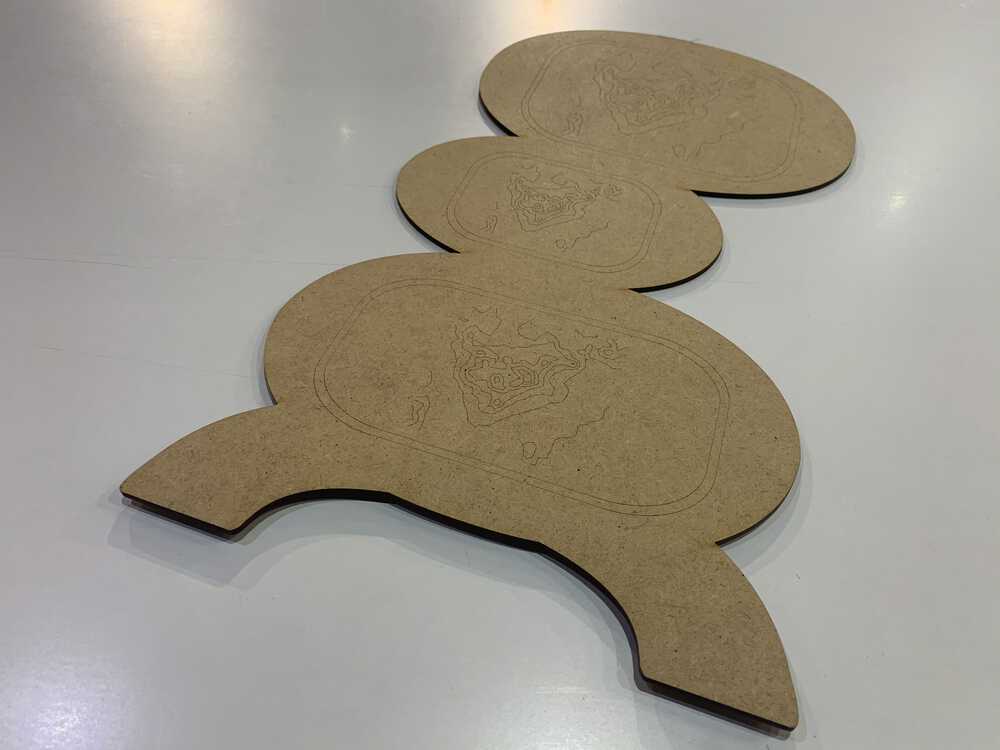
After finishing the design in Rhino 7, I exported to Rhino 5 and sent the file to the Trotec lasercutter to prototype the new design. In this design, I would pocket on the CNC the areas that I engrave on the laser cutter. In this version of the design, I wanted to cut a living hinge on the CNC and fit that into the front and back pieces to create shelving.
After explaining my concept to Eduardo Chamorro, he suggested that it would not work well to cut the living hinges on the CNC. The reason for this was the diameter of the end mill. I would need to adjust my design to account for that width. I would then need to be sure that enough plywood was left in between the passes to be sure that the shelf could hold together. Alternatively, I could laser cut 9mm plywood on the large format Multicam lasercutter. So, we processed the front and back pieces in RhinoCAM to send to the Raptor X SL3200. We produced two files: one that would machine pockets for screws to fix the stock to the bed, and a second to machine the pockets and cuts for the front and back pieces.
Once the front and back pieces were cut, I then tried the living hinges on the Multicam. I did a test with a part of the hinge. There were multiple flare ups and the wood broke when I bent it. Thankfully, the fab lab had a sheet of flexible plywood. I cut the interior pieces out without the living hinges. I then carefully inserted the pieces into the pockets of the cabinet.
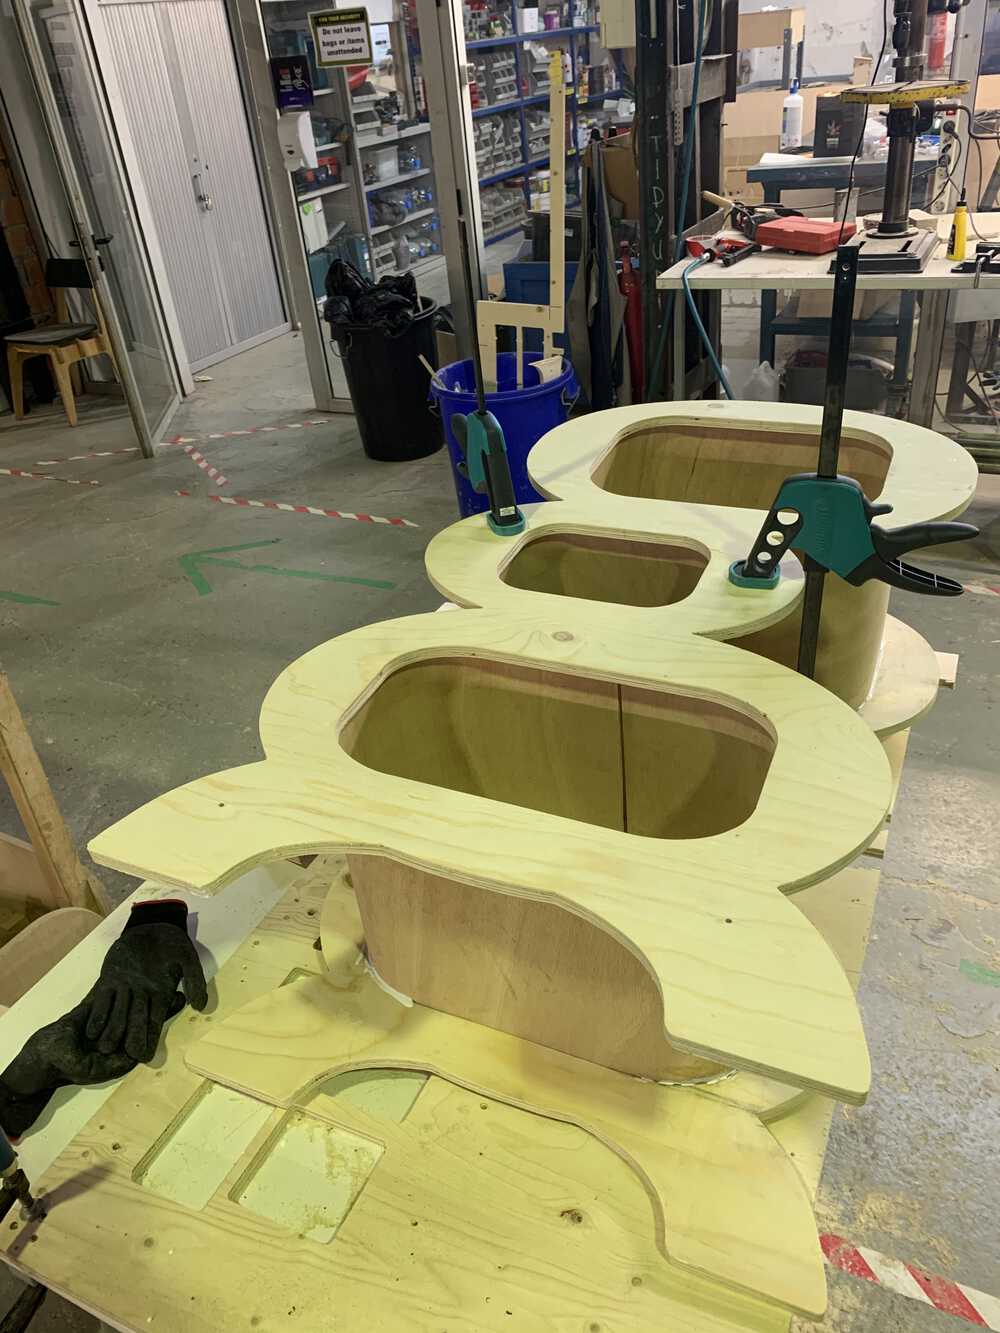
To be sure that the cabinet held together, Mikel in the Fab Lab suggested that I use the staple gun to hold the ends of the flexible plywood. I also added glue to the pockets and clamped the cabinet together. I then left the cabinet to dry over night.
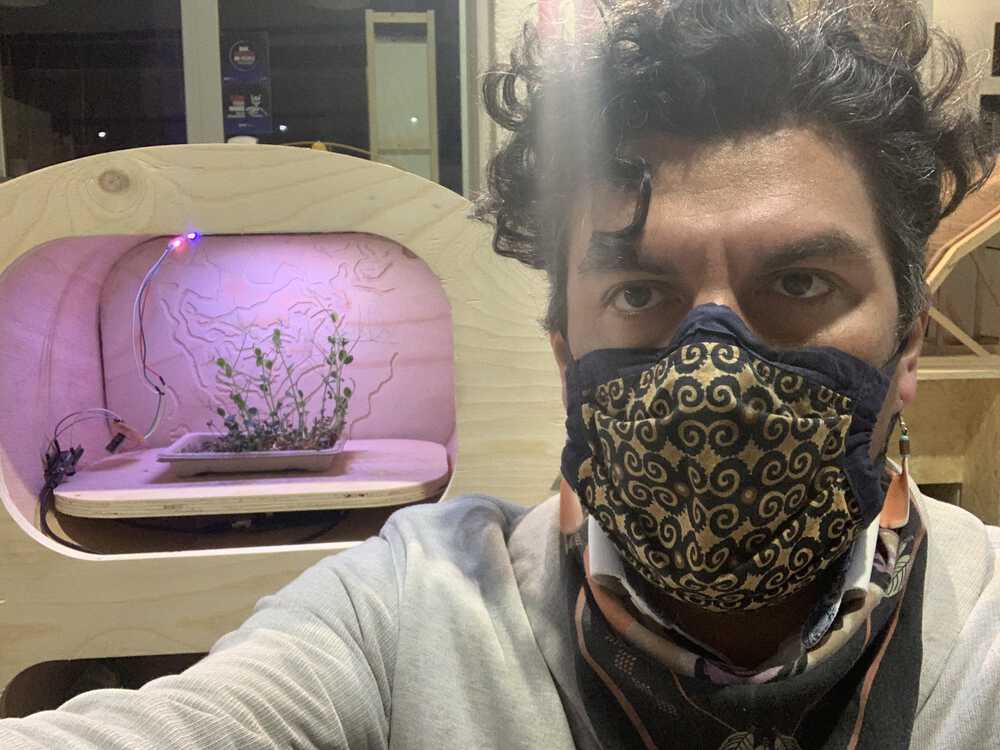
To complete the system, we added a strip of Neopixels and a fan using a HUZZAH32 and a shield that I designed. I will add some of that documentation to the embedded programming week.
- Design files: Right click + Save As
Hero shot and Design Files - 2018
- Design files: Right click + Save As
This week's "Invention Exchange"
Oh. My God. It's like I've always thought. Mystery Science Theater 3000 is a parody of my work at The Fab Foundation!
For the uninitiated, MST3K is about a random guy working at a scientific institute. He could be a janitor, temp, or glorified truck driver. In any case, a boss character who generally specializes in the "Mad" field of science subjects the host to torture in the form of "cheesy movies." Given my experience with customs documentations, I'd rather be watching Gamera movies.
Despite the torture, the host maintains sanity with the help of robots made from parts that were meant to control the movies. Not sure how a gumball machine, bowling pins, or flash light hot glued to an unimaginable amount of hose would control a movie. I couldn't even tell you the amount of programming of AI that would be required to get robots to do comedy riffs.
When I was growing up though, Thanksgiving was "Turkey Day"; a marathon day for MST3K. A sci-fi puppet show really helps as a coping mechanism for colonial legacy.
What was the connection? Oh yeah, Jonah just happened to say, "CNC in my Fab Lab."
Visiting MIT's Center for Bits and Atoms
There's a tutorial for this assignment on The Center for Bits and Atoms site, here. I didn't know that in 2015. So, what ended up happening is that I went to the CBA shop and bothered the "Spiciest Meme Lord" Tom Lutz.
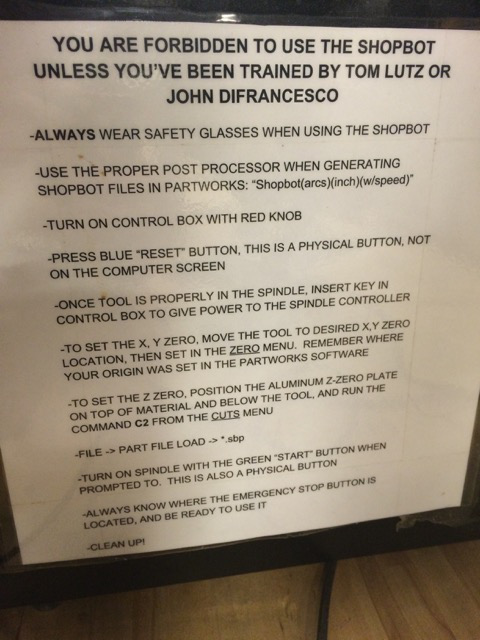
They're not playing around in the CBA Shop. Oh yeah, cause you can lose limbs or die...
He walked me through the process of using Partworks, setting up the ShopBot, and not losing eyes or fingers in the process. With those surviving eyes and fingers, I took copious notes.
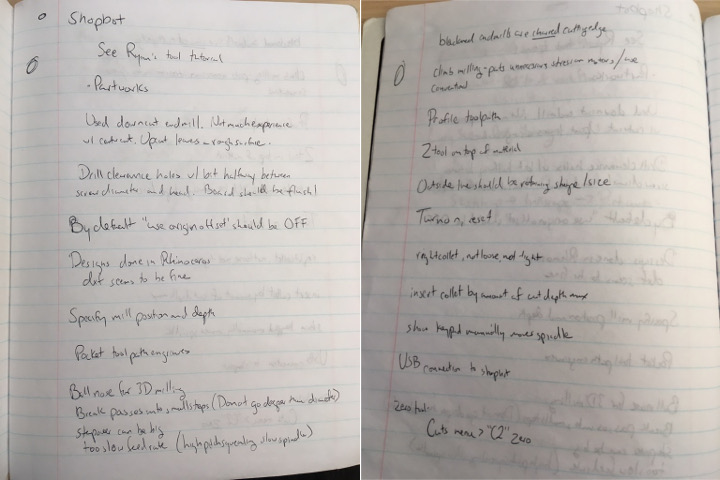
#Copious
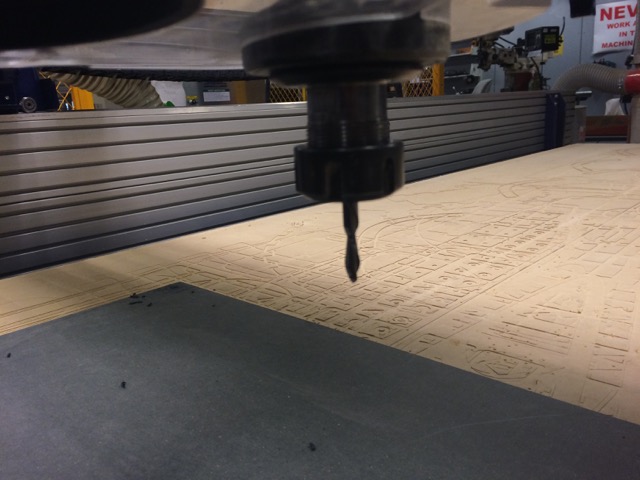
With Tom's assistance, I was able to design and cut out a monogram plaque which I keep by my work desk to this day.


Baby's first machining project
Trouble at The Southend Technology Center
After taking that nice lesson, I returned to the South End Technology Center to wrestle with the first ShopBot ever purchased for a Fab Lab. What a bear that thing was. First off, the control box looked like a hollowed out desktop tower with an emergency stop.
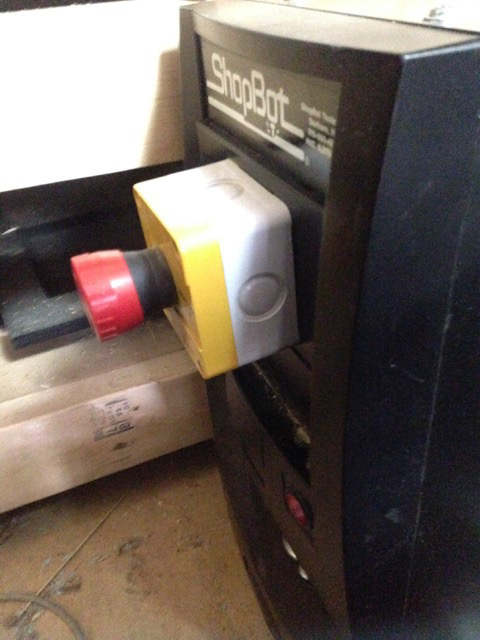
What the Hell is this??
It took a visit from Bill Young and an email to Ed Baafi to figure out what the mystery of the setup was. According to Ed, the big e-stop on the PC case is a hardware e-stop which cuts power. The big e-stop on the spindle controller is a software e-stop that stops a running program.
Bill Young's visit gave us a little history on the "first ShopBot ever purchased for a Fab Lab":
- We did not know when was the last time the pinion gears were changed, if ever
- Dianne Reynolds from ShopBot found the specs on the tool. It's a PRSstandard96-48-6 4/2007 with a 4hp 1 phase spindle (This is actually important to remember when loading the settings file in the ShopBot software)
- We also needed a surfacing bit for leveling the sacrificial board and stock.
- The spindle control that had the software e-stop is a V7-4X VFD. We wanted to replace that, but another visit from Ryan Patterson resolved any bugs by updating the firmware
Next time, I'll do this assignment on #HardMode by flying to Milan, send my files with LinuxCNC, and machining out my parts with a MECAMATIC MF 150. Right, Fiore?
Steps for Machining
Ale Diaz de Leon has a nice summary of work flow on her page that I will adapt and integrate with the tutorials and CBA lesson:
Prepare the file on the ShopBot software. The result is three layers:
- Holes for fixturing the stock
- Inside pieces
- Outlines with tabs with tabs to keep pieces attached to the board while it's cutting
#RobertosTip Roberto Gallo, experiment with the design by fabricating scale models to find design errors. Repeat for at least four iterations to get the best results.
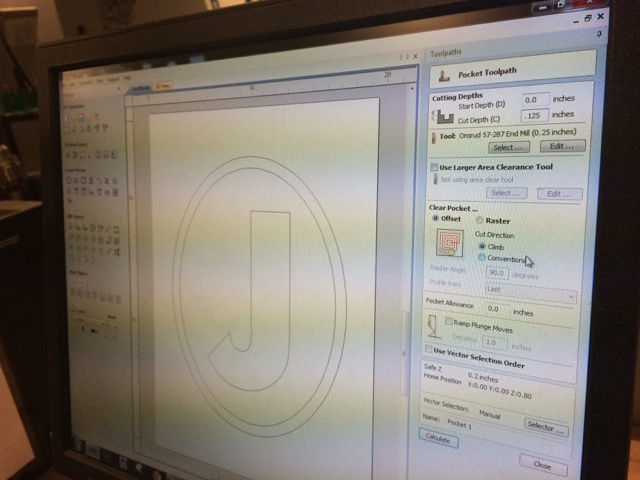
An example of setting up the file from Tom's walk through
#IsaacsTip Isaac Robles, check that all parts of the machining bed are leveled.
Put the stock on the sacrificial board on the machine. The surface should be clean and smooth
Stock is fixtured on four corners, instead of points set in software
- Find the home points for X, Y, Z
- #JeanLucsTip Luciano Betoldi and I tested jogs after noticing that everything was scaled by 50%. Double check that your settings file is the right one for the machine. If you are unsure, send jog commands from the ShopBot software and test that the spindle moves the correct distance of millimeters or inches.
- #EmmasTips Emma Pareschi, (If the machine stops) the XYZ calibration should still be the same so always check if the machine kept it.
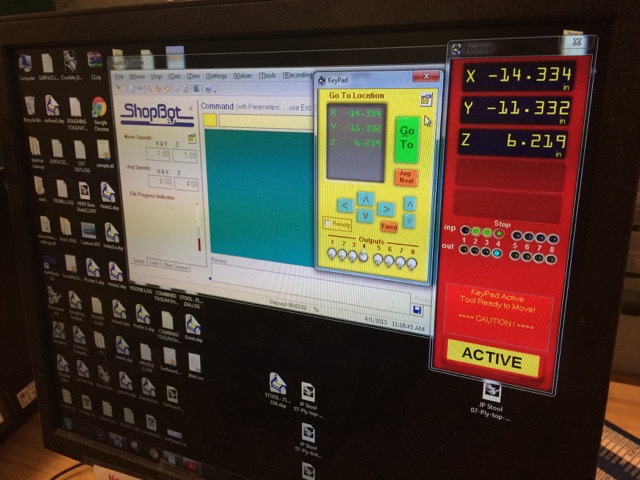
Homing the spindle from the ShopBot software
- Send the file from the ShopBot software to find the holes
- #KonstantinsTip Konstantin Leonenko, don't forget to air cut. When ready, take time to manually load panel-per-panel and hole-per-hole until confident enough to load simultaneous sides. Use a buddy system for fixturing. Careful positioning of screws will save stock and stay out of the way for the machine.
- #ScottsTip Scott Zitek, screws are preferable to clamps which stick up and can easily be hit by a moving spindle. When creating holes for screws on stock, only barely mark the surface.
- Drill the screws on the stock to fixture. That way, the stock will not move during the machining
- Send the file and wait for it to finish cutting.
- #EmmasTips, if during the milling job the machine stops (it can happen for several reason like electric drop or comunication problems with the computer) it's important to take note of the line where the job ended. Then you can start the same job with the option: "start from the line" from the File menu. I suggest to move the bit close to the working area and start the job from two lines before the one you wrote down. For istance if the line stopped at line 200, I would start the new job from line 198.

ShopBot file running and sending tool paths to the machine
- Remove the tabs using a chisel and a hammer.
- Remove the pieces and the excess stock
- #GonzalosTip Gonzalo Siu, finishing is harder than expected. Even though design can be adjusted parametrically, be prepared for a lot of sanding to chamfer males and widen female slots to perfect joints.
Tooling
The week of DigiFabCon 2017, I met Ted Hall at Center for Bits and Atoms. His first words to me were, "Oh, so you're Jean-Luc. I heard everything about you." Bill Young chuckled, "Well, that's one way to start a conversation." Sallye Coyle of ShopBot (and FAB CNC Guru) was on several adventures with me during the course of my work at The Fab Foundation. We've so far been on two lab installs and two FABx meetings.
Before I met Sallye, I would create Fab Lab pro forma based solely on the Fab Lab Inventory curated by MIT. The what's and why's were normally answered by, "this is what MIT recommends" or "this is what is needed to take Fab Academy." That said, I don't think we ever got around to explaining 5 gallons of machine oil or the $130 USD 1/2" two flute upcut ballnose end mill. I received a spreadsheet on tooling from Sallye that was very helpful in explaining what was the right tool for wood-specific applications in a Fab Lab: Right Click + Save
According to Fiore and Ted Hung, they both used a 10mm flat end mill. It appears the closest in the ShopBot "Router Bit Starter Kit" is the 1/2" Two Flute Straight V Flute.
Aside from tooling information, Sallye also composed a very helpful PowerPoint on Fab Lab tools and software: Right Click + Save
Main takeaways:
- Software is either CAD, What + Where, or CAM, How
- Types of toolpaths (ShopBot):
- 2D (Cut to one depth: end mill bit)
- Engrave (Create engraved look in le ering, designs: V bit) • 3D (ball nose bit)
- Able to Machine (ShopBot)
- Wood and wood products: Plywood; Hardwood; MDF
- Plastics (use correct bit and slower RPMs than for wood): Acrylic; PVC; HDPE
- So metals (use correct bit and slower RPMs than for wood, some mes use coolant): Aluminum; Copper/ Brass
- Circuit boards: copper on phenolic (detail depends on model of ShopBot)
- Machineable wax
- Plaster and other mold making materials such as pressed vermiculite and Ceramaguard TM(use good dust collec on and respira on masks)
Materials
I used an Oriented Strand Board. It's fairly inexpensive, but required a hefty delivery charge from Home Depot. Some other things to keep in mind (taking a cue from Isaac Robles), plywood tends to bend while MDF does not. Make sure all the parts of the machining bed are leveled. This is usually accomplished with a very long level, and measuring on the diagonals.
Designing files for Machining
I used Fusion 360 to design the CAD files for Machining. This is a very useful program as it also does CAM.
Building up a ShopBot
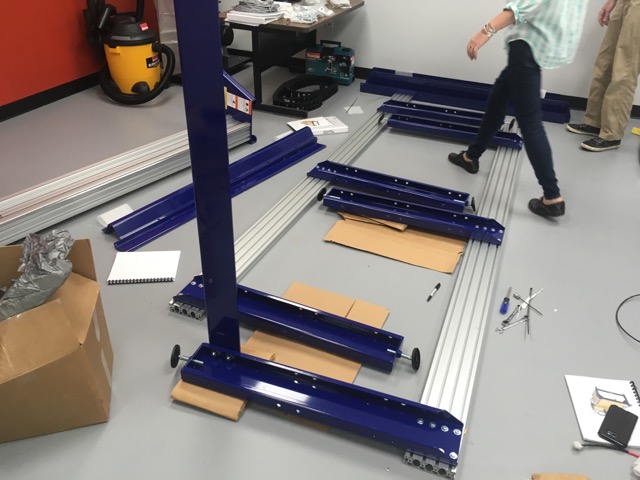
I collaborated with Luciano Betoldi on a Fab Lab installation manual which can be found here
I helped Sallye build and troubleshoot ShopBots at several sites including: Tampa, New Orleans, and Shenzhen.
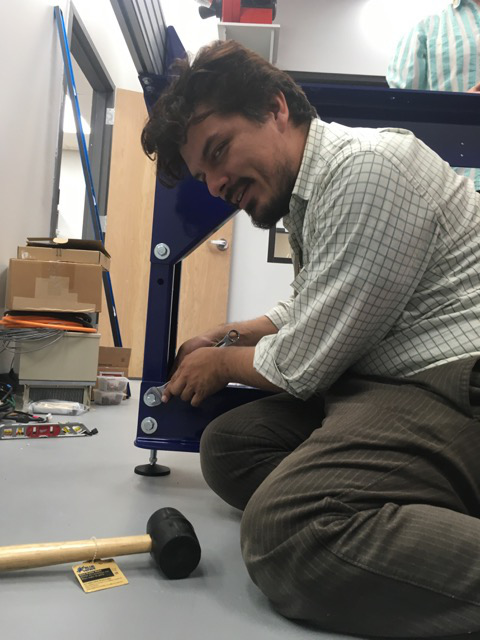
Does this count as "Machine Building"?
Sources
Abiko, K. (n.d.). Kenzo Abiko FabAcademy. Retrieved April 19, 2017, from http://fabacademy.org/archives/2015/na/students/abiko.kenzo/index.html
Baafi, Ed "A couple of quick questions on the ShopBot at SETC" Message to Jean-Luc Pierite. 30 April 2015. E-mail.
Basile, F. (n.d.). Fiore Basile @ FabAcademy 2014. Retrieved April 19, 2017, from http://fabacademy.org/archives/2014/students/basile.fiore/classes/07_computer_controller_cutting.html
Cesar, S. (n.d.). W07 - COMPUTER-CONTROLLED MACHINING. Retrieved April 19, 2017, from http://archive.fabacademy.org/archives/2016/as220/students/273/w07.html
Coyle, Sallye "Bit inventory for Bakersfield" Message to Jean-Luc Pierite. 20 July 2016. E-mail.
Coyle, Sallye "Powerpoint i did in Egypt for the teachers to summarize the equipment and software in a FabLab" Message to Jean-Luc Pierite. 23 March 2016. E-mail.
Diaz De Leon Lastras, A. (n.d.). Computer-Controlled Machining. Retrieved April 19, 2017, from http://fabacademy.org/archives/2014/students/diazdeleon.alejandra/8.Computer-ControlledM.html
Gallo, R. (n.d.). Computer-Controlled machining. Retrieved April 19, 2017, from http://archive.fabacademy.org/archives/2016/fablabyachay/students/302/7w.html
Garita, R. (n.d.). Robert Garita Fab Academy 2014. Retrieved April 19, 2017, from http://fabacademy.org/archives/2014/students/garita.robert/
Harris, A. (2014, March 12). Week 7 (March 12th 2014) | Computer-Controlled Machining (Make Something Big). Retrieved April 19, 2017, from http://fabacademy.org/archives/2014/students/harris.adam/week7.html
Hung, T. (n.d.). Computer-Controlled Machining. Retrieved April 19, 2017, from http://fabacademy.org/archives/2014/students/hung.ted/pages/07.html
Leonenko, K. (n.d.). FabAcademy 2014 - Konstantin Leonenko. Retrieved April 19, 2017, from http://fabacademy.org/archives/2014/students/leonenko.konstantin/week_07.html
Pareschi, E. (n.d.). Emma's note. Retrieved April 19, 2017, from http://fabacademy.org/archives/2014/students/pareschi.emma/classes_wk7.html
Robles, I. (n.d.). 6. Computer-controlled Machining Assignment. Retrieved April 19, 2017, from http://fabacademy.org/archives/2014/students/robles.isaac/assignments/6_Computer_controlled_machining/machining.html
Siu Lam, G. (n.d.). Documento sin título. Retrieved April 19, 2017, from http://fabacademy.org/archives/2015/sa/students/siu.gonzalo/index.html
Sollazzo, A. (n.d.). FA14 | AS. Retrieved April 19, 2017, from http://fabacademy.org/archives/2014/students/sollazzo.aldo/w8.html
Thongsouksanoumane, P. (n.d.). Phonesavanh Thongsouksanoumane. Retrieved April 19, 2017, from http://archive.fabacademy.org/archives/2016/woma/students/463/exercise07.html
Young, Bill "a couple of things for the SETC ShopBot" Message to Jean-Luc Pierite. 20 April 2015. E-mail.
Zitek, S. (n.d.). Week 7 - Scott Zitek - Fab Academy 2014. Retrieved April 19, 2017, from http://fabacademy.org/archives/2014/students/zitek.scott/week7.html