WEEK 8
Embedded Programming
Assignment:
- Read a microcontrolle data sheet
- Program your board to do something, with as many different programming languages and programming environment as possible
- Optionally, experiment with other architectures
Software:
- EAGLE
- Arduino IDE
- Adobe Illustrator
Skill:
- Circuit Design
- Programming
- Sensors
For this week’s assignment I decided it would be a good idea to start working on the sensor system for my final project . My final project is an automated heated jacket. I want the sensor system to have the capability to capture the wears temperature, the outside temperature and maintain an optimal temperature set by the user. For this week want to create a single board that would consist of a RGB LED and thermistor and see if I can get the board to react to temperature change.
SCHEMATIC DESIGN
Functions of the circuit:
- Turns on RED LED when temperature rises ( at least 5 degrees higher than optimal temperature)
- Turns on BLUE LED when temperatures drops (at least 5 degrees lower than optimal temperature)
- Turn on Heating when temperature drops 5 degrees below optimal temperature
- Turns on GREEN LED (for 5 second) when optimal temperature is reached
Components:
- 10k Resistor x 4
- 499 Ohm Resistor x 3
- NTC Thermistor
- Attiny44
- 6 Pin Header
- FTDI
- 1uF Capacitor
- RGB LED ( Common Anode)
CIRCUIT DESIGN
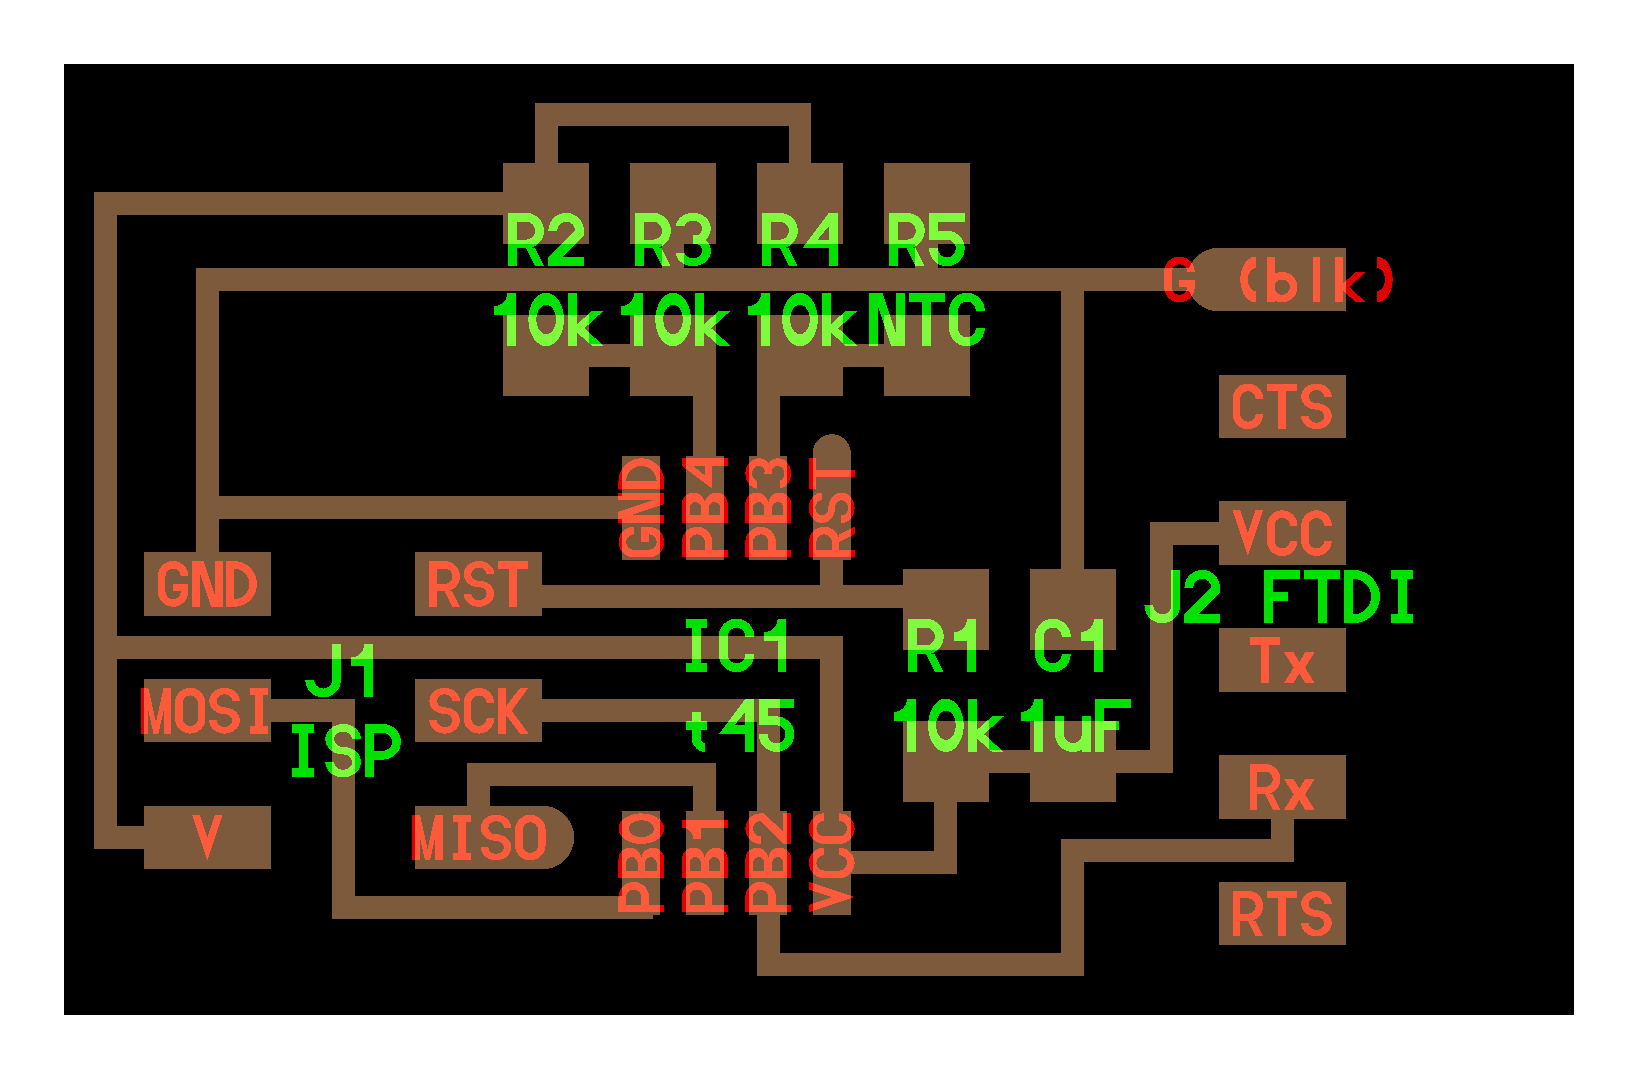
At this point in Fab Academy, designing and creating a circuit board has become second nature. For my board, I used the hell.temp.45.board as a template for my board. I did make a few changes. The major change was replacing the Attiny45 with an Attiny44. The reason behind the switch was that the RGB requires 3 extra pins which the Attiny45 doesn’t have. With 14 pins the Attiny44 the better choice. I also connected the RGB LED to pins 1(VCC), 3,5, and 6 on the Attiny 44. The thermistor and resistor combo are connected to pin 10 and 11.
Reading the datasheet for the ATtiny44 was extremely helpful. The most significant information I received from the data sheet were the pin configurations for the ATtiny44. Having a better understand of what each pin was used for, helped me better my circuit design when it came to creating my board. Also knowing the limitation of the controller is also crucial as I found out at the end of this week’s assignment. More about this will be discussed below.
(Quick Note: This was my first time using a RGB LED, more specifically a Common Anode RGB. Wiring this type of RGB to the Attiny requires a principle called Current Sinking. Setting up the circuit requires connecting the common anode of the LED to the VCC pin of the Attiny44. Then connecting red, blue, and green of the LED to microcontroller pins of the Attiny44. )

After sketching out the placement of components, I used EAGLE to make the board layout and design official. This time around using eagle was straight forward. Once I completed the board, I exported the png and used Adobe Illustrator to complete the finishing touches.


MILLING & STUFFING
]


PROGRAMMING
I approached programming the board with some caution. I have never used an RGB LED before and wasn’t familiar with programming current sinking. Luckily I was able to receive some guidance from Luciano and was provided with a great tutorial (https://create.arduino.cc/projecthub/tech-duino/using-common-cathode-and-common-anode-rgb-led-with-arduino-7f3aa9) on using RGB LEDs with Arduinos. Using the code found in the tutorial I began programming my board. I turned my Arduino Uno into an ISP using the ArduinoISP sketch. I then burned the bootloader onto the Attiny44 and was ready to upload the sketch copied from the tutorial.
*ERROR: serial not declared in this scope Arduino*
This is an error message I never seen before. I am fairly new to Serial function of Arduino and micro controllers so I was pretty stumped at this point. After many hours of relying on my trusty googling skills I was able to find a solution to the problem. The Attiny44 does not come with built in support for serial communication on their pins. The SoftwareSerial Library was developed to allow serial communication to take place on other boards and pins. Knowing this I revisited my code and added “#include

With the problem fixed I was set to program my board. The first test to see if my board worked was writing a simple code to switch between the red, blue and green LED on the RGD LED. I made some quick edits to the code I received from the tutorial mentioned above and uploaded the code to my board. It works.


#include <SoftwareSerial.h> //include Software Serial

SoftwareSerial LED(0,1); //Initial serial port on pins 0 ,1 (RXD, TXD)


void setup(){
  pinMode(7, OUTPUT); //Blue
  pinMode(8, OUTPUT); //Green
  pinMode(9, OUTPUT); //Red
  pinMode(2, INPUT);
  LED.begin(4800);
  LED.println("Im hearing listening");

}

void loop(){


  digitalWrite(7, HIGH);
  LED.println("Blue");
  delay(4000);
  digitalWrite(7, LOW);
  delay(10);
  digitalWrite(8,HIGH);
  LED.println("Green");
  delay(4000);
  digitalWrite(8,LOW);
  delay(10);
  digitalWrite(9,HIGH);
  LED.println("Red");
  delay(4000);
  digitalWrite(9,LOW);
  delay(10);

}
The next I wanted to try making the board read the current temperature and output the data in the serial. I also wanted to see if I can make the RGB turn red, blue or green depending on the temperature reading. I first created a code for the temperature.
#include <SoftwareSerial.h>

SoftwareSerial temp(0,1); //Initial serial port on pins 1, 0 (RXD, TXD)

int Reference = 3; //determine  data type and signal pin
int Temperature = 2; // determine data type and signal pin

void setup(){
  pinMode(7, OUTPUT); //Blue
  pinMode(8, OUTPUT); //Green
  pinMode(9, OUTPUT); //Red


  temp.begin(4800); //initialize software serial port
}

void loop(){

 float Vo1, Vo2, degreeC; // define variables and determine data type

 Vo1 = getVoltage(Temperature); // Call the getVoltage function to get the voltage reading for the sensor
 Vo2 = getVoltage(Reference); // call the getVoltage function to get the voltage reading for the reference resistor
 degreeC = (Vo1 - 0.5) * 100; // Convert Vo1 into degrees Celcius

 temp.print("Vo1= ");
 temp.print(Vo1);
 temp.print("    ");
 temp.print("Vo2= ");
 temp.print(Vo2);
 temp.print("   ");
 temp.println(degreeC); //Print the degrees in serial monitor
delay(5000);
 }

 float getVoltage(int pin)
 {
  return (analogRead(pin) * 0.004882814);
 }

The code was a success but there were a few things that I noticed. When programing my board I realized that the temp code I wrote used between 95%-100% of the memory on the Attiny44. This means the memory on the Attiny44 is too small for what I am trying to achieve. I have to think of upgrading my chip for my final project.
I also experimented with other programming interfaces, specifically Notepad++. I grabbed the hello.temp.45.c code from Neils examples and made some minor tweeks to match my circuit.
I like how clear the visual feedback and user-interface is for Notepad++ but I still prefer the Arduino IDE. I believe this stems from me becoming familar with Arduino IDE after a few years of using it.