WEEK 2
PROJECT MANAGEMENT

ASSIGNMENT DETAILS: Work through a git tutorial and build a personal website.


USING GIT

My first step in understanding git was to visit the useful tutorials on the Fab Academy site. You can find them HERE. For the sake of understanding it better I will describe it as simply as possible.


WHAT IS GIT?

USEFUL LINKS:
Fiore Basile Tutorial
git-scm.com
try.github.io
Git Cheatsheet
Fab Academy Tutorials

Git is a version control system. Version control is a useful solution to keep track of changes made to documents, folders, and kernals of information that are stored on a server or computer. This makes it possible to review changes, avoid mixing up files, and track a history of updates made to your work so that your process can be revisited and reviewed by others. This is especially important if a group of people are sharing information. As is the case for the Fab Academy, or when developers are working on open source software, for example.

This way, people can learn from your projects and, if permitted, make suggestions or changes to your work which you can re-incorporate. Without version control, it would be significantly harder to develop open source tools.

GitLab is the version control tool chosen by the Fab Academy to keep track of all of the useful information we generate through our work. It can track changes we make to our websites by establising a link between a folder on your computer and a repository, or "repo" which is located on a Fab Academy server. This repo generates the necessary metadata required to keep track of our collective work and makes it searchable to others. When you update your website in that folder, you are expected to push it onto the repo which will mirror exactly what is on your computer. The opposit is also true. If someone shares or changes a file on the repo, you can pull this onto your computer. At any given time, your local folder should be identical to the folder located on the repo.

GitLab is one implementation of Git. There is also GitHub and other flavors. To understand the differences between GitLab and GitHub click HERE. As Fab Academy students, GitLab is also acting as an ecosystem and host for the entire Fab Academy infrastructure including our individual pages. It also allows users to communicate, share ideas, and report issues.


CONNECTING TO GITLAB

Note:We are encouraged to use our computer's Terminal as a way to quickly access programs and files. Although you can work directly from the GitLab interface, there is more to learn through Terminal's text-based process and it arguably provides quicker access when you know how use it properly.


STEP 1:

Generating an SSH key.

---> Generating an SSH key is necessary so that GitLab can identify your computer and make a secure connection to your local folder.

Following the help examples on git.fabacademy.org I executed the following commands but replaced email@example.com with my personal email.

cat ~/.ssh/id_rsa.pub | clip

Done properly, you should get a response like this:


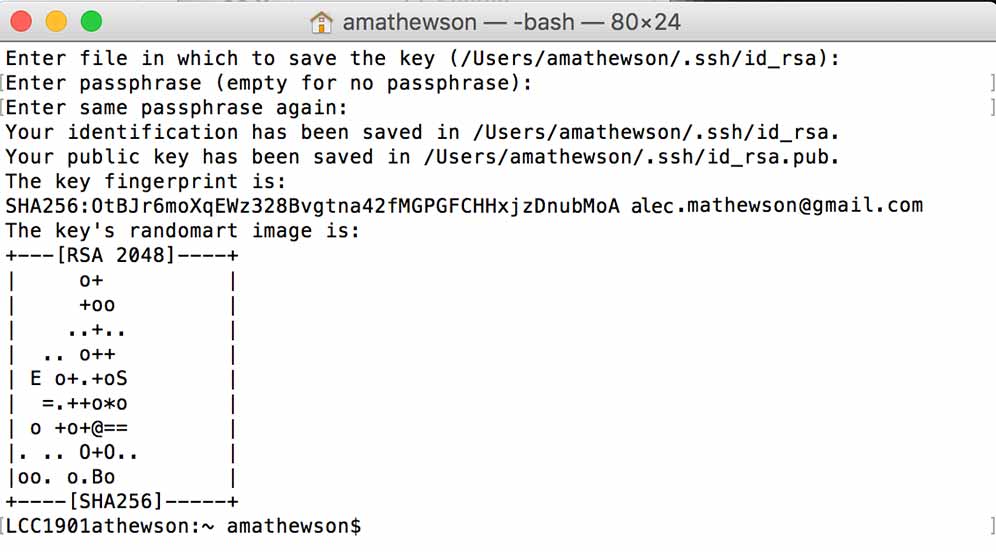
Note:This was my first SSH key and I also opted for all the default settings. When prompted to enter a file to save the key and a passphrase I left it blank.
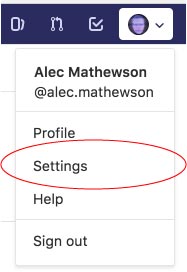

STEP 2:

Copying your public SSH Key and putting it on GitLab

---> If you want to see your public SSH key enter
[cat ~/.ssh/id_rsa.pub] in your terminal but you can also copy it directly to your clipboard by entering the following command.

pbcopy < ~/.ssh/id_rsa.pub

---> With your public key now in your clipboard, go to th GitLab and pull down the settings tab under your user icon.


---> Navigate to the SSH section in your settings.
---> "Command V" / paste your SSH key in the designated section.

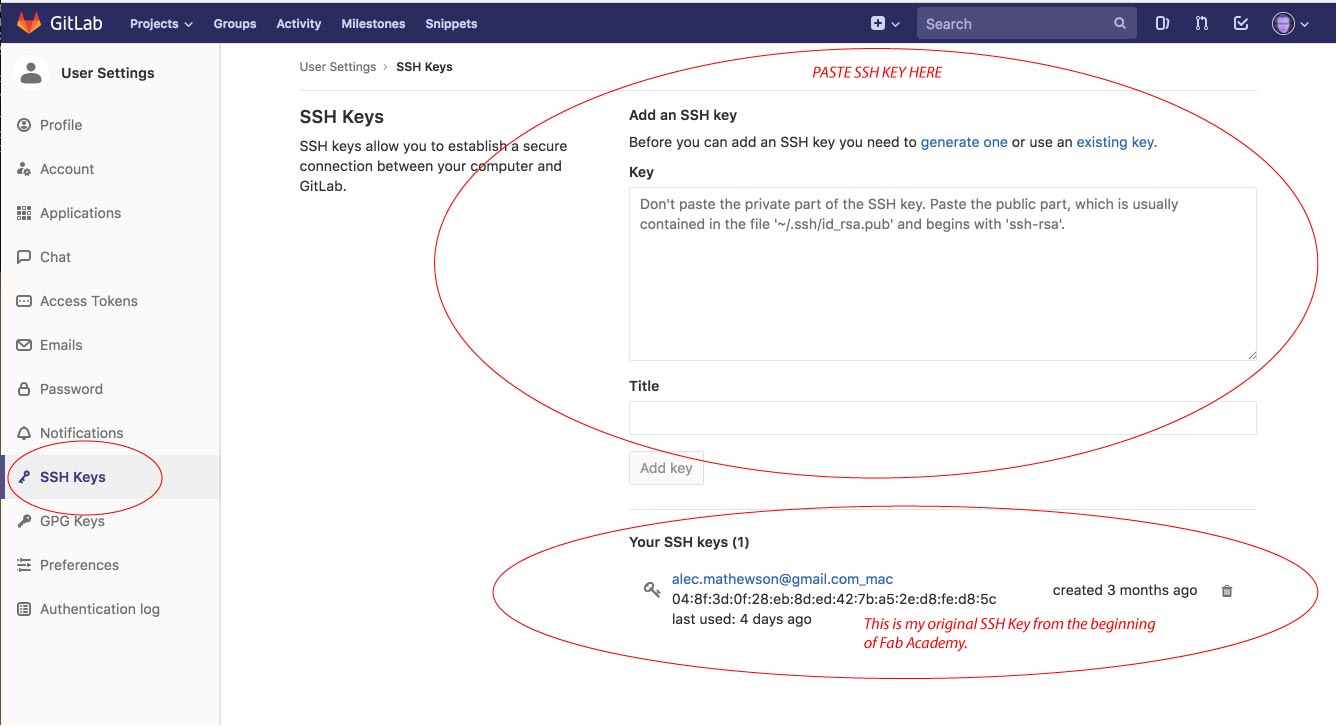
Note: I did not get a proper screen capture the moment I did this step. My SSH key was generated at the beginning of the Fab Academy so you will notice it here at the bottom of the above window. This screen shot was taken 3 months later


STEP 3:

Publishing Your Website

In order to publish your website. You need to create a gitlab-ci.yml file. What is this? The gitlab-ci.yml file lives in the root of your repository. Its purpose is to configure service called CI(Continuous Integration) which basically helps build, test, and deploy, your website. It will automatically update your webpages when you commit any changes through git. To finalize this step you need to generate your .yml file by following these steps on your GitLab portal page:

---> Navigate to the root of your repository and select "New File"from the dropdown menu next to your username.


Note: You will notice in the image above that my root is already populated and that there is already a gitlab-ci.yml in there. This is because I had to created the documentation for this step after my site had already been published. Normally, this folder would be empty.


---> Choose a template type by selecting "gitlab-ci.yml" in the dropdown menu.


---> Apply an HTML template to the gitlab-ci.yml file.


---> Completed, it should look like this:


USING GIT

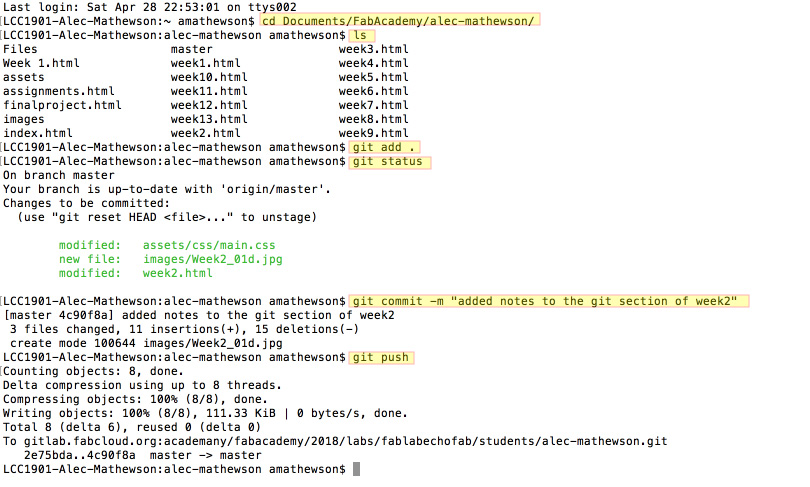
Using Git took a bit of time for me to get used to. Before mucking up any website attempts I first attempted sharing some test files until I understood the right process. I was unsuccessful at first but it turns out I was not in the right directory. Once I navidated to the master folder on my computer, "alec-mathewson" using the cd command I was able to successfully copy a test document.


Here is a list of commands to make this happen
cd ---> Change directory. Use this to navigate within different directories in your computer.

cd Documents/FabAcademy/alec-mathewson

ls ---> Look up file. Use this to see what files are in your current directory.

git add ---> Add files you wish to sync with the repo. You can add specific files or all files.
"git add ." == stage new and modified files.
"git -A" == stage all files / new, modified, and deleted files.
"git add -u" == stage modified and deleted files.

git commit ---> Stores / commits the new changes made to the index. It basically stores all the changes and keeps them logged and ready to be officially pushed to the repo. You are expected to add notes to your commits otherwise it won't work. git commit -m includes the message. Looks something like this:

git commit -m "added notes to the git section of week2"

git status ---> Verify all the changes you have logged before pushing them to the repo. It is good practice to verify what you are pushing onto the git repo and check for errors before you do it.

git push ---> Finalize the process by pushing your commits or changes to the repo.


There are a lot more elements to using Git and many more specific commands but with these few elements you are able to keep your website updated and your folders in sync.


MAKING A WEBSITE

The inspiration for my website comes from a course I took while studying design at Concordia. The course website, design by Vincent Leclerc was very clearly laid out with all the necessary information readily available. In the hopes of implementing similar features in my own course websites, I wanted to learn how to work with accordion features.

INSPIRATION
The style of this website is at least 5 years old. I like it for its simplicity. I am hoping to make a similarly simple page but with some more modern features such as being web responsive.

CREDIT: Vincent Leclerc, CART360 Concordia University, Montreal, QC. Canada.


TOOLS

USEFUL LINKS:

W3 Schools
Code Academy
HTML5-Up

When I was studying mybachelors degree in 2001 I was introduced to basic HTML but quickly lached on to Adobe Dreamweaver as a tool for my own portfolio sites. Times have changed too much to really compare but for ease of use and certain features I have been using services like Squarespace and Wordpress in more recent years. However, I have always wanted to be more comfortable coding websites without the use of a WYSIWYG editor. I took the Fab Academy as an opportunity to jump right in and really did not spend much time revisiting WYSIWYG options. While it has taken me some time to feel comfortable and to get my website up and running smoothly, I feel I now have a better understanding of formatting, and of more complex html and css. I also think it is only strengthening my ability to code which is another personal goal for me. I am sure this website is filled with technical errors or perhaps bad-habbits but I am learning from these things. I am aslo mixing ideas from different places, libraries, scripts, styles etc. which is teaching me how to simplify and avoid coding conflicts. As the course progresses I will continue to streamline and clean up this website. I finally settled on using Adobe Brackets. I have also tried Atom which I may use more of. But for now, my editor of choice has been Brackets. I have included some add-ons to help with formatting.


BUILDING

My website is built using a couple different elements. The index and assignments pages are both built from scratch using bootstrap and scripts. I had spent so much time learning the latter that I decided to choose a template and someting easy to update for the weekly assignments so I chose a theme from html5up.com.


STEP 1:

Viewing Source of website

My first step was to revisit the website that initially inspired me and try and understand it. I took a quick free HTML lesson at codeacademy.com and on w3schools.com

to familiarize myself with HTML & CSS. This made it easier for me to identify the features I would need to learn from.


From this, I learned that the accordion feature in this website comes from a script developed by Kevin Miller/Stickmanlabs and it is published under an MIT License. You can download the github files HERE but this work is dated and there are features in bootstrapthat work just as well.


STEP 2:

Mod the Code

My next attempt was to mod Vincent Leclerc's code and


I spent a lot of time exploring different elements in the CSS files. While it is easy enought to change colors and other visual features, the accordian function is produced using JavaScript which I am not yet good enough with. The main feature I wanted to establish but couldn't was the ability to toggle an Accordian on/or off. In the example of this other course website, the accordian is open during period it is scheduled. I love this feature. Here is the snippet of JavaScript it seems to be associated to.

language="JavaScript" type="text/javascript">
var scheduleAccordion = new accordion('schedule');
scheduleAccordion.activate($$('#schedule .accordion_toggle')[0]);

STEP 3:

Accordions

It was taking me too long to figure this out so I started looking towards examples of Bootstrap which has the accordion feature built in. While I could not figure out how to schedule the opening and closing of an accordion based on a calendar, I did learn how to do it manually.... but by accident!


I was copying bits of code from a bootstrap example on w3Schools, found HERE and noticed that the accordions were toggled open. This made it easy to highlight what was causing that.

closed
div id="collapse4" class="panel-collapse collapse"
open
div id="collapse4" class="panel-collapse collapse in"

After many hours of struggling. I was able to finally make a successful accordion that was divided into three columns but that would only allow one accordion open at a time. I probably spent way too much time on this task but it is something I really wanted to incorporate.


STEP 4:

Templates

After spending hours figuring out the Accordion feature, I decided to take on a different approach for the individual pages for the weekly assignment. I wanted this to be simpler. Upon recomendation, I visit HTML5-Up
and settled on the Read Only template. I like the way the menu follows the scrolling so if you have long post... like this one.... you can navigate more easily. After downloading the files, I had to mess around with the CSS files until it matched the look I settled on in my index.


Note: In this image, I am playing with the css files. Adjusting colors.

CONCLUSION

After a lot of playing around, debugging, and adjusting, I have finally settled on a look and a process for updating my website. If I were to do it again, I would likely just work with a template and worry less about the look. I don't know if it is my interest in design but I did not want to settle. The advantage is that I think I learned a lot more this way. The disadvantage is that this website is a bit of a mishmash of styles which is not ideal. Lots to be learned!


PROJECT MANAGEMENT

While we were supposed to evaluate different project management tools, I have yet to feel the need to step beyond using Google suite. I did have a look at Gant Project which is project management software that generates Gant Charts. A common and useful method for keeping track of large projects with multiple people. I see this as being useful for large teams. In the google projects work fine. That being said, I do need to keep track of my project management as I am doing the Fab Academy while working full time and rasing a family.
At first, I did not really have a best practice to updating my website. As Fab Academy is midway, I have developed a system to updating my website and keeping on track that is working nicely. Generally speaking, my process looks like this:

---> Break up assignment into sections based on chronological order.
---> Using Photoshop, I resize my selection of documentation images and name them according to which section they relate to. Example: Week2_01a, Week2_01b, Week2_02a, Week2_02b, Week2_02c... and so on.If needed, I will add a note: "Week2_02d_3dprint"
---> Upload images to my website in order and place minimal text.
---> Move on to next assignments.
---> As time permits, add descriptions and content to support the documentation.