Embedded Programming Assignment 9
Assignment 9
1) Read Datasheet for Attiny44 and Document what I figure out
2) Make the Code for Hello Echo
3) Test
4) Files
5) Talk About How I am going to Develop My Codes in the Academy
Task 1
I searched online for the Datasheet of Attiny 44 and it is easy to find .. and I started reading it ..
Those Are the Basic Information you need to know about 44 ..
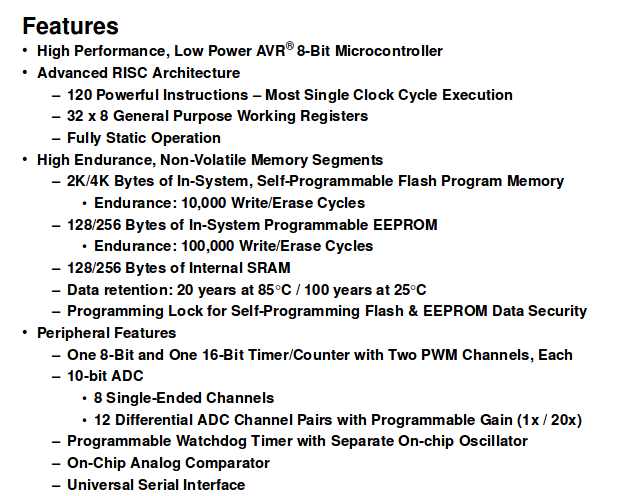
and Those information are very useful Informations to take in consideration .. as Working Voltage and EEPROM To know how the size of the code limitations .. the ability of using the internal Oscillator ..
2K/4K Bytes of In-System, Self-Programmable Flash Program Memory
128/256 Bytes of In-System Programmable EEPROM
One 8-Bit and One 16-Bit Timer/Counter with Two PWM Channels, Each
Programmable Watchdog Timer with Separate On-chip Oscillator
Internal and External Interrupt Sources
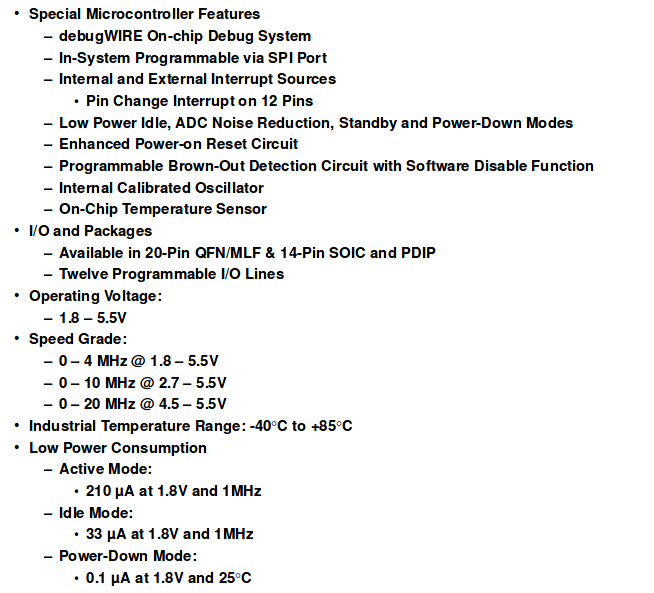
Operating Voltage: 1.8 – 5.5V
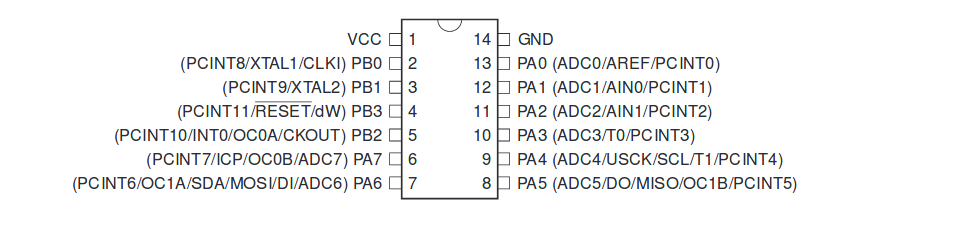
I also Found those tables for registers names .. which is important information ..
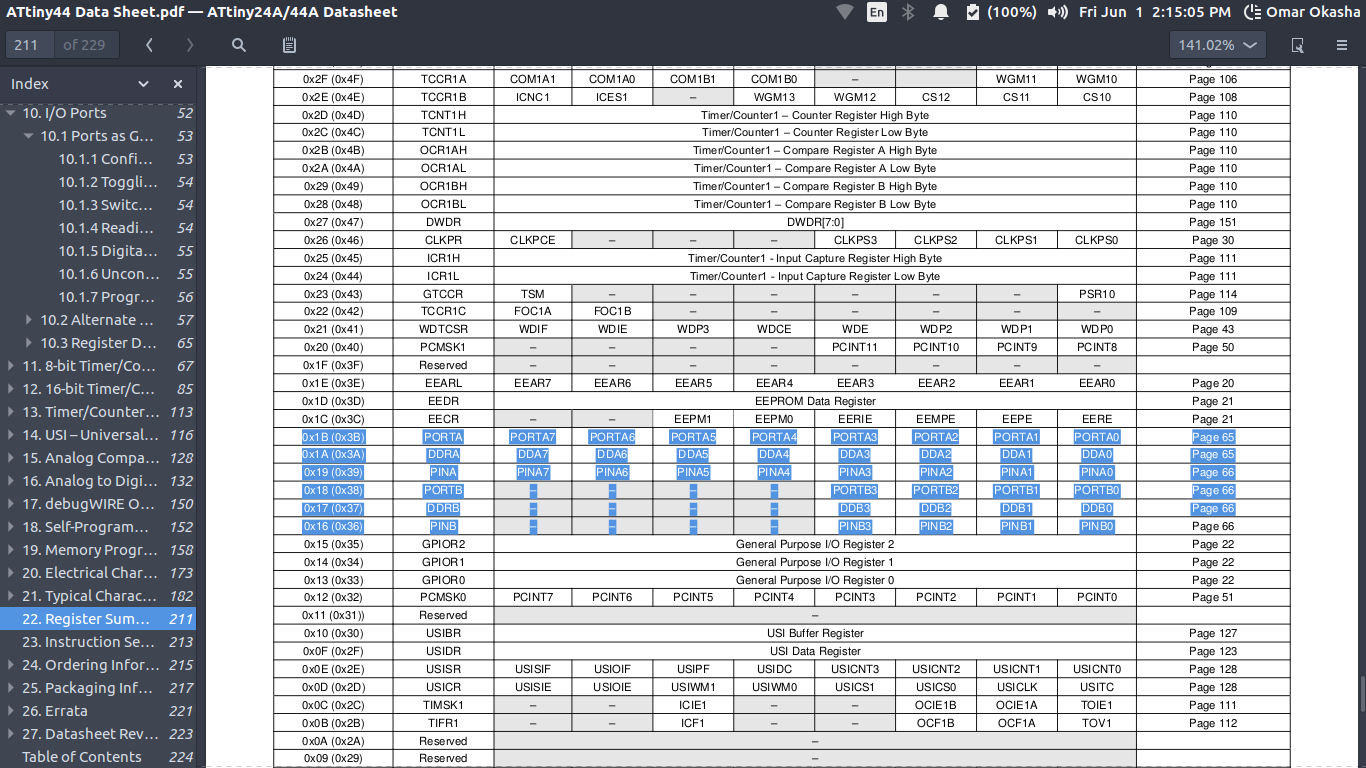
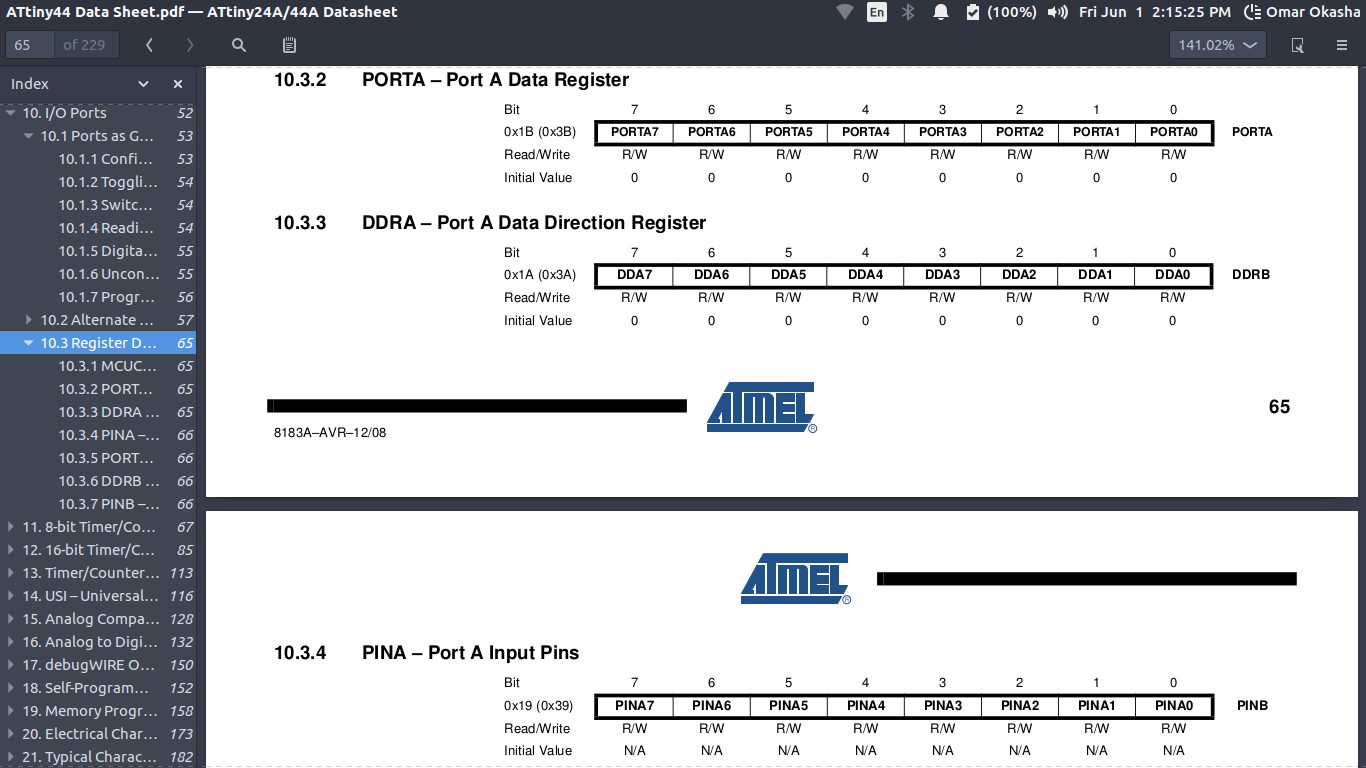
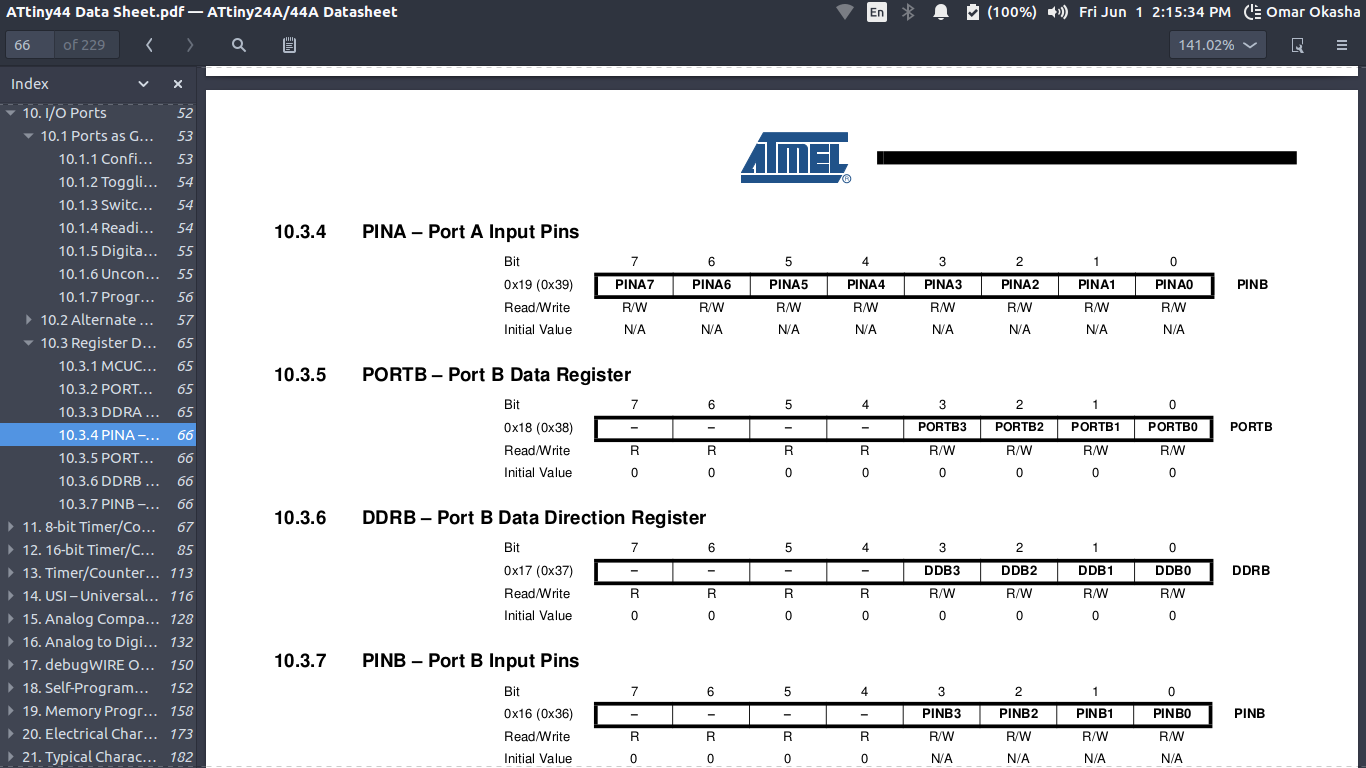
Those the important result for me When I am Going to programming ..
Outcomes :
THis helps me with knowing how to configure pins Inputs and Outputs from DDRA and DDRB
And how to target a specific pin at the Attiny Using (PINA & 0b10000000) for example ..
How to put an output on a full Register or PORT PORTA = 0b00000000;
Operating Voltage:
1.8 – 5.5V
We need to power the Attiny with 5V to work Normally ..
Programmable Watchdog Timer with Separate On-chip Oscillator
Depend on that we can use the internal 8MHz and I already used them to have a stable communication ..
Task 2
Programming Phase :
Before Going in My codes and Programming ..
Let's Talk first about the Programming Language I am going to Use ..
Arduino is a C based Programming Language that can control Arduino Boards .. or AVR Microcontrollers if they have it is Bootloader ..
So Arduino Codes Consists of 3 Main Sectors " Functions "
1) Setup
2) Loop
3) Empty Space " Global Space "
1) Setup is a Sector "Function" That has codes that will occur only 1 Time when your Arduino powered Up and Start Working and it is Codes Write Between it is { } Brackets ..
And This Sector Is Used Mainly for Configuring PinHeaders , Make an Initual Event you need to do it only once ..
2) Loop is a sector "Function " that repeat itself more and more after the setup functions End and We write them as Setup which inside { } Brackets ..
And all Actions occurs here .. Like Digital Output or Reading Input or Make a Pulse width Modulation to control something depending on Time .. and all conditions and Loops will be here ..
3) Empty Space " Global Space " is the prefered area if this your first time to use arduino or programming is the prefered place to define the Variables you are going to use ..
So this is space is outside the 2 Brackets of the Loop and Setup .. You can Define Variables anywhere there ..
Keywords for Programming Using Arduino :
Int : is a function to declare a work you are going to use is a Variable that is value is an Integer Number
ex: int x = 0 ;
Float : is a function to declare a work you are going to use is a Variable that is value is a Float Number
ex: float x = 0 ;
Char : is a function to declare a work you are going to use is a Variable that is value is a 1 Charachter
ex: char x = 'a' ;
If : is a fuction used to compare between values and Based on that start make Decision ..
ex: if (x==1) {digitalWrite(omar,HIGH);}
For : is a Fuction used to make an order for a number of times called Loop
ex:
for (int i = 0 ; i!= 10 ; i++){
    digitalWrite(omar,HIGH);
    delay(1000);
    digitalWrite(omar,LOW);
    delay(1000);
    }
While : like for Exactly same Concept ..
    int i = 0 ;
    while(i!=10)
    {
    digitalWrite(omar,HIGH);
    delay(1000);
    digitalWrite(omar,LOW);
    delay(1000);
    i=i+1;
    }
PinMode : is a function that used for Configure pin is Input or Output ..
M must be Capatial at pinMode
You must Write OUTPUT and INPUT all Capital ..
ex: pinMode(13,OUTPUT);
digitalWrite : is a function used to send a signal on a pin which is must configured before to be OUTPUT ..
W in digitalWrite must be Capital .. HIGH and LOW must be all Capital ..
ex:digitalWrite(3,HIGH);
digitalRead : Is a funtion which return the value of pin and store it at a variable ..
R in digitalRead must be Capital ..
ex:int x = digitalRead(3);
analogWrite : is a function used to send a signal on a pin which is must configured before to be OUTPUT but it send a value not HIGH and LOW.. Send Value from 0 to 255 .
W in digitalWrite must be Capital ..
ex:analogWrite(3,100);
analogRead : Is a funtion which return the value of pin and store it at a variable ..
R in digitalRead must be Capital ..
ex:int x = analogRead(3);
Serial.init : Start a Serial Communication we write it inside the Setup Function
ex: Serial.init();
Serial.read : Read data Coming on serial
ex: int x = Serial.read();
Serial.write : Send data through Serial
ex: Serial.write(10);
delay : Is a function that pause all the Arduino for a Period of Time and it receives number which presented in Microseconds ..
ex: delay(1000); // Is a 1 Second
#Include : Is a Statement to add a library Which Contains some Functions that I am Going to use in my code .. We called the file a "HeaderFile"
ex: #include "softwareSerial.h"
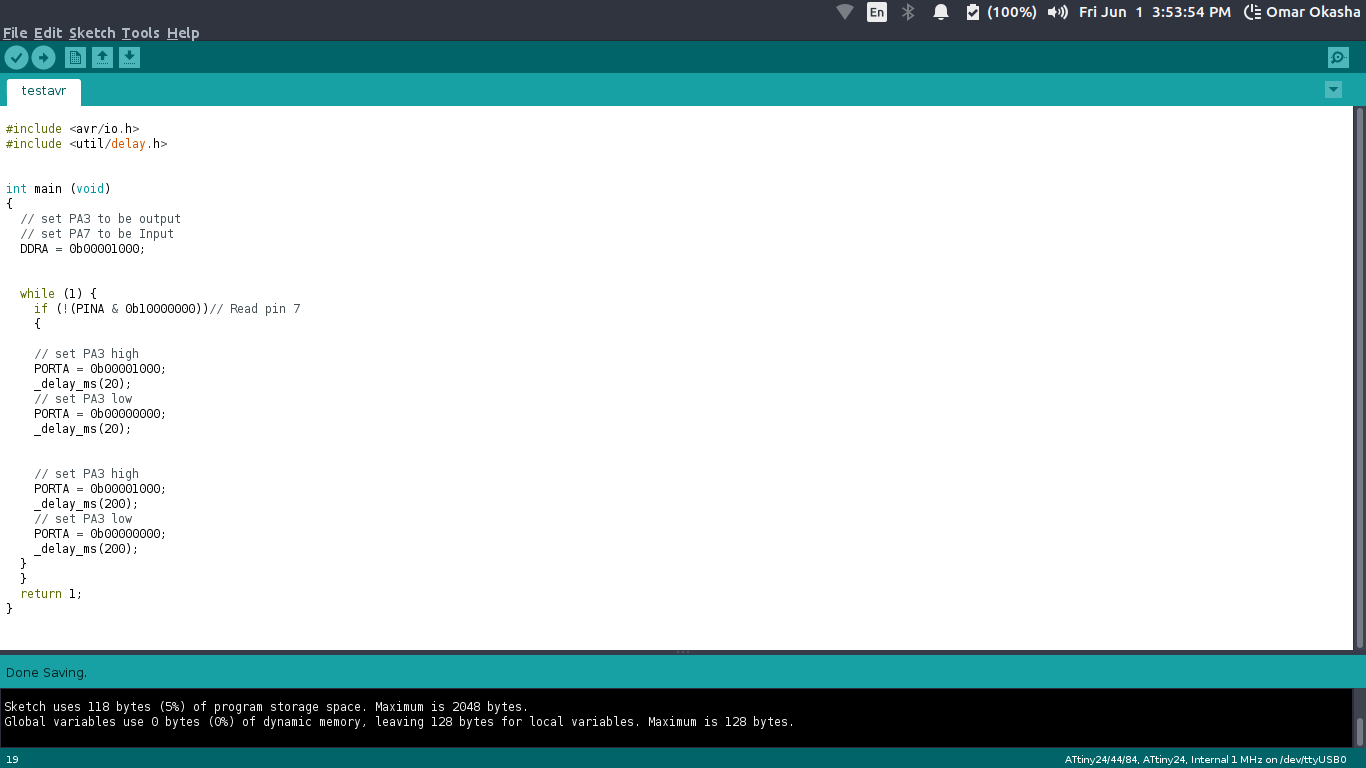
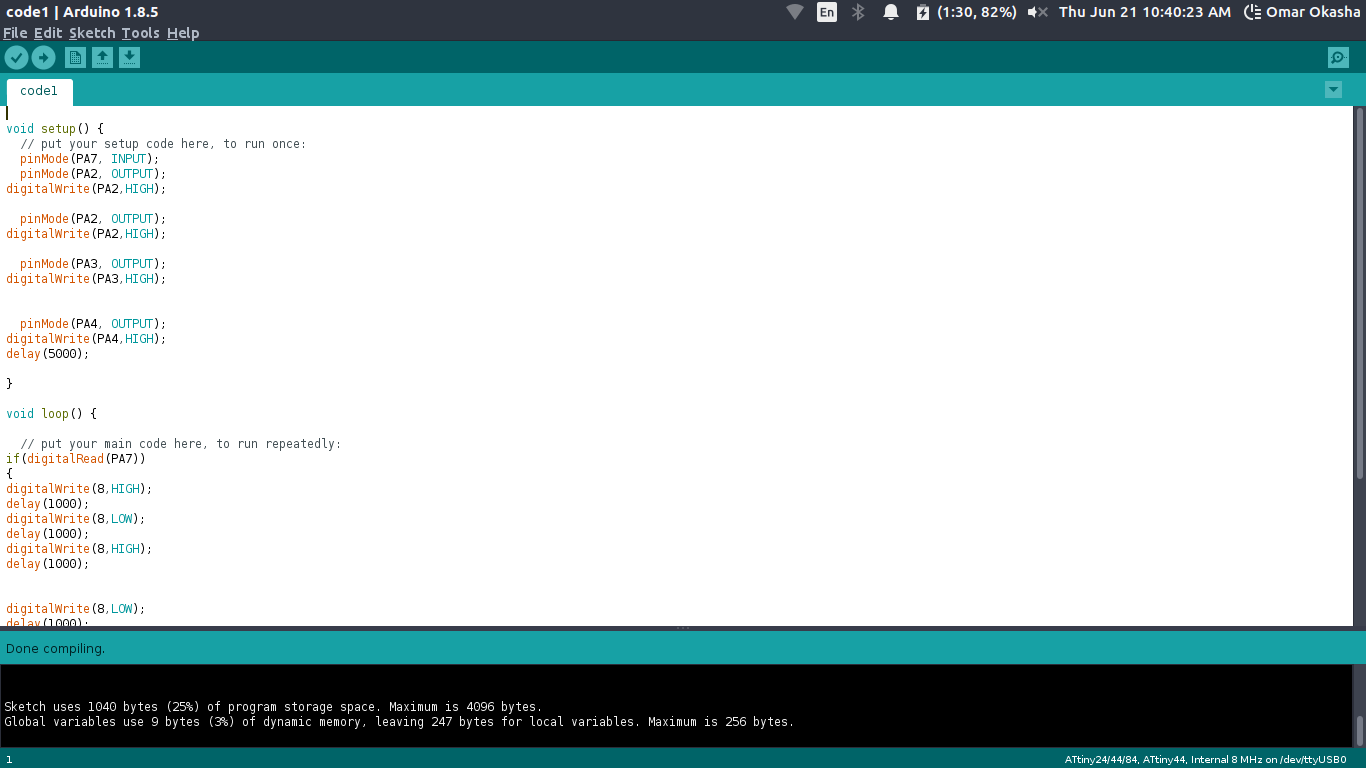
I Here Worked on Programming the Hello Echo Board ..
The code I worked with ..
Arduino Code :
void setup() {
  // put your setup code here, to run once:
  pinMode(PA3, INPUT); //Define Button Input
  pinMode(PA7, OUTPUT); //Define LED Output


delay(5000);

}

void loop() {

  // put your main code here, to run repeatedly:
if(digitalRead(PA3))
{
digitalWrite(PA7,HIGH);
delay(1000);
digitalWrite(PA7,LOW);
delay(1000);
digitalWrite(PA7,HIGH);
delay(1000);


digitalWrite(PA7,LOW);
delay(1000);
digitalWrite(PA7,HIGH);
delay(1000);


digitalWrite(PA7,LOW);
delay(1000);
digitalWrite(PA7,HIGH);
delay(1000);

}


}
AVR Code
#include <avr/io.h>
#include <util/delay.h>


int main (void)
{
  // set PA7 to be output
  // set PA3 to be Input
  DDRA = 0b10000000;


  while (1) {
    if (!(PINA & 0b00001000))
    // Read pin 3

{

    // set PA7 high
    PORTA = 0b10000000;
    _delay_ms(20);
    // set PA7 low
    PORTA = 0b00000000;
    _delay_ms(20);


    // set PA7 high
    PORTA = 0b10000000;
    _delay_ms(200);
    // set PA7 low
    PORTA = 0b00000000;
    _delay_ms(200);
  }
  }
  return 1;
}
Task 3
For configuring the arduino IDE , My arduino IDE is already ready to use with attiny ..
This is compliling the code ..
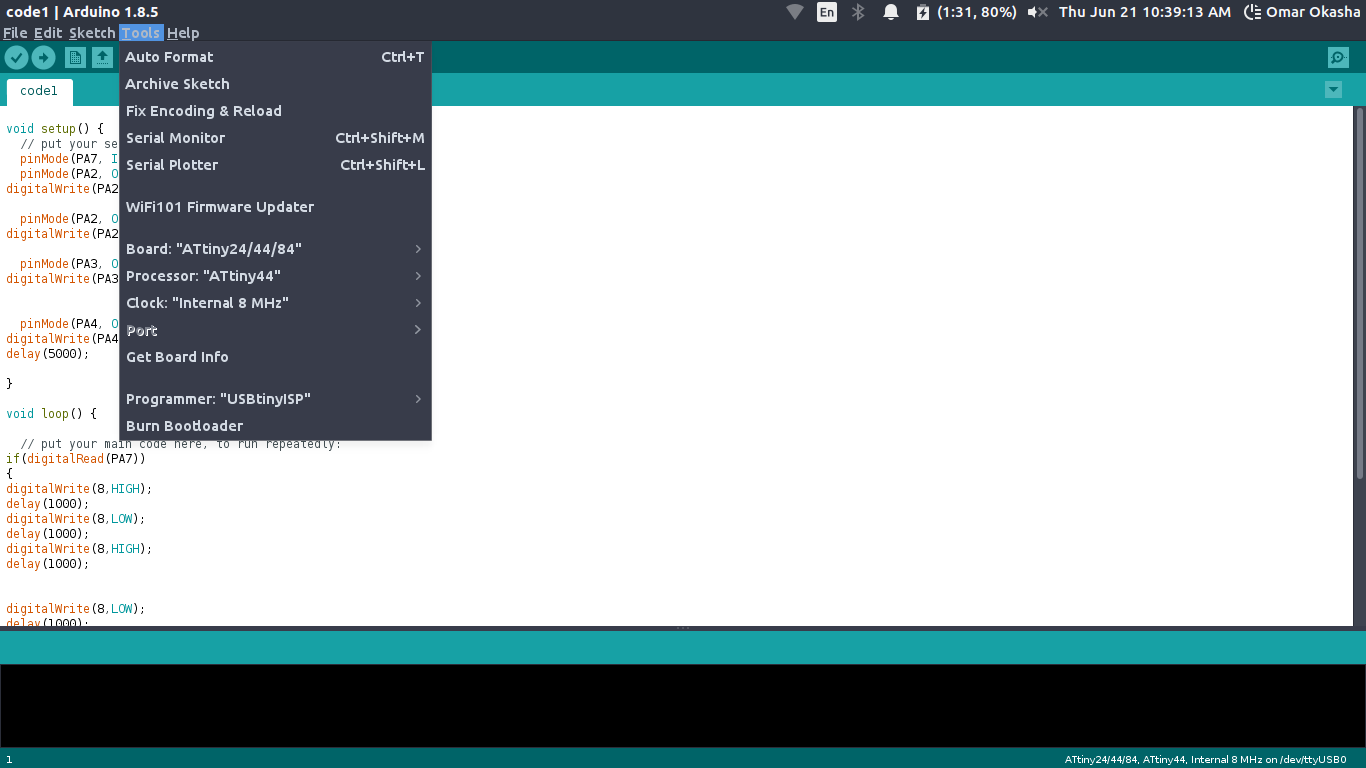
This is the Setting for Upload the code ..
I uploaded it , and Let's Go to test it ..
Task 4 Testing the Circuit ANd This is it :)
Task 5
The Software Development Model I am going to use is the Spiral Model as I need to make a quick Prototyping and get a quick result without having a long planning phase .. also to divide the project to 3 or 4 small wins to feel and can Measure How far I am now in the Project ..
For More Details about Spiral Model Check this Documentation
If this your first time going through Programming .. So You need to Learn how to think like a programmer ..
So Q) What should you do when you encounter a new problem?
Here are the steps:
1. Understand
How to know when you understand a problem? When you can explain it in plain English.
2. Plan
“Given input X, what are the steps necessary to return output Y?”
3. Divide
Do not try to solve one big problem. You will cry.
Once you solved every sub-problem, connect the dots.
4. Stuck?
Debug:
The art of debugging is figuring out what you really told your program to do rather than what you thought you told it to do.
Reassess
Take a step back. Look at the problem from another perspective. Is there anything that can be abstracted to a more general approach?
Research
Search for another solutions because it is 99% someone else phase this problem before ..
Source How to think like a Programmer
My Presentation about this My Presnetation