Week 4
Electronics Production
The theme of this week was "Electronic Production", which provides
tools that let us start from making a printed circuit board with a
milling machine and soldering the components; to load firmware and
test its operation.
The objective of this assignment were:
- Make an in-circuit programmer by milling the PCB.
- Optional: Trying other processes.
Previous experiences
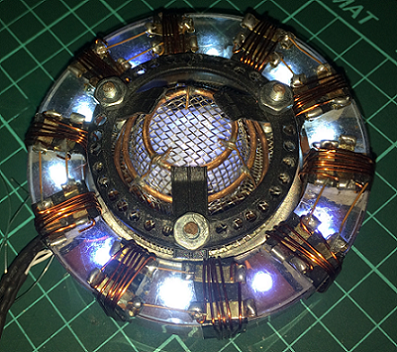
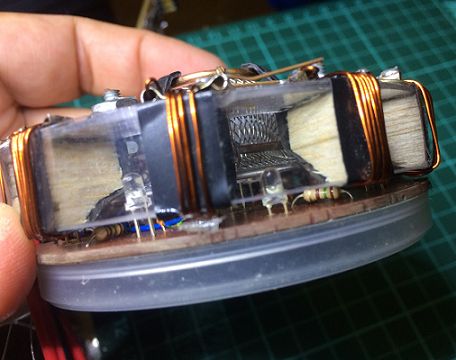
As part of a disguise, a few years ago I made an "Arc Reactor". My first attempt was very rudimentary, only LEDs connected to a switch and some batteries. The light emitted was very strong, but it did not last long, the LEDs began to burn. Because of this experience, I learned that the LEDs must always be protected by a resistance. In the second version, I had the adequate resistance to the voltage, and put everything on a PCB board, for that I used the "home" method of transfer by ironing. Already encouraged by the success of this experiment, I decided to do more details. In these images you can see the result.
As part of a disguise, a few years ago I made an "Arc Reactor". My first attempt was very rudimentary, only LEDs connected to a switch and some batteries. The light emitted was very strong, but it did not last long, the LEDs began to burn. Because of this experience, I learned that the LEDs must always be protected by a resistance. In the second version, I had the adequate resistance to the voltage, and put everything on a PCB board, for that I used the "home" method of transfer by ironing. Already encouraged by the success of this experiment, I decided to do more details. In these images you can see the result.

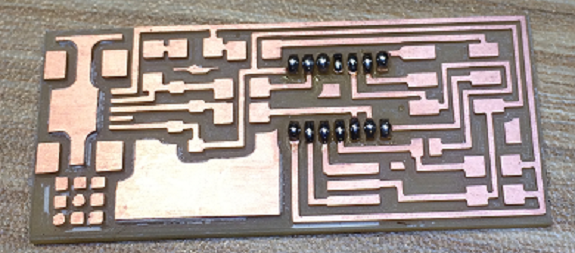
I chose to manufacture the FabISP "hello.ISP.44.res", which is a programmer for AVR microcontrollers. I will use it to program other PCBs that I will do in the next assignments.
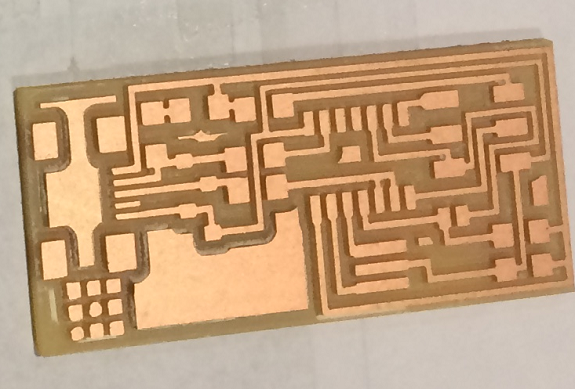
Board
Traces
Interior
Board
Traces
Interior
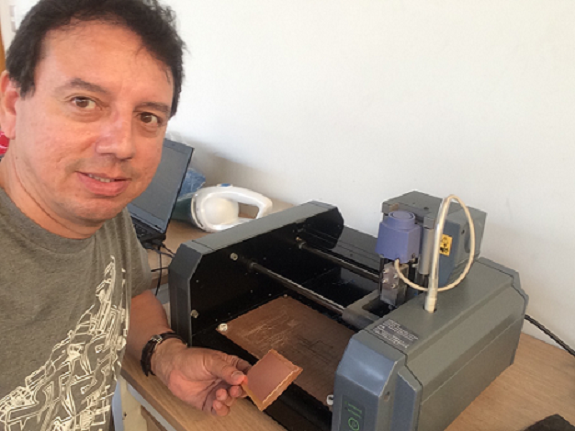
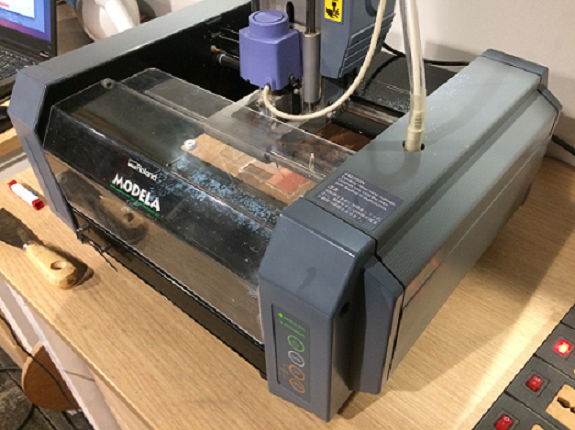
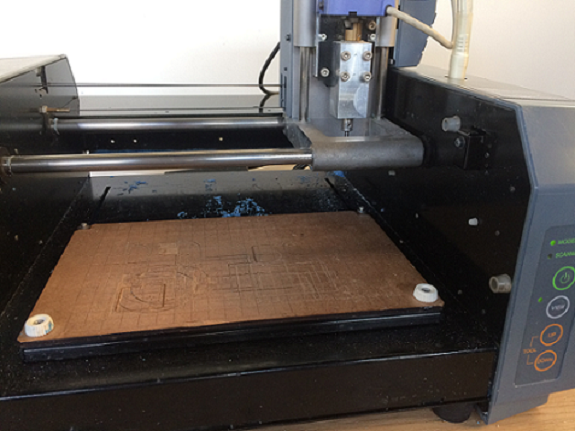
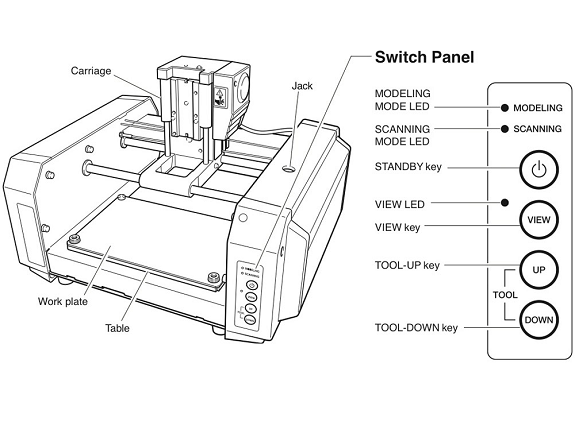
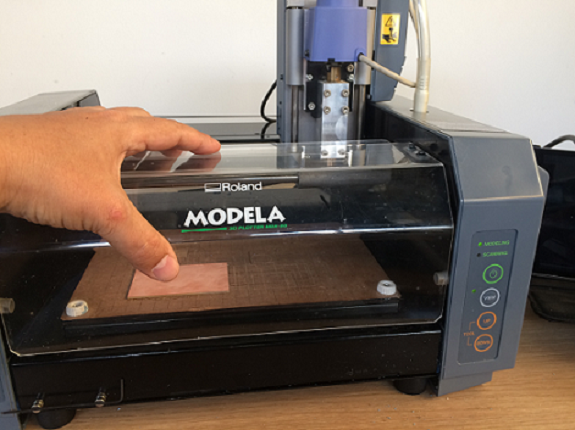
I worked with the Roland's "Modela MDX-20" milling machine. This machine is composed of a mandrel that moves in a carriage from left to right and top to bottom, a board to hold the PCB board that moves from front to back and a command panel. In these images we can see the milling machine and the main parts.
Cautions

- Always turn off the router before changing the cutter
- To avoid accidents, during operation DO NOT introduce anything to the work area.
- In case you notice something is wrong, immediately press the "View" button or the power off button.
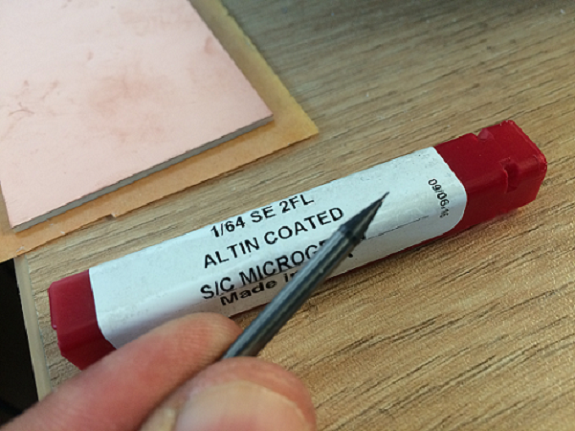
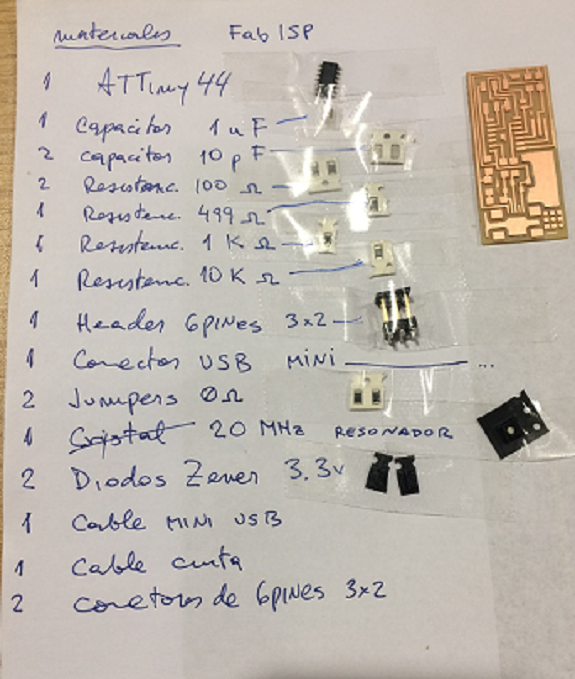
List of Material:
- 3"x 2" PCB board
- 1/64" cutter for engraving
- 1/32" cutter for cutting,
- Roland's milling machine "Modela MDX-20",
- Computer with the milling software.
Start of milling
The manufacturing process of the PCB in the milling machine will be done in two parts:
- Recording of tracks with 1/64" cutter
- PCB board cut with 1/32" cutter
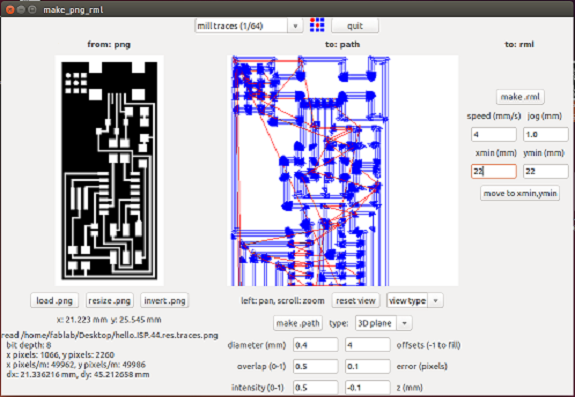
On the computer that is connected to the milling machine, open the milling program with the "sudo fab" command.
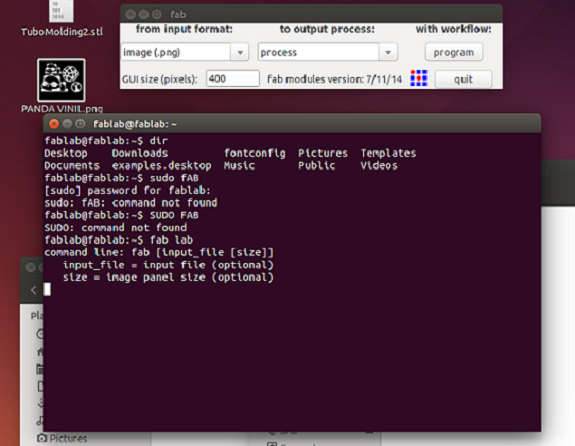
Then, we must select the file with the strokes for the engraving of the tracks.
Choose "mill traces (1/64)" for the recording of the tracks. For the case of cutting it is recommended to choose "cut out (1/32)". Also, the tolerance parameter must be changed to 0.1 error (pixels).
Choose "mill traces (1/64)" for the recording of the tracks. For the case of cutting it is recommended to choose "cut out (1/32)". Also, the tolerance parameter must be changed to 0.1 error (pixels).
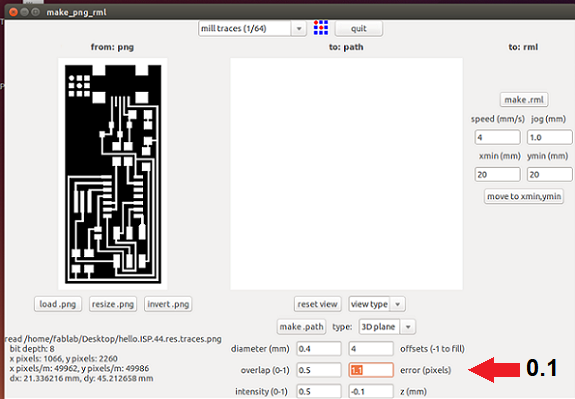
Then, we must click on the "MAKE PATH" button, so that the milling (blue) and displacement (red) routes are calculated.
The (0,0) coordinates are in the lower left part both on the board and in the software.
To prevent the plate from moving during milling, it must be glued with a double contact tape.
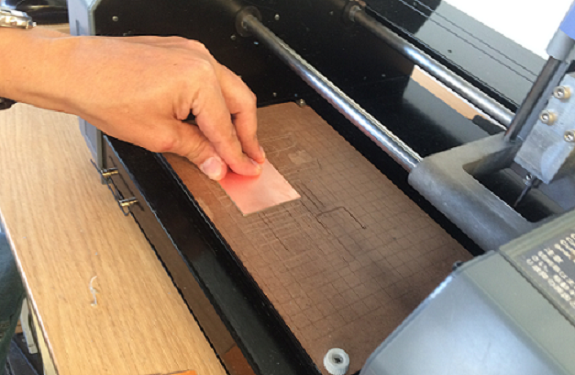
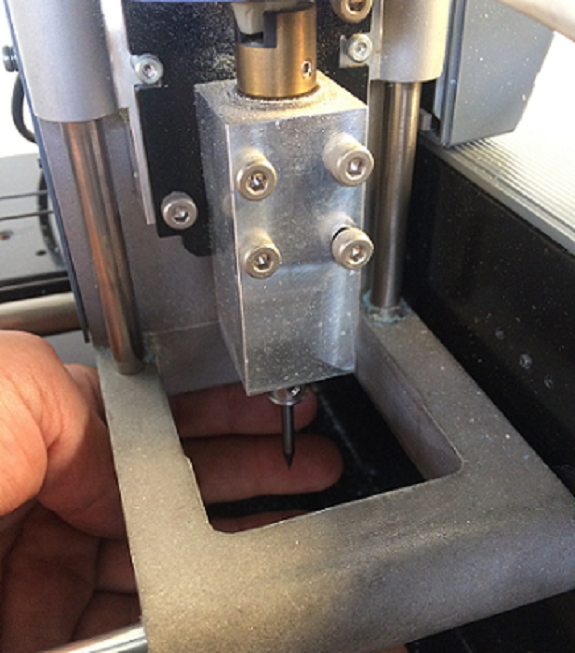
Before starting the milling, the height must be calibrated, for this press the view button so that the milling cutter is positioned in position 0,0. Then in the software enter the Xmin Ymin coordinates and press the "move to Xmin, Ymin" button and very carefully use the "UP" and "DOWN" buttons to bring the bit closer to the surface, it should stop as soon as you notice that they are produced shavings.
As a safety measure, the router only works with the plastic cover in place.
To start milling, click on the button "Send it!"
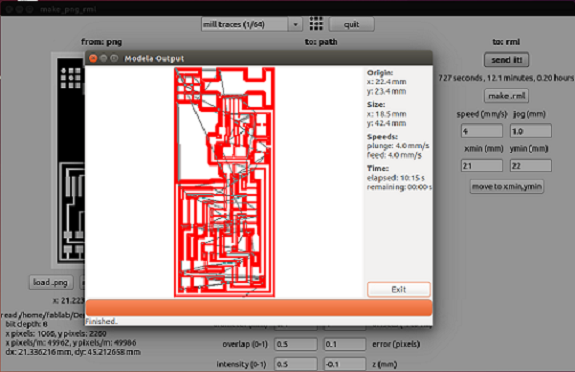
In software we can see the progress of the milling process, as soon as you finish all the strokes will be red.
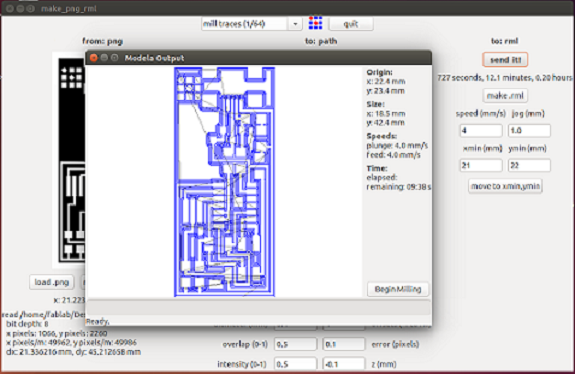
In this video, we can see part of the milling process
Once finished, turn off the router and remove the plastic cover to change the cutter.
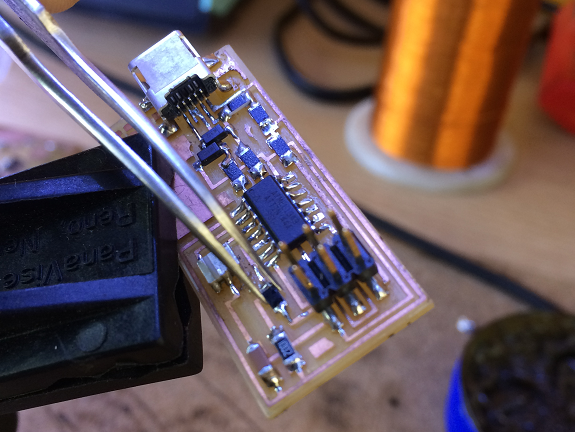
Here we can see the PCB board finished and ready for the next stage "Welding the electronic components".
Welding the components
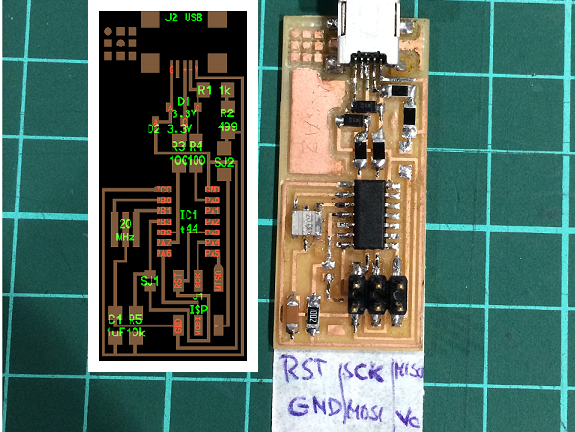
The bill of materials is as follows:
- 1 ATTiny 44 microcontroller Data Sheet (IC1)
- 1 Capacitor 1µF (C1)
- 2 Resistor 100 Ω (R3, R4)
- 1 Resistor 499 Ω (R2)
- 1 Resistor 1K Ω (R1)
- 1 Resistor 10K Ω (R5)
- 1 6-pin header (J1 ISP)
- 1 USB connector (J2 USB)
- 2 jumpers - 0 ohm resistors (SJ1, SJ2)
- 1 Resonator 20MHz (20MHz)
- 2 Zener Diode 3.3V (D1, D2)
- 1 usb mini cable
- 1 ribbon cable
- 2 6-pin connectors
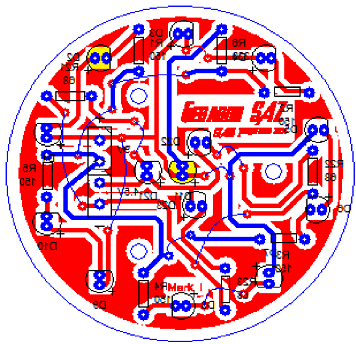
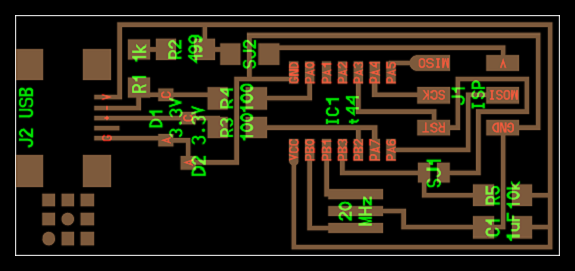
This is the location of the electronic components on the board.
Do not forget
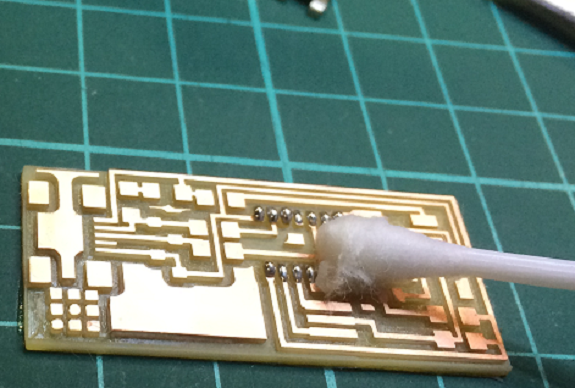
Before starting to solder, the PCB should be cleaned very well, otherwise the soldering will not adhere to the copper surface. In the following image you can see my attempt to solder with the dirty PCB. It took me a long time.
Before starting to solder, the PCB should be cleaned very well, otherwise the soldering will not adhere to the copper surface. In the following image you can see my attempt to solder with the dirty PCB. It took me a long time.
All components must been solder in the following order:
- Mini USB header
- Microcontroller
- Resonator
- Diodes, be careful with their polarity
- Resistances
- Capacitors
- Jumpers, and
- 6pin programming header
Then, we solder the Mini USB connector.
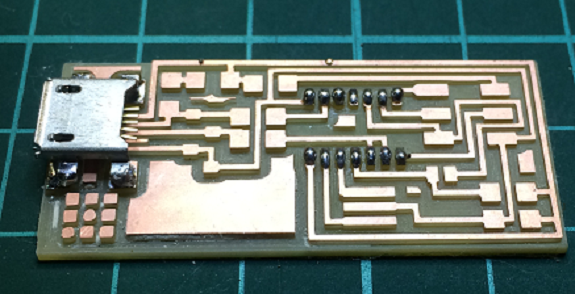
I did not get the mini usb connector for surface mounting, instead I used a micro usb. but to weld it it was necessary to bend the terminals a little.
I did not get the mini usb connector for surface mounting, instead I used a micro usb. but to weld it it was necessary to bend the terminals a little.
Welding the microcontroller took me sometime.
I made a mistake putting solder points on the PCB before the microcontroller.
To fix it I should have used a desoldering wire, but at that time I only had a desoldering pump, I think I would have done it in less time with the desoldering wire.
I made a mistake putting solder points on the PCB before the microcontroller.
To fix it I should have used a desoldering wire, but at that time I only had a desoldering pump, I think I would have done it in less time with the desoldering wire.
Now it's the turn of the resonator.
I did not make the same mistake.
In this design, the resonator replaces the Crystal and two capacitors 10pF.
I did not make the same mistake.
In this design, the resonator replaces the Crystal and two capacitors 10pF.
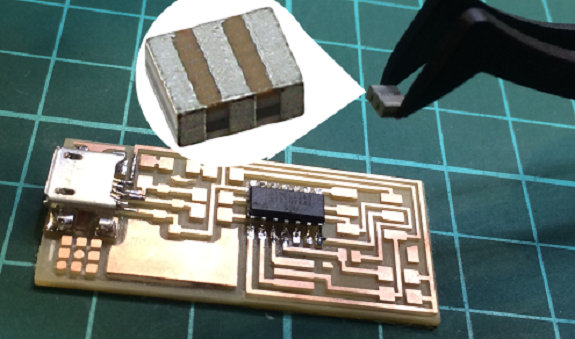
The Zener diodes have polarity, have a line representing the cathode C and
must be soldered as indicated in the following image.
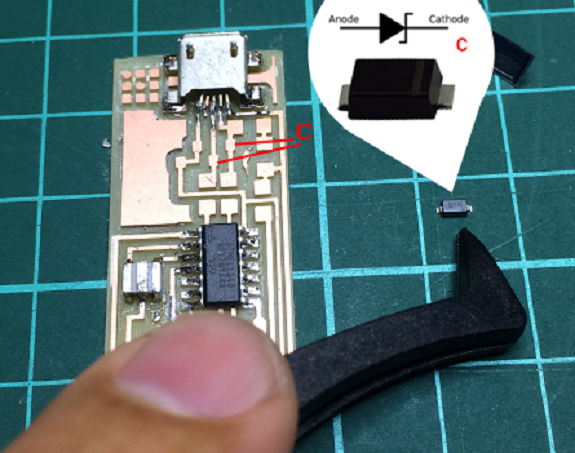
The pieces are so small that you must use tweezers.
You must be careful with the pressure, because they can move during welding, as in this image, or they can jump and fell to the ground, also that happened to me, the microcontroller fell to the ground and I spent 5 minutes in finding it.
To fix the resistor wrong I used the soldering iron, some tweezers, patience and good pulse desolde and re-locate the resistor.

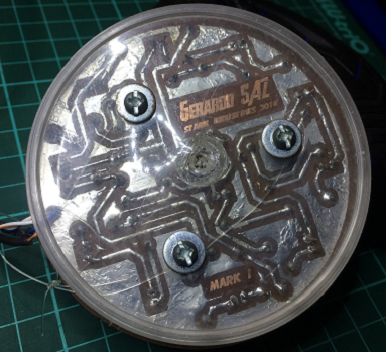
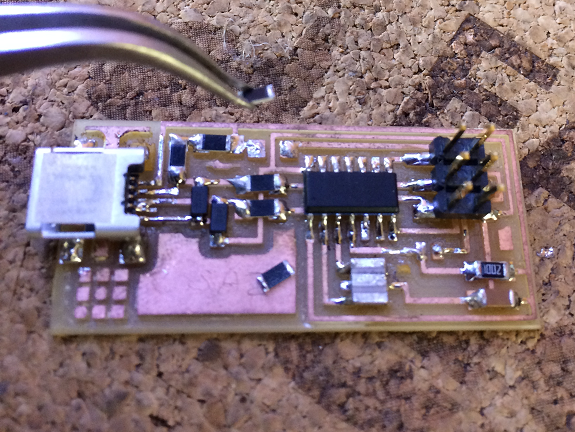
Once finished, we proceed to take it off the table.
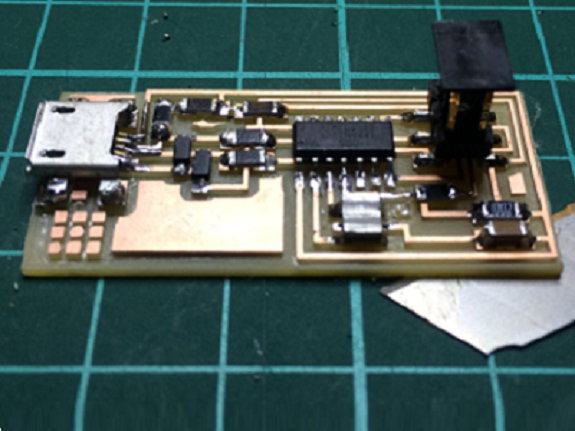
Now, we are ready to start the programming of the new FabISP.
I did the "Smoke Test", I connected the card to the computer through the USB cable and did not detect anything ! ... something must be wrong welded.
I had already checked all the welds and the only one that can be wrong is the micro usb, since its terminals do not touch the copper surface.
I did the "Smoke Test", I connected the card to the computer through the USB cable and did not detect anything ! ... something must be wrong welded.
I had already checked all the welds and the only one that can be wrong is the micro usb, since its terminals do not touch the copper surface.

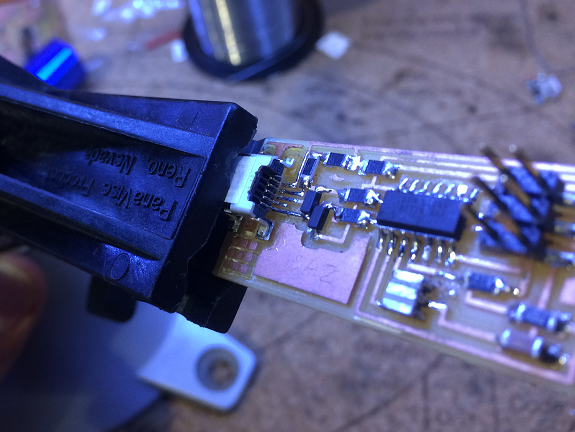
I removed the micro usb connector by heating the contacts, but one of the brackets went out, I hope that with three the new connector can be held, otherwise I will have to redo everything.
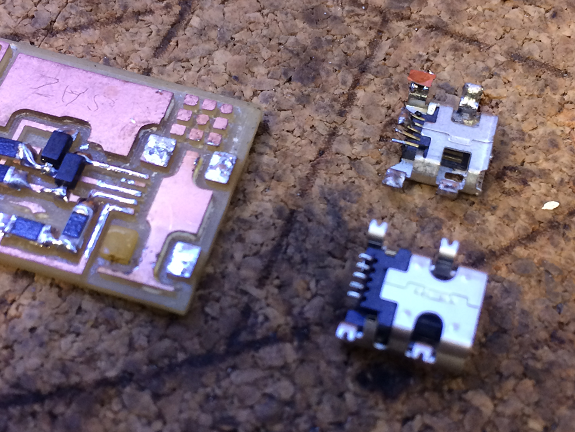
Here we can see both micro and mini usb connectors, the connectors are different.
I secured the card and connector to a bracket without pressing too much and proceeded to weld the legs and connectors.
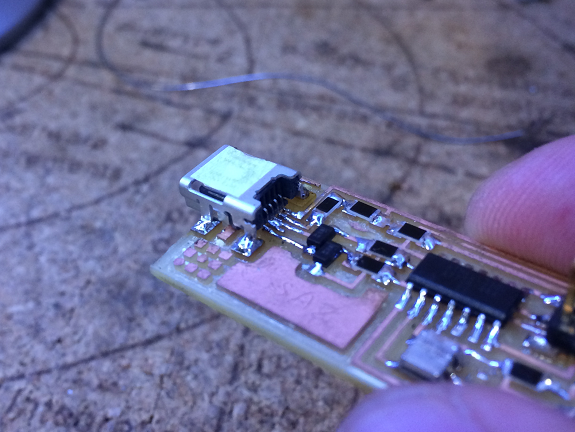
Here we can see the welded connector in its place.
Again I tried the USB connection and this time recognized the presence of a card. Now if we go to the programming phase of FabISP.
Again I tried the USB connection and this time recognized the presence of a card. Now if we go to the programming phase of FabISP.
FabISP programming
Before installing the software for AVR programming, we must identify the pins of the 2x3 pin header taking as reference the GND pin, otherwise we could connect the ISP connection cable backwards.
To program the FabISP I needed to install Avrdude. There is a version of AVRDUDE for Windows 10, but it is not reliable, it is best to install the bash of Ubuntu for Windows 10 and from there run Avrdude.
Here is the link with the explanation:
Ubuntu for windows 10.
Here is the link with the explanation:
Ubuntu for windows 10.
To install AVRDUDE, the following command is executed.
sudo apt-get install flex byacc bison gcc libusb-dev avrdude.
To start the installation the BASH program is executed, this creates a session of Ubuntu in Windows 10.
root@TOSHIBA:/mnt/c/Windows/System32# sudo apt-get install flex byacc bison gcc libusb-dev avrdude.
Reading package lists... Done
Building dependency tree
Reading state information... Done
E: Unable to locate package avrdude
E: Unable to locate package gcc-avr
E: Unable to locate package avr-libc
root@TOSHIBA:/mnt/c/Windows/System32#
Reading package lists... Done
Building dependency tree
Reading state information... Done
E: Unable to locate package avrdude
E: Unable to locate package gcc-avr
E: Unable to locate package avr-libc
root@TOSHIBA:/mnt/c/Windows/System32#
But I received an error message, the packages were not installed.
To fix this I should update the ubuntu with the command:
then asked for the user's password and started updating
sudo apt-get update
then asked for the user's password and started updating
root@TOSHIBA:/mnt/c/Windows/System32# su gsaz
gsaz@TOSHIBA:/mnt/c/Windows/System32$ sudo apt-get update
[sudo] password for gsaz:
Hit:1 http://archive.ubuntu.com/ubuntu xenial InRelease
Get:2 http://security.ubuntu.com/ubuntu xenial-security InRelease [102 kB]
Get:3 http://archive.ubuntu.com/ubuntu xenial-updates InRelease [102 kB]
Get:4 http://archive.ubuntu.com/ubuntu xenial-backports InRelease [102 kB]
Get:5 http://archive.ubuntu.com/ubuntu xenial/universe amd64 Packages [7,532 kB]
Get:6 http://security.ubuntu.com/ubuntu xenial-security/main amd64 Packages [465 kB]
Get:7 http://security.ubuntu.com/ubuntu xenial-security/main Translation-en [201 kB]
Get:8 http://security.ubuntu.com/ubuntu xenial-security/restricted amd64 Packages [7,224 B]
Get:9 http://security.ubuntu.com/ubuntu xenial-security/restricted Translation-en [2,152 B]
Get:10 http://security.ubuntu.com/ubuntu xenial-security/universe amd64 Packages [329 kB]
Get:11 http://security.ubuntu.com/ubuntu xenial-security/universe Translation-en [122 kB]
Get:12 http://security.ubuntu.com/ubuntu xenial-security/multiverse amd64 Packages [3,208 B]
Get:13 http://security.ubuntu.com/ubuntu xenial-security/multiverse Translation-en [1,408 B]
Get:14 http://archive.ubuntu.com/ubuntu xenial/universe Translation-en [4,354 kB]
Get:15 http://archive.ubuntu.com/ubuntu xenial/multiverse amd64 Packages [144 kB]
Get:16 http://archive.ubuntu.com/ubuntu xenial/multiverse Translation-en [106 kB]
Get:17 http://archive.ubuntu.com/ubuntu xenial-updates/main amd64 Packages [744 kB]
Get:18 http://archive.ubuntu.com/ubuntu xenial-updates/main Translation-en [308 kB]
Get:19 http://archive.ubuntu.com/ubuntu xenial-updates/restricted amd64 Packages [7,560 B]
Get:20 http://archive.ubuntu.com/ubuntu xenial-updates/restricted Translation-en [2,272 B]
Get:21 http://archive.ubuntu.com/ubuntu xenial-updates/universe amd64 Packages [606 kB]
Get:22 http://archive.ubuntu.com/ubuntu xenial-updates/universe Translation-en [244 kB]
Get:23 http://archive.ubuntu.com/ubuntu xenial-updates/multiverse amd64 Packages [16.2 kB]
Get:24 http://archive.ubuntu.com/ubuntu xenial-updates/multiverse Translation-en [8,052 B]
Get:25 http://archive.ubuntu.com/ubuntu xenial-backports/main amd64 Packages [4,836 B]
Get:26 http://archive.ubuntu.com/ubuntu xenial-backports/main Translation-en [3,220 B]
Get:27 http://archive.ubuntu.com/ubuntu xenial-backports/universe amd64 Packages [7,084 B]
Get:28 http://archive.ubuntu.com/ubuntu xenial-backports/universe Translation-en [3,812 B]
Fetched 15.5 MB in 19s (808 kB/s)
Reading package lists... Done
gsaz@TOSHIBA:/mnt/c/Windows/System32$
Again I executed the command:
sudo apt-get install flex byacc bison gcc libusb-dev avrdude
gsaz@TOSHIBA:/mnt/c/Windows/System32$ sudo apt-get install flex byacc bison gcc libusb-dev avrdude
Reading package lists... Done
Building dependency tree
Reading state information... Done
gcc is already the newest version.
The following extra packages will be installed:
libbison-dev libfl-dev libftdi1 m4
Suggested packages:
avrdude-doc bison-doc
The following NEW packages will be installed:
avrdude bison byacc flex libbison-dev libfl-dev libftdi1 libusb-dev m4
0 upgraded, 9 newly installed, 0 to remove and 0 not upgraded.
Need to get 1.397 kB of archives.
After this operation, 4.215 kB of additional disk space will be used.
Do you want to continue? [Y/n] y
Get:1 http://pe.archive.ubuntu.com/ubuntu/ trusty/main m4 amd64 1.4.17-2ubuntu1 [195 kB]
Get:2 http://pe.archive.ubuntu.com/ubuntu/ trusty/main libfl-dev amd64 2.5.35-10.1ubuntu2 [17,2 kB]
Get:3 http://pe.archive.ubuntu.com/ubuntu/ trusty/main flex amd64 2.5.35-10.1ubuntu2 [211 kB]
Get:4 http://pe.archive.ubuntu.com/ubuntu/ trusty/main libftdi1 amd64 0.20-1ubuntu1 [15,1 kB]
Get:5 http://pe.archive.ubuntu.com/ubuntu/ trusty/main libbison-dev amd64 2:3.0.2.dfsg-2 [338 kB]
Get:6 http://pe.archive.ubuntu.com/ubuntu/ trusty/main bison amd64 2:3.0.2.dfsg-2 [257 kB]
Get:7 http://pe.archive.ubuntu.com/ubuntu/ trusty/main libusb-dev amd64 2:0.1.12-23.3ubuntu1 [28,9 kB]
Get:8 http://pe.archive.ubuntu.com/ubuntu/ trusty/universe avrdude amd64 6.0.1-1 [289 kB]
Get:9 http://pe.archive.ubuntu.com/ubuntu/ trusty/universe byacc amd64 20140101-1 [46,5 kB]
Fetched 1.397 kB in 4s (288 kB/s)
Selecting previously unselected package m4.
(Reading database ... 270990 files and directories currently installed.)
Preparing to unpack .../m4_1.4.17-2ubuntu1_amd64.deb ...
Unpacking m4 (1.4.17-2ubuntu1) ...
Selecting previously unselected package libfl-dev:amd64.
Preparing to unpack .../libfl-dev_2.5.35-10.1ubuntu2_amd64.deb ...
Unpacking libfl-dev:amd64 (2.5.35-10.1ubuntu2) ...
Selecting previously unselected package flex.
Preparing to unpack .../flex_2.5.35-10.1ubuntu2_amd64.deb ...
Unpacking flex (2.5.35-10.1ubuntu2) ...
Selecting previously unselected package libftdi1:amd64.
Preparing to unpack .../libftdi1_0.20-1ubuntu1_amd64.deb ...
Unpacking libftdi1:amd64 (0.20-1ubuntu1) ...
Selecting previously unselected package libbison-dev:amd64.
Preparing to unpack .../libbison-dev_2%3a3.0.2.dfsg-2_amd64.deb ...
Unpacking libbison-dev:amd64 (2:3.0.2.dfsg-2) ...
Selecting previously unselected package bison.
Preparing to unpack .../bison_2%3a3.0.2.dfsg-2_amd64.deb ...
Unpacking bison (2:3.0.2.dfsg-2) ...
Selecting previously unselected package libusb-dev.
Preparing to unpack .../libusb-dev_2%3a0.1.12-23.3ubuntu1_amd64.deb ...
Unpacking libusb-dev (2:0.1.12-23.3ubuntu1) ...
Selecting previously unselected package avrdude.
Preparing to unpack .../avrdude_6.0.1-1_amd64.deb ...
Unpacking avrdude (6.0.1-1) ...
Selecting previously unselected package byacc.
Preparing to unpack .../byacc_20140101-1_amd64.deb ...
Unpacking byacc (20140101-1) ...
Processing triggers for man-db (2.6.7.1-1ubuntu1) ...
Processing triggers for install-info (5.2.0.dfsg.1-2) ...
Processing triggers for doc-base (0.10.5) ...
Processing 1 added doc-base file...
Registering documents with scrollkeeper...
Setting up m4 (1.4.17-2ubuntu1) ...
Setting up libfl-dev:amd64 (2.5.35-10.1ubuntu2) ...
Setting up flex (2.5.35-10.1ubuntu2) ...
Setting up libftdi1:amd64 (0.20-1ubuntu1) ...
Setting up libbison-dev:amd64 (2:3.0.2.dfsg-2) ...
Setting up bison (2:3.0.2.dfsg-2) ...
update-alternatives: using /usr/bin/bison.yacc to provide /usr/bin/yacc (yacc) in auto mode
Setting up libusb-dev (2:0.1.12-23.3ubuntu1) ...
Setting up avrdude (6.0.1-1) ...
Setting up byacc (20140101-1) ...
Processing triggers for libc-bin (2.19-0ubuntu6.14) ...
Then the next command installed the gcc-avr package
sudo apt-get install gcc-avr
gsaz@TOSHIBA:/mnt/c/Windows/System32$ sudo apt-get install gcc-avr
Reading package lists... Done
Building dependency tree
Reading state information... Done
The following extra packages will be installed:
binutils-avr
Suggested packages:
task-c-devel gcc-doc gcc-4.2 avr-libc
The following NEW packages will be installed:
binutils-avr gcc-avr
0 upgraded, 2 newly installed, 0 to remove and 0 not upgraded.
Need to get 12,6 MB of archives.
After this operation, 67,3 MB of additional disk space will be used.
Do you want to continue? [Y/n] y
Get:1 http://pe.archive.ubuntu.com/ubuntu/ trusty/universe binutils-avr amd64 2.23.1-2.1 [1.312 kB]
Get:2 http://pe.archive.ubuntu.com/ubuntu/ trusty/universe gcc-avr amd64 1:4.8-2.1 [11,3 MB]
Fetched 12,6 MB in 5s (2.305 kB/s)
Selecting previously unselected package binutils-avr.
(Reading database ... 271216 files and directories currently installed.)
Preparing to unpack .../binutils-avr_2.23.1-2.1_amd64.deb ...
Unpacking binutils-avr (2.23.1-2.1) ...
Selecting previously unselected package gcc-avr.
Preparing to unpack .../gcc-avr_1%3a4.8-2.1_amd64.deb ...
Unpacking gcc-avr (1:4.8-2.1) ...
Processing triggers for man-db (2.6.7.1-1ubuntu1) ...
Setting up binutils-avr (2.23.1-2.1) ...
Setting up gcc-avr (1:4.8-2.1) ...
later, to install the avr-libc library I executed the command.
sudo apt-get install avr-libc
gsaz@TOSHIBA:/mnt/c/Windows/System32$ sudo apt-get install avr-libc
Reading package lists... Done
Building dependency tree
Reading state information... Done
The following NEW packages will be installed:
avr-libc
0 upgraded, 1 newly installed, 0 to remove and 0 not upgraded.
Need to get 2.859 kB of archives.
After this operation, 31,8 MB of additional disk space will be used.
Get:1 http://pe.archive.ubuntu.com/ubuntu/ trusty/universe avr-libc all 1:1.8.0-4.1 [2.859 kB]
Fetched 2.859 kB in 4s (680 kB/s)
Selecting previously unselected package avr-libc.
(Reading database ... 271632 files and directories currently installed.)
Preparing to unpack .../avr-libc_1%3a1.8.0-4.1_all.deb ...
Unpacking avr-libc (1:1.8.0-4.1) ...
Setting up avr-libc (1:1.8.0-4.1) ...
finally, I installed libc6-dev library.
sudo apt-get install libc6-devWell, apparently, it was already installed.
gsaz@TOSHIBA:/mnt/c/Windows/System32$ sudo apt-get install libc6-dev
Reading package lists... Done
Building dependency tree
Reading state information... Done
libc6-dev is already the newest version.
0 upgraded, 0 newly installed, 0 to remove and 0 not upgraded.
Reading package lists... Done
Building dependency tree
Reading state information... Done
libc6-dev is already the newest version.
0 upgraded, 0 newly installed, 0 to remove and 0 not upgraded.
Get and build the Firmware
To build the firmware I downloaded the file: Firmware source code and unzipped it.
To build the firmware I downloaded the file: Firmware source code and unzipped it.
I changed to the firmware directory.
then I edited the Makefile file.
gsaz@TOSHIBA:/mnt/c/Windows/System32$ cd \
>
gsaz@TOSHIBA:~$ cd Documents
gsaz@TOSHIBA:~/Documents$ ls
firmware
firmware.zip
gsaz@TOSHIBA:~/Documents$ cd firmware
gsaz@TOSHIBA:~/Documents/firmware$ ls
main.c
main.elf
main.hex
main.o
Makefile
Makefile~
usbconfig.h
usbdrv
>
gsaz@TOSHIBA:~$ cd Documents
gsaz@TOSHIBA:~/Documents$ ls
firmware
firmware.zip
gsaz@TOSHIBA:~/Documents$ cd firmware
gsaz@TOSHIBA:~/Documents/firmware$ ls
main.c
main.elf
main.hex
main.o
Makefile
Makefile~
usbconfig.h
usbdrv
To program my FabISP I used another FabISP, so I located the lines:
#AVRDUDE = avrdude -c usbtiny -p $ (DEVICE)and I exchanged the symbol # (everything that is after this symbol will be ignored in the execution), thus:
AVRDUDE = avrdude -c avrisp2 -P usb -p $ (DEVICE)
AVRDUDE = avrdude -c usbtiny -p $ (DEVICE)
#AVRDUDE = avrdude -c avrisp2 -P usb -p $ (DEVICE)
next I compiled the firmware with the command
make clean
gsaz@TOSHIBA:~/Documents/firmware$ make clean
rm -f main.hex main.lst main.obj main.cof main.list main.map main.eep.hex
main.elf *.o usbdrv/*.o main.s usbdrv/oddebug.s usbdrv/usbdrv.s
rm -f main.hex main.lst main.obj main.cof main.list main.map main.eep.hex
main.elf *.o usbdrv/*.o main.s usbdrv/oddebug.s usbdrv/usbdrv.s
the next step was to compile the hexadecimal file with the command:
make hex
gsaz@TOSHIBA:~/Documents/firmware$ make hex
avr-gcc -Wall -Os -DF_CPU=20000000 -Iusbdrv -I. -DDEBUG_LEVEL=0
-mmcu=attiny44 -c usbdrv/usbdrv.c -o usbdrv/usbdrv.o
avr-gcc -Wall -Os -DF_CPU=20000000 -Iusbdrv -I. -DDEBUG_LEVEL=0
-mmcu=attiny44 -x assembler-with-cpp -c usbdrv/usbdrvasm.S -o usbdrv/usbdrvasm.o
avr-gcc -Wall -Os -DF_CPU=20000000 -Iusbdrv -I. -DDEBUG_LEVEL=0
-mmcu=attiny44 -c usbdrv/oddebug.c -o usbdrv/oddebug.o
avr-gcc -Wall -Os -DF_CPU=20000000 -Iusbdrv -I. -DDEBUG_LEVEL=0
-mmcu=attiny44 -c main.c -o main.o
main.c:88:13: warning: always_inline function might not be inlinable [-Wattributes]
static void delay ( void )
avr-gcc -Wall -Os -DF_CPU=20000000 -Iusbdrv -I. -DDEBUG_LEVEL=0
-mmcu=attiny44 -o main.elf usbdrv/usbdrv.o usbdrv/usbdrvasm.o usbdrv/oddebug.o main.o
rm -f main.hex main.eep.hex
avr-objcopy -j .text -j .data -O ihex main.elf main.hex
avr-size main.hex
avr-gcc -Wall -Os -DF_CPU=20000000 -Iusbdrv -I. -DDEBUG_LEVEL=0
-mmcu=attiny44 -c usbdrv/usbdrv.c -o usbdrv/usbdrv.o
avr-gcc -Wall -Os -DF_CPU=20000000 -Iusbdrv -I. -DDEBUG_LEVEL=0
-mmcu=attiny44 -x assembler-with-cpp -c usbdrv/usbdrvasm.S -o usbdrv/usbdrvasm.o
avr-gcc -Wall -Os -DF_CPU=20000000 -Iusbdrv -I. -DDEBUG_LEVEL=0
-mmcu=attiny44 -c usbdrv/oddebug.c -o usbdrv/oddebug.o
avr-gcc -Wall -Os -DF_CPU=20000000 -Iusbdrv -I. -DDEBUG_LEVEL=0
-mmcu=attiny44 -c main.c -o main.o
main.c:88:13: warning: always_inline function might not be inlinable [-Wattributes]
static void delay ( void )
avr-gcc -Wall -Os -DF_CPU=20000000 -Iusbdrv -I. -DDEBUG_LEVEL=0
-mmcu=attiny44 -o main.elf usbdrv/usbdrv.o usbdrv/usbdrvasm.o usbdrv/oddebug.o main.o
rm -f main.hex main.eep.hex
avr-objcopy -j .text -j .data -O ihex main.elf main.hex
avr-size main.hex
| text | data | bss | dec | hex | filename |
| 0 | 2002 | 0 | 2002 | 7d2 | main.hex |
Out of curiosity, I ran the lsusb command to see the usb ports.
gsaz@TOSHIBA:~/Documents/firmware$ lsusb
Bus 002 Device 002: ID 8087:8000 Intel Corp.
Bus 002 Device 001: ID 1d6b:0002 Linux Foundation 2.0 root hub
Bus 001 Device 002: ID 8087:8008 Intel Corp.
Bus 001 Device 001: ID 1d6b:0002 Linux Foundation 2.0 root hub
Bus 004 Device 001: ID 1d6b:0003 Linux Foundation 3.0 root hub
Bus 003 Device 004: ID 138a:0017 Validity Sensors, Inc. Fingerprint Reader
Bus 003 Device 007: ID 1781:0c9f Multiple Vendors USBtiny
Bus 003 Device 002: ID 046d:c05a Logitech, Inc. M90/M100 Optical Mouse
Bus 003 Device 006: ID 5986:0268 Acer, Inc
Bus 003 Device 005: ID 8087:07dc Intel Corp.
Bus 003 Device 001: ID 1d6b:0002 Linux Foundation 2.0 root hub
then I set the fuses to work with the internal clock with the command
make fuseI got an error, ...sudo command is missing.
gsaz@TOSHIBA:~/Documents/firmware$ make fuse
avrdude -c usbtiny -p attiny44 -U hfuse:w:0xDF:m -U lfuse:w:0xFF:m
avrdude: error: usbtiny_transmit: error sending control message: Operation not permitted
avrdude: initialization failed, rc=-1
Double check connections and try again, or use -F to override
this check.
avrdude: error: usbtiny_transmit: error sending control message: Operation not permitted
avrdude done. Thank you.
make: *** [fuse] Error 1
I tried again, but with the sudo command and readjusted the contacts.
sudo make fuse
gsaz@TOSHIBA:~/Documents/firmware$ sudo make fuse
avrdude -c usbtiny -p attiny44 -U hfuse:w:0xDF:m -U lfuse:w:0xFF:m
avrdude: AVR device initialized and ready to accept instructions
Reading | ################################################## | 100% 0.00s
avrdude: Device signature = 0x1e9207
avrdude: reading input file "0xDF"
avrdude: writing hfuse (1 bytes):
Writing | ################################################## | 100% 0.00s
avrdude: 1 bytes of hfuse written
avrdude: verifying hfuse memory against 0xDF:
avrdude: load data hfuse data from input file 0xDF:
avrdude: input file 0xDF contains 1 bytes
avrdude: reading on-chip hfuse data:
Reading | ################################################## | 100% 0.00s
avrdude: verifying ...
avrdude: 1 bytes of hfuse verified
avrdude: reading input file "0xFF"
avrdude: writing lfuse (1 bytes):
Writing | ################################################## | 100% 0.00s
avrdude: 1 bytes of lfuse written
avrdude: verifying lfuse memory against 0xFF:
avrdude: load data lfuse data from input file 0xFF:
avrdude: input file 0xFF contains 1 bytes
avrdude: reading on-chip lfuse data:
Reading | ################################################## | 100% 0.00s
avrdude: verifying ...
avrdude: 1 bytes of lfuse verified
avrdude: safemode: Fuses OK (H:FF, E:DF, L:FF)
avrdude done. Thank you.
Next, I programmed my FabISP to be an ISP with the command
make program
gsaz@TOSHIBA:~/Documents/firmware$ make program
avrdude -c usbtiny -p attiny44 -U flash:w:main.hex:i
avrdude: error: usbtiny_transmit: error sending control message: Operation not permitted
avrdude: initialization failed, rc=-1
Double check connections and try again, or use -F to override
this check.
avrdude: error: usbtiny_transmit: error sending control message: Operation not permitted
avrdude done. Thank you.
make: *** [flash] Error 1
I got an error, this time it was intentional the omission of the sudo command.
I executed the command again
I executed the command again
sudo make program
gsaz@TOSHIBA:~/Documents/firmware$ sudo make program
avrdude -c usbtiny -p attiny44 -U flash:w:main.hex:i
avrdude: AVR device initialized and ready to accept instructions
Reading | ################################################## | 100% 0.00s
avrdude: Device signature = 0x1e9207
avrdude: NOTE: "flash" memory has been specified, an erase cycle will be performed
To disable this feature, specify the -D option.
avrdude: erasing chip
avrdude: reading input file "main.hex"
avrdude: writing flash (2002 bytes):
Writing | ################################################## | 100% 2.00s
avrdude: 2002 bytes of flash written
avrdude: verifying flash memory against main.hex:
avrdude: load data flash data from input file main.hex:
avrdude: input file main.hex contains 2002 bytes
avrdude: reading on-chip flash data:
Reading | ################################################## | 100% 2.39s
avrdude: verifying ...
avrdude: 2002 bytes of flash verified
avrdude: safemode: Fuses OK (H:FF, E:DF, L:FF)
avrdude done. Thank you.
avrdude -c usbtiny -p attiny44 -U hfuse:w:0xDF:m -U lfuse:w:0xFF:m
avrdude: AVR device initialized and ready to accept instructions
Reading | ################################################## | 100% 0.00s
avrdude: Device signature = 0x1e9207
avrdude: reading input file "0xDF"
avrdude: writing hfuse (1 bytes):
Writing | ################################################## | 100% 0.00s
avrdude: 1 bytes of hfuse written
avrdude: verifying hfuse memory against 0xDF:
avrdude: load data hfuse data from input file 0xDF:
avrdude: input file 0xDF contains 1 bytes
avrdude: reading on-chip hfuse data:
Reading | ################################################## | 100% 0.00s
avrdude: verifying ...
avrdude: 1 bytes of hfuse verified
avrdude: reading input file "0xFF"
avrdude: writing lfuse (1 bytes):
Writing | ################################################## | 100% 0.00s
avrdude: 1 bytes of lfuse written
avrdude: verifying lfuse memory against 0xFF:
avrdude: load data lfuse data from input file 0xFF:
avrdude: input file 0xFF contains 1 bytes
avrdude: reading on-chip lfuse data:
Reading | ################################################## | 100% 0.00s
avrdude: verifying ...
avrdude: 1 bytes of lfuse verified
avrdude: safemode: Fuses OK (H:FF, E:DF, L:FF)
avrdude done. Thank you.
Conclusion: for security, the commands that modify information in a device must be executed with the rights of the super user.

Test the USB Functionality
The lsusb command shows information about the devices connected to the USB ports
The lsusb command shows information about the devices connected to the USB ports
I executed the lsusb command without connecting the FabISP and this is the result. Only the devices connected to the computer are displayed.
gsaz@TOSHIBA:~/Documents/firmware$ lsusb
Bus 002 Device 002: ID 8087:8000 Intel Corp.
Bus 002 Device 001: ID 1d6b:0002 Linux Foundation 2.0 root hub
Bus 001 Device 002: ID 8087:8008 Intel Corp.
Bus 001 Device 001: ID 1d6b:0002 Linux Foundation 2.0 root hub
Bus 004 Device 001: ID 1d6b:0003 Linux Foundation 3.0 root hub
Bus 003 Device 004: ID 138a:0017 Validity Sensors, Inc. Fingerprint Reader
Bus 003 Device 002: ID 046d:c05a Logitech, Inc. M90/M100 Optical Mouse
Bus 003 Device 006: ID 5986:0268 Acer, Inc
Bus 003 Device 005: ID 8087:07dc Intel Corp.
Bus 003 Device 001: ID 1d6b:0002 Linux Foundation 2.0 root hub
This time I connected the FabISP a USB port and executed the command lsusb.
I highlighted in yellow the row with the FabISP information.
I highlighted in yellow the row with the FabISP information.
gsaz@TOSHIBA:~/Documents/firmware$ lsusb
Bus 002 Device 002: ID 8087:8000 Intel Corp.
Bus 002 Device 001: ID 1d6b:0002 Linux Foundation 2.0 root hub
Bus 001 Device 002: ID 8087:8008 Intel Corp.
Bus 001 Device 001: ID 1d6b:0002 Linux Foundation 2.0 root hub
Bus 004 Device 001: ID 1d6b:0003 Linux Foundation 3.0 root hub
Bus 003 Device 004: ID 138a:0017 Validity Sensors, Inc. Fingerprint Reader
Bus 003 Device 002: ID 046d:c05a Logitech, Inc. M90/M100 Optical Mouse
Bus 003 Device 006: ID 5986:0268 Acer, Inc
Bus 003 Device 005: ID 8087:07dc Intel Corp.
Bus 003 Device 015: ID 1781:0c9f Multiple Vendors USBtiny
Bus 003 Device 001: ID 1d6b:0002 Linux Foundation 2.0 root hub
gsaz@TOSHIBA:~/Documents/firmware$
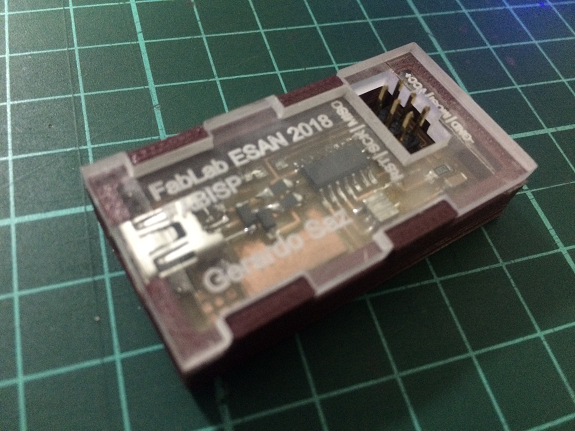
My FabISP is programmed correctly !!
Last step to have a programmer
Last step to have a programmer
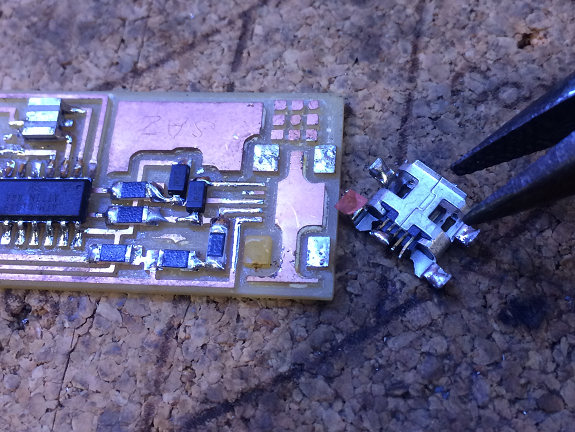
To finish I retired the 0 ohm resistors.
As of this moment my FabISP has become a programmer card and is ready to use it with the next cards that I make.
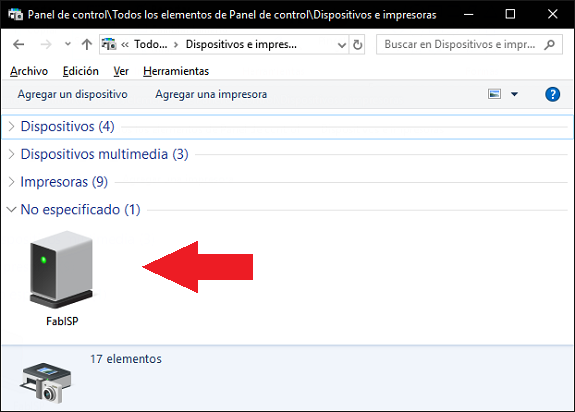
Now from devices and printers in the Control Panel you can see the card fully identified.
Additionally
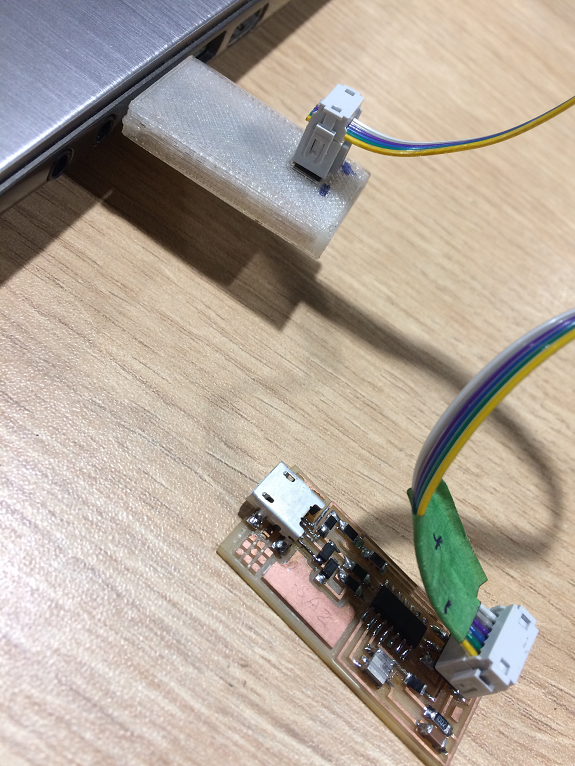
To protect my FabISP, with what I learned in "Computer-controlled cutting" , I made a little box
To protect my FabISP, with what I learned in "Computer-controlled cutting" , I made a little box