Embedded Programming Week
This week's assignment is to program the board we designed 2 weeks ago using low level programming. To do that we have to read the datasheet for the microcontroller we used which is Attiny44.
When I milled and soldered my board two weeks ago, I wanted to make sure everything works fine and to do that I used the Arduino IDE to program it.
Programming Using Arduino ISP
I first programmed the Arduino as ArduinoISP using the examples available in the Arduino IDE.
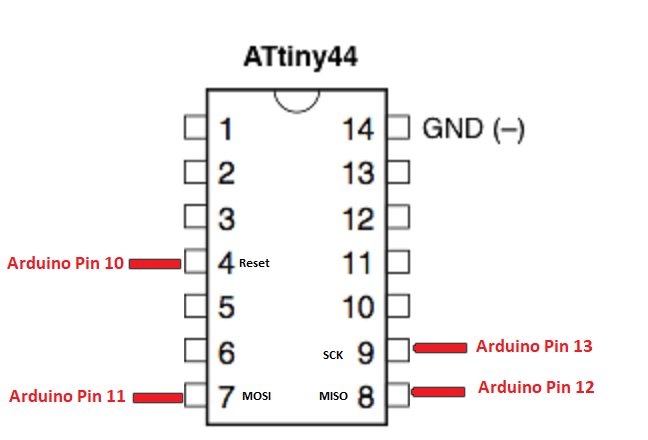
Just like I did two weeks ago, I connected my Echo Hello board to the arduino according to the below schematics.
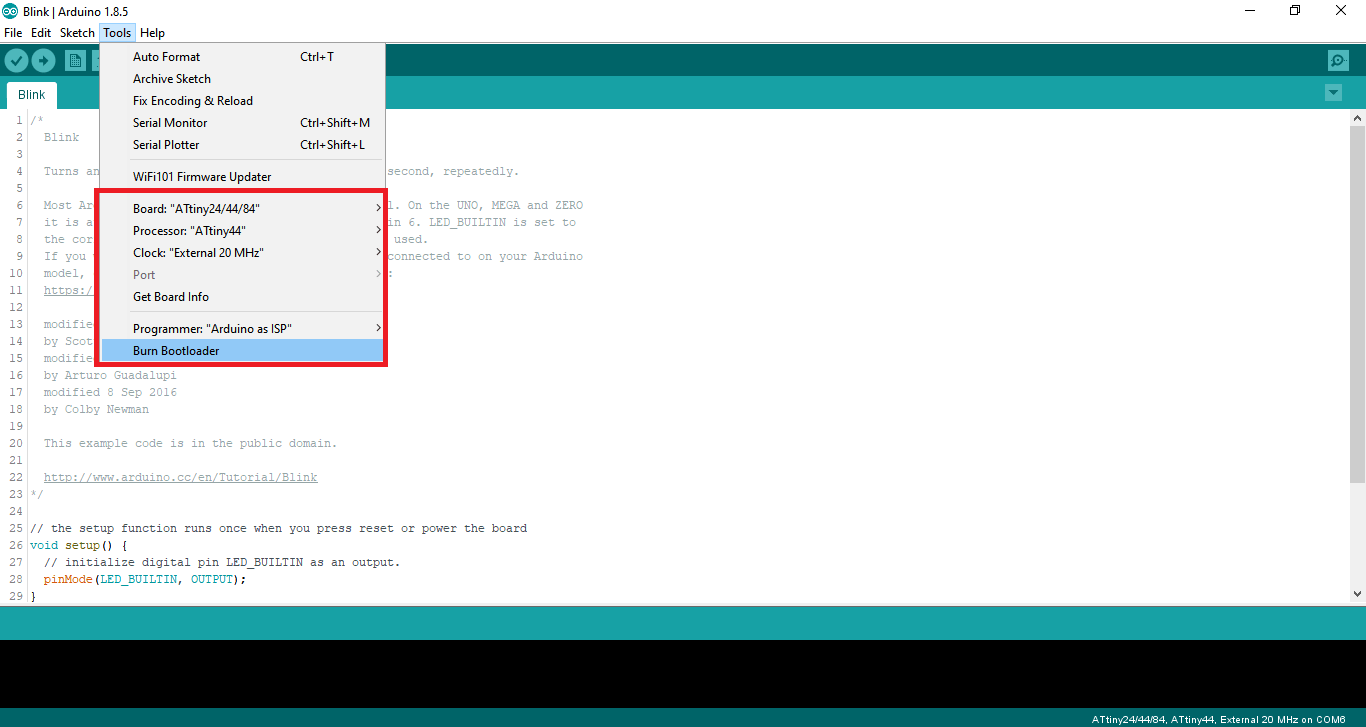
Then I chose the board to be Attiny, the processor to be 44 and the crystal to 20MHz. The programmer I chose was ArduinoISP and then I burnt the bootloader.
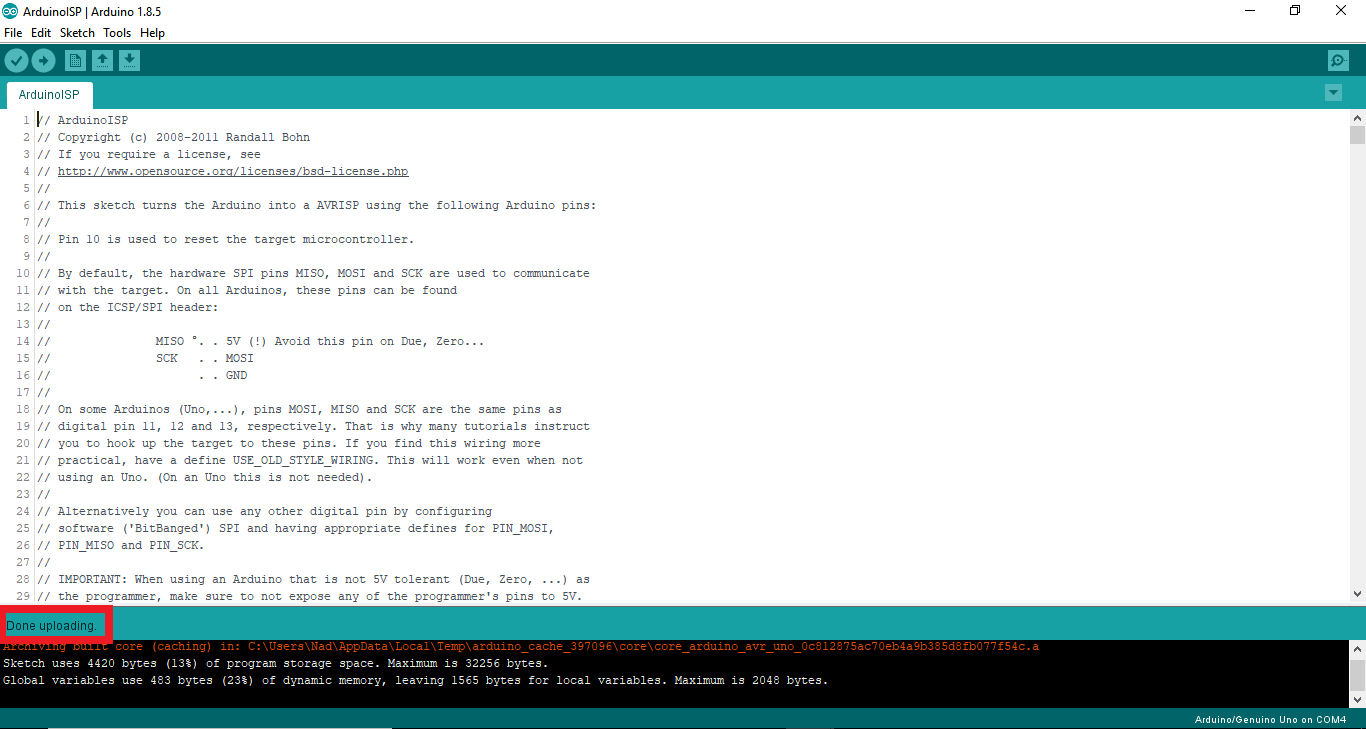
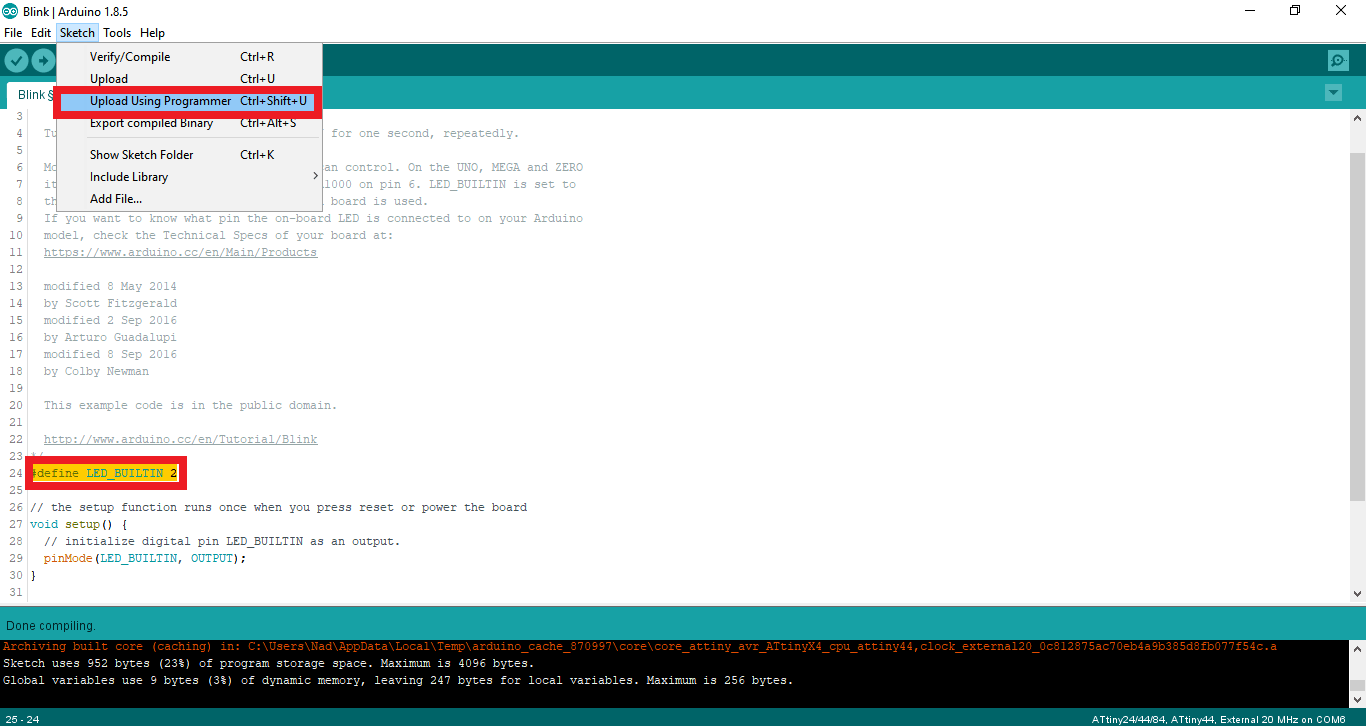
Then I modified the blink example to blink the LED in my board which is connected to pin w. Then I uploaded the code to my echo hello board by choosing upload using programmer.
This verifies that my board works.
Programming Using Fab ISP
After checking that I have soldered everything correctly and that my board works *phew*, it's time to get to the fun not so easy stuff.
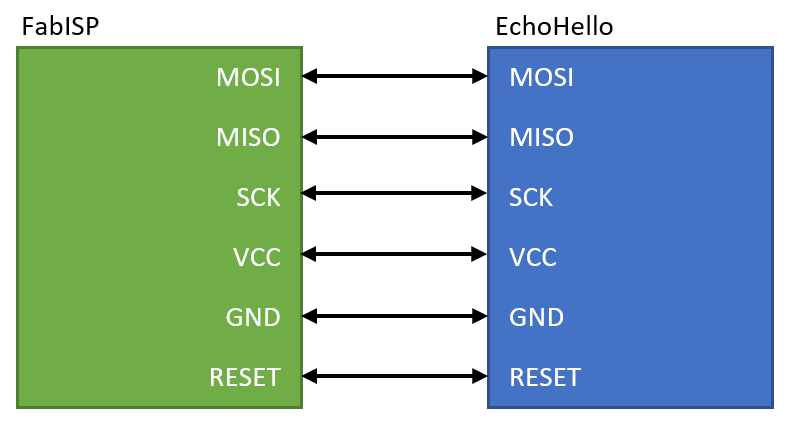
I decided to take advantge of the FabISP I built weeks ago and use it to give life to my Echo Hello board.
To do that, I connected the following pins to each other.
Then I got myself familiar with the datasheet. The datasheet is 238 pages long so you really need to know how to extract the information you need from here cause who has time to read 238 pages, right?!
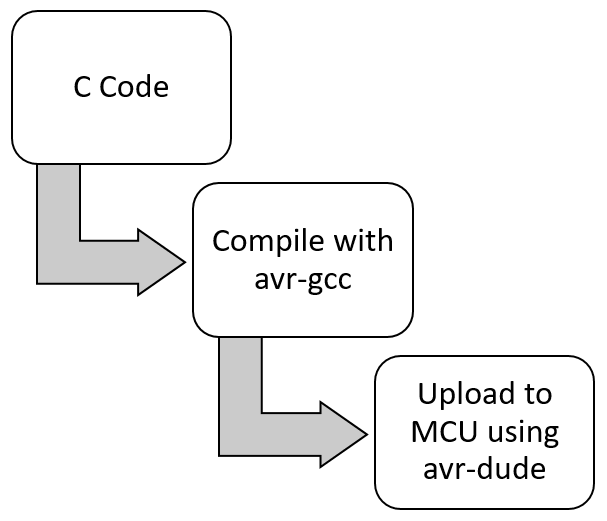
So before I started reading it, I need to know what I'm looking for first. Our instructor told us that in order to program your board using low-level programming, you need 3 things which are:
- AVR libraries - which I can download like I did before when I programmed the ISP.
- A makefile and the make tool.
- A C code
The process for programming the Echo Hello is seen below.
Make is a utility that is designed to start execution of a makefile. A makefile is a bunch of rules that explains how your board reacts based on certain prerequisites which affects the outcome of the program, called "target". In the end you'll have an executable file that dictates how your board operates. While in the directory containing this makefile, you will type make and the commands in the makefile will be executed.
To create my makefile, I used Neil's example and then edited it to have the following:
            PROJECT=nad_echo
            SOURCES=$(PROJECT).c
            MMCU=attiny44
            F_CPU = 20000000
            CFLAGS=-mmcu=$(MMCU) -Wall -Os -DF_CPU=$(F_CPU)     #create set of parameters for the compiler (clock, MCU)

            $(PROJECT).hex: $(PROJECT).out
	        avr-objcopy -O ihex $(PROJECT).out $(PROJECT).c.hex;\      #copy and translate object files
	        avr-size --mcu=$(MMCU) --format=avr $(PROJECT).out         #size utility lists the section sizes

            $(PROJECT).out: $(SOURCES)
	        avr-gcc $(CFLAGS) -I./ -o $(PROJECT).out $(SOURCES)        #to compile the file

            program-fabISP: $(PROJECT).hex
	        avrdude -p t44 -P usb -c usbtiny -U flash:w:$(PROJECT).c.hex       #to upload the file

            program-fabISP-fuses: $(PROJECT).hex
	        avrdude -p t44 -P usb -c usbtiny -U lfuse:w:0x1F:m         #to upload the settings of the fuses
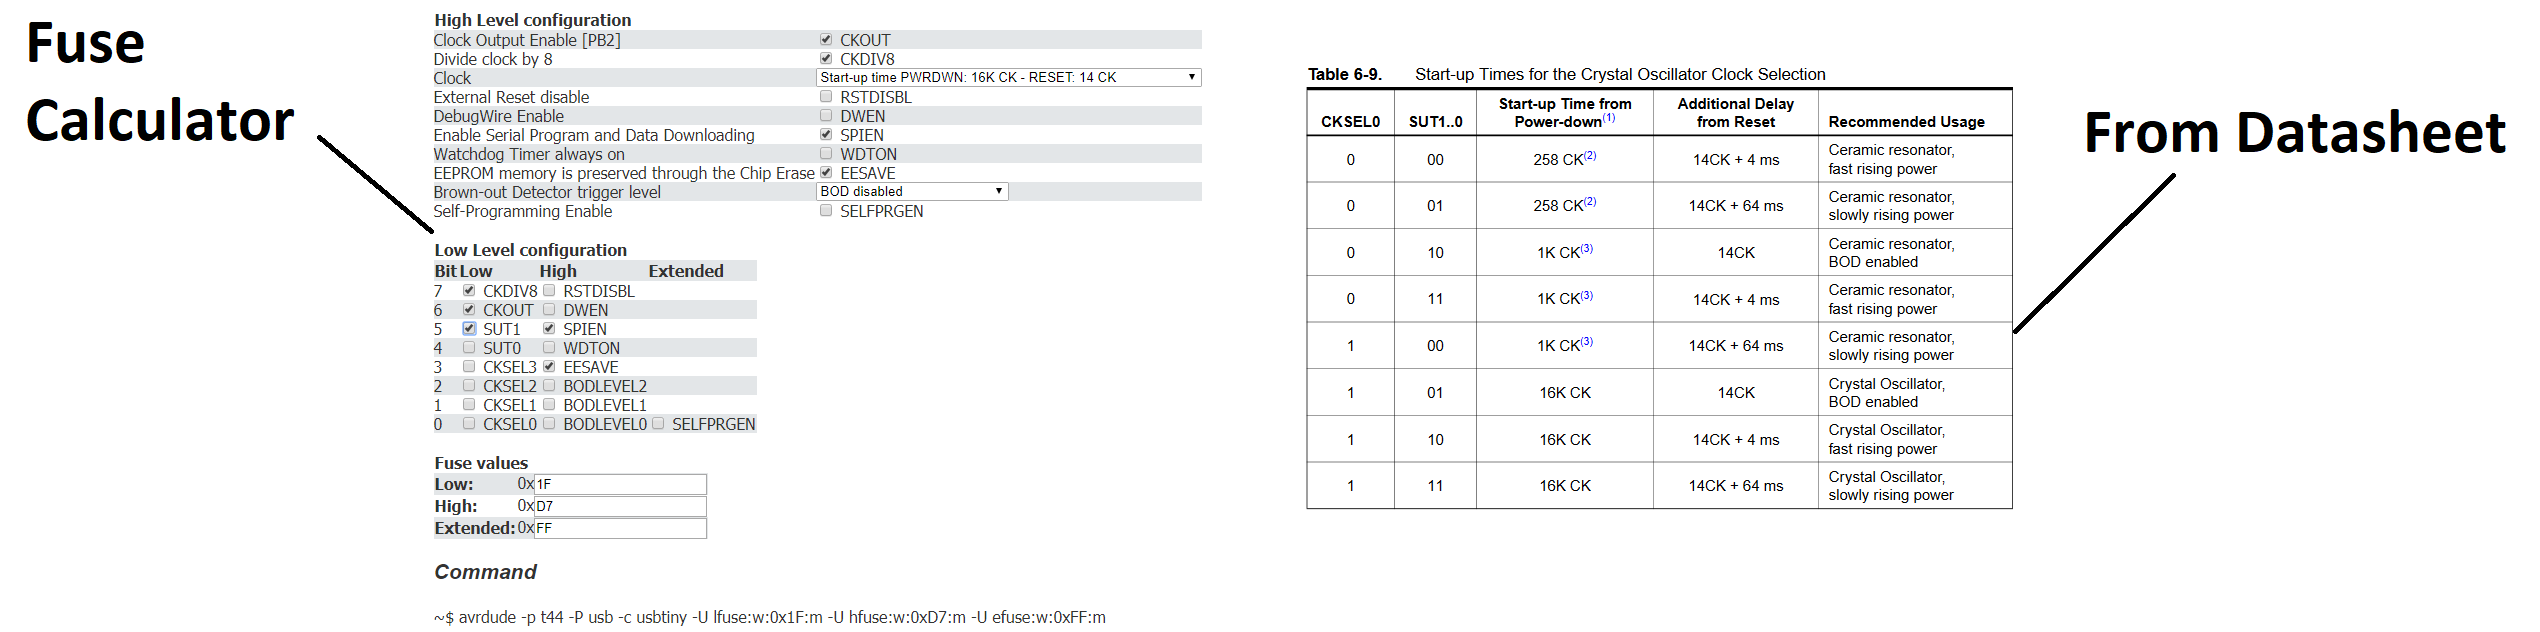
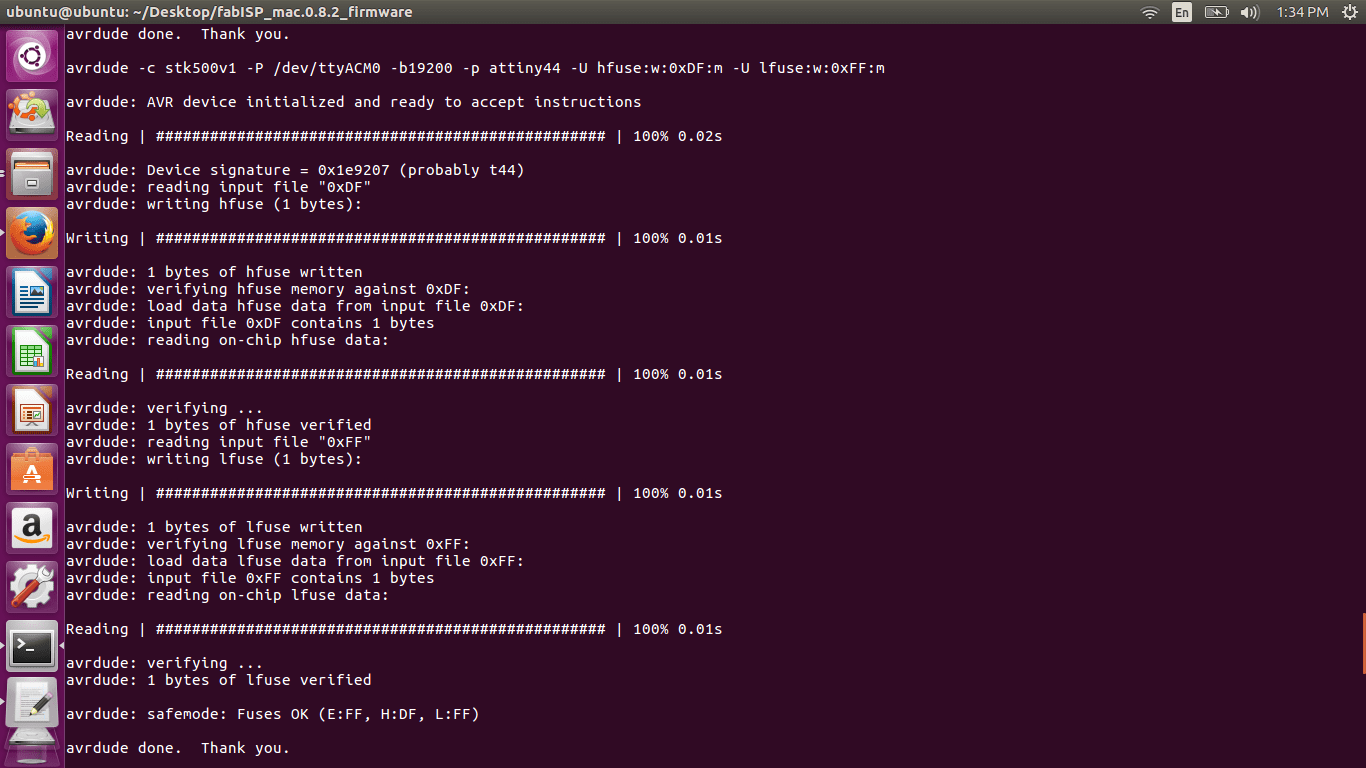
To understand how to set the fuses, I went through this tutorial.
Fuses are 3 bytes of permenant storage that can be reprogrammed to dictate the behavior of your MCU.
There's a fuse calculator that we can use that will automatically give you the line of code for the fuses.
However it was a bit confusing cause going back to the datasheet, 0 means programmed and 1 means unprogrammed and in the calculator if you choose to program (tick the box) you actually unprogram (set it to zero). So I just did it manually for the lower byte with the help of the datasheet.
Now that the make file is ready, I had to get myself familiar with C programming, luckily I know a bit of C so it wasn't that hard.
It is important to know that the Attiny44 has 2 ports, each port has 8 pins which means that we have 16 GPIO (General Purpose Input Output) pins.

To configure a pin as input or output you have to configure it in the DDRX register, where x is the port. For example, if you want to configure pin 2,5 and 7 in PORTA as input, and the rest as output you have to give it the following:
DDRA= 0b 01011011
where 0 means the pin is configured as input and 1 means the pin is configured as output.
Let's say you configured pin 4 as output, how do you set or unset its value?!
You do that using PORTX register by giving it a 1 to set high and a 0 to set low.
The last thing is reading and input and that is done using PX#, where X is the port and # is the number of the pin.
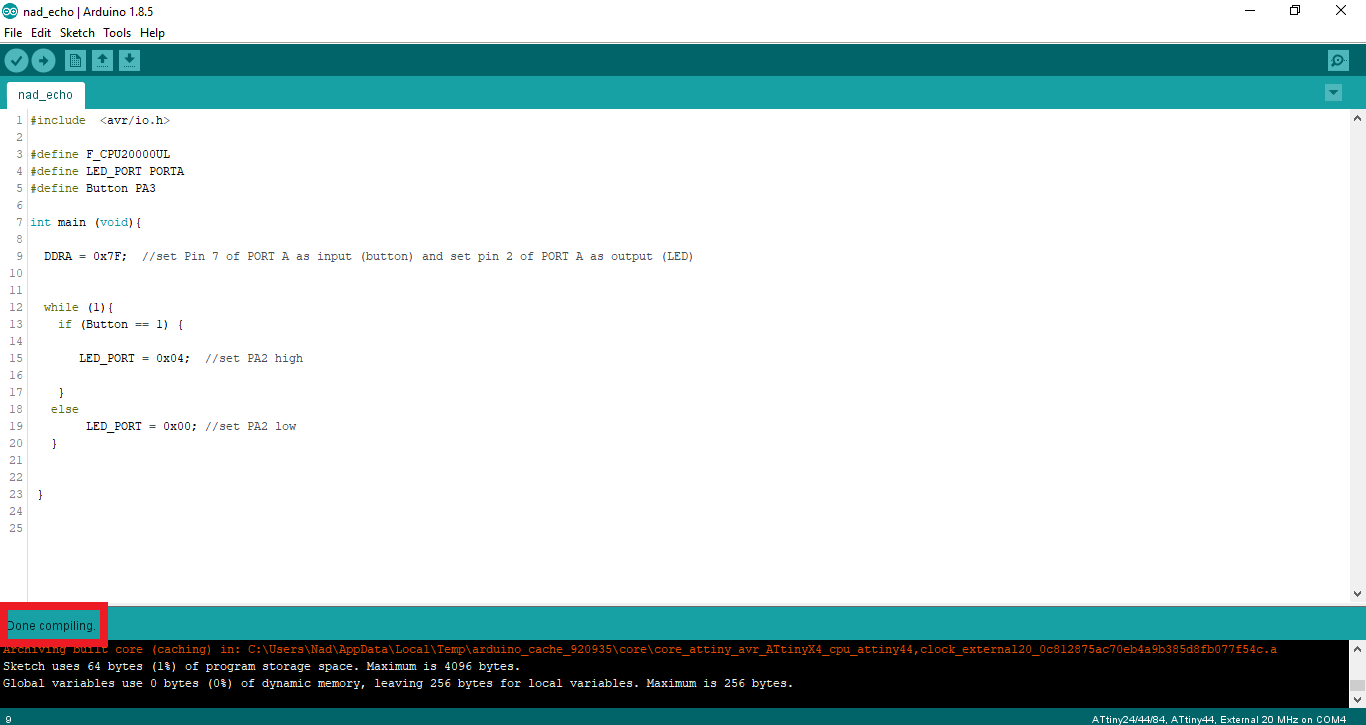
Now that I've got the basics covered, it's time to write my code.
I used Arduino IDE to do it. In my echo hello board I have an LED connected to pin 2 and a button to pin 7.
So I have to set the button as input and the LED as output.
I wrote my program to have the LED light when the button is pressed.
Next, I switched to Ubunto, I have installed on a flash drive and I just boot my computer from there.
To program my board, I have to install the necessary packages for AVR Programming. AVR is the family of the chip we used in our board Attiny44. To install the packages, I followed the below steps.
The below commands are not for the ISP but for my computer to install the necessary drivers & packages:.
            sudo apt-get install flex byacc bison gcc libusb-dev avrdude

            sudo apt-get install gcc-avr

            sudo apt-get install avr-libc

            sudo apt-get install libc6-dev
I created a folder with my makefile and my c code in it. It is important to not put an extension on the makefile and to put the extension of the c code to .c .
Next you navigate to that folder and type make in the terminal, this will create a .hex & .out file. This means it successfully compiled.
Then you type make (name of program), the name of program should be the same as in your makefile. If you did everything right, your board should come to life!
Problema?!!
Using my computer it kept givig me an Error 127 so I connected it to my colleague Qusai's computer and it worked. My guess is that the USB port in my computer is a little loose, I wasted about 3 hours of debugging due to a connection error but oh well you live and you learn!
Here's my board with the uploaded code :)
You can see below my terminal log.
ubuntu@ubuntu:~$ sudo apt-get install flex byacc bison gcc libusb-dev avrdude
Reading package lists... Done
Building dependency tree
Reading state information... Done
gcc is already the newest version (4:5.3.1-1ubuntu1).
The following additional packages will be installed:
libbison-dev libfl-dev libftdi1 libsigsegv2 m4
Suggested packages:
avrdude-doc bison-doc
The following NEW packages will be installed:
avrdude bison byacc flex libbison-dev libfl-dev libftdi1 libsigsegv2
libusb-dev m4
0 upgraded, 10 newly installed, 0 to remove and 426 not upgraded.
Need to get 1,501 kB of archives.
After this operation, 4,607 kB of additional disk space will be used.
Do you want to continue? [Y/n] y
Get:1 http://us.archive.ubuntu.com/ubuntu xenial/main amd64 libsigsegv2 amd64 2.10-4 [14.1 kB]
Get:2 http://us.archive.ubuntu.com/ubuntu xenial/main amd64 m4 amd64 1.4.17-5 [195 kB]
Get:3 http://us.archive.ubuntu.com/ubuntu xenial/main amd64 libfl-dev amd64 2.6.0-11 [12.5 kB]
Get:4 http://us.archive.ubuntu.com/ubuntu xenial/main amd64 flex amd64 2.6.0-11 [290 kB]
Get:5 http://us.archive.ubuntu.com/ubuntu xenial/main amd64 libbison-dev amd64 2:3.0.4.dfsg-1 [338 kB]
Get:6 http://us.archive.ubuntu.com/ubuntu xenial/main amd64 bison amd64 2:3.0.4.dfsg-1 [259 kB]
Get:7 http://us.archive.ubuntu.com/ubuntu xenial/universe amd64 libftdi1 amd64 0.20-4build1 [15.2 kB]
Get:8 http://us.archive.ubuntu.com/ubuntu xenial/main amd64 libusb-dev amd64 2:0.1.12-28 [29.9 kB]
Get:9 http://us.archive.ubuntu.com/ubuntu xenial/universe amd64 avrdude amd64 6.2-5 [291 kB]
Get:10 http://us.archive.ubuntu.com/ubuntu xenial/universe amd64 byacc amd64 20140715-1 [56.9 kB]
Fetched 1,501 kB in 6s (221 kB/s)
Selecting previously unselected package libsigsegv2:amd64.
(Reading database ... 194399 files and directories currently installed.)
Preparing to unpack .../libsigsegv2_2.10-4_amd64.deb ...
Unpacking libsigsegv2:amd64 (2.10-4) ...
Selecting previously unselected package m4.
Preparing to unpack .../archives/m4_1.4.17-5_amd64.deb ...
Unpacking m4 (1.4.17-5) ...
Selecting previously unselected package libfl-dev:amd64.
Preparing to unpack .../libfl-dev_2.6.0-11_amd64.deb ...
Unpacking libfl-dev:amd64 (2.6.0-11) ...
Selecting previously unselected package flex.
Preparing to unpack .../flex_2.6.0-11_amd64.deb ...
Unpacking flex (2.6.0-11) ...
Selecting previously unselected package libbison-dev:amd64.
Preparing to unpack .../libbison-dev_2%3a3.0.4.dfsg-1_amd64.deb ...
Unpacking libbison-dev:amd64 (2:3.0.4.dfsg-1) ...
Selecting previously unselected package bison.
Preparing to unpack .../bison_2%3a3.0.4.dfsg-1_amd64.deb ...
Unpacking bison (2:3.0.4.dfsg-1) ...
Selecting previously unselected package libftdi1:amd64.
Preparing to unpack .../libftdi1_0.20-4build1_amd64.deb ...
Unpacking libftdi1:amd64 (0.20-4build1) ...
Selecting previously unselected package libusb-dev.
Preparing to unpack .../libusb-dev_2%3a0.1.12-28_amd64.deb ...
Unpacking libusb-dev (2:0.1.12-28) ...
Selecting previously unselected package avrdude.
Preparing to unpack .../avrdude_6.2-5_amd64.deb ...
Unpacking avrdude (6.2-5) ...
Selecting previously unselected package byacc.
Preparing to unpack .../byacc_20140715-1_amd64.deb ...
Unpacking byacc (20140715-1) ...
Processing triggers for install-info (6.1.0.dfsg.1-5) ...
Processing triggers for man-db (2.7.5-1) ...
Processing triggers for libc-bin (2.23-0ubuntu9) ...
Processing triggers for doc-base (0.10.7) ...
Processing 33 changed doc-base files, 2 added doc-base files...
Setting up libsigsegv2:amd64 (2.10-4) ...
Setting up m4 (1.4.17-5) ...
Setting up libfl-dev:amd64 (2.6.0-11) ...
Setting up flex (2.6.0-11) ...
Setting up libbison-dev:amd64 (2:3.0.4.dfsg-1) ...
Setting up bison (2:3.0.4.dfsg-1) ...
update-alternatives: using /usr/bin/bison.yacc to provide /usr/bin/yacc (yacc) in auto mode
Setting up libftdi1:amd64 (0.20-4build1) ...
Setting up libusb-dev (2:0.1.12-28) ...
Setting up avrdude (6.2-5) ...
Setting up byacc (20140715-1) ...
Processing triggers for libc-bin (2.23-0ubuntu9) ...
ubuntu@ubuntu:~$ sudo apt-get install gcc-avr
Reading package lists... Done
Building dependency tree
Reading state information... Done
The following additional packages will be installed:
binutils-avr
Suggested packages:
task-c-devel gcc-doc avr-libc
The following NEW packages will be installed:
binutils-avr gcc-avr
0 upgraded, 2 newly installed, 0 to remove and 426 not upgraded.
Need to get 14.1 MB of archives.
After this operation, 74.1 MB of additional disk space will be used.
Do you want to continue? [Y/n] y
Get:1 http://us.archive.ubuntu.com/ubuntu xenial/universe amd64 binutils-avr amd64 2.25+Atmel3.5.0-2 [1,425 kB]
Get:2 http://us.archive.ubuntu.com/ubuntu xenial/universe amd64 gcc-avr amd64 1:4.9.2+Atmel3.5.0-1 [12.7 MB]
Fetched 14.1 MB in 12s (1,141 kB/s)
Selecting previously unselected package binutils-avr.
(Reading database ... 194706 files and directories currently installed.)
Preparing to unpack .../binutils-avr_2.25+Atmel3.5.0-2_amd64.deb ...
Unpacking binutils-avr (2.25+Atmel3.5.0-2) ...
Selecting previously unselected package gcc-avr.
Preparing to unpack .../gcc-avr_1%3a4.9.2+Atmel3.5.0-1_amd64.deb ...
Unpacking gcc-avr (1:4.9.2+Atmel3.5.0-1) ...
Processing triggers for man-db (2.7.5-1) ...
Setting up binutils-avr (2.25+Atmel3.5.0-2) ...
Setting up gcc-avr (1:4.9.2+Atmel3.5.0-1) ...
ubuntu@ubuntu:~$ sudo apt-get install avr-libc
Reading package lists... Done
Building dependency tree
Reading state information... Done
The following NEW packages will be installed:
avr-libc
0 upgraded, 1 newly installed, 0 to remove and 426 not upgraded.
Need to get 4,378 kB of archives.
After this operation, 37.3 MB of additional disk space will be used.
Get:1 http://us.archive.ubuntu.com/ubuntu xenial/universe amd64 avr-libc all 1:1.8.0+Atmel3.5.0-1 [4,378 kB]
Fetched 4,378 kB in 7s (563 kB/s)
Selecting previously unselected package avr-libc.
(Reading database ... 195450 files and directories currently installed.)
Preparing to unpack .../avr-libc_1%3a1.8.0+Atmel3.5.0-1_all.deb ...
Unpacking avr-libc (1:1.8.0+Atmel3.5.0-1) ...
Processing triggers for man-db (2.7.5-1) ...
Setting up avr-libc (1:1.8.0+Atmel3.5.0-1) ...
ubuntu@ubuntu:~$ sudo apt-get install libc6-dev
Reading package lists... Done
Building dependency tree
Reading state information... Done
The following additional packages will be installed:
libc-dev-bin libc6 libc6-dbg
Suggested packages:
glibc-doc
The following packages will be upgraded:
libc-dev-bin libc6 libc6-dbg libc6-dev
4 upgraded, 0 newly installed, 0 to remove and 422 not upgraded.
Need to get 8,411 kB of archives.
After this operation, 2,048 B of additional disk space will be used.
Do you want to continue? [Y/n] y
Get:1 http://security.ubuntu.com/ubuntu xenial-security/main amd64 libc6-dev amd64 2.23-0ubuntu10 [2,079 kB]
Get:2 http://security.ubuntu.com/ubuntu xenial-security/main amd64 libc-dev-bin amd64 2.23-0ubuntu10 [68.7 kB]
Get:3 http://security.ubuntu.com/ubuntu xenial-security/main amd64 libc6-dbg amd64 2.23-0ubuntu10 [3,683 kB]
Get:4 http://security.ubuntu.com/ubuntu xenial-security/main amd64 libc6 amd64 2.23-0ubuntu10 [2,580 kB]
Fetched 8,411 kB in 9s (852 kB/s)
Preconfiguring packages ...
(Reading database ... 197925 files and directories currently installed.)
Preparing to unpack .../libc6-dev_2.23-0ubuntu10_amd64.deb ...
Unpacking libc6-dev:amd64 (2.23-0ubuntu10) over (2.23-0ubuntu9) ...
Preparing to unpack .../libc-dev-bin_2.23-0ubuntu10_amd64.deb ...
Unpacking libc-dev-bin (2.23-0ubuntu10) over (2.23-0ubuntu9) ...
Preparing to unpack .../libc6-dbg_2.23-0ubuntu10_amd64.deb ...
Unpacking libc6-dbg:amd64 (2.23-0ubuntu10) over (2.23-0ubuntu9) ...
Preparing to unpack .../libc6_2.23-0ubuntu10_amd64.deb ...
Unpacking libc6:amd64 (2.23-0ubuntu10) over (2.23-0ubuntu9) ...
Setting up libc6:amd64 (2.23-0ubuntu10) ...
Setting up libc-dev-bin (2.23-0ubuntu10) ...
Setting up libc6-dev:amd64 (2.23-0ubuntu10) ...
Setting up libc6-dbg:amd64 (2.23-0ubuntu10) ...
Processing triggers for libc-bin (2.23-0ubuntu9) ...
Processing triggers for man-db (2.7.5-1) ...
ubuntu@ubuntu:~$ lsusb
Bus 002 Device 001: ID 1d6b:0003 Linux Foundation 3.0 root hub
Bus 001 Device 006: ID 138a:0011 Validity Sensors, Inc. VFS5011 Fingerprint Reader
Bus 001 Device 005: ID 04f2:b5c0 Chicony Electronics Co., Ltd
Bus 001 Device 004: ID 0cf3:e500 Atheros Communications, Inc.
Bus 001 Device 008: ID 045e:0797 Microsoft Corp. Optical Mouse 200
Bus 001 Device 007: ID 1781:0c9f Multiple Vendors USBtiny
Bus 001 Device 002: ID 058f:6387 Alcor Micro Corp. Flash Drive
Bus 001 Device 001: ID 1d6b:0002 Linux Foundation 2.0 root hub
ubuntu@ubuntu:~$ lsusb
Bus 002 Device 001: ID 1d6b:0003 Linux Foundation 3.0 root hub
Bus 001 Device 006: ID 138a:0011 Validity Sensors, Inc. VFS5011 Fingerprint Reader
Bus 001 Device 005: ID 04f2:b5c0 Chicony Electronics Co., Ltd
Bus 001 Device 004: ID 0cf3:e500 Atheros Communications, Inc.
Bus 001 Device 008: ID 045e:0797 Microsoft Corp. Optical Mouse 200
Bus 001 Device 009: ID 1781:0c9f Multiple Vendors USBtiny
Bus 001 Device 002: ID 058f:6387 Alcor Micro Corp. Flash Drive
Bus 001 Device 001: ID 1d6b:0002 Linux Foundation 2.0 root hub
ubuntu@ubuntu:~$ ls
Desktop  Documents  Downloads  Music  Pictures  Public  Templates  Videos
ubuntu@ubuntu:~$ cd Desktop/nadine
ubuntu@ubuntu:~/Desktop/nadine$ ls
makefile  nad_echo.c
ubuntu@ubuntu:~/Desktop/nadine$ lsusb
Bus 002 Device 001: ID 1d6b:0003 Linux Foundation 3.0 root hub
Bus 001 Device 006: ID 138a:0011 Validity Sensors, Inc. VFS5011 Fingerprint Reader
Bus 001 Device 005: ID 04f2:b5c0 Chicony Electronics Co., Ltd
Bus 001 Device 004: ID 0cf3:e500 Atheros Communications, Inc.
Bus 001 Device 008: ID 045e:0797 Microsoft Corp. Optical Mouse 200
Bus 001 Device 040: ID 1781:0c9f Multiple Vendors USBtiny
Bus 001 Device 002: ID 058f:6387 Alcor Micro Corp. Flash Drive
Bus 001 Device 001: ID 1d6b:0002 Linux Foundation 2.0 root hub
ubuntu@ubuntu:~/Desktop/nadine$ ls
makefile  nad_echo.c
ubuntu@ubuntu:~/Desktop/nadine$ make
avr-gcc -mmcu=attiny44 -Wall -Os -DF_CPU=20000000 -I./ -o nad_echo.out nad_echo.c
avr-objcopy -O ihex nad_echo.out nad_echo.c.hex;\
avr-size --mcu=attiny44 --format=avr nad_echo.out
AVR Memory Usage
----------------
Device: attiny44

Program:      64 bytes (1.6% Full)
(.text + .data + .bootloader)

Data:          0 bytes (0.0% Full)
(.data + .bss + .noinit)


ubuntu@ubuntu:~/Desktop/nadine$ make program-fabISP
avr-objcopy -O ihex nad_echo.out nad_echo.c.hex;\
avr-size --mcu=attiny44 --format=avr nad_echo.out
AVR Memory Usage
----------------
Device: attiny44

Program:      64 bytes (1.6% Full)
(.text + .data + .bootloader)

Data:          0 bytes (0.0% Full)
(.data + .bss + .noinit)


avrdude -p t44 -P usb -c usbtiny -U flash:w:nad_echo.c.hex

avrdude: AVR device initialized and ready to accept instructions

Reading | ################################################## | 100% 0.00s

avrdude: Device signature = 0x1e9207 (probably t44)
avrdude: NOTE: "flash" memory has been specified, an erase cycle will be performed
To disable this feature, specify the -D option.
avrdude: erasing chip
avrdude: reading input file "nad_echo.c.hex"
avrdude: input file nad_echo.c.hex auto detected as Intel Hex
avrdude: writing flash (64 bytes):

Writing | ################################################## | 100% 0.06s

avrdude: 64 bytes of flash written
avrdude: verifying flash memory against nad_echo.c.hex:
avrdude: load data flash data from input file nad_echo.c.hex:
avrdude: input file nad_echo.c.hex auto detected as Intel Hex
avrdude: input file nad_echo.c.hex contains 64 bytes
avrdude: reading on-chip flash data:

Reading | ################################################## | 100% 0.07s

avrdude: verifying ...
avrdude: 64 bytes of flash verified

avrdude: safemode: Fuses OK (E:FF, H:DF, L:FE)

avrdude done.  Thank you.

ubuntu@ubuntu:~/Desktop/nadine$
And here's a screenshot of my work.
I decided to do another more complex C code, the code I wrote uses a button and an LED. If the button is pressed a long press it will blink the led 3 times, if it was a double click it will blink the led twice and if it was a single click it will blink only once.
#include  <avr/io.h>
#include  <util/delay.h>

#define F_CPU20000UL
#define LED_PORT PORTA
#define Button PA7

int main (void){

  DDRA = 0x7F;  //set Pin 7 of PORT A as input (button) and set pin 2 of PORT A as output (LED)
  int stat=0; //define a variable that will check if the button is pressed or not, zero means the button
  //is not pressed, 1 means it was pressed

  int delaying=50; //we should add a small delay to make sure we debounce the button's status


  while (1){

   if (stat==0 && bit_is_set(PINA, PA7)) {
        _delay_ms(200); //delay for 1000 milie second to see if it is still high then it is a long press
        if (bit_is_set(PINA, PA7)){
          long_press();
        }
        else{
          stat=1;  //set state to 1, first click
        }
      }
   if (stat==1 && bit_is_set(PINA, PA7) ){ // if state is one and the button is pressed again then it is the second click
      double_click();
      stat=0;
    }
    else { //then it must be only one click
      one_click();
      stat=0;
  }
 }
 }

 void long_press(){
     LED_PORT = 0x04;  //blink led 3 times
     _delay_ms(100);
     LED_PORT = 0x00;
     _delay_ms(100);
     LED_PORT = 0x04;
     _delay_ms(100);
     LED_PORT = 0x00;
     _delay_ms(100);
     LED_PORT = 0x04;
      _delay_ms(100);
     LED_PORT = 0x00;
  }


  void double_click(){
      LED_PORT = 0x04;  //blink led 2 times
     _delay_ms(500);
     LED_PORT = 0x00;
     _delay_ms(500);
     LED_PORT = 0x04;
     _delay_ms(500);
     LED_PORT = 0x00;
      }

void one_click(){
      LED_PORT = 0x04;  //blink led once
     _delay_ms(1000);
     LED_PORT = 0x00;
     _delay_ms(1000);
      }
    //note: I changed the speed of blinking to be able to distinguish the difference between the cases.
After writing the code, I switched back to Ubuntu and programmed my attiny as seen below.
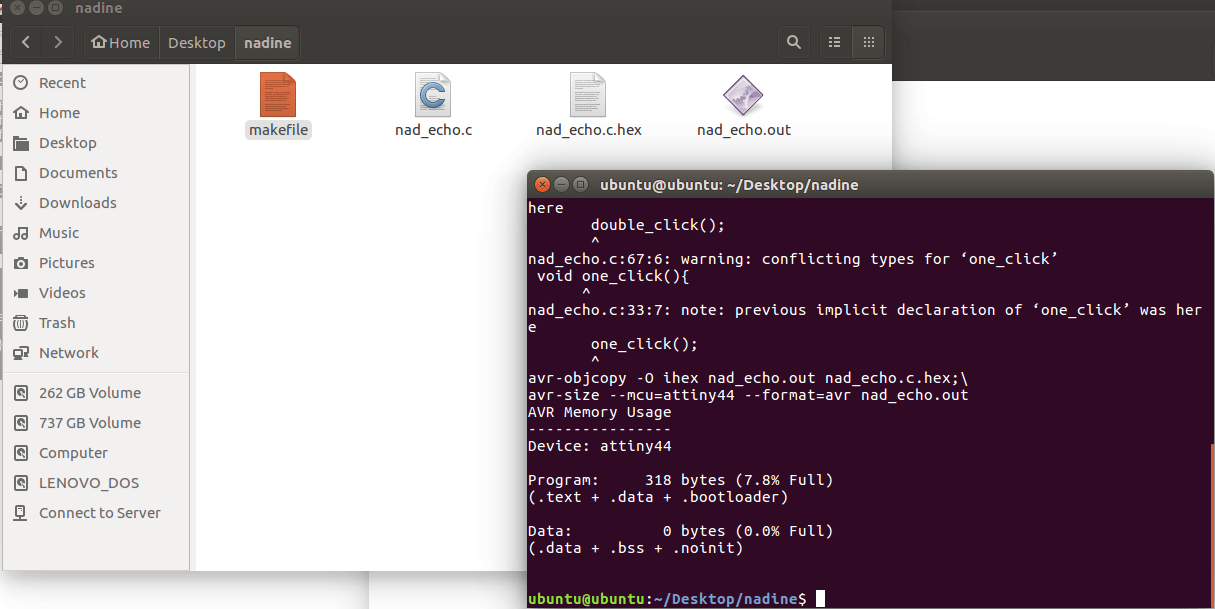
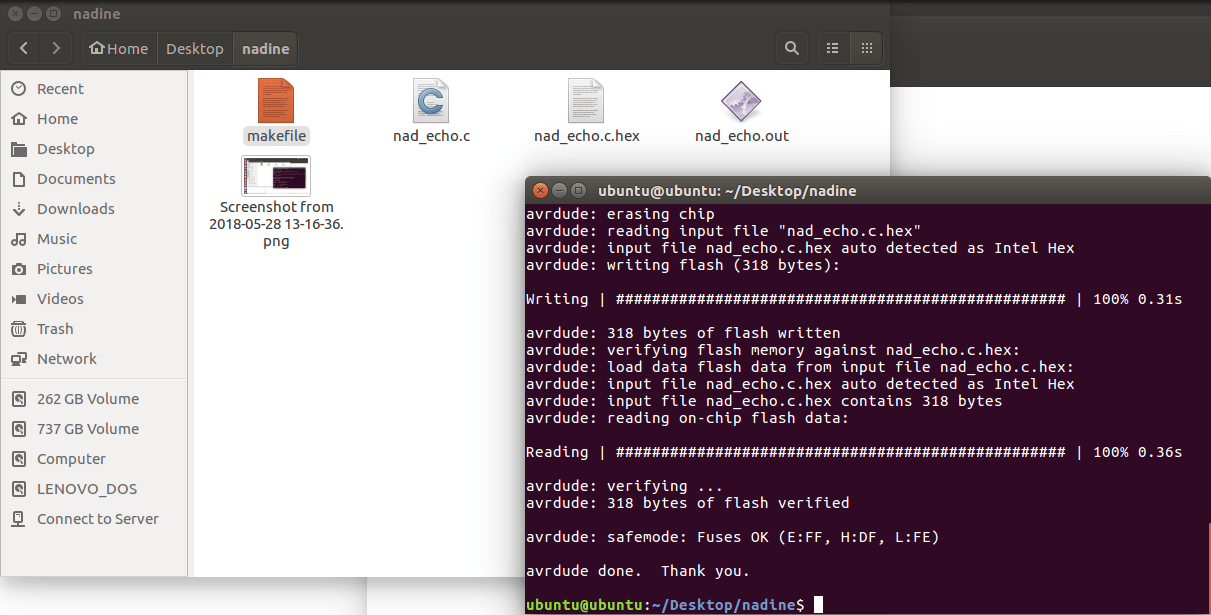
You can find my log below.
ubuntu@ubuntu:~$ cd Desktop
ubuntu@ubuntu:~/Desktop$ cd nadine
ubuntu@ubuntu:~/Desktop/nadine$ ls
makefile  nad_echo.c
ubuntu@ubuntu:~/Desktop/nadine$ make
avr-gcc -mmcu=attiny44 -Wall -Os -DF_CPU=20000000 -I./ -o nad_echo.out nad_echo.c
nad_echo.c: In function ‘main’:
nad_echo.c:21:11: warning: implicit declaration of function ‘long_press’ [-Wimplicit-function-declaration]
           long_press();
           ^
nad_echo.c:29:7: warning: implicit declaration of function ‘double_click’ [-Wimplicit-function-declaration]
       double_click();
       ^
nad_echo.c:33:7: warning: implicit declaration of function ‘one_click’ [-Wimplicit-function-declaration]
       one_click();
       ^
nad_echo.c:13:7: warning: unused variable ‘delaying’ [-Wunused-variable]
   int delaying=50; //we should add a small delay to make sure we debounce the button's status
       ^
nad_echo.c: At top level:
nad_echo.c:42:7: warning: conflicting types for ‘long_press’
  void long_press(){
       ^
nad_echo.c:21:11: note: previous implicit declaration of ‘long_press’ was here
           long_press();
           ^
nad_echo.c:57:8: warning: conflicting types for ‘double_click’
   void double_click(){
        ^
nad_echo.c:29:7: note: previous implicit declaration of ‘double_click’ was here
       double_click();
       ^
nad_echo.c:67:6: warning: conflicting types for ‘one_click’
 void one_click(){
      ^
nad_echo.c:33:7: note: previous implicit declaration of ‘one_click’ was here
       one_click();
       ^
avr-objcopy -O ihex nad_echo.out nad_echo.c.hex;\
avr-size --mcu=attiny44 --format=avr nad_echo.out
AVR Memory Usage
----------------
Device: attiny44

Program:     318 bytes (7.8% Full)
(.text + .data + .bootloader)

Data:          0 bytes (0.0% Full)
(.data + .bss + .noinit)


ubuntu@ubuntu:~/Desktop/nadine$ make program-fabISP
avr-objcopy -O ihex nad_echo.out nad_echo.c.hex;\
avr-size --mcu=attiny44 --format=avr nad_echo.out
AVR Memory Usage
----------------
Device: attiny44

Program:     318 bytes (7.8% Full)
(.text + .data + .bootloader)

Data:          0 bytes (0.0% Full)
(.data + .bss + .noinit)


avrdude -p t44 -P usb -c usbtiny -U flash:w:nad_echo.c.hex

avrdude: AVR device initialized and ready to accept instructions

Reading | ################################################## | 100% 0.00s

avrdude: Device signature = 0x1e9207 (probably t44)
avrdude: NOTE: "flash" memory has been specified, an erase cycle will be performed
         To disable this feature, specify the -D option.
avrdude: erasing chip
avrdude: reading input file "nad_echo.c.hex"
avrdude: input file nad_echo.c.hex auto detected as Intel Hex
avrdude: writing flash (318 bytes):

Writing | ################################################## | 100% 0.31s

avrdude: 318 bytes of flash written
avrdude: verifying flash memory against nad_echo.c.hex:
avrdude: load data flash data from input file nad_echo.c.hex:
avrdude: input file nad_echo.c.hex auto detected as Intel Hex
avrdude: input file nad_echo.c.hex contains 318 bytes
avrdude: reading on-chip flash data:

Reading | ################################################## | 100% 0.36s

avrdude: verifying ...
avrdude: 318 bytes of flash verified

avrdude: safemode: Fuses OK (E:FF, H:DF, L:FE)

avrdude done.  Thank you.

ubuntu@ubuntu:~/Desktop/nadine$
The video of the code running on the attiny is seen below.
Arduino Language
I also decided to try a code using Arduino Language. The connection is seen below.
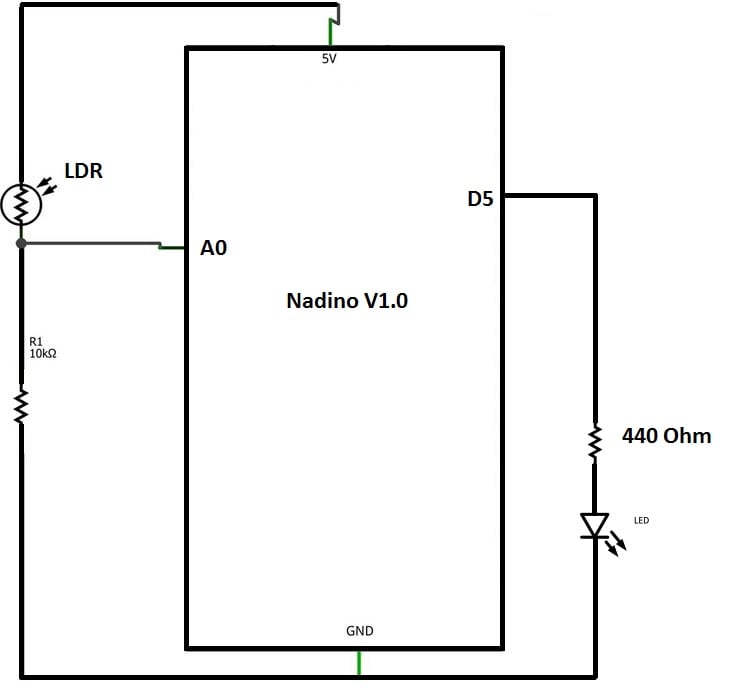
The code I used is pretty simple,it lights an LED when it's dark depending on the reading of an LDR sensor.
#define LED 5
void setup() {
   pinMode(LED, OUTPUT);
}

void loop() {
  int LDR=analogRead(A0); //read the LDR value
  if(LDR >300){ // if it is dark, turn the LED on
    digitalWrite(LED,1);
  }
  else{
    digitalWrite(LED,0);
  }
  delay(2000);
}
The video is seen below.
Intrigued to learn more!
This week was definitely eye-opening to me, being a computer engineer and all. I did embedded programming for PIC microcontrollers before but I always used different IDEs to do so. This was my first time using the command line.
When I have time, I'd like to learn more on why embedded programming is still a thing in 2018 and what advantages it has.
You can download my files here.
