Computer controlled machining
Testing pocket and profile toolpaths with different speeds and feeds
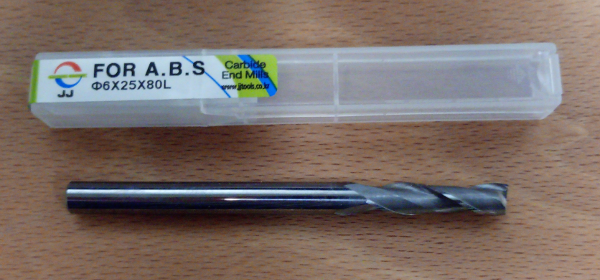
6 mm Endmill Up-Cut two flutes
| Tool diameter | 6 mm |
|---|---|
| Depth of the cut | 6 mm |
| Step | 2.4 mm |
| Spindle speed | 12000 r.p.m |
| Feed Rate | 3600 mm/min |
| Plunge Rate | 1200 mm/min |

| Tool diameter | 6 mm |
|---|---|
| Depth of the cut | 6 mm |
| Step | 2.4 mm |
| Spindle speed | 18000 r.p.m |
| Feed Rate | 2286 mm/min |
| Plunge Rate | 900 mm/min |


6.35 mm Carbide Tipped two Flute Straight V

| Tool diameter | 6.35 mm |
|---|---|
| Depth of the cut | 6.35 mm |
| Step | 2.54 mm |
| Spindle speed | 12000 r.p.m |
| Feed Rate | 3600 mm/min |
| Plunge Rate | 1200 mm/min |

| Tool diameter | 6.35 mm |
|---|---|
| Depth of the cut | 6.35 mm |
| Step | 2.54 mm |
| Spindle speed | 18000 r.p.m |
| Feed Rate | 2286 mm/min |
| Plunge Rate | 900 mm/min |


Testing profile toolpath with/without allowance offset and different cutting directions
6 mm Endmill Up-Cut two flutes
| Tool diameter | 6 mm |
|---|---|
| Depth of the cut | 6 mm |
| Step | 2.4 mm |
| Spindle speed | 12000 r.p.m |
| Feed Rate | 3600 mm/min |
| Plunge Rate | 1200 mm/min |
| Tool diameter | 6 mm |
|---|---|
| Depth of the cut | 6 mm |
| Step | 2.4 mm |
| Spindle speed | 18000 r.p.m |
| Feed Rate | 2286 mm/min |
| Plunge Rate | 900 mm/min |
No allowance offset - 12000 rpm - cutting direction conventional

No allowance offset - 18000 rpm - cutting direction conventional

No allowance offset - 12000 rpm - cutting direction climb

No allowance offset - 18000 rpm - cutting direction climb

0.3 mm allowance offset - 12000 rpm - cutting direction climb

0.3 mm allowance offset - 18000 rpm - cutting direction climb

Testing tolerance
| Tool diameter | 6 mm |
|---|---|
| Depth of the cut | 6 mm |
| Step | 4.08 mm |
| Spindle speed | 12000 r.p.m |
| Feed Rate | 3657 mm/min |
| Plunge Rate | 600 mm/min |
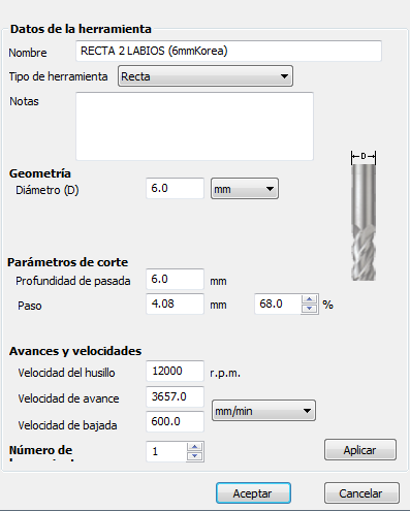


Testing kerf
As part of the group assignment I performed some tests that will allow me not only to do the correct kerfing to bend the wood in my TV stand but also to create the joins with the right sizes:
| Tool diameter | 6 mm |
|---|---|
| Depth of the cut | 6 mm |
| Step | 4.08 mm |
| Spindle speed | 12000 r.p.m |
| Feed Rate | 3657 mm/min |
| Plunge Rate | 600 mm/min |
Test how to do the kerfing to bend the wood
For testing how to bend the wood I designed a piece with cuts that is actually the side part of my furniture. In the next pictures you can see the sketch with the cuts, and the shape that I am saying I wanted to obtain.
I wanted to have a 90º angle in my bending, and to do so you have to measure the outside (120mm) and the inside perimeter (78mm) of the curve.
Then, you need to do a number of cuts (with the corresponding width, the diameter of the tool) that makes that 120 - > 78mm by making cuts.
I did three kerfing tests: the two first ones with an outside perimeter of 170 and the final one with 120mm of perimeter.
- 170mm of outside perimeter with 10 cuts, being the width of the cuts the one of the tool.
- Eleven wider cuts over the same distance as the previous one.
- 9 cuts over a perimeter of 120. This perimeter corresponds to the one that I was using on my TV stand so, once the previous tests were performed I did a this one as the final one.

Test the tolerance
I included a 40x40mm square in order to measure the tolerance of the machine.
Testing the tabs width
I also included the tab that I will use for the joins in my furniture. The real size of that tab is 60x40x30mm, I added two more tabs that were 0.2 and 0.4 mm smaller to see which was the optimal fit.

Milling the test pieces with the CNC
I cut these test parts with the 6mm tool. In the next picture you can see the three trayectories that I performed, the exterior, interior and the kerfing one, following the same steps that I have explained before.


Test results:
ToleranceThe test shows that when you cut the square, having an original size of 40x40mm, the size is reduced by 0.2 in all of the sides. I also observed that the last side that was cut, was not 100% straight, it had a bit of an angle. That could be caused by the strength of the tool, moving this small piece to the other side.
Tabs testing: I found out that the optimal width for my tabs is 0.4 more than the width of the join.
Kerfing: In the next picture the three tests can be observed. The top one correspongs the the tight cut, with ten 6mm width cuts. The one underneath with eleven wider cuts and the bottom one is the final test with the distance of my furniture and 9 cuts.
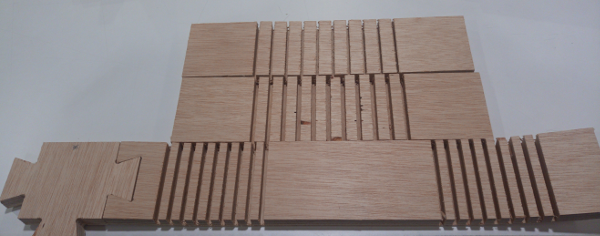
These results showed that when you do the cuts with the tool width, 6mm, the wood bends but is not optimal, is too stiff, whereas the second test with wider cuts is easier to bend without loosing stability.


With these tolerance, joins and kerfing final tests I did the corresponding design that was explained during the individual assignment.

