Embedded programming
Using another architecture,Raspberry Pi 3
Basics of the Raspberry Pi
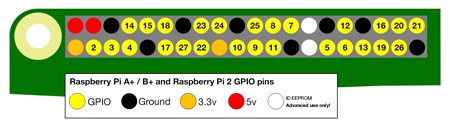
p>A Raspberry Pi is "a credit card-sized computer". The Raspberry Pi is not as fast as a modern laptop but it is a complete Linux computer. It can provide all the expected abilities that implies at a low-power consumption level.What is characteristic of the Raspberry Pi 3 as a board is the number of GPIO ports that it has. You can see in the image bellow how they are distributed:
Of the 40 pins, 26 are General purpose input/output (GPIO) pins and the others are power or ground pins. Click here to see the documentation.
 It's important knowing how to connect the I/O in order not to kill the board. You have to know if what you are connecting to the Pi uses a lot of power or not!
- - When the pin is HIGH it outputs 3.3 volts (3v3)
- - When the pin is LOW it is off.
For working with the pins you can either use the GPIO numbering or the physical numbering. The first way is how the computer sees the pins and the second one you refer to the pins is by simply counting across and down from pin 1 at the top left (nearest to the SD card). It is better to get used to know the GPIO numbering that you can find in this site.
Doing a tutorial for programming the Raspberry Pi
To learn how to use the Raspberry I followed this Tutorial. It guides you to programm a quick reaction game using python.
Hardware needed
- 1 x Breadboard
- 1 x LED
- 1 x 330 ohm Resistor
- 4 x Male-to-female jumper wires
- 2 x Male-to-male jumper wires
- 2 x Tactile push buttons
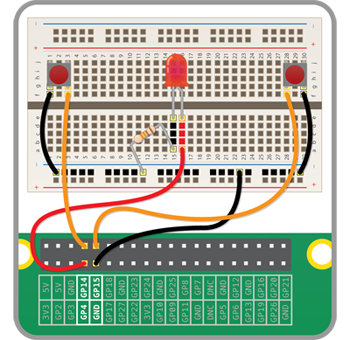
The circuit that I had to build was this cone:
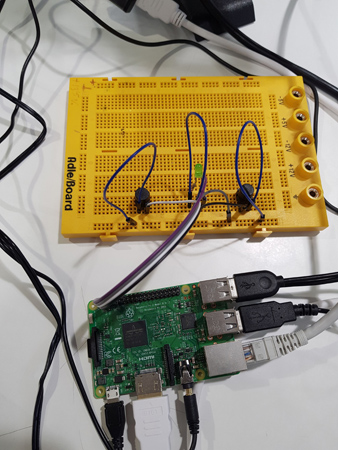
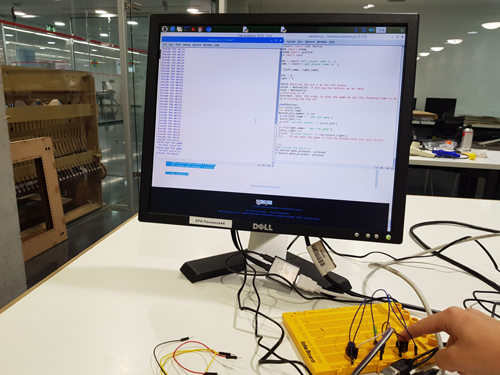
Once the circuit is build I start to program the board. For doing so I opened IDLE3 (as the tutorial recommended using this one), Python’s Integrated Development Environment, that can be used to write the code in the Raspberry. I created a new file called reaction.py.

The aim of this game is that the LED is switched on every a certain time, being this time random, and the two players have to click as fast as they can whenever the LED is turned on.
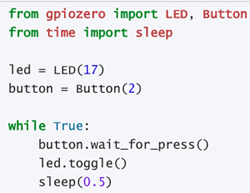
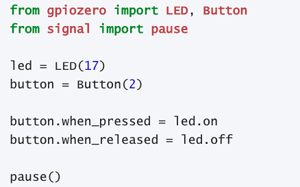
For using a LED the code that you need to write is quite simillar as when using Arduino or other IDE. You need to import it: from gpiozero import LED
Then you need to set in what pin is the LED connected. led = LED(17). And then in order to switch it on and off you need to write: led.on() and led.off(). There is also another function when warking
with LEDs that is led.blink(a,b) which will make the LED blink, being a second on and b seconds off.
For the button, we initialize it in the same way: library from gpiozero import Button and we set the pin: button = Button(2)what we need to listen to the input is: button.wait_for_press()
A combination for LED and button can be:
In this case, I first had to import the different libraries.
- LED and button pins.
-Time: to add a delay in the program using sleep.
-Random: to be able to generate a random time.
-Sys: for when I wanted the game to end every round. Then I asked for the players names and I set the inputs and outputs that will be used, the LED and the two buttons.
I created a function that detects which of the players pressed before the button and that saves the score that they both have.
from gpiozero import LED, Button
from time import sleep
from random import uniform
from sys import exit
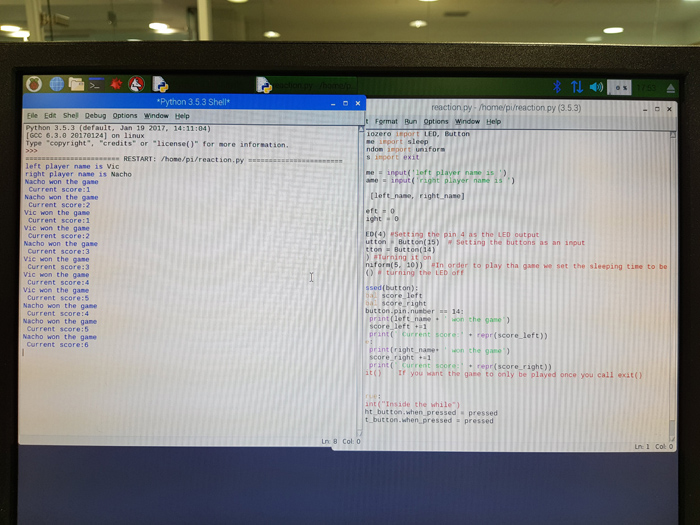
left_name = input('left player name is ')
right_name = input('right player name is ')
score_left = 0
score_right = 0
led = LED(4) #Setting the pin 4 as the LED output
right_button = Button(15) # Setting the buttons as an input
left_button = Button(14)
led.on() #Turning it on
sleep(uniform(5, 10)) #In order to play tha game we set the sleeping time to be random
led.off() # turning the LED off
def pressed(button):
global score_left
global score_right
if button.pin.number == 14:
print(left_name + ' won the game')
score_left +=1
print('Current score:' + repr(score_left))
else:
print(right_name+ ' won the game')
score_right +=1
print('Current score:' + repr(score_right))
#exit() If you want the game to only be played once you call exit()
while True:
#print("Inside the while")
right_button.when_pressed = pressed
left_button.when_pressed = pressed
time.sleep(1)
Once the code was ready I clicked in the Run tab, or you can also press F5 in the keyboard to run the program. A new python window opened, the one you can see on the left of the picture displaying the messages that we have set when the different actions take place.