Interface and application programming
Processing
The first tool that we used was Processing. We wrote a script in Arduino and another one in Processing that will be communicating between them.
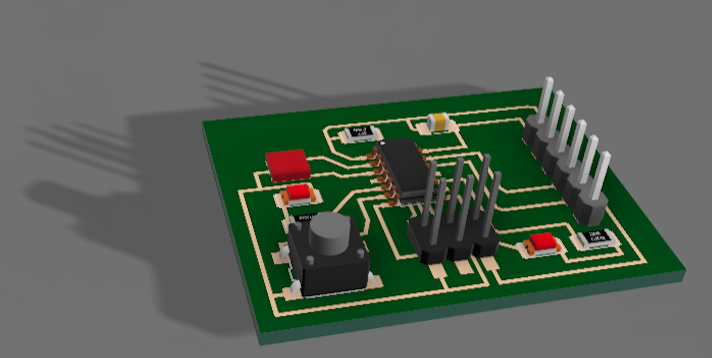
The code in Arduino is the following. We are first declaring the values for the pins that we are using. Both rx and tx for the serial communication and then the pins of the LED and the button.
We set the LED as an output and the button as an input and then what the loop id doing is: If its receiving data through the serial communication it will check the state of the LED. If this state is equal to 1 it will set the LED to high and
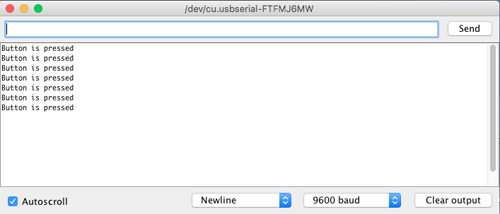
otherwise it will set it to low. Also, when the button is pressed a message will be sent to the serial 'Button is pressed'.
#include <SoftwareSerial.h>

const int rx = PA0;
const int tx = PA1;
const int led = PA3;
const int button = PA7;

SoftwareSerial mySerial(rx, tx);

void setup() {
    pinMode(led, OUTPUT);
    pinMode(button, INPUT_PULLUP);
    mySerial.begin(9600);
  }

void loop() {
    if (mySerial.available() > 0) {
        char ledState = mySerial.read();
        if (ledState == '1') {
          digitalWrite(led, HIGH);
          }
        else if (ledState == '0') {
          digitalWrite(led, LOW);
        }
      }
    int buttonState = digitalRead(button);
    if ( buttonState == LOW) {
        mySerial.println("Button is pressed");
        delay(500);
      }
  }
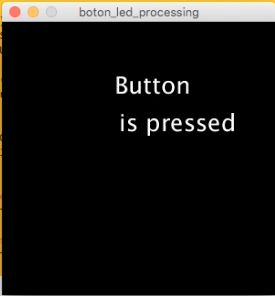
Then the code that we used in processing was the next one. What we are doing here is first to set the size of the window that will be open (300,300) and then creating the serial port to be able to read from it. As it was shown before, we are sending a message to the serial when pressing the button. This message will be read here. We use the draw function to draw what will appear in the window.
import processing.serial.*;
Serial myPort;
String myText="";

void setup(){
    size(300, 300);
    myPort = new Serial(this, "/dev/cu.usbserial-FTFMJ6MW", 9600);
    myPort.bufferUntil('n');
  }
void serialEvent (Serial myPort){
    myText = myPort.readStringUntil('n');
  }
void draw(){
    background(0,0,0);
    text(myText, 120, 120);
    textSize(26);
    myText="";
    if(mousePressed && (mouseButton == LEFT)){
        myPort.write('1');
      }
    if (mousePressed && (mouseButton == RIGHT)){
        myPort.write('0');
      }
  }
Python Web-based Serial Console using WebSockets
The second one that I tried was Python. I followed this tutorial to build an interactive web page for creating user interfaces
to serial devices.
The requirements for this tutorial are:
- I have a device that is communicating using a FTD interface via serial protocol to a computer.
- I will be receiving or sending data from sensors through the serial port.
- Manipulate the data in an HTML webpage using Javascript.
- I will use Web Sockets for having an open communication between the webpage and the web server.
This is the architecture that is used in this tutorial:

The code that is used during this tutorial can be downloaded in this .zip file.
- serialworker.py: where you define the serial port that you are going to be reading data from and the functions that are required for reading and writing in the serial. The data that is comming in will be stored in a queue to be read and the output data in another one that will be sent.
- server.py: Using Tornado, where you define the port that you are going to be using and the web socket.
- index.html: where we describe the interface that the user is going to see.
- main.js: JavaScript code that using the Websocket will interact with the user.
Trying JavaScript
For using JavaScript I had to install some packages previously.
The first thing I installed was node, but instead of installing it directly from the site I downloaded it from nvm.
1. I first installed nvm: curl -o- https://raw.githubusercontent.com/creationix/nvm/v0.33.9/install.sh | bash.
2. I checked that it had installed with this command command -v nvm.
When executing this you should get 'nsv' in the terminal. The first time I did it I didn't get this message but then I closed and open a new terminal
and it was working.
3. Then I moved on to clone the git repository, and as I already have git I run:
git clone https://github.com/creationix/nvm.git .nvm.
4. I checked what version I was using : cd ~/.nvm + git checkout v0.33.9. When doing so I got HEAD is now at 1b14e6b... v0.33.9.
I activated it through . nvm.sh.
5. I installed node nvm install node. I checked what versions I had nvm ls and which one I was using node --version. As I was using the 9th one and I want to use the 6th one, I installed it nvm install 6.14.1.
The three libraries that I will use are express, serial port and socket.io.
For installing them I wrote in the console:
npm i express
npm i serialport
npm i socket.io
Once I had everything installed, my instructor gave me some examples for working with JavaScript and an input or an output. One of the files that you need to have is the one containing the modules.
The structure of the files will be this one:

node.button.c:
In this file what we are doing is to, first, initialize the clock, the input (button) and the serial communication. Then the script will send a '1' whenever the button is pressed and a '2' when is not. The way of sending this numbers is :
put_char(&serial_port, serial_pin_out, '1'); .
put_char(&serial_port, serial_pin_out, 10);
We send the 1 directly and then the 10 corresponds in the ASCII code to a line break, as we will set the program to read when there is one.
#include <avr/io.h>
#include <util/delay.h>
#define output(directions,pin) (directions |= pin) // set port direction for output
#define input(directions,pin) (directions &= (~pin)) // set port direction for input
#define set(port,pin) (port |= pin) // set port pin
#define clear(port,pin) (port &= (~pin)) // clear port pin
#define pin_test(pins,pin) (pins & pin) // test for port pin
#define bit_test(byte,bit) (byte & (1 << bit)) // test for bit set
#define bit_delay_time 102 // bit delay for 9600 with overhead
#define bit_delay() _delay_us(bit_delay_time) // RS232 bit delay
#define half_bit_delay() _delay_us(bit_delay_time/2) // RS232 half bit delay
#define input_port PORTA
#define input_direction DDRA
#define input_pin (1 << PA7)
#define input_pins PINA
#define serial_port PORTA
#define serial_direction DDRA
#define serial_pins PINA
#define serial_pin_out (1 << PA1)
void put_char(volatile unsigned char *port, unsigned char pin, char txchar);
int main(void) {
static char chr;
CLKPR = (1 << CLKPCE);
CLKPR = (0 << CLKPS3) | (0 << CLKPS2) | (0 << CLKPS1) | (0 << CLKPS0);
set(serial_port, serial_pin_out);
output(serial_direction, serial_pin_out);
set(input_port, input_pin); // turn on pull-up
input(input_direction, input_pin);
while (1) {
while (0 != pin_test(input_pins, input_pin))
;
put_char(&serial_port, serial_pin_out, '1');
put_char(&serial_port, serial_pin_out, 10); // new line
while (0 == pin_test(input_pins, input_pin))
;
put_char(&serial_port, serial_pin_out, '2');
put_char(&serial_port, serial_pin_out, 10); // new line
}
}

server.js:
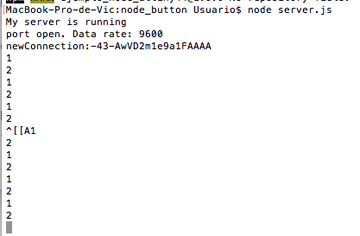
In this file what we are doing is to create a local server that will make the connection between the board and the web. For doing so we first create the express variable and we set the port that we will be listening through (we can set one that we know that won't be used, like 1234). We also set the file where the .html, the libraries and the sketch.js are installed, in this case the public one.
Next thing is to create the web socket. There is a function that will send a message to the console every time we have a new connection event. Is important to create the socket before defining the port as it will make use of it.
We define the serial and the port that is used; establishing the properties that we want it to have like the speed and the moment when we want it to read, in this case after /n.
Inicialization of the functions and then we define them.
showPortOpen: this function is to check when a port is open. A message will be displayed in the console.
sendSerialData: this function is sending the data that we are receiving from the previous code, the button one. In this case a condition is written just to know how it can be set but the only thing that will be needed to send the data is : io.emit('button', data);.
showPortClose and showError: testing messages for when the port is closed or when we have an error.
var express = require('express');
var app = express();
var server = app.listen(1234);
app.use(express.static('public'));
console.log("My server is running");

var socket = require('socket.io');
var io = socket(server);
io.sockets.on('connection', newConnection);

function newConnection(socket){
    console.log('newConnection:' + socket.id);
  }

var SerialPort = require('serialport');
  var myPort = new SerialPort("/dev/cu.usbserial-FTFMJ6MW", {
  baudRate: 9600,
  options: false,
  parser: SerialPort.parsers.readline("\n")});

myPort.on('open', showPortOpen);
myPort.on('data', sendSerialData);
myPort.on('close', showPortClose);
myPort.on('error', showError);

function showPortOpen() {
    console.log('port open. Data rate: ' + myPort.options.baudRate);
  }

function sendSerialData(data) {
    console.log(data);
    if (data==1){
    io.emit('button', data);}
    if (data==2){
    io.emit('button', data);}
  }

function showPortClose() {
    console.log('port closed.');
  }

function showError(error) {
    console.log('Serial port error: ' + error);
  }
index.html:
Here we are calling to the different files that we are going to be using and the libraries.
<!DOCTYPE html>
<html>
<head>
<meta charset="UTF-8">
<title>Sockets Example</title>
<script src="libraries/socket.io.js" type="text/javascript"></script>
<script src="libraries/p5.js" type="text/javascript"></script>
<script src="libraries/p5.dom.js" type="text/javascript"></script>
<script src="libraries/p5.sound.js" type="text/javascript"></script>
<script src="sketch.js" type="text/javascript"></script>

<style>
  body {
    padding: 20px;
  }
</style>
</head>
<body>
</body>
</html>
sketch.js:
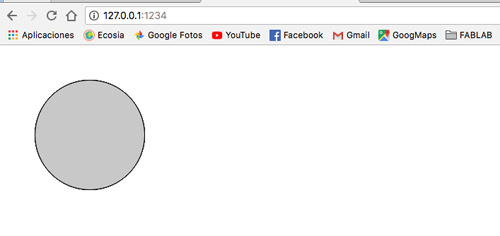
In this file we are defining the socket to create the connection with the server, in this case a local server. Then what we do here is to call the socket that we have created before and set it to do a function, in this case socket.on('button', changeCircle);, this means that the button will do the changeCircle funtion. We define the function, in this case an ellipse will be changing colour when the button is pressed.
var socket;

function setup() {
    createCanvas(1024, 762);
    background(255);
    socket = io.connect('http://localhost:1234');
    socket.on('button', changeCircle);
    ellipse(100, 100, 155, 155);
  }

function changeCircle(data) {
    if (data == 1){
    fill(51);
    ellipse(100, 100, 155, 155);
  }
else if (data==2){
    fill(200);
    ellipse(100, 100, 155, 155);
  }
}

function draw() {
}
To start this server and work with this codes I went to the directory where the files were and I wrote
node server.js in the console. At first I had some trouble as I was using the version v9.11.1 and I wanted to use the version 6: v6.14.1. I wrote nvm use v6.14.1 and then I had to reinstall the serial npm i serialport. And then I wrote again node server.js and it was working!.
I opened a web explorer and I went to the server that I was using: http://127.0.0.1:1234/, clicked the button and the image was changing! :