- Assignment 16
Wildcard Week
This week I chose to use the sewing and embroidery machine to build kiwido poi.
Image
Since often the bolas are inflamed I chose a fire as my model.
Looking on the internet I found this image:

Figure 1. Fire emoji on Android 9
To make it easy to process I opened it with GIMP and on Colours -> Brightness-Contrast Tool I set Brightness to the minimum (-127) and Contrast to the maximum (127).

Figure 2. Edits in GIMP
Afterwards I colored white the inner flame and the background. Now the file is ready.

Figure 3. Image ready to CAM
CAM
The machine has its own series of programs to process images to be embroidered.
Design Center
The first is Design Center where I imported the image that, since it had already been optimized, I imported without adjusting any parameters.

Figure 4. Import settings
By pressing on the parrot image in the top right side I switched to the next screen. Here the only setting I changed to 120x120 is the frame area by clicking on Seleziona Area....

Figure 5. Select the area of working
In the next screen I didn't need to modify the trace so I went straight to the last one.

Figure 6. Nothing to edit

Figure 7. Idem
From the toolbar I selected the Punto pieno to do the embroidery and with the right mouse button I selected the area. In the menu that appears I changed the parameters as in the figure and pressed Enter.

Figure 8. Punto pieno work.
I did a similar thing with Punto a Zigzag to do the outer seam.

Figure 9. Punto a Zigzag work.
Layout & Editing
Clicking on the last parrot of the Design Center toolbar opens another program: Layout &
Editing.
First of all in Opzioni -> Proprietà Pagina Disegno I set the frame 120x120.

Figure 10. Layout dimension.
Then clicking on the icon of the three numbered folders in the toolbar I set the execution order. The layer I put last I'm not going to sew it, indeed I haven't changed its parameters before.

Figure 11. The three works.
Finally, I increased the flame size by holding down CRTL to scale it proportionally. At the bottom left of can see the size.

Figure 12. File ready to export.
I have exported the file twice, one as it is and one mirrored by the command in the toolbar.
PREMIER+ Embroidery Free
The last program I used was PREMIER+ Embroidery Free, which only used to convert the file from HUS to vp3 by importing one file at a time and exporting it directly. Then I saved the files on a flash drive.

Figure 13. A simple file conversion.
Embroidery and sewing
The machine I used is a HUSQVARNA VIKING with a 120x120mm frame.
Preparation
The first thing I did was frame the fabrics to the loom. I used two of them to make the piece more resistant. First I placed the red on top of the loom and after the orange one that will be respectively the back and the front .

Figure 14. Back

Figure 15. Front
Then I inserted the loom in the moving arm of the machine and the yellow wire in the needle.

Figure 16. Machine is ready!
Embroidery
Inserting the key on the side of the machine appeared on the screen the list of available files to run, from there I chose with the kiwido_left.

Figure 17. Embroidery preview.
I pressed START STOP (see Figure 16) to start the machining process.
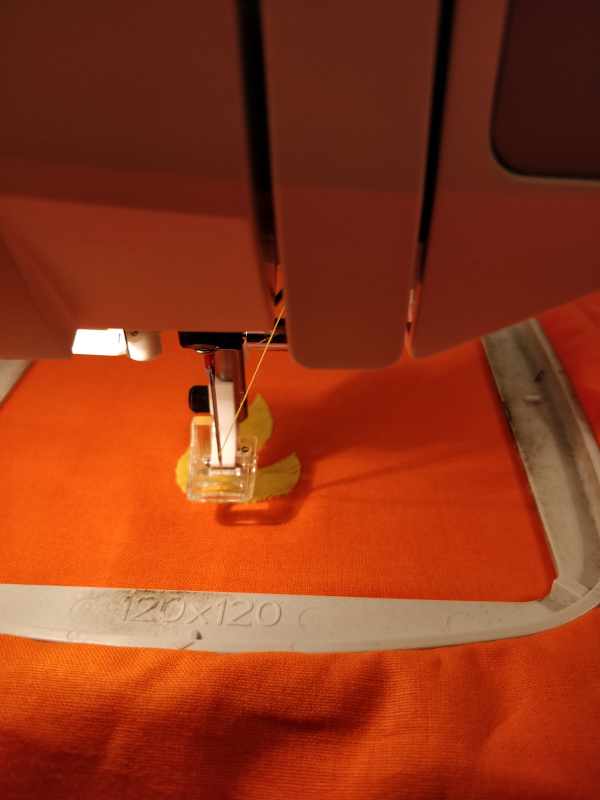
Figure 18. Work in progress.
Sewing
When the first working is finished, the machine warns us to change the wire, suggesting the colour according to the one chosen during the CAM. I put the red to make the edge.

Figure 19. The warning.

Figure 20. Starting the second work.
From the previous picture you can see that there are two pins in the fabric, this is because I inserted a piece of red fabric bent on the back of the frame and I also helped with some stops to lock it.
During the undersewing of the outer edge the wire has broken, luckily the machine can understand it and warn me in good time. Then I rewired the wire and restarted it by pressing START STOP again.

Figure 21. The warning caused by broken wire.

Figure 22. The machine is restarted without any problems.
Here is the result of the two works.

Figure 23. Front

Figure 24. Back
Post processing
After removal from the loom I cut along the edge to give it the final shape.

Figure 25. Final front

Figure 26. Final back
Then I put a grommet to pass the cable that I knotted several times to prevent it from coming out.

Figure 27. The kiwido is almost ready.
Finally I put a bag of rice and the tail made with the leftover fabric in the pocket on the back. The kiwido is then ready!

Figure 28. I love them.

Figure 29. And they also work.