Week 3 : Computer-Aided Design
- Model (draw, render, animate, simulate, …) a possible final project, and post it on your class page with original 2D and 3D files.
Fab Academy 2018 - Thierry Dassé
In my final project, I'll make boxes to store different wastes. I can make them with laser cutted pieces in 3mm MDF for example and assembly
sheets with tenons and mortises. I've sometimes done this type of box and being very precise is essential to be able
to assembly the box. I decided to use Inkscape, a 2D vector tool, to draw it, because I found it efficient and it's a free software.
I first made a grid 1mm width to draw precisely. I also made a 0.1 mm grid. With this grid, I can add 0.1 mm extra material to the tenon to
clear the kerf and have a press fit. So, I won't glue pieces and will be able to mount and unmount. It can be very usefull when prototyping.
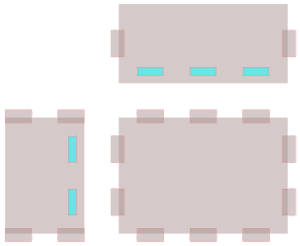
To design pieces with tenons, I just made a rectangle first. Then, I draw a tenon with an extra part on the rectangle.
After that, I duplicated this tenon each time I need. I also made a blue rectangle for hole and duplicate it to fix bottom sheet
in sides to have a stronger bottom part.
To make pieces design, I just have to select all grey shapes on a rectangle and make a boolean union. Then select all blue rectangles,
make a union and then a difference with grey part. Then, I have all outlines to cut my pieces. This way is faster than design all tenons
and mortises. Using clones, I also can modify all tenons in one step.
 I used Blender for 3D assembling importing my svg 2D design. It can be a good way to verify all is at the right place.
First I imported svg file in Blender.
Since Inkscape 0.92, svg import have a wrong scale.
So, I need to rescale with s shift-z 0.28222222 to retrieve good measures.
After, I created two materials, one for front faces and one darker for the rim (to imitate laser cut render).
Then, I used a solidify modifier, adjust thickness and put 1 in Rim (Material Index Offset) to use the second material.
After making a very simple box, I also train to make parts in 3D.
I first use Blender to design a screw. By just adding a single vertice, I extrude it several time to design screw profile.
Then I used screw modifier and adjust parameters to have a real screw.
By this way you can control precisely screw profile, diameter and step.
It can be usefull to make screws in plastic to fix different pieces together.
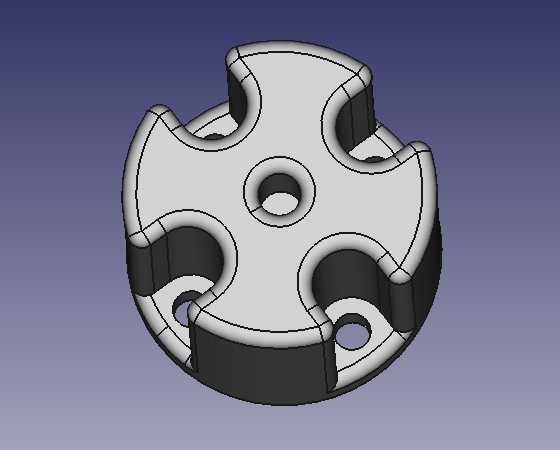 Freecad is a free software, mechanical design oriented. I used it to make a piece I wanted to connect to a Dynamixel MX 28 servo motor.
For this piece, I used a spreadsheet. It's very interesting because you can put datas in a cell add an alias name in tis properties and replace
values in cotation by spreadsheet_name.alias_name. It's also possible to use alias in formulas.
Modifying a value in spreadsheet change the design.
 To make gear on freecad, I have installed an add on :
Goto tools/addon manager, select FcGear, then install. Restart Freecad.
With this add on, It's very easy to design gears and rack gears.
 I wanted to show key pressed and mouse clicks in order to record it in screencast or videos.
To do that, I found a good small soft named key-mon on linux. I just install it with :
sudo apt-get install key-mon
A small window appear, with last keypressed, hotkeys and mouse. It works good.
To record my work in 3D modelling, I try simpleScreenRecorder.
Installation with a ppa repository on linux
sudo add-apt-repository ppa:maarten-baert/simplescreenrecorder
sudo apt-get update
sudo apt-get install simplescreenrecorder
First try, I choose 854x480px, 25p/s H.264 codec and make a small video.
Size is around 1.2Mb/min. It's quite a lot, so I'll have to make short videos.