Fablab Sorbonne - Paris, France

home

Roto-Casting Machine (Weeks 15 & 16)

As a group, we set about creating a Roto-Casting Machine (rotocaster). The work was conducted between the Fab Labs in Sorbonne and Cite de Science et Industrie. The idea was to create a rotocaster that would be operated by a motor, guiding one axis. A second axis would be effected by the first, moving on the opposite axis by means of inertia.The plan was to insert a mold containing liquid plastic into a chamber on the axis, rotating the liquid for 30mins-20hrs. The liquid would therefore set over time, producing a mold with a hollow surface, a rotational mold.

1920x1080 SLIDE LINK

Brainstorming

mechanical design 5 mechanical design 1

The first task brainstorming ideas. Amongst other things we looked at the work of past students such as Tommaso Spagnoli.

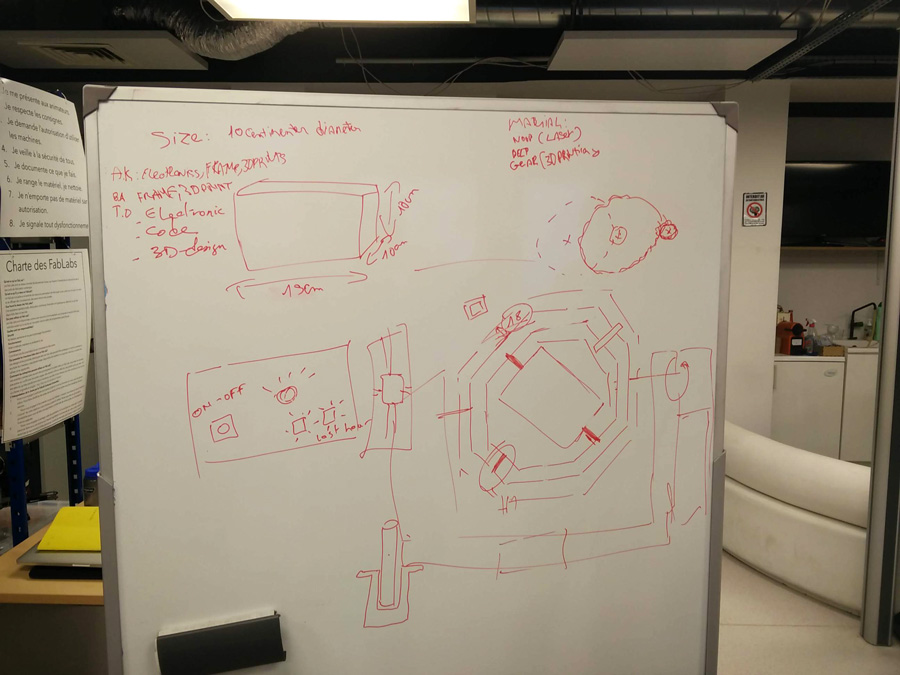
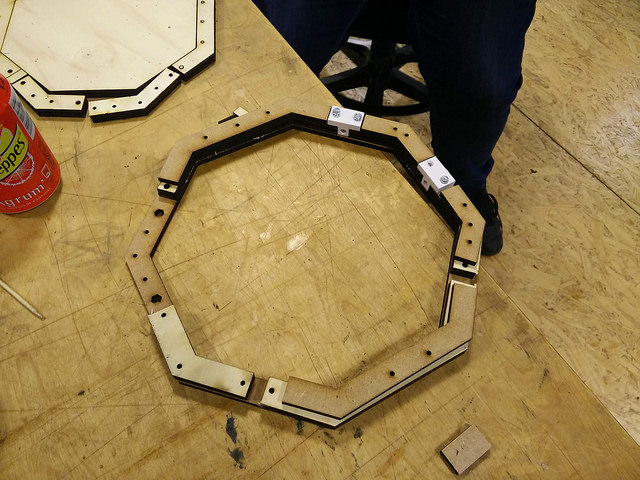
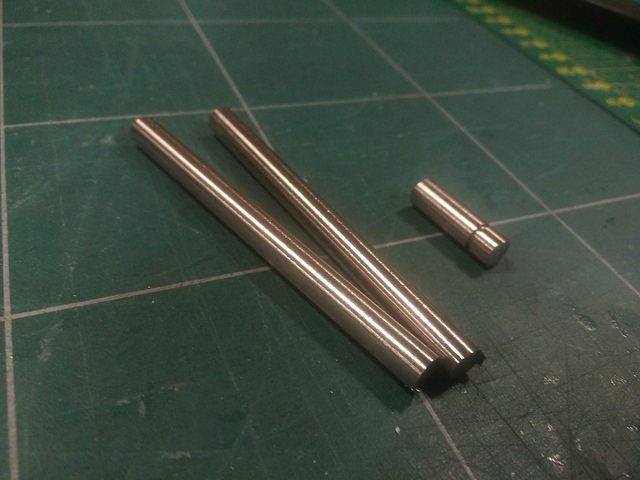
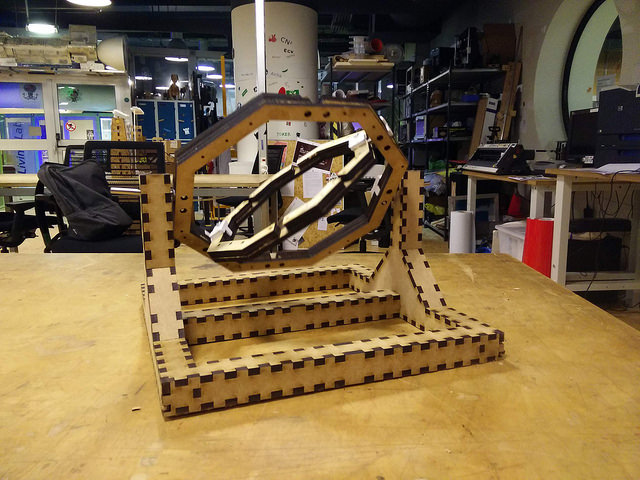
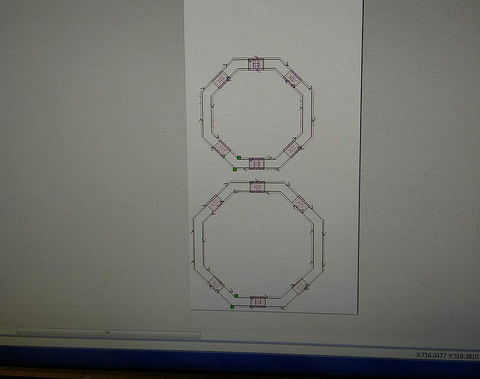
On reflection, we felt that an octagonal shape would give the strength to the axis: An external axis to rotate the mold vertically and an internal axis, picking up on inertia and rotating the mold diagonally. The rotation would happen around 4 lengths of metal piping (6mm thick) – two longer lengths would support the rotation vertically, to be machine driven. The two smaller lengths were for the inertia-driven rotation.

mechanical design 4

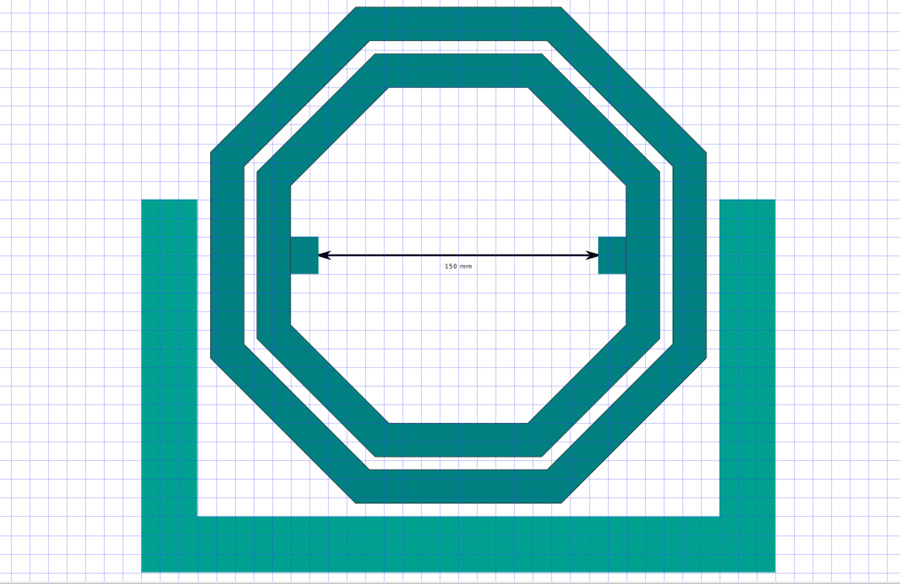
We also considered creating a strong base and supports for the axis, using press-fit construction at a suitable height. There needed to be enough room for the full frame to rotate.

We defined the dimensions of the mold chamber as 150x100x100, allowing for a wide mold or possibly, three smaller molds within the space. It is important that the chamber is liquid-tight to avoid any spillage. We discussed the use of glue and straps along with press fit construction.

mechanical design 3

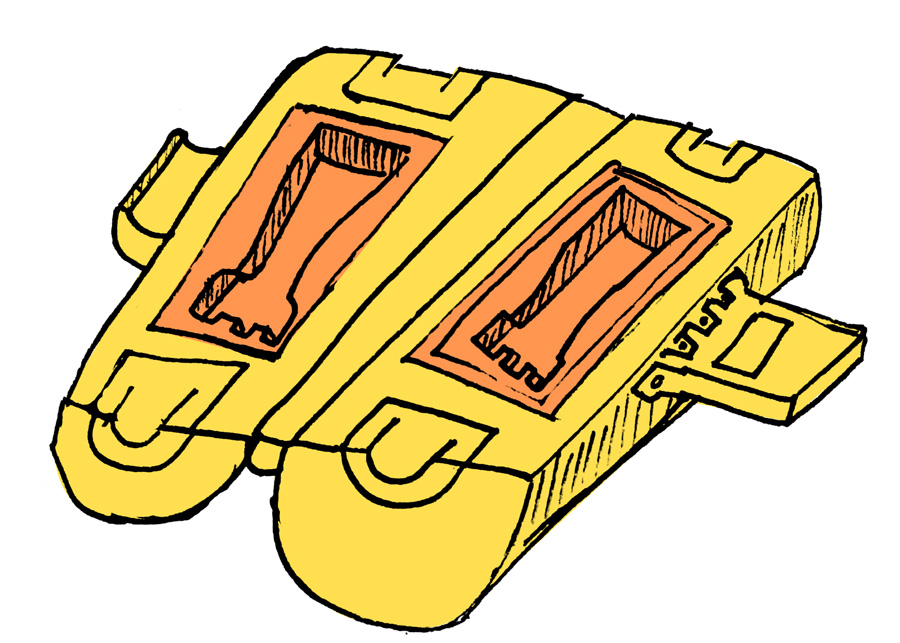
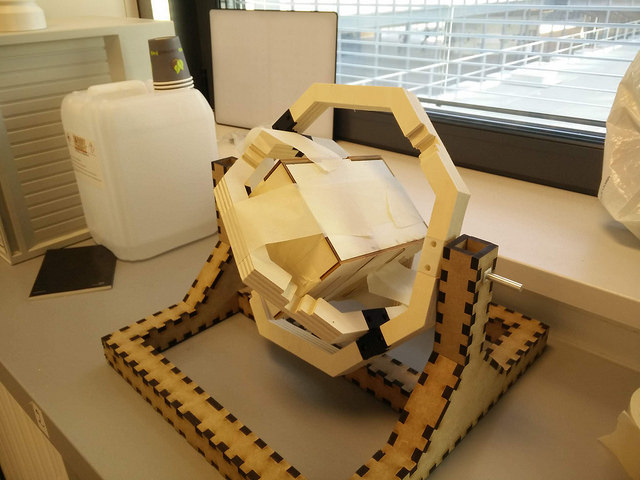
The first attempt at visualising the chamber was to make a cylindrical shape with a replaceable tray (seen here in yellow and orange). It would have to be 3d printed which have lengthly 3d printing time.

mechanical design 2

Instead of using the bars to hold the chamber, the suggestion was to use bolt it with a hinge to the octagon.

mechanical design 7

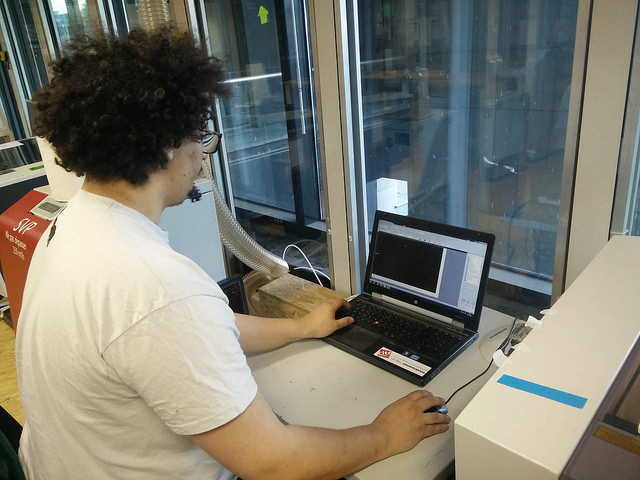
Separately we designed the axis, base and chamber files for lasercutting. We then gathered 6mm, 10mm and 3mm MDF for each. The files were cut from Inkscape to the Trotec accordinly.

mechanical design mechanical design

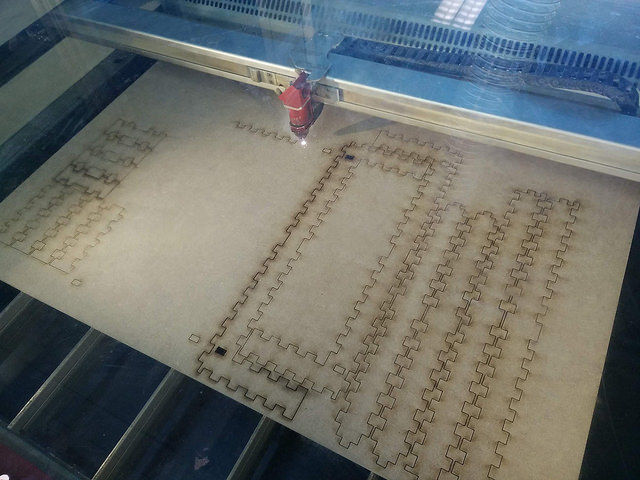
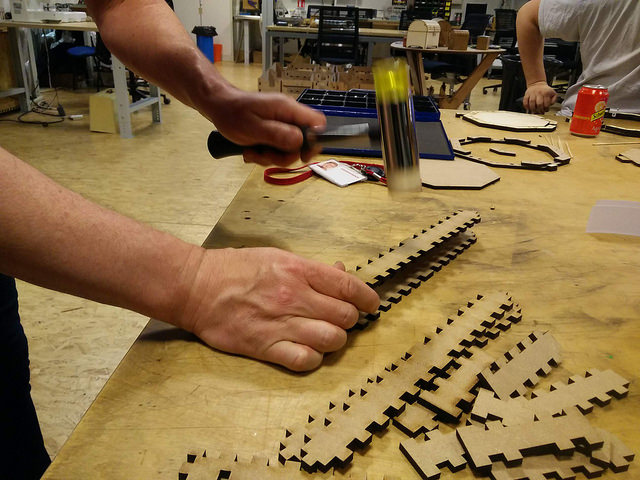
Some of the smaller elements proved challenging to remove from the material.

mechanical design 6

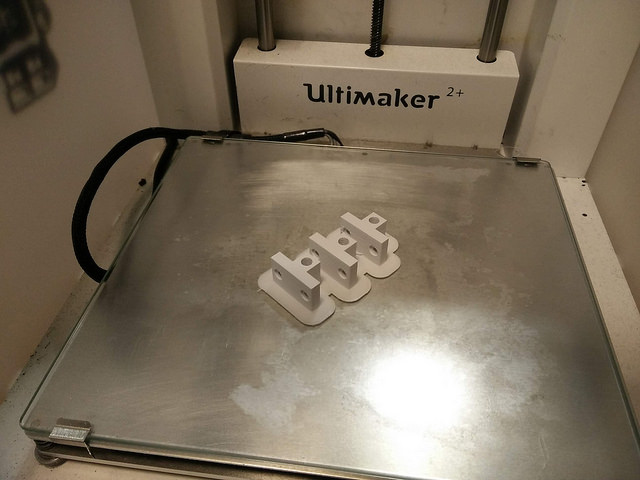
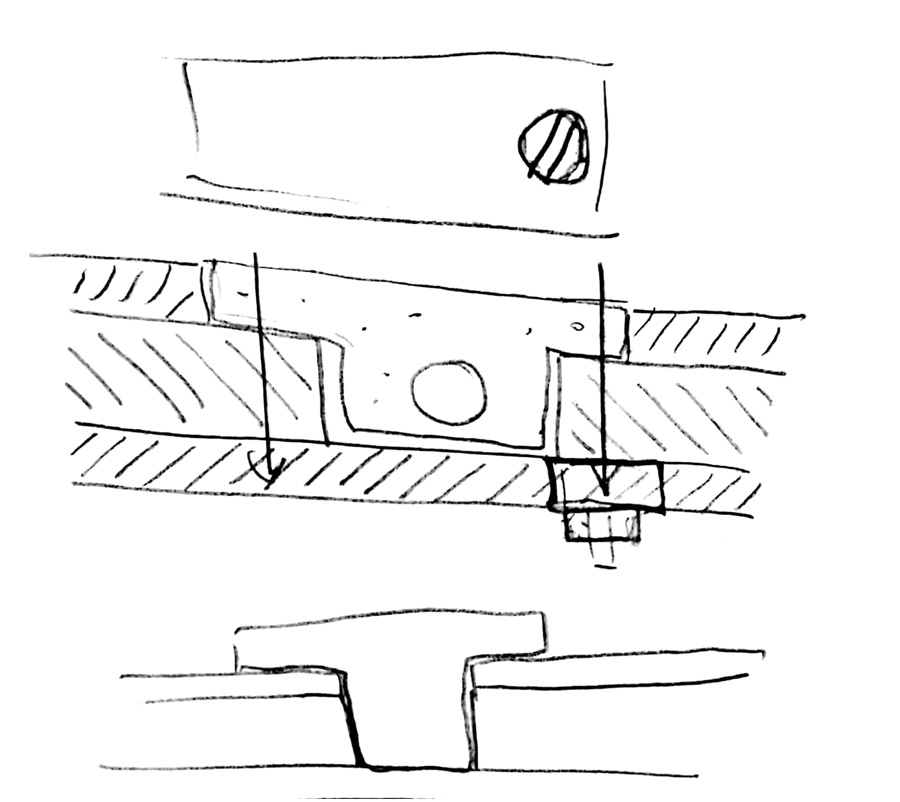
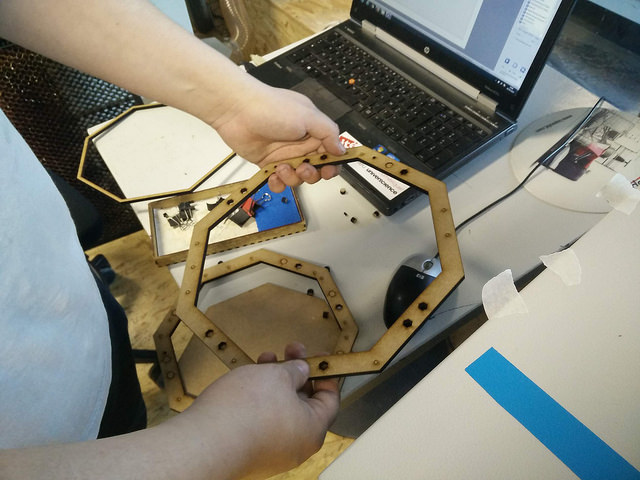
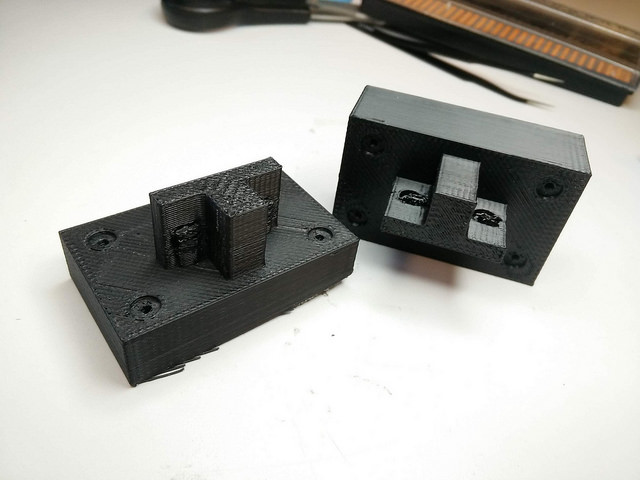
Joints to assemble the octagon firmly were drawn up. These would position the screws at an angle way from the moving elements. The joints were built in 3D modelling software and printed with the Ultimaker 2+.

mechanical design mechanical design mechanical design

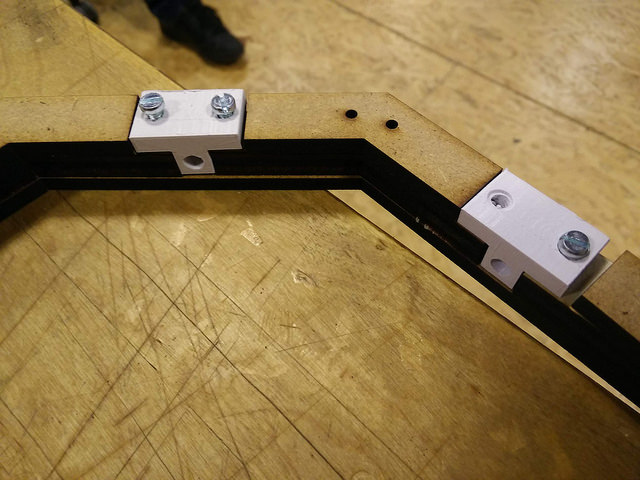
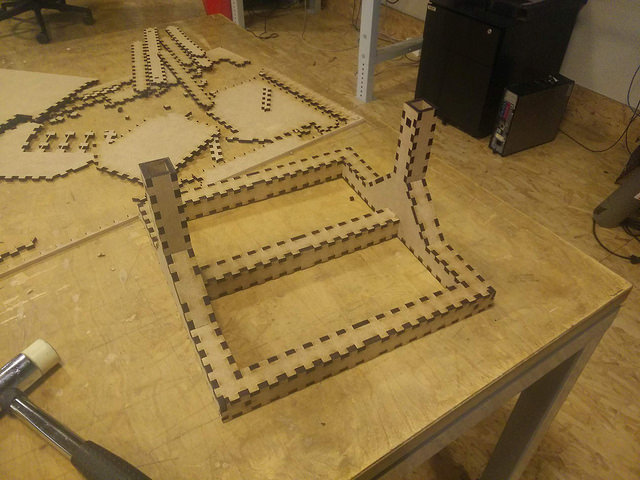
This early prototype screwed together in a looser manner than we expected.

mechanical design

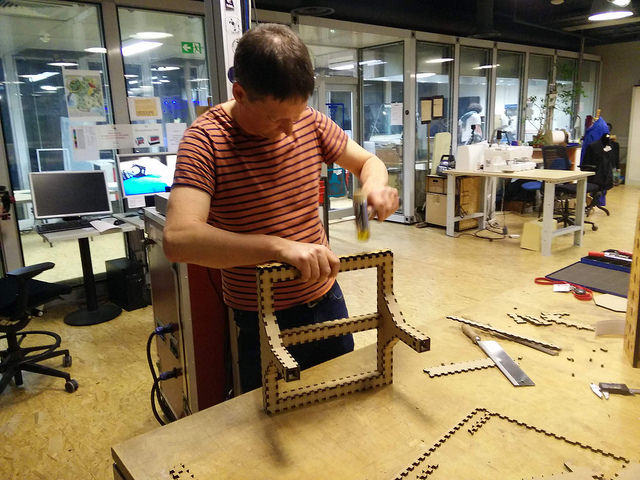
A mallet with soft edge was used to apply a certain amount of force to the proceedings!

mechanical design mechanical design mechanical design

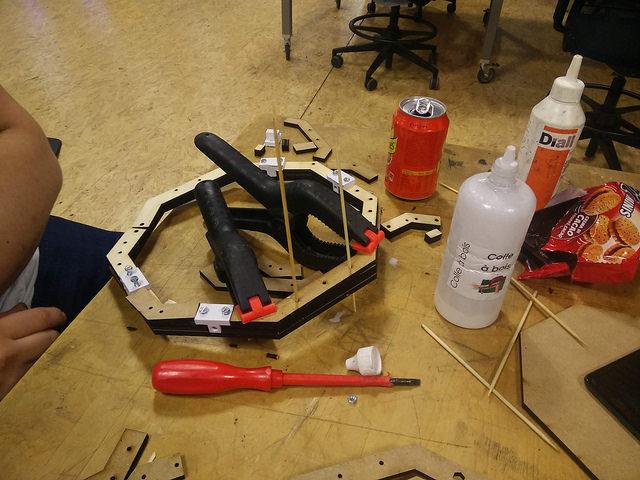
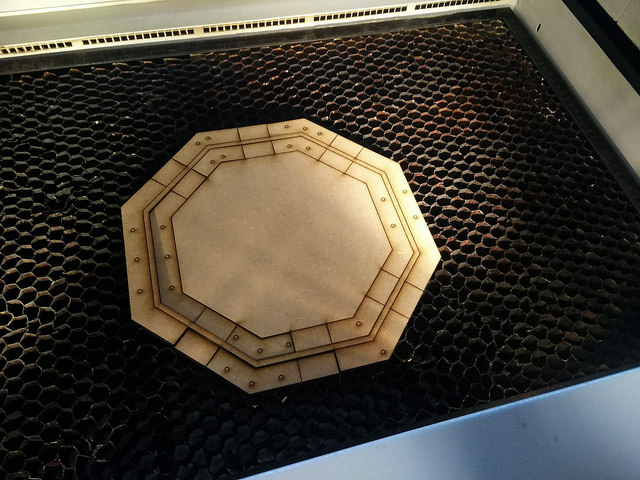
Glue and grips were used to stick three 6mm pieces together to form an 18mm thick octagon. Sandwich picks were used to keep holes free of excess glue.

mechanical design

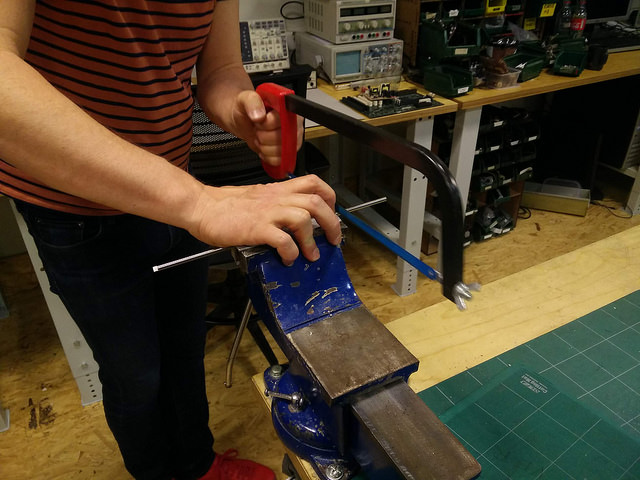
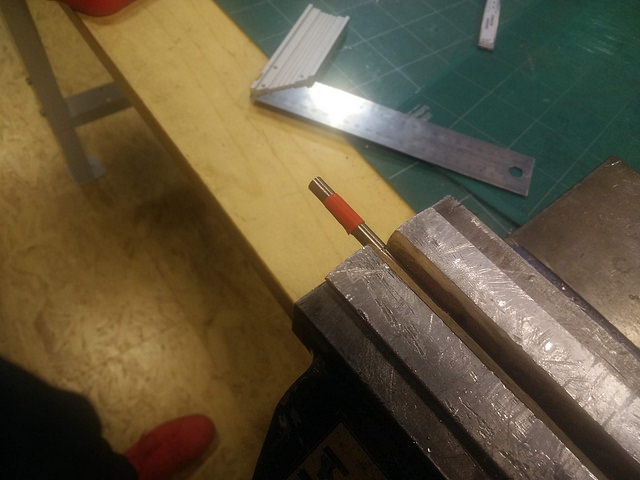
We cut our metal piping to size from a larger piece. The metal saw generates a lot of heat so care we taken. A pencil and later electrical tape was use to guide the exact cut position.

mechanical design mechanical design mechanical design

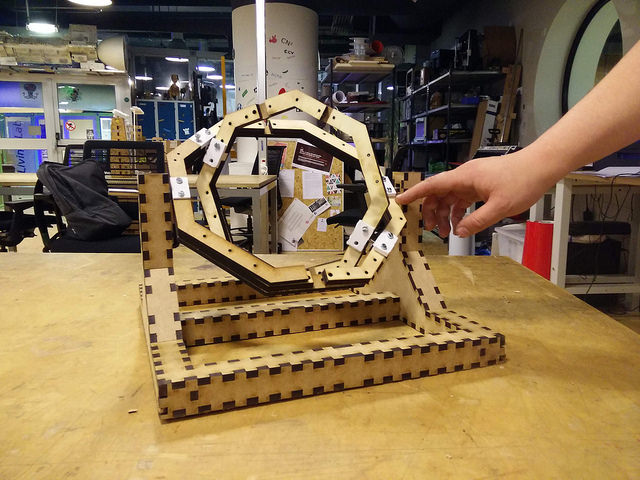
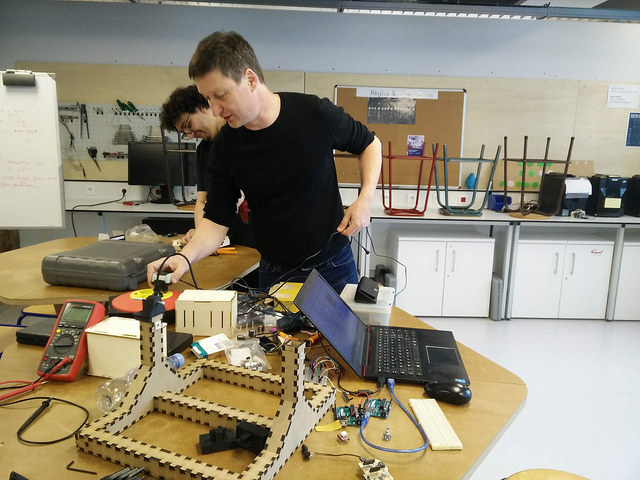
In a test at the end of the first day, we were able to support and rotate the axis on the base. Good result after a hard day's night!

mechanical design mechanical design

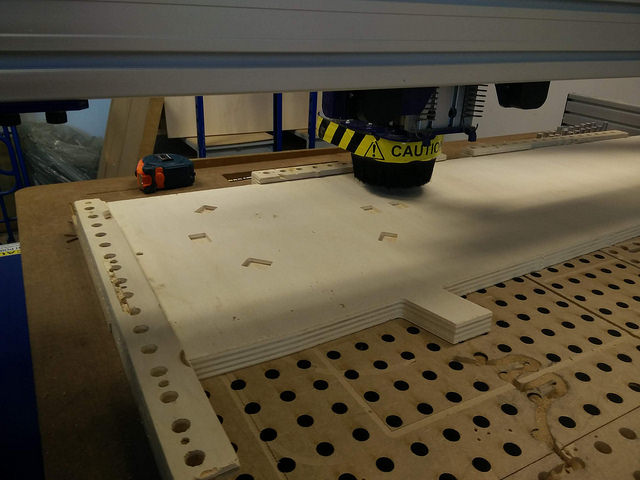
Adel worked to create an improved stronger axis on the CNC.

mechanical design mechanical design

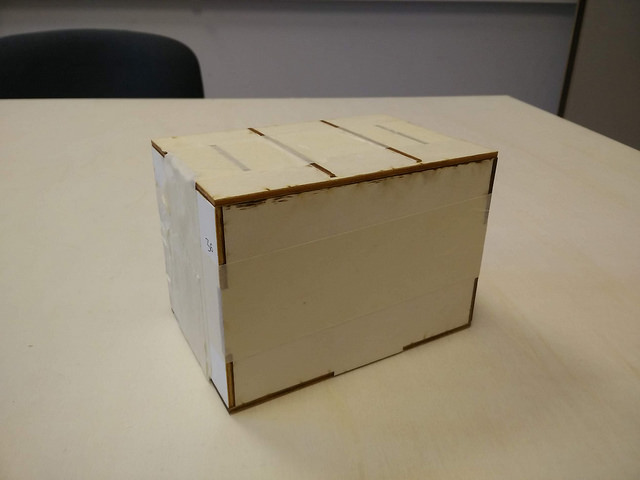
Ben developed the inner chamber as a press-fit box.

mechanical design

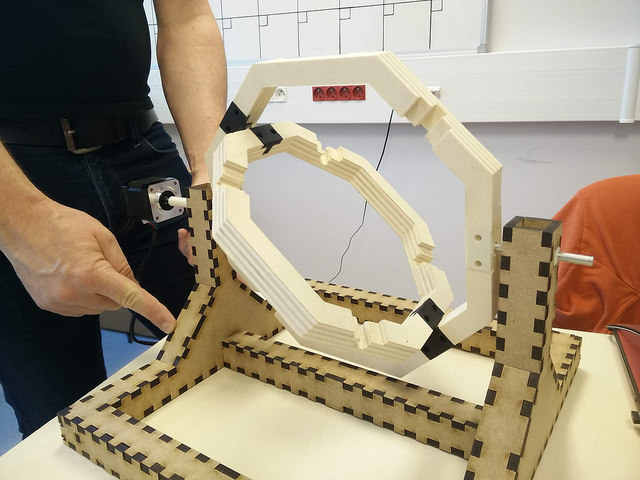
Thierry and Adel developed the code to get the motor running. They positioned it on the base.

mechanical design mechanical design

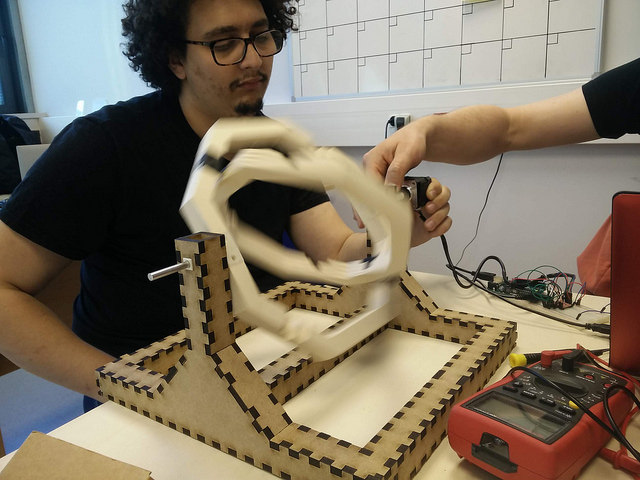
A quick test with the chamber in position.

Revised Physical Parts

mach design

We worked on several new parts: A piece was created on one side to hold the stepper motor in position. It was essential to fit the dimensions of the frame and axis. Parts were designed in Fusion 360 and printed using a UP3D Tiertime 3D printer. We considered at this point how the main and encoder pcb boards would sit on the base.

mach design

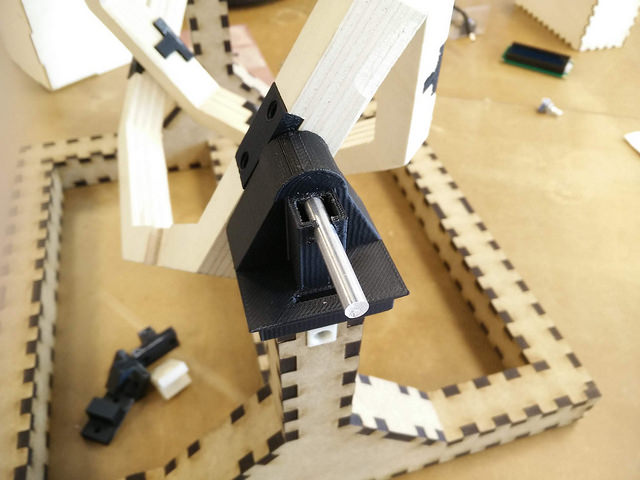
Key to the machine was support the axis with a metal bar on the opposite side to the motor. This piece needed to hold position, while at the same time, allow freedom of movement. Alternative shapes, and springs were considered before design and print.

mach design

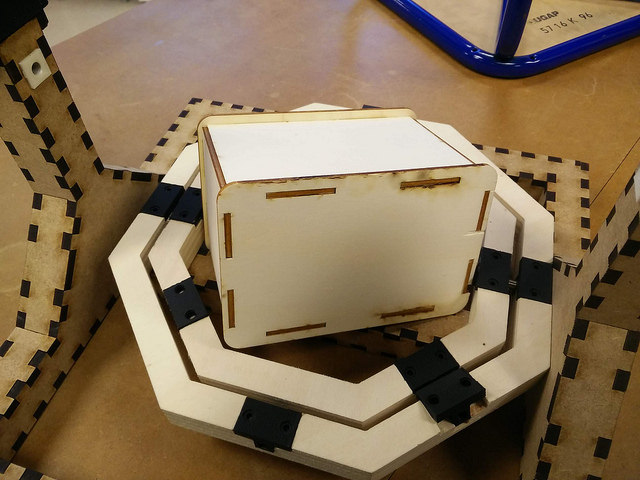
The mold chamber was improved to be better press-fit without glue. The pieces were designed in Fusion 360 and exported as flat sketches (.dxf) to Inkscape. From here, they were prepared as an SVG and cut with the Trotec lasercutter.

mach design

Two connector parts were also 3D printed to close the distance between the chamber and axis. They were prepared with a right angle to fit the pockets of the axis.

Electronics: Wiring/Breadboards/Components

mach design

We considered the interface would allow users to operate the rotational molder. We chose to use a small Uctronics LED which could provide various menus to adjust settings.

mach design

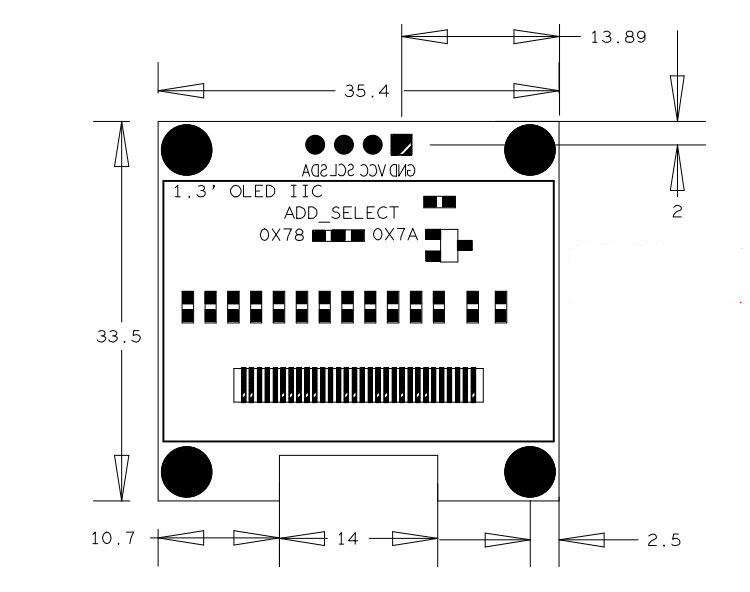
We reviewed the datasheet and considered the number of pins, including those required for the motor. Early on, it seemed clear we would work with a ATMega as the number of pins was high.

mach design

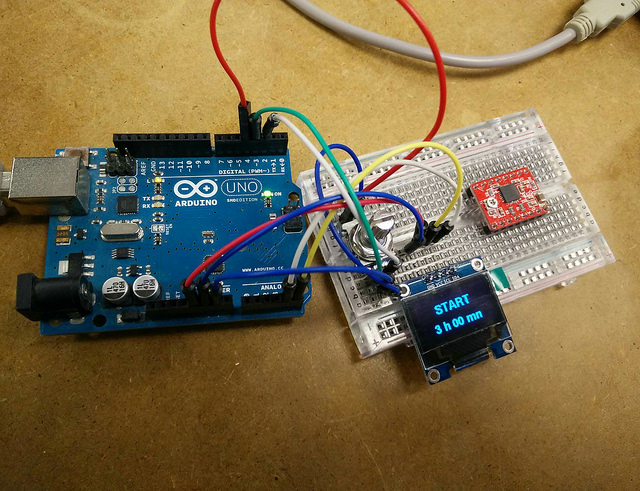
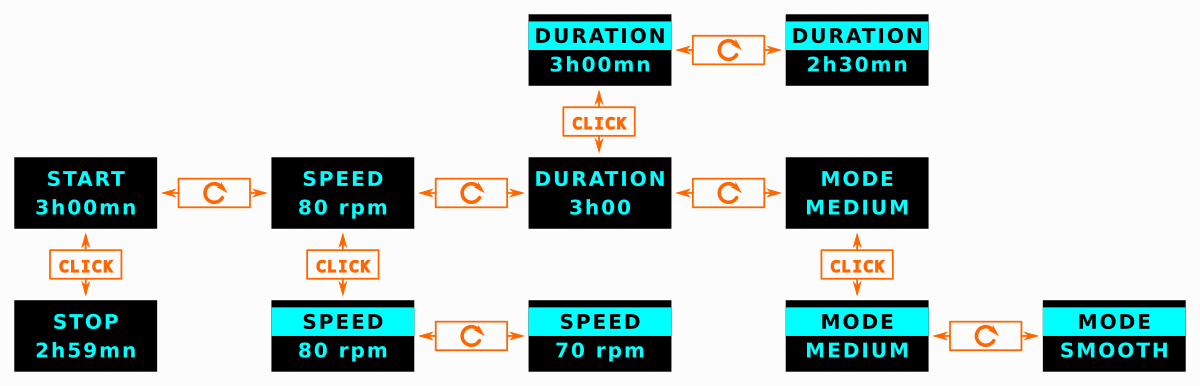
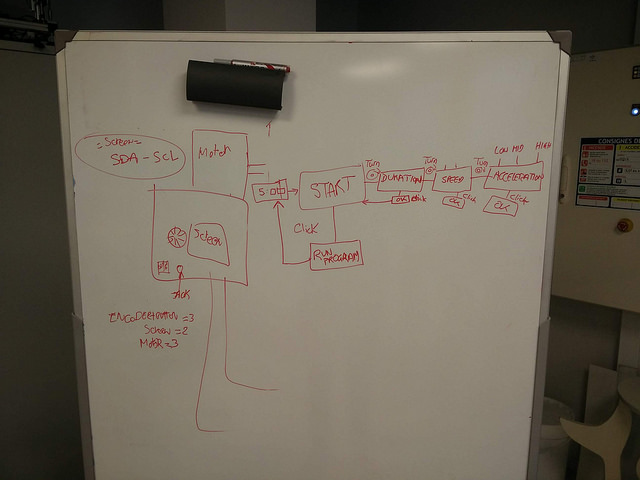
The encoder has a dial and button and we worked out the menu on a breadboard. The following photos indicate the steps of the menu as you rotate the dial. First is the 'Start' with a default three hour duration. Click once to start the machine.

Boards: Eagle/FabModules/SRM-20/Soldering

mach design

We worked to complete the machine and documentation for Wednesdays deadline. Parts were drilled and press fit as required. Then came the time for planning and designing a board for the microcontroller.

mach design

We built pcb boards with using Eagle, Fab Modules and the SRM-20. A lot of trial and error was involved to cut such small routing for the ATMega and other components.

mach design

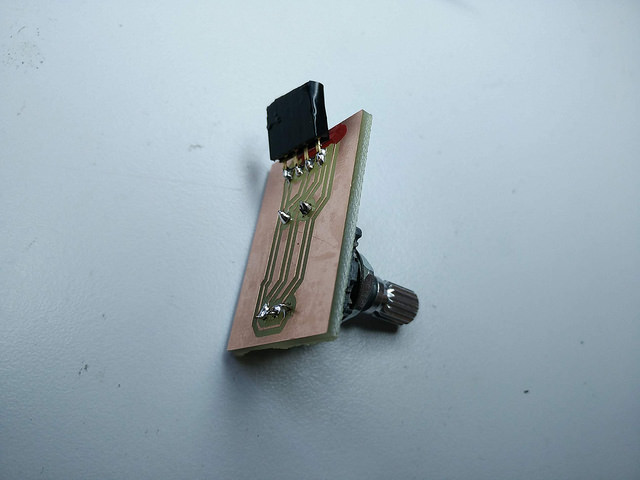
A separate board without VCC was designed for the encoder.

Program stepper motor

To move frames, we have chosen a stepper motor because we can easily control speed and turn slowly if we want to.

On first program, we send pulse to A4988 step pin each 10 milliseconds.
As Nema 17 is 200 steps a turn, rotation speed is half-turn a second.

/*
 * Machine design : Rotomolding machine
 * stepper motor constant speed rotation
 */

const int stepPin = 2; // A4988 step pin
const int dirPin = 3; // A4988 dir pin
 
void setup() {
  pinMode(stepPin,OUTPUT);
  pinMode(dirPin,OUTPUT);
  digitalWrite(dirPin,HIGH); // set dir pin to high : clockwise rotation
}

void loop() {
  digitalWrite(stepPin,HIGH); // send a pulse to step pin
  delayMicroseconds(500);
  digitalWrite(stepPin,LOW);
  delayMicroseconds(500);
  delay(9); // wait 9 milliseconds
}

With this program, second axis oscillate or reach a stable position but we dont have a good rotation.
So we decided to test variable speed on stepper motor.
To set smooth acceleration on stepper motor in order to force second axis rotation, I code a sinusoidal speed with:

  delay(5+2.5*sin(0.031416*i));

where i is step number (between 0 to 200), 0.031416 turn step number to angle in radians, 5 is mean delay and 2.5 variation amplitude.
We tested different values and found that mean delay 4 and amplitude 1.8 are very good values to force second axis rotation.

/*
 * Machine design : Rotomolding machine
 * stepper motor variable speed rotation
 */

const int stepPin = 2; // A4988 step pin
const int dirPin = 3; // A4988 dir pin

int i = 0;
 
void setup() {
  pinMode(stepPin,OUTPUT);
  pinMode(dirPin,OUTPUT);
  digitalWrite(dirPin,HIGH); // set dir pin to high : clockwise rotation
}

void loop() {
  digitalWrite(stepPin,HIGH); // send a pulse to step pin
  delayMicroseconds(500);
  digitalWrite(stepPin,LOW);
  delayMicroseconds(500);
  delay(4+1.8*sin(0.031416*i)); // variable speed
  i = (i+1) % 200;
}

Machine devices

A rotocasting machine is simple. You don't need to upload files to control it or as an input.
So it can be a standalone machine, we just have to be able to set some parameters like speed and duration.

We decided to control the machine with a rotary encoder and a screen. You can push the encoder to start or stop the machine and turn to modify parameters.
Values ans machine state can be seen on screen. We also wanted to control screen using I2C protocol.

We first had to decide wich microcontroller we will use.
We'll need 3 pins for rotary encoder (2 for rotation and 1 for switch), 2 pins for I2C (SDA & SCL) and 3 pins for A4988 stepper driver (step, dir and enable pins). We will need 8 digital pins.
We can't use ATTiny85 because it has 5 pins (6 if we reprogram reset pin).
We tried to use ATTiny84. It has enough pins. So, I searched a library to control I2C screen and before tu use I2C.
TinyWireM has been written for ATTiny85. On tutorials, some speek about a version for ATTiny84. They all link to http://www.scenelight.nl/?wpfb_dl=22 but unfortunately, link is no longer available. I tried to find somewhere else without result.
That's why we decided to change microcontroller and to use ATmega328.
I made test on 16x2 LCD display (with LiquidCrystal_I2C library) and OLED SSD1306 (with U8glib library). Both can be used with ATmega.
We decided to use the second one beacause display si smaller and more readable.

Machine interface

By default speed is set to 80 rpm, duration to 3 hours and mode (acceleration amplitude) to medium.
You can start by clicking. When elapsed time returns to 0, the rotocaster stops by itself and duration is reset to 3 hours.
Before or during running time, you can modify parameters by rotating encoder, choose menu, click on it and modify the value with encoder.
Speed increase or decrease by 10rpm.
Duration increase 30 mn if elapsed time is more than 2 hours, 10mn if time is more than 10mn and 1 mn else.
Mode can be set between smooth, medium and sharp wich modify acceleration intensity. It changes second rotation.
Rotocasting machine interface

Rotary encoder programming

Rotary encoder A, B and Switch pins are directly connected to ATmega digital pins, other pins are connected to ground.
Using pullup resistor we can read a high level when circuit is opened (switch button released) and low level when closed(switch button pressed).
You can detect switch pin is pressed when pin state change from high to low level.
You can detect rotation when A or B pins change. When A turn form high to low before B, button turn clockwise else counterclockwise.
So, I have to keep previous pin level and read new one to compare. I will use 6 bits to have all, 3 low bits for previous states and 3 for new ones.

unsigned short encoder = 0b000111; // new S:0 B:0 A:0 previous S:1 B:1 A:1

To write new rotary encoder pin A level :

readPin = (unsigned short) digitalRead(encoderPinA);
encoder = (encoder & 0b110111) | (readPin << 3); //write encoderA state in the fourth digit

When rotary encoder is pressed, encoder variable value becomes 0b011111 because switch pin turns from 1 to 0.
When rotary encoder is turned clockwise, encoder variable value becomes 0b110111 because pin A turns from 1 to 0.
When rotary encoder is turned counterclockwise, encoder variable value becomes 0b101111 because pin B turns from 1 to 0.

To copy new states to previous ones :

encoder = encoder >> 3;

Calculate delay

To drive stepper motor, I should send a pulse on step pin 200 times a second to turn 60 rpm.
To modify speed making second rotation, I calculate delay as :

delay
where s is speed and m mode in [0..2] and i step number in [0..199].

Instantaneous speed graph with smooth, medium and sharp modes are below.
Instantaneous speed in smooth mode Instantaneous speed in medium mode Instantaneous speed in sharp mode

Rotocasting full program

After integration of screen functions and motor controls, program is finished.

/*
 * Rotocasting machine
 * Main program
 */

#include "U8glib.h" //library for OLED SSD1306 screen. Source : https://github.com/olikraus/u8glib

#define encoderPinA 11 //encoder pins
#define encoderPinB 12
#define pushPin 13

#define stepPin 6 // A4988 stepper driver pins
#define dirPin 5
#define enablePin 7

#define duration 180 // default duration
#define ymargin 10 //ymargin between two lines on OLED SSD1306 screen

unsigned short encoder = 0b000111; // encoder 6 bits state
unsigned short menu = 0; //current command
unsigned short in = 0; //inside a command 0 : no, 1: yes
unsigned short start = 0; //running 0: no, 1: yes
unsigned short rspeed[] = {20,80,150}; //motor speed {min,current,max}
unsigned int rtime[] = {1,duration,1200}; //elapsed time {min,current,max}
unsigned short rmode = 1; //acceleration mode 0:smooth, 1: medium, 2: sharp
unsigned long timer,next;
int d; //d : delay before stepper motor next step pulse
int r; //r: number of tenth milliseconds before next pulse
int i; //i: step number [0..200] on stepper motor


int screenWidth;
int fontHeight;

U8GLIB_SSD1306_128X64 u8g(U8G_I2C_OPT_NONE|U8G_I2C_OPT_DEV_0); //screen object

void writeTime() { //write elapsed time on second line screen
  int l;
  char stime[11];
  short pos = 0;
  if (rtime[1] >= 600) { //if elapsed time is more than 10 hours
    stime[pos++] = rtime[1] / 600 + '0'; // add tens digit
  }
  if (rtime[1] >= 60) { //if elapsed time is more than 1 hour
    stime[pos++] = (rtime[1] / 60) % 10 + '0'; // add units digit
    stime[pos++] =' ';
    stime[pos++] ='h';
    stime[pos++] =' ';
  }
  
  stime[pos++] = (rtime[1] % 60) / 10 + '0'; // add tens digit of minutes
  stime[pos++] = (rtime[1] % 60) % 10 + '0'; // add units digit of minutes
  stime[pos++] = ' ';
  stime[pos++] = 'm';
  stime[pos++] = 'n';
  stime[pos++] = 0;
  l = (screenWidth-u8g.getStrWidth(stime))/2; // calculate left margin to center text
  u8g.drawStr( l, 2*(fontHeight+ymargin), stime); //draw time
}

void writeMenu() { // write screen depending on menu value
  char com[16];
  int l;
 switch (menu) {
  case 0: // start/stop menu
    if (start) {
      strcpy(com,"STOP");
    } else {
      strcpy(com,"START");
    }
    l = (screenWidth-u8g.getStrWidth(com))/2;
    u8g.drawStr( l, fontHeight+ymargin, com);
    writeTime();
    break;
  case 1: // speed menu
    strcpy(com,"SPEED");
    l = (screenWidth-u8g.getStrWidth(com))/2;
    if (in) {
      u8g.drawBox(0, ymargin +2, screenWidth, fontHeight);
      u8g.setDefaultBackgroundColor();
    }
    u8g.drawStr( l, fontHeight+ymargin, com);
    u8g.setDefaultForegroundColor();
    strcat(itoa(rspeed[1],com,10)," rpm");
    d = (screenWidth-u8g.getStrWidth(com))/2;
    u8g.drawStr( l, 2*(fontHeight+ymargin), com);
    break;
  case 2: // duration menu
    strcpy(com,"DURATION");
    l = (screenWidth-u8g.getStrWidth(com))/2;
    if (in) {
      u8g.drawBox(0, ymargin +2, screenWidth, fontHeight);
      u8g.setDefaultBackgroundColor();
    }
    u8g.drawStr( l, fontHeight+ymargin, com);
    u8g.setDefaultForegroundColor();
    writeTime();
    break;
  case 3: // mode menu
    strcpy(com,"MODE");
    d = (screenWidth-u8g.getStrWidth(com))/2;
    if (in) {
      u8g.drawBox(0, ymargin +2, screenWidth, fontHeight);
      u8g.setDefaultBackgroundColor();
    }
    u8g.drawStr( l, fontHeight+ymargin, com);
    u8g.setDefaultForegroundColor();
    switch (rmode) {
      case 0:
        strcpy(com,"SMOOTH");
        break;
      case 1:
        strcpy(com,"MEDIUM");
        break;
      case 2:
        strcpy(com,"SHARP");
        break;
    }
    l = (screenWidth-u8g.getStrWidth(com))/2;
    u8g.drawStr( l, 2*(fontHeight+ymargin), com);
    break;
  }
}

void setup() { //program initialisation
  pinMode(encoderPinA, INPUT_PULLUP); //encoder pins are in input mode using pull up resistor
  pinMode(encoderPinB, INPUT_PULLUP);
  pinMode(pushPin, INPUT_PULLUP);
  pinMode(stepPin,OUTPUT);
  pinMode(dirPin,OUTPUT);
  digitalWrite(dirPin,HIGH); // set dir pin to clockwise rotation
  pinMode(enablePin,OUTPUT);
  digitalWrite(enablePin,HIGH); // disable motor

  u8g.setFont(u8g_font_helvB14);
  fontHeight = u8g.getFontAscent()-u8g.getFontDescent();
  screenWidth = u8g.getWidth();

  u8g.firstPage(); //write start menu
  do {
    writeMenu();
  } while( u8g.nextPage() );

}

void loop() { //main loop
  unsigned short readPin = (unsigned short) digitalRead(encoderPinA); //read encoder pins
  encoder = (encoder & 0b110111) | (readPin << 3); //write encoderA state in the fourth digit

  readPin = (unsigned short) digitalRead(encoderPinB);
  encoder = (encoder & 0b101111) | (readPin << 4); //write encoderB state in the fifth digit

  readPin = (unsigned short) digitalRead(pushPin);
  encoder = (encoder & 0b011111) | (readPin << 5); //write push state in the sixth digit

  if (encoder == 0b110111) { //turn clockwise
    if (in) {
      switch (menu) {
        case 1: // increase speed
          if (rspeed[1] < rspeed[2]) {
            rspeed[1] += 10;
          }
          break;
        case 2: // increase time 30mn is time is more than 2 hours, 10mn if more than 10mn and 1mn else
          if (rtime[1] >= 120) {
            if (rtime[1] + 30 <= rtime[2]) {
              rtime[1] += 30 - rtime[1] % 30;
            } else {
              rtime[1] = rtime[2];
            }
          } else if (rtime[1] >= 10){
            rtime[1] += 10 - rtime[1] % 10;
          } else {
            rtime[1] +=1;
          }
          break;
        case 3: // increase mode
          if (rmode < 2) {
            rmode++;
          }
          break;
      }
    } else {
      menu = (menu + 1) % 4;
    }
    u8g.firstPage();
  do {
    writeMenu();;
  } while( u8g.nextPage() );
  } else if (encoder == 0b101111) { //turn counterclockwise
    if (in) {
      switch (menu) {
        case 1: // decrease speed
          if (rspeed[1] > rspeed[0]) {
            rspeed[1] -= 10;
          }
          break;
        case 2: //decrease time
          if (rtime[1] > 120) {
            if (rtime[1] % 30) {
              rtime[1] -= rtime[1] % 30;
            } else {
              rtime[1] -= 30;
            }
          } else if (rtime[1] > 10) {
             if (rtime[1] % 10) {
              rtime[1] -= rtime[1] % 10;
             } else {
              rtime[1] -= 10 ;
            }
          } else if (rtime[1] > rtime[0]) {
            rtime[1] -= 1 ;
          }
          break;
        case 3: // decrease mode
          if (rmode > 0) {
            rmode--;
          }
          break;
      }
    } else {
      menu = (menu + 3) % 4;
    }
    u8g.firstPage();
    do {
      writeMenu();
    } while( u8g.nextPage() );
  } else if (encoder == 0b011111) { //push on encoder
    if (menu == 0) { // push on start/stop
      start = !start;
      if (start) {
        timer = millis();
        next = timer;
        r = 0;
        i = 0;
        digitalWrite(enablePin,LOW); // enable motor
      } else {
        digitalWrite(enablePin,HIGH); // disable motor
      }
    } else {
      in = !in;
    }
    u8g.firstPage();
    do {
      writeMenu();
    } while( u8g.nextPage() );
  }
  
  encoder = encoder >> 3; // write encoder current values to encoder previous values

  if (start) {
    if ((millis() -timer) > 60000UL) { // if one more minute is passed, rewrite time
      rtime[1] = rtime[1] - 1;
      timer += 60000UL;
      if (rtime[1] == 0) { //end of time
        rtime[1] = duration;
        start = 0;
        digitalWrite(enablePin,HIGH); // disable motor
      }
      u8g.firstPage();
      do {
        writeMenu();
      } while( u8g.nextPage() );
    }
    
    if (millis() > next) { // A4988 control
      digitalWrite(stepPin,HIGH); // send a pulse to step pin
      delayMicroseconds(500);
      digitalWrite(stepPin,LOW);
      delayMicroseconds(500);
      d = 3000 / rspeed[1]*(1+sin(0.031416*i)/(2*(3-rmode)));
      next += d / 10;
      r += d % 10;
      if (r >= 5) {
        r -= 10;
        next++;
      }
      i = (i+1) % 200;
    }
  }
}

We have just finished the machine. After months of uses, we will be able to know if parameters are good and to adapt default values (duration : 3h00, speed : 80 rpm, mode : medium) and extrema.
Oled SSD1306 functions in u8glib use time and we have small stops on motor when screen is updating. To avoid this, we may use a more simple screen like lCD 2 lines screen.

Solving problems as a team

We worked through several iterations of the axis and molding chamber, discussing redesign together every few days. Testing of the code and motor together was a focus of the project - Thierry and Adel spent a great deal of time testing the machine.

Future Developments