Project Management
Wednesday January 24, 2018

Preamble
This week I landed in Dubai, made it to the lab on the day of the Week 2 class. I got to meet the other students in the class and was introduced to the new facility. This FabLab had only been open for two months but it's absolutely massive. The electronics workshop alone is twice the size of the SOLDER Lab back in Perth!
This was my first full day with (nearly) unrestricted internet since I left Australia so I had a bunch of emails and social media that needed attending to. Before I left Australia I had just sold a car, moved out of two rentals, been in a car crash, handed over the three jobs I was working and moved away from a girl I was seeing. So all of the associated baggage had been taking a good few hours of each day up until this point.
Learning a new city layout was also quite a busy task - finding the nearest sources of caffeine in case of emergency, understanding the most cost effective menu items at the chicken place down the road and when to use them... There's also pretty much a blanket rule on no beer, no swearing and no sex which means I'll have to get EXTRA creative about finding fun things to do.
What'd we have to do?
Ok so this week was all about setting up Version Control Software (VCS), in our case Git via Gitlab, and then scripting a portfolio website via HTML (using CSS Bootstrap) and JavaScript hosted via the FabCloud. Pretty much we had to build a rudimentary platform for hosting our write-ups of assignments we'll complete during the semester and demonstrate a clear understanding of the fundamentals of software projects (which we would then apply to building our hardware projects).This was also an opportunity for us to introduce ourselves to the FabLab community and get to know about the rest of the cohort around the world.
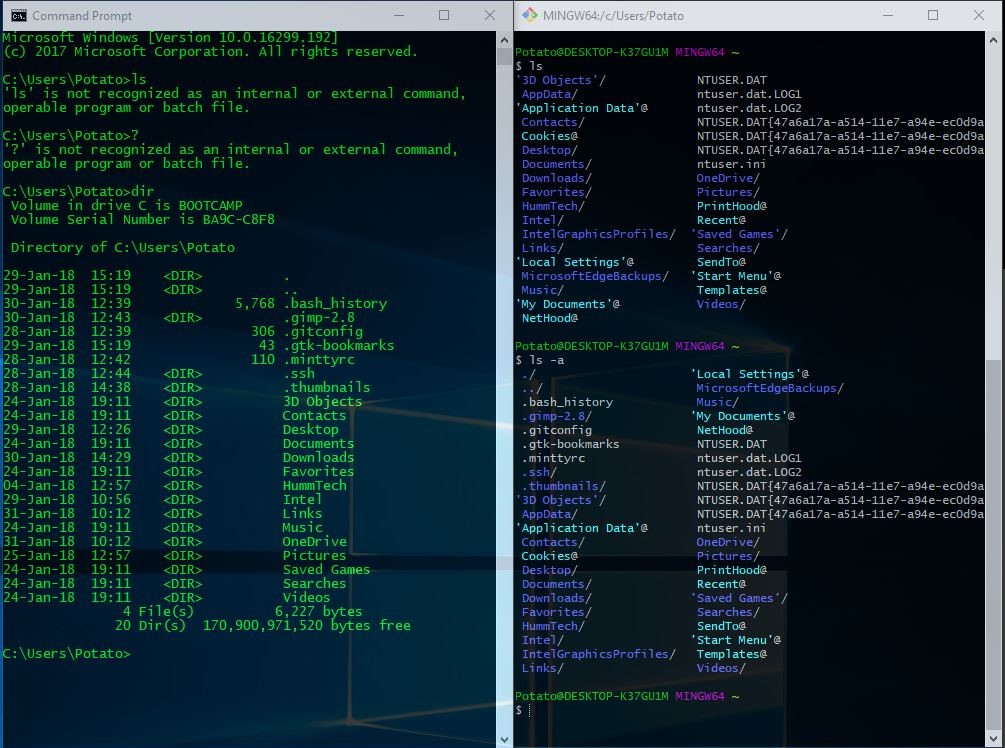
The first thing we did was install Git BASH. As far as I understand this is a Linux emulated environment on Windows. It's easy to use if you're used to Linux because Windows uses stupid terminal comands like "DIR" and "type" whereas linux uses "ls" and "cat". It also seems to have a bunch of built-in tools like 'nano' and such which can be convenient when moving to a Windows system.
You never really realise how good you have it until you move from Linux to Windows. Don't get me wrong, I grew up on Windows, but when doing dev-work it will test parts of your patience you didn't even know you had.
Next we logged into Gitlab. I already know you're going to skip this paragraph so without boring you with the details Git allows us to do cool things like keep track of changes we've made, and also if we MAJORLY screw something up we do this thing called a "revert" which I'll take you through later.
If you're into the details, what Gitlab itself does is host a Git-based service allowing a thing called a 'remote repository' to be stored and worked on by multiple people at a time. A repository (repo for short) is a fancy word for a place where you store data. In the case of Git, we actually have two repo's - a local repo on your computer that you can work on, and then a remote repo that is stored in a central location so that multiple people can be pushing their work from their own local repo's to the remote repo.
You might not appreciate why or how this is useful just yet but just remember that there is a repo stored on your own computer and a repo stored in a central place. I'll take you through how to use it soon and by the end of this explanation you'll be dying to master it ;)
 The FabAcademy grand council had set up user accounts for us already under the FabCloud, which was a fabulous idea except for the fact I already had a Gitlab account. If you have one too and you're joining an organisation make sure to join with the account the organisation gave you and not your existing account. For me, it logged me in automagically to my previous account which meant I could view all the repositories but I didn't have ANY permissions to make changes. And it was a difficult error to spot. So look out for the auto-login issue.
Then we set up our Git environment. To do this we have to set up a config file within the ~/.git/ directory so that when we commit Git knows which user has made the commit and can send that to the remote repository. To do this is very simple;
git config --global user.name "your.username"And you can check this at any time going to your home folder and looking at .gitconfig.
git config --global user.email "your.email@provider.com"
cd ~Remember if 'cat' doesn't work in this part it's probably because you're in Command Prompt and not Git BASH.
cat .gitconfig
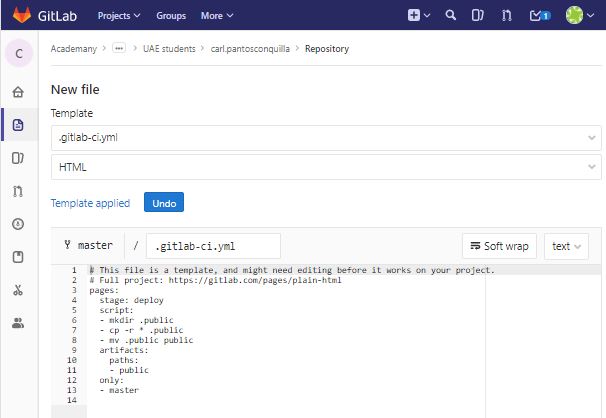 We also need to set up a support file for our Javascript which has the extension *.yml (pronounced 'ya-mul'). Luckily, there's a template for this in Gitlab so we just add a new file from the browser and select the .gitlab-ci.yml template, and the type is HTML. It should look like below. If you're having trouble finding it you can simply copy the contents into a *.txt file and rename the filetype to *.yml.
Next we gotta set up our SSH keys. SSH is a security protocol for shell. It involves having an encryption key for a sender and receiver so that anyone without the key wouldn't be able to unscramble the data being sent. Your machine can generate this key using:
ssh-keygen -t rsa -C "your.email@provider.com" -b 4096Just save it in the default location for now and don't add a password. You can just press enter a bunch of times to do the default actions. You should see some cool signature art relating to the key you just generated, and two files will be created: id_rsa, and id_rsa.pub.
The key you need is in id_rsa.pub, and you should paste this into the SSH section of your Gitlab profile. I'm not going to post screenshots here because we're talking about encryption, but for more information about this step try this link from Gitlab.
NOW, after all that setup, we clone the repository. We navigate ourselves to our working directory (some people do this in home, some do this on the Desktop). The command is:
git clone "the_url_to_your_repository"And you can find the url to your repository usually at the top of the page under the name of the repository (see the screenshot of the repo above).
What this does is make a copy of the repo from the server and sets up all the necessary files for a local repo. Now you're able to work on the files on your computer without affecting the remote files.
I always like to sanity check regularly just to make sure everything is working like I expect it to, so next we try to make a new file and push it to the remote repo. To do this just make a file and call it 'index.html'. This type of file is the first file that the webserver looks for so it will be our front page. For now I kept it simple because I was going to abandon it in lieu of a template-formatted html page later. Here's what my original one looked like:

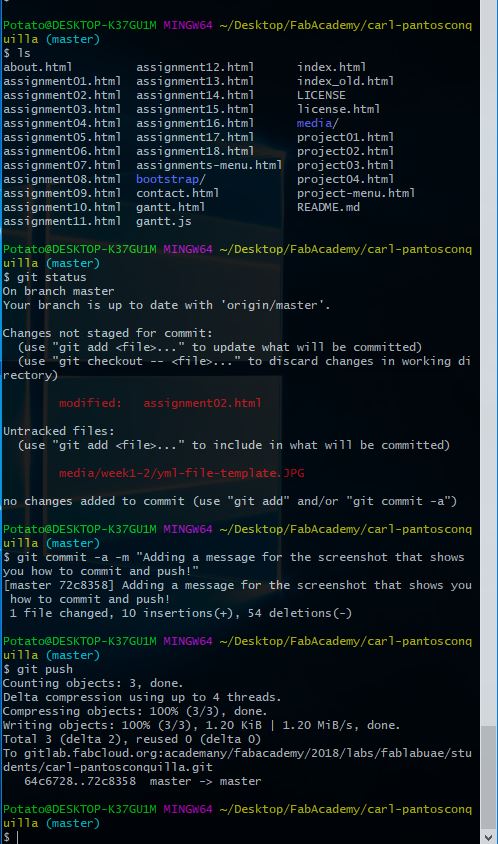 Now we do a couple things that help us understand how the system is feeling at this point. First we ask:
git statusWhich tells us which files haven't been committed yet, and any files in the directory that aren't being tracked by Git yet. To add new files (like the index.html we just added) we use:
git add -ANow that that file is tracked we do a thing called a "commit". Commits are little snapshots of your work just like when you're in a computer game and you save the game. It's useful for being able to come back to it if you stuff up or if you're tryna do something difficult/risky. So to do a commit we do:
git commit -a -m "Add your commit message here"Be a bit descriptive with your commit messages here, because as I said they will save you some day. Get in the habit. Hundreds of thousands of people around the world use this system because it WORKS! Use the commit system well and it will save your butt.
By the way, the commits you make are only stored locally. That means you need one last step to push your changes to the remote repo! This one is super simple, you use:
git pushSee? Painless. You can take a look at my step-through of status, commit and push on the right. And you don't actually have to push every time, you can commit as many times as you like before pushing to remote.
Now that we have the hang of how to commit and push, we're going to clone a template. I personally can't stand my own programming, so I prefer to use the hard work others have shared as much as possible. For this website you're currently on, I've used a template by Massimo Menichinelli that was recommended by the FabAcademy.
It's a pretty good starting point, and simple enough to work with in only a few hours as a beginner. I downloaded the zip from the repo at that link and then took all the files and dropped them in the root of my local repo. You'll see a whole bunch of new files in there, and it's going to override the index.html file you made earlier. But that's ok - good thing you didn't spend too much time on it!
To start off with, we should add all those new files to be tracked by Git. Next, we're going to commit the new changes, and lastly we're going to push to remote. All in one go we're looking at:
git add -ALast thing that's useful to note is that because Git is designed for collaboration, you need to be aware of any changes someone is making to the repo. Git has a function called "branching" which allows people to work in separate "branches" so their work is isolated from each other, however this isn't always possible or practical. So in the case that two or more people are working within the same branch (the default is usually 'master'), make sure to use "git pull" before a new session of work. This will take any changes that have been made from the remote repo and update your local repo so there are less problems with repo's being out of synchronisation.
git commit -m "Just chucking a new template in, don't mind me!"
git push
And now for some HTML..
 In my admittedly limited experiences with HTML, I've never had good one. Some people find it really easy, personally I don't. Because of this, I hoped to keep things very simple, and just stick to the template as much as possible. In my opinion the thing that could take the most time this week is mucking around with the template trying to make it do things that HTML really just shouldn't do. My advice would be to keep it simple and focus on the content.
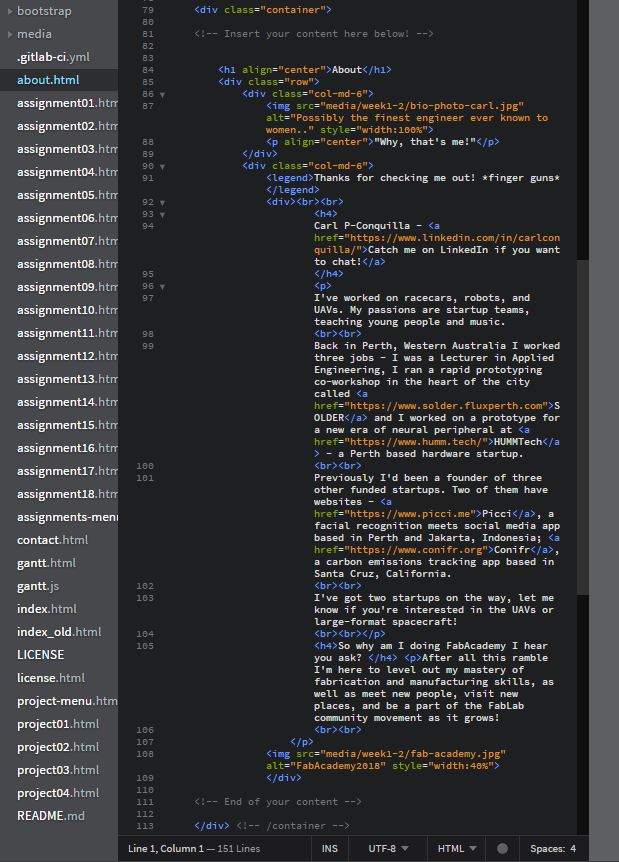
Basically HTML is a markup language that defines how a webpage is laid out. It uses tags to define what different things are. You can see a snippet of what my HTML looks like from my About page on the left. You can see different types of tags, and they all mean different things. You'll slowly find out what each of them are as you find the need to use them.
To edit I used Brackets, since it has a pretty good live preview of the HTML you are writing. This is pretty cool when you're starting out because you can see side-by-side the impact you are having on the code. A feature I used often to adapt the template was the "Find and Replace" feature, which allowed me to change all of the instances of 'exercises' to a word I much preferred - 'assignments'. However, before I did such a large automated operation I made sure to commit just before.
Luckily I did too, because I royally screwed a bunch of references on the first try. I ended up having to frantically figure out how to use the Git 'revert' functionality. That really saved my bacon.
Since I kept things simple with the template I wanted to do some interesting things with the layout of the page. It took me some time to figure out how to make columns happen in a predictable way especially between pictures and text columns. Resizing images and wrapping text around them when they were left or right aligned took a few attempts. If anyone looks at the source code you'll find that as I went from page to page the style of inserting pictures has matured especially up to this current page.
One thing about inserting images is that there's two ways you should do it. One way involves downsizing the image to make it the size it should appear on the website - i.e. defining the pixel dimensions. The downside to this is that the image is permanently displayed in this resolution, so if your image has some text or fine detail you may want to try the next option.
The second way you can do this is to resize the image to the smallest it can be but still see the detail required, then you insert it into the HTML and use the inbuilt image scaling attributes. The only issue with doing it this way is that even though the image is displayed smaller, it is still downloaded in full resolution which can take time to load. You don't want to do this method often either, because the extra size can add up in the total size of your media folder.
Other things I explored were inserting *.gif animations, and also short video files in *.mp4. Cropping, scaling, downsizing and other operations were easiest using Gimp and Inkscape. For turning video into *.gif I've always used Giphy for making memes and it also works for this function as well.
Other things I learned with inserting video was customising attributes for autoplay and the controls for play, pause, fullscreen etc., and I also entered shallowly into the domain of CSS by needing to add a rule for how CSS will handle video files. In this case I added some rules for padding and rounded corners on the view box.
The tags
I don't know an awful lot about CSS, but basically the way CSS works with HTML is that when you use a class in HTML, the respective class can have attributes defined in the CSS. One example, is that I like rounded edges on things (it makes them look complete or at least deliberate) so I added the border-radius: 20px; attribute to all my img and div classes.What that does is anytime I use an HTML tag with either img or div the browser will render it with those attributes. You can set styling universally across your webpage using CSS and it allows you to update the look of your page quickly!
Super cool. Now let's look at a couple tags I like to use: "div", "h headers", "br", "em", "strong", "img", "video", "legend", "a" and "div".
div - I think this stands for "division", or at least it will help you understand how to use it. If you want to divide your content into sections, you use a div. Divs can be used to break up sections in many ways, but also help the page layout be more dynamic on different screen sizes.
For example you can have two columns of content side by side using the width=50% attribute. Alternatively you can have as many columns you feel by changing the percentage appropriately.
Just don't forget to end your div class with the /div tag when you're finished. Most of the time if your layout is screwed while you're editing, it's because you've missed an end tag (or even sometimes you have too many!).
h headers - The headers h1, h2, h3, h4, etc. can be used to make titles and subtitles. These format automagically according to the style sheet.
Once again, don't forget to end your tag with the /h(whatever) tag, otherwise all the text after it will be formatted as a header too!
br - Line break. I'm not sure if this is the best way to do this but it's certainly not the only one. I find it convenient this far to use, but there may be others. Just chuck a br tag anywhere you want a line break.
One strange thing about this one is that you don't *need* to have an end tag for it. I don't think anybody will complain, but if you're really worried about semantics you can end the tag by using br/ instead.|
This is an example of a tag that ends within itself. Having a "/" at the end of a tag signifies that the tag starts and ends within the tag itself.
em - Emphasis tag. If you're wondering how I make text italic like this then look no further. This one is really handy for making inline text italic. Just place the start "em" tag at the start and the end tag "/em" where you want the italics to end.
strong - Bold tag. For those of you who grew up with Microsoft Word 95 this is the equivalent of bold text. It's used the same way as the "em" tag.
img - This is how we insert an image. Can you tell that I really love this one? Each image you'd like to use you should write something like "img src="path/to/your/img.JPG" alt="Some text goes here about your image in case the image doesn't load, or someone is using a dictation service (it will read out this description)." style="float:left; width:50%"/"
There's a couple inline attributes here - the src stands for source, and the style dictates the way the image should be displayed. In the style you can say either "align" or "float" to position your image. Float means that other content will wrap around the image. Also you can set the width (and/or height) in either percentage, pixels or auto depending whether you want the image to scale with the screen width or not.
The best thing to do is have a play with these attributes to see what works for you.
video - This is pretty self explanatory, except that there's really two tags involved. Inserting a video in HTML looks like this: "video width="75%" height="50%" controls"
This opening tag sets up a container that expects video. Where it says "controls", you can also add things like "autoplay". If you were to say both "autoplay controls", it would display the controls in the video container AND autoplay the video when the page loads.
You'll notice you can't specify a source for your video here, and I have no idea why that is. But so let it be written by the HTML overlords, so let it be done.
Here's how you add the source: In a separate tag you use the source tag i.e. "source src="path/to/your/video.mp4" type="video/mp4"/" . Notice the source tag is also a self-ending tag.
You can also use *.ogg type files in here if you know what that is (I don't).. Note some browsers, in particular mobile browsers, don't enjoy playing video this way. It's always good practice to check a couple browsers on different devices when developing software.
After all this, you finish up with a "/video" tag.
legend - Caption for an img or video. These are awesome because they look different from regular text and you can put them right below an image.
a - Insert a hyperlink (also known as a "link" in newspeak). Hyperlinks are similar to images, since they need a source to refer to when someone clicks it. But they're also a bit different, since I don't know why they called it "a" and also instead of src or source they use "href".
It goes a little like this: "a href="https://somewhere.you.want.your.link.to/go" "
The text you want displayed goes after it between the open and close tags; "The text that goes between the tags"
Then finish up with the end tag: "/a"
You might notice that anywhere there's a source, src or href attribute you can point to something served either from your site or anywhere else on the internet! That means links and images can be pointed to interchangeably.
The only problem is that sometimes an image you refer to that's somewhere else on the internet could be taken down, have it's name changed or otherwise, and then your source will be lost. Most of the time you should point to within your own site because then things will only break when it's your fault. That's a nicer way to live.
div - Yeah, I did just say div twice. That's because there's really many ways you can use a div. Now that I've talked about how to align and size img/video classes, there are some cool ways you can combine them with the div tag to form a layout.
I mentioned using the "float" and "width" attributes for imgs, you can (a) wrap a video in a div to control it's size and scaling, and (b) you can actually plop a bunch of images inside a div so that they display in a grid or pattern. This is useful if, like me, you have an excess of images and don't want them to display one-by-one but in groups instead.
Other tags you should know about but I don't use often enough to explain well: head and body. If you go into the source of a webpage (right click and view source, usually) you can see how the content of the page is structured.
You'll see at the top it has a "head" section and near the middle or bottom it has a "body" section. The function of these sections haven't been that useful for me to know, but don't be thrown off if you're analysing a webpage. Most of the stuff you'd be interested in initially is in the "body" section.