Fiveth Week
ELECTRONCIS PRODUCTION
ASSESSESMENTS
| HAVE YOU | TASK COMPLETED |
|---|---|
| Shown how you made and programmed the board | YES |
| Explained any problems and how you fixed them | YES |
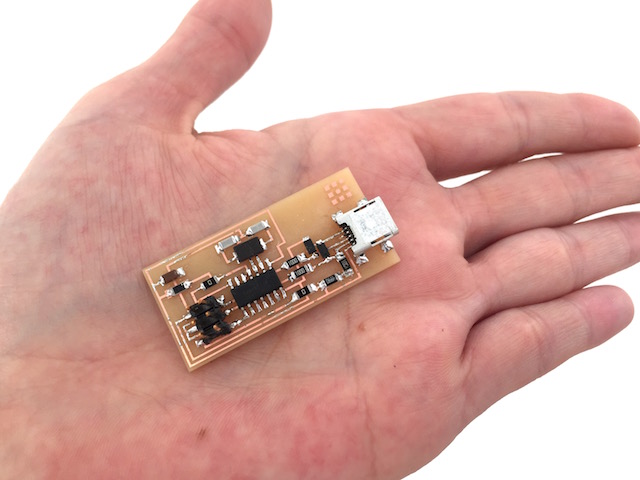
| Included a ‘hero shot’ of your board | YES |
GROUP PROJECT
| HAVE YOU | TASK COMPLETED |
|---|---|
| Characterize the specifications of your PCB production process | YES |
NEIL´S LESSON
Index
Week 4 : Electronics Production from Pilu Caballero on Vimeo.
WEEK 4
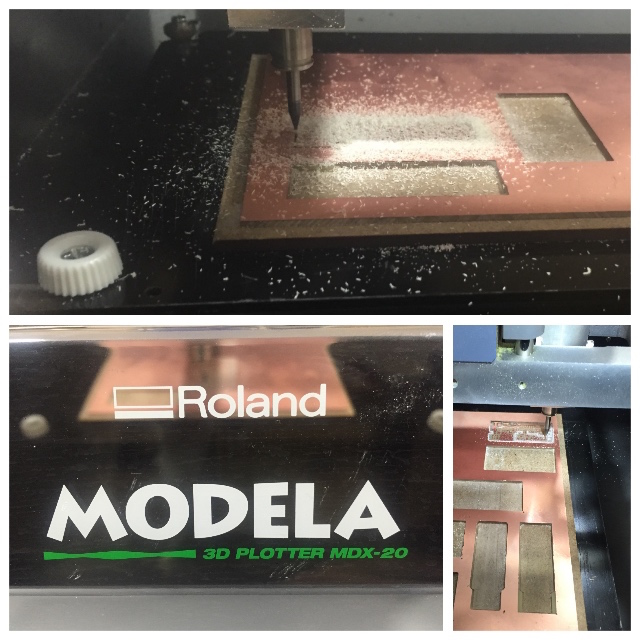
MILLING TIME
1st For this week, one of the goals is learn to use the Modela MDX 20 for Electronics Production. As is my happy assignment by my soldering experience (not smd components), i decided milling two electronics boards, one Fab ISP model mentioned by Neil at last class, Brian´s Design and the other recomended by my instructor Epifanio, the Fab ISP Tiny 44.
For learn with the basics of mill i was practicing with the use of the milling machine, inserting two damaged millers for feel secure with new ones and don´t break nothing at the real process!. After a pair of times, i was ready! I could feel the adrenaline was wonderful. Probably is one of the moments that i more expected in the last years.

The Steps i followed were :
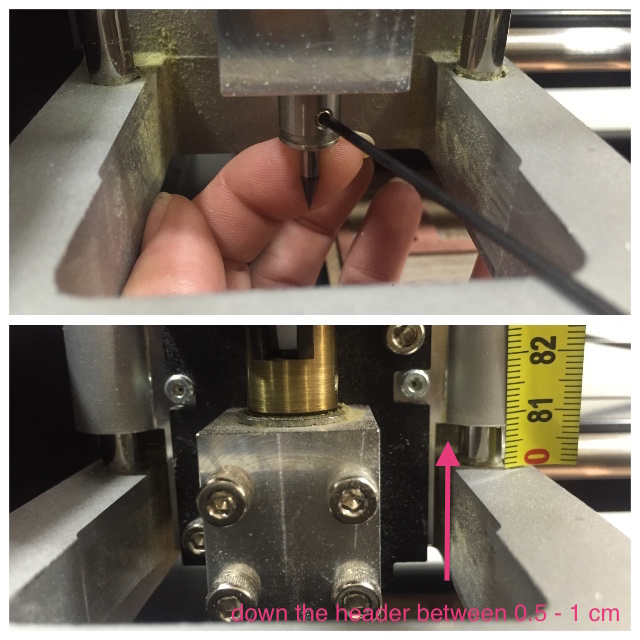
1. Switch On the machine : The order of switching is important.
2. Switch On the computer and open the terminal writing inside : ./mods_serial
(this connect the modela with the computer and set ready for send our circuits)
3. Open explorer and mods :
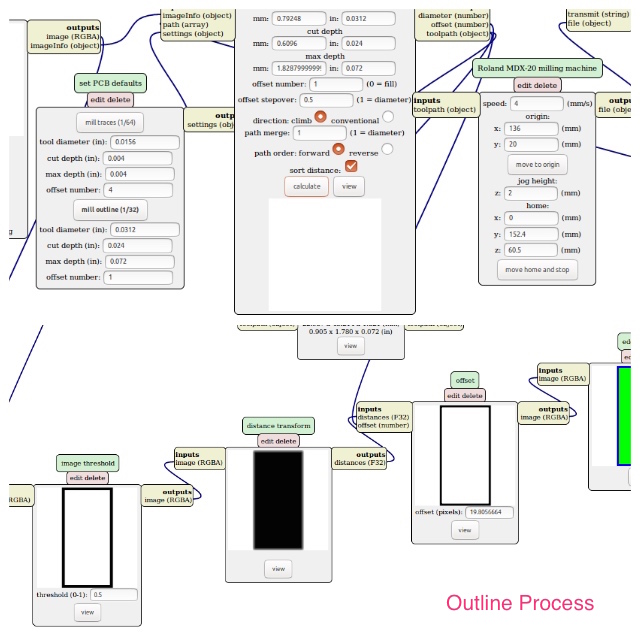
4. Selected the file and set offset numbers at PCB defaults mod. I made one with fill so i selected 4 fill and one with out fill for practice in this case i selected 0.
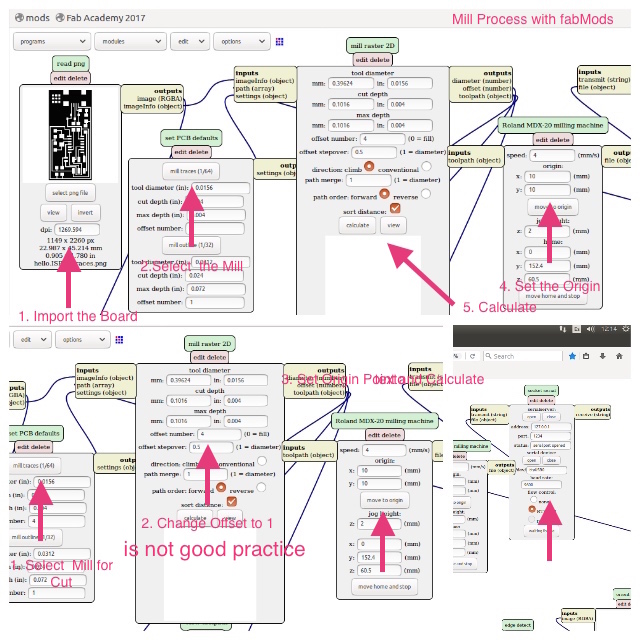
Before to send the electronic board design to the milling machine, it´s necessary to calculate the file and check that all it´s rignt and the image about the circuit is in correct way.
For last, I repeated the same operations with the file for cut but changing the offset number for 1.
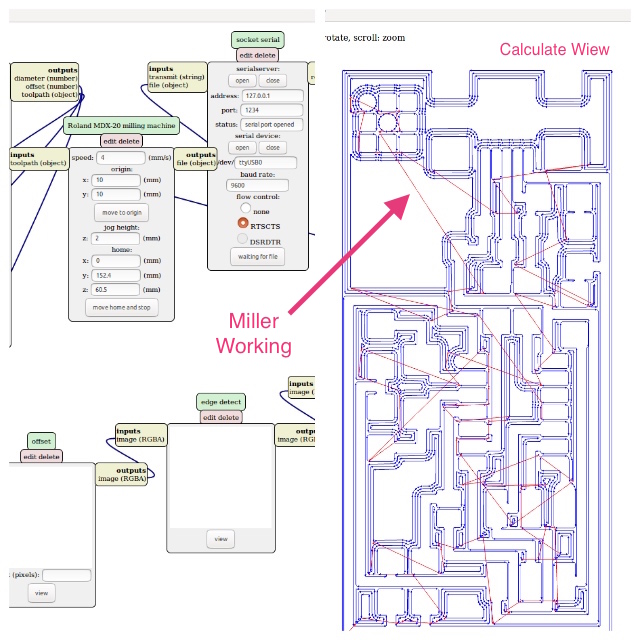
After .mods calculated the file i was ready for send the file to the Modela MDX20, just was waiting to finished machine work.
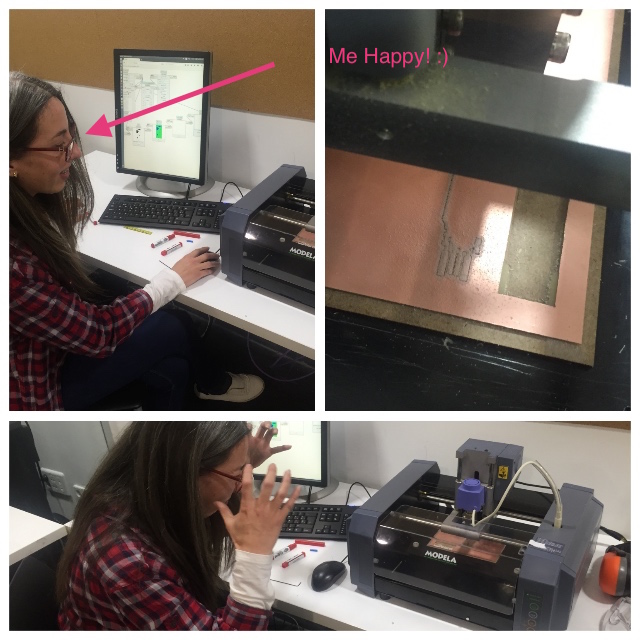
The machine´s milling process was a lovely experience, definetively, i love to mill. At night was dreaming with one at my desktop... All the process was without problems!.
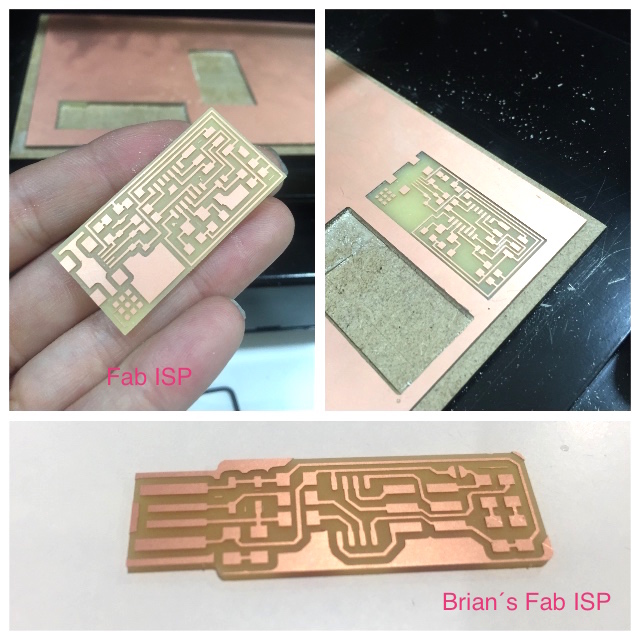
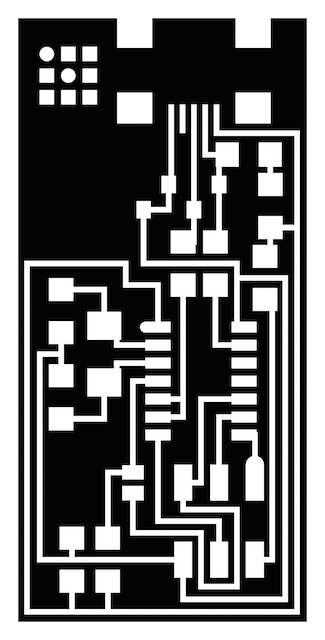
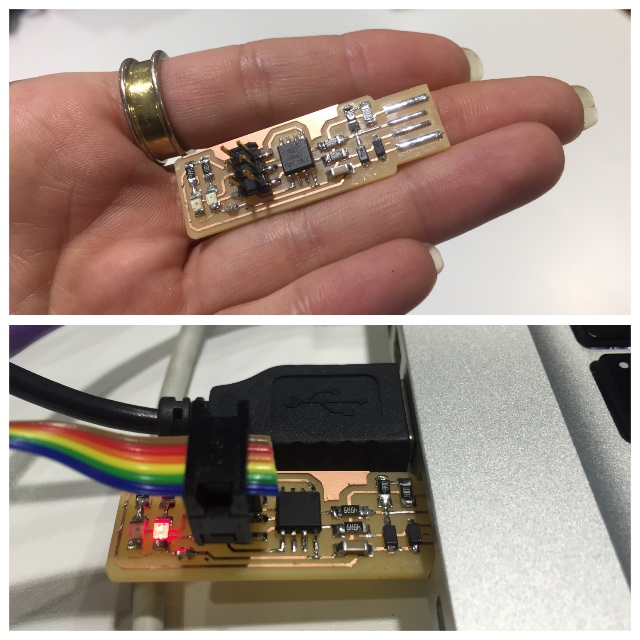
As you see at the picture i mill 3 boards, 2 Attiny 44 and the Brian´s design : My idea is to solder just two.
WELD TIME
2nd
Our FabLab allow to buy the electronic components in an specific hour every week so the friday´s our instructor open doors of the store.
After i cleaned the milling machine i was ready for make the electronics components list or BOM and buy them searching at the Fab Academy´s inventory.:
After this practice i learned how to make a real BOM for future assignments, for the moment made a quick list and spent a fun time inside the inventory.
Brian´s Fab ISP Electronic Design :
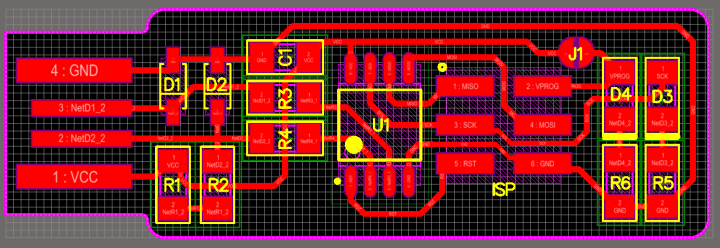
Brian´s Fab ISP Schematic :
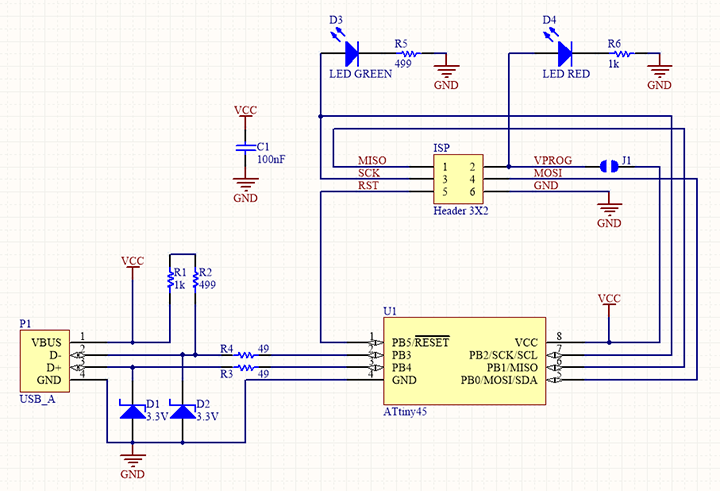
Fab ISP AtTiny 44 Electronic Design:

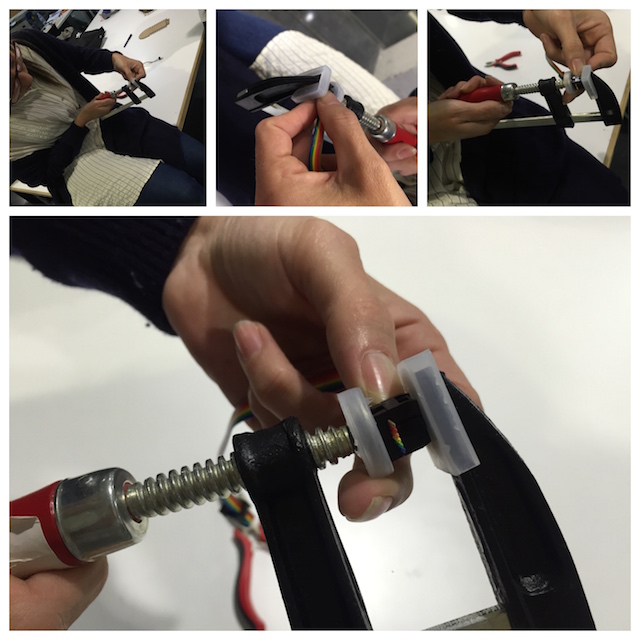
For solder I use basic Soldering Stuff like as :
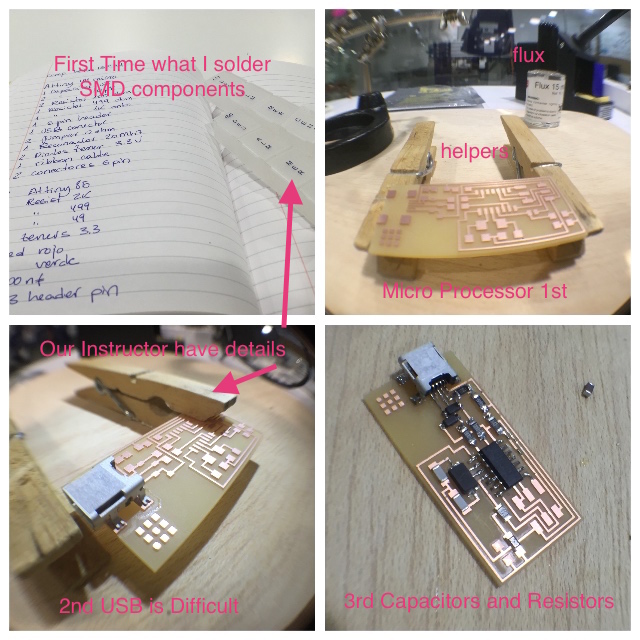
When finished both boards i made my wire for connect the Fab ISP to future boards for program.
I decided to use a rainbow wire for save to my memory the colors associated to each pin for later make check and muiltimeters practices more easy for my dislexic mind.
PROGRAMMING FAB ISP ATTINY 44
The last part of the week assignment is program the boards :
For this, i began with my Fab ISP Attiny 44 following the tutorials suggested at FabAcademy Tutorials.
1. I installed the drivers from CrossPack for my OSX.
2. Xcode it´s necessary too but I didn´t installed because i installed previously.
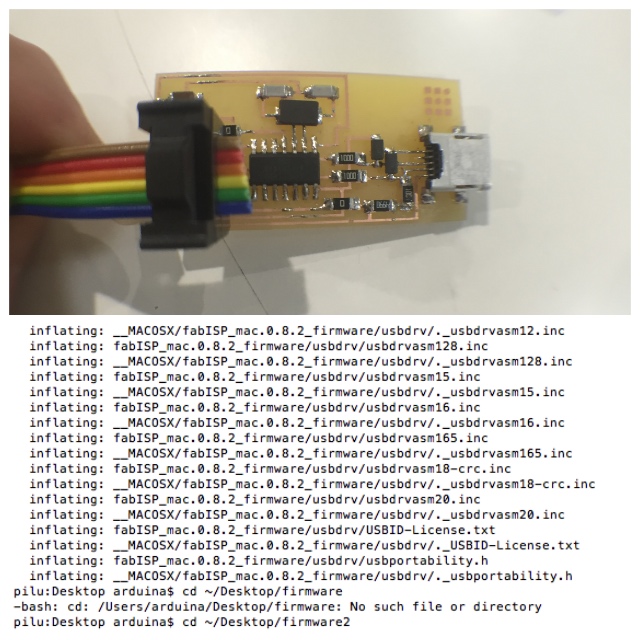
3. Also downloaded the firmware and open a terminal for extract the "firmware file" on my desktop with cd Comands lines .
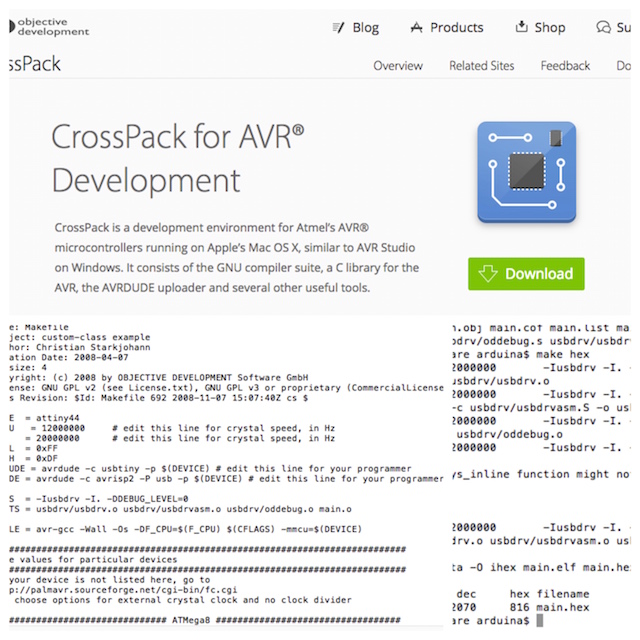
4. Opened the "Make file" inside firmware and checked the default "Programer" selected, probably you need changes for choose your correct device. I made it changing to "avrisp2" The programmer that my instructor Epifanio gave to me for began.

Before to the "make hex", i connected my new board to the USB Avrisp XP II but when made the next step and wrote at my terminal the line command: "make fuse" i got an error finding devices:
WEEK PROBLEMS AND SOLUTIONS
Discarting all electronic milling mistakes at first moments because i check all connections with the multimeter after of weld with my instructor as supervisor, ( for this time i was sure that i welt right), i changed the AVRISP programmer by an Atmel ICE and i had having the same problem.
So, for to solve problems with the first one , searching at internet with my instructor, we found that the AVRDUDE version which CrossPack installed on my laptop don´t show me the Programers. So uninstalled CrossPack with the uninstaller inside the .dmg.
I need the AVRDUDE 6.2.1 version for detect the AVRISP II. I have the correct version now after i dowloaded from oficial site, but for advance, i was trying to program with the Epifanio´s Fab ISP AtTiny 44 for clear more things having the same problems but an important difference that now we could see at my hardware information system the usb used for the Fab Attiny.
PROGRAMING BRIAN´S ISP
How i made the "Brian´s ISP" too, i decided try with it connecting to Epi´s FabISP using another firmware, the correct for brian´s board : fts_firmware_bdm_v1
1. I open the make hex for check the ISP.
2. When made fuses, all was without problems. I admited this moments was crossing my fingers.Brian´s Design looked fantastic. This option allow to me made fuses correctly and when check to my hardware system info again, i can see both connected.
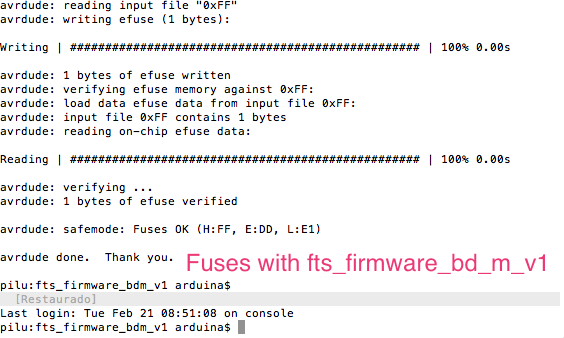
Finally i prgrammed the board without problems with make program command and Brian´s ISP is working and ready for program another boards.
My Fab Attiny 44 Adventure
1. For solve things with the Attiny 44, first i was looking a new version about avrdude that can work with my OSX. I have a laptop with Yosemite so for that i installed avrdude 6.2.1 from oficial site.
After i installed trought terminal, connected my board and find the same error.2. For discarting soldering problems my instructor was cheking my board and found an error so suggested me test the connections. I was measuring all for clear things again. After that, the conclusion came shawing old pics about my board.
When i was rewieving my welds i connect a traces from 6 pin header having a short circuit. I repaired it and after made a multimeter continuity and V was ready for continue with the process.
3. The last fight was install correctly another avrdude that works fine at my laptop, after severals tutorials from adafruit there found a slow solution but finally i did this with a toolchain follow the clean installation suggested by Limor.
The process was slow and presented some conclicts with libraries, but i resolved it removing the avrdude.conf writing at terminal some lines of commands described here:
rm´/usr/local/etc/avrdude.conf´
a) Forcing the link and overwrite all conclicting files:
brew link -- overwrite avrdude
b) To list all files that would be deleted:
brew link -- dry - run avrdude
c) This instruction shaw me conflicted libraries and other things...
d)After this i had to remove avrdude again and repeat the process with:
brew remove avrdude
Now i have my avrdude version work fine, i connected my Fab ISP to my computer and could to see at USB system information, so i was ready for program it.(crossing my fingers again but i felt this time will to work).
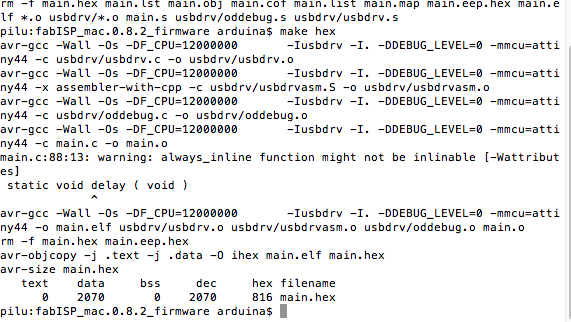
1. When make fuses with command lines : make fuse i made it without problems.
2. Finally write the magic Command _ make program
3. I´m really happy, the process not was easy but i learned a lot about install and unistall things from terminal while knew more about the Attiny 44 and other programmers such as Atmel Ice and AVR Risp II or how they works at differents OSX.
Milled 2 boards allowed to me advance and discard for clear things during the process so i would to advise about this practice.
At the end, i must to remove the resistors desoldering them for use my new FAB ISP as a Programer for Program any board.

THE GROUP PROJECT
The last part of the assignment is Characterize the specifications of your PCB production board so this is a new task for this year and as i´m working with new machines i made the task with Lucio.
First i made for the task was develope a new group projects website for documented all this news processes together.
I develope a schedule for have the task in time too and after we watched the assesments we began with the practice described in our new web that you can to visit here :
I learned a lot with the cnc machine created by lucio who fixed during the practice and now we are the machine ready for next assignments.
THINGS I LEARNED
The use of Fab Mods allowed to me understand the fabrication process, mill my first boards was an excited experience.
The use of Modela allow to fabricate boards easy and quick, during this task i learned how to use the millers machine and some differents between another fabrication processes.
I learned also how to care the millers and mills.
I learned how to program both boards and how to solve problems troght my terminal window, a task that never made before so i learned too new useful commands.
For Add, i was reading datasheets about components :