3. Computer Aided design
In my role at Madison Park, I have been tasked with doing several projects involving designing things in 2-Dimensions to be cut out on either a vinyl or laser cutters, so I am very comfortable using a combination of GIMP and Inkscape to prepare images to cut. One thing I would still like to work on is getting better at node editing, but that will come!
3-D design, however, is something I need to work on. As a chemical engineer, I have done some, but mostly that was modeling pipes to analyze heat transfer and fluid dynamics - pretty straightfoward, as it is drawing a line and revolving. My endeavors for this week were to develop a better skill in modeling more complex objects.
Three Dimensional Modeling
TinkerCAD
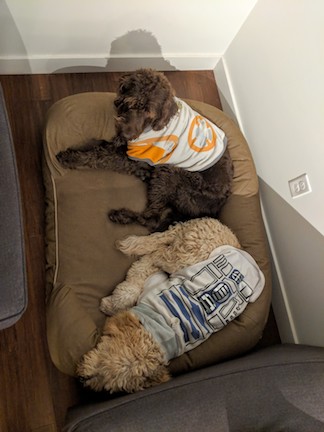
I began my investigation with TinkerCAD - an introductory level software that has some basic steps - select things, and put them together. Playing around with the supplied tutorials allows you to get going with it in only a couple of minutes. A colleague asked me to make a sign holder (similar to what is shown below).
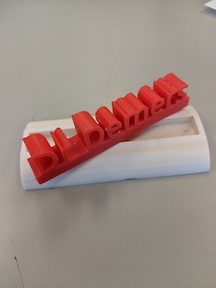

What she requested was to be about 36” long, so it would take a little bit of figuring out how best to make the individual components so everything could be 3-D printed. I was able to figure it out, by using a combination of align features and holes to make the joinery.
Success!
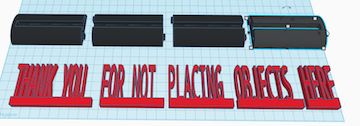
It still needed a bit of tidying up, but overall I was ok with how it came out.
TinkerCAD is a great introductory tool for CAD, but ultimately what it gains from ease of use it loses in higher level functionality. On to the next one!
SolidWorks
Given that my node is at the SolidWorks headquarters, it would make sense to do some work with it, right? Part of my role at the school is scheduling a SolidWorks training, I decided that I can wait for that to play around with the software. My work computer is also a Mac, so it cannot run it anyways.
Fusion360
I decided next to try Fusion360 - the free educational license available to teachers, and the fact that the storage is cloud based, made it appealing. It is also integrated with ShopBots, which is a plus.
I followed along with some tutorials, and was able to design a bookcase, as well as lay it out for cutting out later on our ShopBot!
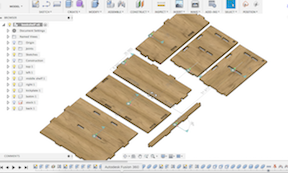
Sidenote - Neal, we have your ShopBot running, but there are still some problems. We’re working on it!
Next, I decided to try to use it to model my project. I know I would need a hopper, an auger, casing, and a nozzle at the super bare minimum. I followed tutorials found on YouTube, and was able to have some success in parts of it. The auger was tricky to learn how to do and took some time, but I did it! I still need to finish up all of the other parts, but I’m confident in my Fusion 360 skills to do so.
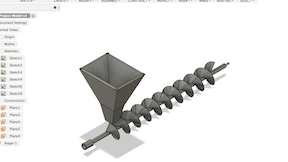
When I started designing these parts, I realized there are more things to add - a grinder, another hopper, a heating system, the body - there’s a lot of individual pieces that go into everything! Maybe when the New England Patriots aren’t winning the Super Bowl, I will be able to work on everything.
Further Modeling
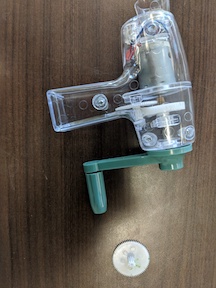
Now that I have run through a couple tutorials, let’s figure out something practical to model. The physics department has a bunch of hand crank generators to use when teaching concepts in electricity. Unfortunately, the plastic used in the gears is not the best in the world and the gears tend to strip as a result (I’m sure everyone trying to crank the hell out of it doesn’t help, either).
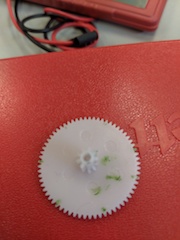
This gear for example is stripped, so the rotation stops when it gets to there. I think I can replicate it for future fabrication, in case that part breaks again and to get this one working.
So in Fusion 360, it’s straightforward - draw a circle, draw another circle, add some rectangles, do a pattern, do it again on top, and boom!
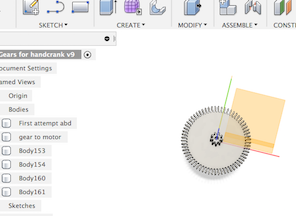
That doesn’t look right. How can I fix it? Maybe instead of drawing rectangels off of the circle, I could inscribe an n(/i>-sided polygon, where n is the number of teeth,then do a triangle off of that how far I have to go!
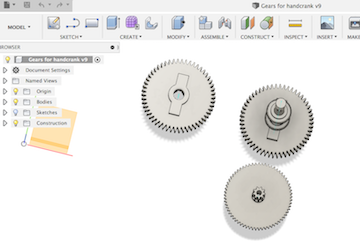
Much better. I added fillets to the points (0.25mm). To figure out how far out everything needed to go for the triangles - I knew the total diameter and the diameter of my circle, so I found the distance between the midpoint of the polygon edge to the circle, then added the distance left needed plus some to account for the fillet.
Wrapping Up
Yay, 3D Modeling! Just needed to brush up a bit, follow some tutorials, and overall get more comfortable with the software. I do like Fusion. It has customizable hotkeys for the functions you use most, which I like, and it is a straightforward, easy to use, and well integrated platform.
Gallery