8. Computer controlled machining
Make something big!
Week’s Goals
Learning outcomes Demonstrate 2D design development for CNC production Describe workflows for CNC production
Have you? Explained how you made your files for machining (2D or 3D) Shown how you made something BIG (setting up the machine, using fixings, testing joints, adjusting feeds and speeds, depth of cut etc) Described problems and how you fixed them Included your design files and ‘hero shot’ photos of final object
Background
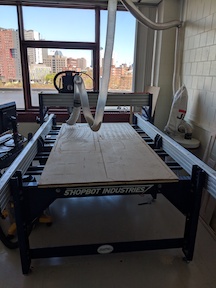
At Madison Park, we have two ShopBots - one that works, and one that doesn’t. Fun fact - the one that doesn’t work is Neil’s old ShopBot. Fortunately for me, the one that works is by me and not four floors away in carpentry. I could probably stand to do those flights of stairs, though…anyways. ShopBot!
I was shown how to use them and get the 3D files ready to be machines and how to set it up and all of that other fun relevant stuff by Luciano and Chris Burns from ShopBot, so I’m pretty good at it. I even helped teach and use it for everyone else in the class so yay I know how to do it!
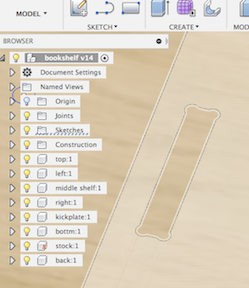
So previously in my musings of figuring out Fusion 360, I designed that bookcase from the tutorial. I need some bookcases for my classroom, so perfect! And it’s pretty big so I think it counts.
The Model
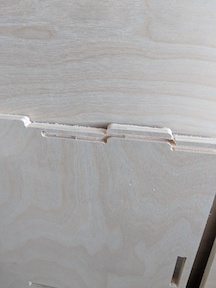
I used the model made previously - and made sure that the Dogbone add in works. It occasionally has problems, but fortunately everything worked this time. When it doesn’t I’ve found it best to just reinstall the add-in (which I need to do on a couple of the lab computers…). Other than that, manual dogbones could work? But yeah. Dogbones are important on these so that things have room to flex for when you pop stuff in, since we are using press fit joints for the connections. One of the biggest challenges is having the patience to select every single profile that needs to be cut out. The tutorials I had followed for the bookcase worked great for learning how to setup the manufacturing part though, left me feeling confident in how I can do that later on.
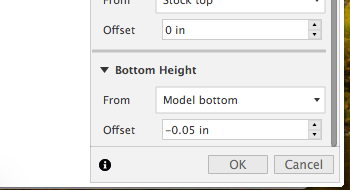
On the manufacturing, it is always good to go a bit underneath the stock to make sure it goes through (I do 0.05”, but whatever works).
I’ve found the manufacture feeds and speeds for materials are fine. If I was making a manufacturer, sure, I’d look to optimize, but for my purposes those are completely fine.
To the ShopBot!
Set Up
Followed instructions to set it up. Zero X and Y axes using proximity switches, zero Z axis with the thingamabob (to the top of the workpiece), run a program to mark where screws are safe to use. Basic stuff. I did remember to measure the thickness of the wood and adjust my model beforehand this time, so I’ve got that going for me at least.
To cutting!
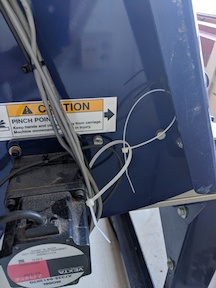
Or not. There wound up being an issue with one of the wires getting caught on a fixture and not letting it go all the way down, which led to things getting cut wrong. Ooops! Fixed it though, with some sweet zip tie action.
So that could have gone better. I helped out a bunch with other FabAcademy students with their assignment, and then remembered I had to make my own big thing.
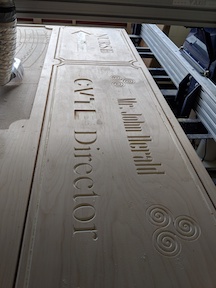
I was asked to make a sign for the guys down in carpentry, so I did that! It was straightforward, doing the modeling. I had some trouble getting the images in for a format that worked. Basically, I needed to edit everything in Inkscape to get it to work. It did, and here’s the model below! Acrylic was used to inlay on the MCAP part and hardhat (already had the files in Inkscape! Just resized them about 5% smaller), and a piece of wood was etched and made to sit in that last cavity. The AGCMA lettering was to be painted in. The engraved lettering was down with a ½” 90° engraving tool, and the rest was planed or cut out with a ¼” 2 flute downcut - clearing the space took a while!
 d
d
Can’t find a picture of it right now - will put one up when I do
Looks great!
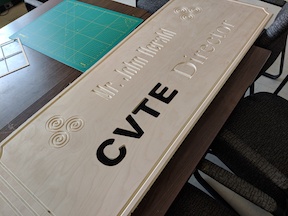
Since that one came out so good, I was even asked to do another one, for the head of CVTE. Might as well through in some directions to the nurses office, too! For this one, I did use a planing bit to do the big swaths of space, and adjusted the rounding of the corners for it. To get from here to the laser cutter for the inlays, I used the shaper add-in to export the faces and adjusted the size down a tad.

Moving Forward
I also want to make something else. I did have a design for a stool, since I need more seating in my classroom. So why not do a 4 piece Shopbot-able stool?!
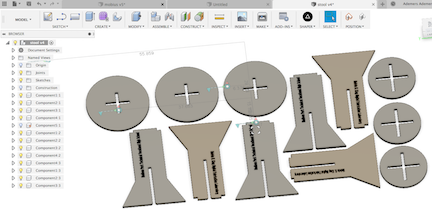
I haven’t cut it out yet, but will update when I do!
UPDATE:STOOLS!
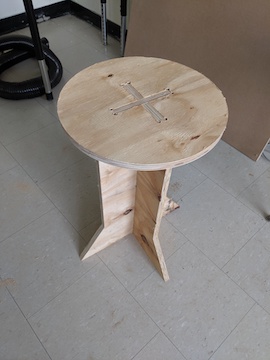
There are two tops of different sizes. It didn’t need the crosspiece, so instead I made the smaller one more of a stool top while the bigger disk is more of a little coffee table style.
Summary
ShopBots are cool, and you can make a lot of cool things with them. Since it is eventually going to be nice out, I would like to maybe make my own cornhole boards on the machine. But they are really versatile, and I’m excited to what we are able to design. Big takeaways: If it sounds like something is going wrong, stop and reset. When in doubt, there is a tutorial for it.
3-D Models
Puppers!