9. Embedded programming
Program…I am…a…Robot.

Week’s Goals
Learning outcomes Identify relevant information in a microcontroller data sheet. Implement programming protocols.
Have you? Documented what you learned from reading a microcontroller datasheet. What questions do you have? What would you like to learn more about? Programmed your board Described the programming process/es you used Included your code
Background
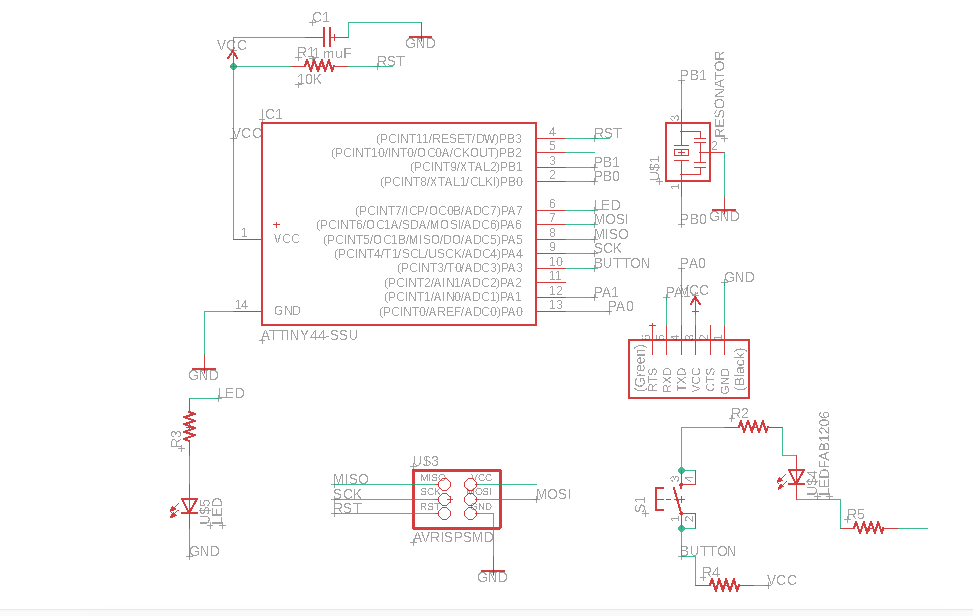
See Week 7: Electronics Design for stuff done previously and the board I’m using here.
There’s the board again below, for reference. Now what have we learned from the last time? Well, we have learned from reading the data sheet that we got lucky picking pins for this - there is not ADC in every pin, but for this we only need to worry about a digital input and output. So phew! The ATTiny44’s do in fact have 7, and most of the available pins do have them - from the hello world board, only PB2 does not. So that’s cool, it just means that if the LED is on there we would not be able to adjust the brightness of it, if we ever wanted to. Edit to add - Another good thing to know from reading data sheets, though not relevant to the blink sketch we use: Analog Read is 10 bit (0-1023), analog write is 8-bit (0-255). Good to know!
As a quick aside, when I first designed the initial board shown in Week 7, I had wanted to do this thing where each button turned on a light, then when both were pressed they would both blink instead of solidly on. I am not doing that here with the redesigned board that actually has power supplied properly and a resistor to pull, but the programming block would be something like do a “While” loop for the button being pressed and it checks for both buttons to blink instead of just being on in an “If” loop within the “While” loop, and do it for each button. Anyways.
Programming
I decided to use the Arudino IDE to program everything, since it is a relatively straightforward system to do so, is free, and has extensive tutorials and forums on-line discussing it’s use. That is conducive to me, a not-computer-scientist, for the purpose of this. The native C++ has some different syntax than I am used to, but again, the tutorials and verification function helps a lot.
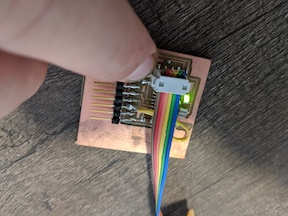
I started with the Arudino basics blink example, since that is the best way to start to learn about everything. Using the arduino database is helpful for learning the commands, since that is what I am using to program. Cool, so let’s do it. First thing is to update the pins - time to bust out this handy photo so learn what the programming equivalent is.
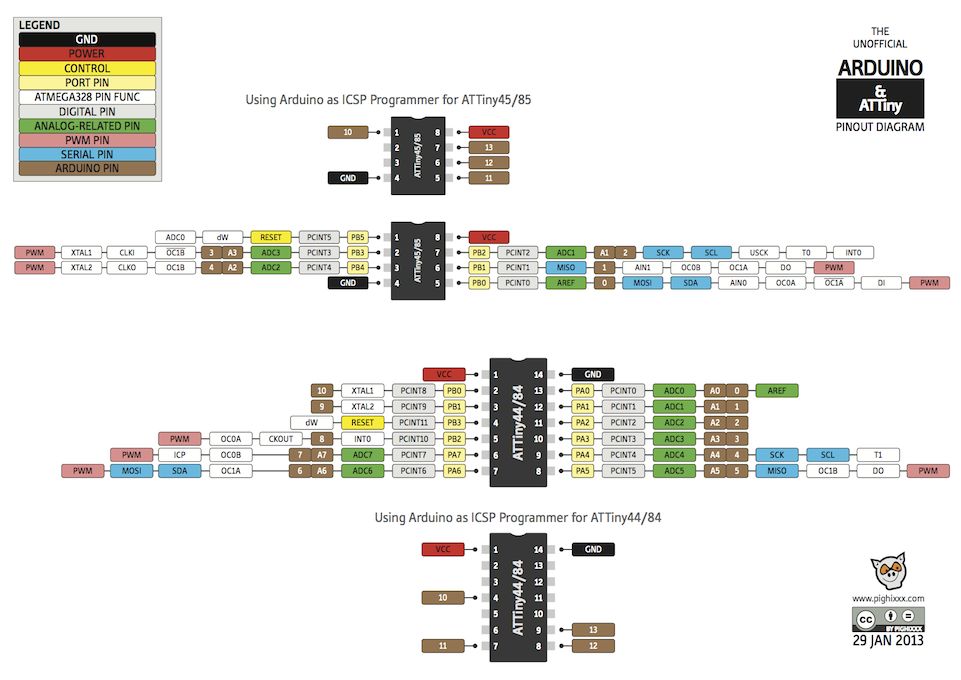
Sweet. (Update as I write this several weeks later - I think I referred to this picture more than almost anything else in the class) Correct the pins to what it needs to be, and do the thing! Go through the iteration of light is on with button, light is off, and blinks with the delay. It’s a pretty straightforward If…then…else… logic that is one of the first things you learn. A while loop is probably more appropriate. So let’s try that! Oh! Maybe it would be good to figure out how the built in timer can work, so the program can continue to operate without the “delay” function in case other things need to be done. I think that can be done at a later time.
Summary
Programming can be challenging, in terms of making sure all of your syntax is correct. Other than that, it is a straightforward logical thing that you just need to make sure that your pins are correct, variables are consistent, it’s commented enough to remember what the hell you were thinking, and to make sure the program is the proper size for the programmer. This can be easier said than done with the ATtiny44s, especially when you need to use additional libraries like Software Serial.
Pictures!

Videos
From the While Loop Program:
Code
Basic blink with If Loop:
// constants won't change. They're used here to set pin numbers:
const int buttonPin = 3;     // the number of the pushbutton pin
const int ledPin =  7;      // the number of the LED pin

// variables will change:
int buttonState = 0;         // variable for reading the pushbutton status

void setup() {
  // initialize the LED pin as an output:
  pinMode(ledPin, OUTPUT);
  // initialize the pushbutton pin as an input:
  pinMode(buttonPin, INPUT);
}

void loop() {
  // read the state of the pushbutton value:
  buttonState = digitalRead(buttonPin);

  // check if the pushbutton is pressed. If it is, the buttonState is HIGH:
  if (buttonState == LOW) {
    // turn LED on:
    delay(500);
    digitalWrite(ledPin, LOW);
    delay(500);
    digitalWrite(ledPin,HIGH);
  } else {
    // turn LED off:
    digitalWrite(ledPin, LOW);
  }
}
Basic Blink with while statement:
// constants won't change. They're used here to set pin numbers:
const int buttonPin = 3;     // the number of the pushbutton pin
const int ledPin =  7;      // the number of the LED pin

// variables will change:
int buttonState = 0;         // variable for reading the pushbutton status

void setup() {
  // initialize the LED pin as an output:
  pinMode(ledPin, OUTPUT);
  // initialize the pushbutton pin as an input:
  pinMode(buttonPin, INPUT);
}

void loop() {

  digitalWrite(ledPin, LOW);

  delay(200);

  // read the state of the pushbutton value:
  buttonState = digitalRead(buttonPin);

  /*
  if (buttonState == LOW) {
    // turn LED on:
    delay(500);
    digitalWrite(ledPin, LOW);
    delay(500);
    digitalWrite(ledPin,HIGH);
  } else {
    // turn LED off:
    digitalWrite(ledPin, HIGH);
  }
  */
  while (buttonState == HIGH) {
    digitalWrite(ledPin, HIGH);
    delay (200);
    buttonState = digitalRead(buttonPin);
    delay (200);
  }


    digitalWrite(ledPin, HIGH);
    delay (500);
    digitalWrite(ledPin, LOW);
    delay (500);
    buttonState = digitalRead(buttonPin);
    delay (200);
  }
Dogs!