14. Networking and Communications
Learning outcomes - Demonstrate workflows used in network design - Implement and interpret networking protocols
Have you? - Described your project using words/images/diagrams/schematic screenshots. - Explained the programming process/es you used. - Outlined problems and how you fixed them - Included design files (or linked to where they are located) and original code
Background
The internet is a series of computers and other devices hooked up to each other to allow for communication. While it seems like magic (and is!), all it is a bunch of code allowing things to talk to each other. Let’s find out how it works!
Networking Devices
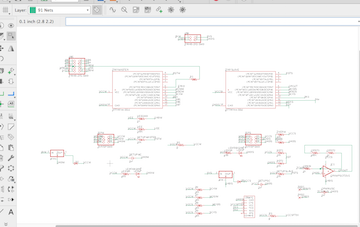
I decided to use the I2C protocol for having different microcontrollers talk to each other, since the infrastructure for its use (clock and MOSI, used as SCL and SDA, respectively) are already in place on every board we design! Shout out to here for having all of the background and sample code available for how to use it with an Arduino and the Wire library. As always, the Arduino Reference for Wire is always great for getting the syntax…write (ba dum tiss). I used Neil’s schematic initially to make the LCD display, but I saw that you do not need to use the SCK pin (which is needed for the I2C communication), so I used one of the other ADC pins for the E connection to the display.
First things first - the ATTinyCores library needed to be installed for I2C to work (thanks to seeing the problems that Aleza and Jose had - crisis averted on my part!)
I know that the Serial communication is generally used to check everything out, but what if we monitor the serial from the slave board, and have an LCD on the Master so we can check both spots to make sure things are the same? OK? Cool! This also fits into one of the side projects I at one point thought of using for my final project, where one controller controls an LCD to show the ambient temperature as well as the temperature from a couple of thermocouple probes that would be used in an offset charcoal smoker. This would be great, since we could have the dedicated pins needed for the display, while also having the temperature reading inputs not crowding up the rest of the device. And while we are at it, we can also put them on the same board because why not?


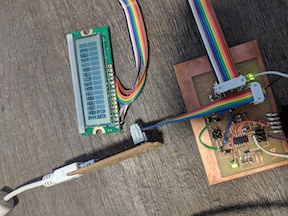
On the slave side, there was a slight issue with solder connecting a couple of traces underneath the microcontroller, thus cutting the VCC above it and the wire connecting the ISP connection to the microcontroller. I put everything on the board for a thermocouple signal to be amplified (K type is around 40 μV/℃, so it requires a roughly 500 times signal multiplier, thus the 500 and 1 kΩ resistances in their respective positions on the op amp (series - add resistances). The thermistor is there to measure the ambient temperature to act as the cold junction compensation. I will be sending over the temperature to the display, as well as to the serial monitor.
Programming the Boards
First, make sure that the LCD display works.
// include the library code:
#include <LiquidCrystal.h>

// initialize the library by associating any needed LCD interface pin
// with the arduino pin number it is connected to
const int rs = 5, en = 7, d4 = 3, d5 = 2, d6 = 1, d7 = 0;
LiquidCrystal lcd(rs, en, d4, d5, d6, d7);

void setup() {
  // set up the LCD's number of columns and rows:
  lcd.begin(16, 2);
  // Print a message to the LCD.
  lcd.print("I love my wife!");
}

void loop() {
  // set the cursor to column 0, line 1
  // (note: line 1 is the second row, since counting begins with 0):
  lcd.setCursor(0, 1);
  // print the number of seconds since reset:
  lcd.print(millis() / 1000);

  // success! 5/31/2019
}
I followed the previously linked to tutorials to figure out the code for the networking. Pretty straightforward, some initial issues making sure all of my syntax was correct, but that is always the problem with code. The serial commented out in the slave code was used to make sure I was getting the same reading on the serial side and the networking side. I also need to make sure the math is correct for the thermistor, but for now we can see how we send over the analog reading.
Master Code:
// include the library code:
#include <LiquidCrystal.h>
#include <Wire.h>

// initialize the library by associating any needed LCD interface pin
// with the arduino pin number it is connected to
const int rs = 5, en = 7, d4 = 3, d5 = 2, d6 = 1, d7 = 0;
LiquidCrystal lcd(rs, en, d4, d5, d6, d7);

void setup() {
  // set up the LCD's number of columns and rows:
  lcd.begin(16, 2);
  Wire.begin();
  // Print a message to the LCD.
  lcd.print("Analog Reading");
}

void loop() {
  // set the cursor to column 0, line 1
  // (note: line 1 is the second row, since counting begins with 0):
  lcd.setCursor(0, 1);
  lcd.print("                ");
  lcd.setCursor(0,1);
  Wire.requestFrom(3,1);
  while (Wire.available()) {
    int anaread = Wire.read();
    lcd.print(anaread);
  }
  delay (5000);


}
Slave Code:
#include <Wire.h>

//#include <SoftwareSerial.h>


//#define TX  2
//#define RX    3
//#define thermread  1


//SoftwareSerial Temp(3, 2);


int anaread;

void setup() {
  // put your setup code here, to run once:
  anaread = analogRead(1);
  Wire.begin(3);
  Wire.onRequest(requestEvent);
  pinMode(1,INPUT);
//  Temp.begin(9600);
//  Temp.println("Starting serial communication...");

  delay(200);

}

void loop() {
  // put your main code here, to run repeatedly:
delay (100);
/*
 *     anaread = analogRead(1);
    if (anaread > 255) {
      anaread = anaread-300;
    }
    String anaread1 = String(anaread);

 //   Temp.print("Reading: "); Temp.print(anaread); Temp.print(anaread1); Temp.println("");
    long v0 = analogRead(1)*5.15/512;
    //Serial.print(10000*(5.15/v0-1));
    //Serial.print(v0);
    //Serial.println(analogRead(1));

    Wire.write(v0);
 */
}

void requestEvent() {
    delay(1000);
    anaread = analogRead(1);
 /*   if (anaread > 511) {
      anaread = anaread - 1024;
    }
    // int refread = analogRead(0);
    // long vref = refread*5.15/1024;
    long v0 = 2.5 - anaread*5.15/(20*512);
    long r0 = 10000/(5.15/v0 - 1);
    int tempC = 295*3750/(3750 + 295 * log(r0/7400)) - 273;
    int tempF = tempC * 1.8 + 32;


 //   Temp.print("Reading: "); Temp.print(anaread); Temp.print(anaread1); Temp.println("");

    // Serial.print(10000*(5.15/v0-1));
    // Serial.print(v0);
    // Serial.println(analogRead(1));

*/
    Wire.write(anaread);

}
Notice how we do have the serial and wire libraries being used. Cool!
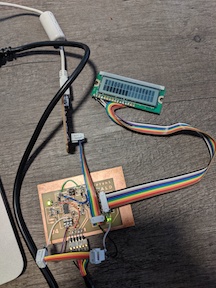
First, the setup!
Note to self: don’t forget to disconnect the controllers from each other before uploading a program, because it will give you the “Yikes!” error every time.
Note to viewers: The trimmed connectors hanging out above everything is where the connection between the programmers happens.
Results!
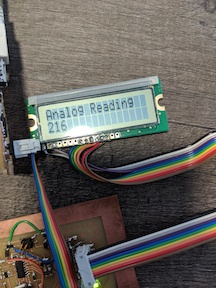
Close enough! Let’s keep going.
Here’s the code to figure out the temperature from the voltage, which is the new slave code:
#include <Wire.h>

//#include <SoftwareSerial.h>


//#define TX  2
//#define RX    3
//#define thermread  1


//SoftwareSerial Temp(3, 2);


int anaread;

void setup() {
  // put your setup code here, to run once:
  anaread = analogRead(1);
  Wire.begin(3);
  Wire.onRequest(requestEvent);
  pinMode(1,INPUT);
//  Temp.begin(9600);
//  Temp.println("Starting serial communication...");

  delay(200);

}

void loop() {
  // put your main code here, to run repeatedly:
delay (100);
/*
 *     anaread = analogRead(1);
    if (anaread > 255) {
      anaread = anaread-300;
    }
    String anaread1 = String(anaread);

 //   Temp.print("Reading: "); Temp.print(anaread); Temp.print(anaread1); Temp.println("");
    long v0 = analogRead(1)*5.15/512;
    //Serial.print(10000*(5.15/v0-1));
    //Serial.print(v0);
    //Serial.println(analogRead(1));
    long temperaturek = 295*3750/(3750+295*log(10000*(5.15/v0-1)/7400));
    long temperaturef = (temperaturek - 273.15)*9/5+32;

    Wire.write(v0);
 */
}

void requestEvent() {
    delay(1000);
    anaread = analogRead(1);
    if (anaread > 511) {
      anaread = anaread - 1024;
    }
    // int refread = analogRead(0);
    // long vref = refread*5.15/1024;
    long v0 = 2.5 - anaread*5.15/(20*512);
    long r0 = 10000/(5.15/v0 - 1);
    int tempC = 295*3750/(3750 + 295 * log(r0/7400)) - 273;
    int tempF = tempC * 1.8 + 32;


 //   Temp.print("Reading: "); Temp.print(anaread); Temp.print(anaread1); Temp.println("");

    // Serial.print(10000*(5.15/v0-1));
    // Serial.print(v0);
    // Serial.println(analogRead(1));


    Wire.write(tempF);

}
Cool. Here’s the updated master code to show that it’s the temperature instead of the analog reading:
// include the library code:
#include <LiquidCrystal.h>
#include <Wire.h>

// initialize the library by associating any needed LCD interface pin
// with the arduino pin number it is connected to
const int rs = 5, en = 7, d4 = 3, d5 = 2, d6 = 1, d7 = 0;
LiquidCrystal lcd(rs, en, d4, d5, d6, d7);

void setup() {
  // set up the LCD's number of columns and rows:
  lcd.begin(16, 2);
  Wire.begin();
  // Print a message to the LCD.
  lcd.print("Temperature (F)");
}

void loop() {
  // set the cursor to column 0, line 1
  // (note: line 1 is the second row, since counting begins with 0):
  lcd.setCursor(0, 1);
  lcd.print("         ");
  lcd.setCursor(0,1);
  Wire.requestFrom(3,1);
  while (Wire.available()) {
    int tempF = Wire.read();
    lcd.print(tempF);
  }
  delay (5000);


}
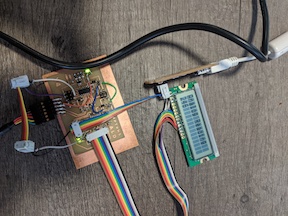
That’s…not right. But at least it is sending something still! Probably the math is wrong somewhere, but hey at least the boards are talking to each other.
Got it to work! I went through and derived everything, but there were still some issues. So I looked at the variable types, and realized I had everything as “295” for my floats, instead of “295.0” which was throwing off the calculations.
Updated Master code:
// include the library code:
#include <LiquidCrystal.h>
#include <Wire.h>

// initialize the library by associating any needed LCD interface pin
// with the arduino pin number it is connected to
const int rs = 5, en = 7, d4 = 3, d5 = 2, d6 = 1, d7 = 0;
LiquidCrystal lcd(rs, en, d4, d5, d6, d7);
long v0;
long r0;
int tempC;
int tempF;


void setup() {
  // set up the LCD's number of columns and rows:
  lcd.begin(16, 2);
  Wire.begin();
  // Print a message to the LCD.
  lcd.print("Temperature (F)");
}

void loop() {
  // set the cursor to column 0, line 1
  // (note: line 1 is the second row, since counting begins with 0):
  lcd.setCursor(0, 1);

  Wire.requestFrom(3,1);
  while (Wire.available()) {
    int tempF = Wire.read();
/*    int anaread4 = anaread * 4;
    v0 = 2.5 - anaread4*5.15/(20*512);
    r0 = 10000/(5.15/v0 - 1);
    tempC = 295*3750/(3750 + 295 * log(r0/7400)) - 273;
    tempF = tempC * 1.8 + 32;
 */
    lcd.print(tempF);
  }
  delay (500);


}
Updated Slave code:
#include <Wire.h>

//#include <SoftwareSerial.h>


//#define TX  2
//#define RX    3
//#define thermread  1


//SoftwareSerial Temp(3, 2);


int anaread;

void setup() {
  // put your setup code here, to run once:
  anaread = analogRead(1);
  Wire.begin(3);
  Wire.onRequest(requestEvent);
  pinMode(1,INPUT);
//  Temp.begin(9600);
//  Temp.println("Starting serial communication...");

  delay(200);

}

void loop() {
  // put your main code here, to run repeatedly:
delay (100);
/*
 *     anaread = analogRead(1);
    if (anaread > 255) {
      anaread = anaread-300;
    }
    String anaread1 = String(anaread);

 //   Temp.print("Reading: "); Temp.print(anaread); Temp.print(anaread1); Temp.println("");
    long v0 = analogRead(1)*5.15/512;
    //Serial.print(10000*(5.15/v0-1));
    //Serial.print(v0);
    //Serial.println(analogRead(1));
    long temperaturek = 295*3750/(3750+295*log(10000*(5.15/v0-1)/7400));
    long temperaturef = (temperaturek - 273.15)*9/5+32;

 */
}

void requestEvent() {
    delay(1000);
    anaread = analogRead(1);
    float vT = anaread*5.15/1024.0;
    float rT = 10000*vT/(5.15-vT);
    int rTt = int(rT/100);
    float tempC = 3750.0*295.0/(3750.0+295.0*log(rT/10000.0))-273.0;
    int tempF = int(tempC * 1.8 + 32);


    Wire.write(tempF);

}
