18. Wildcard week
This week I designed and produced something with a digital fabrication process (incorporating computer-aided design and manufacturing) not covered in another assignment. Neil encouraged us to utilize the diversity of technologies in our specific labs, that may be different than others across the world. I am very fortunate to be located in Boston, MA. and reached out to a Fab Academy alum that is doing 3D Kitting research within the MIT Aeronautics and Astronautics Space Systems Laboratory. This is probably one of the coolest machines I have ever witnessed and would love to return for further research.
I apologize ahead of time for this weeks documentation is quite wordy… however this is an entirely new machine to me and in order to teach myself the very basic It is important to me to understand the mechanics of the machine. This may be hard to believe but this is shorter than the entire user catalog. Please note this documentation is specifically for the 3D SWG 061 N2 Series.
Machine : SHIMA SEIKI 3D 061 N2
![]()
The “SWG-N2” series is a member of SHIMA SEIKI’s compact class of WHOLEGARMENT knitting machines. Which are capable of producing a range of fashion accessories from gloves, socks, hats, mufflers, neck-ties and other small items, with NO SEWING OR LINKING REQUIRED SHIMA SEIKI prides itself in “Revolutionizing the Supply Chain” from planning to production and sales is achieved. Equipped with With a 24” knitting width, and a larger number of yarn carriers and holding hooks for yarn cutting as well as a separate yarn holder with increased capacity allows for even more flexibility.
Functions
Above the Slide Needle is photographed, Shima Seiki reinvented the most basic element of knitting, the needle. Yes, this doesn’t look like your average sewing needle and that is because the slide-needle is the result of thorough re-evaluation of the 150 year old design of the conventional latch needle. The flexible 2 piece slider mechanism splits and extends beyond the needle hook for increased potential. This effectively eliminates the transfer clip and allows the needle to be mounted in the center of the needle groove thereby achieving perfectly symmetrical loop formation.
Below is a diagram I put together in an attempt to dissect and understand the functions of this complex machine. In the videos following you can witness firsthand these subsystems in action.
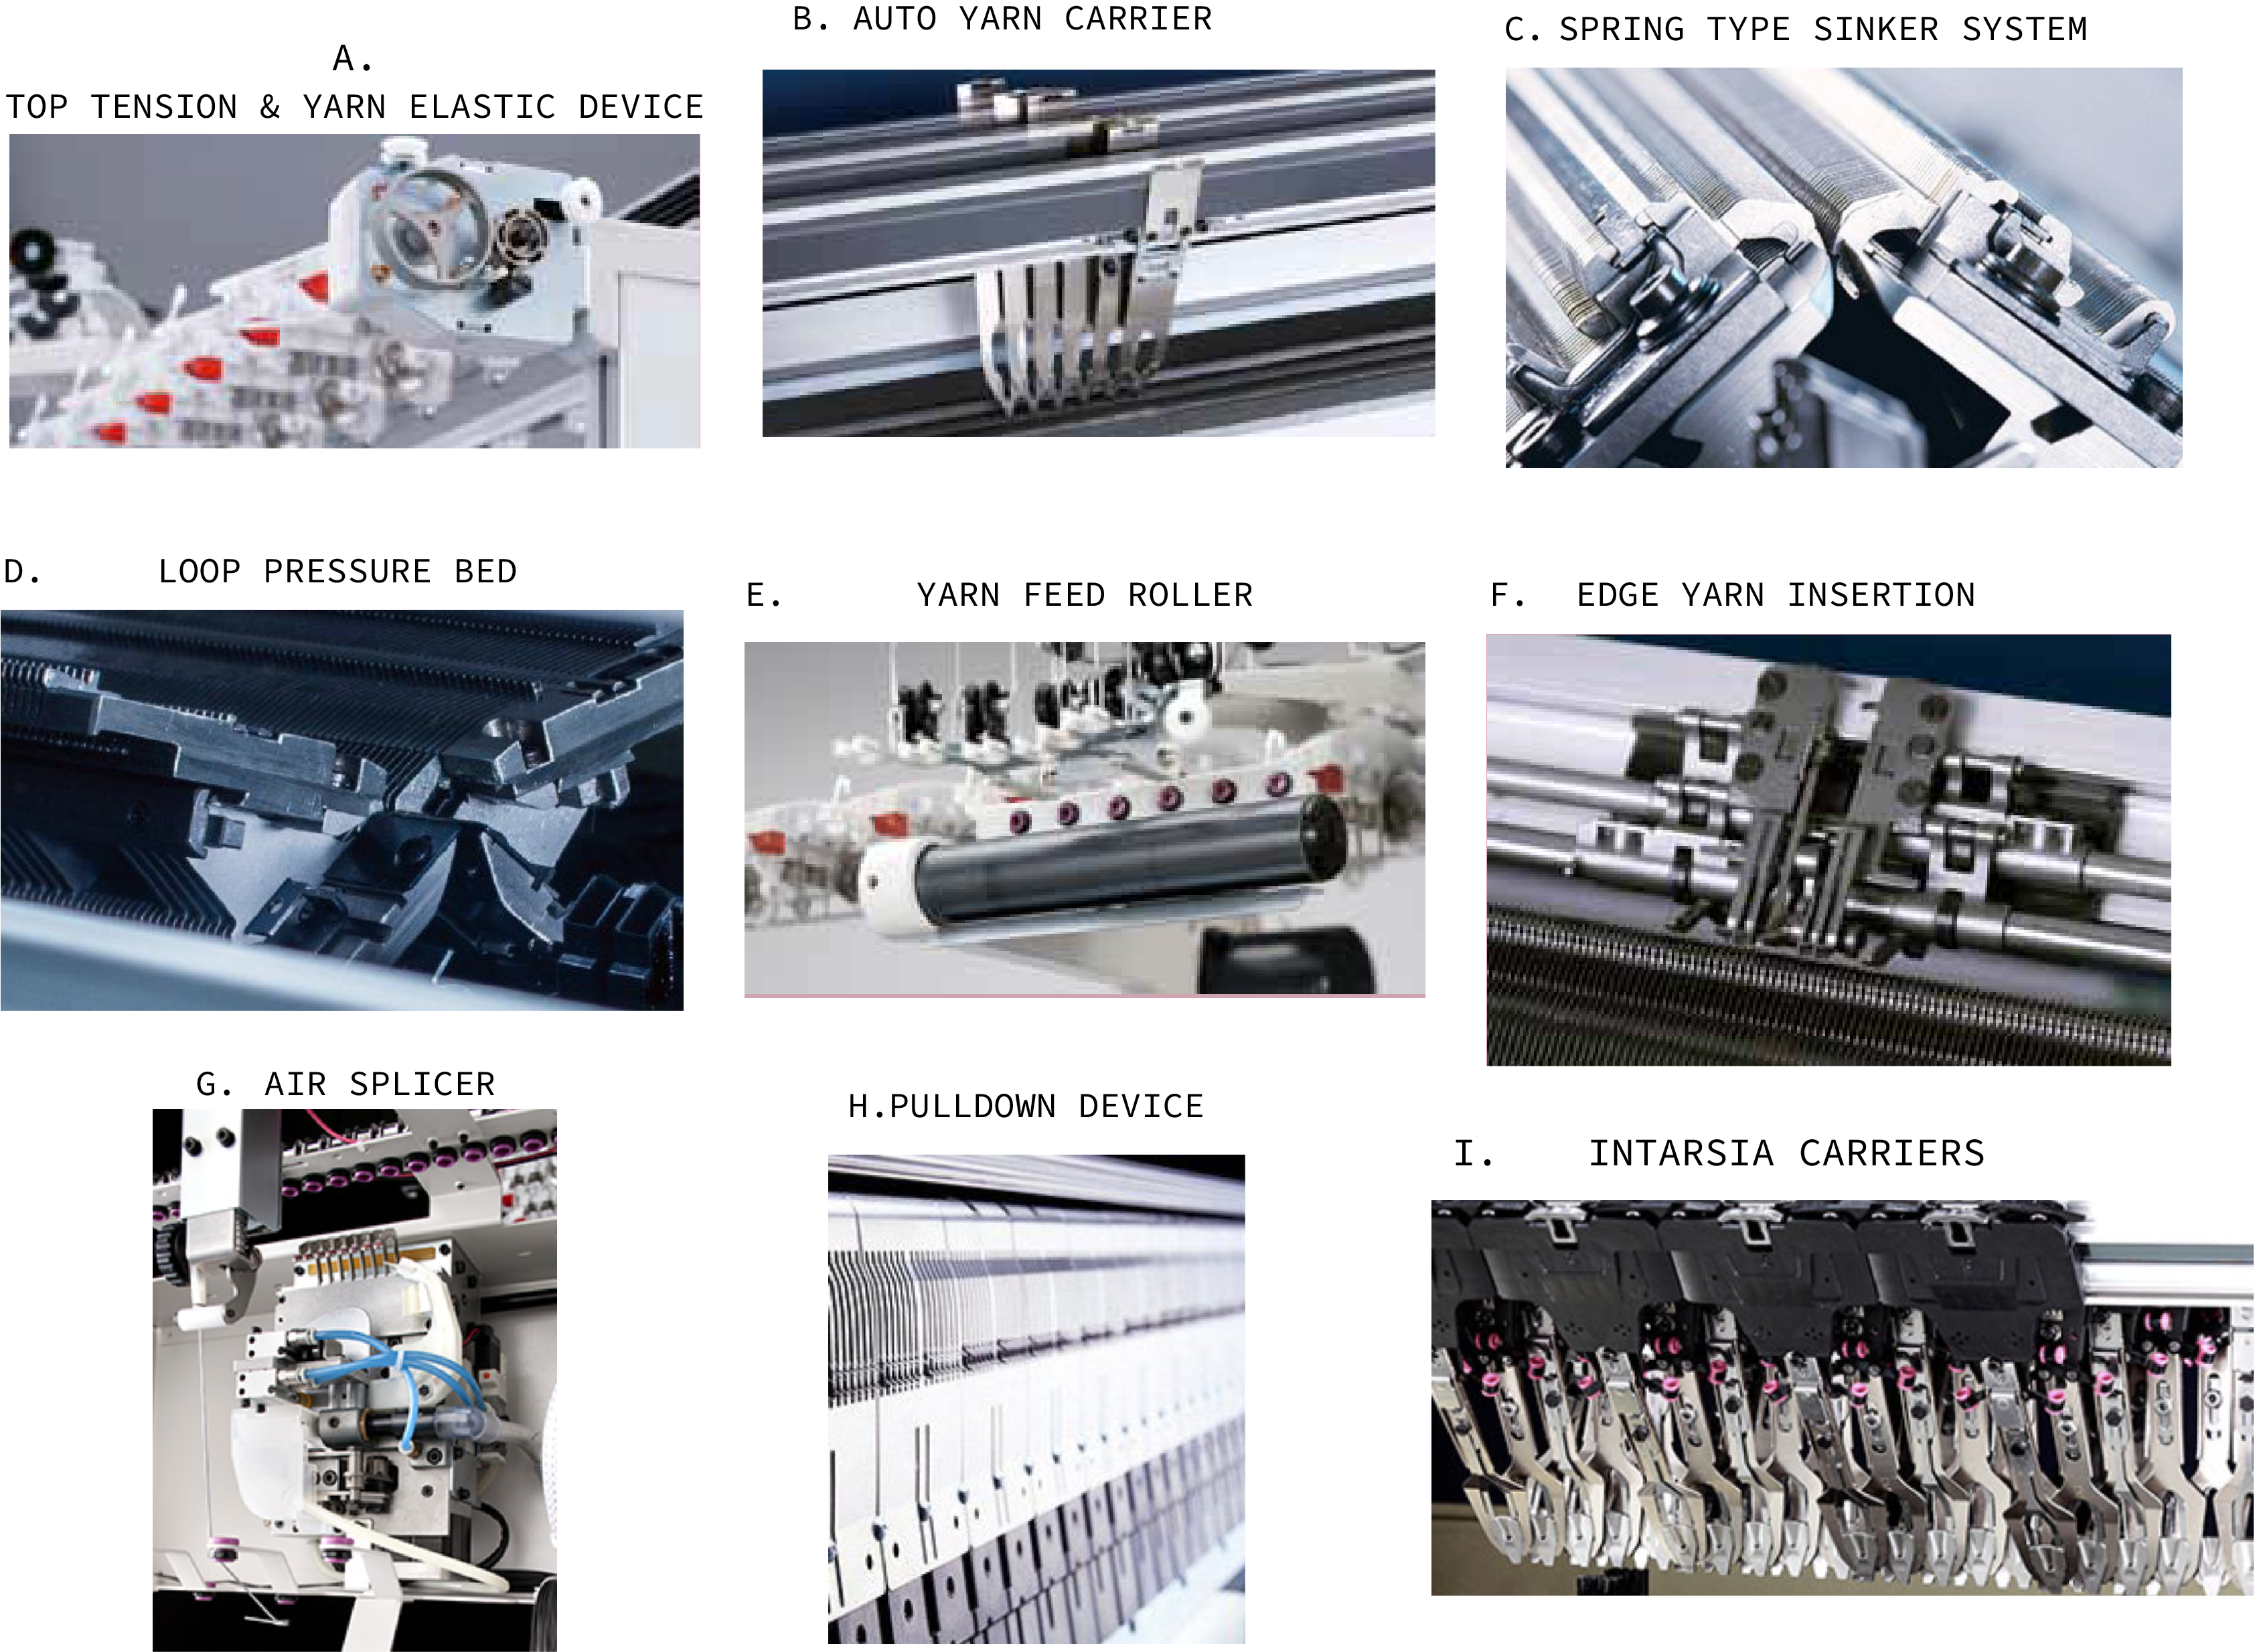
A.) The Top Tension Device employs a convenient one touch threading system. When a knot is detected during knitting the machine stops for large knots, while small knots cause the machine to slow down. The top tension therefore serve as an effective quality control sensor. The elastic yarn advance device features a motorized unit for controlled advancing of elastic yarns, which allow production of various supporters and braces for the sports and medical fields (pretty cool!!!). The advance is preformed from above for greater reliability and efficiency.
B.) The number of Auto Yarn Carrier is increased in this model. Together with separate yarn holder with high capacity, allows for increased flexibility in multi color knitting. Auto yarn carriers are motorized and move independently, eliminating the need for extra carriage courses to move carriers out of the way during intarsia knitting.
C.) Spring-Type Sinker System: To understand this system, I first looked at Conventional forced operation type sinkers which are only active upon carriage traverse in each course, and tend to subject fabrics to unnecessary stress and cause compressed loops and even yarn breakage. On the other hand, the Spring-Type Sinker System works full time regardless of carriage position and provides gentle hold down movement.
D.) By utilizing a Loop Pressure Bed, stable hold-down of loops are achieved, allowing full control especially when producing inlay patterns. Inlay (in weaving) fabric is produced by inserting yarn into existing knit fabric in a weave fashion, yielding unique fabrics that are neither typically knit nor woven. Inlay also suppresses typical stretch characteristics of knitwear, and since new yarns and materials can be used for inlay structures, new applications in addition to fashion apparel such as sports and medical as well as other industrial applications can be anticipated.
E.) Yarn Feed Roller is not the coolest part in this system but is very important seeing as it prevents yarn breaks when kitting delicate yarns.
F.) With an Edge Yarn Insertion Device, edge yarns can be cleaned up not only at the finger/toe tips but also between fingers and toes for gloves and socks. SWG-N2 series feature a motor-driven insertion hook and cutter which ensure reliable insertion.
G.) The Air Splicer is a very neat function, unlike conventional knotter systems which mechanically tie together yarn ends, the Air Splicer cuts then twists together yarns with a burst of pressurized air with split-second accuracy. Working in precise coordination with i-DSCS+DTC, the Air Splicer is able to time each splice so that perfect color changes can occur exactly as programmed.
H.) New computerized Pulldown System consists of front and rear panels over which tiny pins are distributed for separately controlling pulldown tension for the front and back when knitting WHOLEGARMENT knitwear. In addition, each panel is separated into 1.5-inch sections which can be individually controlled for specific tension control across the entire width of the garment. This precise control over pulldown tension permits three-dimensional shaping of WHOLEGARMENT items—for example, by allowing shoulder lines for set-in sleeves to be positioned over the shoulder toward the back—resulting in a more dimensionally accurate garment which conforms better to the shape of the torso.
I.) Using dedicated Intarsia Carriers allows more color changes within a given knitting width. Working with “Intarsia carrier auto allocation software” production lead time can be significantly reduced.
Diagramed below is the R2CARRIAGE “Rapid Response Carriage System” Advanced carriage mechanism combined with improved software programming achieves quicker carriage returns after each course, resulting in higher productivity.
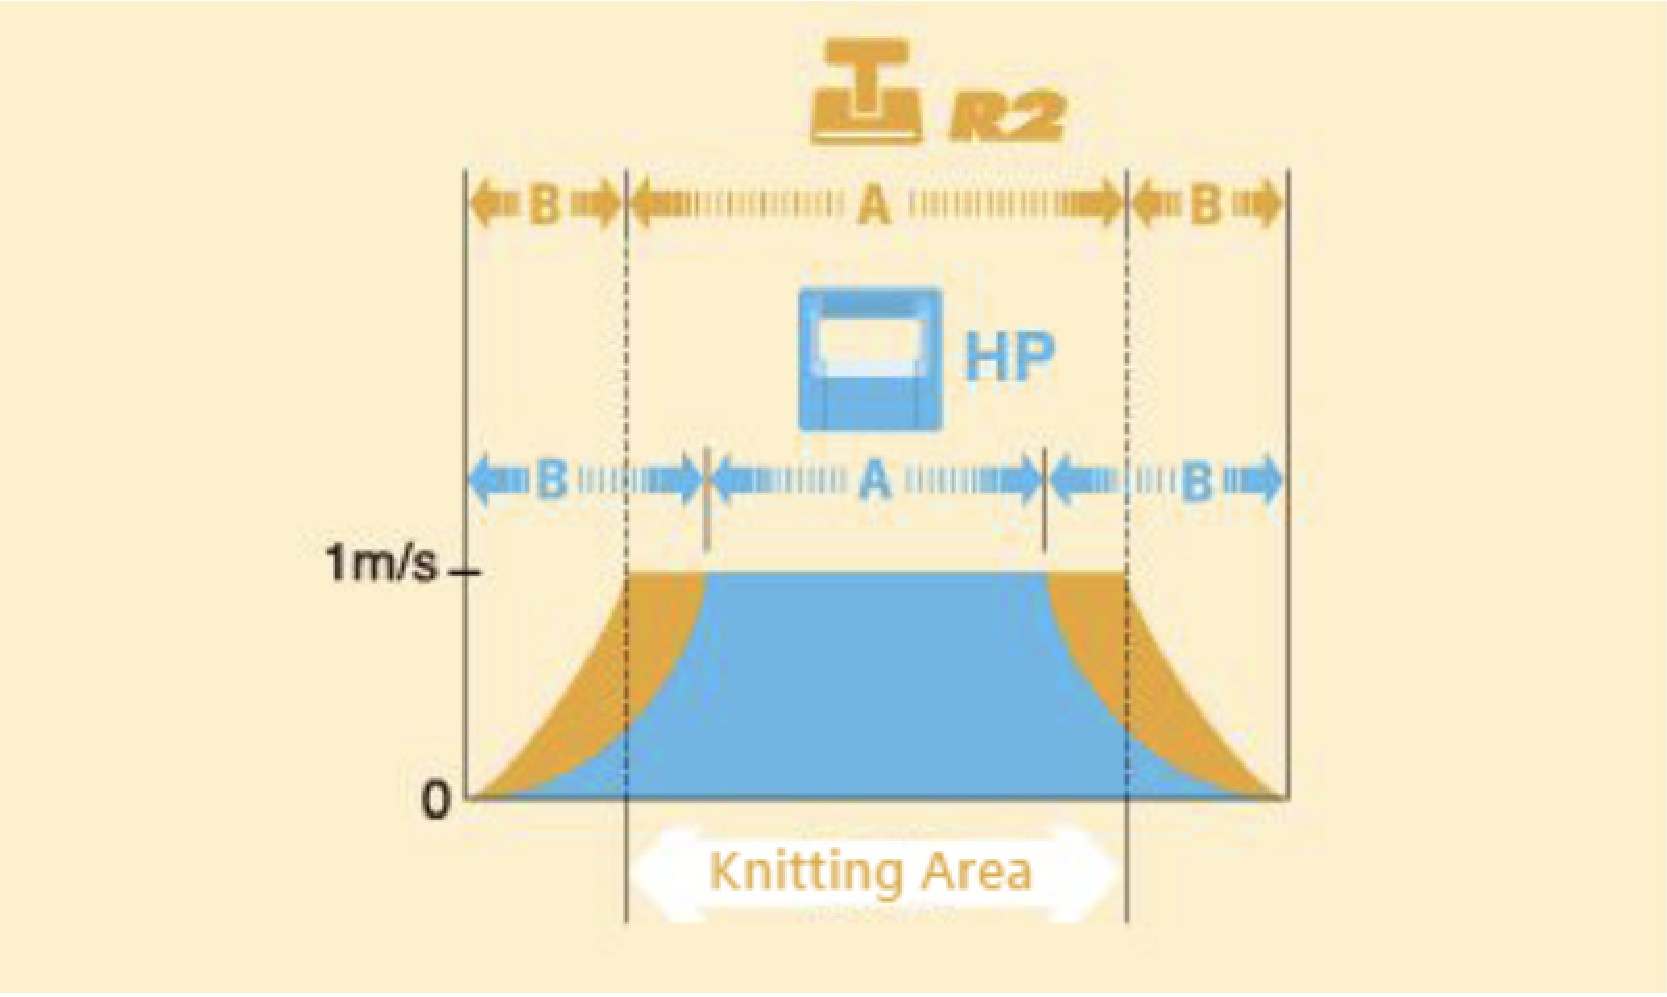
For a given knitting width, a larger and heavier carriage requires more space (B) at each end of the machine to decelerate, return and accelerate back up to speed, so the actual portion where the carriage runs at full speed (A) becomes very limited. With a compact, lightweight carriage, less space is required for the carriage to make returns, allowing more area for the carriage to run at full speed.
i-DSCS+DTC Digital Stitch Control System “with intelligence” has the capability to actively control yarn-feed in both feed and retrieval directions as necessary, through variable electronic control of yarn tension. This results in even higher quality and greater productivity using a wider variety of yarns, including high-speed knitting of challenging yarns such as fancy yarns, stretch yarns, slub yarns and delicate cashmeres. Precise electronic control means i-DSCS+DTC provides consistent quality among different machines, production batches and repeat orders, and is crucial to the precision knitting required in WHOLEGARMENT production.
Design System
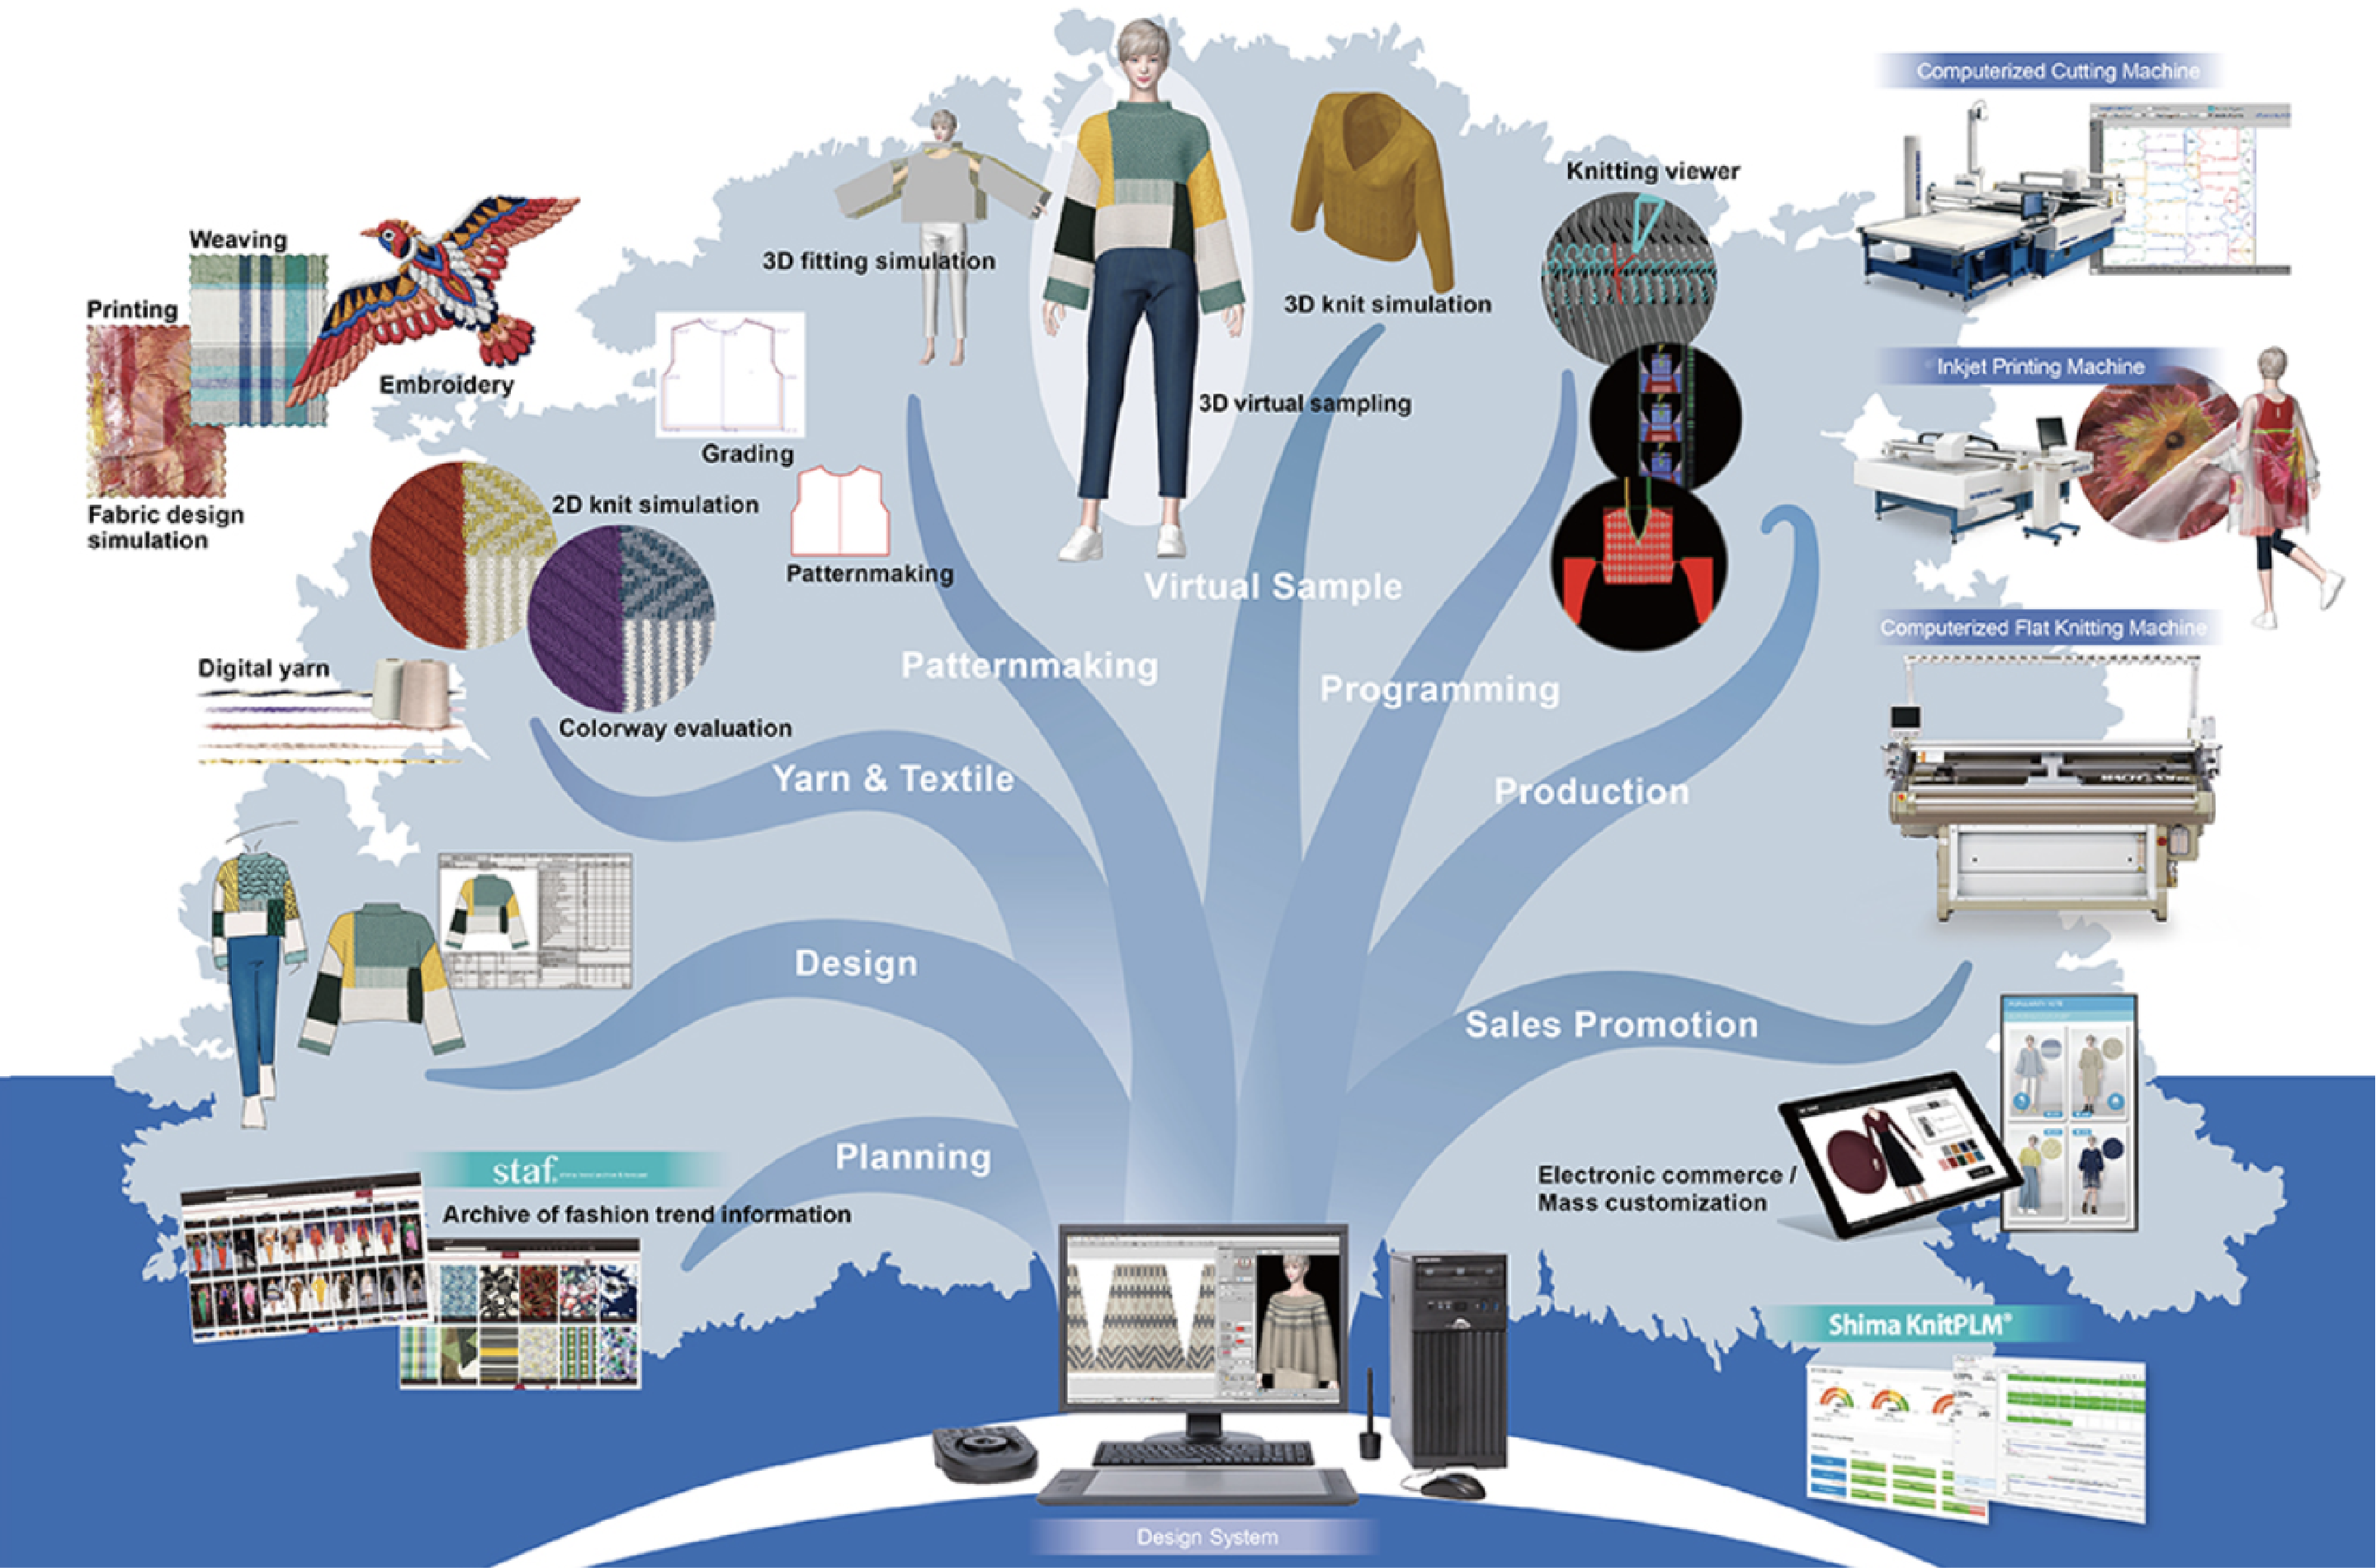
“SHIMA SEIKI’s 3D CAD design system SDS-ONE APEX series realizes the digitalization and acceleration of the product development process at the highest quality with high-definition virtual samples.” Below Simha Seiki’s Big Tree, showing that the SDS-ONE APEX series is at the core, connecting all of the machines.
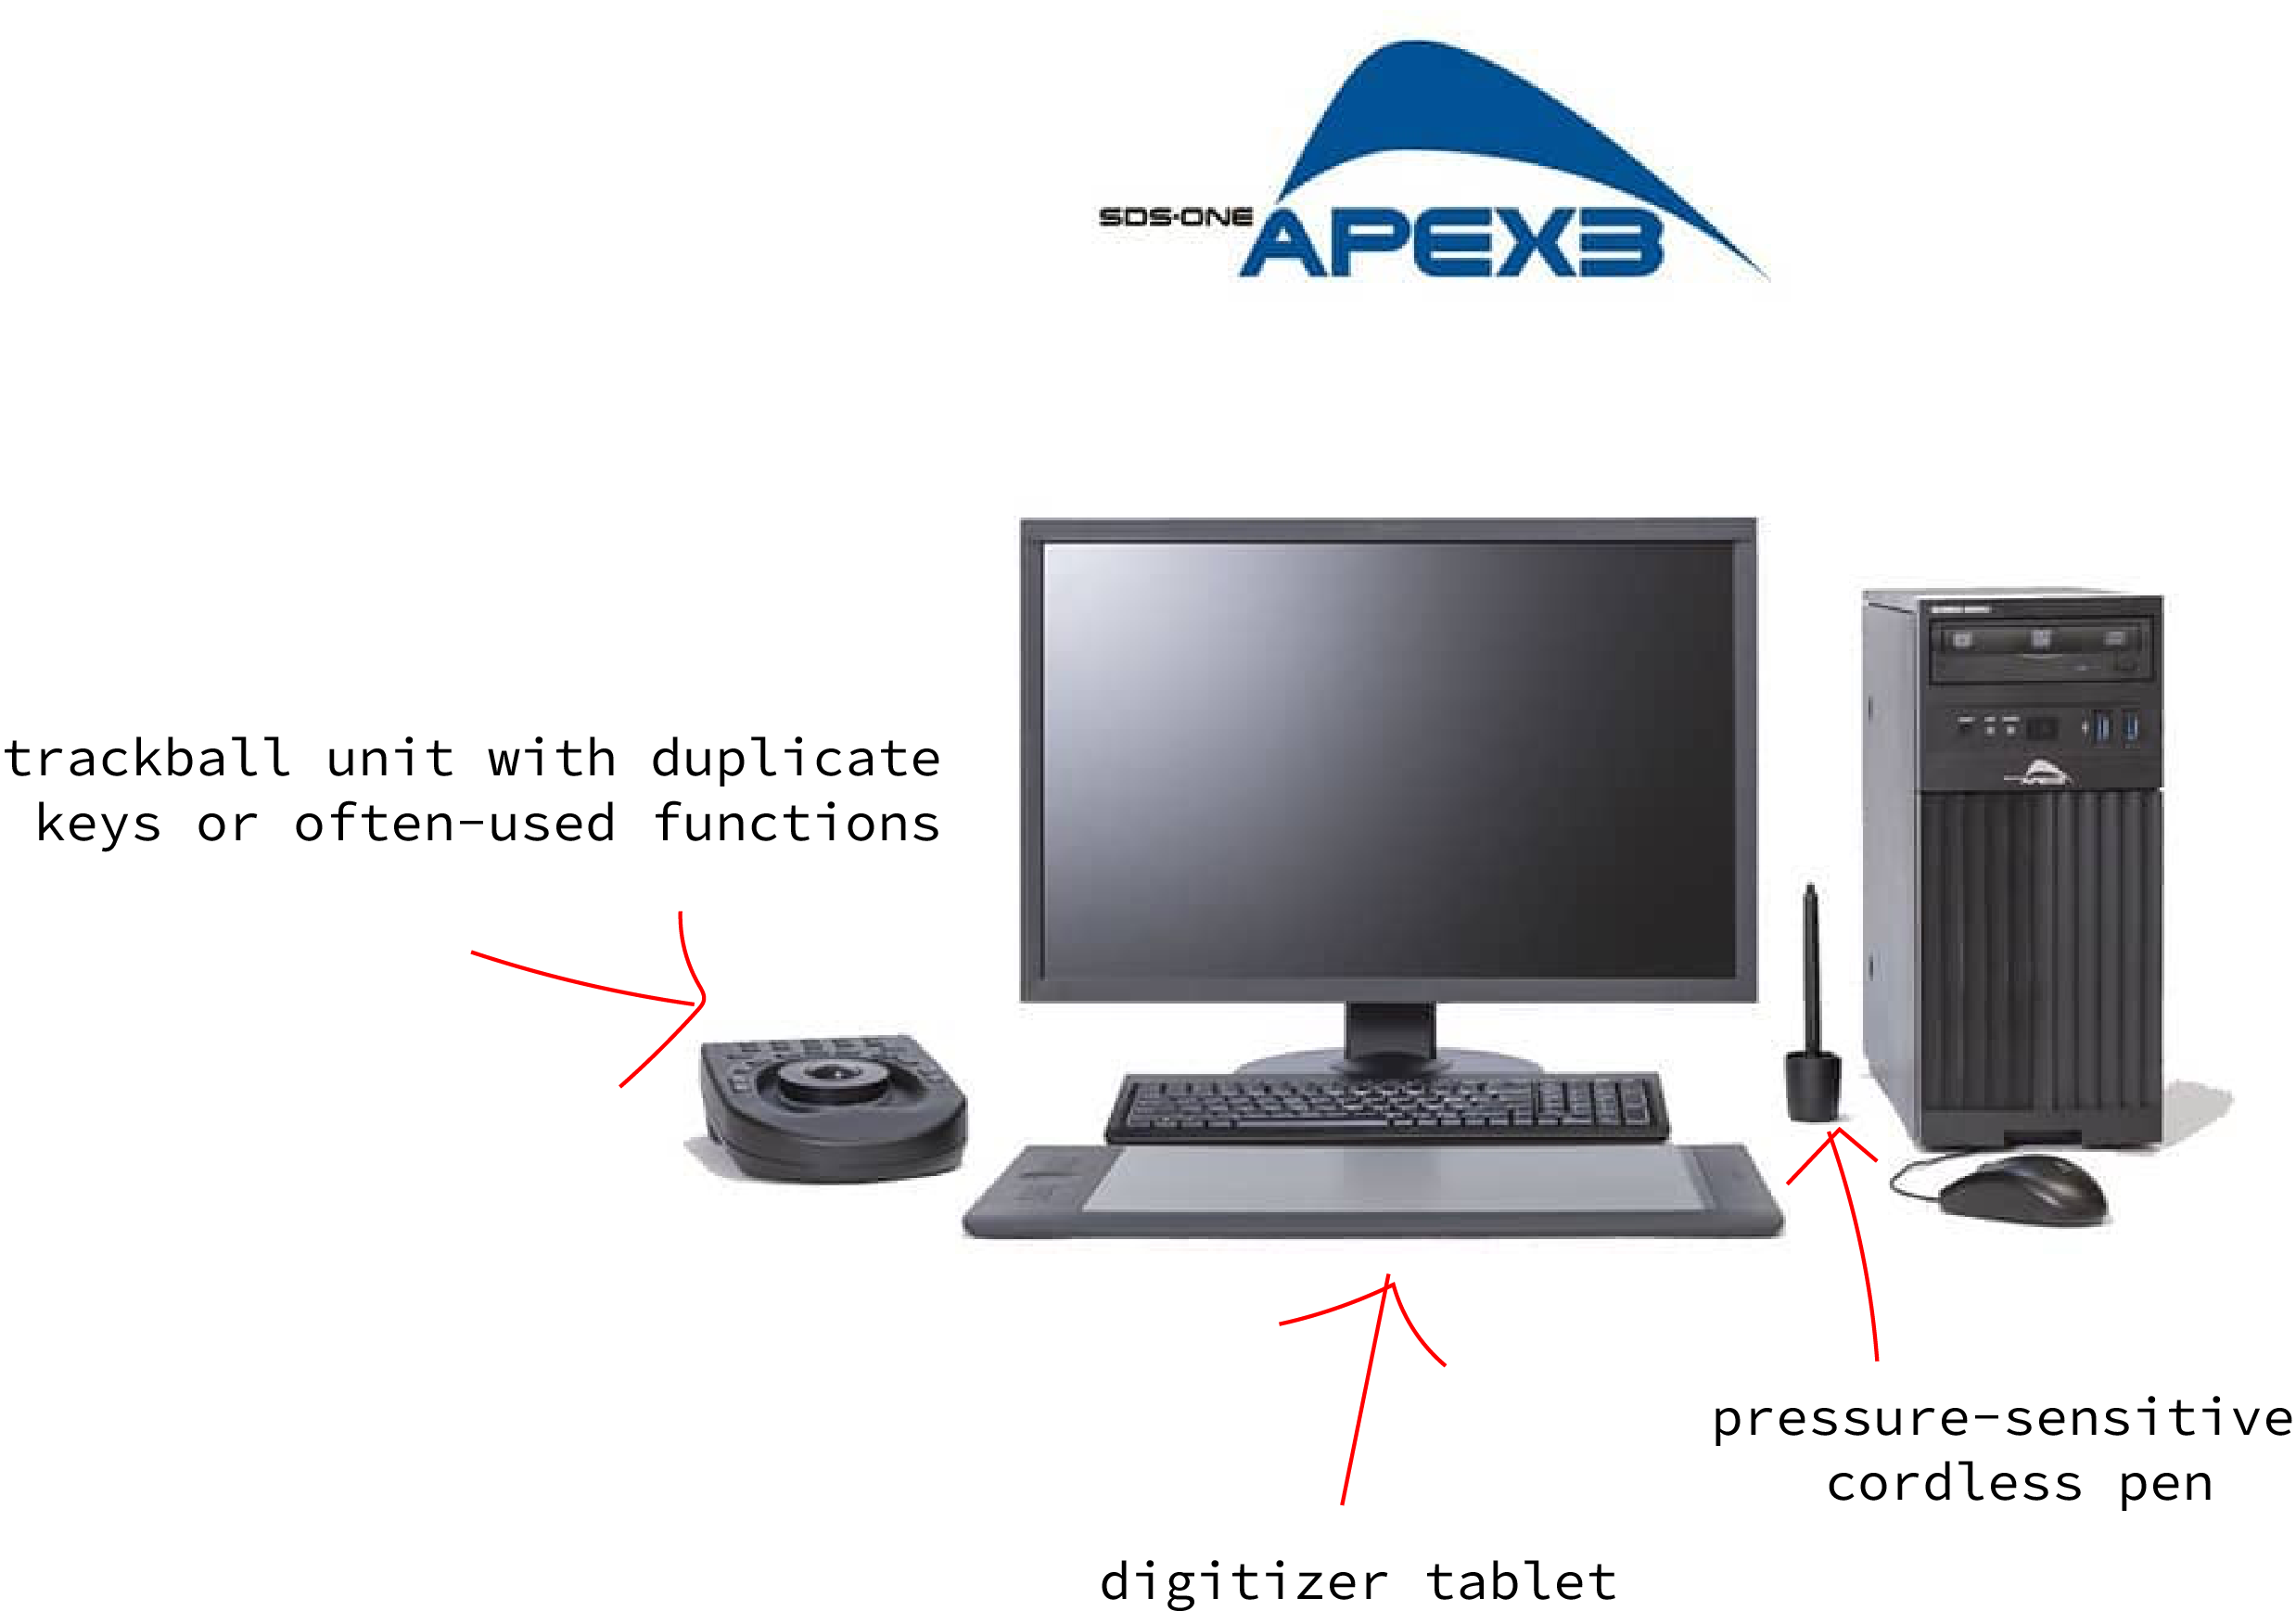
The system comes with the setup above, which is used to navigate the system with ease.
This is a full color LCD touch sensitive control panel, featuring a user friendly menu interactive function. Buttons permit easy input and editing as well.

Here I am zeroing the machine using the LCD touch screen.
After zeroing the machine goes through needle training
Next I started creating the design using the Flat Knitting. I am very interested in using this machine in my final project for producing the sneaker pattern. For this reason I decided to work with a sock body.
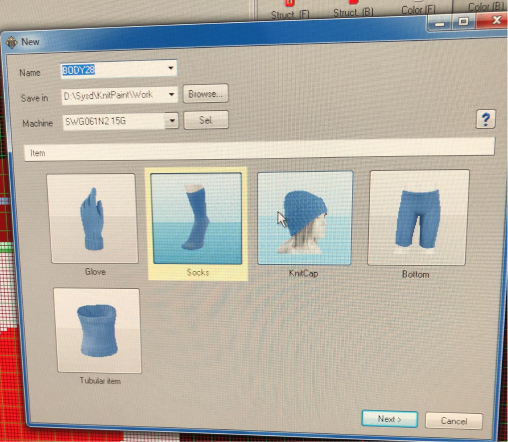
First I selected the Item I wanted to work with and saved it as a body.
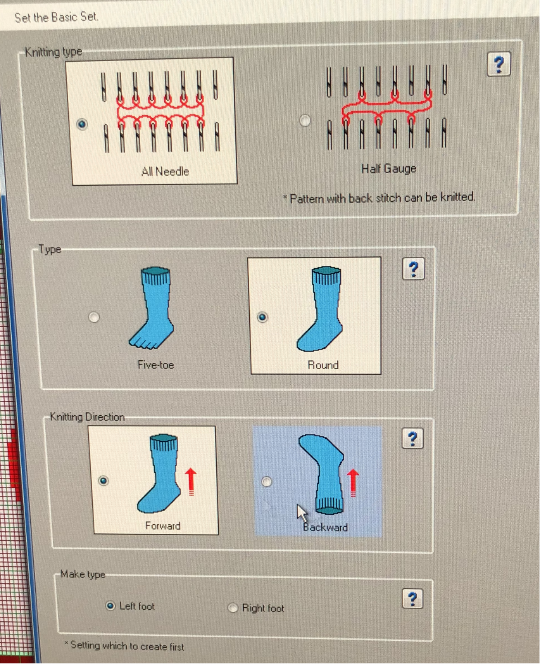
The system then prompted me to set the “Basic Set” Since I am a beginner with the machine I stuck with the recommended “all needle” knitting type. I wanted my sock to have a round type and selected a forward knitting direction. Forward: Starts knitting with toe. Backward: Starts knitting with leg part. Last I selected which foot.
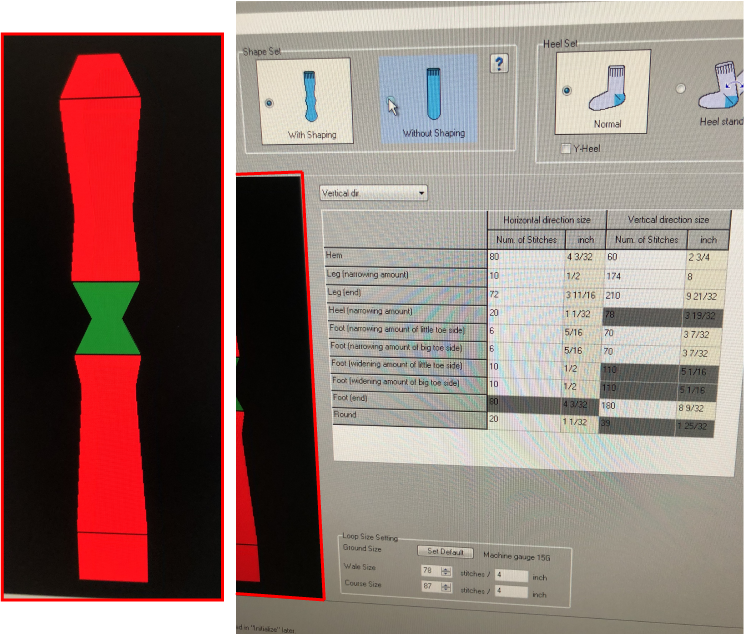
After I input the basic set, the machine moved to the shape and heal set. On the left you can see the flattened pattern. I wanted my shape set to have shaping and my heel to be normal. However if I were working on the shoe pattern I think I would choose the heel stand. It may be hard to read but in the table underneath the set is where I input my dimensions. When I input the size in inches the system automatically calculated the number of stitches.
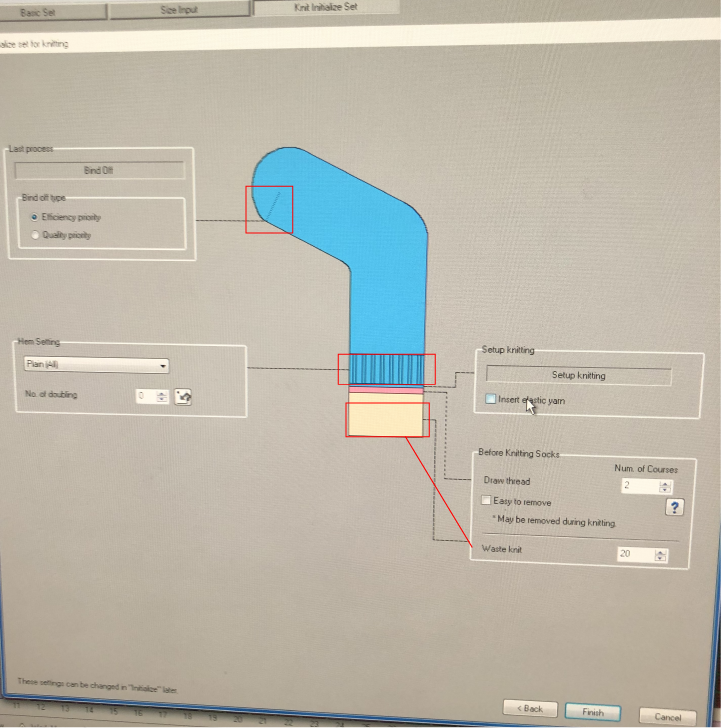
This is the last phase of the setup, “Initialize set for kitting.” See the red squares to visualize where the parameters are controlling. I set the “bind off” and the “bind type” to “efficiency priority.” There is also a “quality priority” option but since this my first go I went with efficiency. I set the “Hem Setting” to plain with no doubling. There is an “insert elastic yarn” option but I did not have any in the machine so I left this unchecked. The “Before knitting the Socks” setup is an important part of the machine setup. This step happens after the needle training and and before the body knit is initialized. I set the number of courses (or passes) to 2 and the waste knit to 20. The waste knit assures that the needles are warmed up and ready to go on the final product.
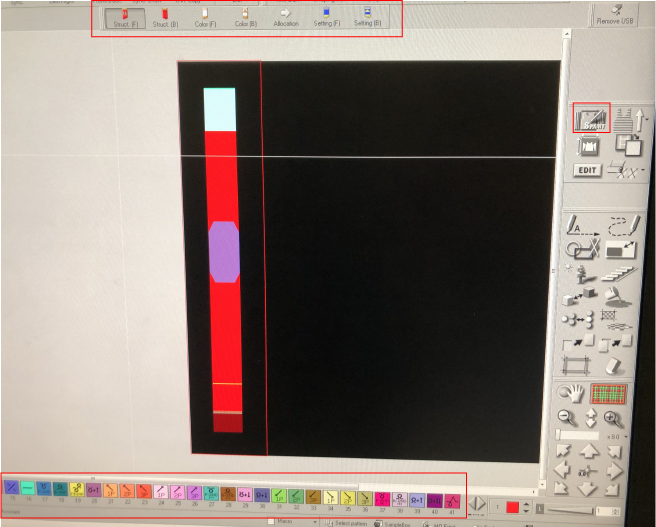
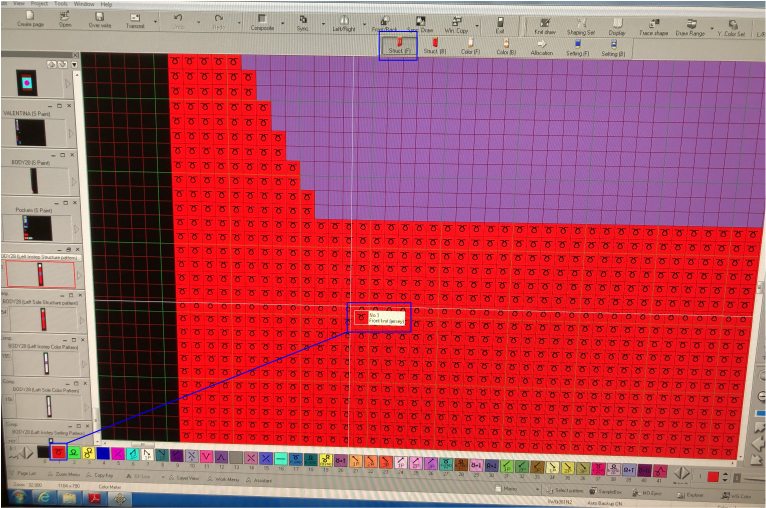
The red rectangle at the top of this picture highlights the settings in this part of the design system. The options read: Struct.(F(front)), Struct.(B(back)), Color (B), Color (F), Allocation, Setting (F), Setting (B). The red box below on the right side highlights the S Paint control which brings you into the final stage of preparing the design. The rectangle at the bottom highlights the different types of stitches.
Here I am looking at what stitch I am using on the front structure. The red part is the area I can manipulate and the purple indicates the area that is untouchable. I am using the “NO.1 Jersey” stitch type.
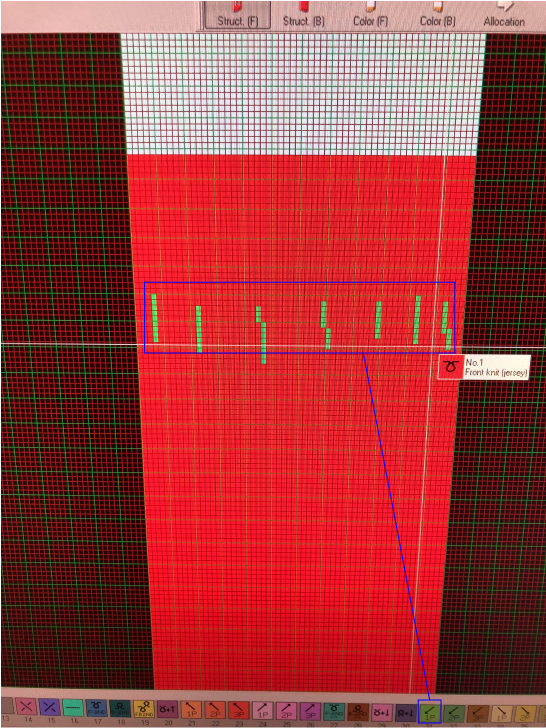
The green lines you see inside the blue rectangle I am illustrating how I could make “ribs” in the structure by changed the stitch type and direction.
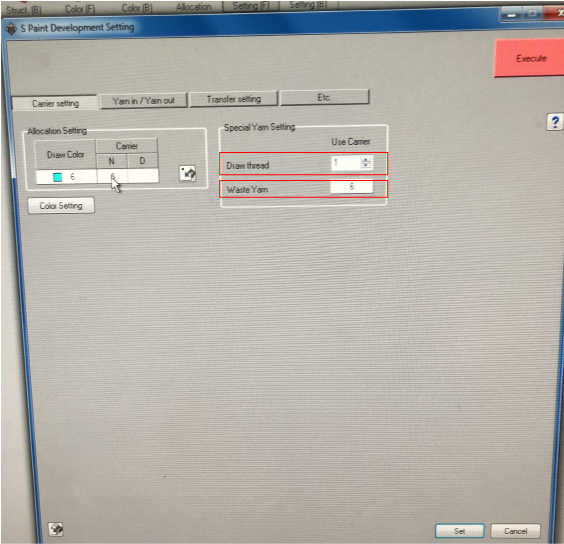
Once my design was ready I entered the S Paint Development Setting. I stuck to using the systems standard settings for Yarn in /Yarn out, Transfer setting. Selected the color in the “Allocation Setting menu.” The red rectangles in this photo indicate which carrier I want to use for the “Draw thread” and the “waste yarn.” The draw thread is what will be used for knitting my sock and the waste yarn is the carrier I will allocate for the waste layer. After I set these I clicked “Execute” to start the machine.
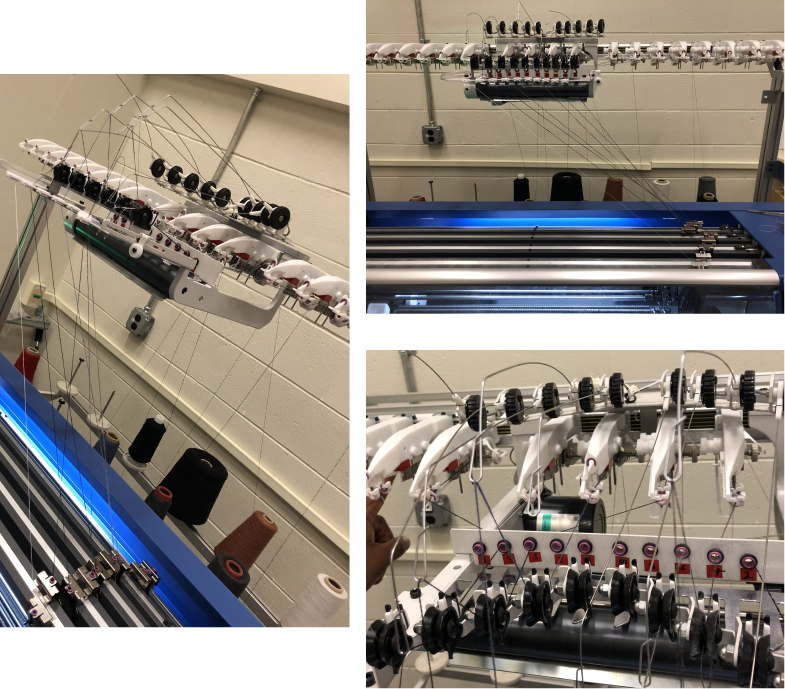
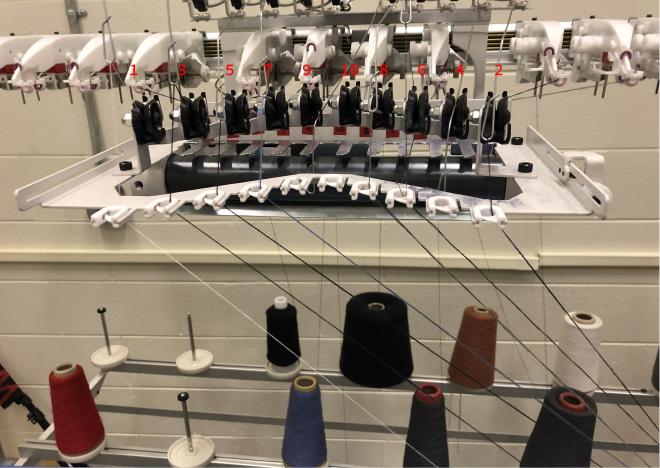
The red arrow indicates the yarn passing through to the auto yarn carrier and.
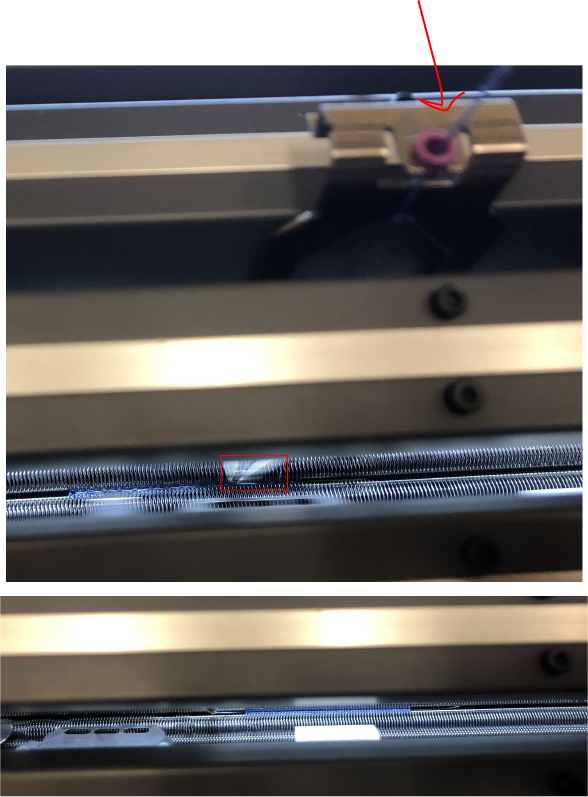
The needle moves so fast that it is a blur in the photo.
Here you can see the waste yarn at the top of the tube and in the video below the machine creating the waste.
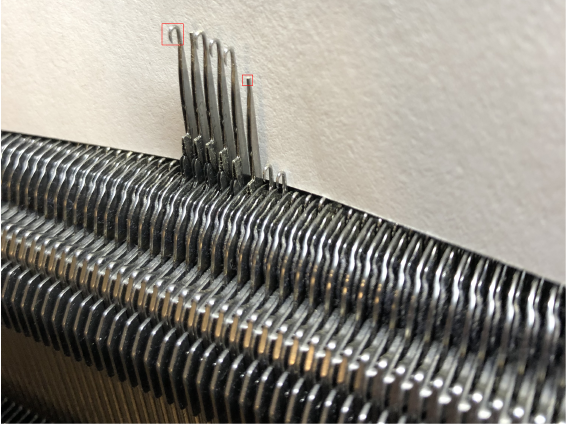
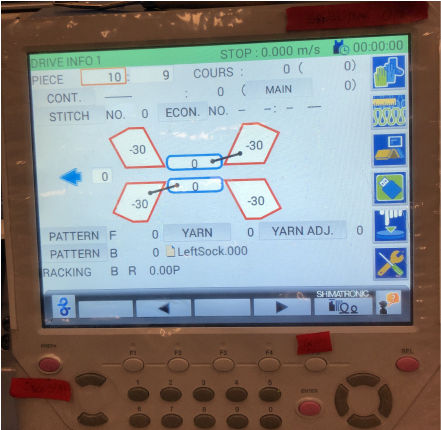
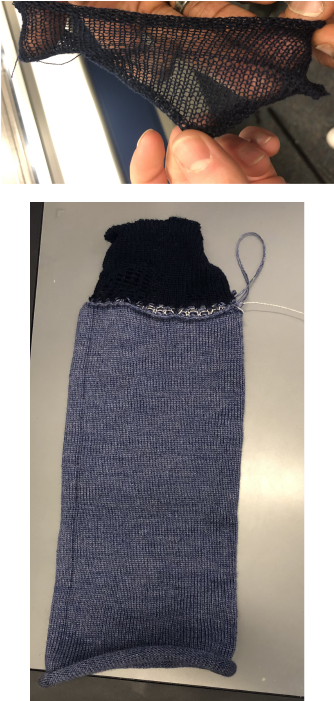
Unfortunately the machine had broken needles that I was unaware of and the sock was unable to finish, however the tubular form that came out in only 6 minuets of machining was well worth it. The larger red square indicates how the needle should look and the smaller one indicates a broken one.
!!!Machine in Action!!!
FINAL RESULT
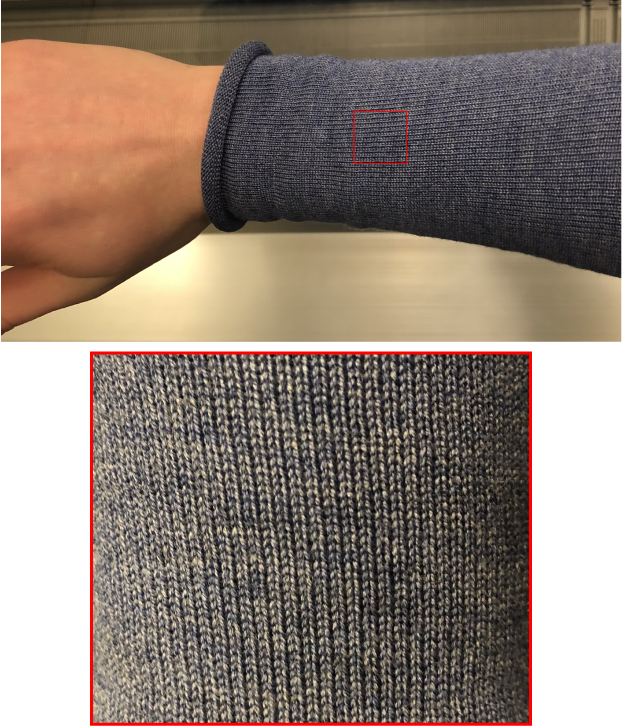
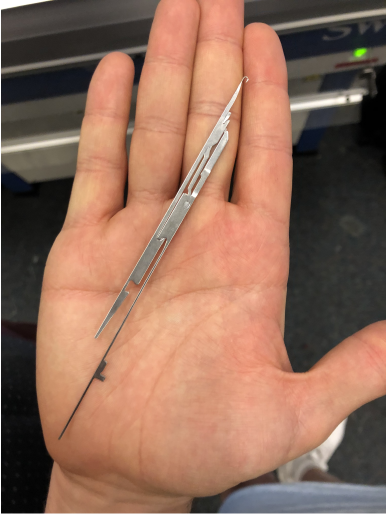
Here I am trying to highlight how beautiful the stitching came out. It was almost like magic. Not to mention the tube felt and fit very comfortably on my arm.
I went back to use the machine over the weekend but even more needles had broken during the week and needed special maintenance. Someday, I hope we meet again @ShimaSeiki!