Final Project
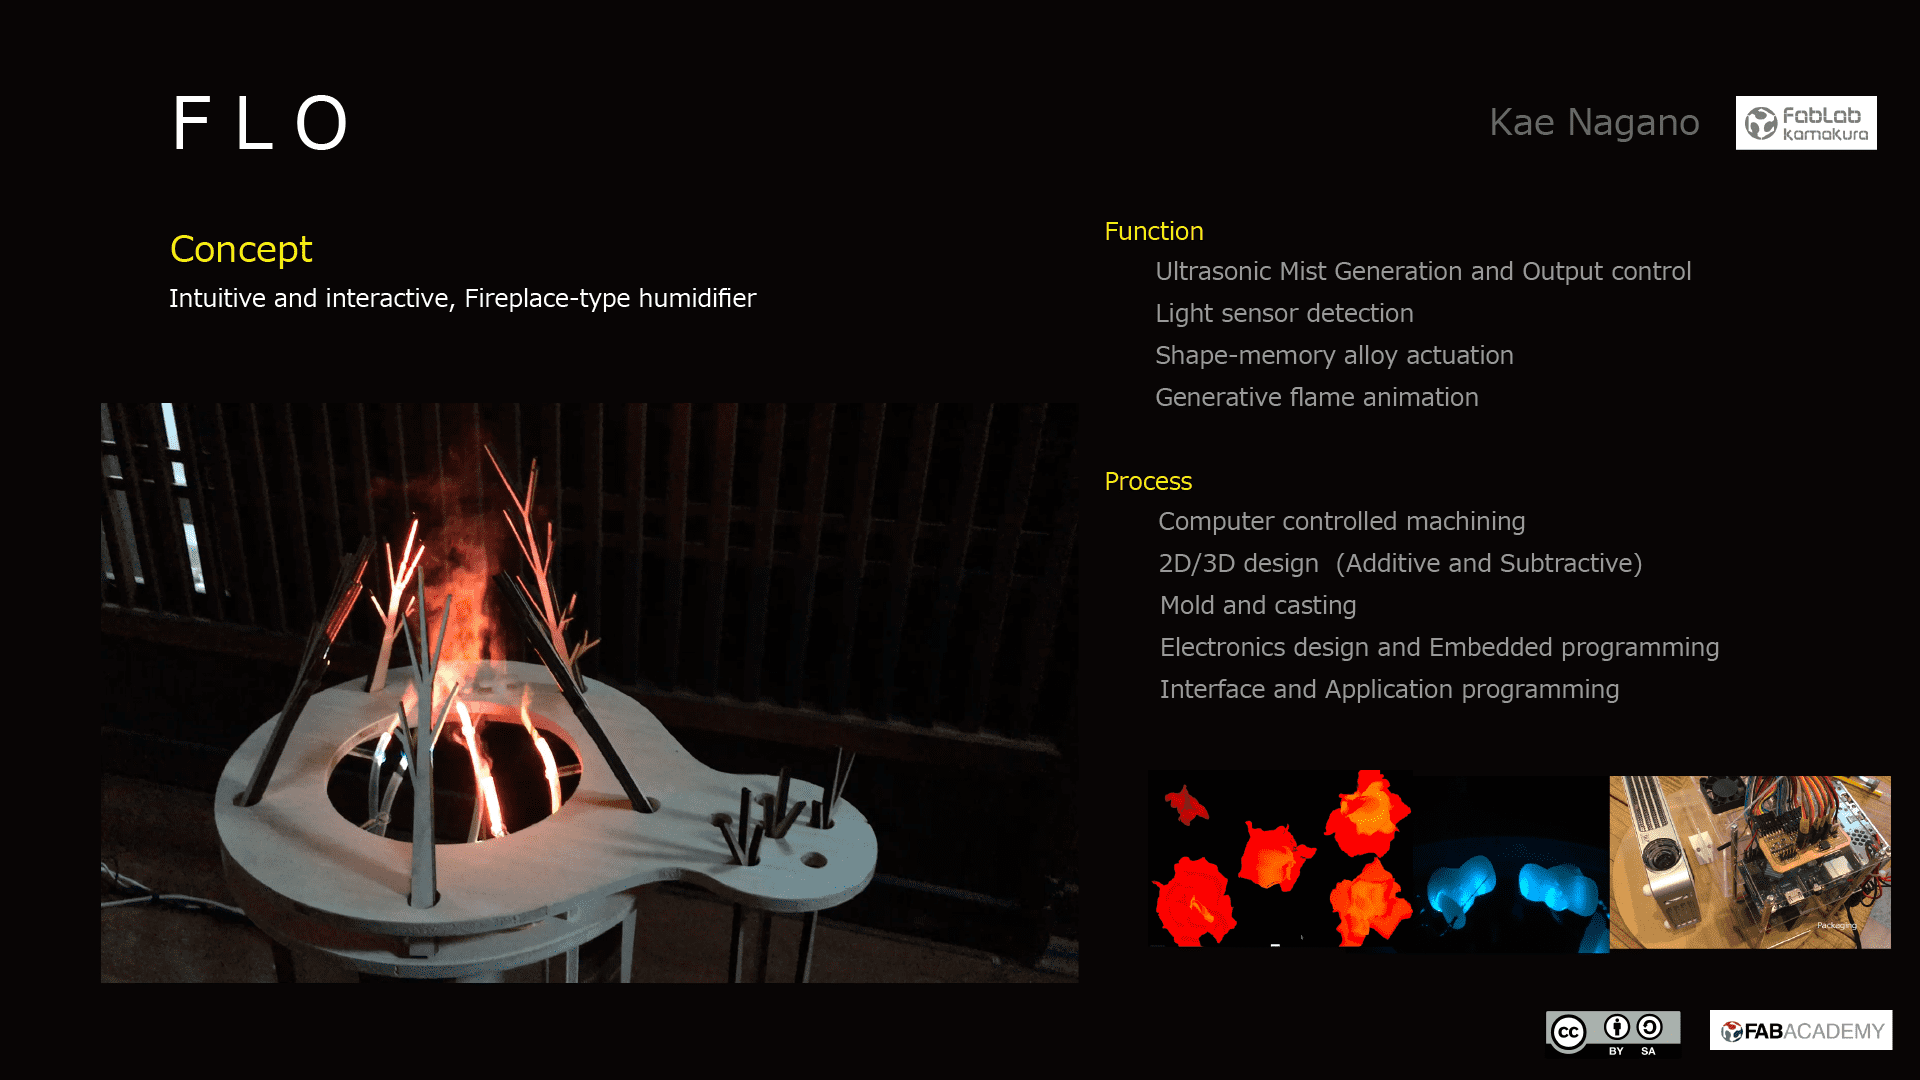
Concept (What does it do)
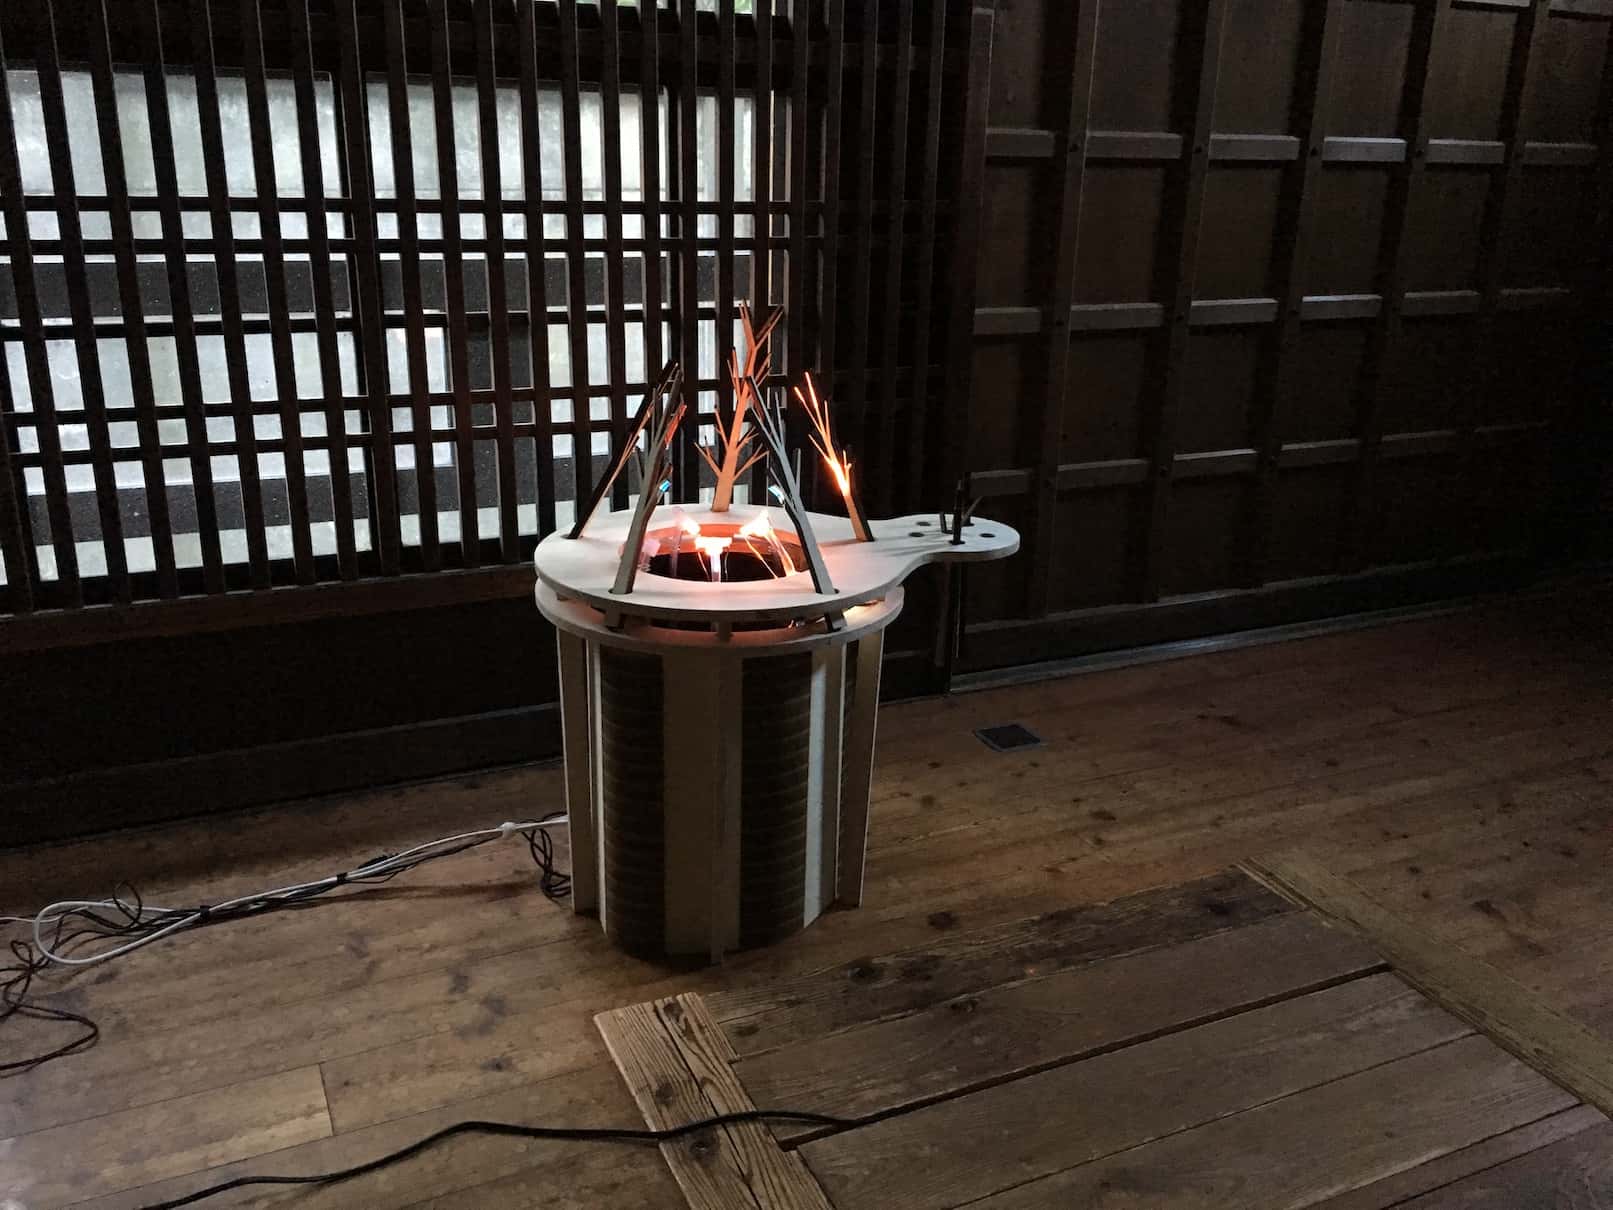
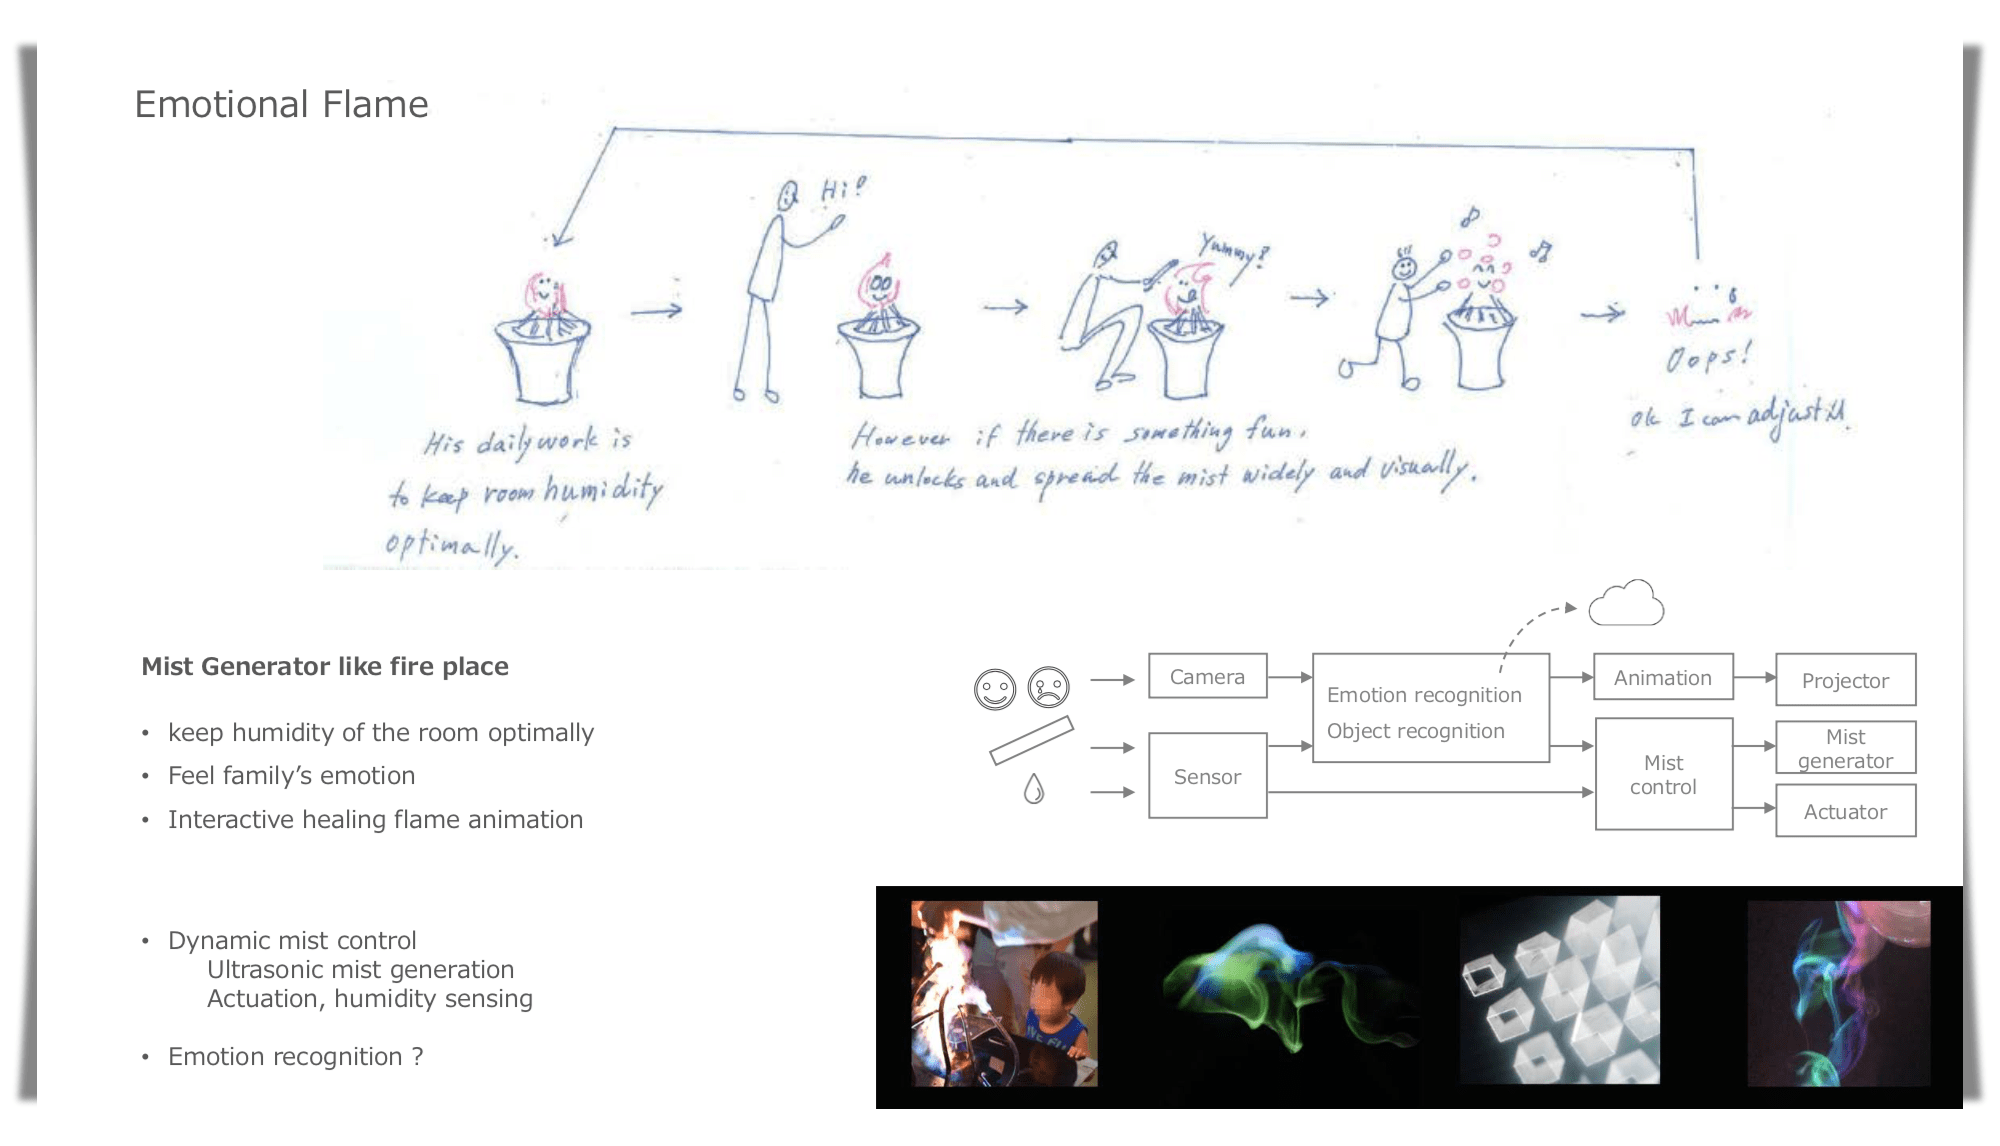
In Japan, humidifiers are very common in order to keep the room comfortable. The FLO is an interactive fireplace humidifier. The flame is generated by ultrasonic mist and is not hot. So even children can play by touching it. When you put fire wood, the size of flame will change accordingly. The natural flow of flame makes you feel comfortable and healed.

I created a kind of prototype in 2015 and demonstrated at the Maker Faire Tokyo.
The purpose of my final project is to improve the above prototype in the following points:
- Intuitive interaction
- Circuit board of generating mist
- Natural enclosure design
Who has done what beforehand?
I researched precedent cases and projects as reference for the final project.
Fog Art
- Funiko Nakaya
Fumiko Nakaya is a famous artist who create fog sculptures. There are many beautiful large-scale works that wrap parts of buildings and nature with fog. Visitors can experience in the dynamic flow of fog, and feel a kind of scary and attractive at the same time.
Electric flame

The flame is created by LED lights and a mirror element that rolls and reflects the light. Though the flame looks very realistic, there is no interactive function.
- 6 color LED Ultrasonic Aromatherapy Diffuser
There are many kinds of ultrasonic aroma diffusers and humidifiers which have multi-color LED.

Mist generator
I found some projects in the archive of FabAcademy.
-
Grow It Yourself
The FabAcademy 2017 final project has a function of ultrasonic Atomizer (fog maker) as a new method to irrigate plants. The mist generator itself is purchased and MOS FET on the original board controls the output. -
Cogus
This is the Mushroom cultivation system of FabAcademy 2017. Ultrasonic mist generator is used for watering. -
Make Your Own Super Simple Ultrasonic Mist Maker
Information how to make ultrasonic mist maker board.
Design
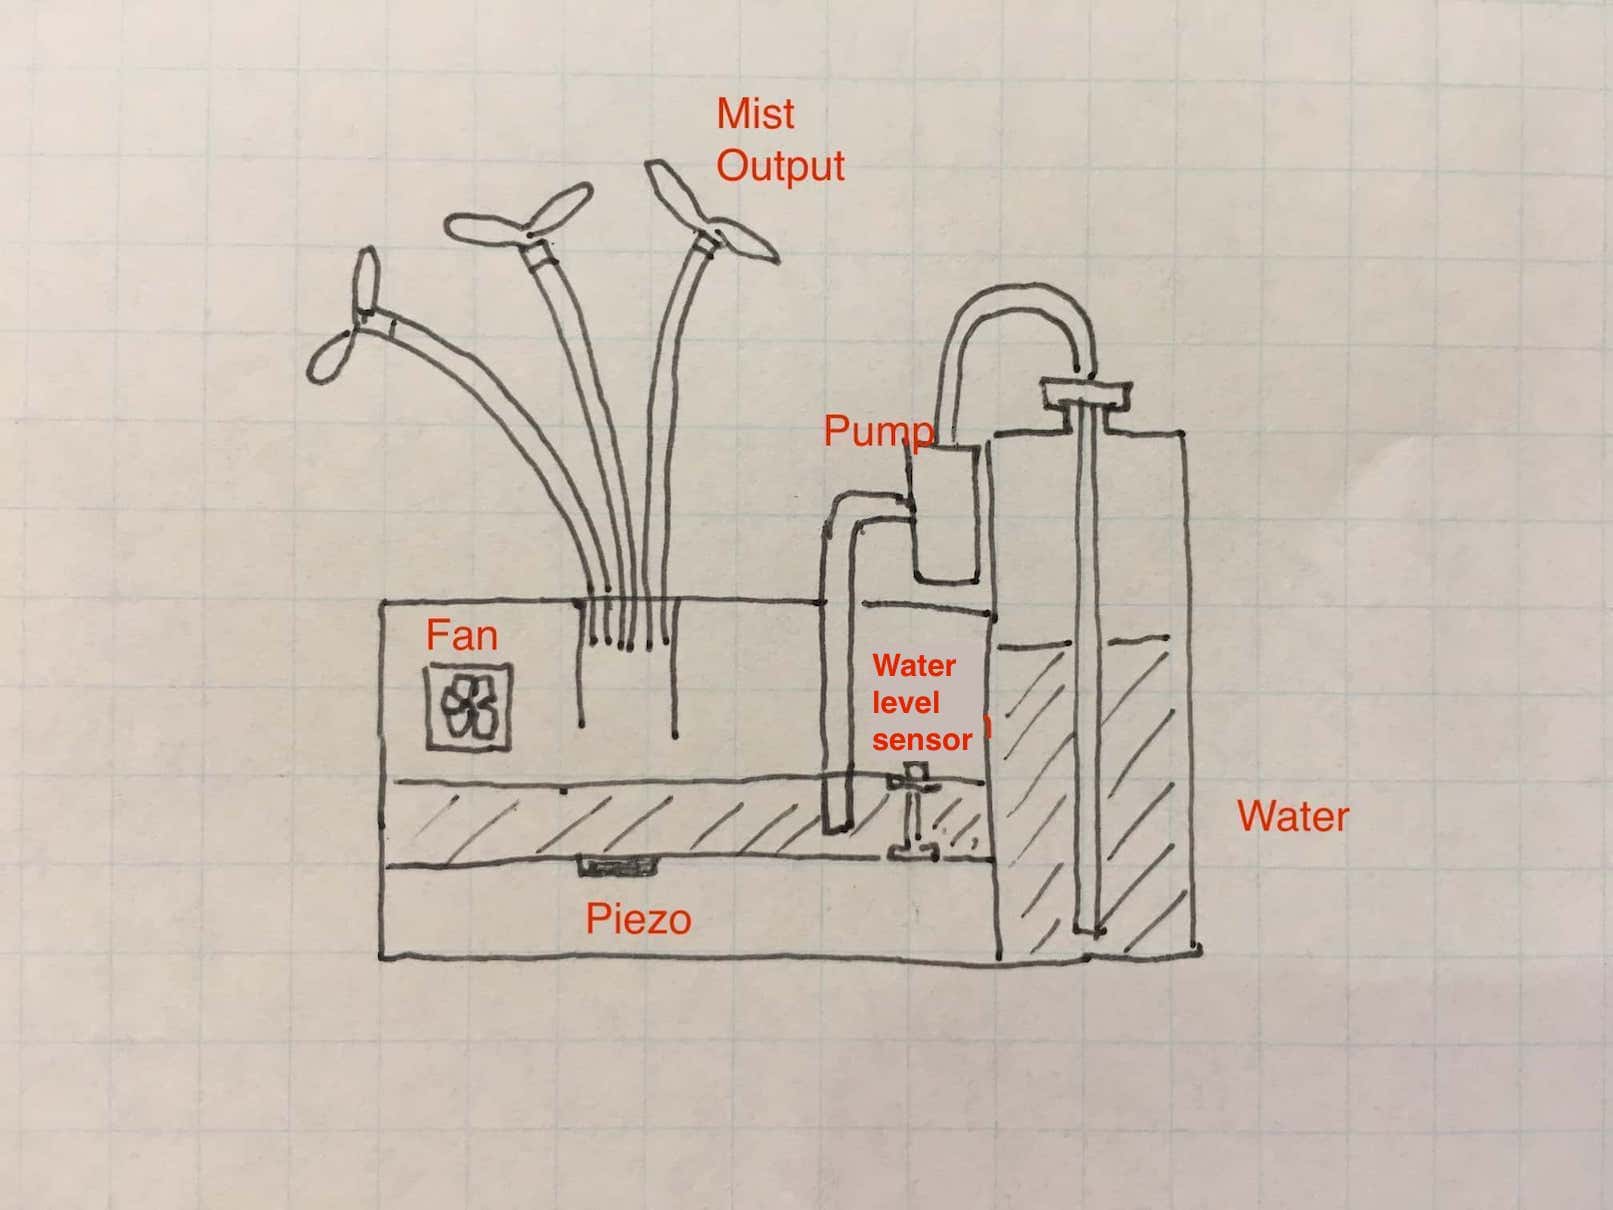
The FLo is consists of following modules.
- Light sensor module
- Mist generation module
- End parts actuation module
- Mist control module
- Application
The yellow blocks in the diagram below were made in my final project.
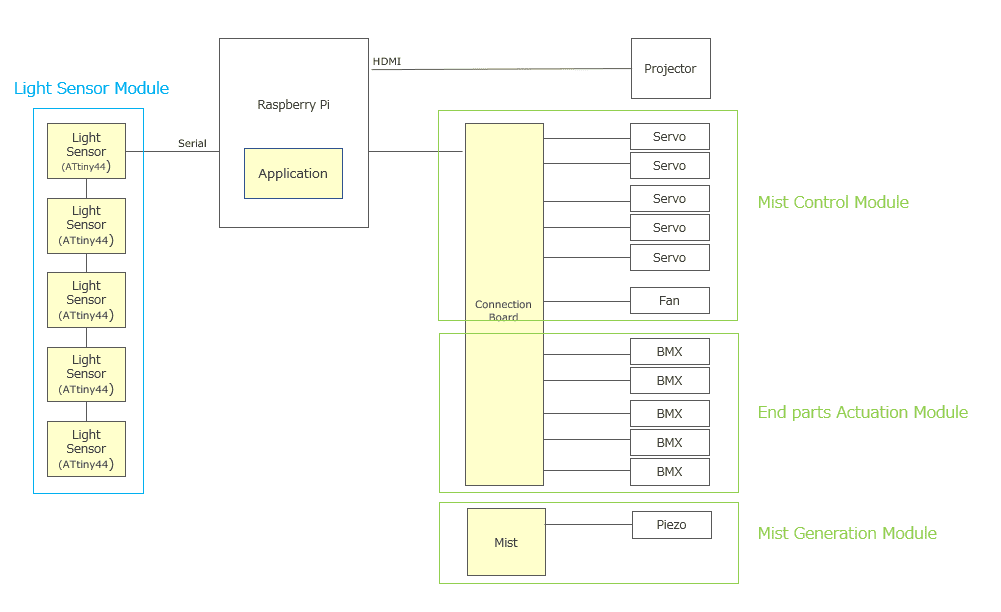
Light sensor module
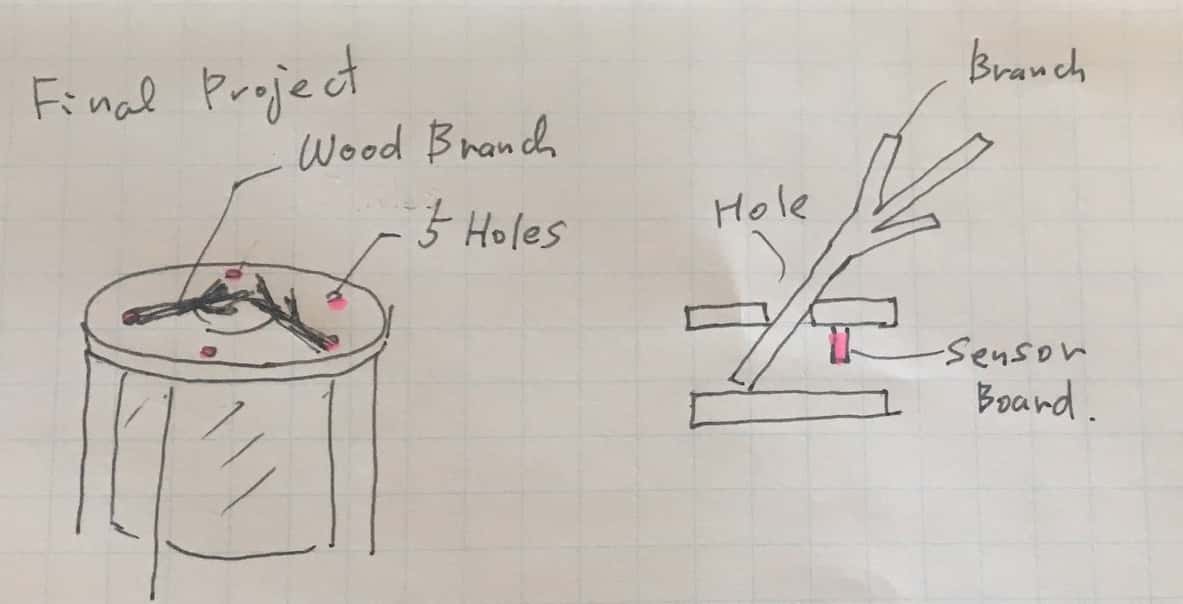
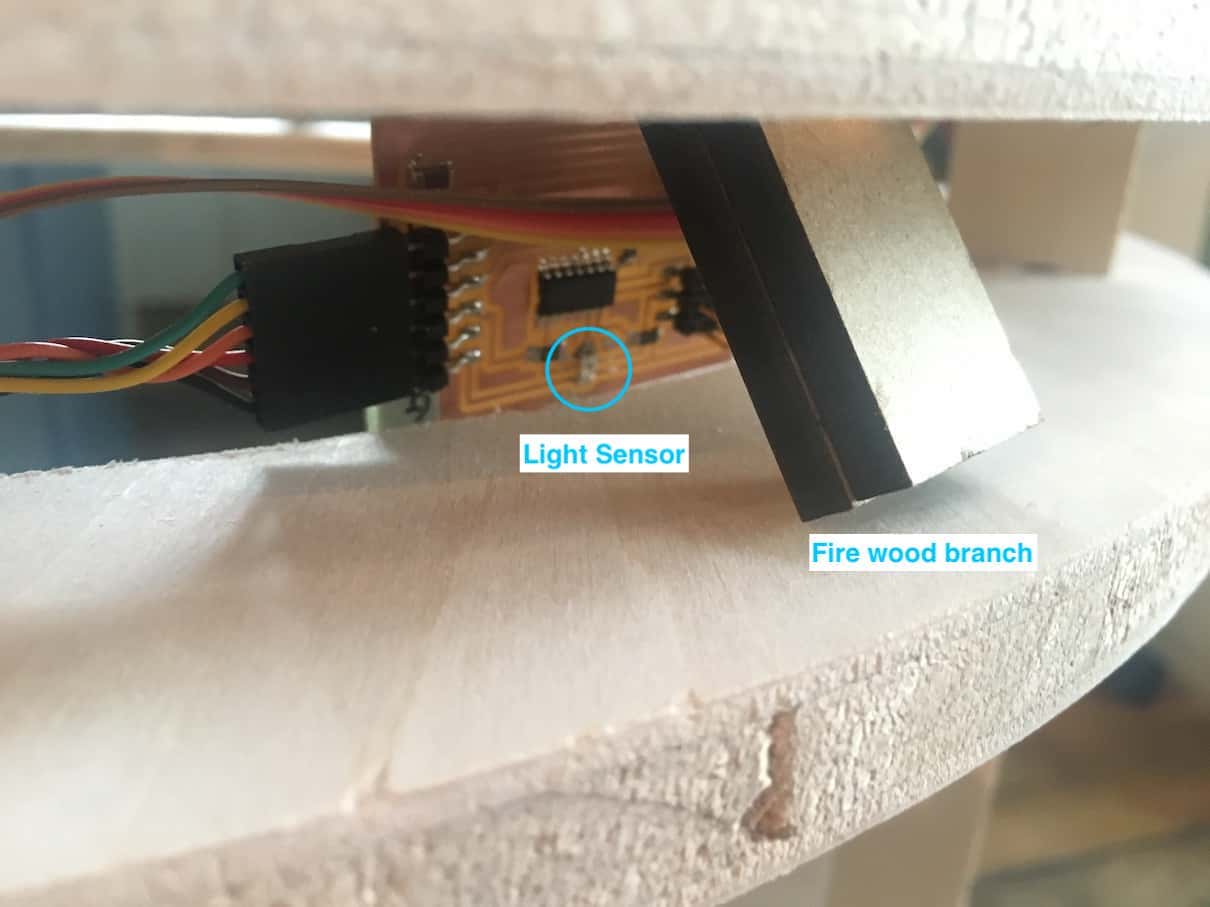
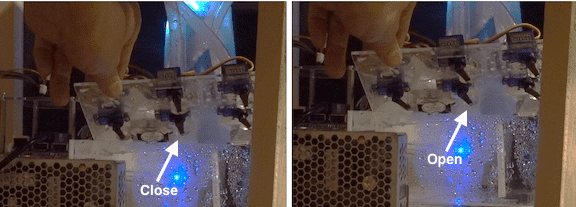
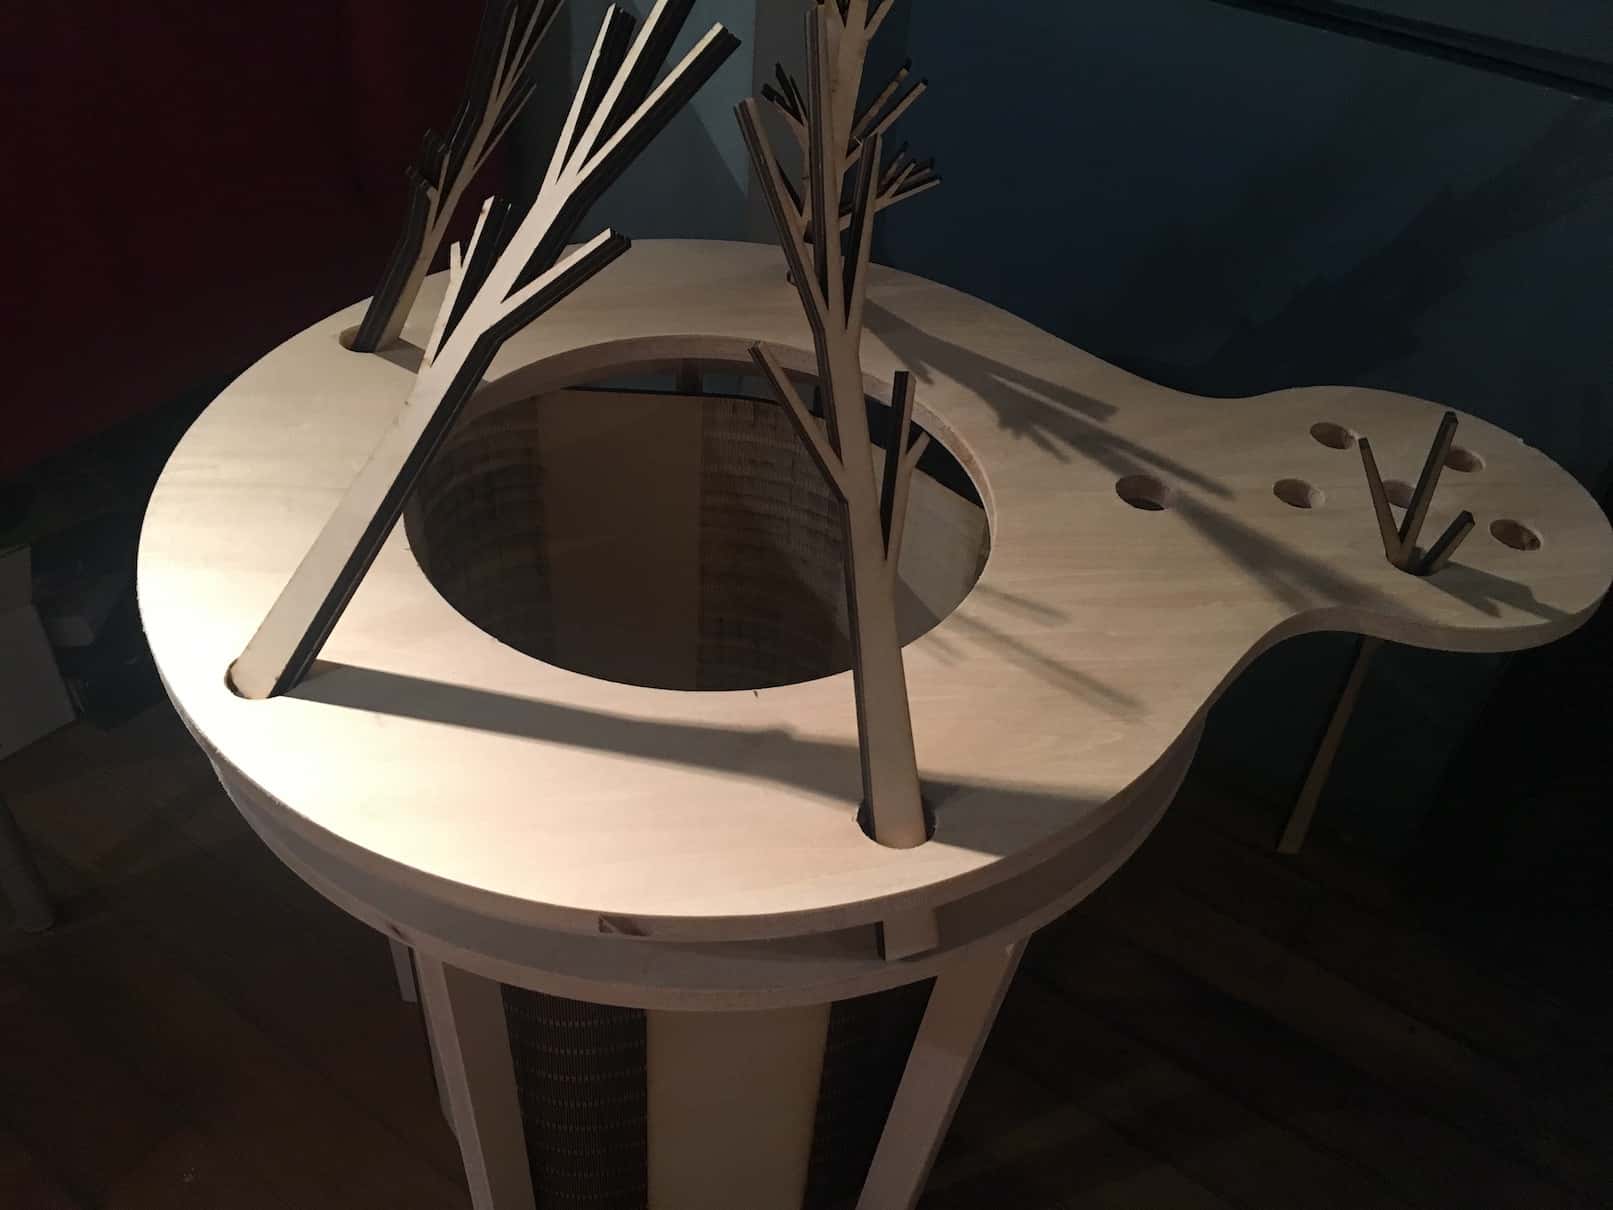
Light sensors were used to detect user interaction. When a user put a fire wood branch into a hole of the table I created at week 8, then the output of the mist changes accordingly.
-
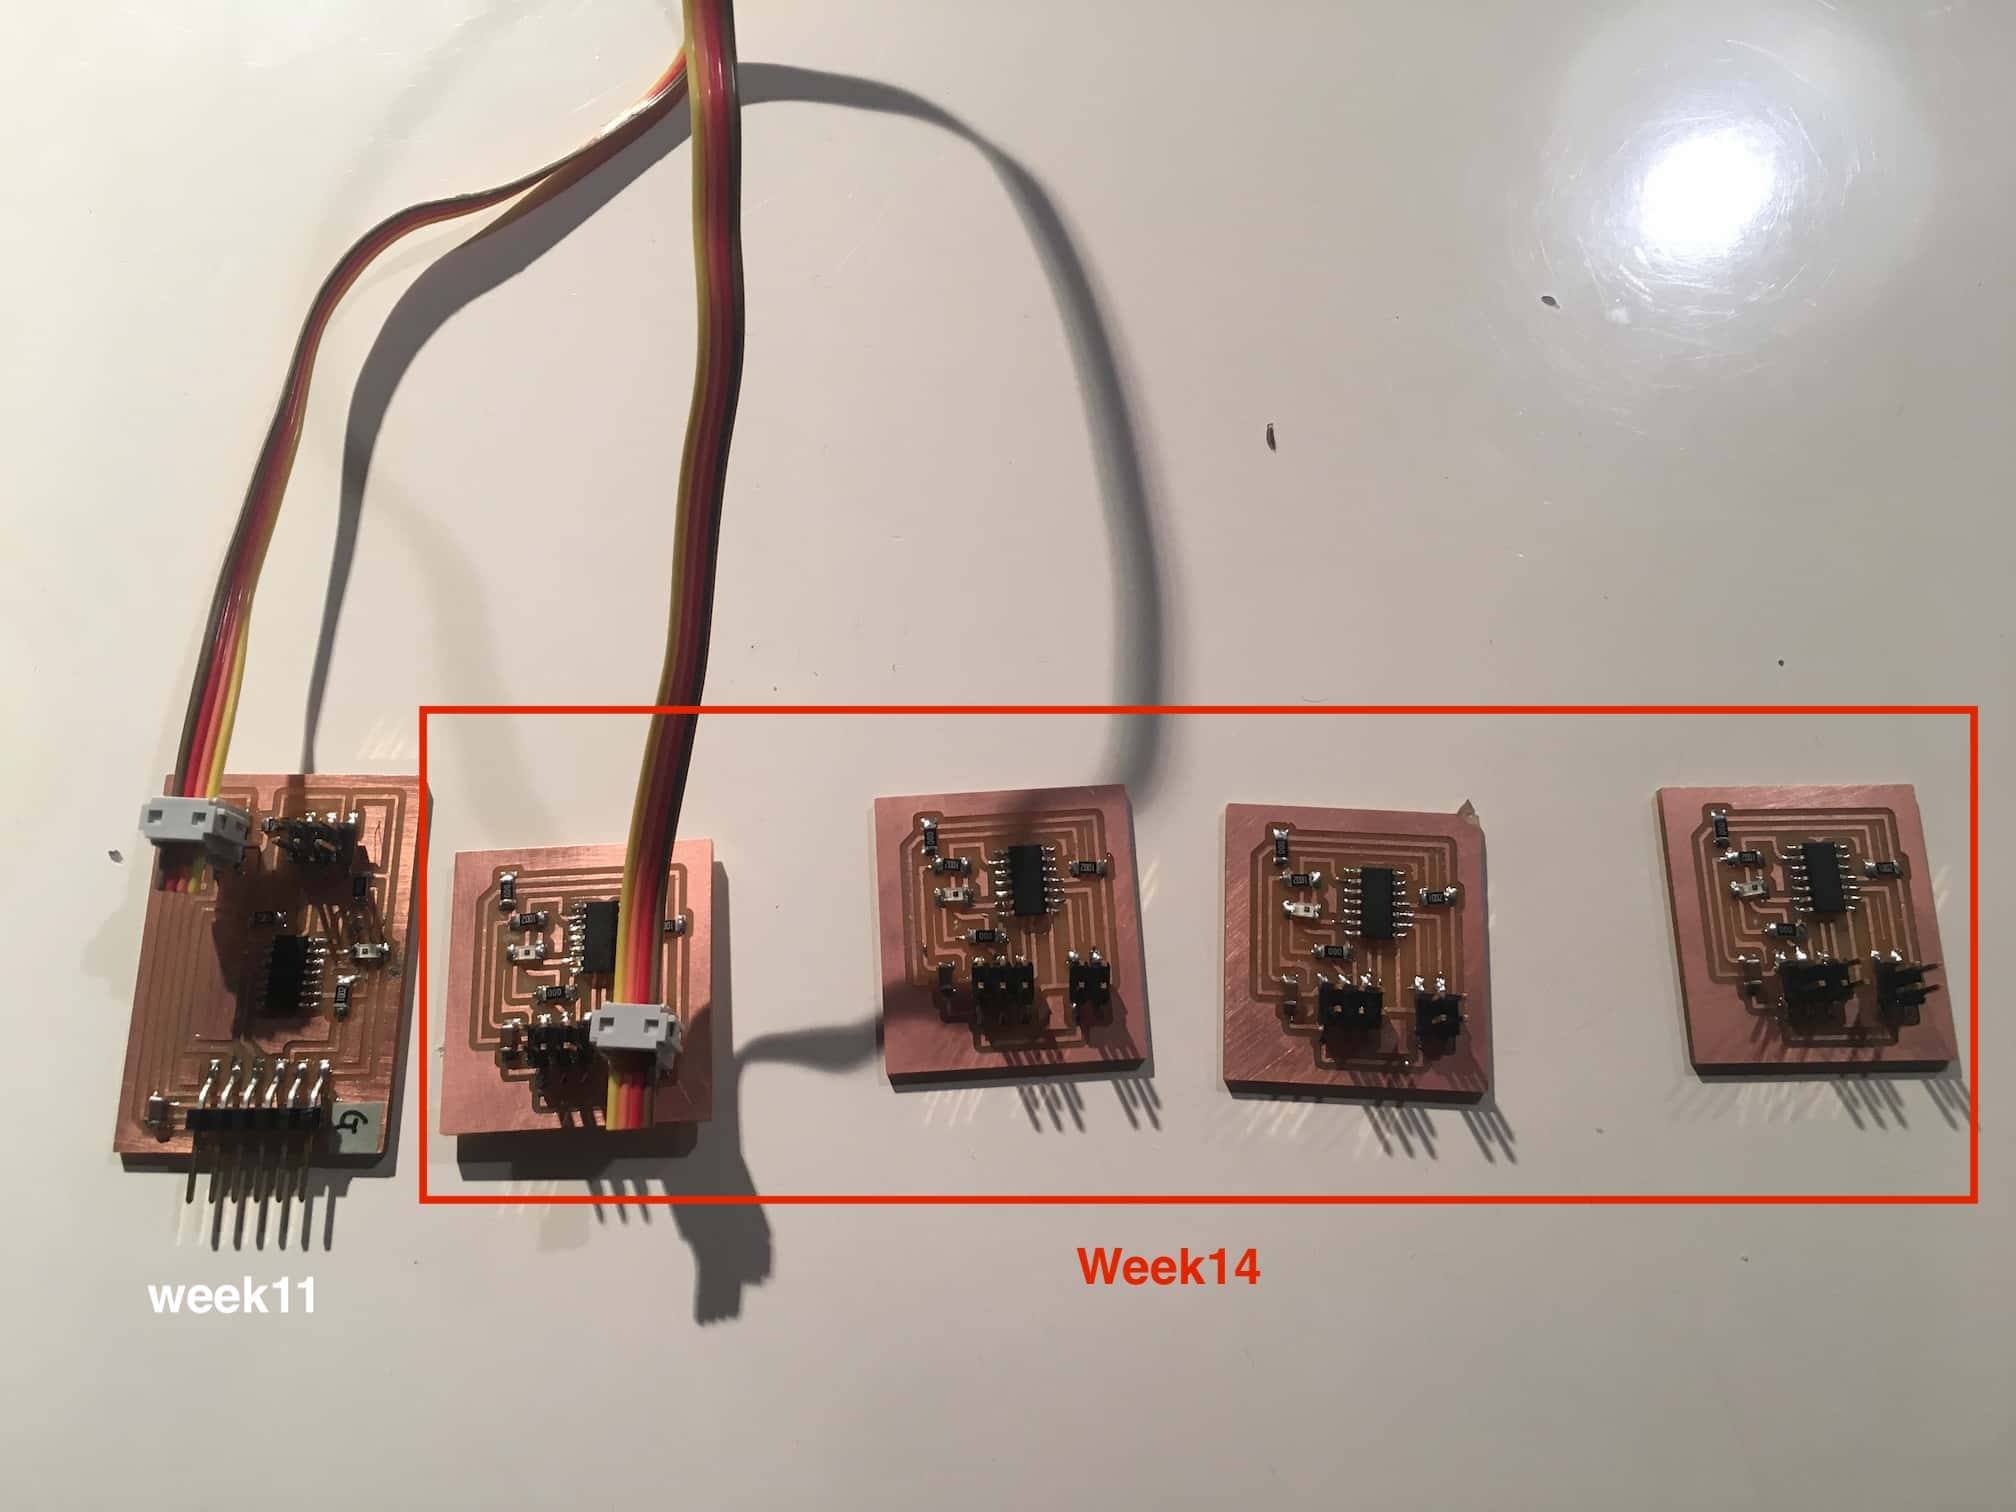
Week 11
First board was created. It communicates with main micro via serial. ( >> detail ) -
Week 14
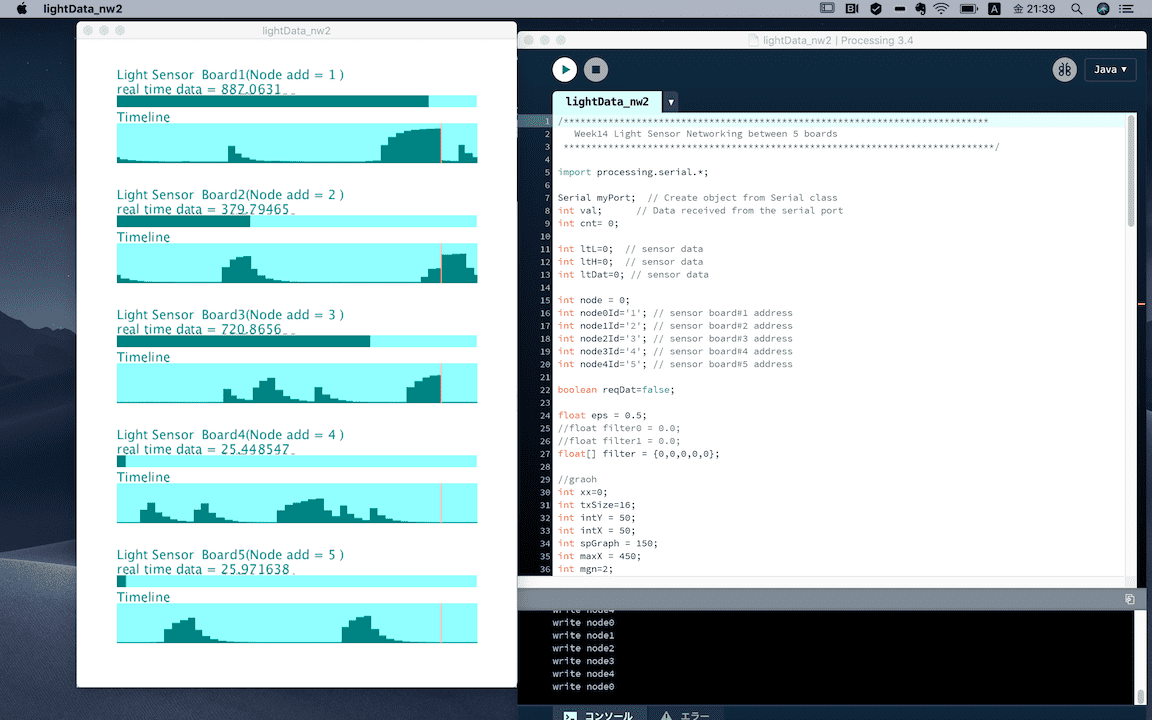
Other 4 boards were created and all 5 boards were networked. ( >> detail )
Visualized the data of five sensor boards using Processing.
Light sensor reaction by putting a fire wood into a hole
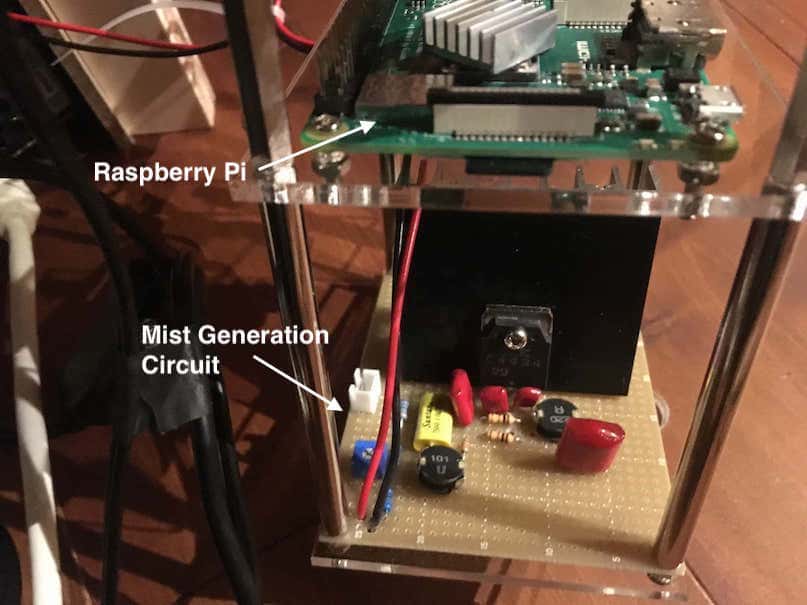
Mist Generation module
Mechanism of mist generation
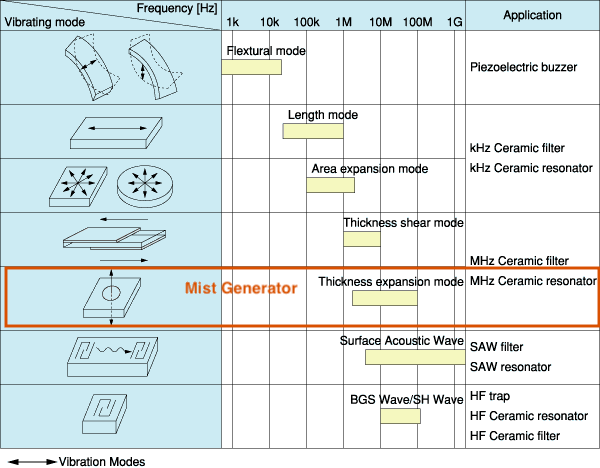
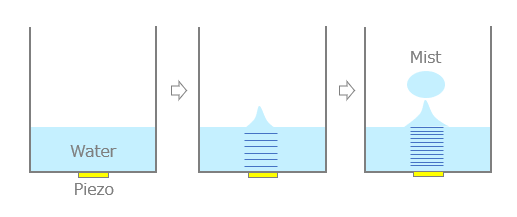
I used Piezoelectric Ceramics to generate mist. Piezoelectric ceramics are used in a variety of applications from speakers to sensors. It will expand or contract when subjected to a voltage, and generate a voltage when subjected to a pressure. The table below is the vibration modes of Piezoelectric ceramics referenced from Description of Piezoelectric Ceramics. The frequency of piezoelectric ceramics I used for FLO is 1.7MHz. So it corresponds to the red rectangle part, “Thickness expansion vibration” mode. It means that the vibration in the thickness direction of a thin plate.
Mist is generated when the water depth and frequency, diameter, thickness of piezoelectric ceramics are optimized.
1st trial
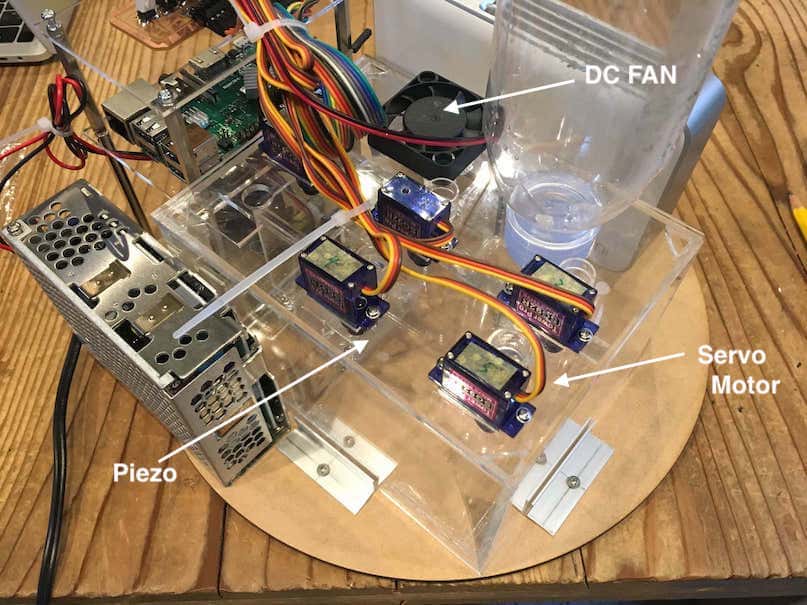
First I tried a mist generation using commercially available board .
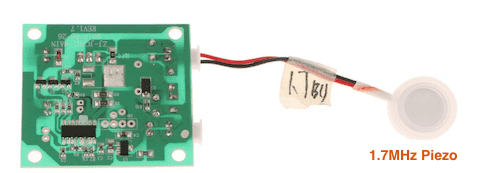
I made a rough enclosure using acrylic board. And added a DC fan to push out the mist through the tubes. The spec of the piezo part is 1.7MHz, and the voltage of the circuit is 24V. It worked fine as follows.
2nd trial
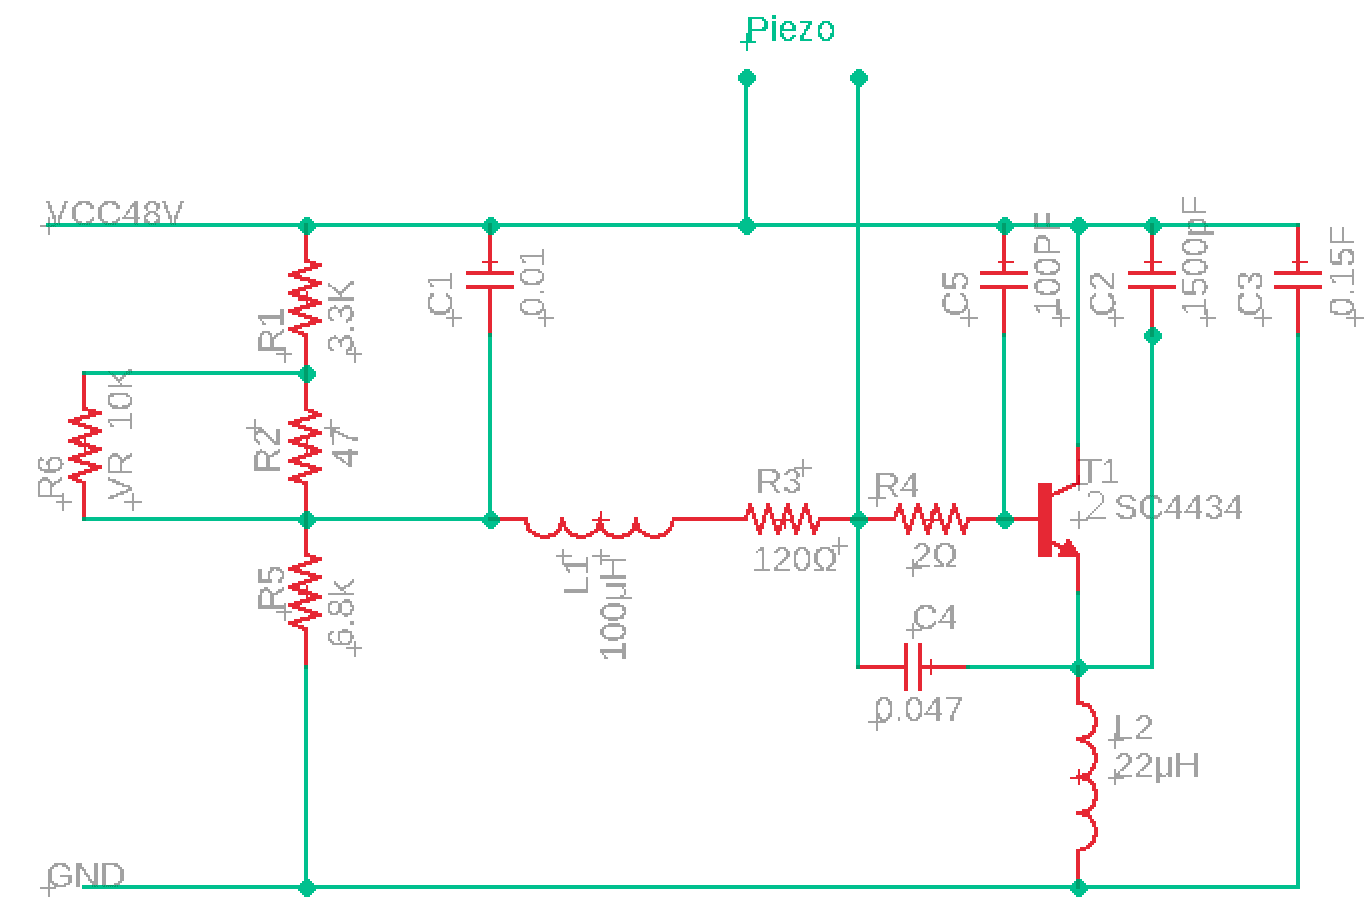
I researched the schematic and tried to create the board.
System image:
I decided to use the third circuit, and modified some parts with Kamakura instructor’s advice.
Original Circuit:
Final Project Circuit:
I encountered a problem of transistor. As I could not get same parts as the original circuit, I used 2SC3851 (data sheet:) first. It vibrated when no water, but when water was poured, the vibration stopped with water load. It seemed that over current flowed because the current of inductance changed from AC to DC. The inductance didn’t work as resistance. So I tried other transistors with HW instructor’s advice, then I chose 2SC4434. It worked very stable even when water was poured and adequate mist was generated with 48V power supply. The transistor generated much heat, so big heat sink was attached at the back of transistor.
Circuit test with Bread board
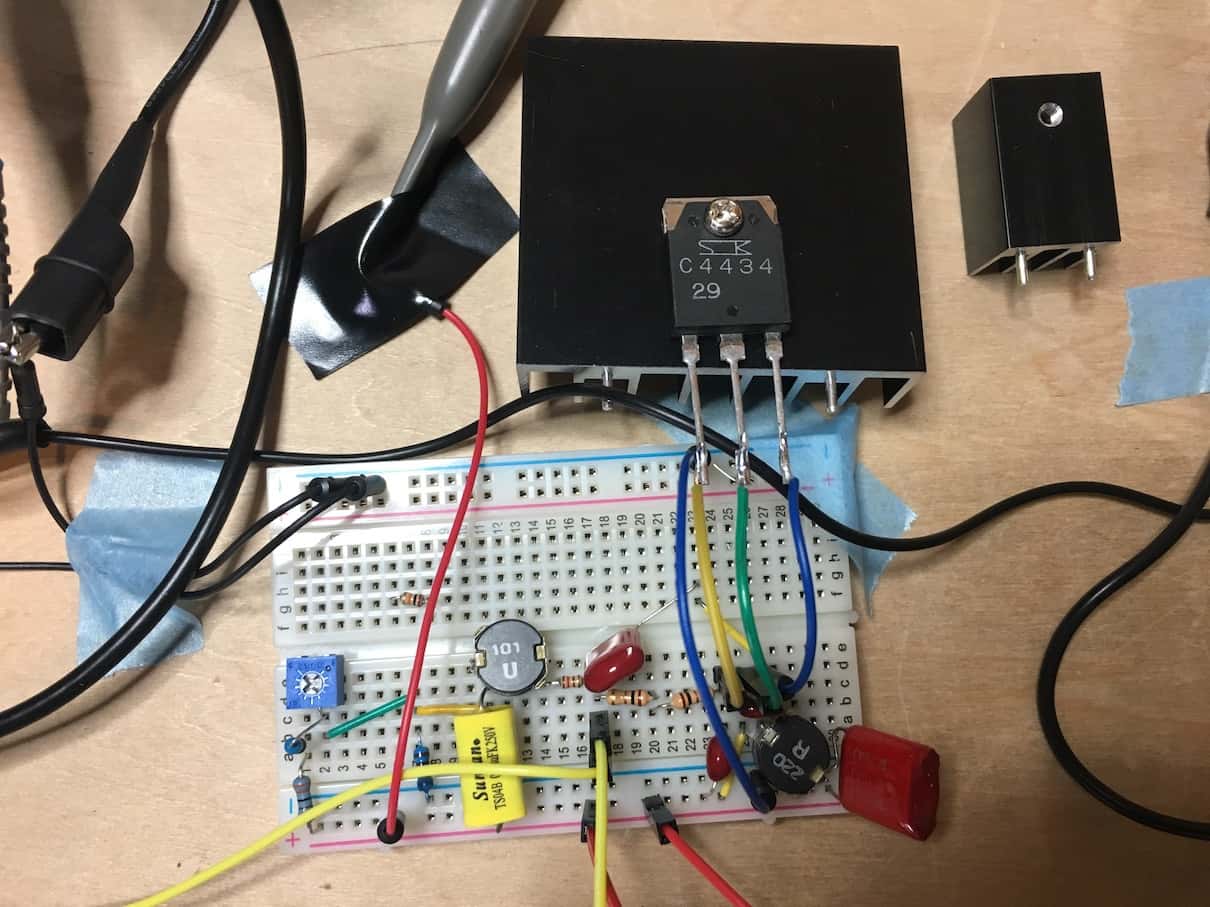
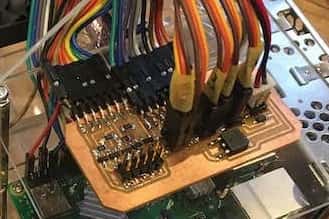
I soldered the parts on a universal board.
End parts actuation module
End Parts
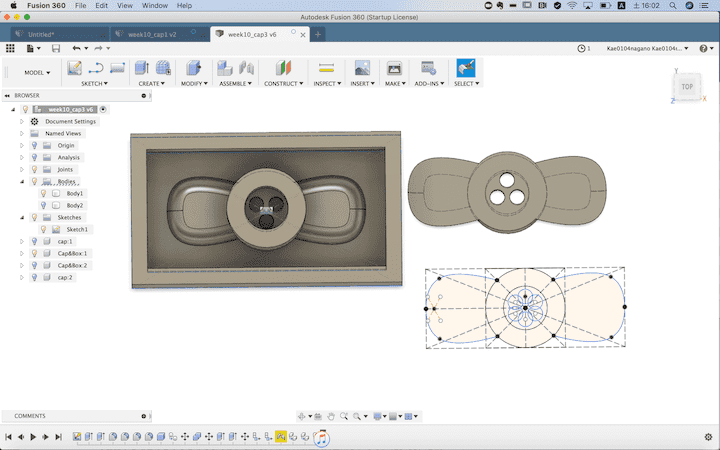
At the Molding and Casting week, I designed a small parts using Fusion360. It will be placed at the top of mist tube. ( >> detail )
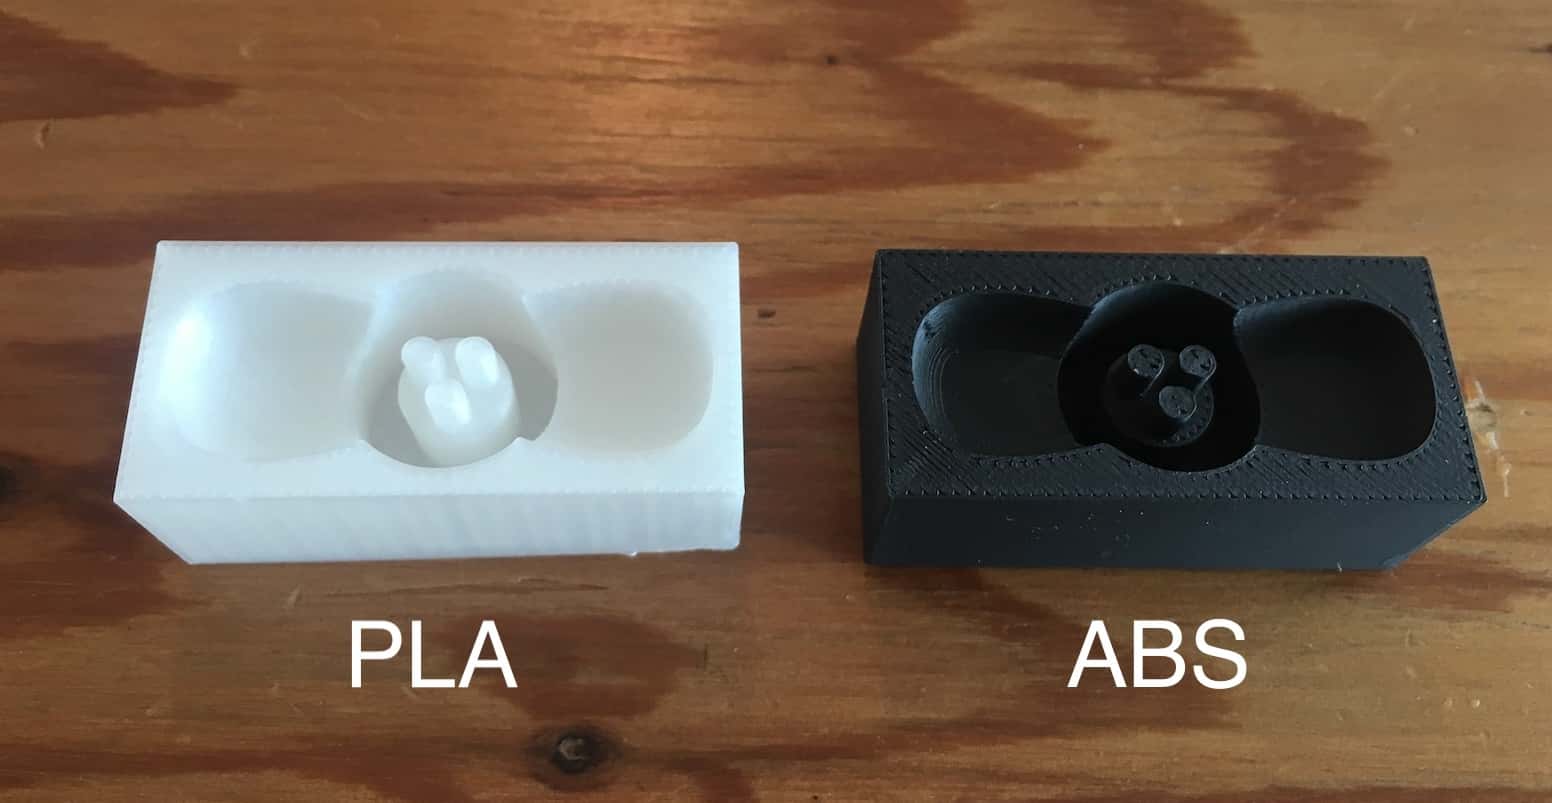
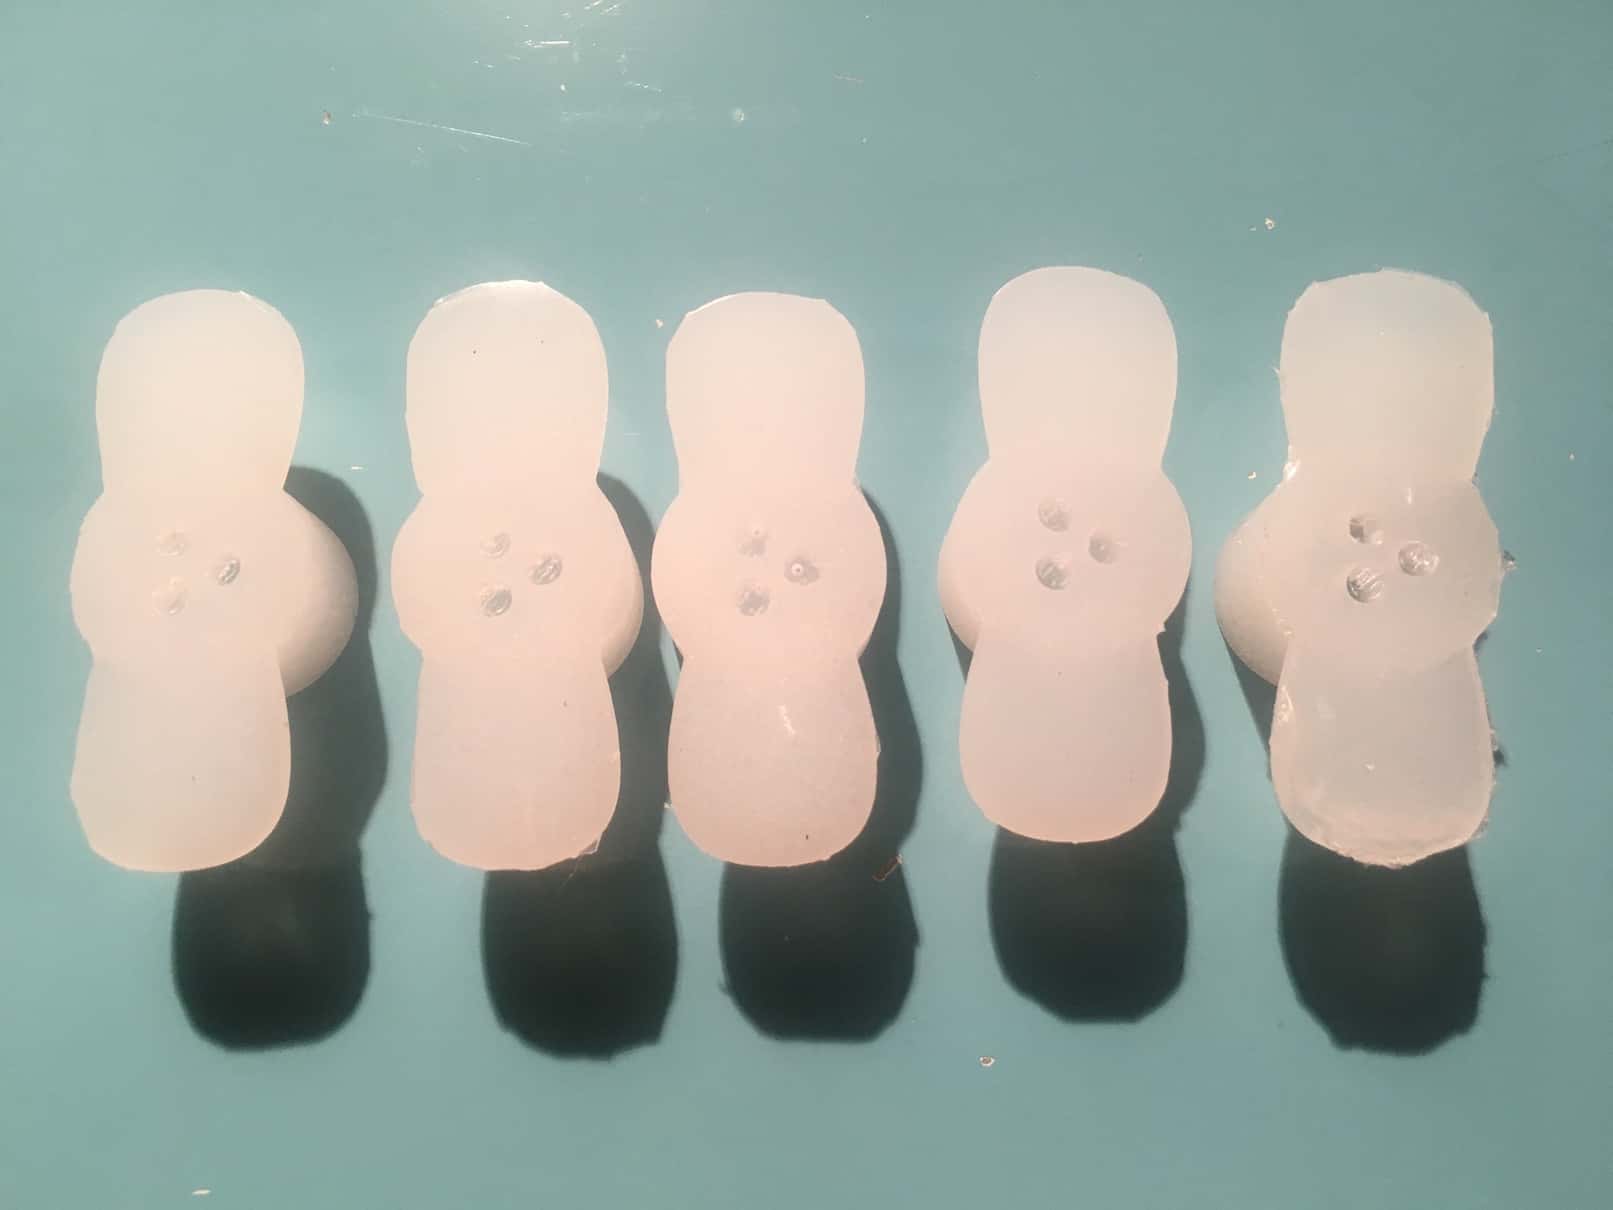
The sillicone mold I used at week10 was so sticky that it seems hard to reproduce the parts repeatedly.
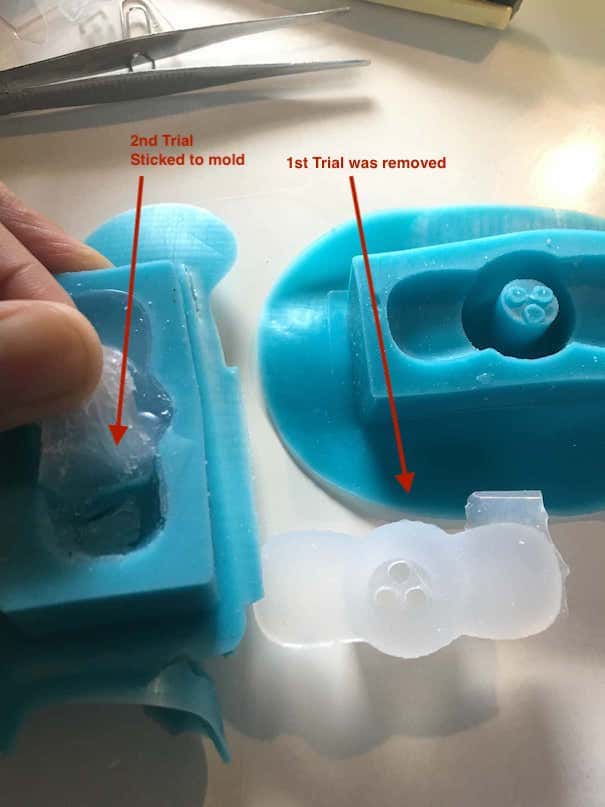
So I printed new mold with ABS and PLA, then made five parts using Ecoflex 00-50 that I used week10. 3D Printed molds were not stick to the flexible material and could removed easily.
- Ecoflex 00-50
Actuation
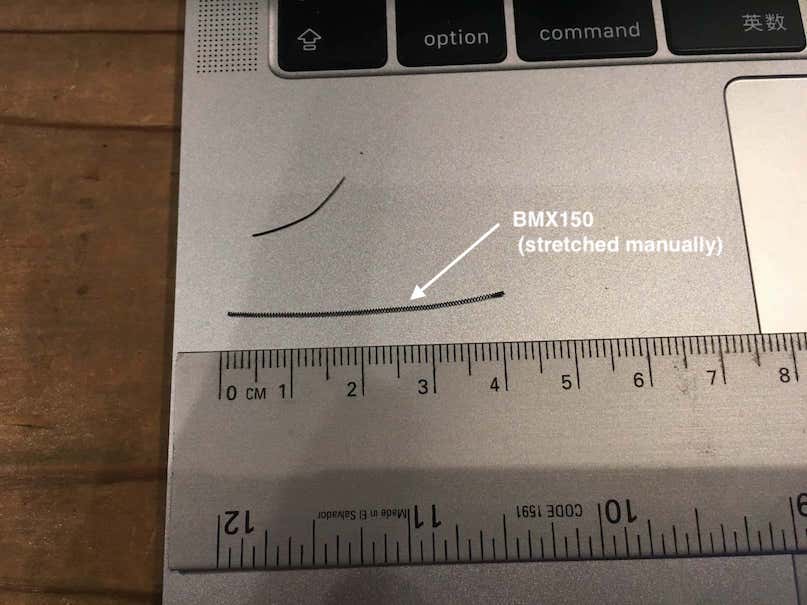
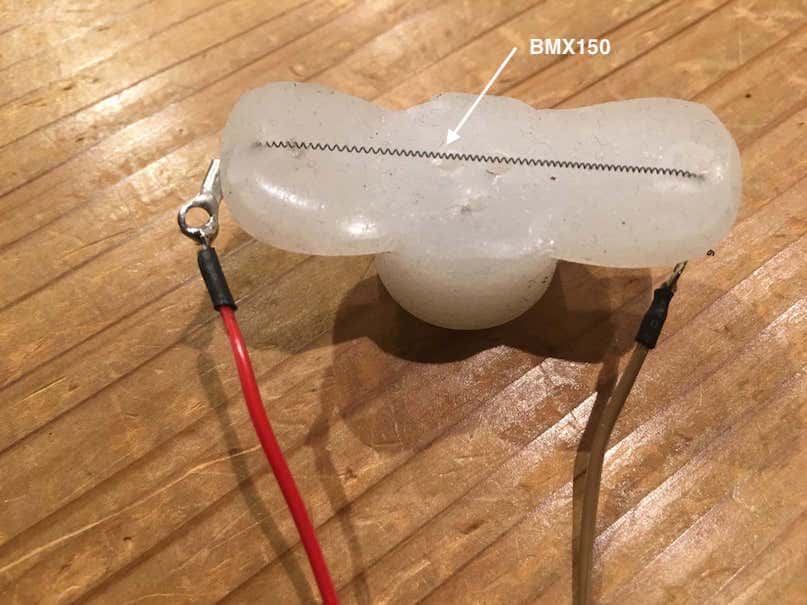
I planned to use Biometal BMX150 I used at Mechanical design week.( >> detail ) . It is a fiber-like actuator based on shape-memory alloy, and moves like a muscle when current flows. The actuator was controlled by Arduino PWM at Mechanical design week. For the final project, it was controlled by Raspberry pi digital port.
 ..
.. 
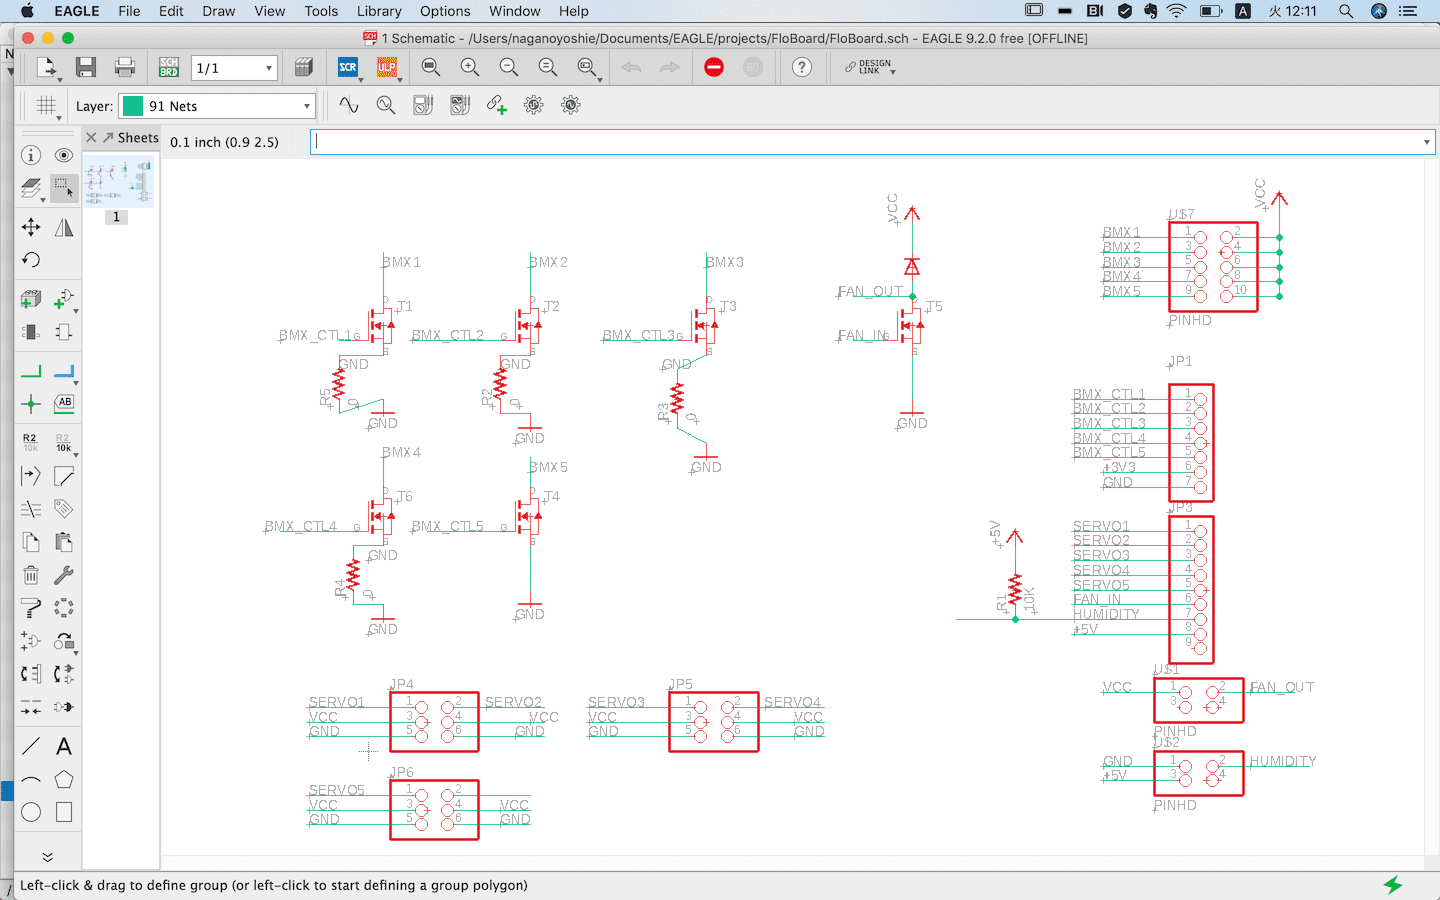
Mist Control module
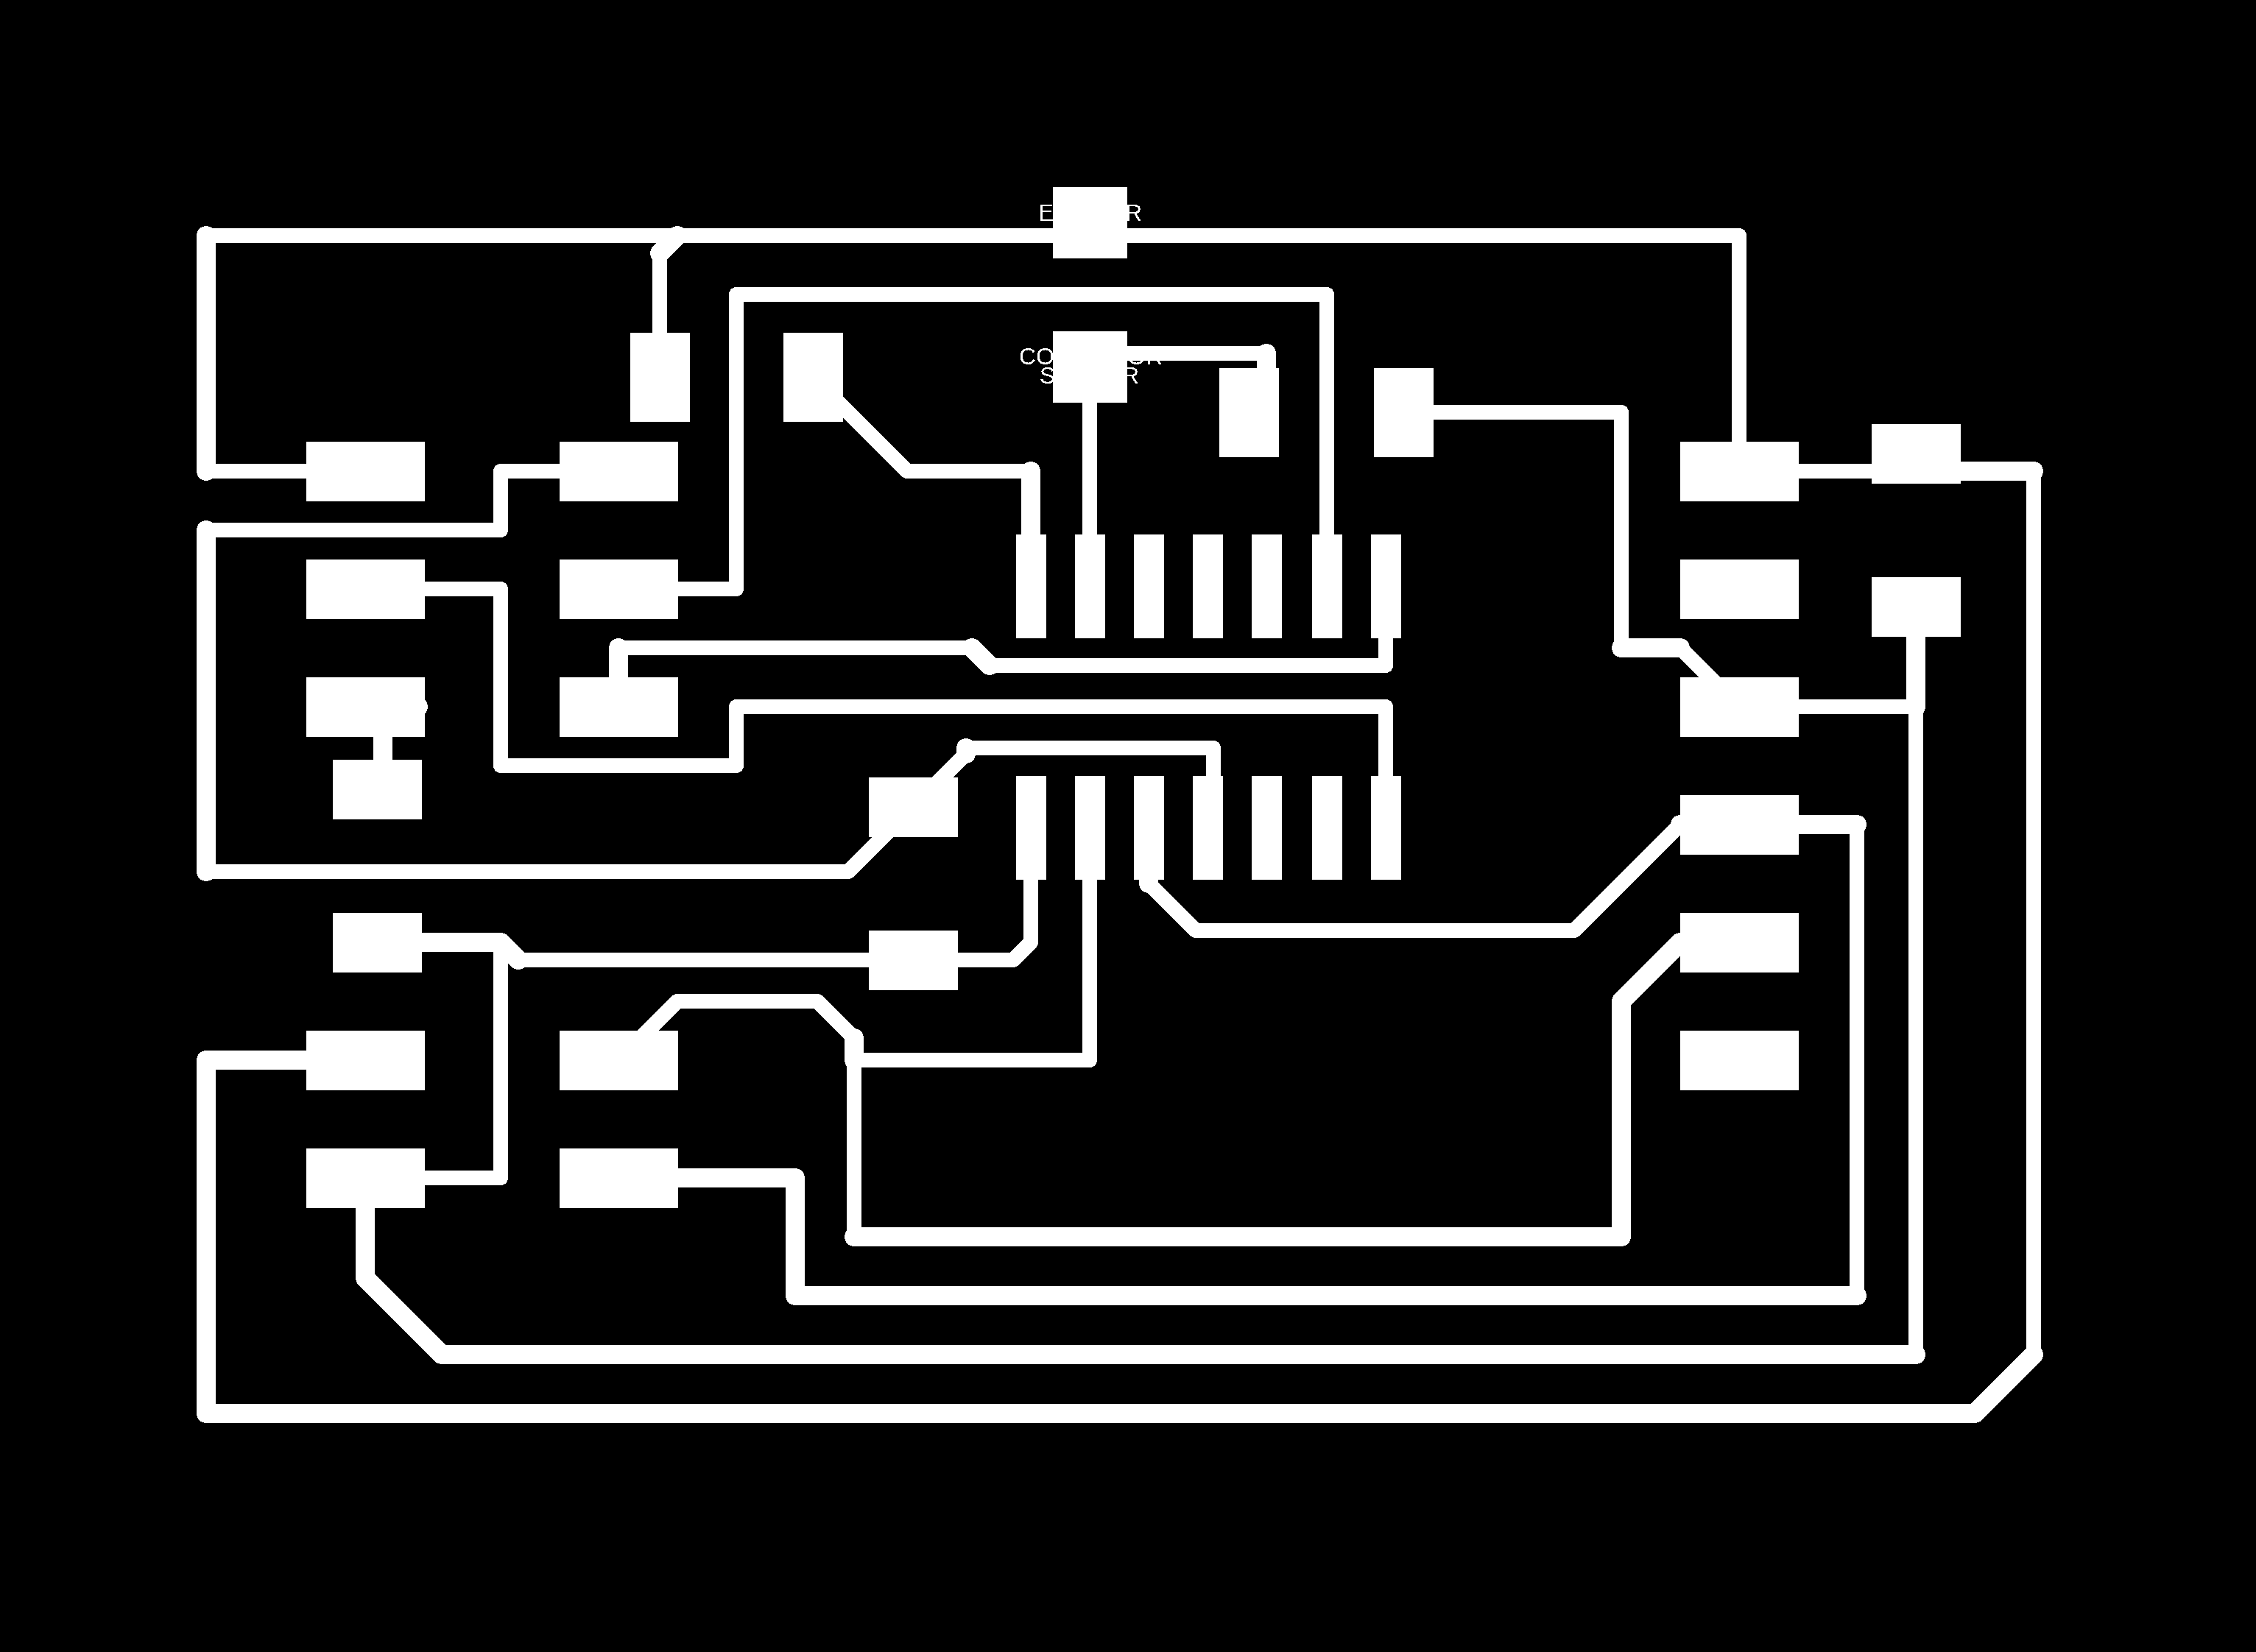
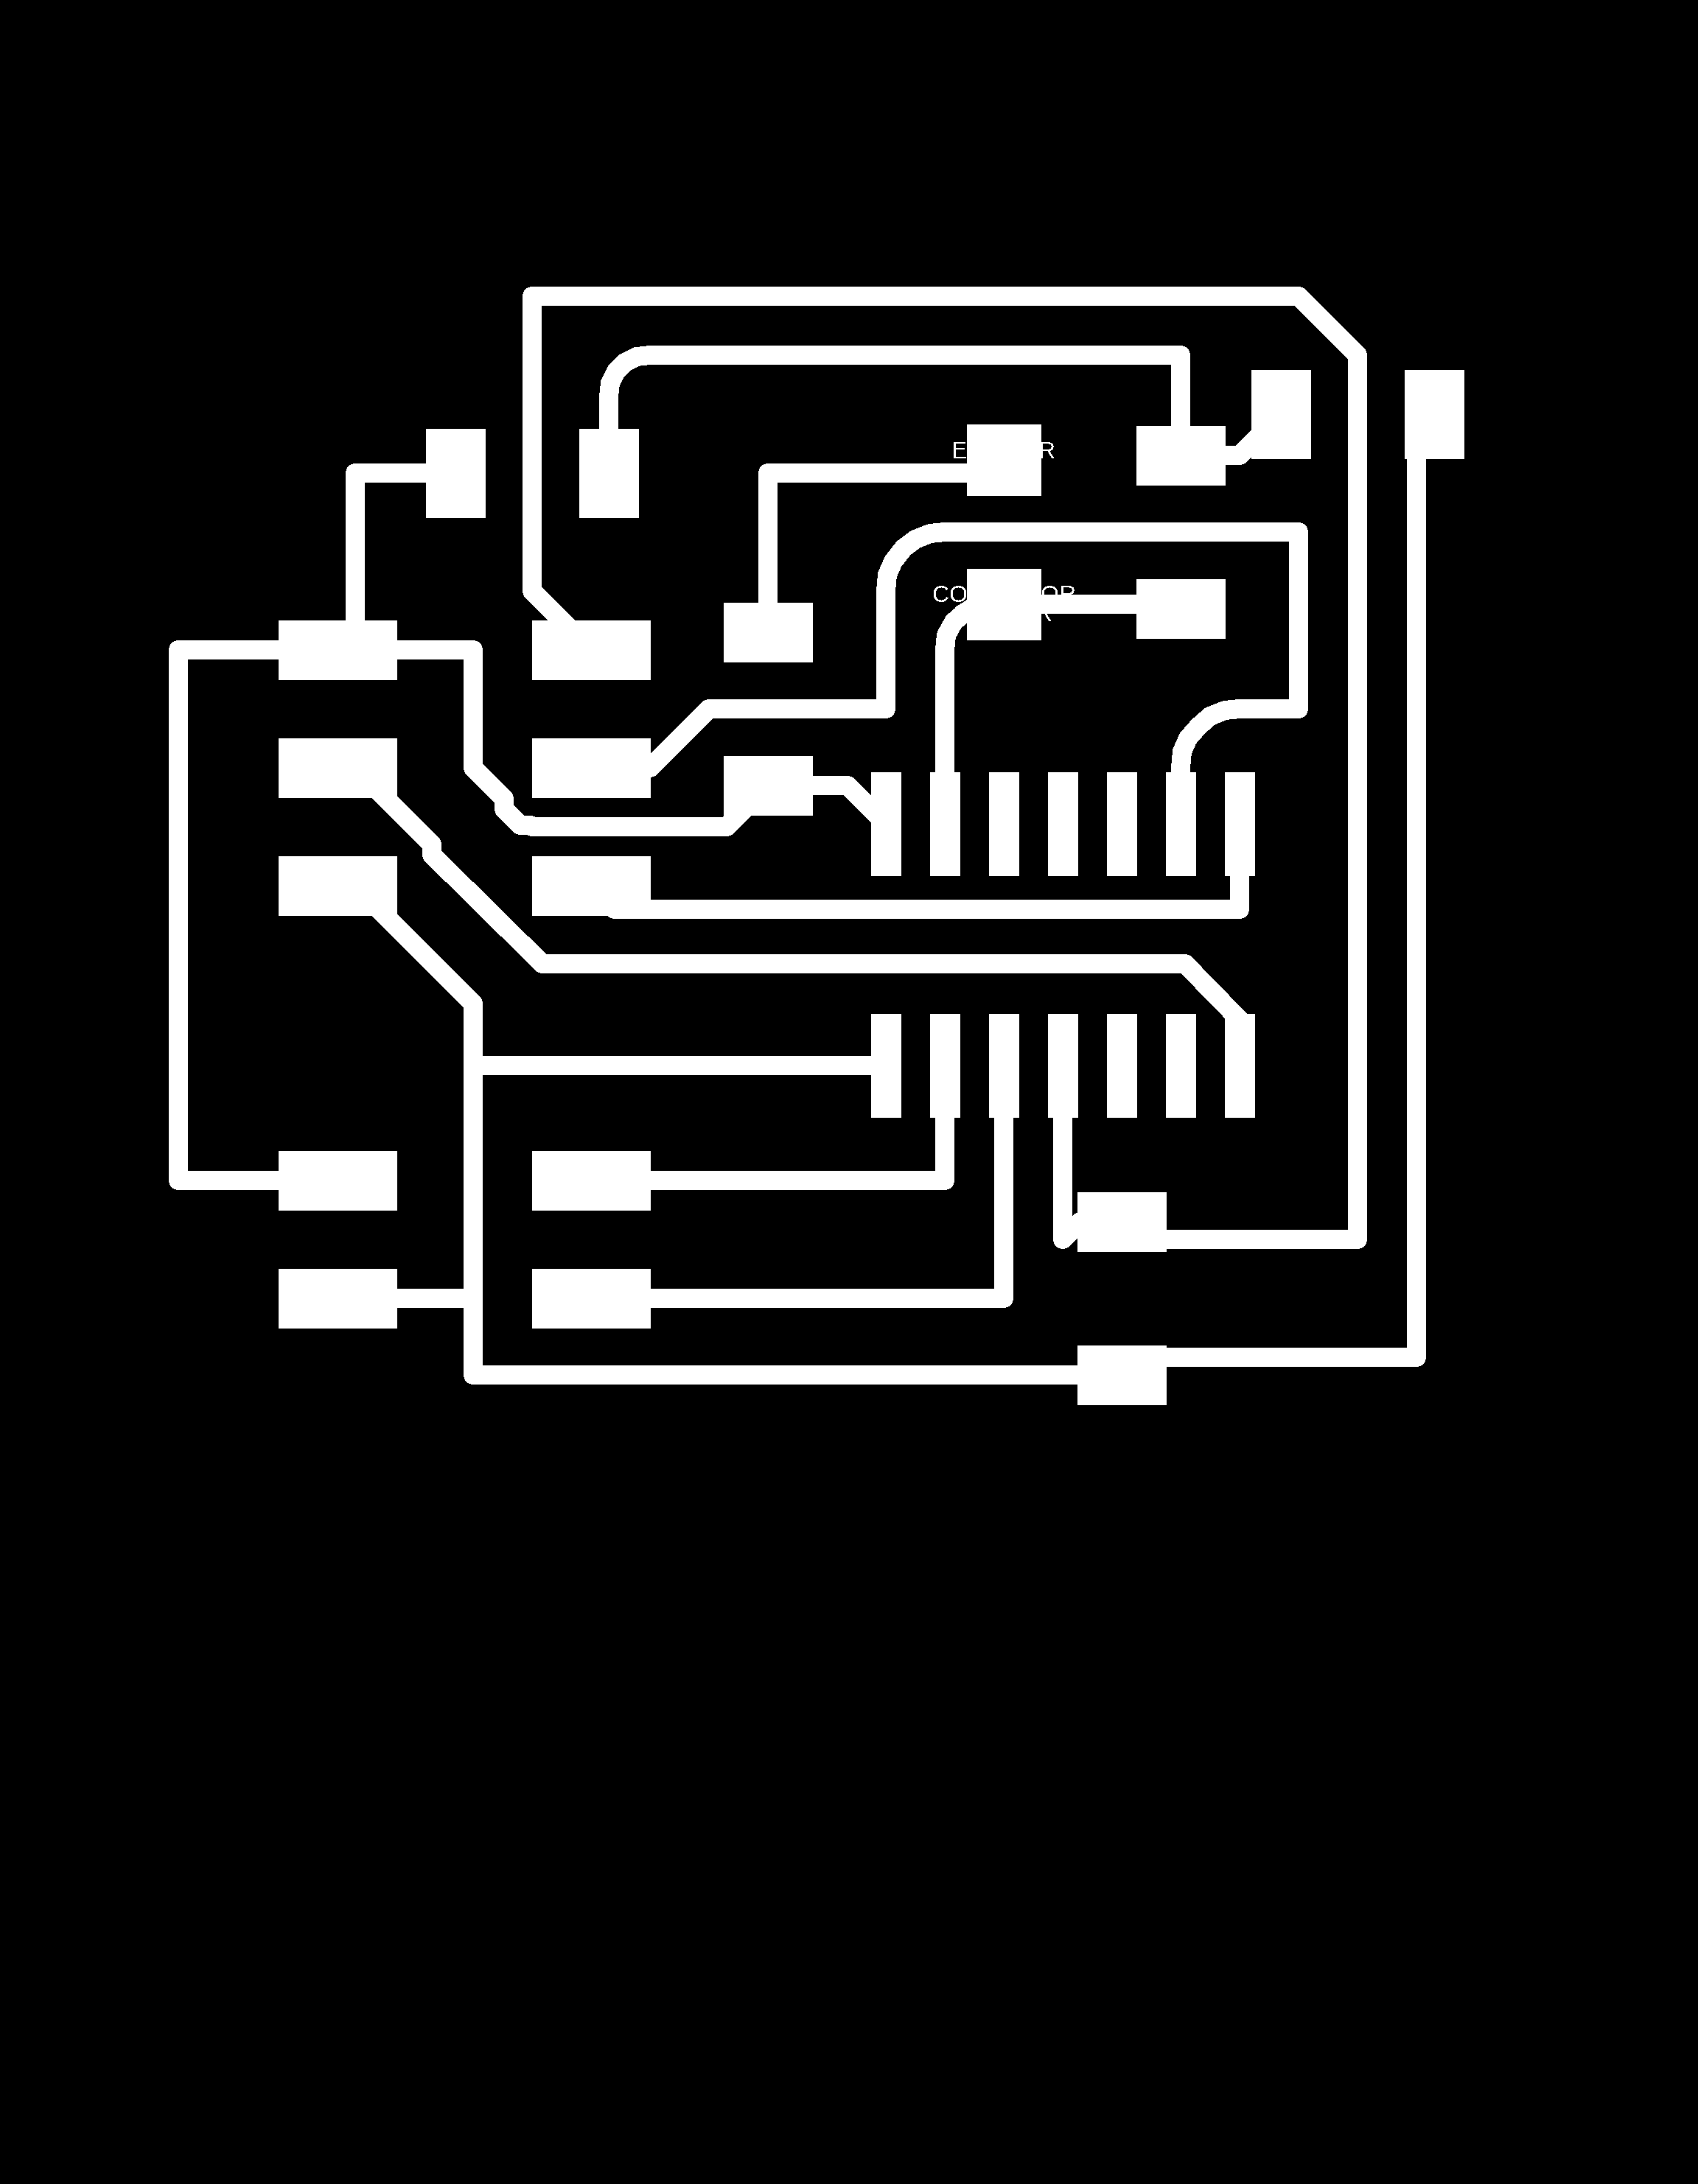
Connection Board design
I designed the Connection board between Raspberry pi and parts. It consists of following function.
-
Servo connection
Servo motor is used to open/close each mist tube. -
Actuator control
MOSFETs for Biometal are placed on the board. The mist flow of each tube is controlled by raspberry pi. -
DC fan control
MOSFETs for DC fan is placed on the board. The Raspberry pi control blows the generated mist into tubes.
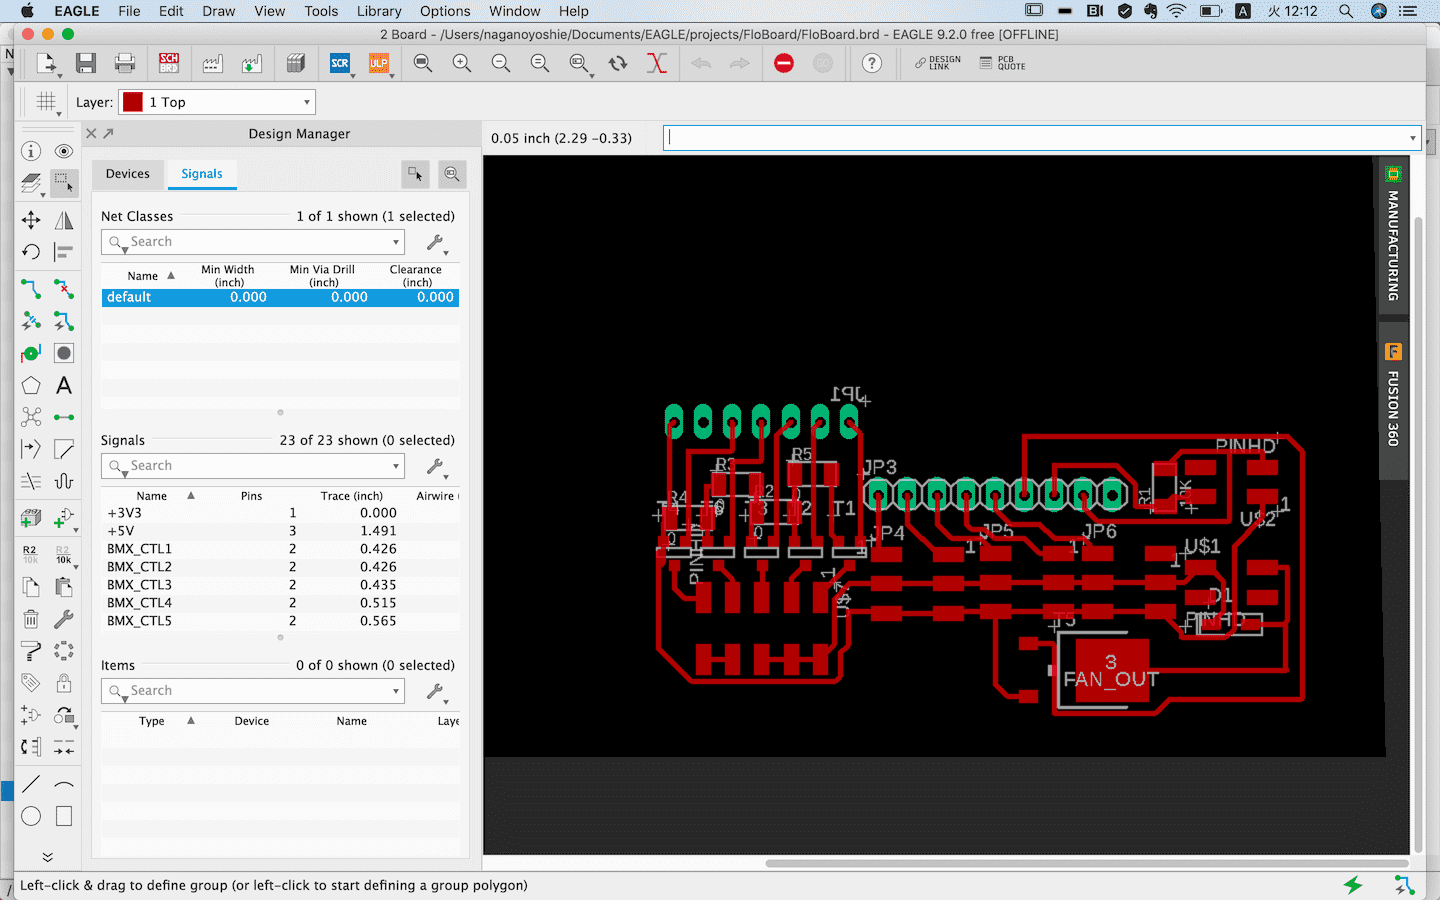
Connection board:
Open/Close by servo motor
Application
Pi Processing
Application was developed by Processing. First I coded at Macbook, after that moved to Raspberry pi and used the Macbook as VNC viewer,. How to use Processing on Raspberry pi is here. There are extensions for pi such as GPIO class and I2C class.
I encountered some issues about pi Processing:
-
PWM
I wanted to use PWM for BMX150 control, however hardware PWM was not supported at Pi Processing for the time being. I tried to use Software servo class as software PWM, however BMX didn’t move properly. So I decided to use digital port and just on/off the BMX150 actuator. -
Performance
Generative flame animation ran well at Macbook, however the speed was very low at the Raspberry pi. The light sensor detection was also very low. Though I gave priority to packaging using Pi instead of PC, I have to solve the performance issue in the next step.
Application mode
The application is consists of following mode.
- Initial mode
- Initialize screen size, port and serial settings, so on
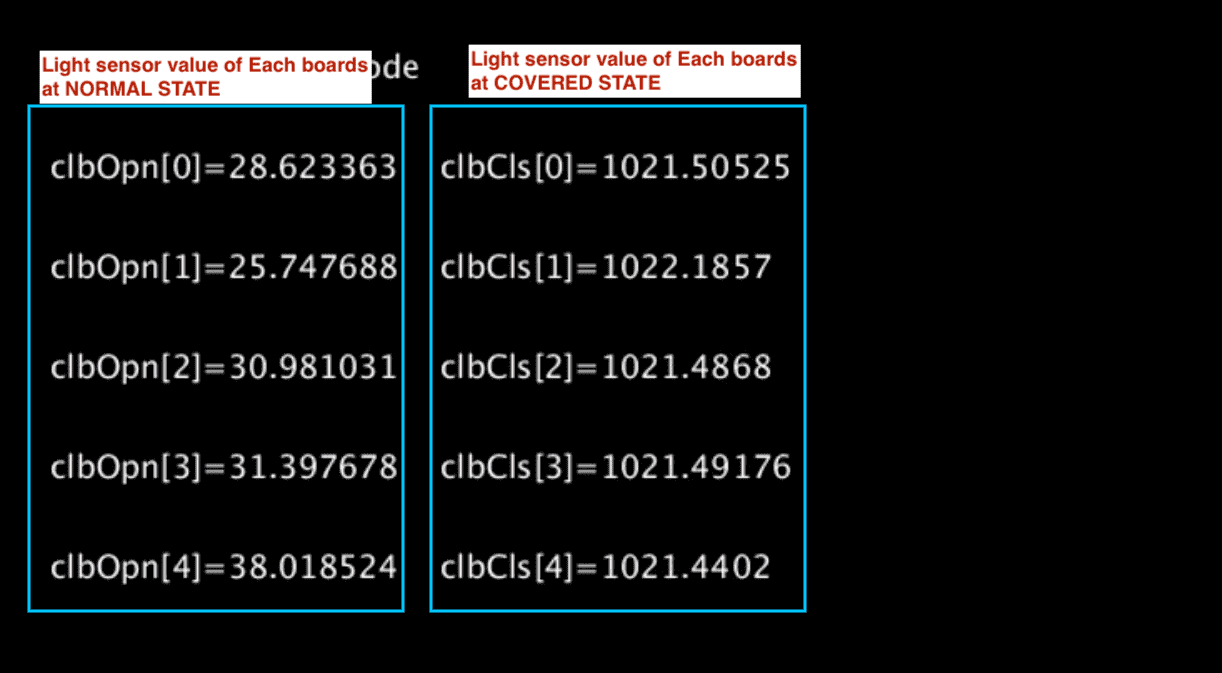
- Calibration mode
The light condition is different from each room and location, so I added the function that measure the threshold.- Open: wood branch is not inserted
- Close: wood branch is inserted
- Normal mode
- Flame animation
- Play mode
- Variation of the expression
Calibration
When fire woods are not inserted in the holes, press ‘a’ key. Then the average of light value ( n=10) will be calculated as follows.
  switch(appMode){
    case MDclbOpn:
       if(isClbOpn){
            clbOpn[node]+=filter[node];
            println ("calib open bord " + node +"=" + clbOpn[node]);
            clbCnt++;
            if(clbCnt == 5*clbNum){
              for(int i=0; i<5; i++){
               clbOpn[i]=clbOpn[i]/clbNum;
               }
               clbCnt=0;
              println ("calib open finished");
             isClbOpn = false;
          }
       }
      break;
After that, put fire wood into all holes, then press ‘s’ key, then the average of light value ( n=10) will be calculated.
Normal mode
Light sensor board communication
The value of five sensor boards are read one by one. The beginning of draw loop, ‘sendAdd’ function is called.
void sendAdd(){
  if(!reqDat){

        myPort.write( nodeID[node]);
        println ("write Address : node"+ node + "=" + nodeID[node]);
       reqDat=true;
  }
}
If not in serial communication (reqDat flag is not true), send the next board address via serial port. And set reqDat flag to indicate that communication is in progress.
When the light sensor board detects the own address, it sends the sensor value. Then the Raspberry Pi detects the serial interruption, and receive the sensor value as follows. Because the sensor value tends to fluctuate, a filter ‘(1-eps)filter[node] + epsltDat’ is applied. As the eps value is 0.5, it is average of last value and current value.
void serialEvent(Serial myPort) {
  readLight();
}


//---- Read Light sensor data ---------------
void readLight(){
 val = myPort.read();         // read it and store it in val

  switch(cnt){
      case 0:
      ltL = val;
      cnt = 1;
      break;

   case 1:
      ltH = val;
      ltDat = 256*ltH + ltL;
      filter[node] = (1-eps)*filter[node] + eps*ltDat;
       println ("light" + node + "= " + filter[node]);

      cnt = 0;
      reqDat=false;

      chkCalib();

      node++;
      node=node%5;

      break;
  }
}
Flame Animation
Flame animation was developed at the interface and application programming week. ( >> detail ) The size of the flame changes according to the value of light sensor.
The application for the final project has tuned. The color mode is changed from RGB to HSB to define color range. The Color palette for the flame animation is defined in the setup sequence. The color range of Hue from 0 - 30 , it means red to orange, are stored to the palette to express flame image.
colorMode(HSB, 360,100,100);
  // generate flame color palette  (Red - Orange :H0-H30)
   flame_palette = new int[300];
  for(int n=0; n<9; n++){
   for (int i=0; i<29; i++)
    {
      flame_palette[30*n+i]  = color(i, 100, 100);      // H: 0-30
    }
  }
The ‘drawFlame’ below is the function that create one flame animation. The main loop ‘draw’ calls the function five times with the parameter of XY position. In order to make natural fluctuation of the flame, noise function is used. I love noise function instead of random function when express organic movement.
void drawFlame(int i, int xx, int yy, float RR){
  pushMatrix();
  translate(xx, yy);

  for(float radious = RR; radious > 0; radious -= 2){

    float c = noise(nz)*RR;
    nz += step;
    fill(flame_palette[int(c)]);

    beginShape();
    for(float angle = 0; angle < 360; angle += 0.5){
      float radian = radians(angle);
      float x = radious * cos(radian);
      float y = radious * sin(radian);

      float nx = x + map(noise(x * scale + offset1[i].x, y * scale + offset1[i].y, frameCount * 0.015), 0, 1, -200, 200);
      float ny = y + map(noise(x * scale + offset2[i].x, y * scale + offset2[i].y, frameCount * 0.015), 0, 1, -200, 200);

      vertex(nx, ny);
    }
    endShape(CLOSE);
  }
  popMatrix();

}
Play mode
This is a variation of expression. As first idea of my final project, I planned flame that has emotion. So based on the user and character (flame)’s emotion, the animated graphic changes. Though I have not finalize the concept at thie time, the below is one example of the image.

The ‘drawPoint’ below is the function that draw one ellipse. It also use noise function at ellipse shape, hue and saturation to create organic movement. At the beginning of the function, the current coordinate of the application is stored by pushMatrix, then an ellipse is wrote at the location specified in parameter of the function call.
void drawPoint(float x, float y, float noiseFactor) {
  pushMatrix();
  translate(x,y);
  rotate(noiseFactor * radians(540));
  noStroke();
  float edgeSize = noiseFactor * 75;
  float hc = 150+(noiseFactor*60);
  float sc = 100+(noiseFactor*100);
  float alph = 150 + (noiseFactor * 120);
  fill( hc,sc,100,alph);

 ellipse(0,0, edgeSize, edgeSize/2);
  popMatrix();
}
Enclosure
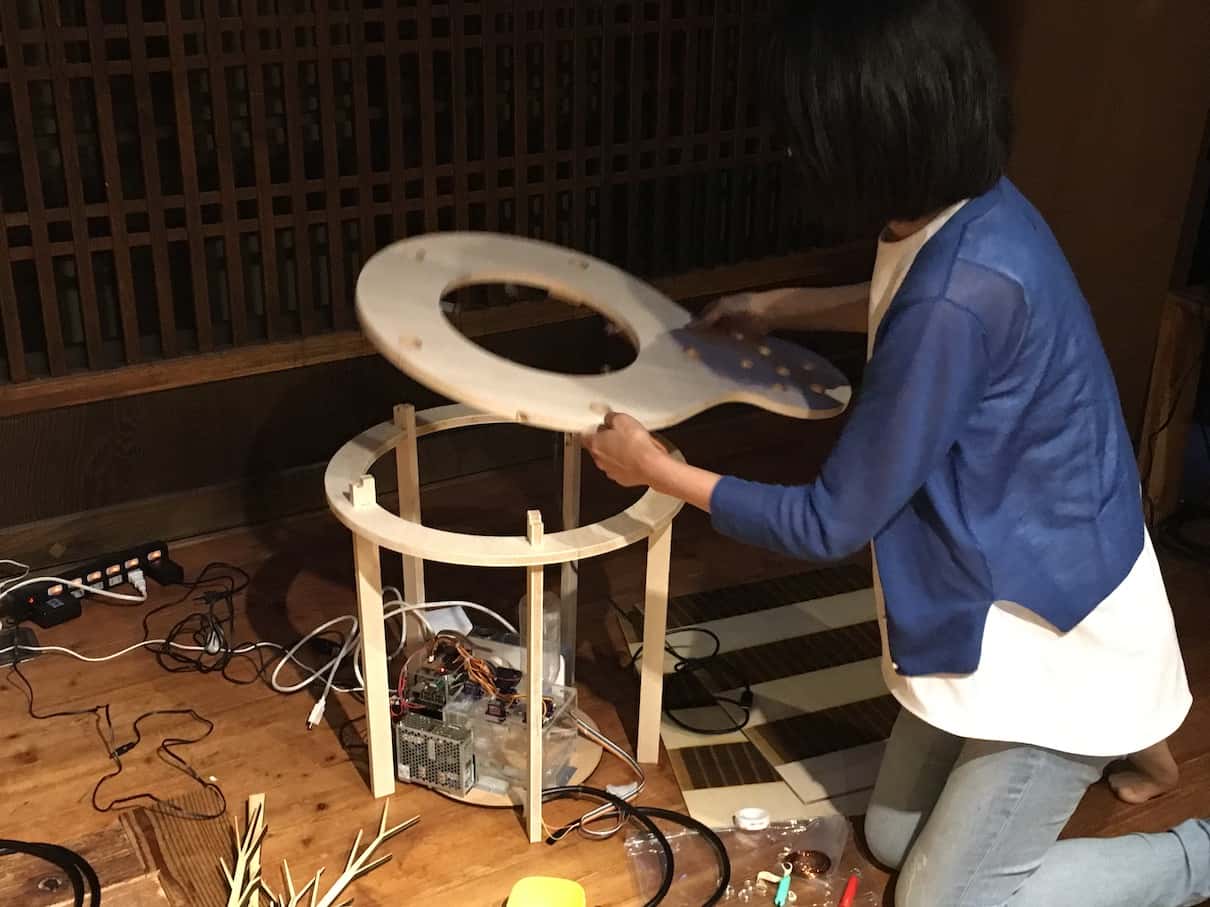
Fireplace table
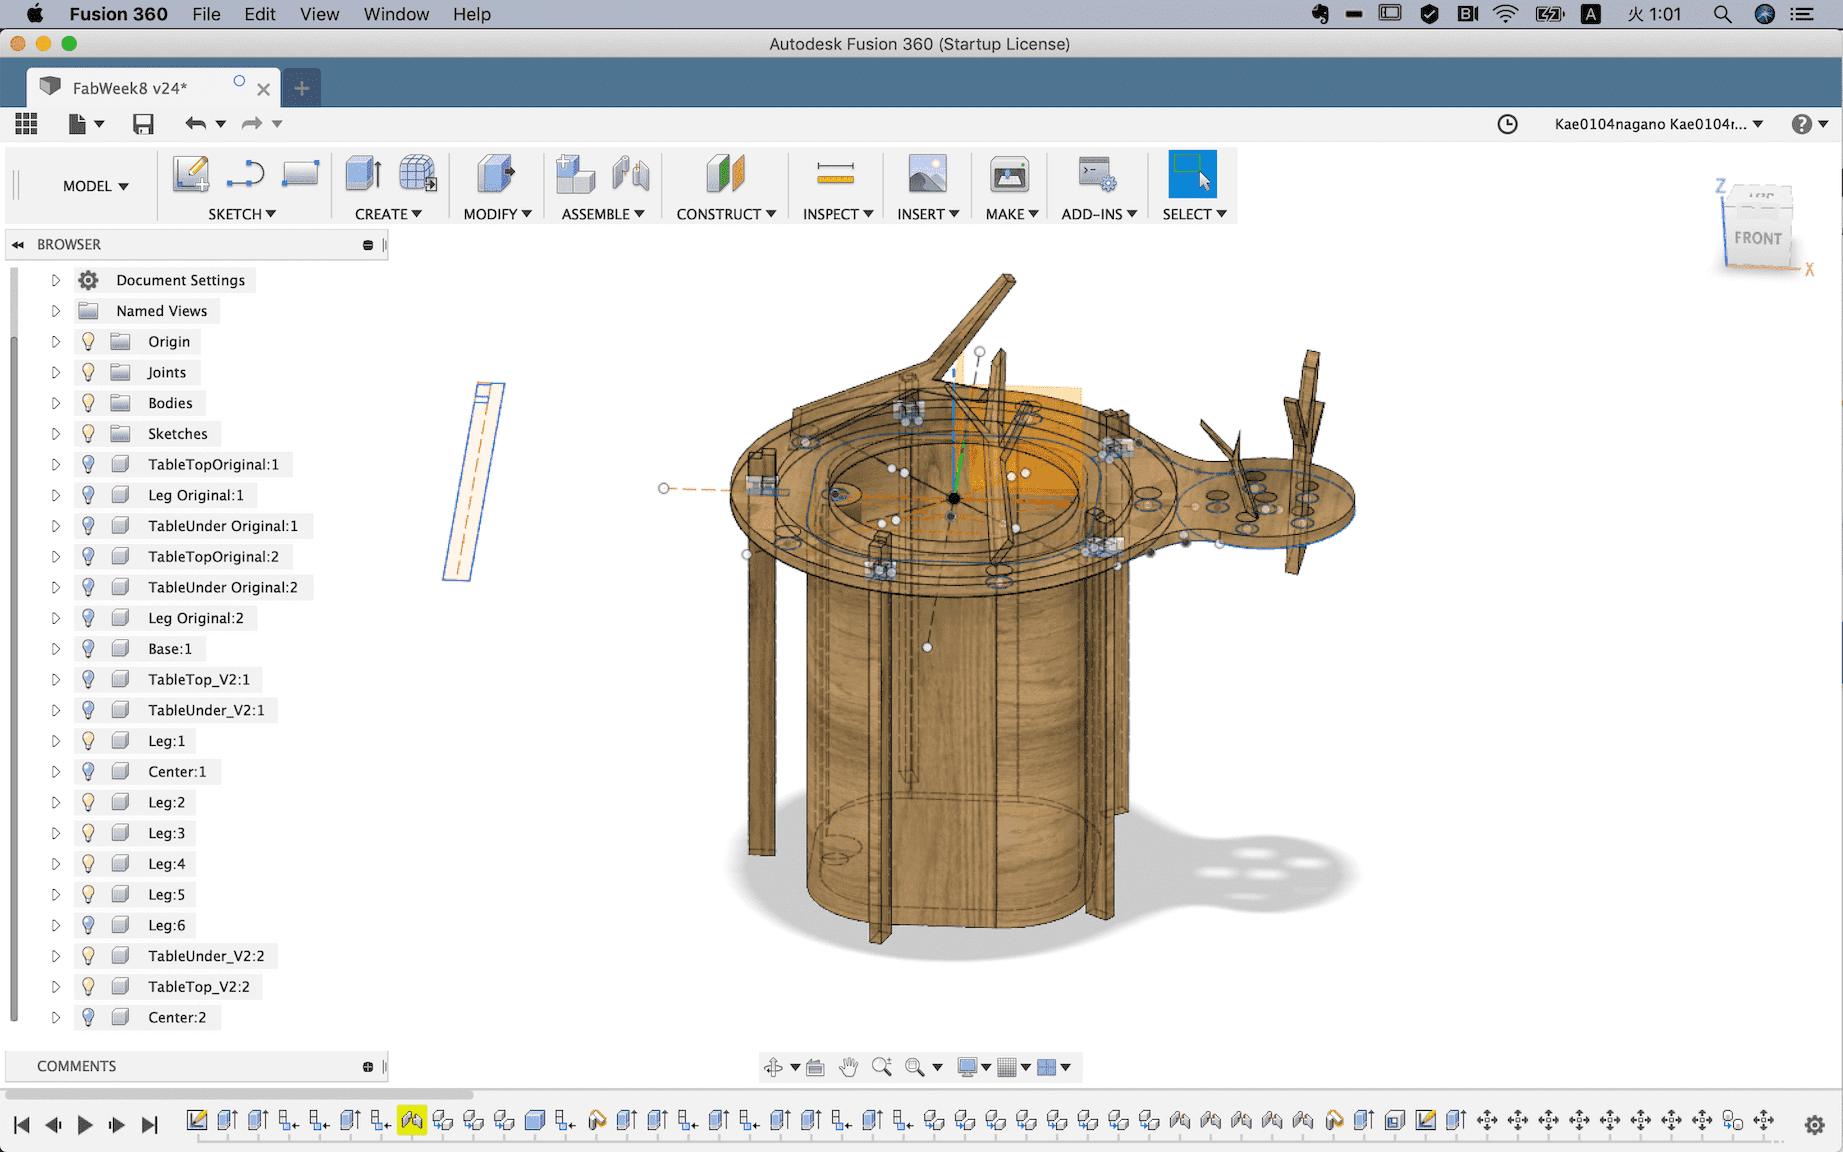
I designed the fireplace table using Fusion360 at something big week. ( >> detail )
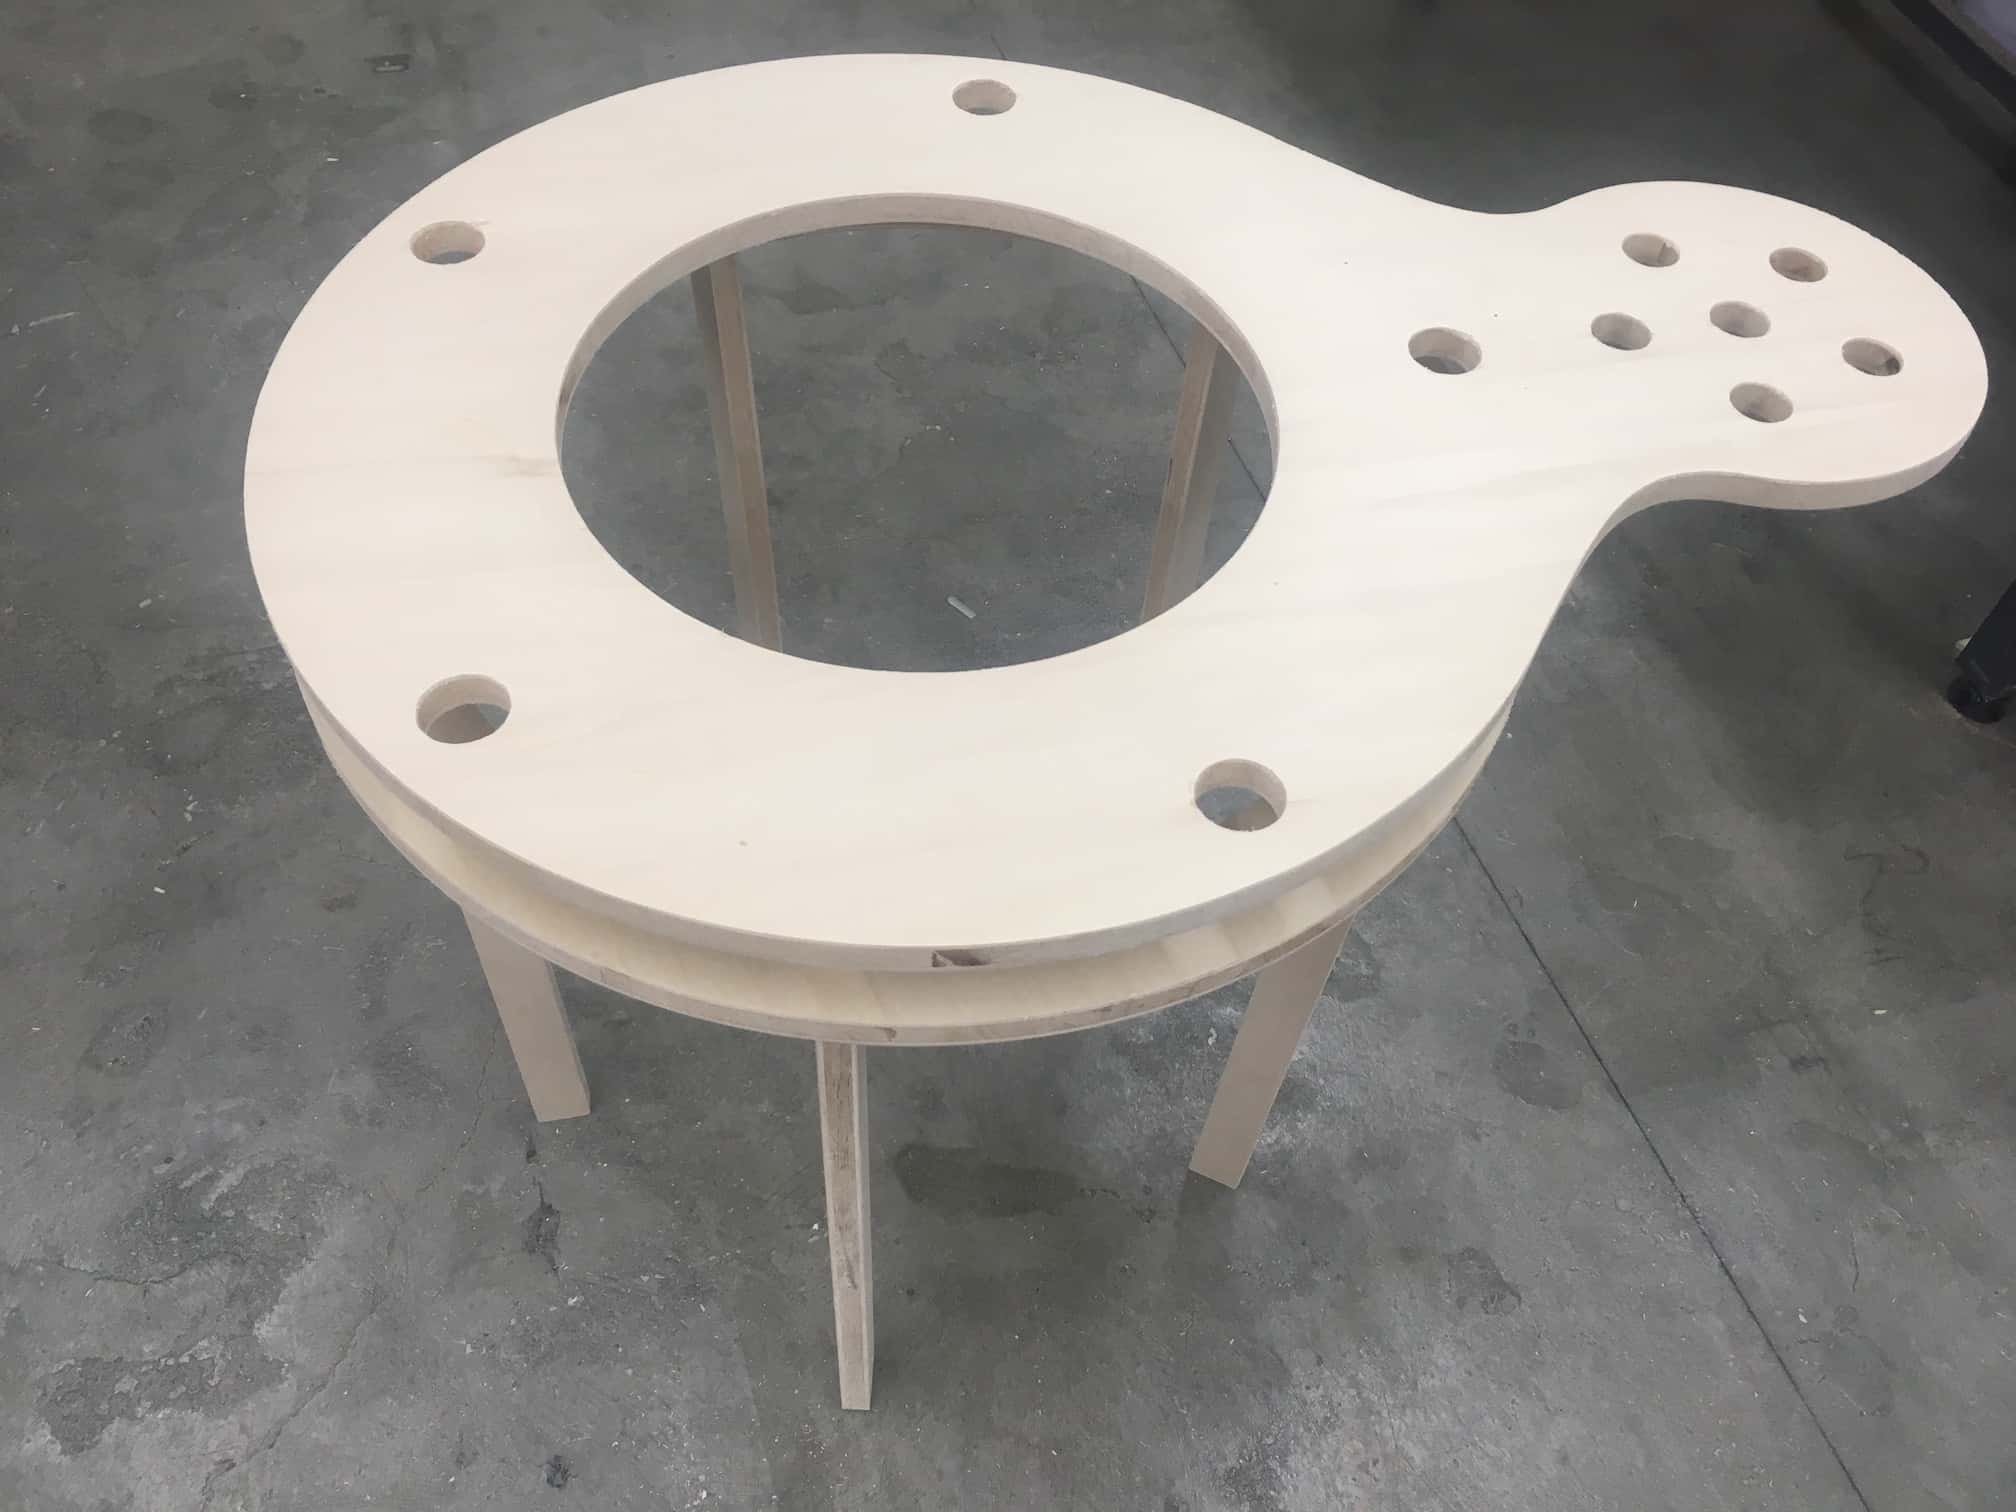
Fire wood
Fire woods were designed using illustrator and cut lumber core board.
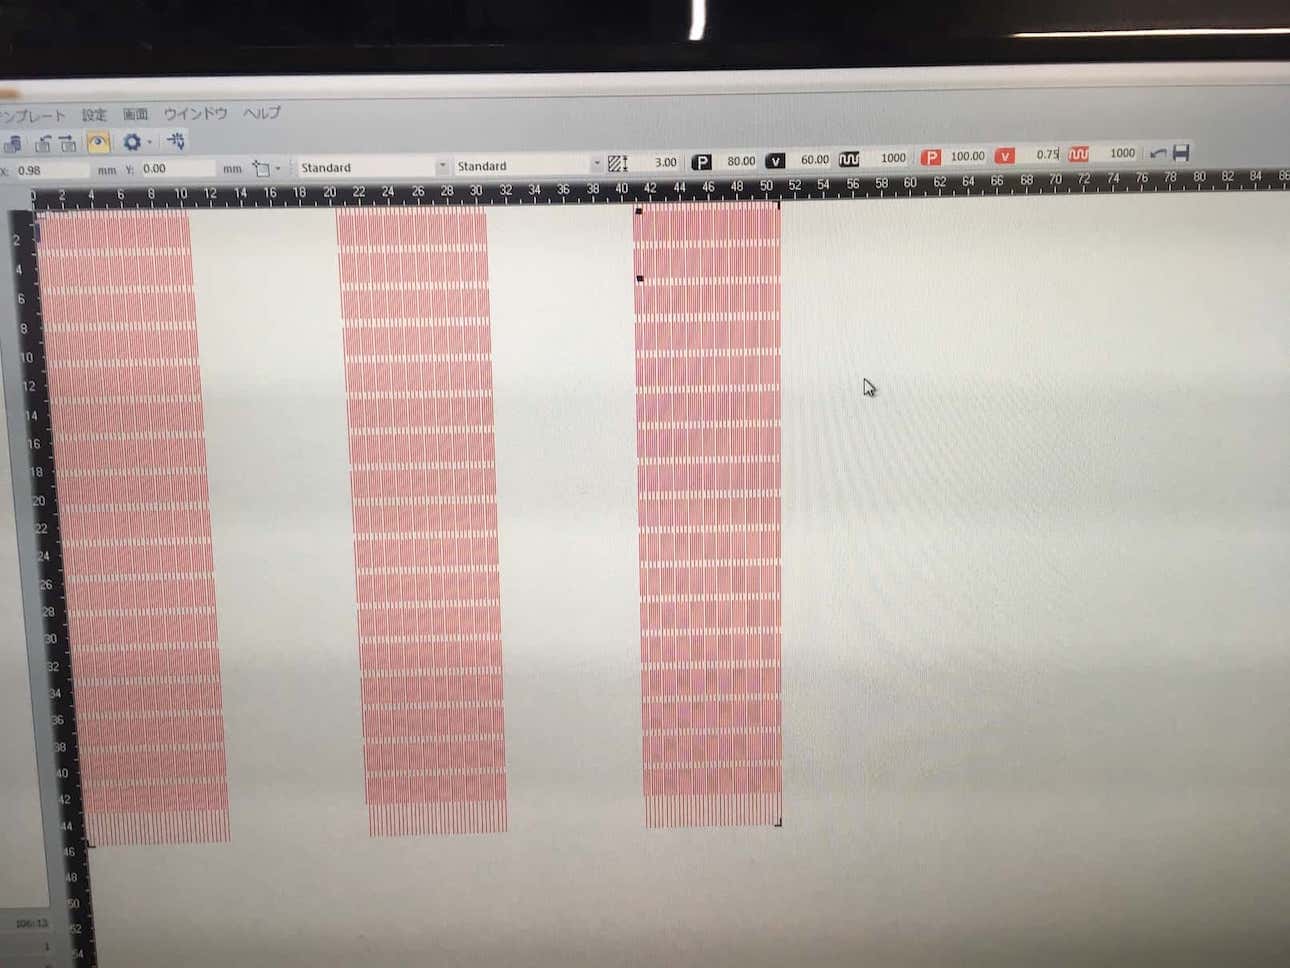
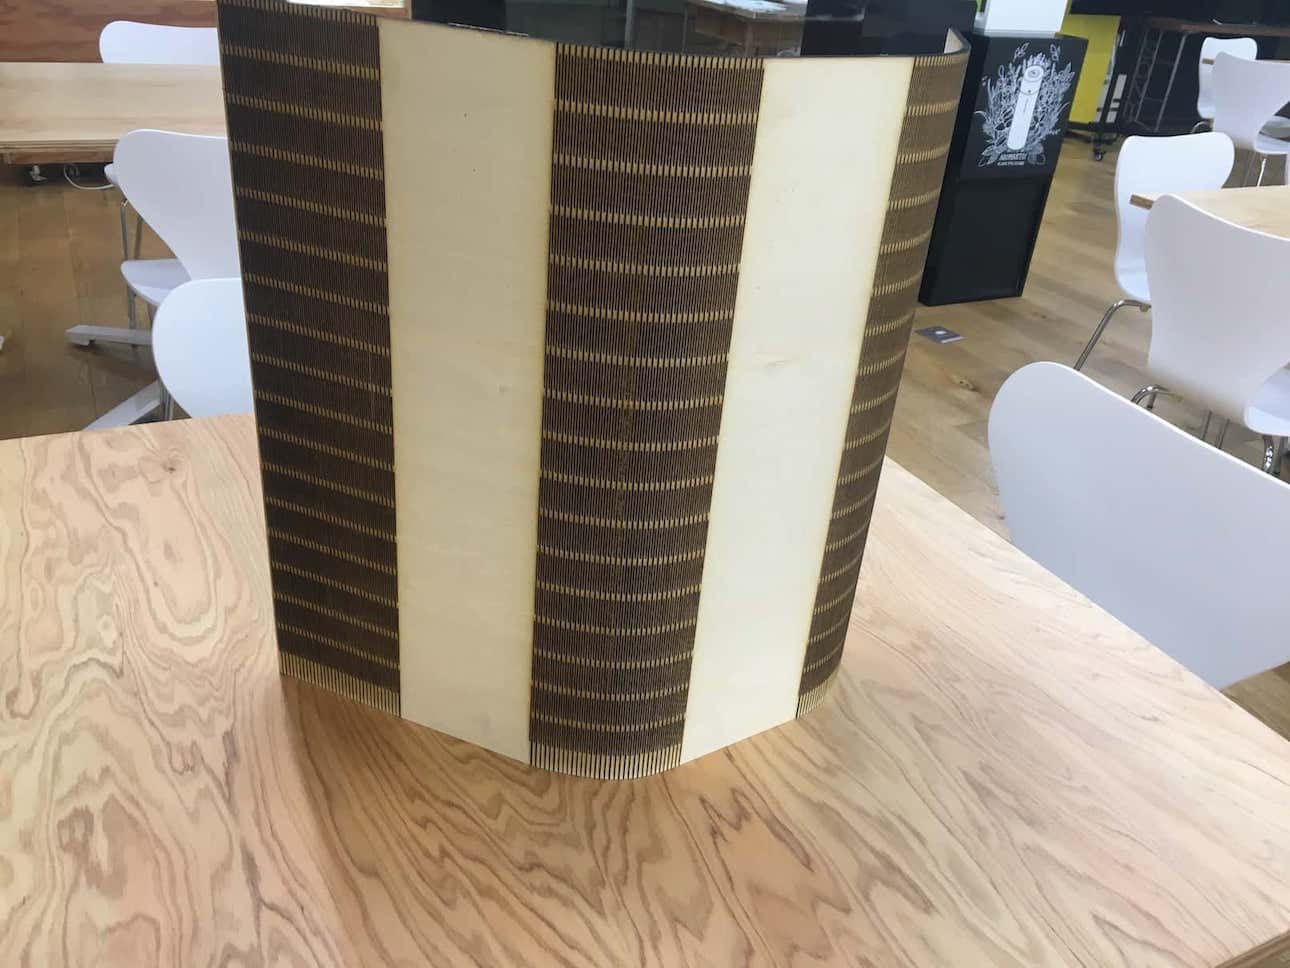
Living hinge
Living hinge was designed using illustrator to cover projector and mist modules. 5.5mm Lumber core plywood board was cut using laser cutter for a part of the enclosure.
Packaging and integration
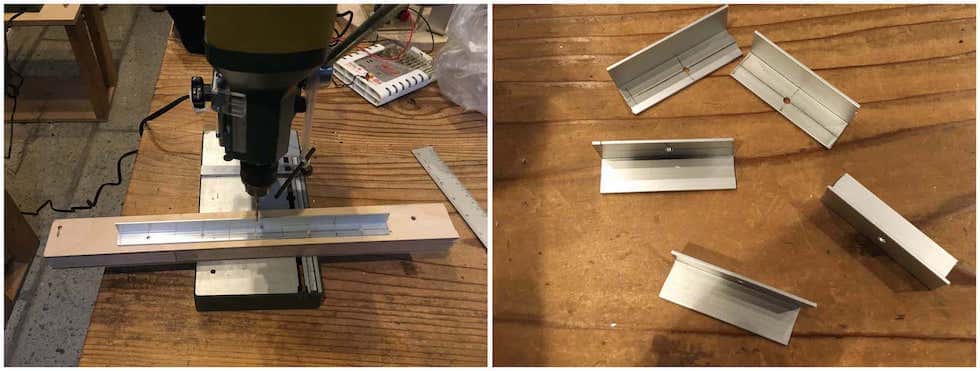
Made some L type joint parts for packaging.

BOM (Bill of Materials)
The materials and components will be required for the final project.
| block | parts | description | number | cost | dealer |
|---|---|---|---|---|---|
| Light sensing | micro controller | ATTiny 44 | 1 | ¥82.9 | digi-key |
| Light sensor | PT15-21C/TR8 | 1*5 | ¥35.2 | digi-key | |
| capacitor | 1uF | 1*5 | ¥20.3 | digi-key | |
| resistor | 10KΩ | 2*5 | ¥1.6 | digi-key | |
| resistor | 0KΩ | 2*5 | ¥1.6 | digi-key | |
| header | 6pin for FTDI | 1 | ¥20 | Akizuki Denshi | |
| header | 6pin for ISP | 1*5 | ¥86.8 | digi-key | |
| header | 4pin for serial | 1*5 | ¥82.1 | digi-key | |
| Mist Generator | Transistor | 2SC4434 | 1 | ¥472 | Wakamatsu Tsuusyou |
| resistor R1 | 3.3K | 1 | ¥1.6 | digi-key | |
| resistor R2 | 47 | 1 | ¥1.6 | digi-key | |
| resistor R3 | 120 | 1 | ¥1.6 | digi-key | |
| resistor R4 | 2 | 1 | ¥1.6 | digi-key | |
| resistor R5 | 6.8K | 1 | ¥1.6 | digi-key | |
| VR | 10K | 1 | ¥40 | Akizuki Denshi | |
| Capacitor C1 | 0.01F250V Film | 1 | ¥30 | Akizuki Denshi | |
| Capacitor C2 | 1500pF 2A-UPZ-152JE | 1 | ¥16 | Sengoku Densho | |
| Capacitor C3 | 0.15μF 2A-UPZ-154JE | 1 | ¥42 | Sengoku Densho | |
| Capacitor C4 | 0.047μF 2A-UPZ-473JE | 1 | ¥32 | Sengoku Densho | |
| Capacitor C5 | 100pF 2A-UPZ-101JE | 1 | ¥16 | Sengoku Densho | |
| Inductor L1 | 100μH NR10050T101M | 1 | ¥60 | Akizuki Denshi | |
| Inductor L2 | 22μH NRI10050T220M | 1 | ¥60 | Akizuki Denshi | |
| Heat sink | 54x50x15mm | 1 | ¥110 | Akizuki Denshi | |
| Piezoelectric ceramics | 20mm 1.7MHz | 1 | ¥370 | Amazon | |
| Power Unit | DC48V 2.1A RWS100B-48 | 1 | ¥3800 | Akizuki Denshi | |
| Mist unit | Servo Mortor | SG92R | 5 | ¥500 | Akizuki Denshi |
| DC Fan | 5V 30mm | 1 | ¥280 | Akizuki Denshi | |
| resistor | 0Ω | 4 | ¥1.6 | digi-key | |
| diode | BZT52C3V3-FDICT-ND | 1 | ¥24.7 | digi-key | |
| Tube | inner/outer= 8mm/11mm, 5.5m | 1 | ¥892 | Amazon | |
| Actuator | Biometal | BMX150 | 3 | ¥2000 | Toki Corp. |
| Transistor | MOSFET | NDS355ANCT-ND | 5 | ¥48.8 | RS Components |
| Transistor | MOSFET | RFD16N05LSM9ACT-ND | 1 | ¥138.8 | Digi-key |
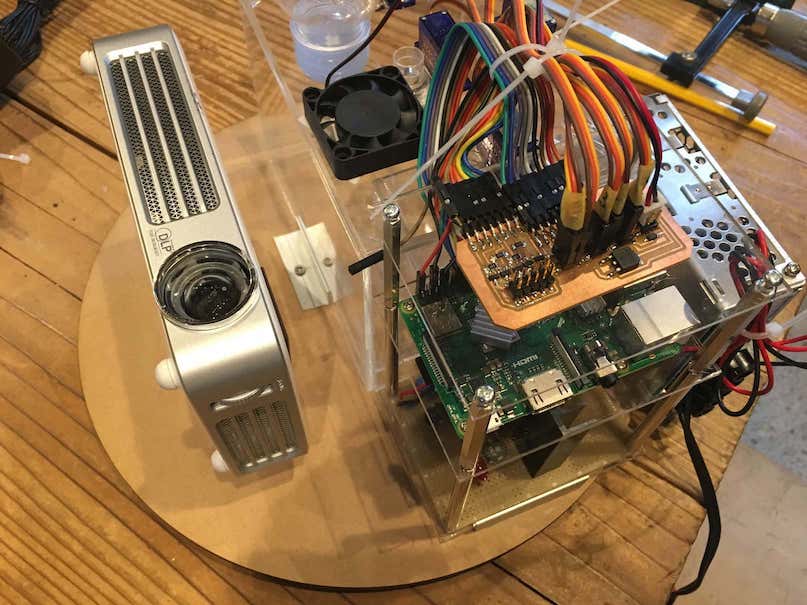
| Control | Raspberry pi | RaspberryPi3 Model B+ | 1 | ¥5,600 | Akizuki Denshi |
| Projector | WXGA 720P | QUMI Q6-WT | 1 | ¥36000 | vivitek |
| Cast | MOLD STAR 16 FAST | SMOOTH-ON | 1 | ¥5700 | SAC |
| Enclosure | lumber core plywood | 1220 x 1210 x 15 | 1 | ¥2494 | Hokurei Wood |
| Shina plywood | 300 x 450 x 5.5 | 3 | ¥280 | Hokurei Wood | |
| Acrylic board | 450x600x3mm | 1 | ¥1100 | Hazaiya | |
| Acrylic board | 220x300x5mm | 1 | ¥600 | Hazaiya |
Used Processes
- 2D design for enclosure
- 3D design tor enclosure, mist tube end parts
- Additive fabrication processes for mold
- Subtractive fabrication processes for enclosure
- Mold and casting for mist tube end parts
- Input device(Light sensor) and Output device (Servo motor and Biometal BMX150)
- Electronic design and production for Light sensor boards (with ATtiny44), mist generation board and connection board
- Interface and application programming
What other questions need to be answered?
- Can you make this system compact?
- Do the parts rust with mist?
- Are there any measures for loud servo noise?
What I learned
-
I have learned basic skill to design electronics and make circuit board with soldering surface mount parts. I failed many times and have become no to so afraid making micro controller board.I used to implement all functions on a commercially available microcomputers such as Arduino and Raspberry Pi, but in the final project, I learned how to attach small ATTiny to each sensor board and communicate each other. This enables an appropriate and scalable design to fit the concept.
-
Not only 2D design, I have learned 3D design and computer controlled machining. Parametric design was really useful for this kind of rapid prototyping iteration. When planning assignments, I came to think about combining various processes that I learned at academy. At that time, I read the documents of myself and other students many many times and recognized the importance of the documents.
-
Through Group assignment experiment, I have Learned how to collaborate with others,. Double assignment of group and individual was really tough load, but was nice opportunity to discuss how to survive. Especially machine design weeks was fun assignment left in my mind.
-
Not only learning production techniques, I learned attitudes and mindset from the academy, such as project management, documentation, dissemination and FAB world. My first purpose of applying the Fab Academy was just improve my fab skill. But during the academy, I became interested in the remote fab education itself that connected to world-wide. As the next step, I would like to keep studing to be able to contribute the Fab Academy as instructor.
Future step of the project
-
Performance
It is necessary to improve performance for interactivity. I used processing for the final project because the graphic expression is beautiful. But it seemed heavy load for Raspberry pi. I have to use other languages like python or find a small computer that can be integrated into the enclosure. -
Integration
The system was large for me that packaging and integration took time. There were minor troubles during integration and operation, for example tubes were easily detached. I have to improve joints and operation in next step. -
Noisy servo
I used servo motor to open/close the mist tube. But it was really noisy mechanical sound in the silent room. Need research about silent mechanical control. When I played a back ground music of bonfire beside the application, then the noisy mechanical servo sound changed to the sound of small firewood explosion. Combining BGM and /or sound effects may be interesting. -
Mist generation
As I used analogue circuit to generate mist, so high power was necessary and generated heat at the transistor. I would like to try digital circuit using MOSFET that Niel recommended next time.
Files
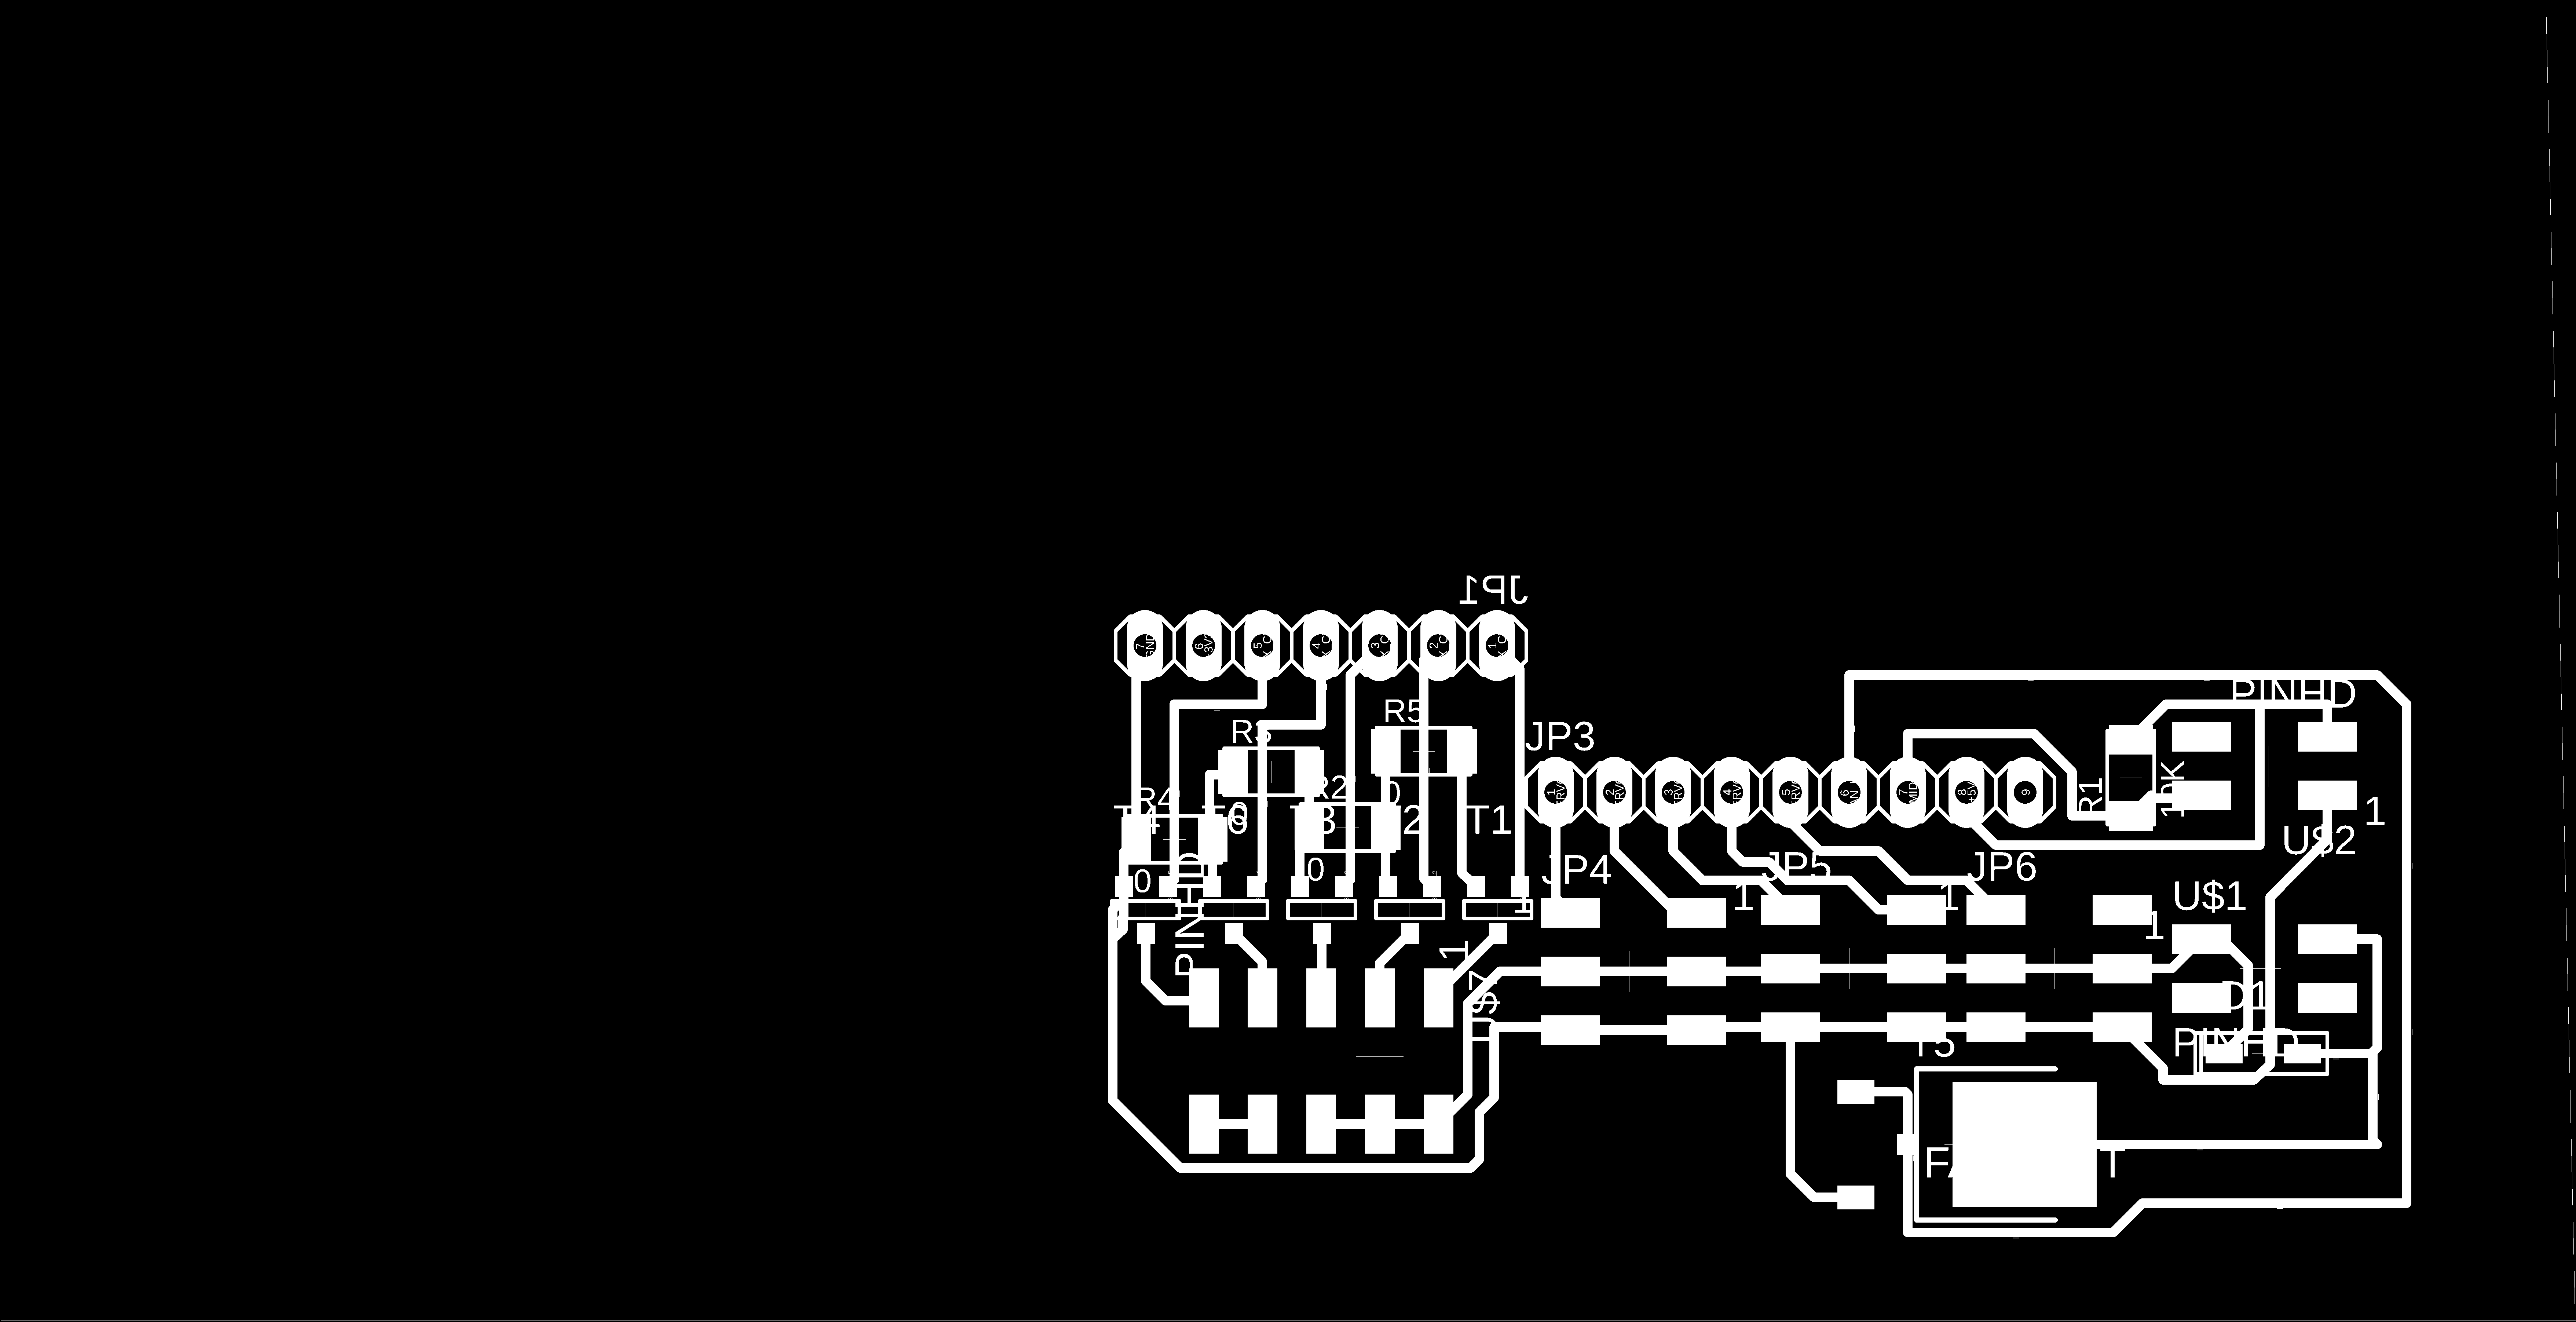
Light Sensor Board
- Board1: png
- Board1 outline: png
- Board1: Eagle sch
- Board2 outline: png
- Board2: Eagle sch
- Board1: make
- Board2: C code
- Board2: make
Connection board
Mist board
Application
Enclosure
- Table: Fusion file
- Table: dxf file
- Table: step file
- Mist Box: Illustrator
- Mist Box Joint: Illustrator
References
concept
Mist generation
Application
- Fire animation >> Generative animation using Perlin noise
- Fire animation>> Color pallet
- Generative Art
Enclosure
Deferred idea and functions
First idea
There were two final project idea as of week#1. One was a laser cutter machine for food and another was a Mist generator. I focused the laser cutter machine first, because I would like to know the mechanical design and control of this kind of machine. After that I realized that there was an opportunity to create a machine as group assignment. So I prioritized the second idea, mist generator, as my final project.
Characterize the system
The meaning of “characterizing the system” is:
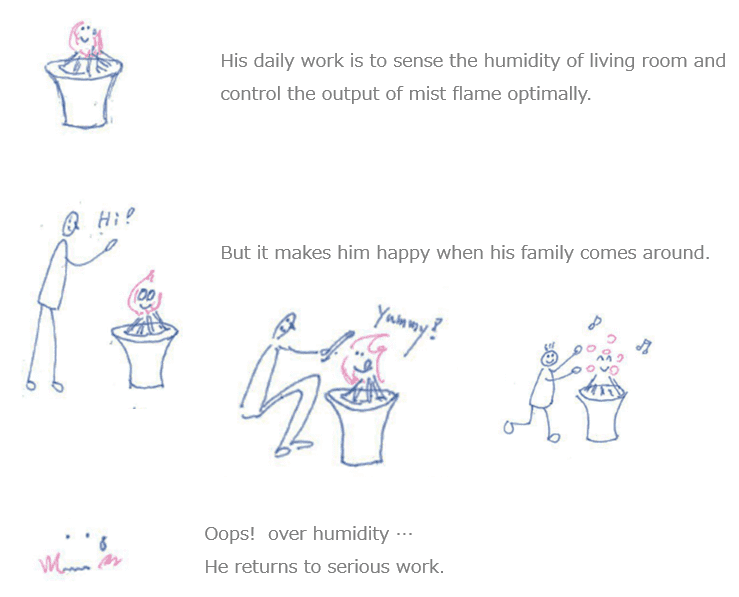
I was in charge of developing video recorder products before. This kind of home appliance has a mission and it needs to work exactly at any time.
For example, the mission of irobot roomba is to clean room.
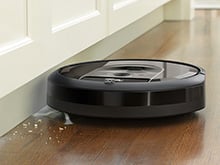
But he (Roomba) looks happy when he is taking care of the cat.
So I characterize the fire place as strict hard worker but sometimes let himself go, humanly.
Unity application
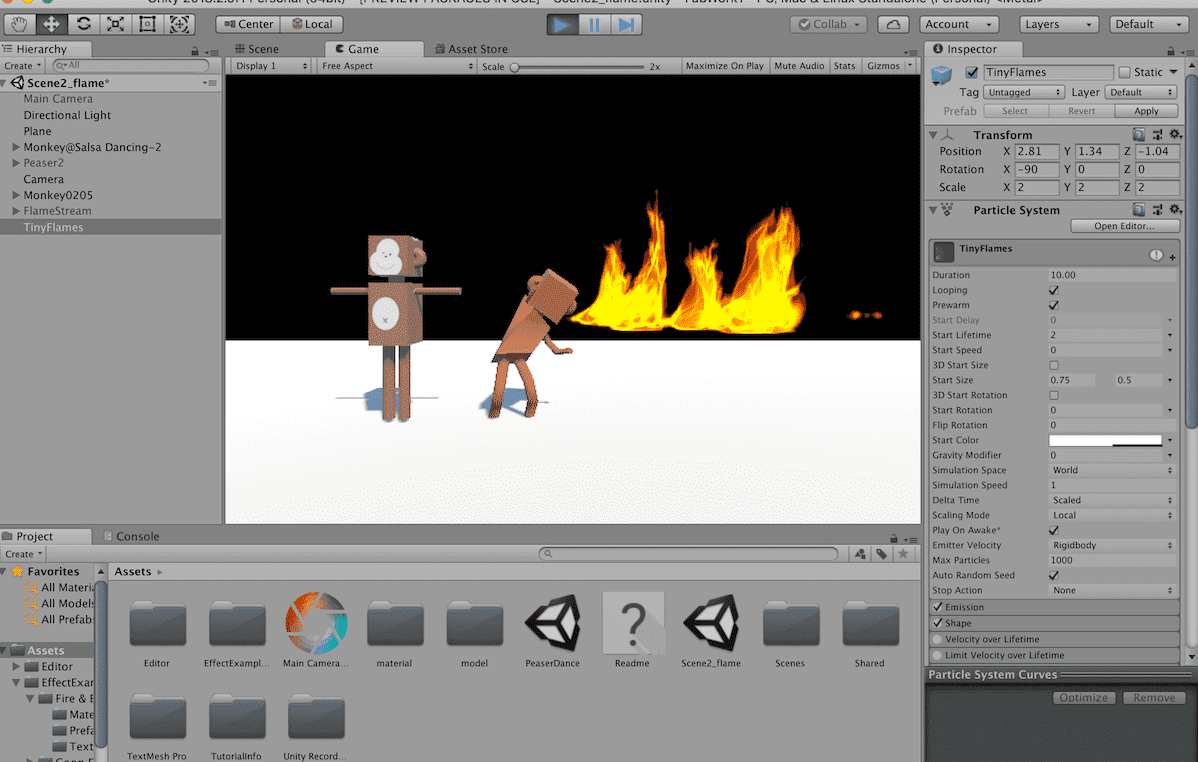
I added particle asset to the scene I created at week#3, and got a feeling of flame visualization. For the final system, I will use Raspberry pi, so it will be difficult to run the Unity application properly. So I will develop simple flame animation using Processing or Python.
- First trial: TinyFlames @ Unity Particle pack
Humidity sensing
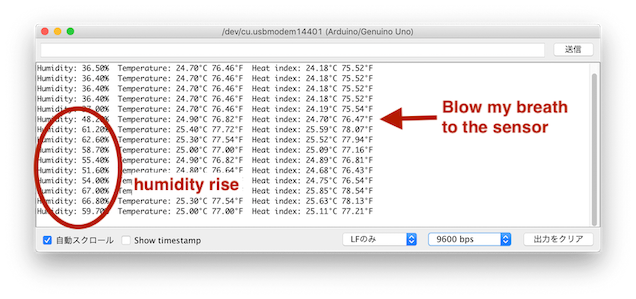
The DHT22 will be used to sense the humidity level of the room regularly. Then the output of mist will be changed using feedback control method.
I tested the basic function of DHT22 using Arduino IDE. Following libraries were installed and data line was pull upped with 10kΩ resistor.
- DHT sensor library by Adafruit
- Adafruit Unified Sensor library by Adafruit
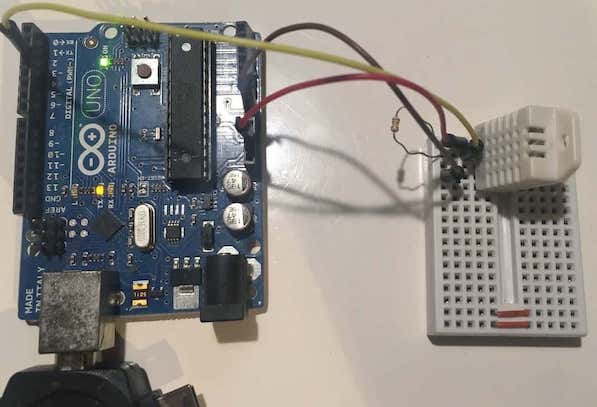
Humidity and temperature were displayed in the serial monitor of Arduino IDE. I tested the change of the humidity with my breath.
I tried a circuit using ATtiny44 to control DHT22, however the DHT22 library was too big to install. So I also tried compact TinyDHT library, but not worked. I decided to deffer the function to future trial.
Special Thanks
Special thanks to instructors of Fablab Kamakura and kamakura classmates about kind and dedicated support and inspired works. I learned Fab skills and mindset in a great environment!