Week02. Project management
In this week, I will learn to manage projects using Git and create websites using a text editor.
I did the work in Windows
1 Preparation for Week2
Install Git for the project.
Also install TortoiseGit to check with GUI.
Install Visual Studio Code for text editing.
1-1 Install applications
Installation will be done according to the directions of the official website.
- for version controls
- Git
- Git Bash
- Installed With Git
- Tortoise Git
- Tortoise Git For your lauguage
- Install Tortoise Git LanguagePack
- looking for bottom
- Install Tortoise Git LanguagePack
- for editing document
- Visual Studio Code
- Install Visual Studio Code
2 Setup
Set SSH key to use Git.
Then use GitBash to clone the repository.
2-1 Generate SSH key
- Start a Command Prompt
- Run SSHkey generator.
- Enter the following command
ssh-keygen
- Enter the following command
- Setting SSH key
- Fill in the following question
Enter file in which to save the key (C:\Users\%UserName%/.ssh/id_rsa):
    Enter passphrase (empty for no passphrase):
    Enter same passphrase again:
- Fill in the following question
- Copy contents of public key to clipboard
- Enter the following command
- folder path that saved the key
clip < C:\Users\%UserName%/.ssh/id_rsa.pub
- folder path that saved the key
- Enter the following command
2-2 Set SSH key with GitLab
- Start a any Web Browser
- Move to GitLab’s SSH key setting screen
- Paste your public SSH key…
- In the (2-1 step 4) you copy the key
- Enter Title
- A meaningful name
- Click [Add Key] Button
2-3 Cloning git Repository
- Start a Git Bash
- Check current folder
- Enter the following command
- There is current folder
pwd
- There is current folder
- Enter the following command
- Move to an arbitrary folder
- Enter the following command
cd %Path%
- Enter the following command
- Cloning Own FabAcademy Repository
- Enter the following command
- If you do not know, find your own project from here
git clone git@gitlab.fabcloud.org:academany/fabacademy/2019/labs/[Your Class Name] /students/[Your Name].git
- If you do not know, find your own project from here
- Enter the following command
- Check Created Clone Repository
- Enter the following command
ls
- Enter the following command
2-4 Edit Documents
- Start a Visual Studio Code
- Open Project Folder
- Press [Ctrl + K] → [Ctrl + O]
- Select Project Folder
- The folder cloned in the (2-3 step 4)
- Open the file to want Edit
- Open Week01.md
- Preview Markdown File
- Press [Ctrl + K] → [V]
- Editing......
- Do not forget to save
2-5 Push to Repository
- Start a Git Bash
- If you did not close what you opened in (2-3 step 1) still use it
- Move to Cloned Repository Folder
- You know there
- Add Change Files to Stage
- Enter the following command
git add .
- Enter the following command
- Commit Change Files to Local Repository
- Enter the following command
git commit -m "Commit change"
- Enter the following command
- Push Change Files to Remote Repository
- Enter the following command
git push
- Enter the following command
- Show project Folder in exproler
- Start TortoiseGit
- Click right mouse button
- looking for tortoise Git
- Show log
- can see the chenge log
3 Make My Web Site
I will use the configuration prepared in advance as it is.
3-1 Change Theme
- Edit mkdocs.yml
- Change the following settings
theme:
    name: readthedocs
    palette:
        primary: "Teal"
        accent: "Red"
    font:
        false
    feature:
        tabs: true
- Change the following settings
4 Git practice only local
Practice locally to use Git quickly.
And, as much as possible CUI only.
4-1 Create Remote Repository
- Start Git Bash
- Call ‘RemoteWindow’
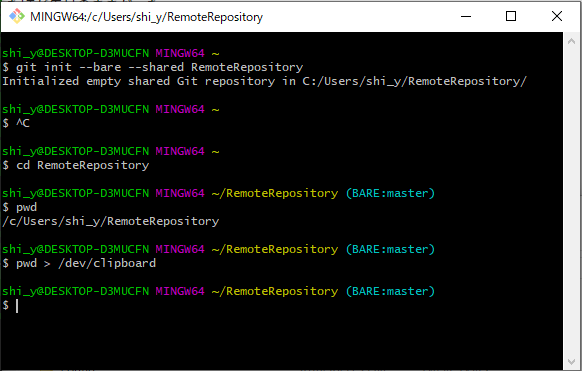
- Initialize Remote Repository
- Enter the following command
git init --bare --shared RemoteRepository
- Enter the following command
- Change Directory
- Enter the following command
cd RemoteRepository
- Enter the following command
- Check current directory
- Enter the following command
pwd
- Enter the following command
- Copy current directory path
- Enter the following command
pwd > /dev/clipboard
- Enter the following command
Like this
4-2 Create Local Repository1
- Start Git Bash
- Start separately from the one started in (4-1 step 1)
- Call ‘LocalWindow’
- Cloning Remote Repository
- Enter the following command. Replace contents of []
git clone [Paste the copy in step 5] LocalRepository1
- Enter the following command. Replace contents of []
- Change directory
- Enter the following command
cd LocalRepository1
- Enter the following command
- Change username
- Enter the following command
git config --local user.name 'localuser1'
- Enter the following command
Like this

4-3 Create Local Repository2
- Repeat 4-2
- Name of LocalRepository is LocalRepository2
- Opened GitBash Call ‘LocalWindow2’
- username is ‘localuser2’
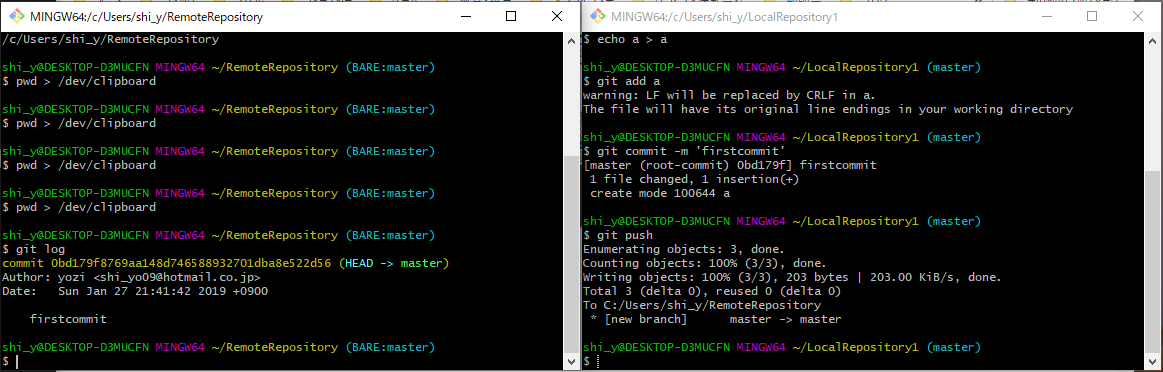
4-4 Add Contents
- First commit in LocalRepository1
- Enter the following command in ‘LocalWindow’
echo a > a
    git add a
    git commit -m 'firstcommit'
- Enter the following command in ‘LocalWindow’
- Push to RemoteRepository
- Enter the following command
git push - If you receive an error, use this command
git push -u origin master
- Enter the following command
- Check RemoteRepository
- Enter the following command in ‘RemoteWindow’
git log
- Enter the following command in ‘RemoteWindow’
Like this
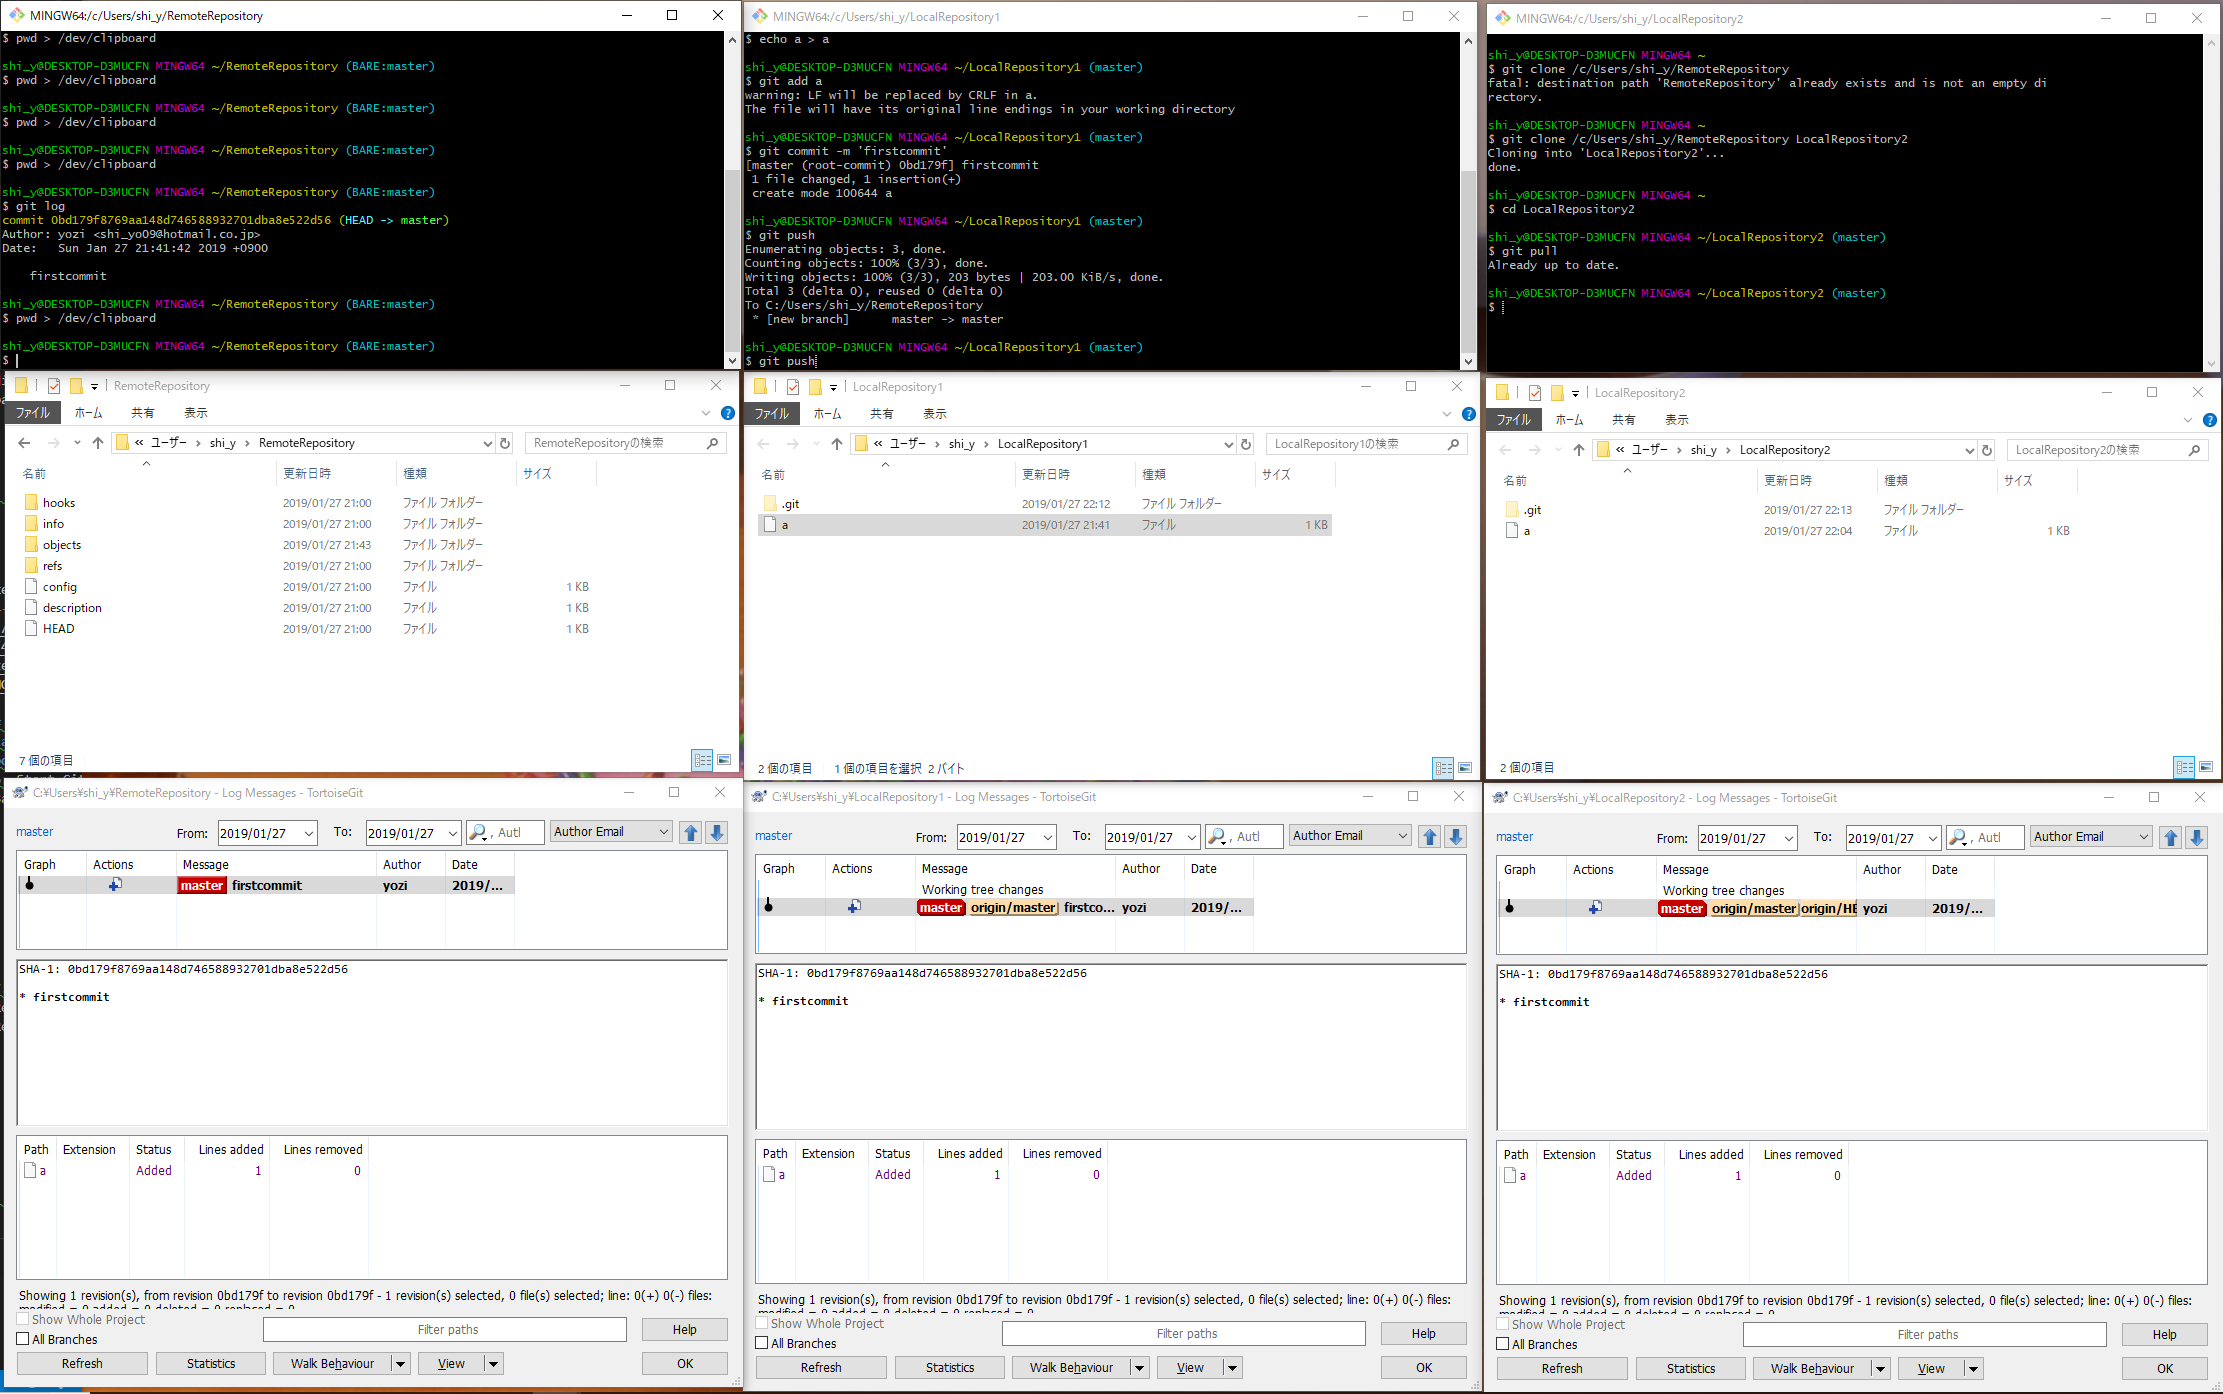
4-5 Pull Contents
- Pull change in RemoteRepository
- Enter the following command in ‘LocalWindow2’
git pull
- Enter the following command in ‘LocalWindow2’
4-6 Check on GUI
- Show in explorer
- Show log in TortoiseGit
- Line up
Like this
4-7 Try tutorial and various things
4-8 Finish
Delete All files