Week14. Networking and communications
I will learn about circuit-to-circuit communication this week.
I communicate using I2C.
Group Assignment
The content of our group assignment is here.
Week14 Group Assignment
Impressions
I thought that a mistake would occur in the same way as human communication.
Networking Device
Create a circuit with I2C pins available.
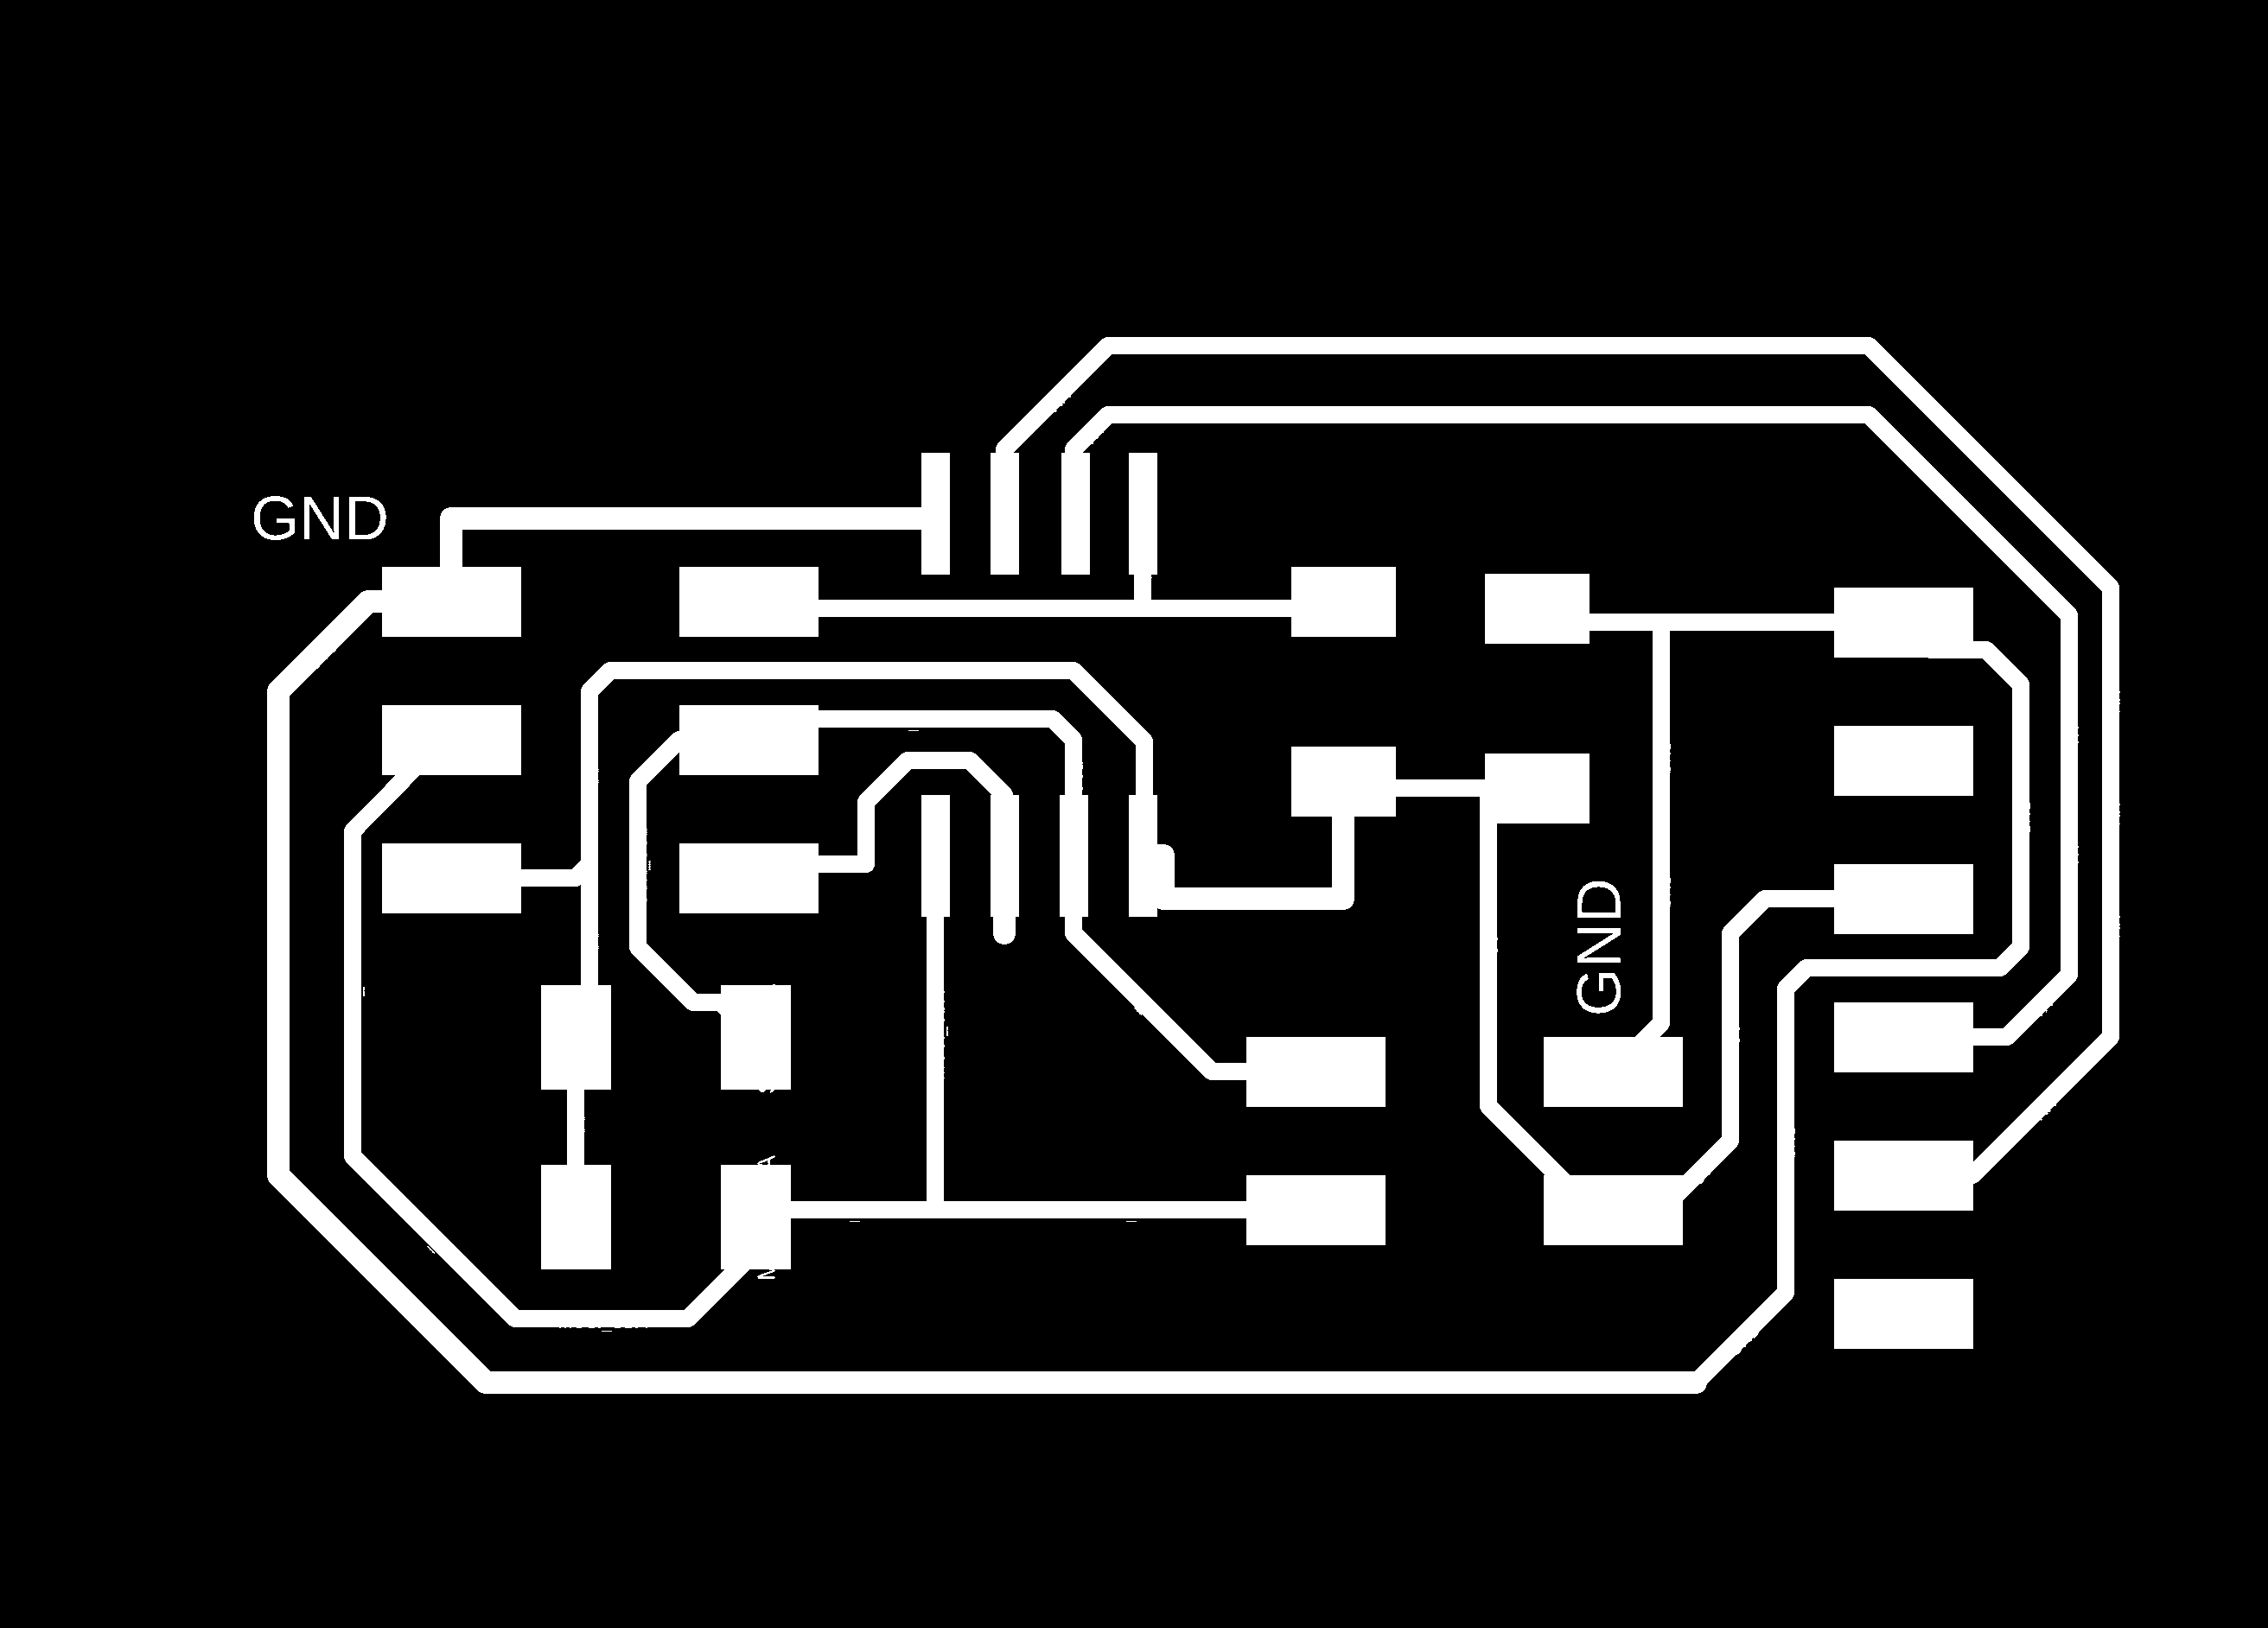
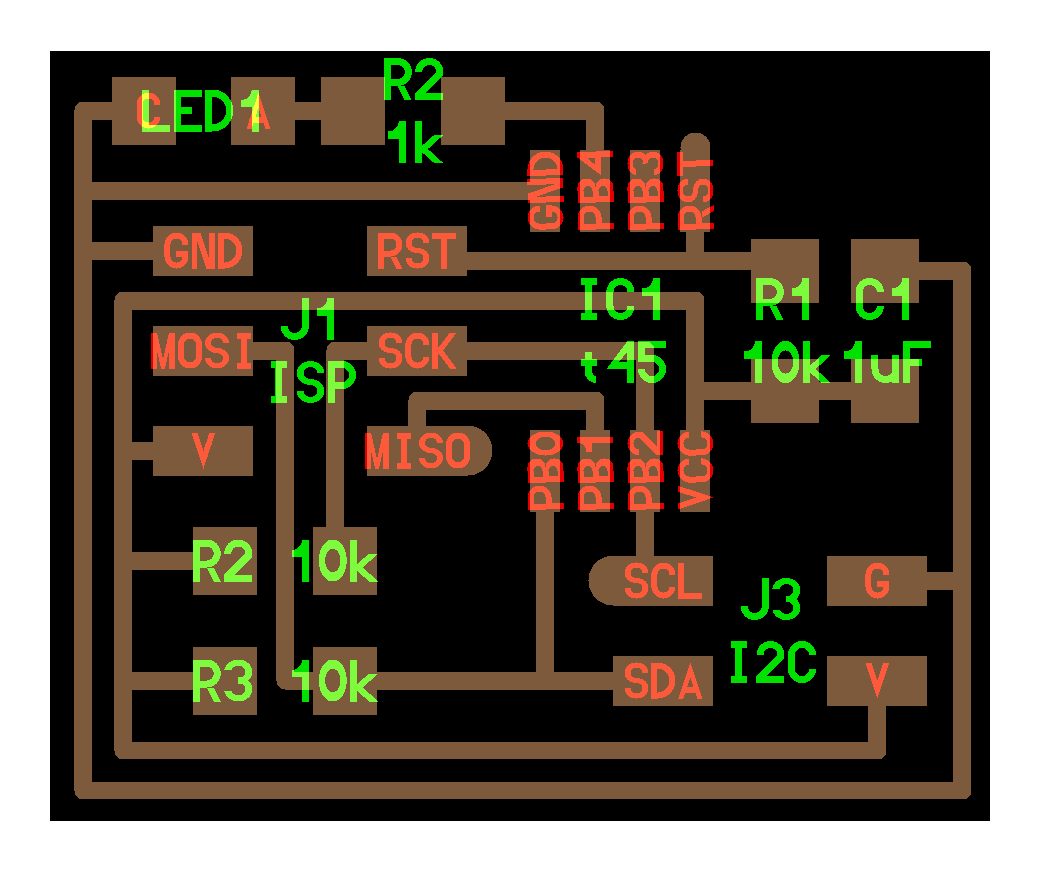
Design
I used the Eagle to design the schematic and circuit board.
The design was done referring to hello.I2C.45.
- HelloI2CBridge
-
Bridge
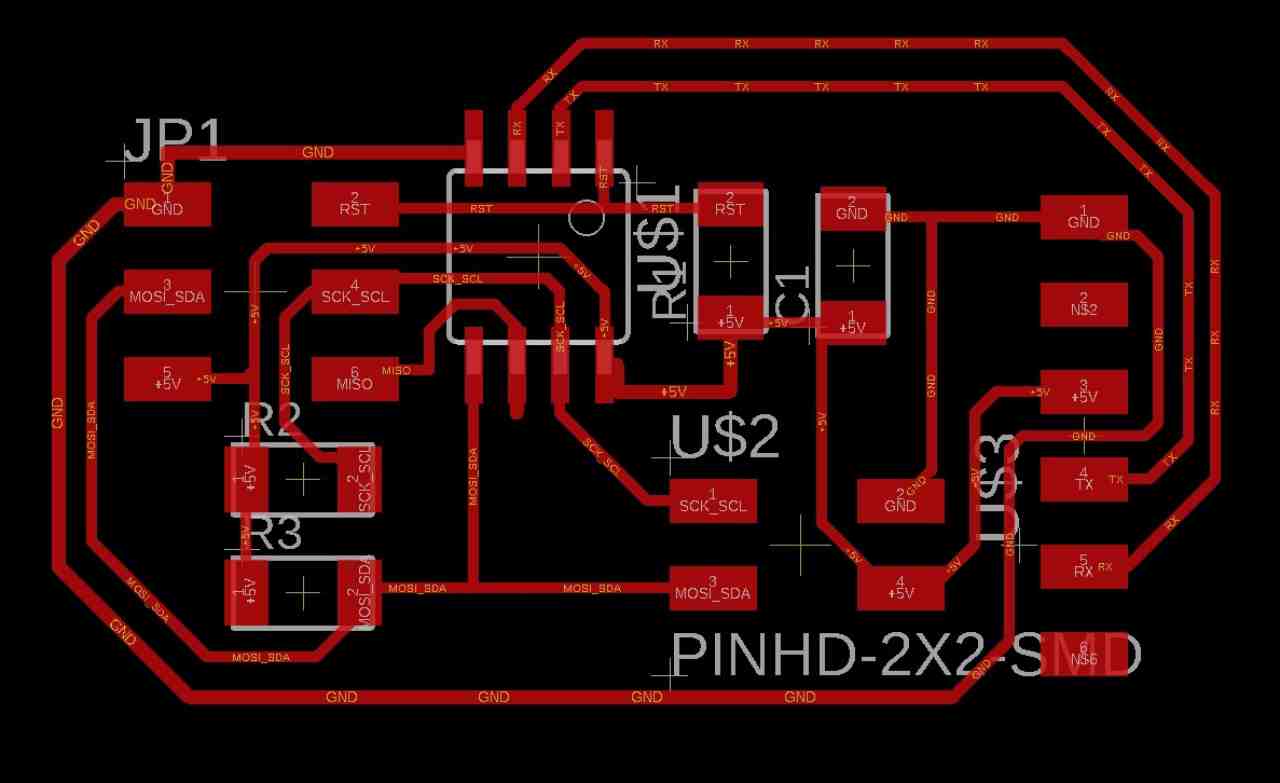
- Scematic
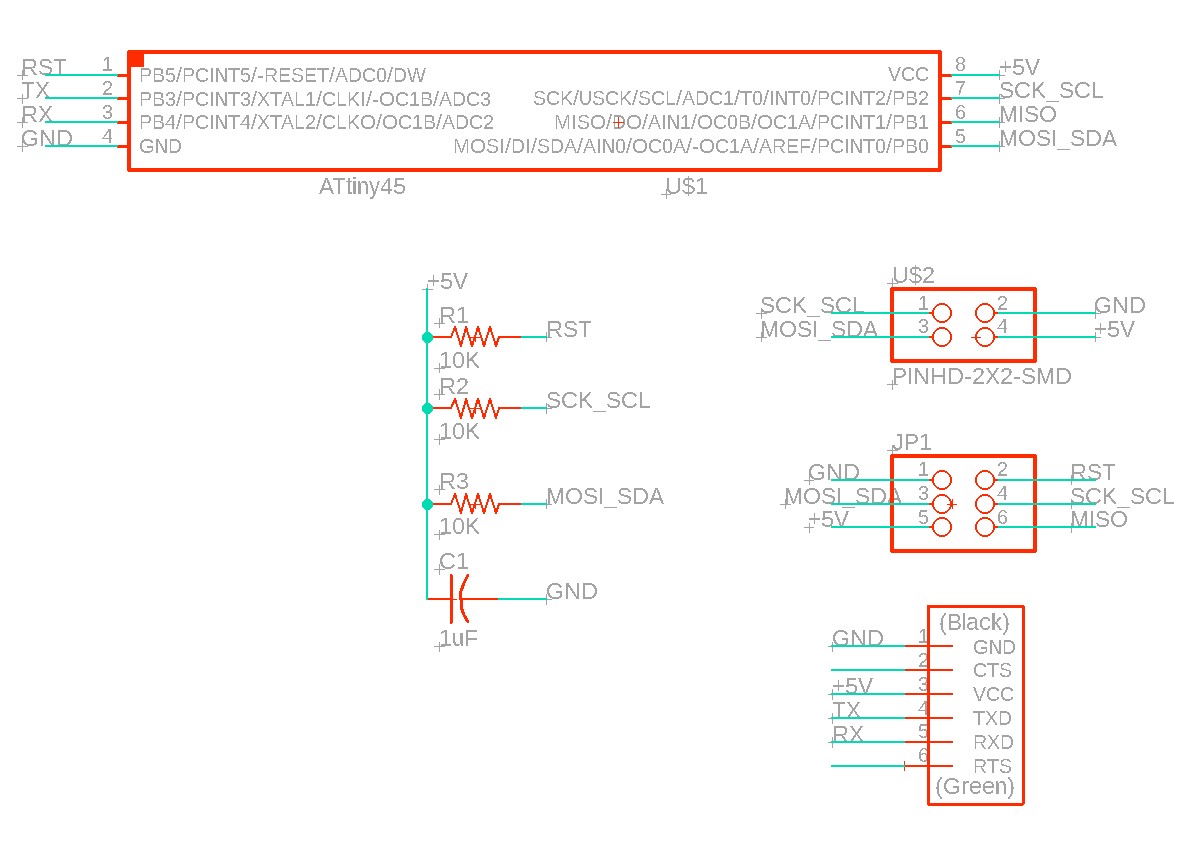
- Board
-
Node
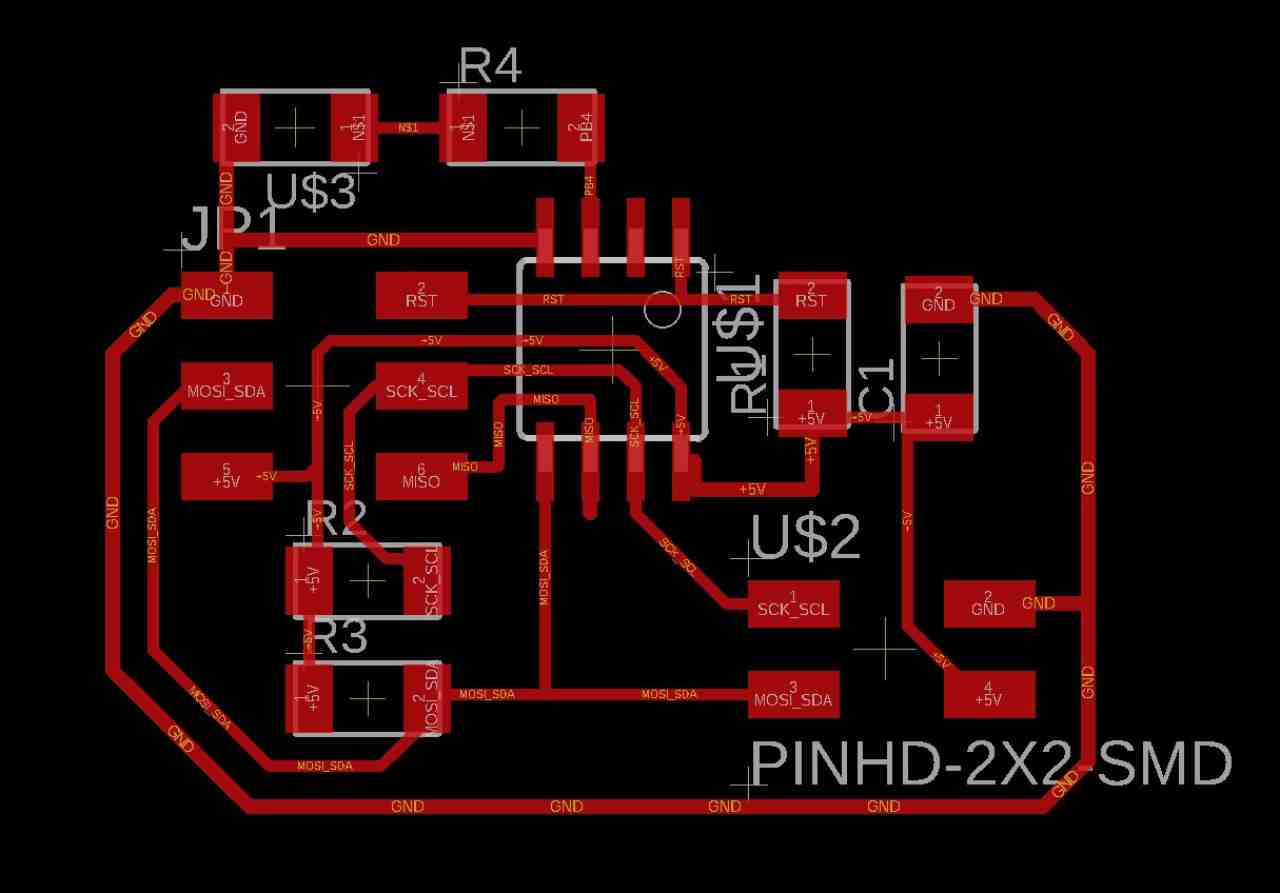
- Scematic
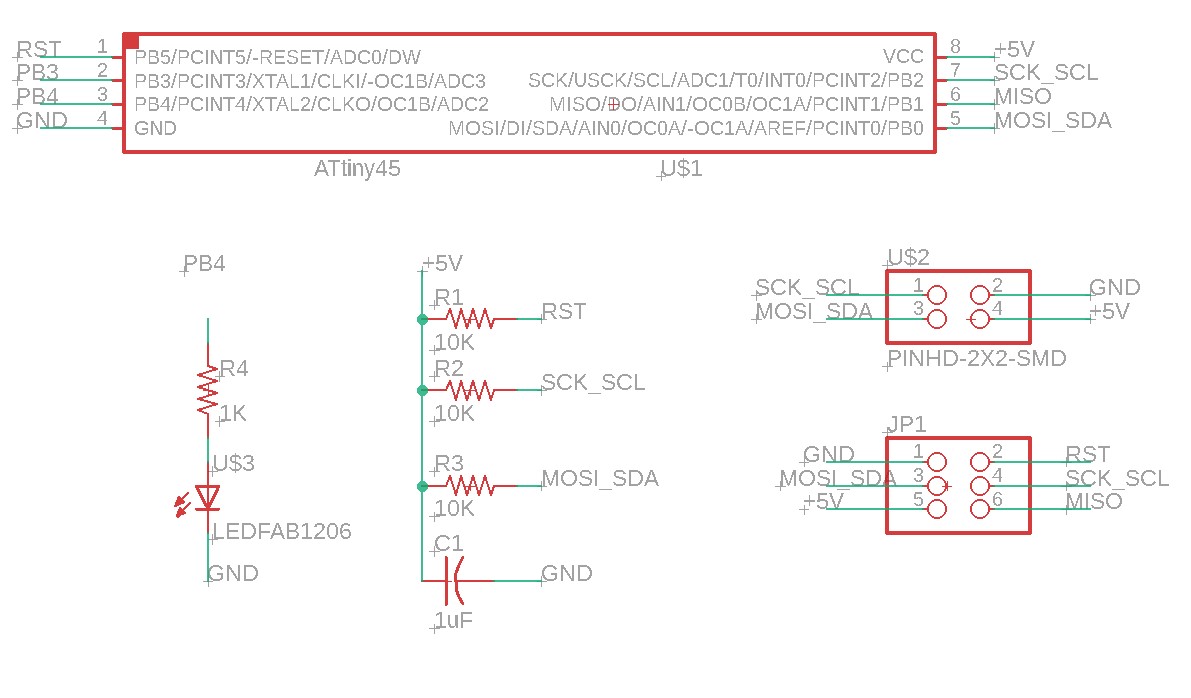
- Board
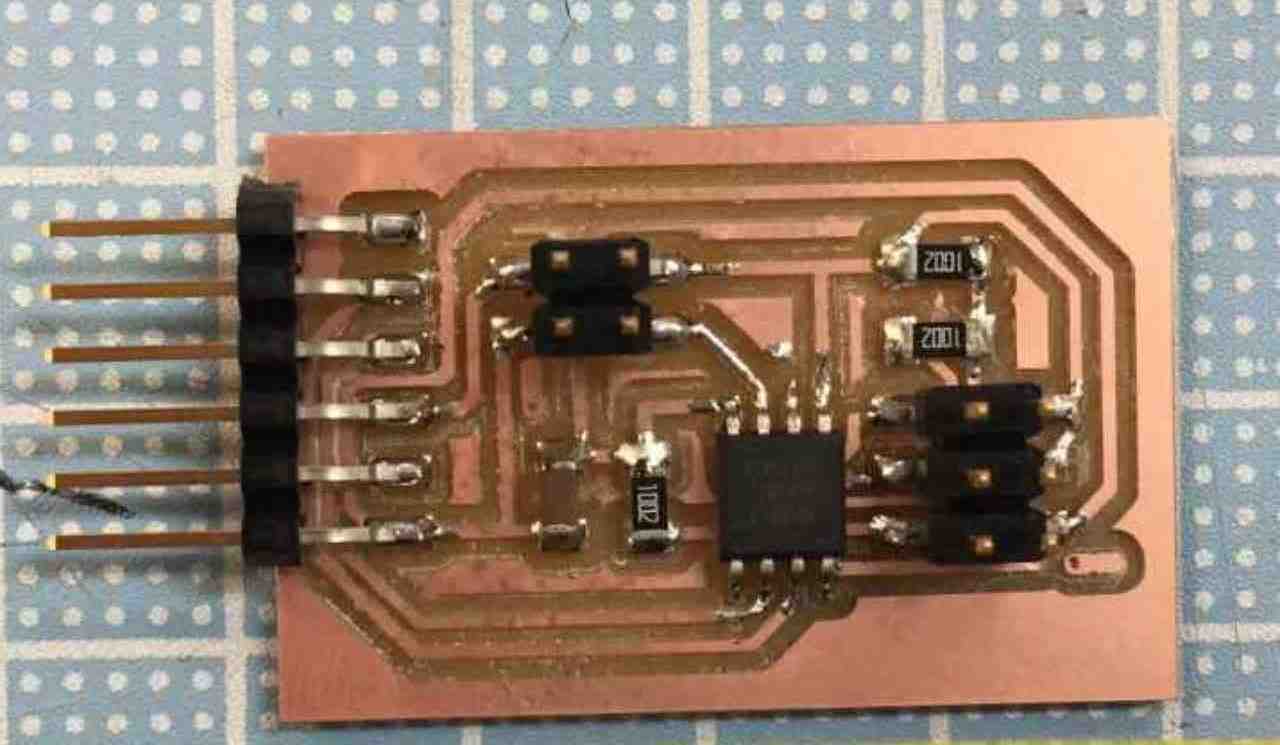
Cut out
I created one Bridge and twe Nodes.
-
Bridge
- Circuit
- Round

- Cutout & Soldering
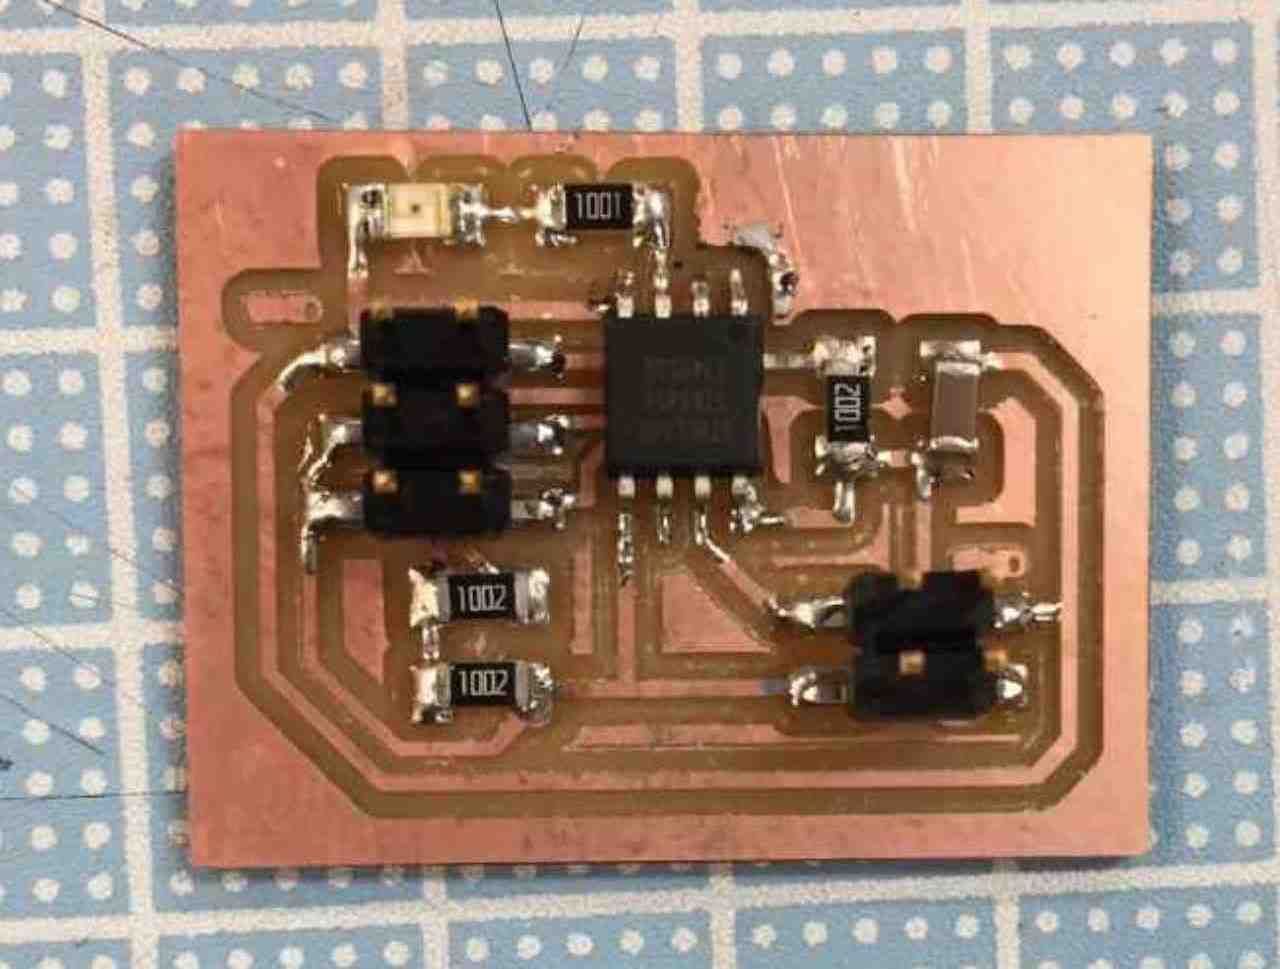
-
Node
- Circuit

- Round

- Cutout & Soldering
When I cut old version board, I cut it with my hand because no path was generated in the following part.
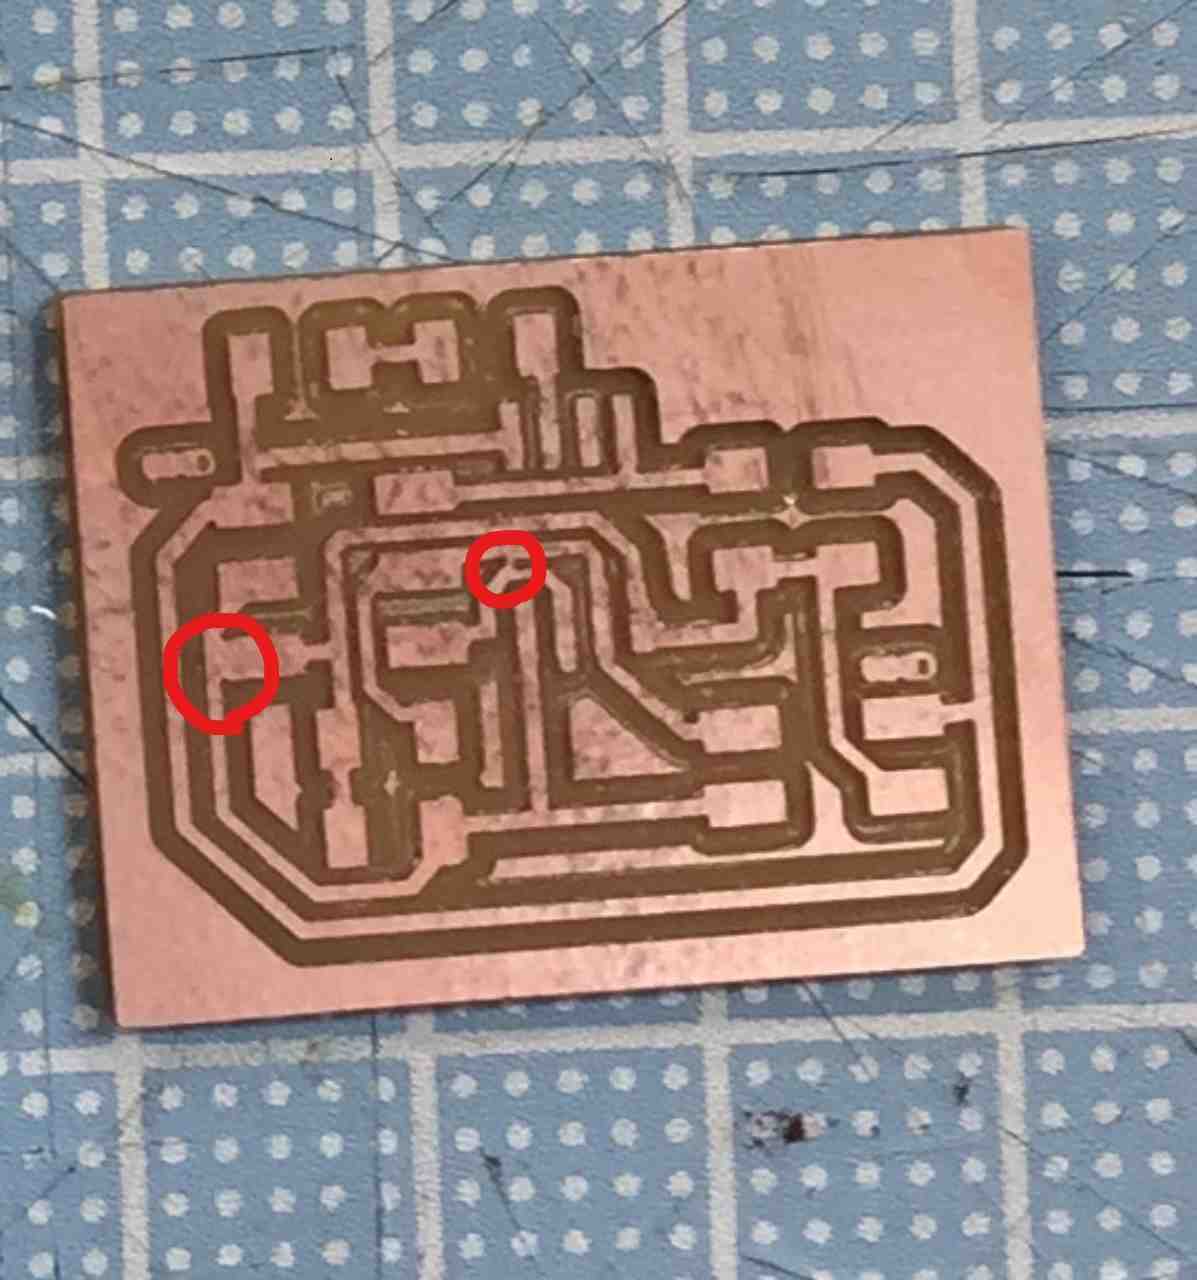
Programming
I created a program using Arduino.
Attiny45 can not use Serial and I2C(Wire) standard library. I have imported the following library.
Arduino
The following program was created by Arduino and written.
Attiny45 can not use serial communication and I2C standard library.
So I imported the following library.
- [SoftwareSerial]
- Included with Arduino.
- TinyWireM
- TinyWireS
- TinyWire
- Importing TinyWire and SoftwareSerial together will run out of memory and not compile.
I tried three ways.
1. ArduinoUno (master) → HelloI2CBridge (Slave)
2. HelloI2CBridge (master) → Arduino Uno (Slave)
3. HelloI2CNode (master) → HelloI2CBridge (Slave)
1. ArduinoUno (master) → HelloI2CBridge (Slave)
It confirmed that the created Bridge can function as a Slave.
Code of ArduinoUno (master)
#include <Wire.h>

void setup() {
  Wire.begin(); // join i2c bus (address optional for master)
}

byte x = 0;

void loop() {
  Wire.beginTransmission(0x26);       // transmit to device #38
  Wire.write(x);                      // sends one byte
  Wire.endTransmission();             // stop transmitting
  x++;
  delay(500);
}
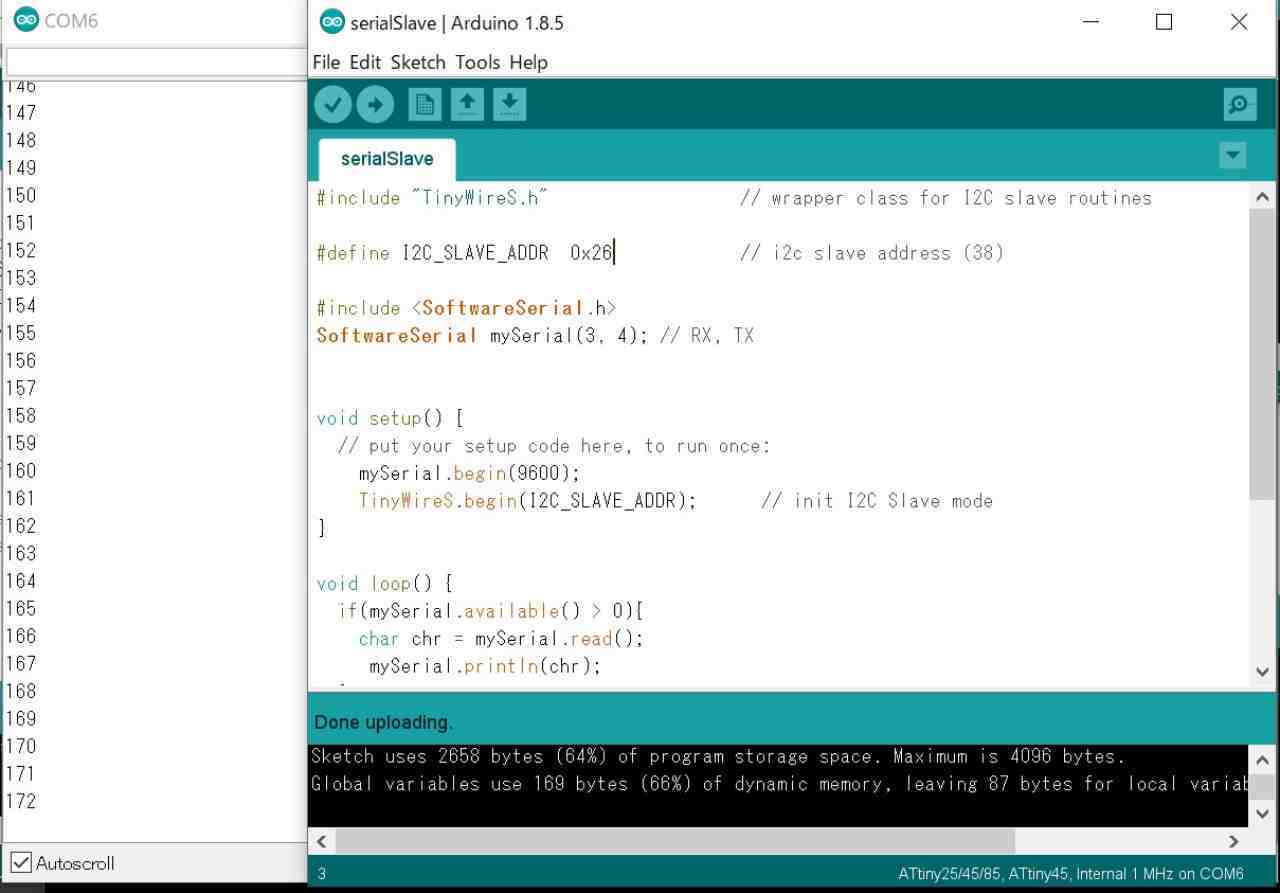
Code of HelloI2CBridge (Slave)
#include "TinyWireS.h"                // wrapper class for I2C slave routines

#define I2C_SLAVE_ADDR  0x26          // i2c slave address (38)

#include <SoftwareSerial.h>
SoftwareSerial mySerial(3, 4); // RX, TX


void setup() {
  // put your setup code here, to run once:
    mySerial.begin(9600);
    TinyWireS.begin(I2C_SLAVE_ADDR);  // init I2C Slave mode
}

void loop() {
  if(mySerial.available() > 0){
    char chr = mySerial.read();
     mySerial.println(chr);
  }
  delay(100);
  while (1 < TinyWireS.available()) { // loop through all but the last
    char c = TinyWireS.receive();     // receive byte as a character
    mySerial.print(c);                // print the character
  }
  int x = TinyWireS.receive();        // receive byte as an integer
  mySerial.println(x);                // print the integer
}
Result ArduinoUno (master) → HelloI2CBridge (Slave)
2. HelloI2CBridge (master) → Arduino Uno (Slave)
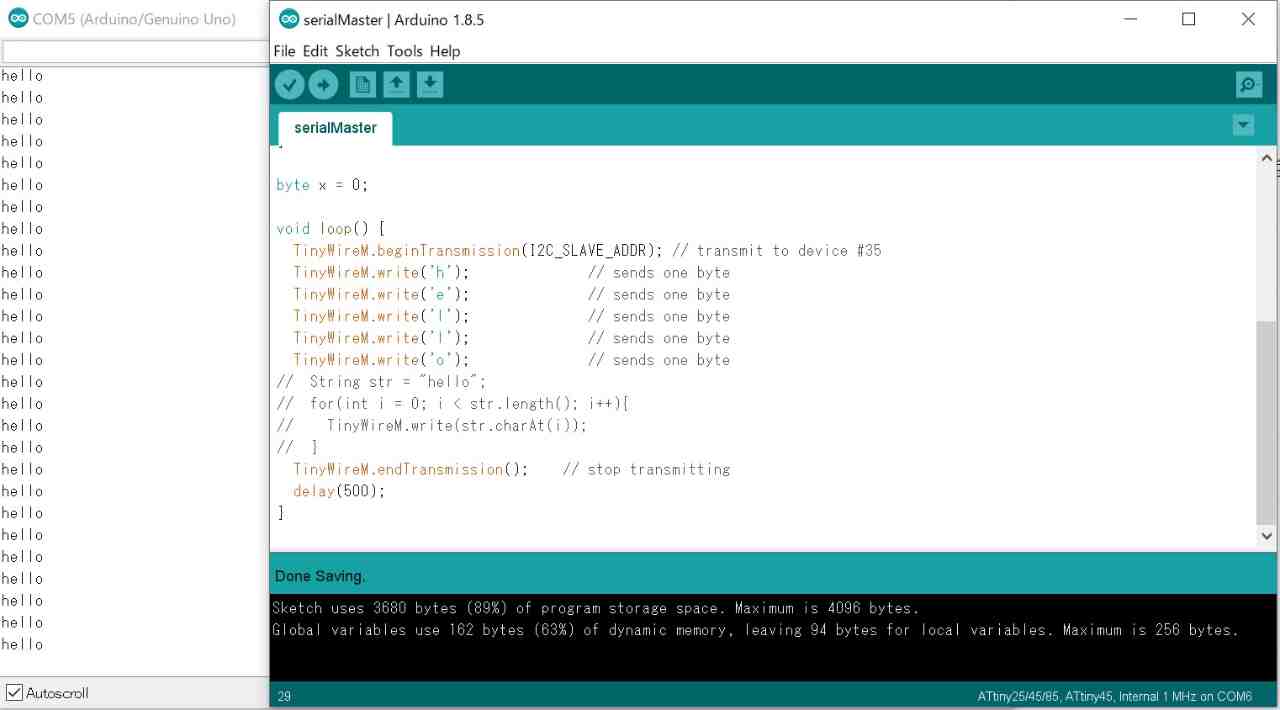
It confirmed that the created Bridge can function as a Master.
Code of HelloI2CBridge (master)
#include "TinyWireM.h"                  // wrapper class for I2C slave routines

#define I2C_SLAVE_ADDR  0x25            // i2c slave address (37)
#define LED1_PIN 4

void setup() {
    mySerial.begin(9600);
    TinyWireM.begin();      // init I2C Master mode
    pinMode(LED1_PIN,OUTPUT);
}

void loop() {
  TinyWireM.beginTransmission(I2C_SLAVE_ADDR); // transmit to device #37
  TinyWireM.write('h');              // sends one byte
  TinyWireM.write('e');              // sends one byte
  TinyWireM.write('l');              // sends one byte
  TinyWireM.write('l');              // sends one byte
  TinyWireM.write('o');              // sends one byte

//The following code should write "hello" one by one like the above code but it does not work
//  String str = "hello";
//  for(int i = 0; i < str.length(); i++){
//    TinyWireM.write(str.charAt(i));
//  }

  TinyWireM.endTransmission();    // stop transmitting
  delay(500);
}
Code of Arduino Uno (Slave)
#include <Wire.h>

void setup() {
  Wire.begin(0x25);                // join i2c bus with address #37
  Wire.onReceive(receiveEvent); // register event
  Serial.begin(9600);           // start serial for output
}

void loop() {
  delay(100);
}

void receiveEvent(int howMany) {
  while (1 < Wire.available()) { // loop through all but the last
    char c = Wire.read(); // receive byte as a character
    Serial.print(c);         // print the character
  }
  char x = Wire.read();    // receive byte as an char
  Serial.println(x);         // print the char
}
Result HelloI2CBridge (master) → Arduino Uno (Slave)
3. HelloI2CNode (master) → HelloI2CBridge (Slave)
It confirm that the created Bridge and Node can communicate by I2C.
Node is doing Master because Bridge has a pin for serial communication.
It is easier to understand if the received signal is displayed by serial communication.
Code of HelloI2CNode (master)
#include "TinyWireM.h"                  // wrapper class for I2C slave routines

#define I2C_SLAVE_ADDR  0x26            // i2c slave address (38)
#define LED1_PIN 4

void setup() {
    mySerial.begin(9600);
    TinyWireM.begin();      // init I2C Master mode
    pinMode(LED1_PIN,OUTPUT);
}

void loop() {
  TinyWireM.beginTransmission(I2C_SLAVE_ADDR); // transmit to device #38
  TinyWireM.write('h');              // sends one byte
  TinyWireM.write('e');              // sends one byte
  TinyWireM.write('l');              // sends one byte
  TinyWireM.write('l');              // sends one byte
  TinyWireM.write('o');              // sends one byte

  // The following process should work the same as above, but it did not work
  //  String str = "hello";
  //  for(int i = 0; i < str.length()+1; i++){
  //    TinyWireM.write(str.charAt(i));
  //  }

  TinyWireM.endTransmission();    // stop transmitting
  delay(500);
}
Code of HelloI2CBridge (Slave)
#include "TinyWireS.h"                // wrapper class for I2C slave routines

#define I2C_SLAVE_ADDR  0x26          // i2c slave address (38)

#include <SoftwareSerial.h>
SoftwareSerial mySerial(3, 4); // RX, TX

void setup() {
  // put your setup code here, to run once:
    mySerial.begin(9600);
    TinyWireS.begin(I2C_SLAVE_ADDR);  // init I2C Slave mode
}

void loop() {
  delay(100);
  while (1 < TinyWireS.available()) { // loop through all but the last
    char c = TinyWireS.receive();     // receive byte as a character
    mySerial.print(c);                // print the character
  }
  int x = TinyWireS.receive();        // receive byte as an integer
  mySerial.println(x);                // print the integer
}
Result HelloI2CNode (master) → HelloI2CBridge (Slave)
Nothing happened......
3-2. HelloI2CBridge (master) → HelloI2CNode (Slave1 & 2)
Using AttinyCore’s board manager, I was able to include Wire.h.
Try again using Wire.h
Code of HelloI2CBridge (master)
#include <Wire.h>
#include <SoftwareSerial.h>

#define SLAVE_1 1
#define SLAVE_2 5

SoftwareSerial mySerial(3, 4); // RX, TX

void setup() {
  Wire.begin(); // join i2c bus (address optional for master)
  mySerial.begin(9600);
  mySerial.println("start");
}

byte x = 0;

void loop() {
  Wire.beginTransmission(SLAVE_1); // transmit to address
  Wire.write(x);              // sends one byte
  Wire.endTransmission();    // stop transmitting
  delay(1000);
  Wire.beginTransmission(SLAVE_2); // transmit to address
  Wire.write(x);              // sends one byte
  Wire.endTransmission();    // stop transmitting
  delay(1000);
  x = (x == 0) ? 1 : 0;
}
Code of HelloI2CNode (Slave1)
#include <Wire.h>

#define SLAVE_ADDR  1           // i2c slave address (1)
#define LED_PIN 4

void setup() {
  // put your setup code here, to run once:
  pinMode(LED_PIN,OUTPUT);
  Wire.begin(SLAVE_ADDR);      // init I2C Slave mode
  Wire.onReceive(receiveEvent); // register event
}

void loop() {
  delay(100);
}
volatile byte msg = 0;
void receiveEvent(int howMany){
  while (0 < Wire.available()) {
    msg = Wire.read();
    if (msg == 1){
      digitalWrite(LED_PIN, HIGH);
    }else if (msg == 0){
      digitalWrite(LED_PIN, LOW);
    }else{
      msg = 0;
    }
  }
}
Code of HelloI2CNode (Slave2)
#include <Wire.h>

#define SLAVE_ADDR 5           // i2c slave address (5)
#define LED_PIN 4

void setup() {
  // put your setup code here, to run once:
  pinMode(LED_PIN,OUTPUT);
  Wire.begin(SLAVE_ADDR);      // init I2C Slave mode
  Wire.onReceive(receiveEvent); // register event
}

void loop() {
  delay(100);
}
volatile byte msg = 0;
void receiveEvent(int howMany){
  while (0 < Wire.available()) {
    msg = Wire.read();
    if (msg == 0){
      digitalWrite(LED_PIN, HIGH);
    }else if (msg == 1){
      digitalWrite(LED_PIN, LOW);
    }else{
      msg = 0;
    }
  }
}
Result HelloI2CBridge (master) → HelloI2CNode (Slave1 & 2)
It’s different from what I thought. However, I think that I2C communication is possible.