17. Machine design
Following up on the mechanical design of our Digital Artist here is a sum up of the process of creating the full end-to-end “foto-to-painting” workflow for it so we could actually use the Dobru for live demostrations and expo’s.
Steps:
- First off we need to be able to control the motion by means of stepper control.
- Then we need some sort of user interface from where we control the whole workflow starting with uploading photos, vectorizing them and generating gecode from it.
- With our interface we want to set the startpoint for printing or homing Digital Artist machine and finally starting the print.
- Lastly we must convert standard G-code to HelloStepper syntax
Motor drivers & control
The motor drivers we implemented were based on the HelloStepper board design with the ISP headers installed on them. We tweaked the design to use Serial communication over the ISP header, so both steppers are tied to the same serial UART bus listening to the same messages coming over but each only responding to his own relevant (part of) messages.
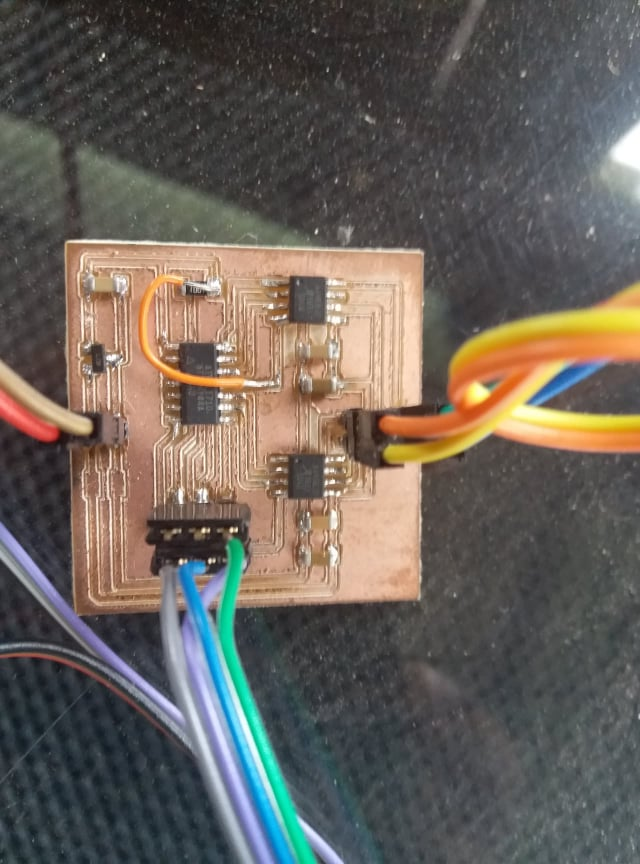
So the X-actuator listens independently to the same gcode coming over the line but only acts on the X command in the message if there is any.
The actuators only listen to serial strings of type X-10 or Y+3 compared to a full line of Gcode that looks like G1 X-10 Y3 F100 for instance. We made a quick hack on an existing Arduino gcode parser library we found to make it behave as we wanted by isolating the relevant relevant portion(s) and feeding the to the shared I/O. The servo will be directly controlled on G0 or G1,2,3 .. code.
Image manipulation & gcode generation
After many trials with Gimp and Inkscape on Raspberry Pi with macros the team could not produce results expected so i decided to go a completely different route. I will do the image handling fully automated within NodeJS and based around some existing libraries and ultimately hosting our solution integrally into CNCJS platform. I will also do some reconfig to make cncjs more focused towards our solution yet keeping the GRBL like Gcode capabilities available in the background.
Great starter article about Graphics processors in JS space
Steps:
- Use Jimp a library for image pre-processing & manipulation doing the image reading and pre-processing (alter contrast, brightness etc).
- Potrace.js for turning the pre-processed jpg or bmp image into a black and white drawing in SVG
- CNCJS as SVG to GCode converter / our own Dobru controller
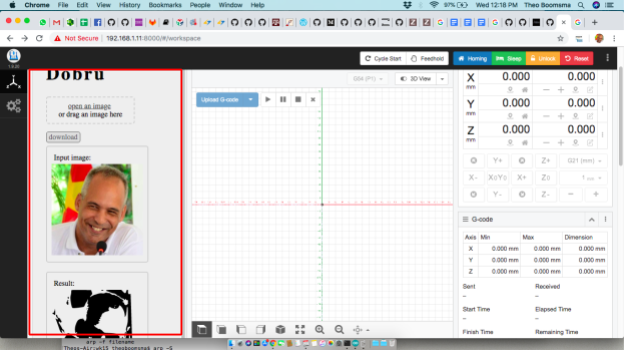
- UI for simplicity’s sake i will use the CNCJS as base for the control. Adding widgets for JIMP cpanel and the Potrace converter
3. CNCJS
Installing CNCJS on Raspberry Pi. Make sure you have NodeJS >version6. Since we installed NVM already this is a matter of a single command. We choose to go with version 8.11.1
$ nvm install 8.11.1
Install CNCJS as a global node library
$ npm install -g cncjs
Or
$ sudo npm install --unsafe-perm -g cncjs
Building the CNCJS widgets you could use the boilerplate code first
$ git clone [https://github.com/cncjs/cncjs-widget-boilerplate.git](https://github.com/cncjs/cncjs-widget-boilerplate.git)

$ cd cncjs-widget-boilerplate

$ npm install
Create a directory under src/widgets and put your code in there (our widget is called “Dobru”).
src/

   widgets/

      Dobru/index.js
Run a local development server for development,
$ npm run dev
Connect to http://localhost:5000 to review your widget.
Specify a mount path to test your widgets with CNCjs:
cncjs -vv --mount /widget:/path/to/cncjs-widget-boilerplate/dist
Run npm run prepublish to build production code. It will output index.html, fonts, images, and JavaScript files to the dist folder.
After that, you can copy all dist files to a directory (e.g. /home/widget), and specify a mount path for the static directory, as shown below:
$ mkdir -p ~/home/widget/dobru

$ cp -af /path/to/cncjs-widget-boilerplate/dist/* /home/widget/dobru
Add the widget files in that folder and start CNCJS with
$ cncjs --mount /widget:/home/widget/dobru --allow-remote-access --controller Grbl
Configure CNCjs
- Click Manage Widgets to add a custom widget **
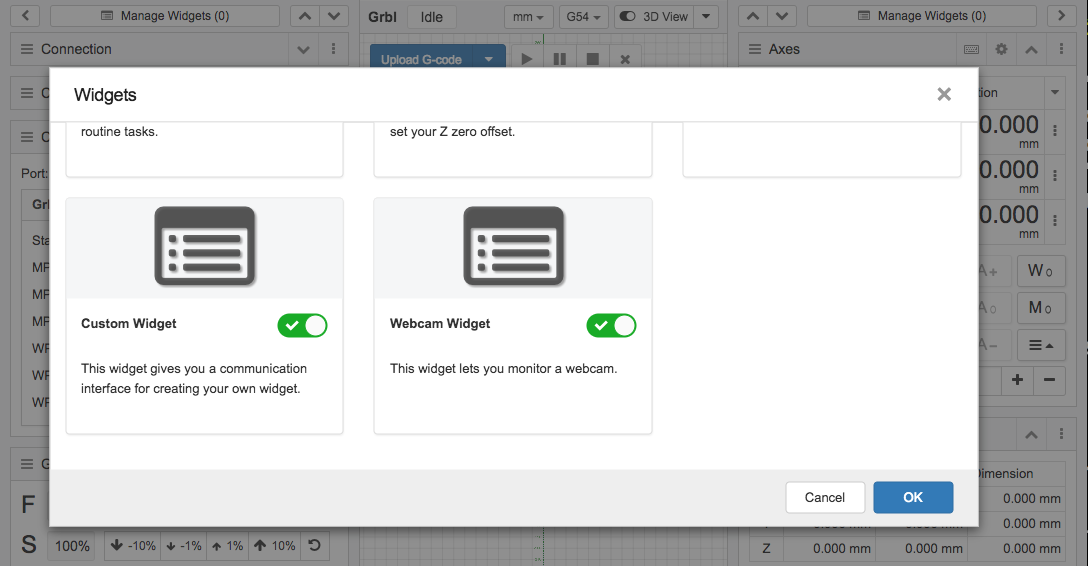
- Click the icon to configure widget settings**
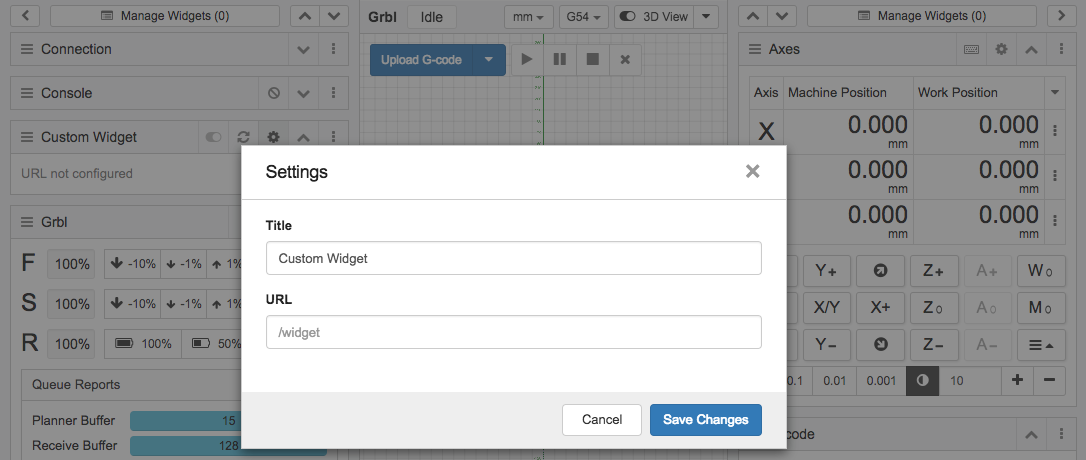
- After adding your screen should show the widget: **
Save the SVG automatically to the CNCJS drop-off folder (as defined in the CNCJS config)
So everything in the process flow will be file-based in a public Samba share (At the momement we dont care too much about the security thereof for now).
GCode orchestration
Next step would be going from the GCode generated to our stepper drivers.
Initially we built NC machine control around the GRBL controller that runs on any Arduino UNO or Mega. It is a complete CNC infrastructure and felt a bit to heavy for a simple 2-Axis + 1 servo drawing machine.
We set it up for testing and experimenting control of steppers in general using a few commercial drivers we had available in the lab.
Ultimately we decided to write/update a piece of existing code we found that reads Gcode into buffer and activates 2 steppers to draw.
The hack we had to create was to convert the incoming GCode commands to our rudimentary stepper language over serial.
This means relative stepping from the current start position (where tyhe pen is at the moment) with the syntax of type X=3 and Y=-5.
Of course we still need to solve the Pen engage servo control that could in this case be directly controlled from the orchestrator Arduino I/O. It means reading G0 or Gx (anything else) to pen/servo up/down command.
The base line source can be found here
Since both our motors are directly connected to the same serial port (discrimminating on input received) and the servo is directly connected to this board we can use the complete code as is and just have to add two commands for direct serial stepping of the attached motors
Problem is the current code uses the Serial port already for its own command interface so we will have to move to SoftwareSerial for stepper control instead.
#define swBAUD           (57600)  // Com speed of the stepper controllers
#define PEN_IO            (9)      // IO pin of the servo

#include <SoftwareSerial.h>

SoftwareSerial swSerial(10, 11); // RX, TX

void setup(){
    ...
   myServo.attach(PEN_IO);
}
Motors are directly spoken to over the newly created swSerial port
void m1step(int dir) {
    swSerial.println(dir>0?"x=1":"x=-1");
}

void m2step(int dir) {
    swSerial.println(dir>0?"y=1":"y=-1");
}
Adding the PEN servo we just add the servo library, attach it in the setup and create a simple pen up/down routine
#include <Servo.h>

Servo myServo;

// Pen up and pen down degrees of your servo (change acordingly)
Int pen_up = 0;
Int pen_down=45;

void setup(){
  ....
  myServo.attach(9);
}

void pen(int dir){
    // sets pen up if 0 or down if <>0
    myServo.write(dir=0?pen_up:pen_down);
}
Complete modded & working code can be found here.
The digital Artist is now transparent to generic GCode.
Testing the Digital Artist
Let’s put the workflow to the test
- Open CNC.JS app
- Load and image (jpg or bmp)
- Move the artist to start position
- Start printing
See video
Room for improvement
- Image filtering and contrast/brightness thresholds on the widget
- Limit print-object size to be printed (run a scale-to-fit command)
- Add end stoppers to Digital Artist for automatic homing
Downloads
Files included:
DobruController (Digital Artist GCode orchestrator) CNCJS Dobru-Widget Jimp (Node JS Graphical manipulation library(