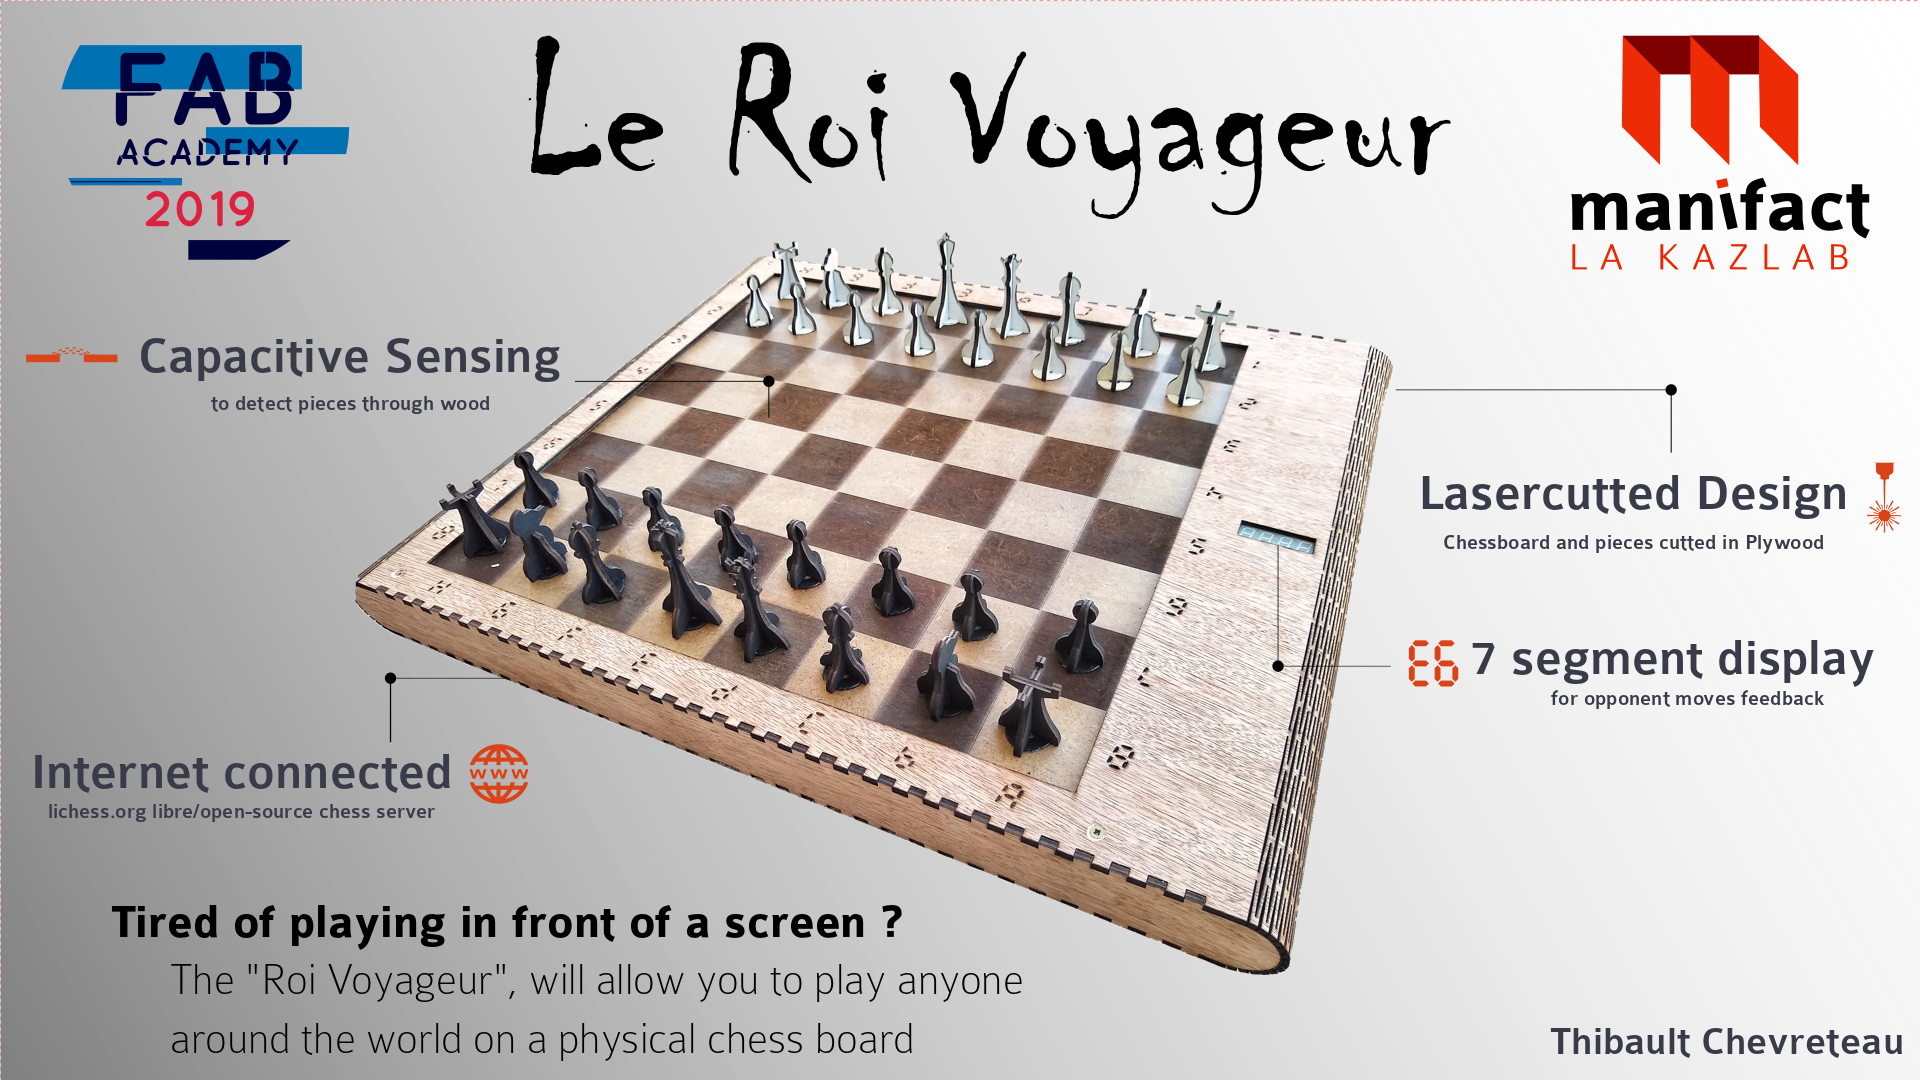
Le Roi Voyageur, A connected chessboard
Play across the world with no screen
Many games are now videogames. Even old classical games are becoming video-played. From one side, I see it as a good thing : it allows me to play with my friends all around the world. From the other side, it bothers me : I now have to play on a small, immaterial, touch-screen.
Chess is the perfect example : Firstly, chess sets are often beautifull pieces, secondly, large chessboard helps to improve your visualization of the game.
The idea is to provide a well-documented fabacademy final project that can inspire anyone to develop his own connected game with no screen.
The chessboard is able to detect piece moves and to send a signal to the player to know the move of his opponent. I wanted at first to have it connected by bluetooth to a smartphone which send the moves to a open-source chess website lichess. But it was too much for the time I had. So for now it is connected to a computer with an FTDI cable.
Last month schedule to finish the final project on time

Files and skills used
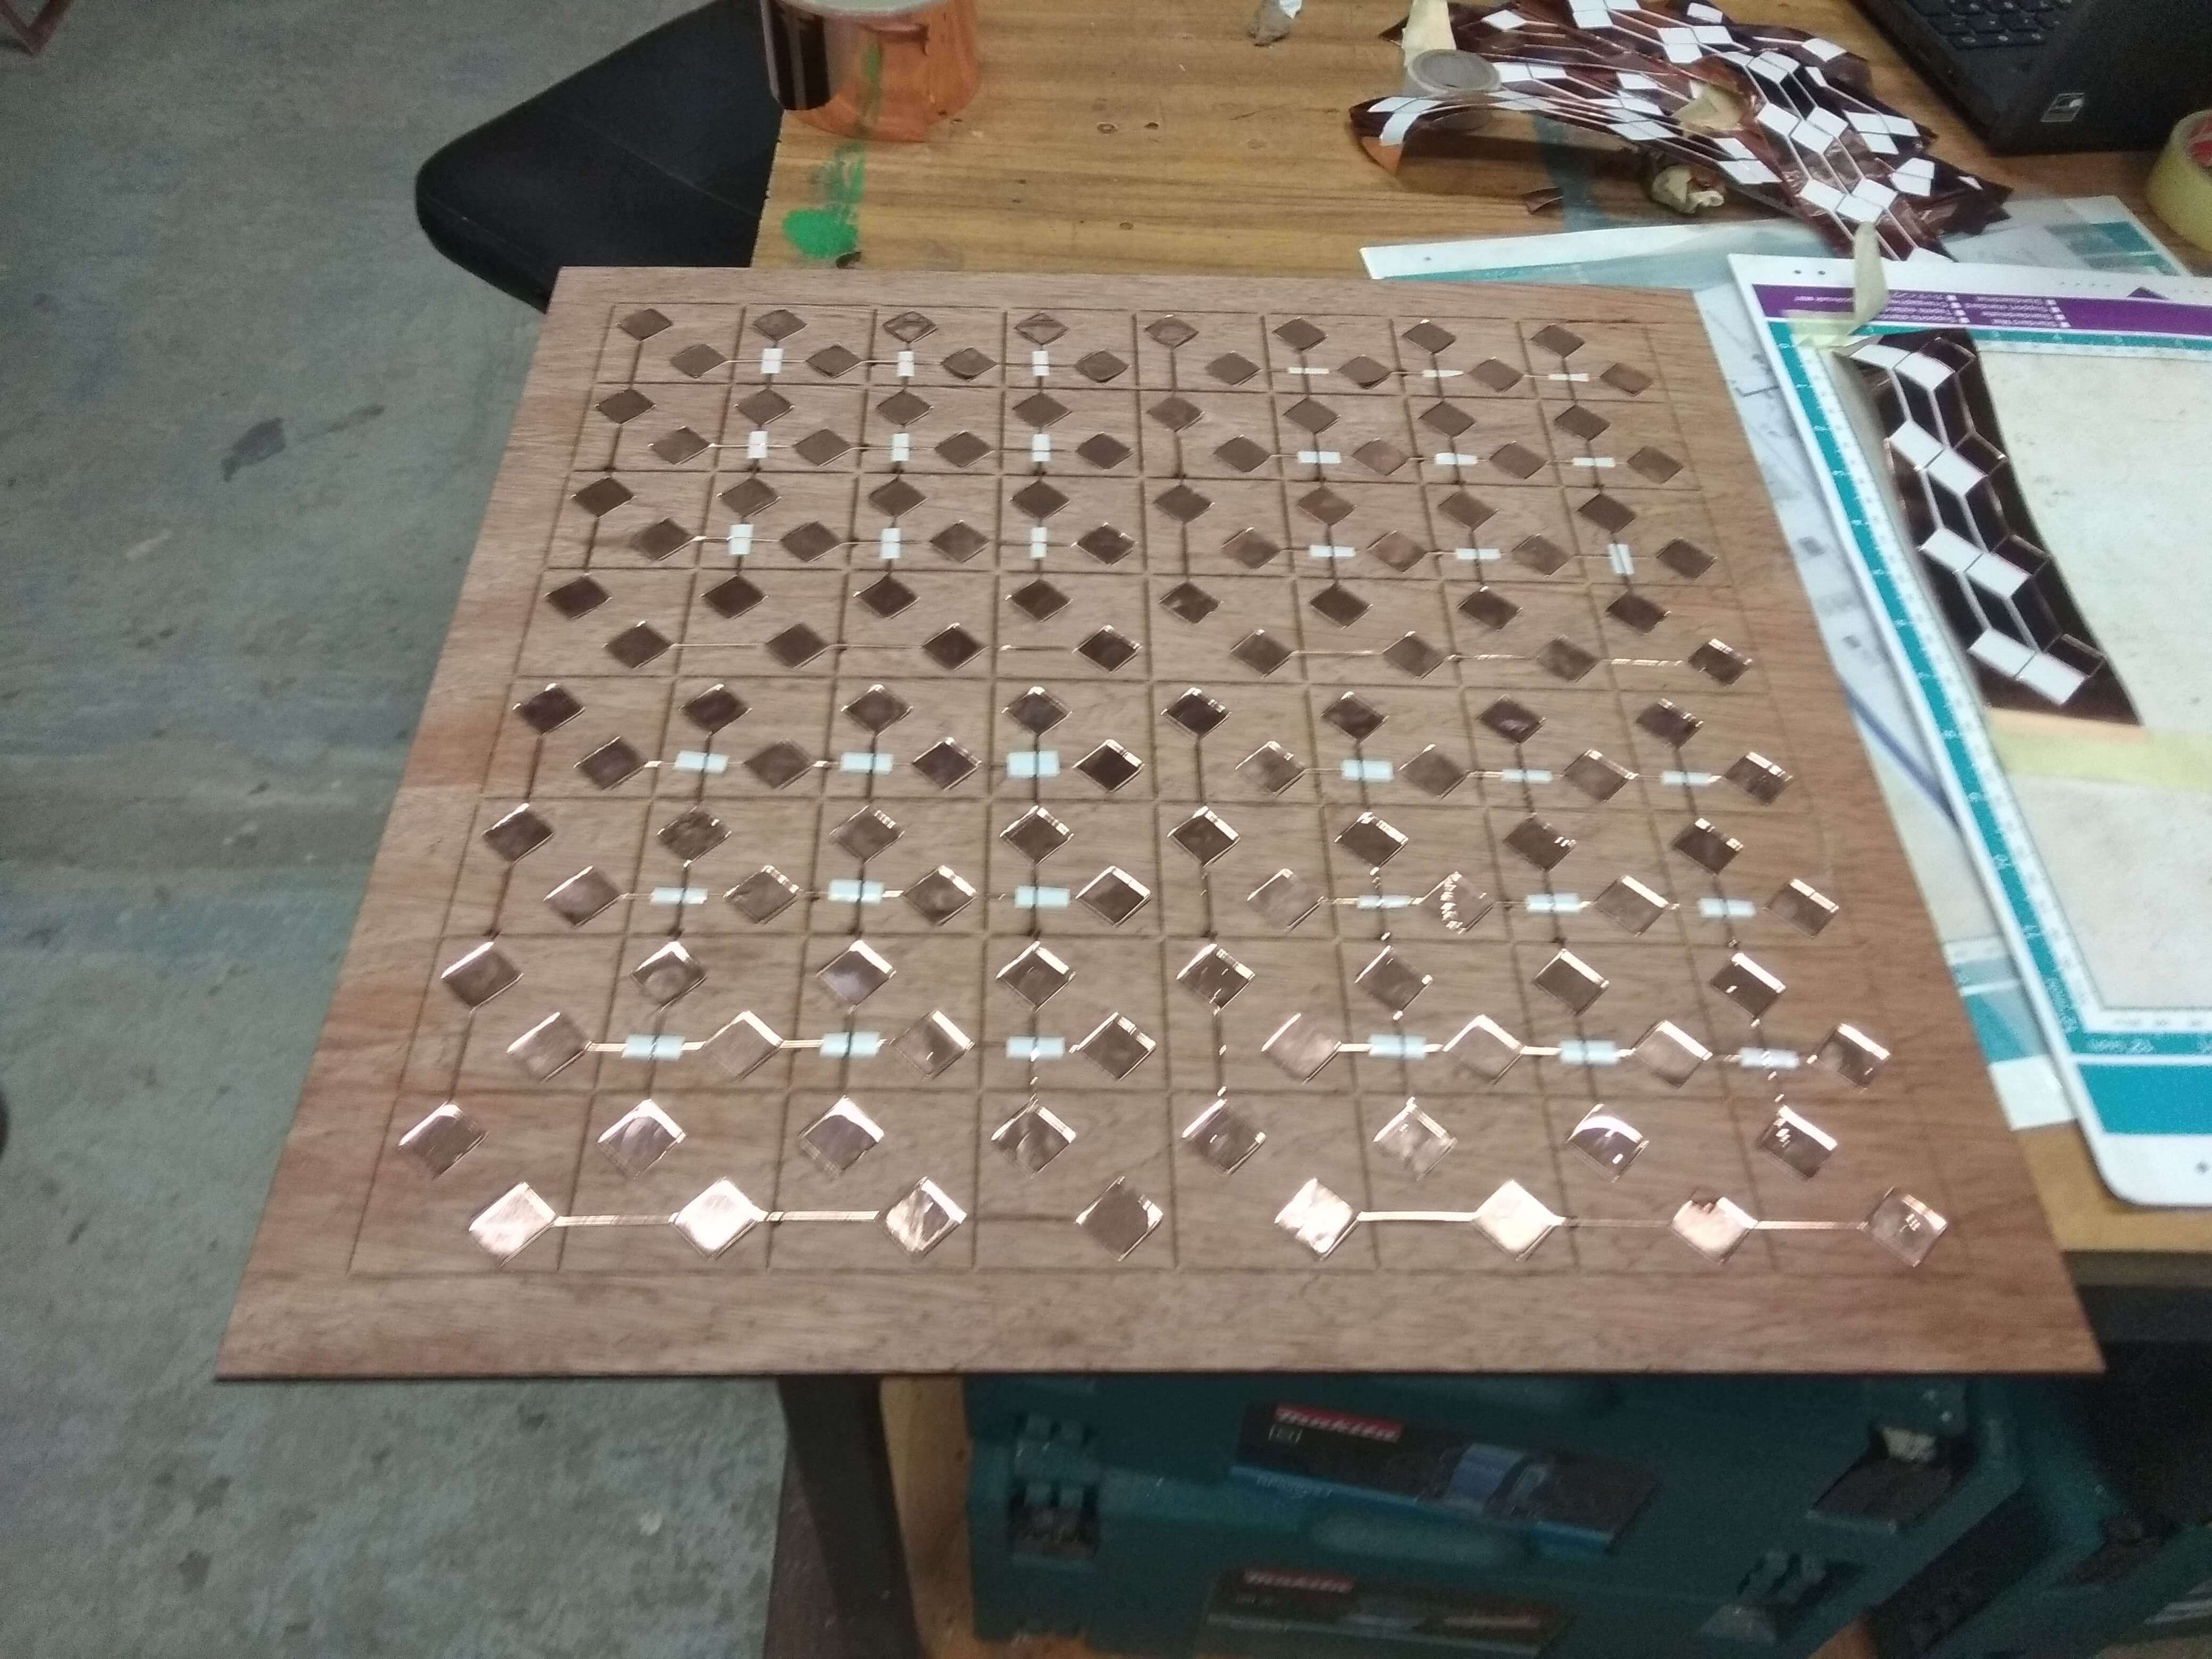
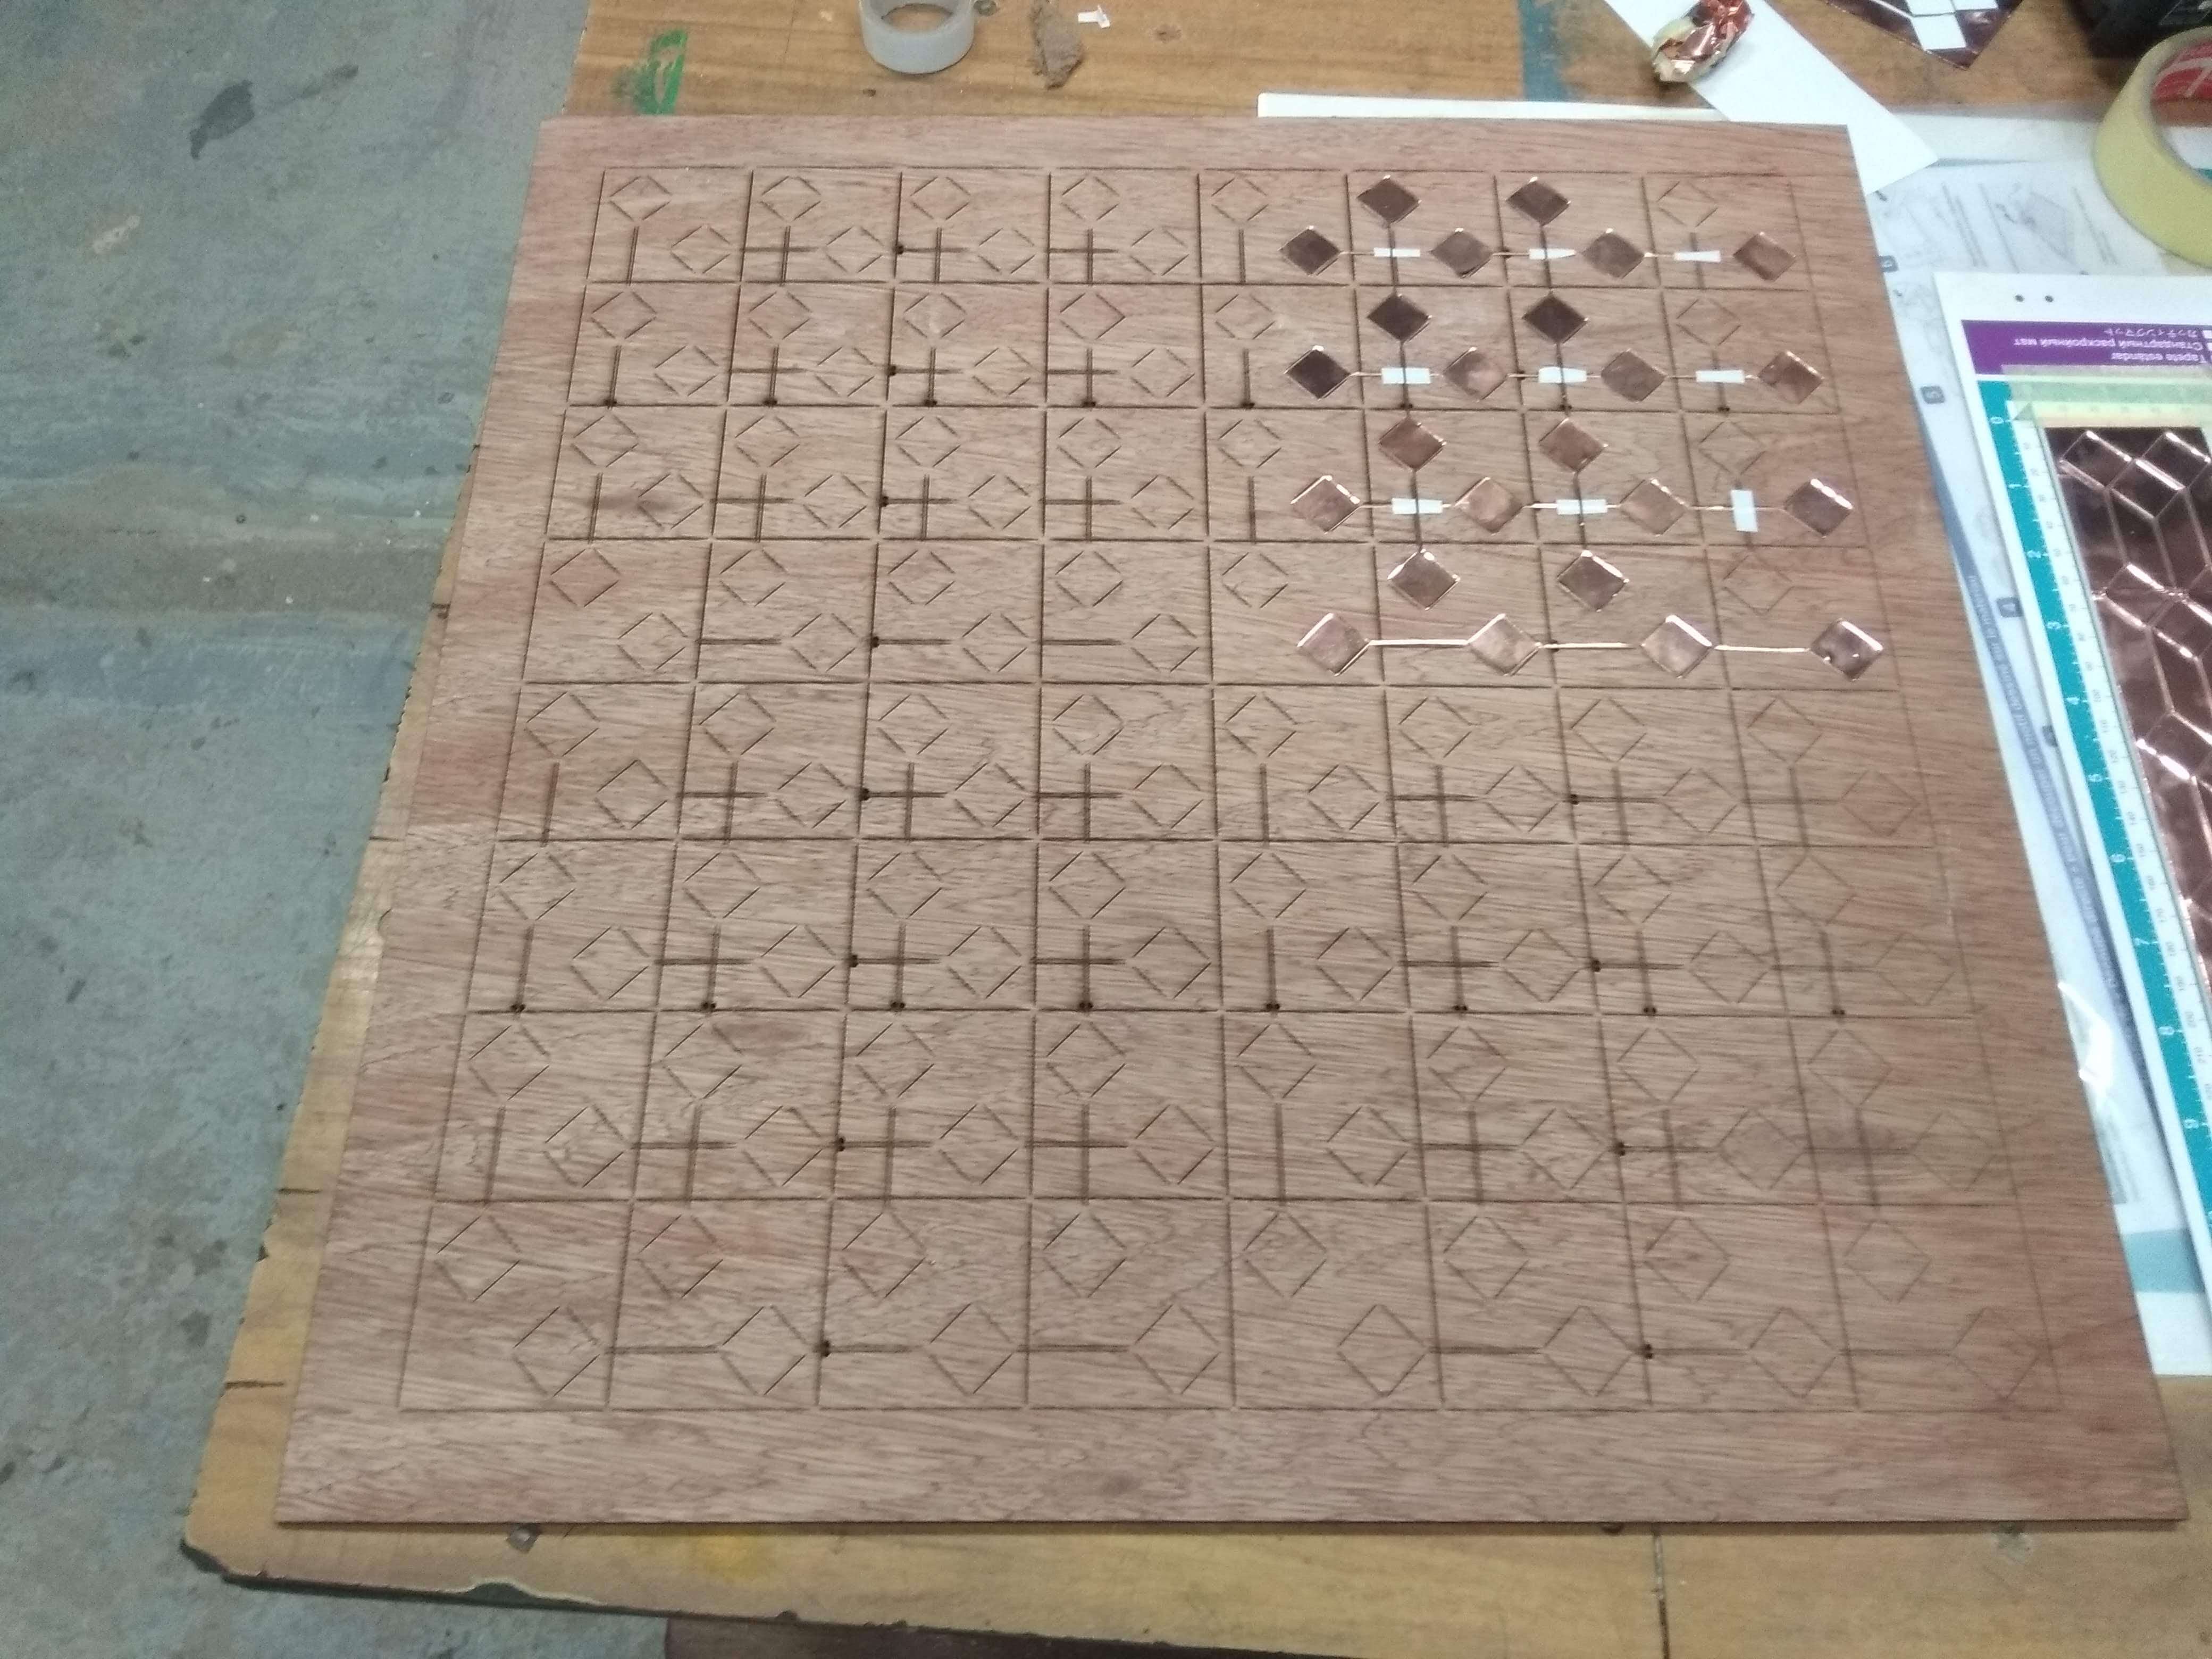
2D Design : Vynilcutted Copper Tape
To create transmit and receive electrodes for my step response sensing, I simply used vynilcutted copper tape. Each cutted piece is a row of 4 squares connected by a thin line of 1mm. Since I only had 50mm wide copper tape I cutted 3 pieces at a time.
The FCM file I used is accessible here.
2D Design + Substractive technique : Lasercutted + engraved board
The board on which I sticked the copper tape is a piece of 4mm plywood that I lasercutted and engraved to mark the positions of where I needed to stick the copper tape and to do small holes for wire connections.
The file is accessible here
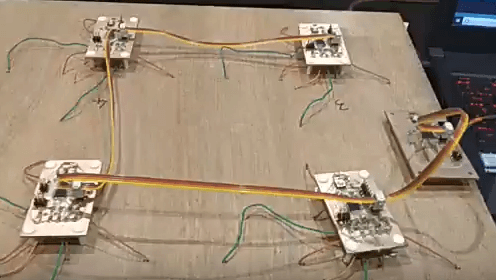
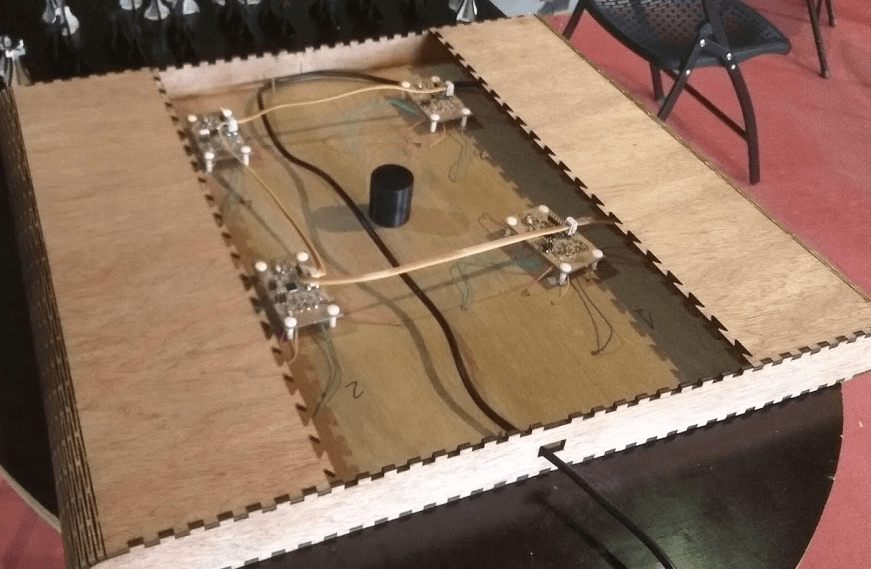
Electronic Design : 4+1PCBs
For this project I hade to produce 5 PCBs but to design only 2 since 4 are identical.
You can find the archive of the capacitive sensing board here. Each four of them is covering one quarter of the board and uses an atmega328 with height 10MOhm resistors for more senitivity.
You can find the archive of the master board here. This board is receiving capacitive values through I2C from the other fours and transmit opponent moves feedback on the seven segment display.
Emmbedded Programming : Transmit and receive step-response code
The only library used is wire.h
You can find the code uploaded into the capacitive boards here. You just have to change the value for the wire.begin(#) call to give a different adress to every board.
You can find the code uploaded into the master board here.
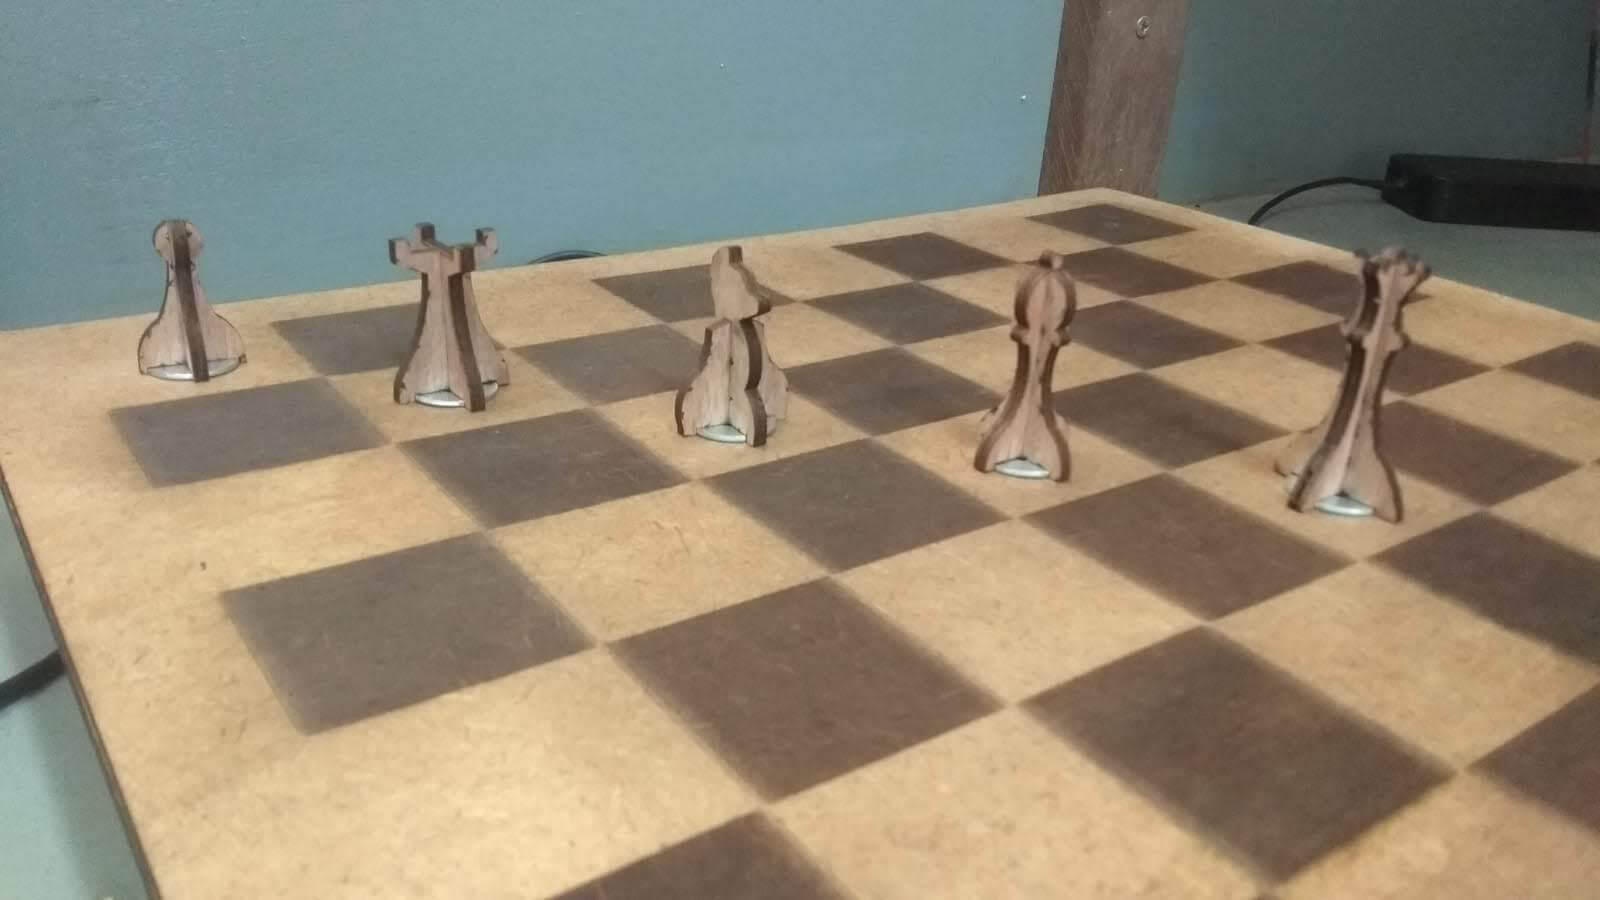
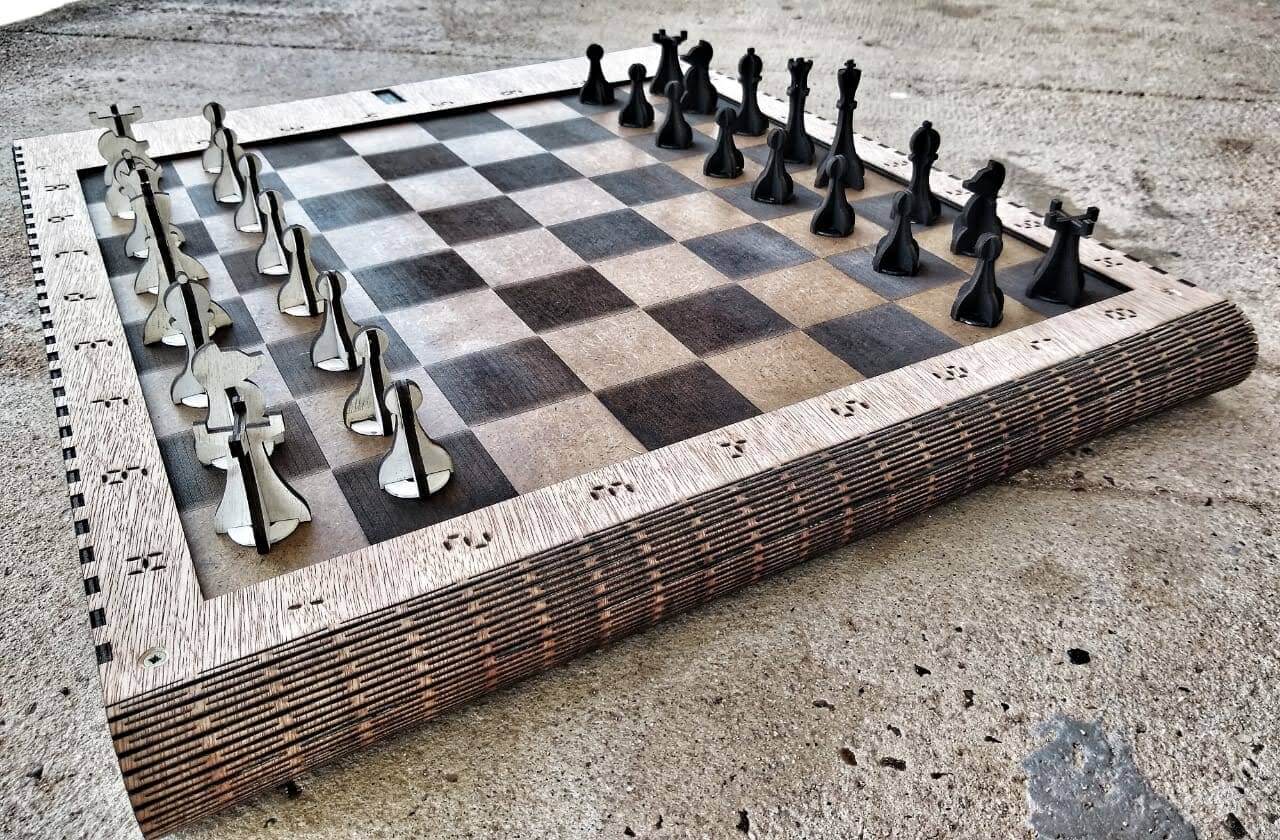
2D Design + Substractive technique : Lasercutting chess set
I designed my pieces in Fusion360, you can find here the svg file for one color for painted 4mm plywood
I finished the assembly of each piece with a washer which have several advantages:
- It tighten the pressfit
- It is cheap
- It is easy to find everywhere
- It is well detected in capacitive sensing
I created in inkscape the checkerboard which are a succession of lines to increase engraving speed. You can find the file here.
Eventually, I designed the enclosure starting from boxes.py website which is an automatic box generator. I had many modifications to perform like creating the hole for the checkerboard and the seven segment, creating the letters and figures for pieces coordinates and creating an access panel at the bottom of it.
You can access the file here.
Programming : Python Code to play moves and send seven segment feedback of opponent moves
You can find the python code here.
It uses Serial communication to receive capacitive values from the master board. I uses berserk which is a python client for the lichess API to connect myself to the website.
3D Design + Additive technique : Cylindrical Support Tower
To avoid bending at the middle of the board I 3D designed and printed a cylindrical support tower that I attached with double sided tape at the midle of my board.
You can find the stl file here.
Presentation Video
Bill of materials
| Name | Price |
|---|---|
| 4mm plywood panel | 5.95 |
| 2mm medium | 0€ - Recycled |
| Washers, screws, Push Rivets | 3€ |
| 2*Copper plate | 4.16€ |
| Copper Tape | 5€ |
| 1*FTDI cable | 21.25€ |
| 1*seven segment | 3.96€ |
| 5*IDC Header | 3.85€ |
| 120cm*4 Ribbon cables | 0.11€ |
| Jumpers cables | 2.00€ |
| 10*1uF | 1.86€ |
| 5*20MHz | 2.62€ |
| 5*2*3 header | 3.66€ |
| 5*2*2 header | 3.45€ |
| 5*Led | 1.35€ |
| 5*FTDI header | 3.21€ |
| 24*10MOhm | 3.21€ |
| 5*Switches | 5.09€ |
| 20*10KOhm | 1.48€ |
| 5*Atmega | 10.35€ |
Total cost : 81.47€
Licence
(c) Thibault Chevreteau 2019
This work may be reproduced, modified, distributed, performed, and displayed for non commercial purposes, but must acknowledge "Le Roi Voyageur(C)". Copyright is retained and must be preserved. The work is provided as is; no warranty is provided, and users accept all liability.
My project is aimed to allow people to play chess websites on a physical board, so, this license allows to use it for non commercial purposes.
Thanks
That is it, the FabAcademy is over. It was an exhausting journey but so much exciting. It will definetly be a useful background in many fields.
All of this as been made possible thanks to many people but I wanted to give special thanks to some of them:
- Rudi Floquet - Manifact Director who allowed me to take part in this training knowing the cost and how time consumming it will be
- Reina Raveless - Cabinet Director of the ministry of industry and tourism who believes so much in Fablabs
- Theo Boomsma - IoT lab director for having his lab 24/7 open for me and all the others
- Willem and Elodie - My colleagues for managing like pros all the tasks I coulnd't handle during this period
- All my classmates - For the support and never to feel alone in the boat
- My beloved Fiancé - Who was supporting me at every step and for not being jealous of the lab :)
The following informations are the tracking notes I made during the FabAcademy. I keep them as a notebook.
Pieces Detection
Following Neil’s advice I will try to detect the chess pieces capacitively:
An alternative to magnets and Hall sensors is to detect the pieces capacitatively, which just requires electrodes.
Progress from the 14/05/18
Today I managed to detect a matrix of 44 washers using capacitive sensing. For now, the idea is to have 4 microcontrolers. Each of them will detect a matrix of 44 squares to cover the entire board. The video below is showing the result. You can check my week16 assignement for more details.
Progress from the 05/05/18
I have been performing tests to see I can detect objects with capacitive sensing. For now, I managed to detect two objects efficiently. Here is a picture of the instalation with a video of the result.
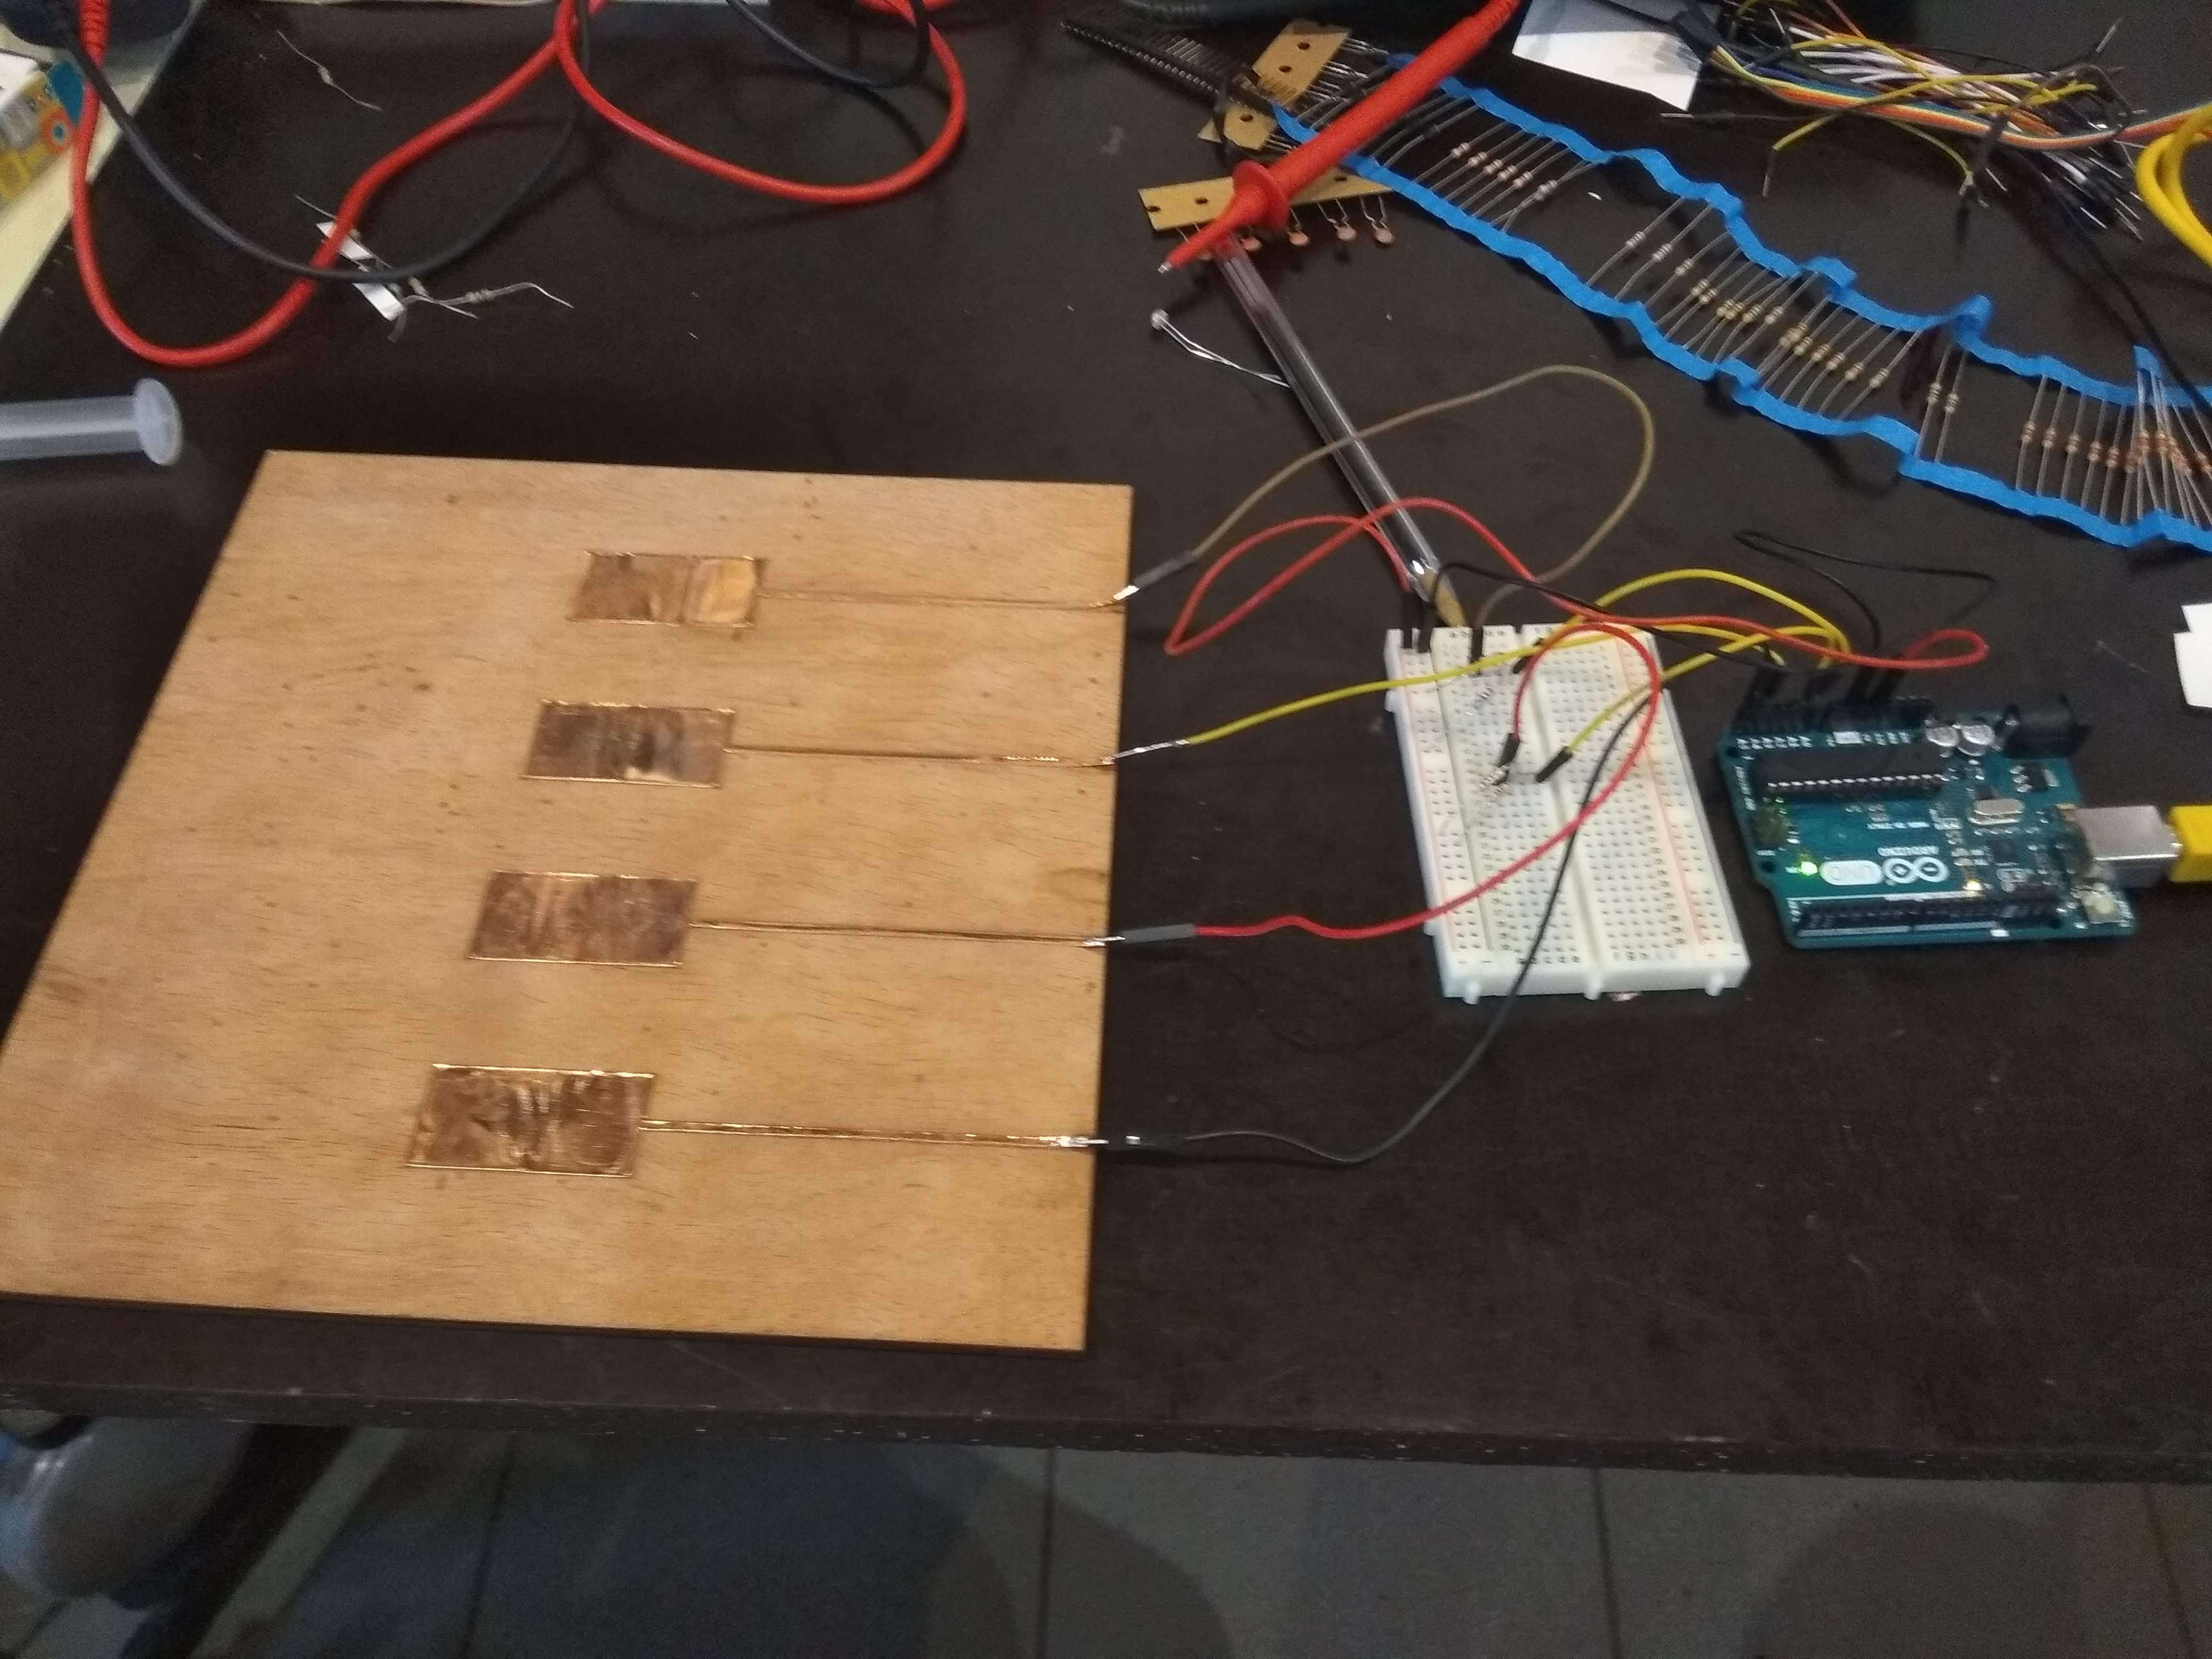
Here is the code used:
int nloop = 100;
int count, i;
int up[2],down[2],value[2];
int x;
double eps = 0.05;
double filt[2] = {0.000, 0.000};
//String analog_pins[] = {A4,A5};

void setup() {
  pinMode(A0, INPUT);
  pinMode(A1, INPUT);
  pinMode(A4, OUTPUT);
  pinMode(A5, OUTPUT);
  Serial.begin(9600);
}

void loop() {
  for (i = 0; i<2; i++){
    up[i] = 0;
    down[i] = 0;
  }
  for (i = 0; i<2; i++){
    for (count = 0; count < nloop; ++count){
      delayMicroseconds(100);
      analogWrite(i+18,255);
      x = analogRead(i);
      up[i] += x;
      delayMicroseconds(100);
      analogWrite(i+18,0);
      x = analogRead(i);
      down[i] += x;
      }
    }
  for (i = 0; i<2; i++){
    value[i] = up[i] - down[i];
    filt[i] = (1-eps)*filt[i] + eps*value[i];
  }
  Serial.print(filt[0]);
  Serial.print(" ");
  Serial.println(filt[1]);
}
Progress from the 25/04/18
This part is still to be tested. But, according to Neil's advice, a good way to detect chessmoves would be to do it capacitively. This way should be very affordable. However, what I would really like is for the player not to see any electrode. I saw this videos where it was possible to detect through 6mm thick plywood.
Then, the idea would be to create a matrix of sensors the same way than in the Matt Blackshaw example:
The $4 Touchpad from Matthew Blackshaw on Vimeo.
Communication with Lichess
I am going to use LiChessAPI
In week9 - Embedded programming, I managed to use the HelloBoard button to play a chessmove.
The workflow was the following:
- Programming the HelloBoard with an Arduino as ISP
- Transmitting the signal to another arduino (because I didn't have FTDI cable available)
- Reading the signal through a serial port onto the computer
- Interpreting the signal thanks to a python code to play a move using LiChessAPI
Here is a video of the result:
Opponent moves feedback
To inform the player that a move has been played I will use a 7 segments display.
Build the chesspieces
I experienced many ways to build the chesspieces:
What I would like the most is to build them with turning lathe. But I am afraid I will not have time to do it in the given time. The cheapest and fastest way is to do them pressfit.
Build the Board
The board will be lasercutted/engraved into 4mm thick plywood.