9. Embedded programming
This week I studied architecture of microcontrollers and supported drivers; then I approached to approached to programming languages, as the C programming language and the Arduino IDE I studied and worked with.
Microcontrollers
Microcontrollers, in combination with AVR software and hardware, are the main part of computing science and mechanical engines.
Architecture
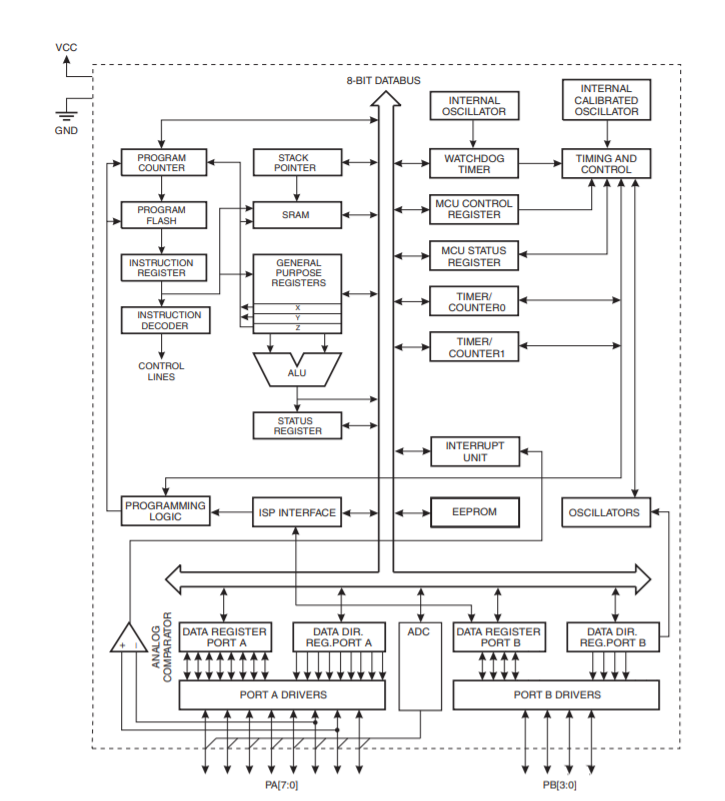
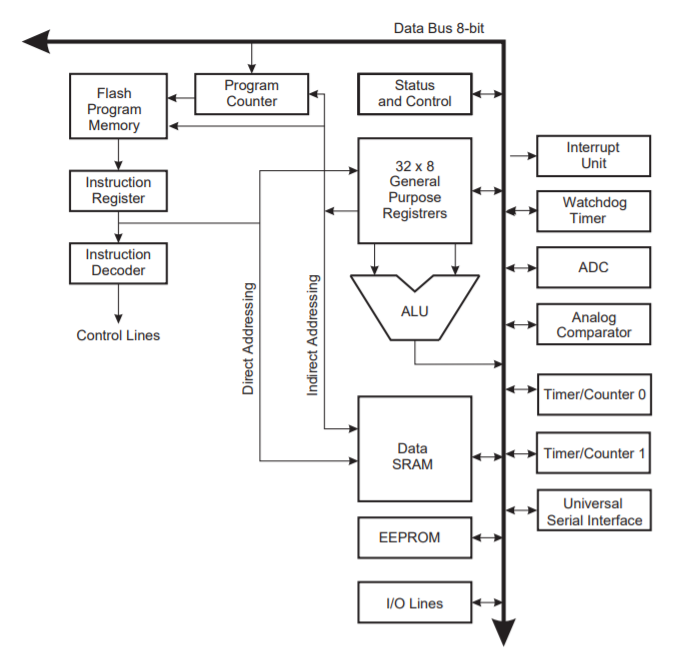
Microcontrollers process a rich instructions of data for several specific purposes associated to the registers; threse are connected to the arithmetic logic unit that process each instruction in one clock cycle of pipelines.
Microcontrollers, as AVR architecture, have flash non-volatile and reprogrammable memory to keep and manage data A-B ports.
Supported drivers
Most of AVR microcontrollers are manufactured on the same process technology. AVR architecture maximize performance separating memories and buses. So executing a single instruction, the follwing ones are pre-fetched from the Program memory. This concept enables instructions to be executed in every clock cycle.
I installed necessary drivers during the electronics production week, as the supported toolchain and firmware, GNU make and avrdude too.
Programming languages
Then, first I started approaching to C language and then to Arduino IDE.
C programming language
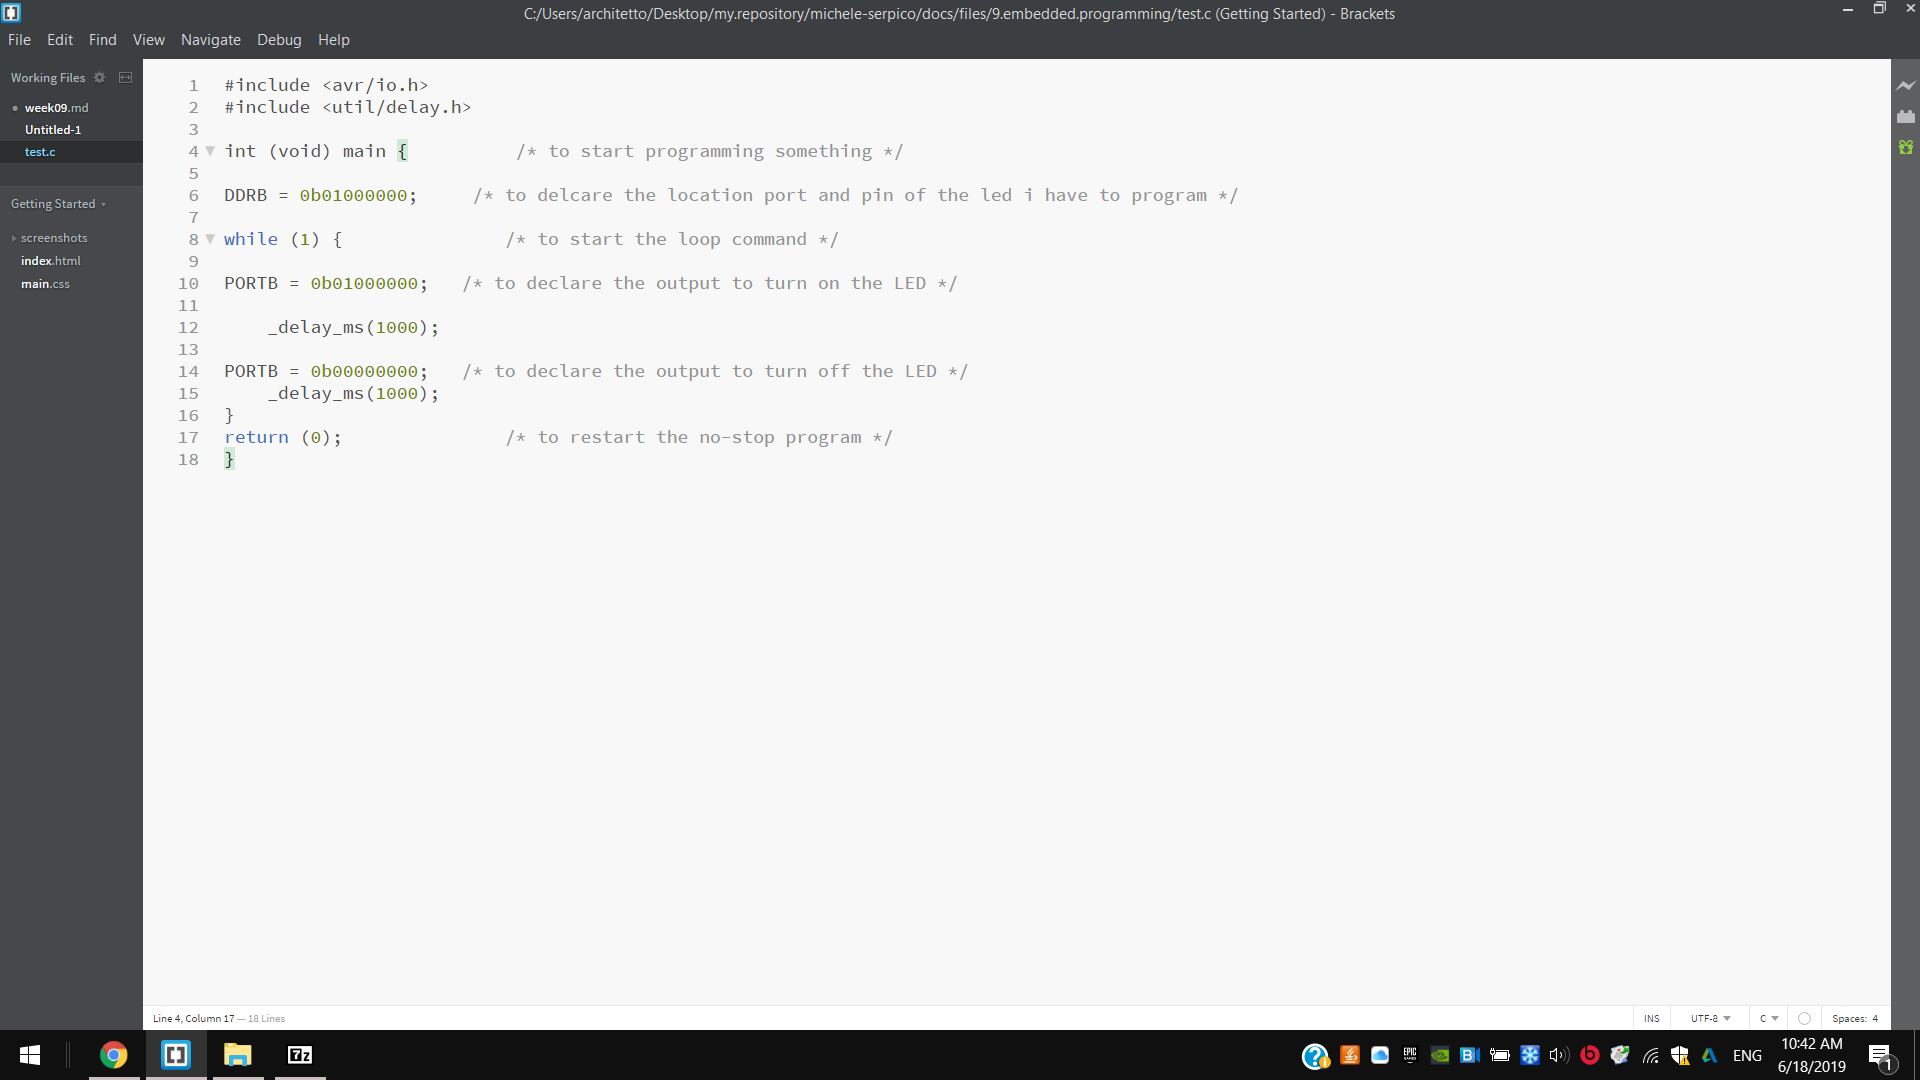
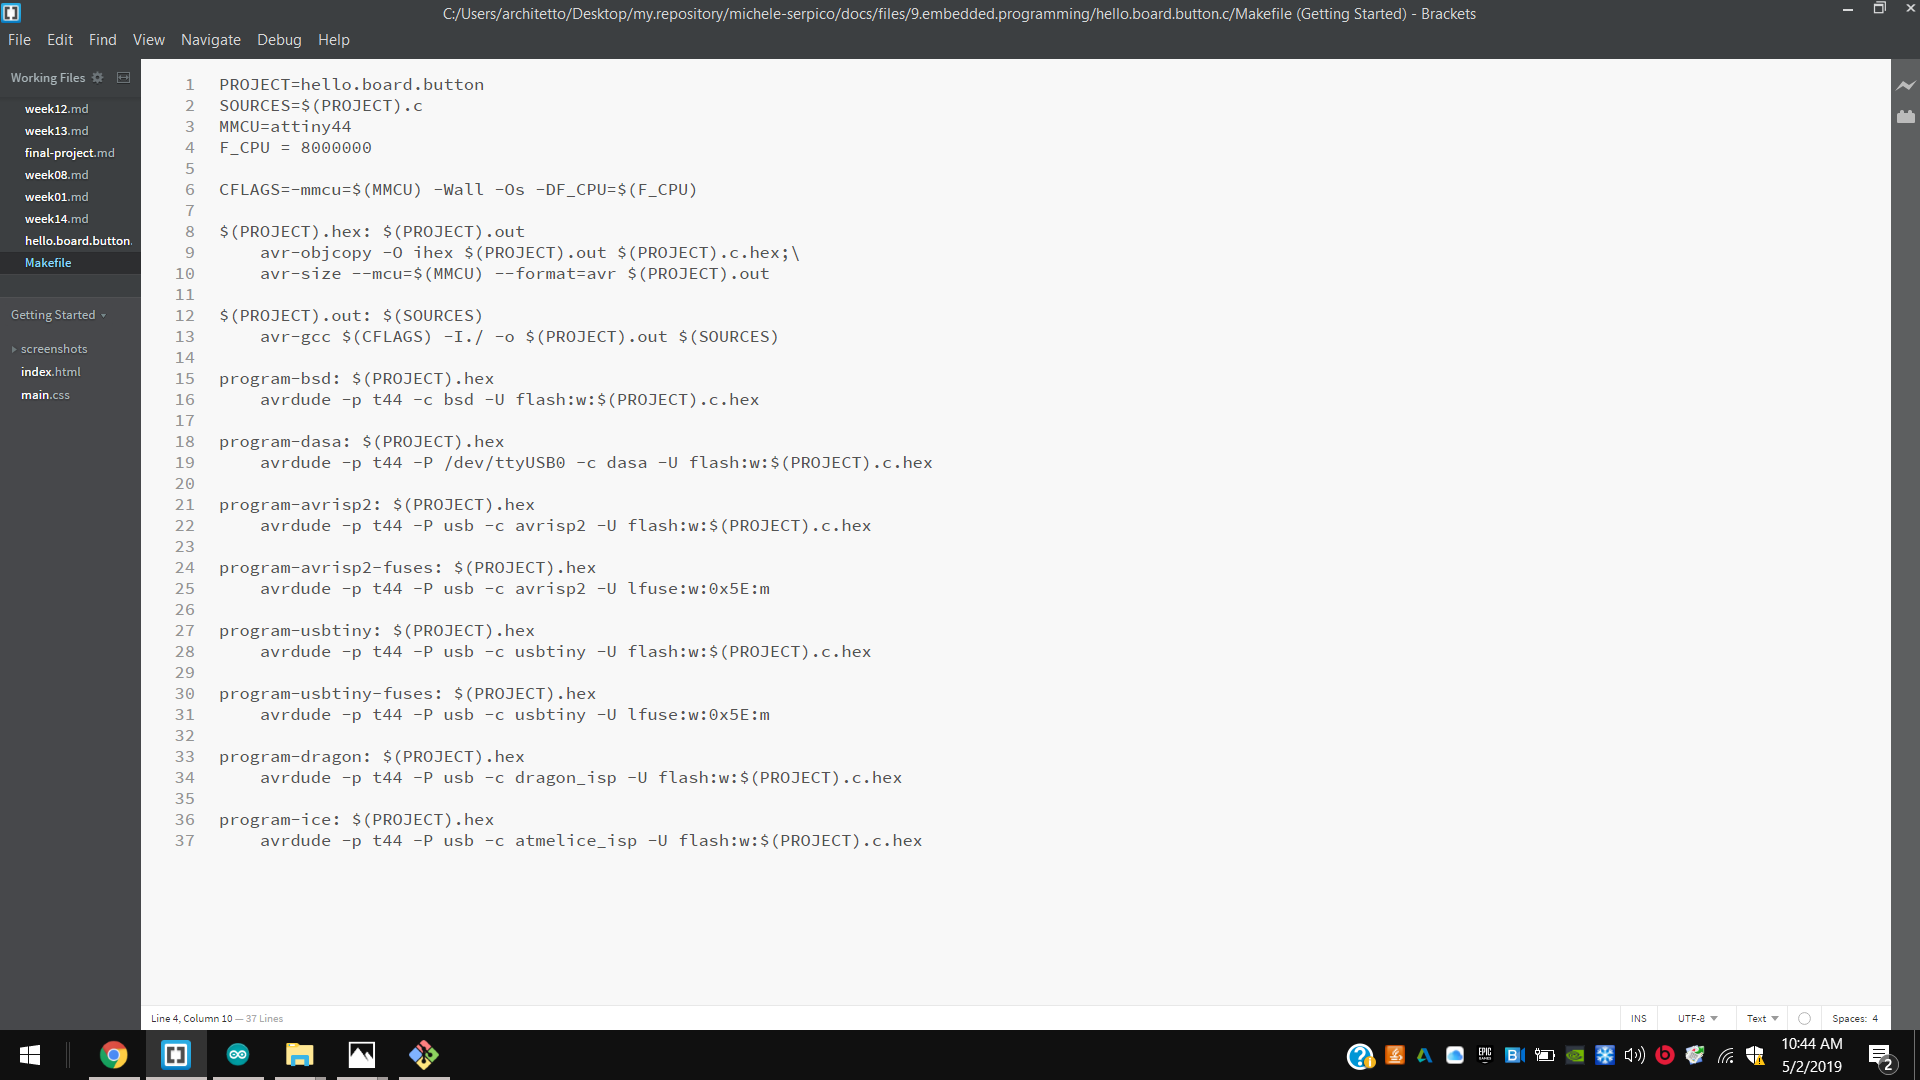
C programming language is a binary language where 1 means true and 0 means false. C language works with Makefile that contains features about microcontrollers and programmers, and with the .c that contain functions.
The .c files work through the principal (void) main function and the two others while and return loop functions, defined by conditions.
In the command prompt of the pc the C programs have to be uploaded with make command to generate hexadecimal .exe file, and then with the command make flash.
Arduino IDE
Arduino IDE looks even more synthesized and simple, just cheking and learning the Arduino Language Reference.
As C language it works defining costants and variables; then the main void setup foregoes the void loop that often includes several digital or analogic functions.
Obviously it’s necessary to declare tools, as programmer, board, microcontrollers, clocks and ports.
Examples
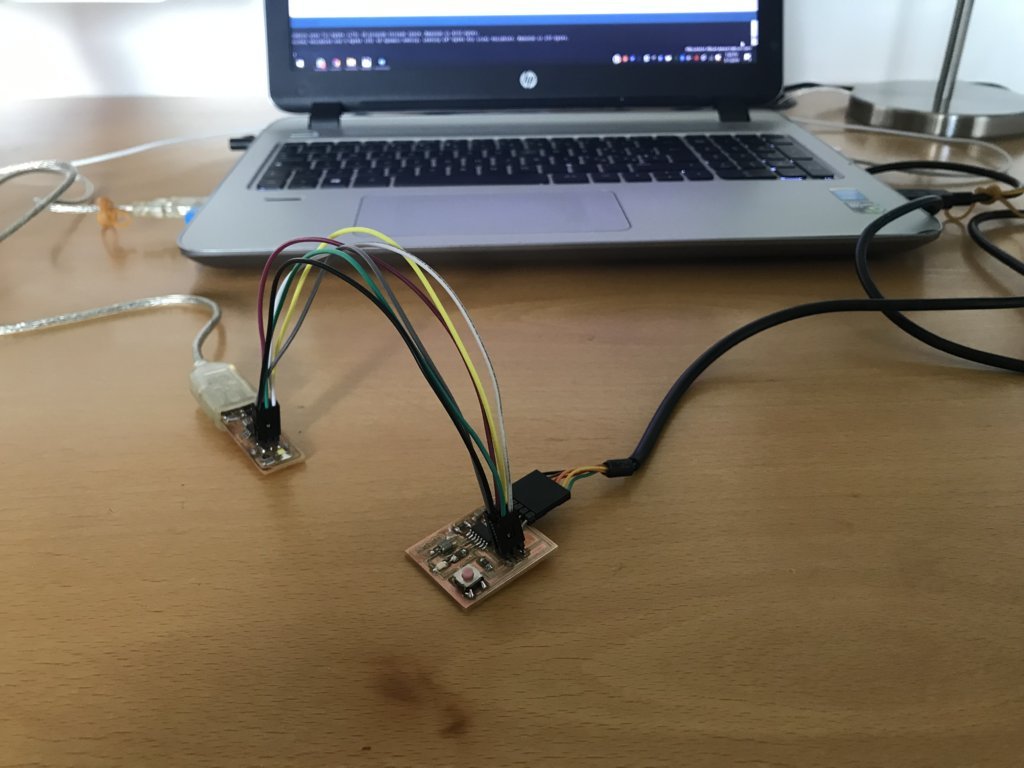
Respectively on my hello board I programmed blink and button-led codes.
I connected it to my USBTinyISP and charged it with a 3.3V FTDI wire by serial port.
Blink
C
1st On Brackets editor I made the Makefile of my blink program, first including necessary libraries;
2nd Then I defined features about microntroller;
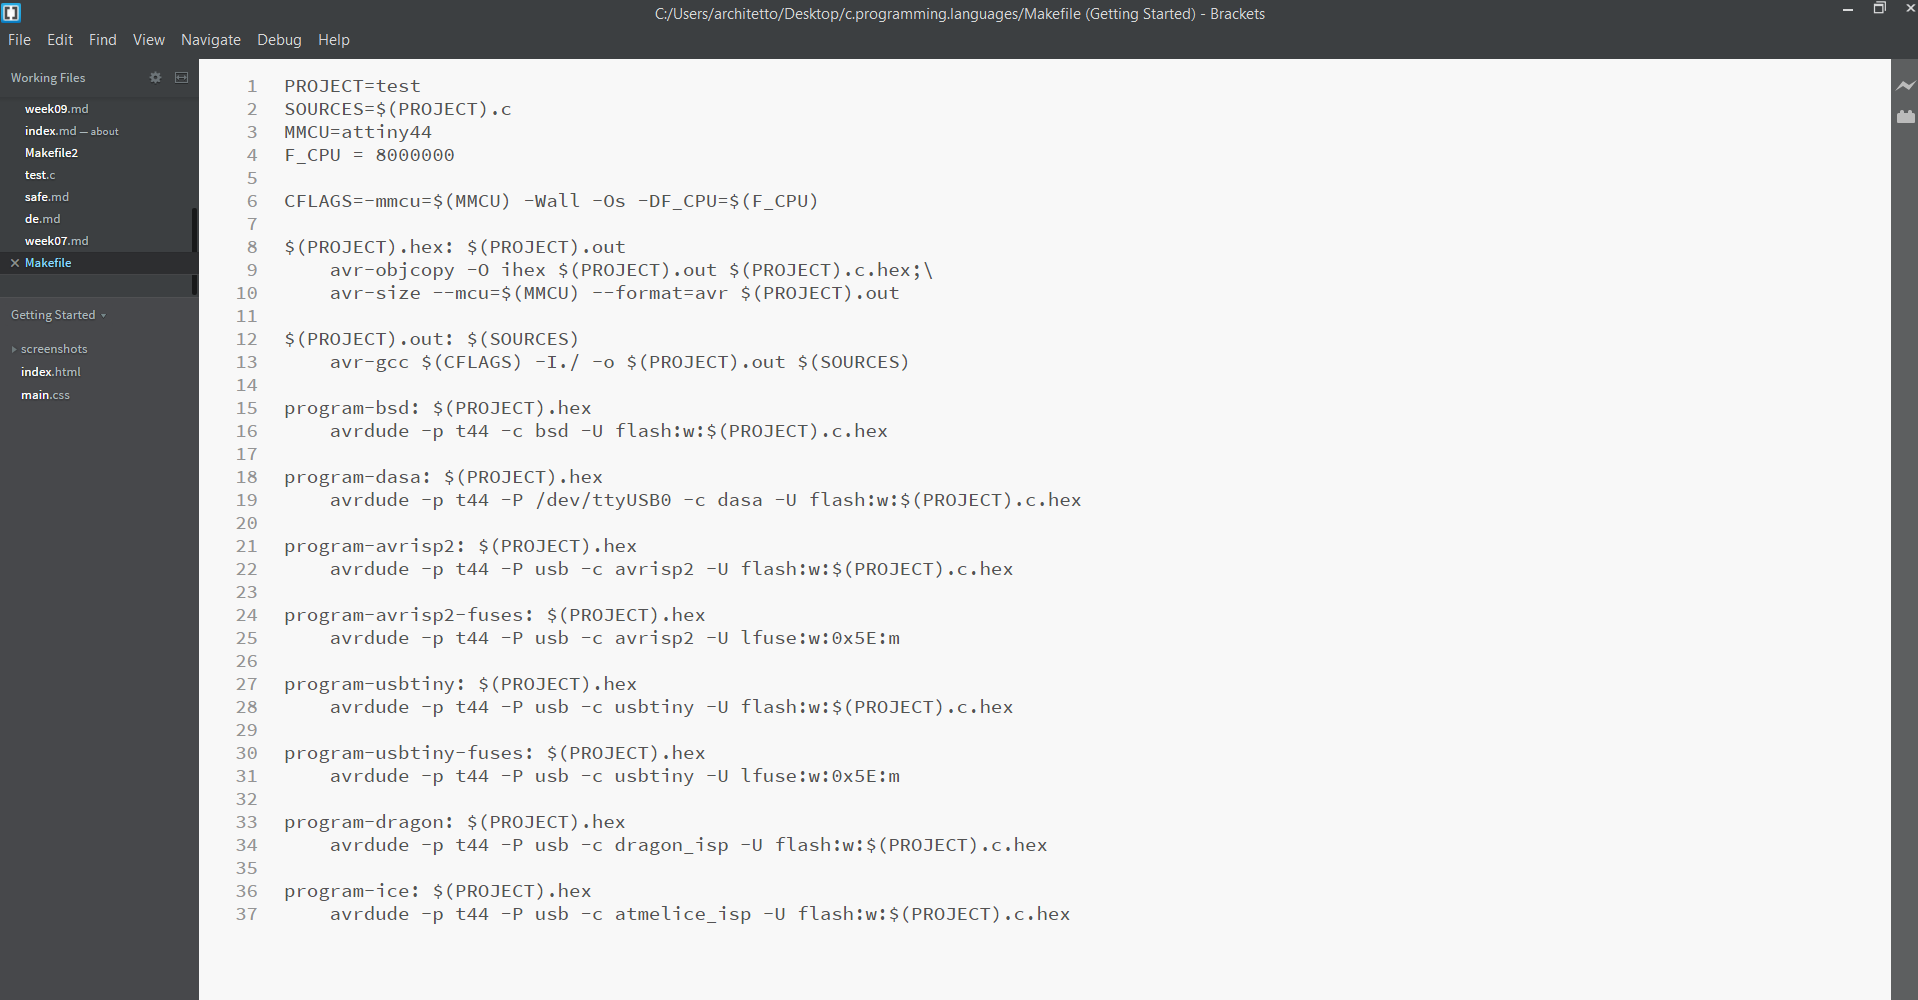
3rd I made a new file and I compiled the .c code defining respective ports’ directions and respectives I/0 pins (ON/OFF)
4th I opened the command prompt of my pc and changed direction in this Makefile and .c folder;
5th And I runt first make to make the .exe file, and then make flash.
MicheleSerpico MINGW64 ~
$ cd Desktop/

MicheleSerpico MINGW64 ~/Desktop
$ cd c.programming.languages/

MicheleSerpico MINGW64 ~/Desktop/c.programming.languages
$ ls
Makefile  test.c

MicheleSerpico MINGW64 ~/Desktop/c.programming.languages
$ make
avr-gcc -mmcu=attiny44 -Wall -Os -DF_CPU=8000000 -I./ -o test.out test.c
avr-objcopy -O ihex test.out test.c.hex;\
        avr-size --mcu=attiny44 --format=avr test.out
AVR Memory Usage
----------------
Device: attiny44

Program:     102 bytes (2.5% Full)
(.text + .data + .bootloader)

Data:          0 bytes (0.0% Full)
(.data + .bss + .noinit)


MicheleSerpico MINGW64 ~/Desktop/c.programming.languages
$ make program-avrisp2
avr-objcopy -O ihex test.out test.c.hex;\
        avr-size --mcu=attiny44 --format=avr test.out
AVR Memory Usage
----------------
Device: attiny44

Program:     102 bytes (2.5% Full)
(.text + .data + .bootloader)

Data:          0 bytes (0.0% Full)
(.data + .bss + .noinit)


avrdude -p t44 -P usb -c avrisp2 -U flash:w:test.c.hex

avrdude: AVR device initialized and ready to accept instructions

Reading | ################################################## | 100% 0.00s

avrdude: Device signature = 0x1e9207
avrdude: NOTE: FLASH memory has been specified, an erase cycle will be performed
         To disable this feature, specify the -D option.
avrdude: erasing chip
avrdude: reading input file "test.c.hex"
avrdude: input file test.c.hex auto detected as Intel Hex
avrdude: writing flash (102 bytes):

Writing | ################################################## | 100% 0.03s

avrdude: 102 bytes of flash written
avrdude: verifying flash memory against test.c.hex:
avrdude: load data flash data from input file test.c.hex:
avrdude: input file test.c.hex auto detected as Intel Hex
avrdude: input file test.c.hex contains 102 bytes
avrdude: reading on-chip flash data:

Reading | ################################################## | 100% 0.03s

avrdude: verifying ...
avrdude: 102 bytes of flash verified

avrdude done.  Thank you.
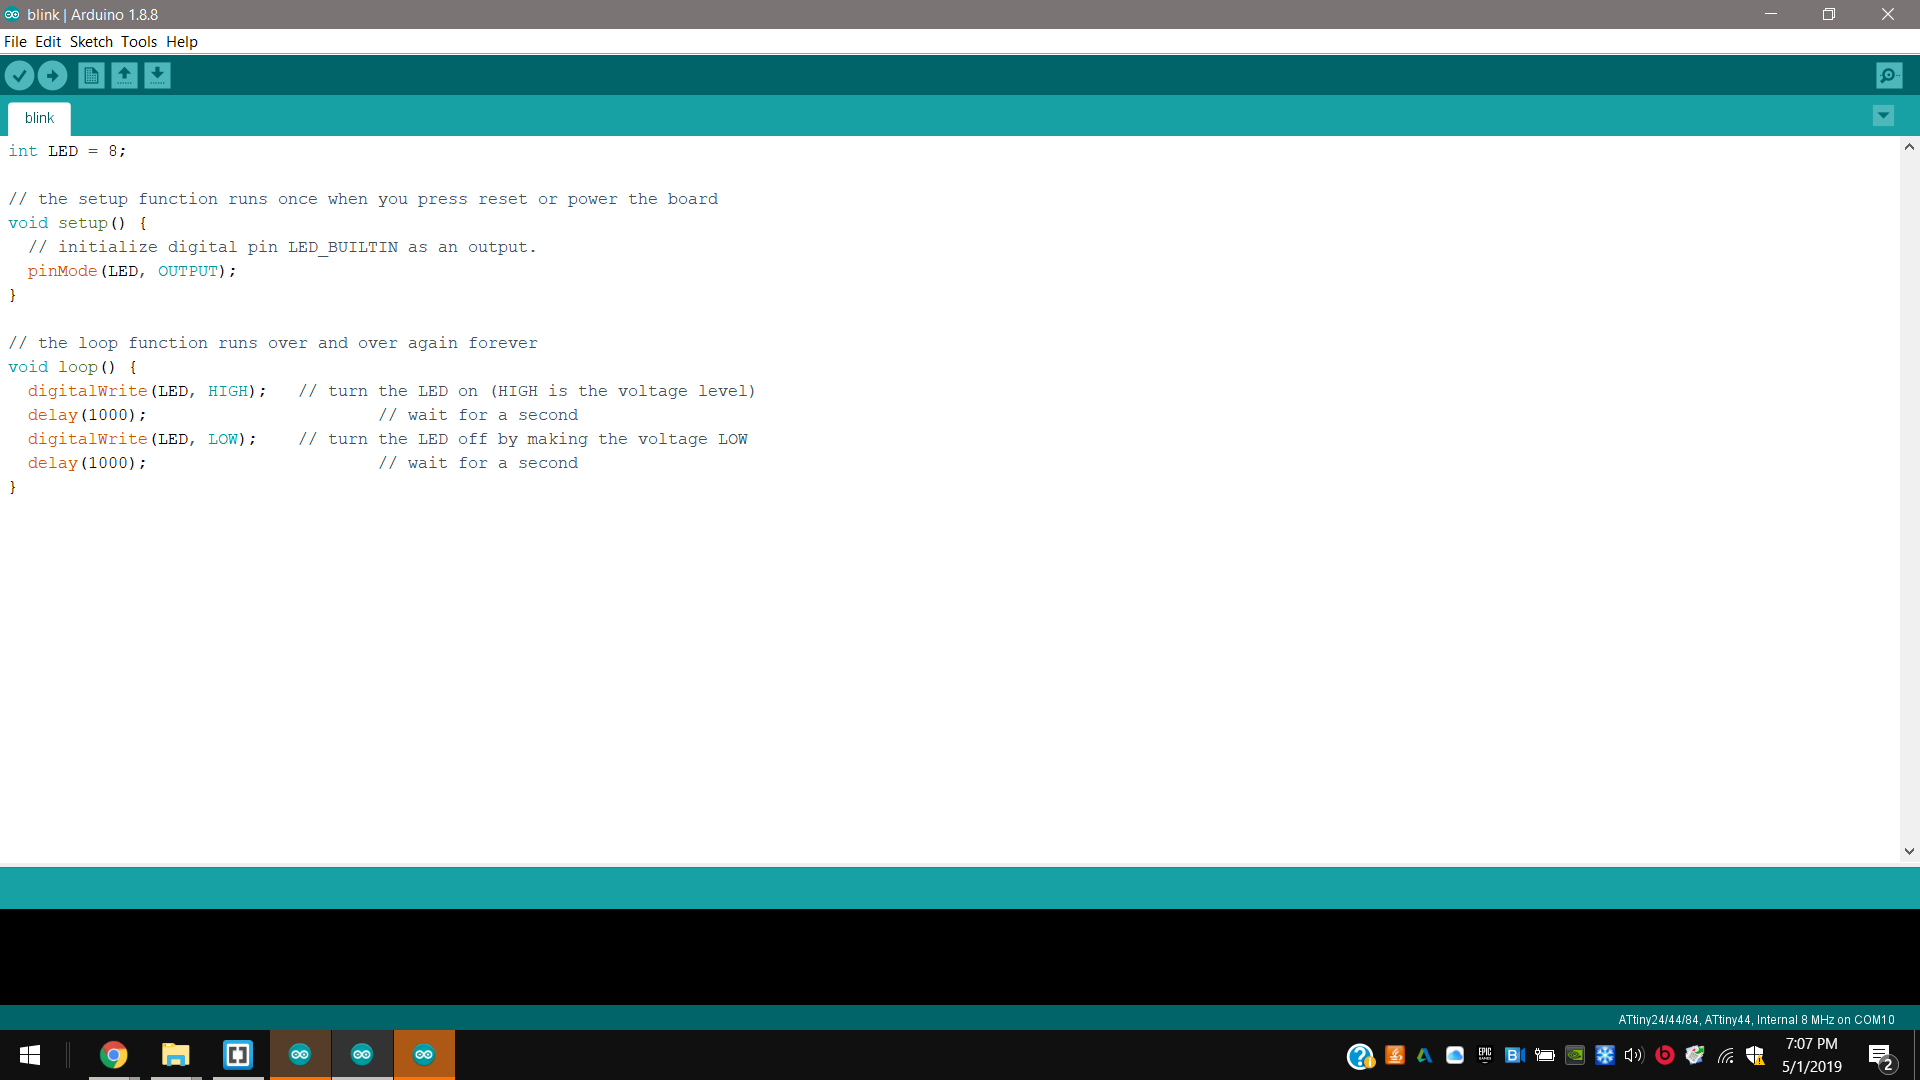
Arduino IDE
1st I defined LED pin;
2nd I set this pin as an output;
3rd And I programmed my board as HIGH and LOW loop fucntion respectively with 1000 milliseconds. Then I uploaded the program with my USBtinyISP.
int LED = 8;

// the setup function runs once when you press reset or power the board
void setup() {
  // initialize digital pin LED_BUILTIN as an output.
  pinMode(LED, OUTPUT);
}

// the loop function runs over and over again forever
void loop() {
  digitalWrite(LED, HIGH);   // turn the LED on (HIGH is the voltage level)
  delay(1000);                       // wait for a second
  digitalWrite(LED, LOW);    // turn the LED off by making the voltage LOW
  delay(1000);                       // wait for a second
}
Button
C
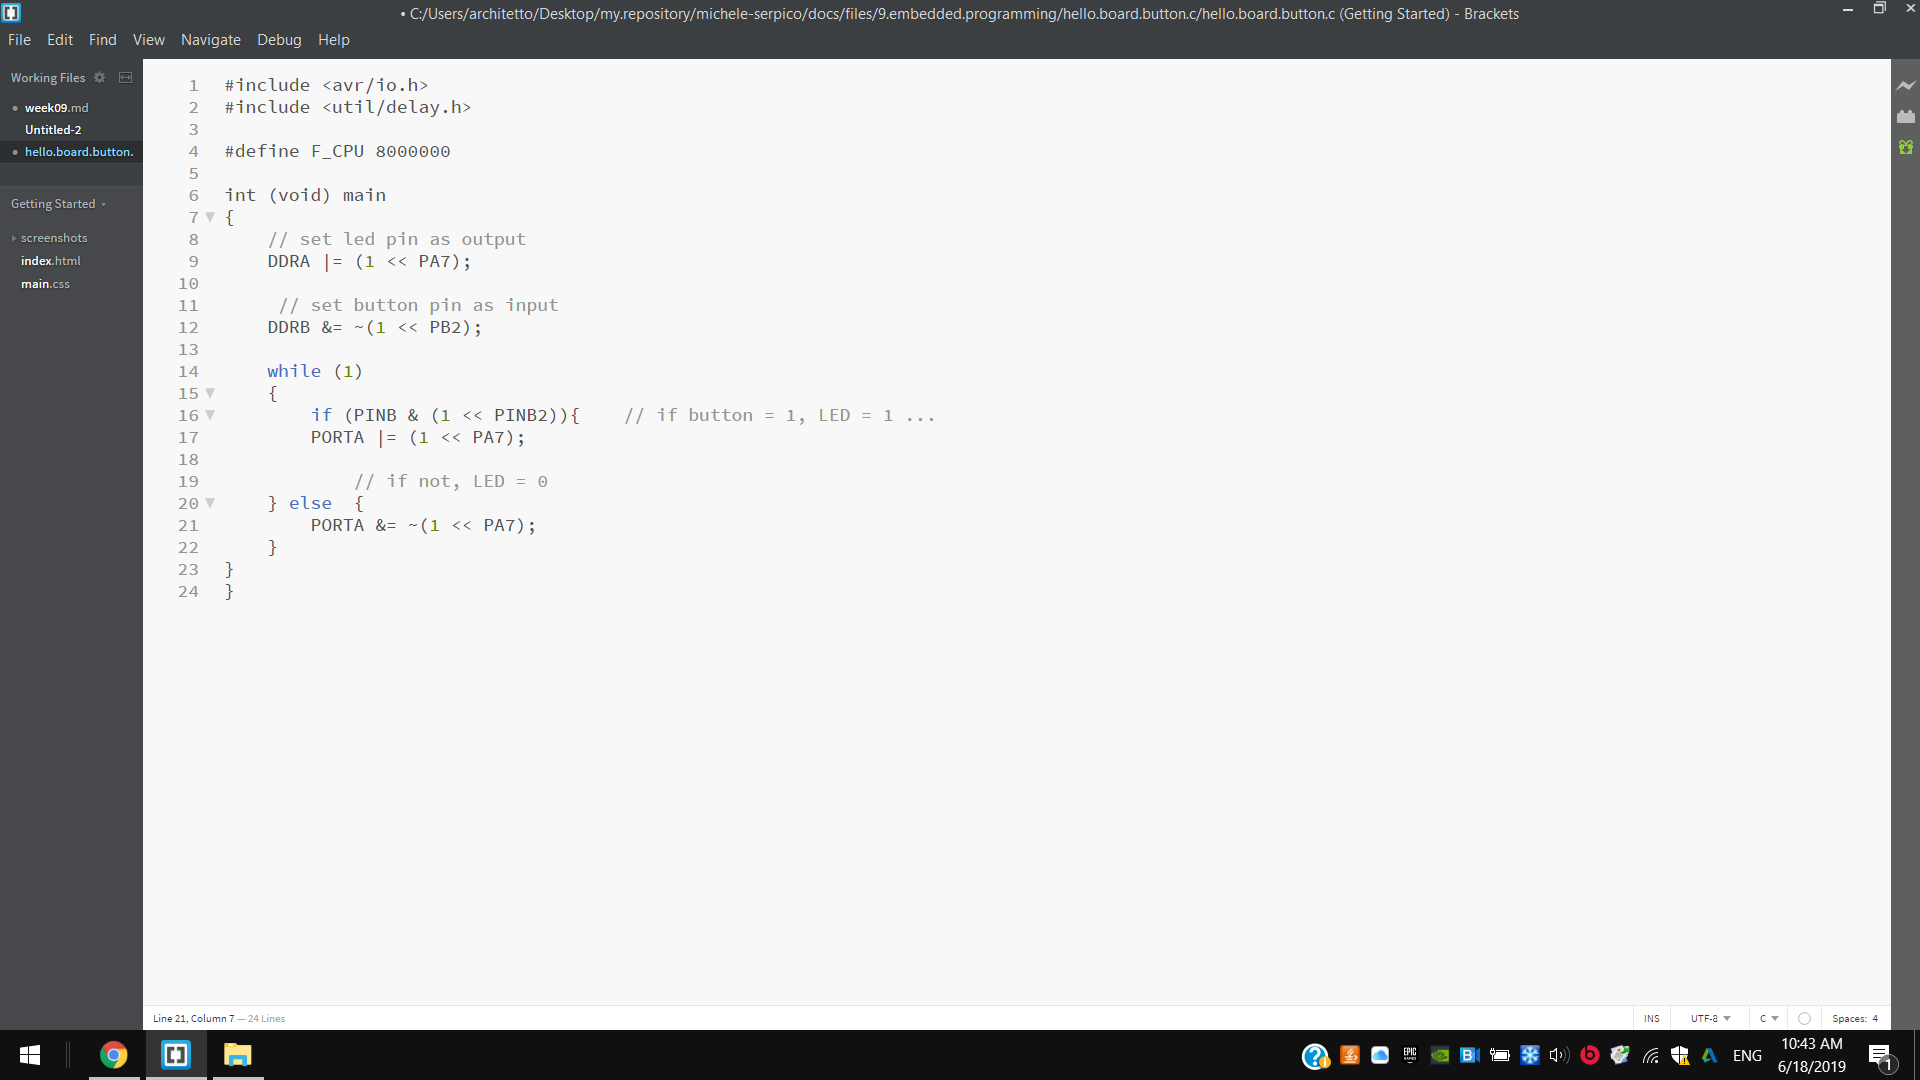
1st Here respectively I defined LED and button pins as output and input
2nd Then I set an if function followed by the opposite else one.
MicheleSerpico MINGW64 ~
$ cd Desktop/

MicheleSerpico MINGW64 ~/Desktop
$ cd my.repository/

MicheleSerpico MINGW64 ~/Desktop/my.repository
$ cd michele-serpico/

MicheleSerpico MINGW64 ~/Desktop/my.repository/michele-serpico (master)
$ cd docs/

MicheleSerpico MINGW64 ~/Desktop/my.repository/michele-serpico/docs (master)
$ cd files/

MicheleSerpico MINGW64 ~/Desktop/my.repository/michele-serpico/docs/files (master)
$ cd 9.embedded.programming/

MicheleSerpico MINGW64 ~/Desktop/my.repository/michele-serpico/docs/files/9.embedded.programming (master)
$ cd hello.board.button.c/

MicheleSerpico MINGW64 ~/Desktop/my.repository/michele-serpico/docs/files/9.embedded.programming/hello.board.button.c (master)
$ ls
hello.board.button.c  Makefile

MicheleSerpico MINGW64 ~/Desktop/my.repository/michele-serpico/docs/files/9.embedded.programming/hello.board.button.c (master)
$ make
avr-gcc -mmcu=attiny44 -Wall -Os -DF_CPU=8000000 -I./ -o hello.board.button.out hello.board.button.c
avr-objcopy -O ihex hello.board.button.out hello.board.button.c.hex;\
        avr-size --mcu=attiny44 --format=avr hello.board.button.out

 AVR Memory Usage

Device: attiny44

Program:      90 bytes (2.2% Full)
(.text + .data + .bootloader)

Data:          0 bytes (0.0% Full)
(.data + .bss + .noinit)


architetto@MicheleSerpico MINGW64 ~/Desktop/my.repository/michele-serpico/docs/files/9.embedded.programming/hello.board.button.c (master)
$ make program-usbtiny
avr-objcopy -O ihex hello.board.button.out hello.board.button.c.hex;\
        avr-size --mcu=attiny44 --format=avr hello.board.button.out

AVR Memory Usage

Device: attiny44

Program:      90 bytes (2.2% Full)
(.text + .data + .bootloader)

Data:          0 bytes (0.0% Full)
(.data + .bss + .noinit)


avrdude -p t44 -P usb -c usbtiny -U flash:w:hello.board.button.c.hex

avrdude: AVR device initialized and ready to accept instructions

Reading | ################################################## | 100% 0.00s

avrdude: Device signature = 0x1e9207
avrdude: NOTE: FLASH memory has been specified, an erase cycle will be performed
         To disable this feature, specify the -D option.
avrdude: erasing chip
avrdude: reading input file "hello.board.button.c.hex"
avrdude: input file hello.board.button.c.hex auto detected as Intel Hex
avrdude: writing flash (90 bytes):

Writing | ################################################## | 100% 0.12s

avrdude: 90 bytes of flash written
avrdude: verifying flash memory against hello.board.button.c.hex:
avrdude: load data flash data from input file hello.board.button.c.hex:
avrdude: input file hello.board.button.c.hex auto detected as Intel Hex
avrdude: input file hello.board.button.c.hex contains 90 bytes
avrdude: reading on-chip flash data:

Reading | ################################################## | 100% 0.10s

avrdude: verifying ...
avrdude: 90 bytes of flash verified

avrdude done.  Thank you.
Arduinio IDE
1st Respectively I defined LED and button pins;
2nd I defined the button state variable starting as off (0);
3rd I defined pins as outputs, in setup;
4th I set the “digitalRead” function for the button;
5th I set the if condition and the opposite one else (if button state is HIGH, turns LED on, else turns it LOW).
// constants won't change. They're used here to set pin numbers:
const int buttonPin = 7;     // the number of the pushbutton pin
const int ledPin =  8;      // the number of the LED pin

// variables will change:
int buttonState = 0;         // variable for reading the pushbutton status

void setup() {
  // initialize the LED pin as an output:
  pinMode(ledPin, OUTPUT);
  // initialize the pushbutton pin as an input:
  pinMode(buttonPin, INPUT);
}

void loop() {
  // read the state of the pushbutton value:
  buttonState = digitalRead(buttonPin);

  // check if the pushbutton is pressed. If it is, the buttonState is HIGH:
  if (buttonState == HIGH) {
    // turn LED on:
    digitalWrite(ledPin, HIGH);
  } else {
    // turn LED off:
    digitalWrite(ledPin, LOW);
}
}

Other architectures
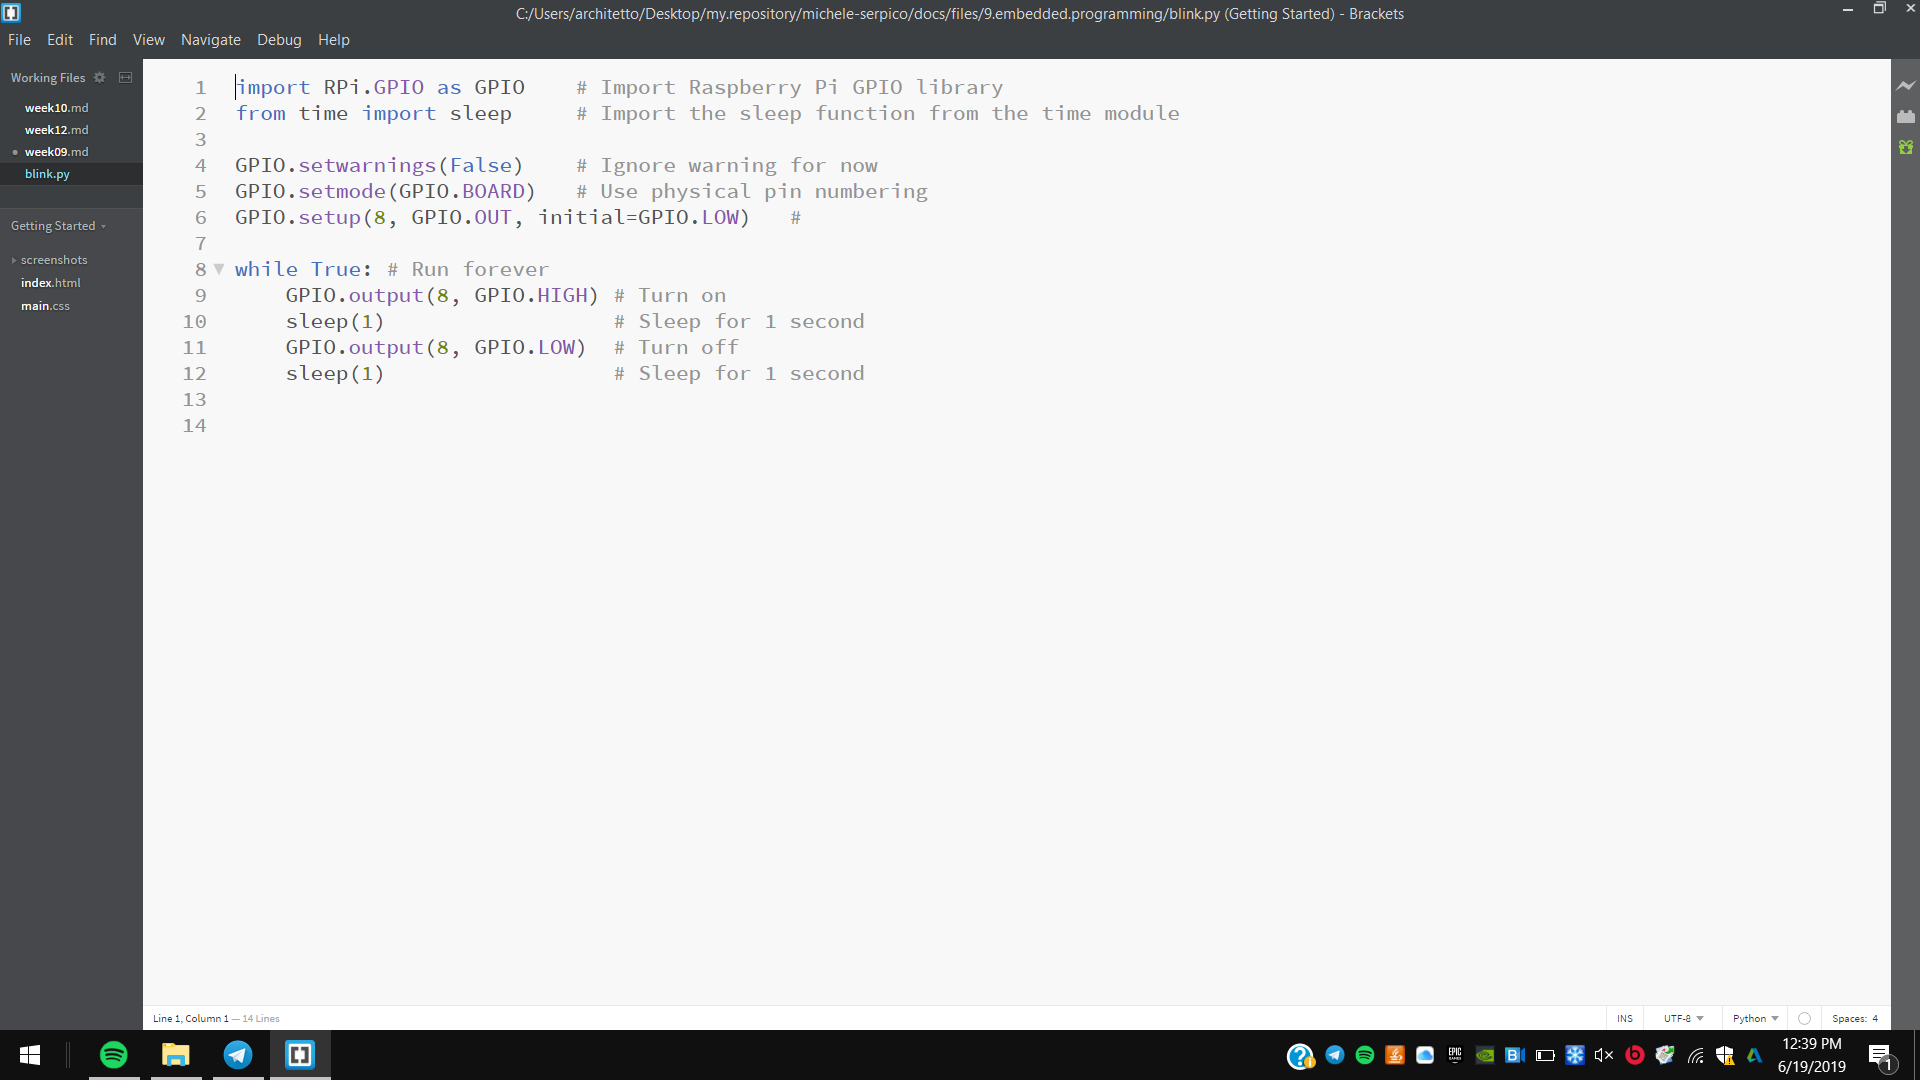
Raspberry Pi
I also uploaded a blink code to a Raspberry Pi Zero single board-computer through a micro-SD card;
-
I downloaded Python;
-
I connected the the micro-SD card to my pc;
-
I downloaded the time-library;
-
I wrote a blink code using Bracket Editor including this library ;
-
I uploaded it on the micro-SD card using Python;
-
And I insrted it in the Raspberry Pi Zero again and I connected a green LED.