Project Management
Creating the Website
I have very little experience with creating websites. Therefore, the local Project Management session at the FabLab was a very useful introduction into creating webpages and styling them
The first thing I had to do was to link my GitLab to my master folder on the local PC I'm using. Using Git Bash I started configuring my account:
git config --"reeman.bustami" (My gitlab user name)
git config --global reemanbustami@hotmail.com (The email I'm signed up at GitLab with)
git config --global core.editor nano
The next step is to generate the SSH key.
ssh-keygen -t rsa -C "reemanbustami@hotmail.com"
/c/Users/Fablab/.ssh/id_rsa (path to folder in which the SSH key will be saved)
cat~/.ssh/id_rsa.pub (to access the public key)
Copied it and pasted it to my GitLab.
The next step is to create the local folder.
I created the local folder at desktop, and saved my favorite template in it. I got the template from free-css and the template is Treviso.
I used Brackets to edit the HTML files. I later realized that the portfolio entries on my homepage do not link to other pages. instead, they link to modals. Since this was not convenient to the kind of content I'd be creating, I added "more" buttons and linked to portfolio pages. For the portfolio pages I used the Blog Post template from Bootstrap. To edit the HTML, I used Brackets. As a start, I've added four pages; Week1, Week2, Week3, and Final Project. I also added a "Coming Soon" page that I linked all upcoming weeks to.
The following are essential commands I used repeatedly while working on the website:
Adding images:
The HTML code for adding an image is: (example from Week1)

the "class" is defined in the CSS sheet of the template - which I used in all images for consistency.
"src" is the source of the image on the local folder.
"height" is the height of the image in pixels. I could have also defined width. In some pages I relied on the width - depending on the nature of the images. I, however, avoided defining both height and width as that would stretch or constrain the images.
Adding links:
I used two types of links while documenting:
Extrenal links - linking to addresses not within my website. For that I used this HTML code: (example from week1)

I used the same class used in the navigation bar.
"href" leads to the website.
and the text is the one that should be hyperlinked.
The other type of links is internal ones, meaning that they're part of my local folder: (example from the navigation bar on top of every page in the website)
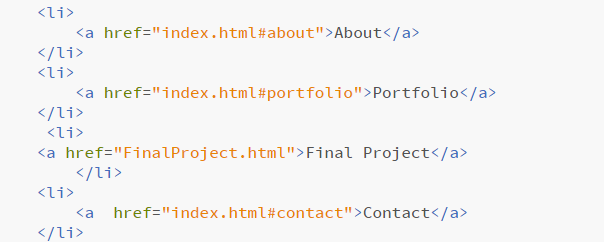
"href" takes to the page.
#NAME that follows takes to a specific division of the page. As you can see, my index.htm page (homepage) has three divisions: About, Portfolio, and Contact.
Adding lists:
I only used unnumbered lists in my documentation. The HTML code is: (Example from week 20)
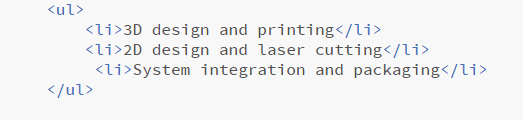
The list begins with "ul" - Unnumbered List - and each item begins with "li".
Adding files:
To upload my working files, I used this HTML code: (example from Week5)

The "href" is followed by the directory of the file on the local folder.
After making changes to the folders I had to push the changes to Git Lab. Using Git Bash, I ran the following commands:
cd Desktop/Websitefiles
cd reeman-bustami (master folder)
git add -A
git commit -m ""
git push
Used Software: