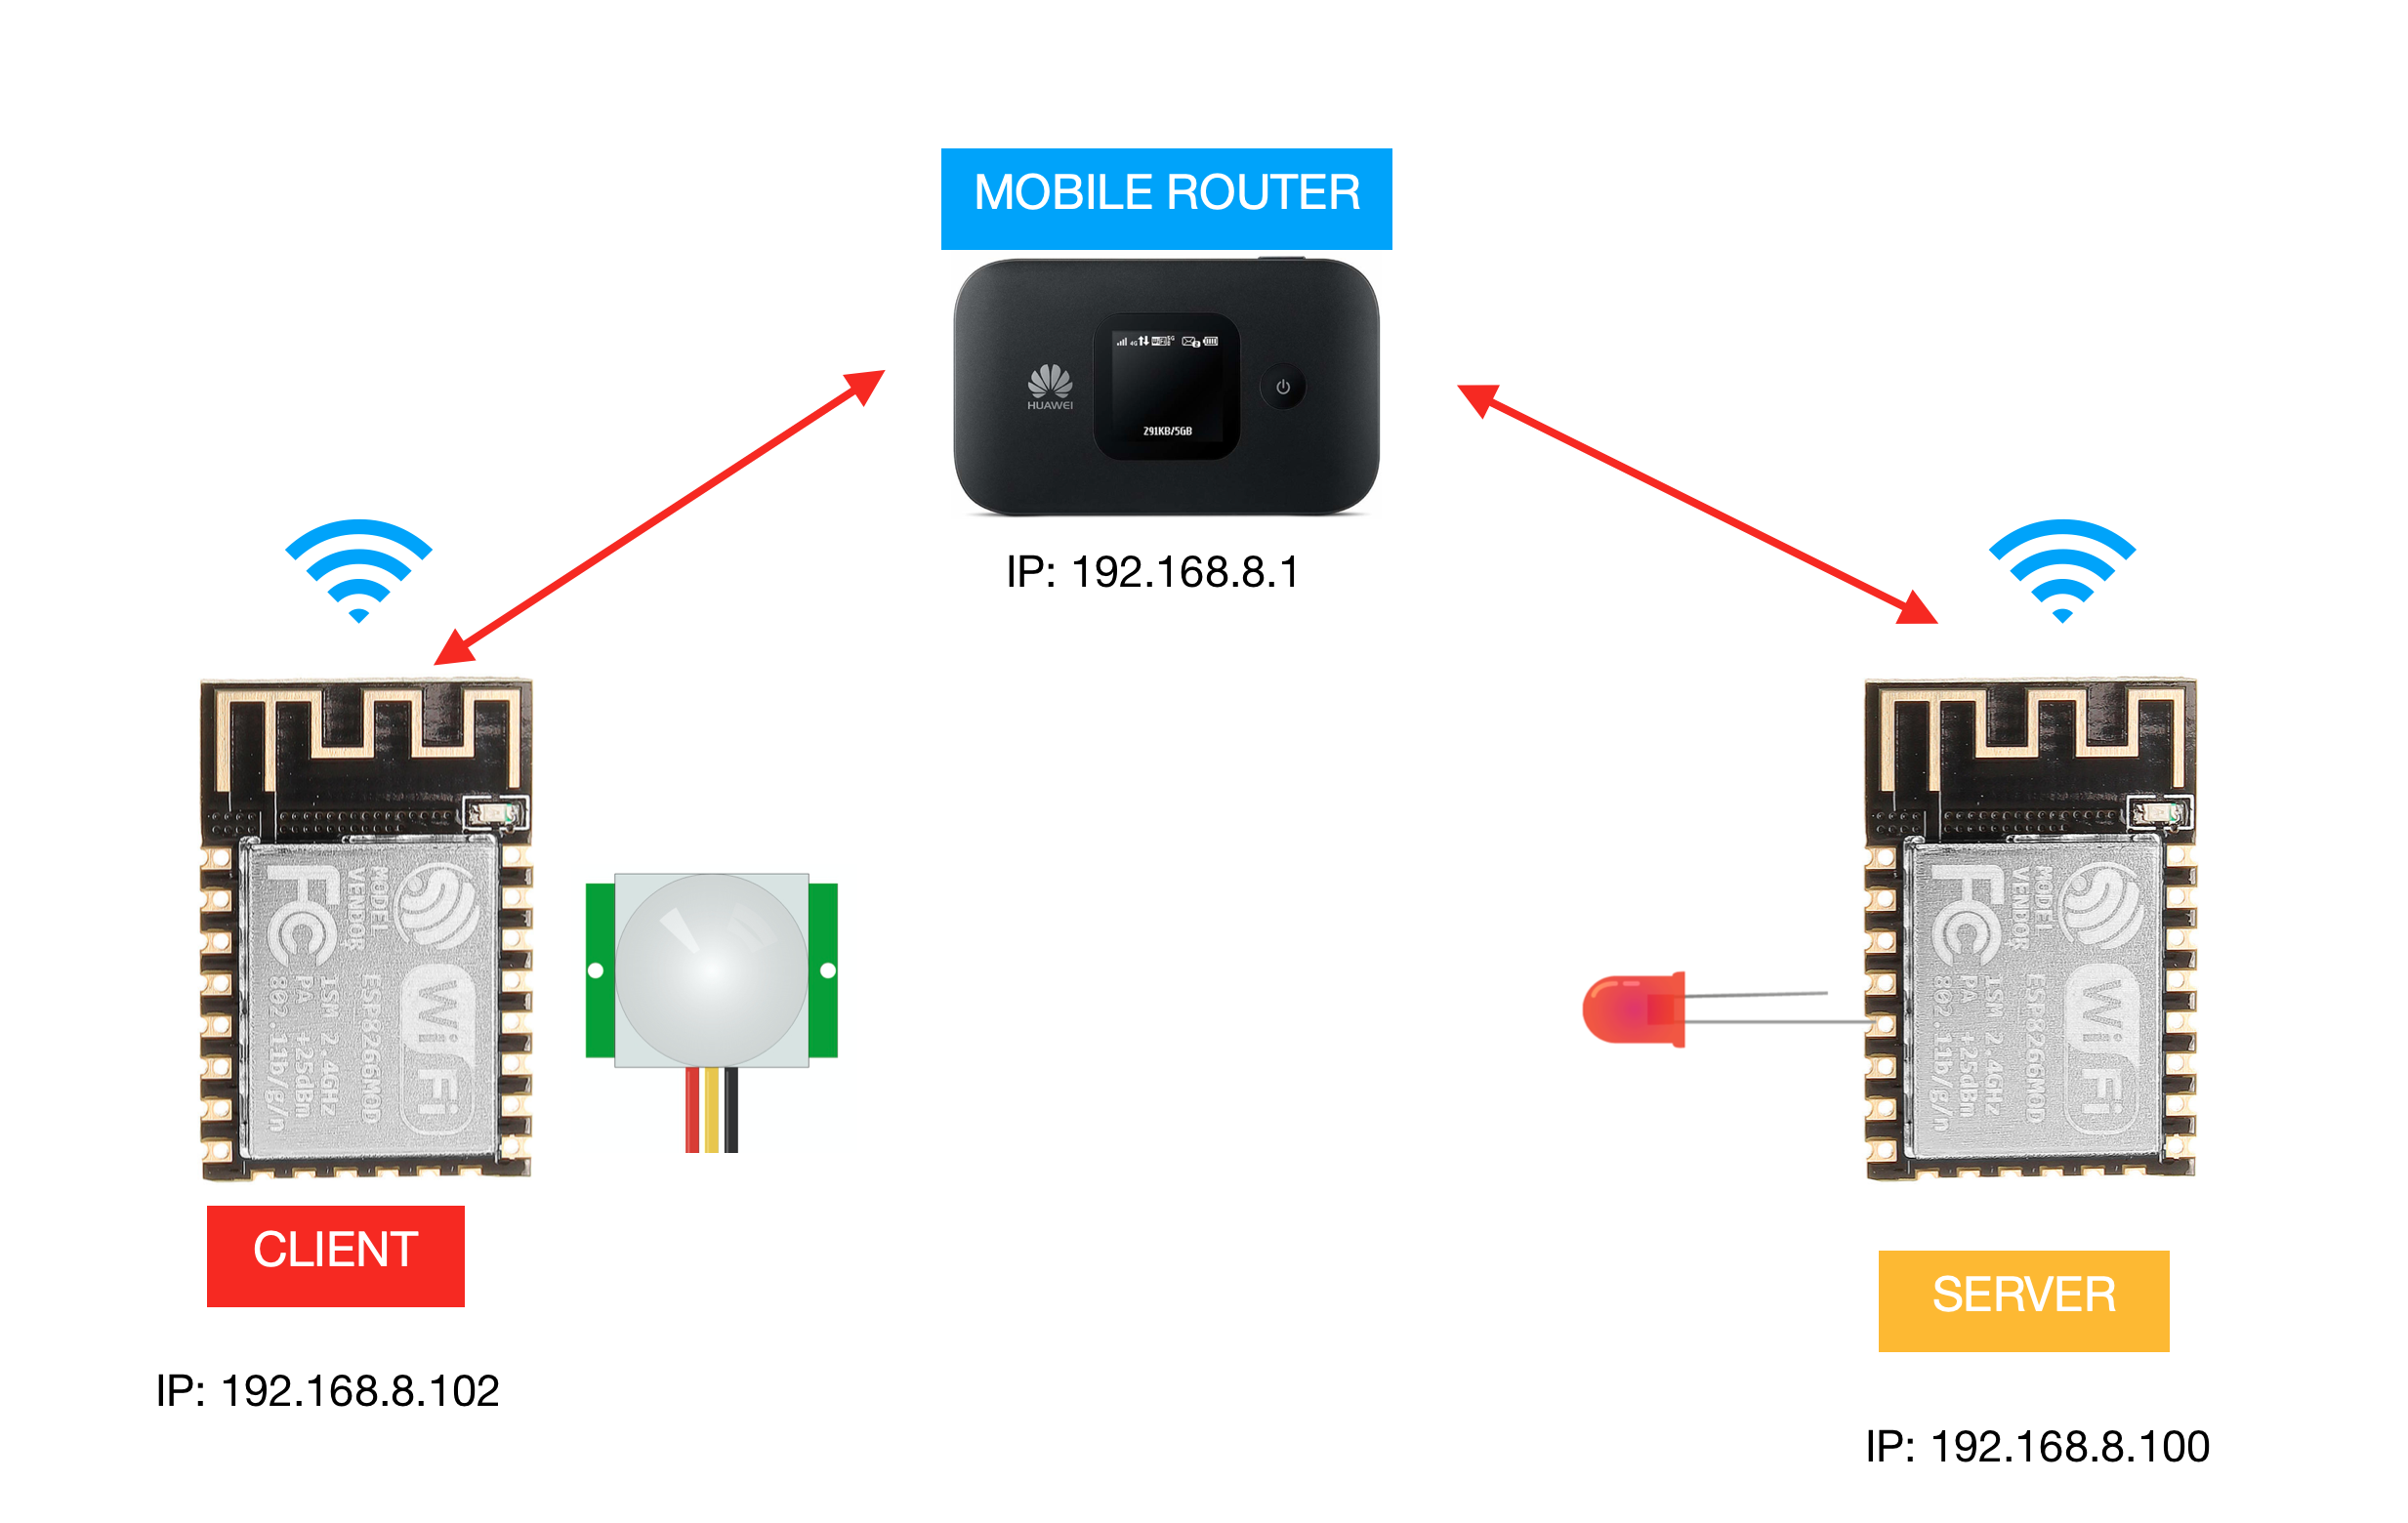
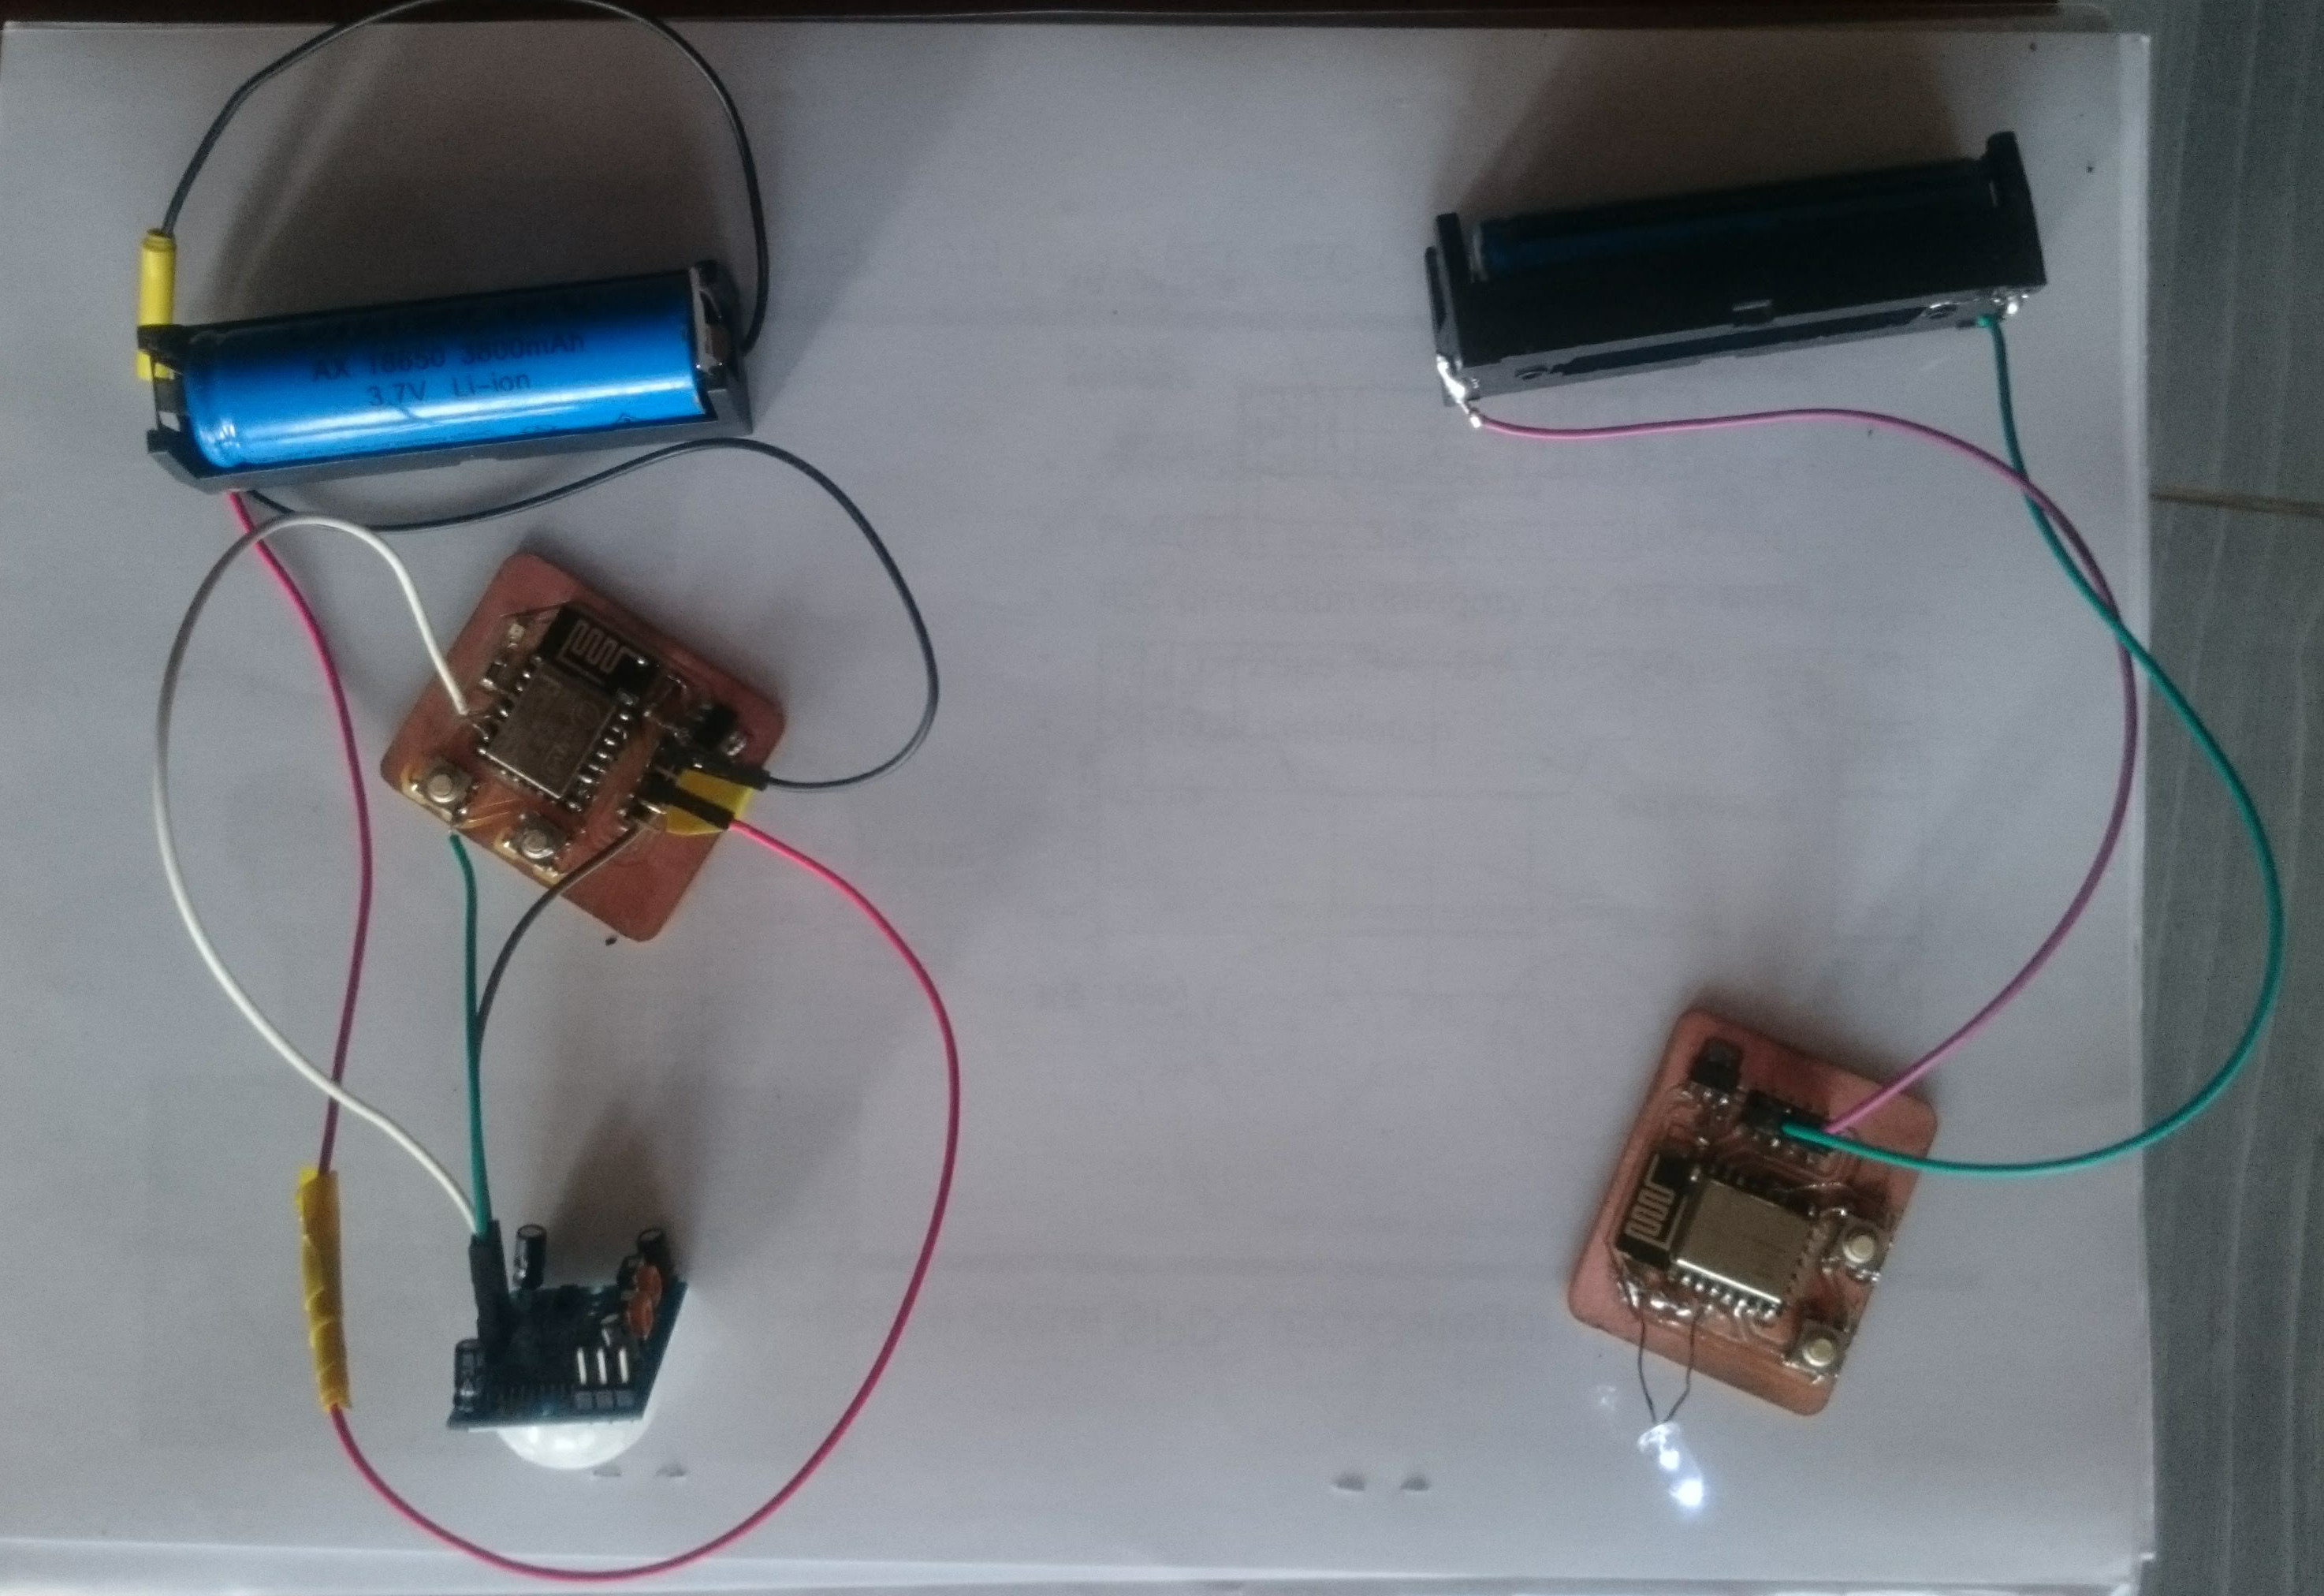
This week assignment is to design, build, and connect wired or wireless node(s) with network or bus addresses. I decided to create a wireless communication network between two ESP8266 boards. I created a WiFi Communication Between Two ESP8266 Based MCU Through the Home Router. At client side nodemcu I connected a PIR sensor with Pin#GPIO13. Pin#GPIO13 is used as input pin. When there is a presence of the IR source like human, dog or bird the input signal will be given to the Pin#GPIO13 (3.3Voltage). On the server side the led connected at the Pin#GPIO16 server side(ESP8266) toggles. ESP8266 boards are powered through the 3.7V lithium battery.
ESP8266 Operating Modes
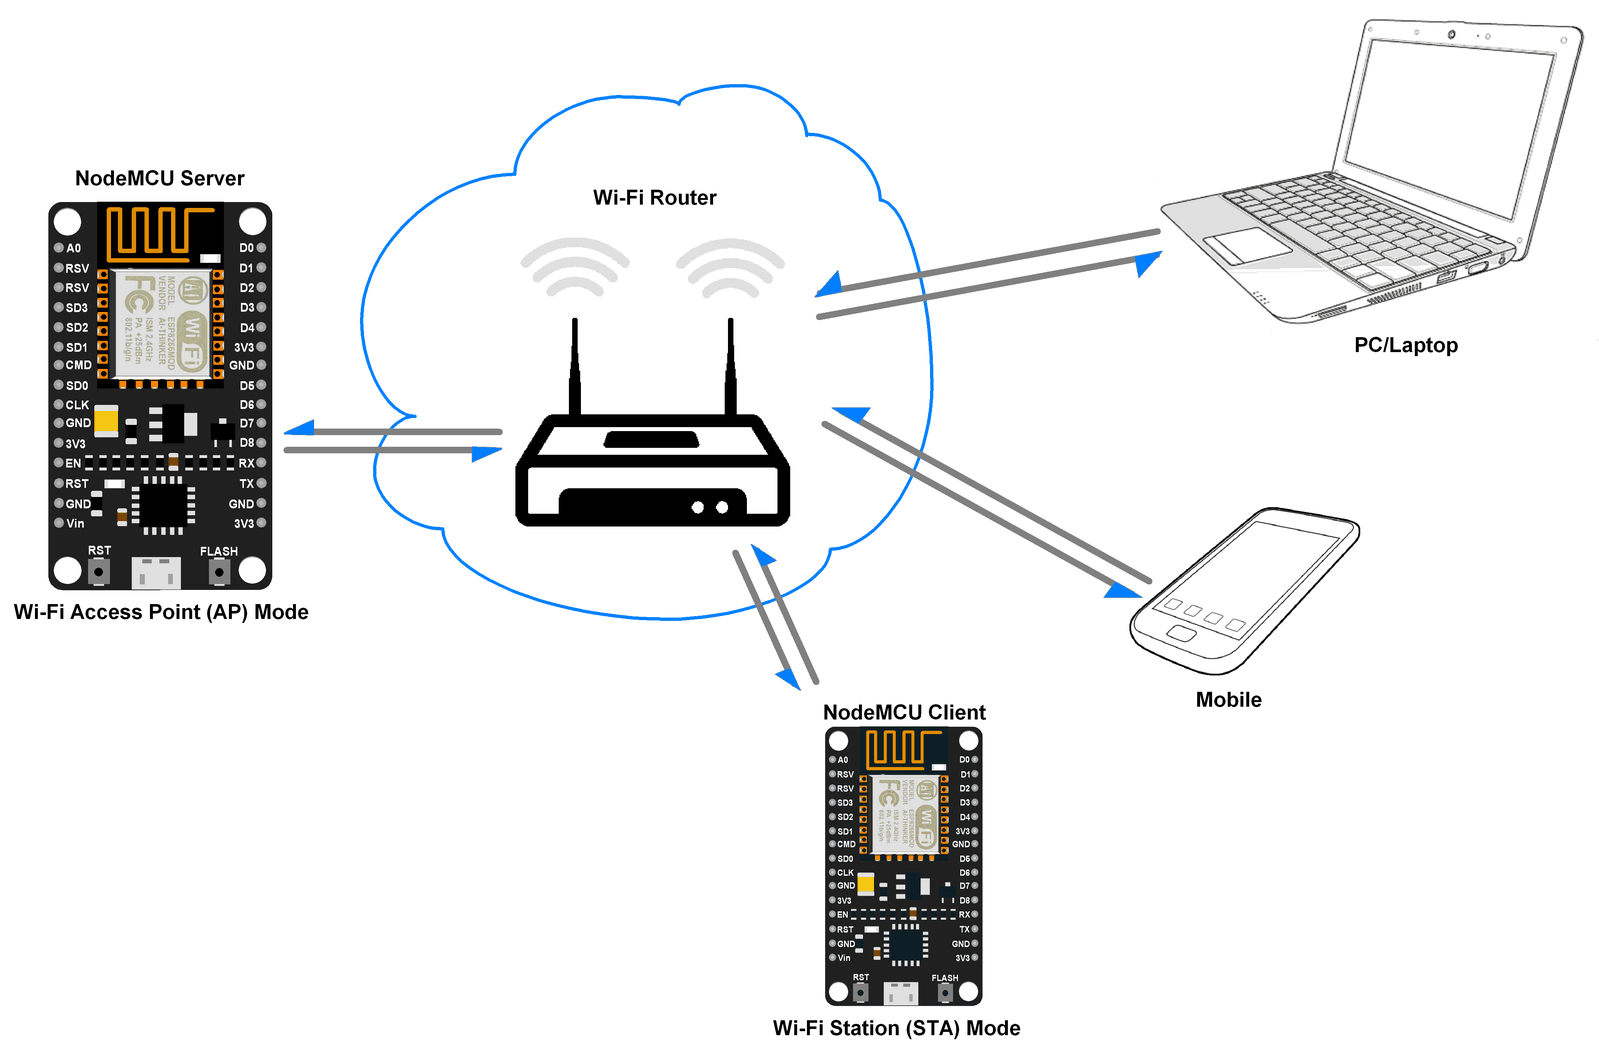
One of the greatest features ESP8266 provides is that it cannot only connect to an existing WiFi network and act as a Web Server, but it can also set up a network of its own, allowing other devices to connect directly to it and access web pages. This is possible because ESP8266 can operate in three different modes: Station mode, Soft Access Point mode, and both at the same time. This provides possibility of building mesh networks.
HTTP Server on NodeMCU with Arduino IDE
The Hypertext Transfer Protocol (HTTP) is standard application layer protocol which functions as a request response protocol in between server and client. It is widely used in IoT (Internet of Things) embedded applications, where every sensor is connected to a server and we have access to control them over the internet.
NodeMCU has Wi-Fi functionality available on board. With this Wi-Fi functionality NodeMCU can connect to any wi-fi network as client or it can create a network to which other wi-fi enabled devices can connect.
NodeMCU as HTTP Server using Wi-Fi STA mode
NodeMCU has Station (STA) mode using which it can connect to existing wi-fi network and can act as HTTP server with IP address assigned by that network.
ESP12 as HTTP Server using Wi-Fi STA mode
NodeMCU gets IP from Wi-Fi router to which it is connected. With this IP address, it can act as an HTTP server to which any wi-fi device can connect.
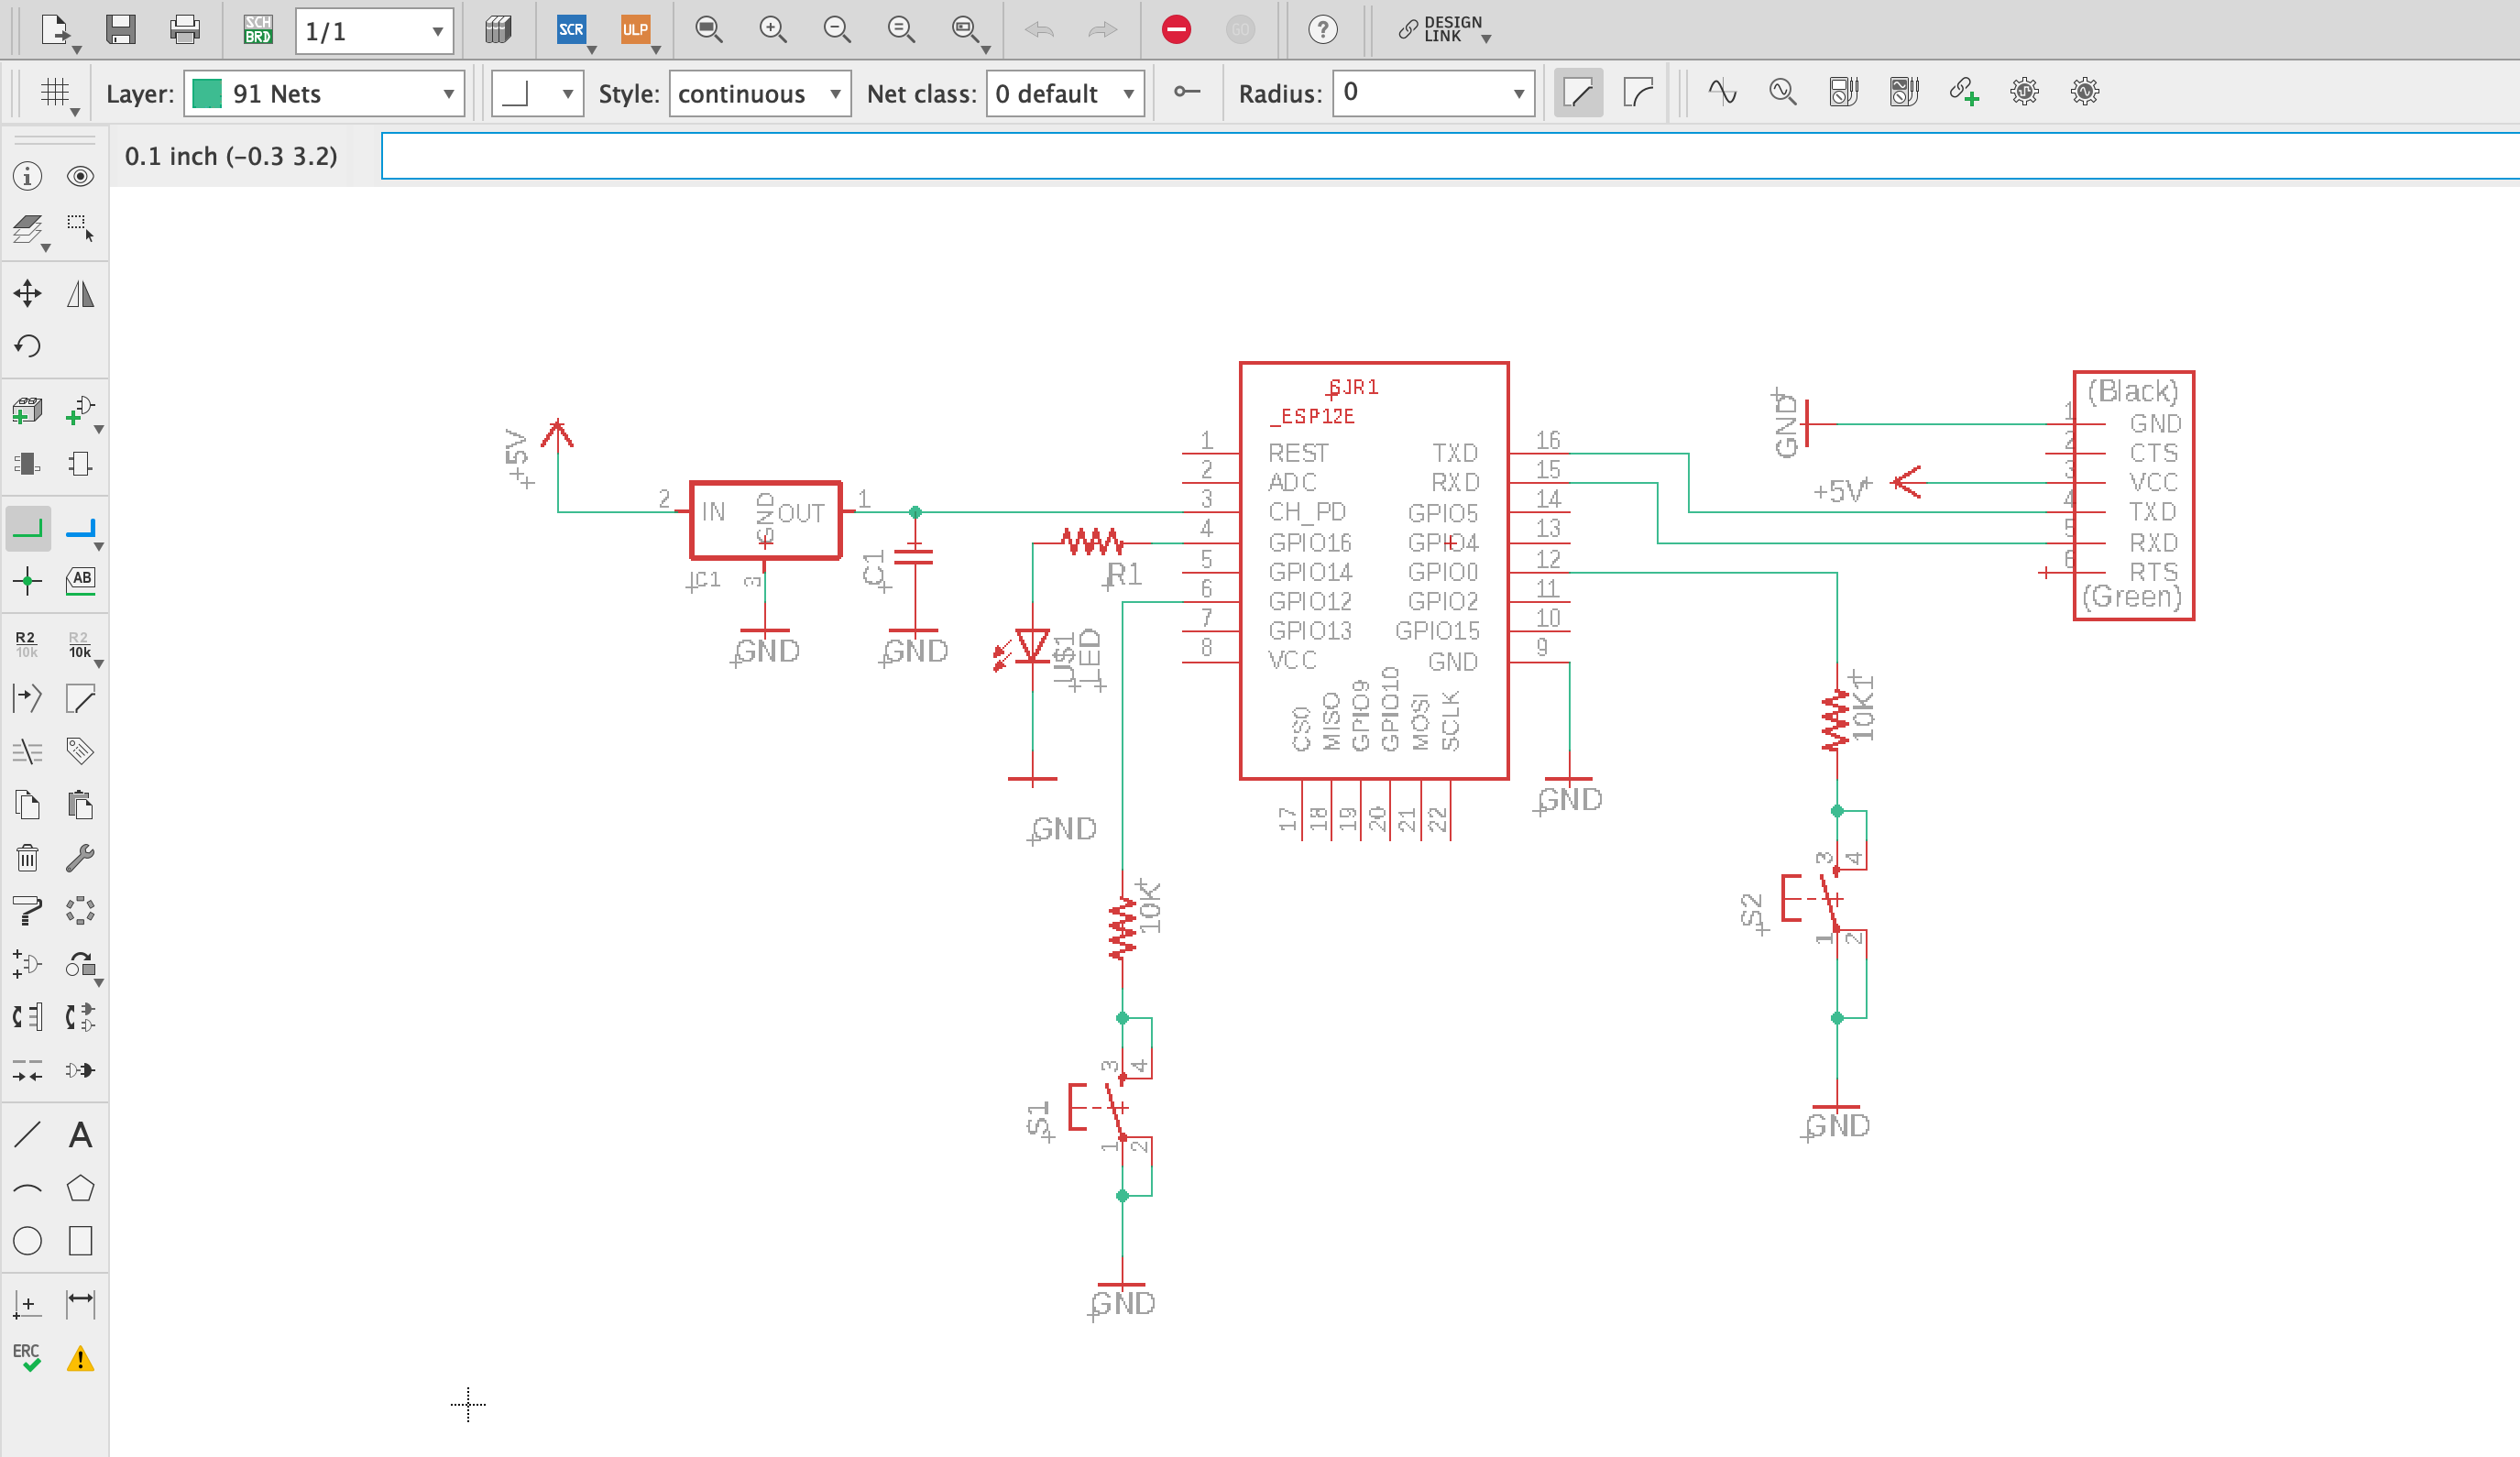
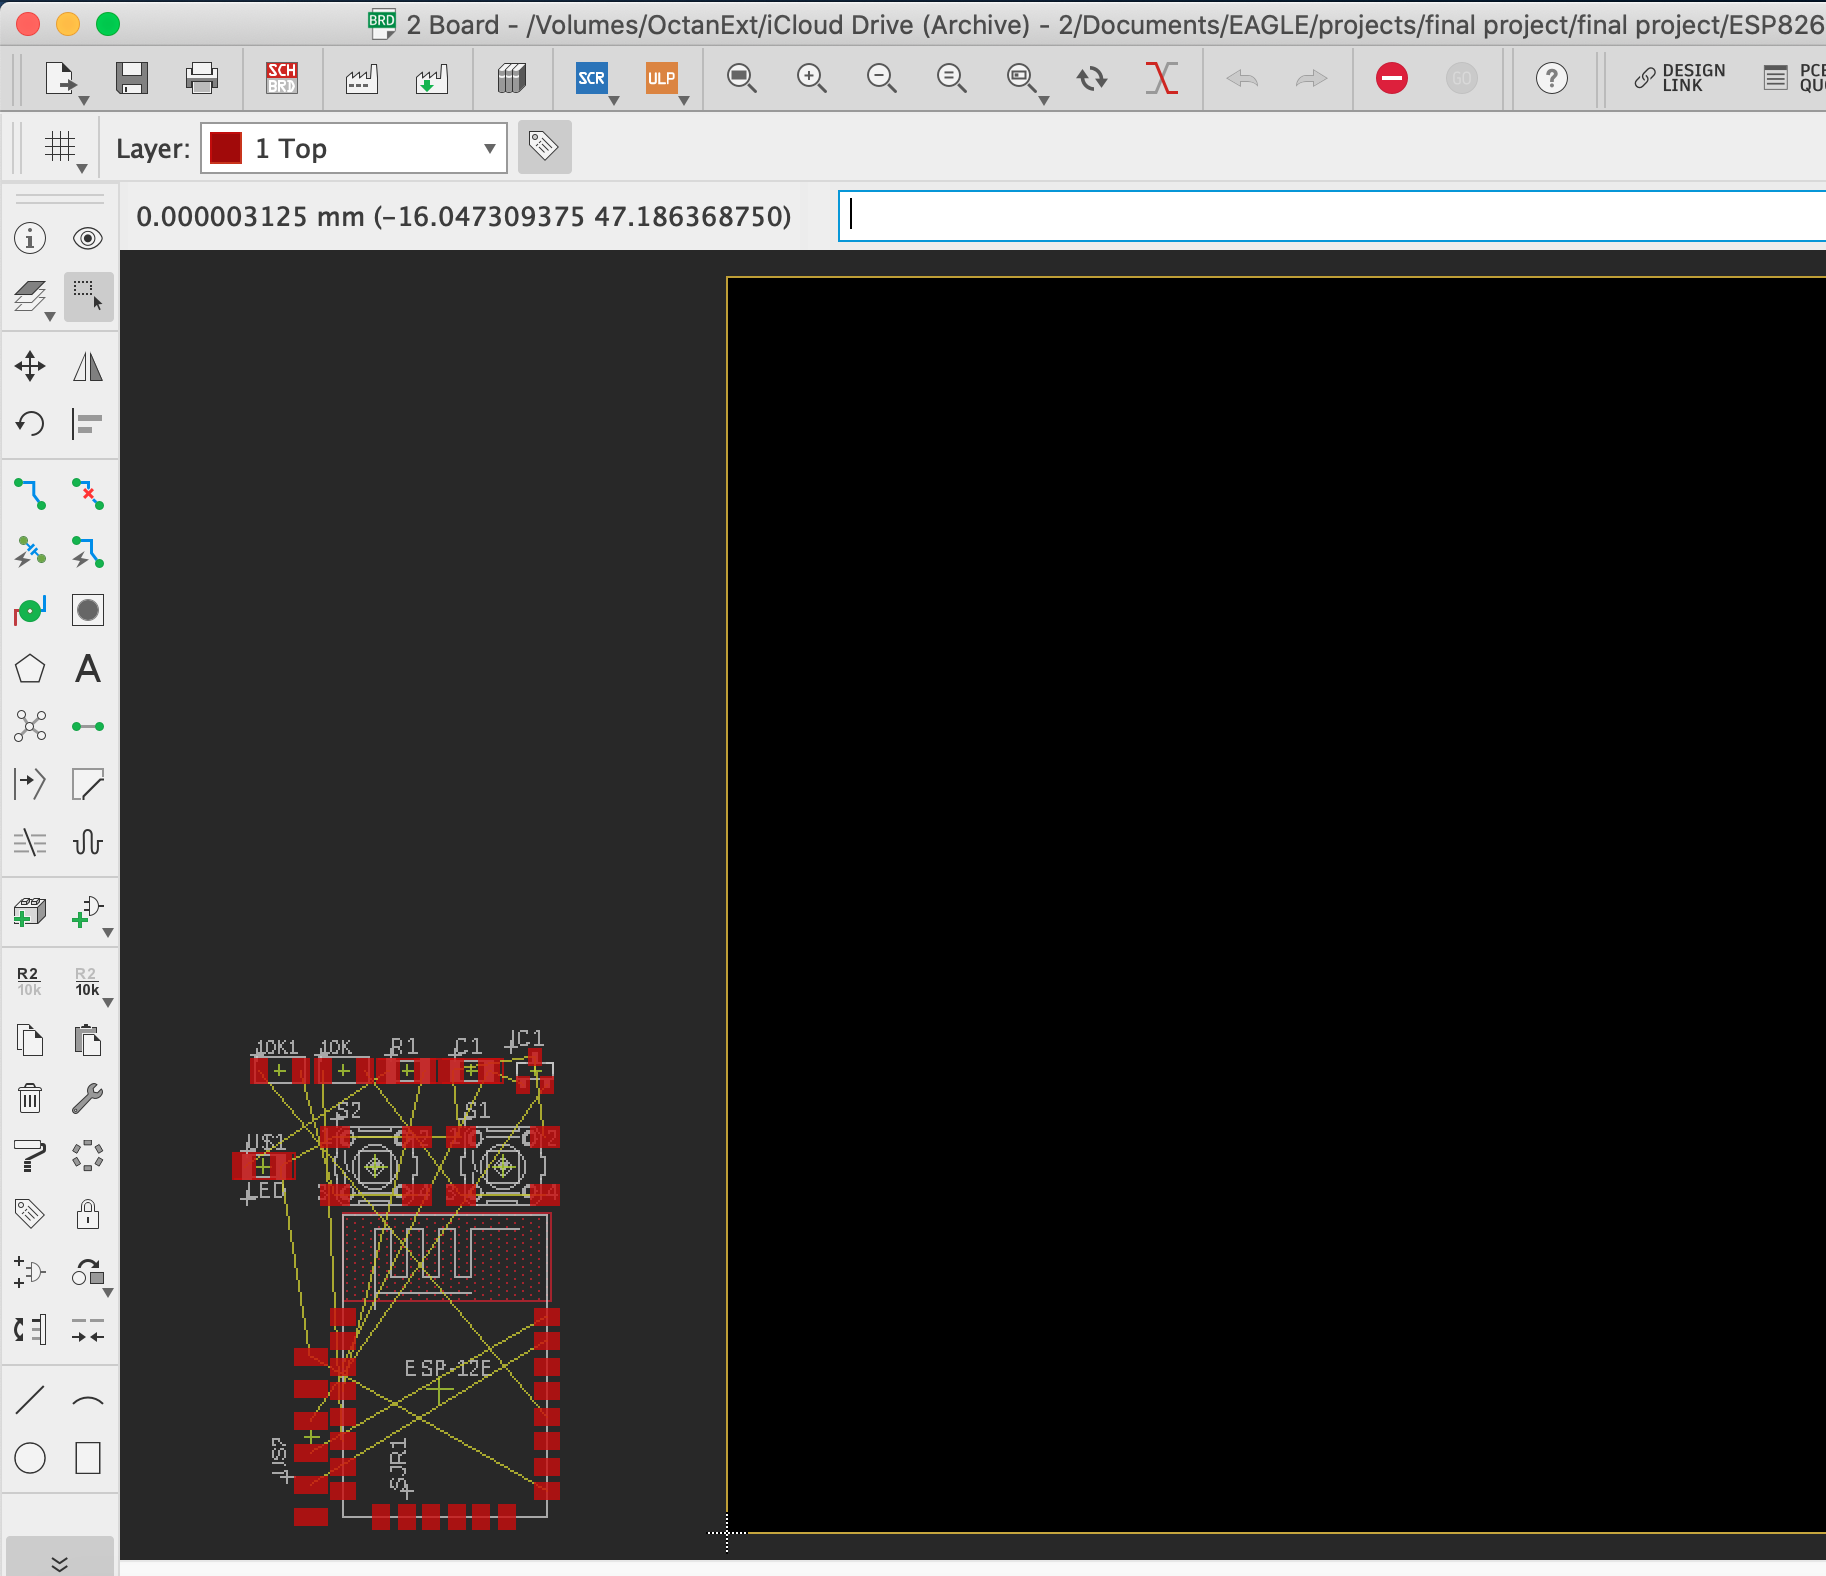
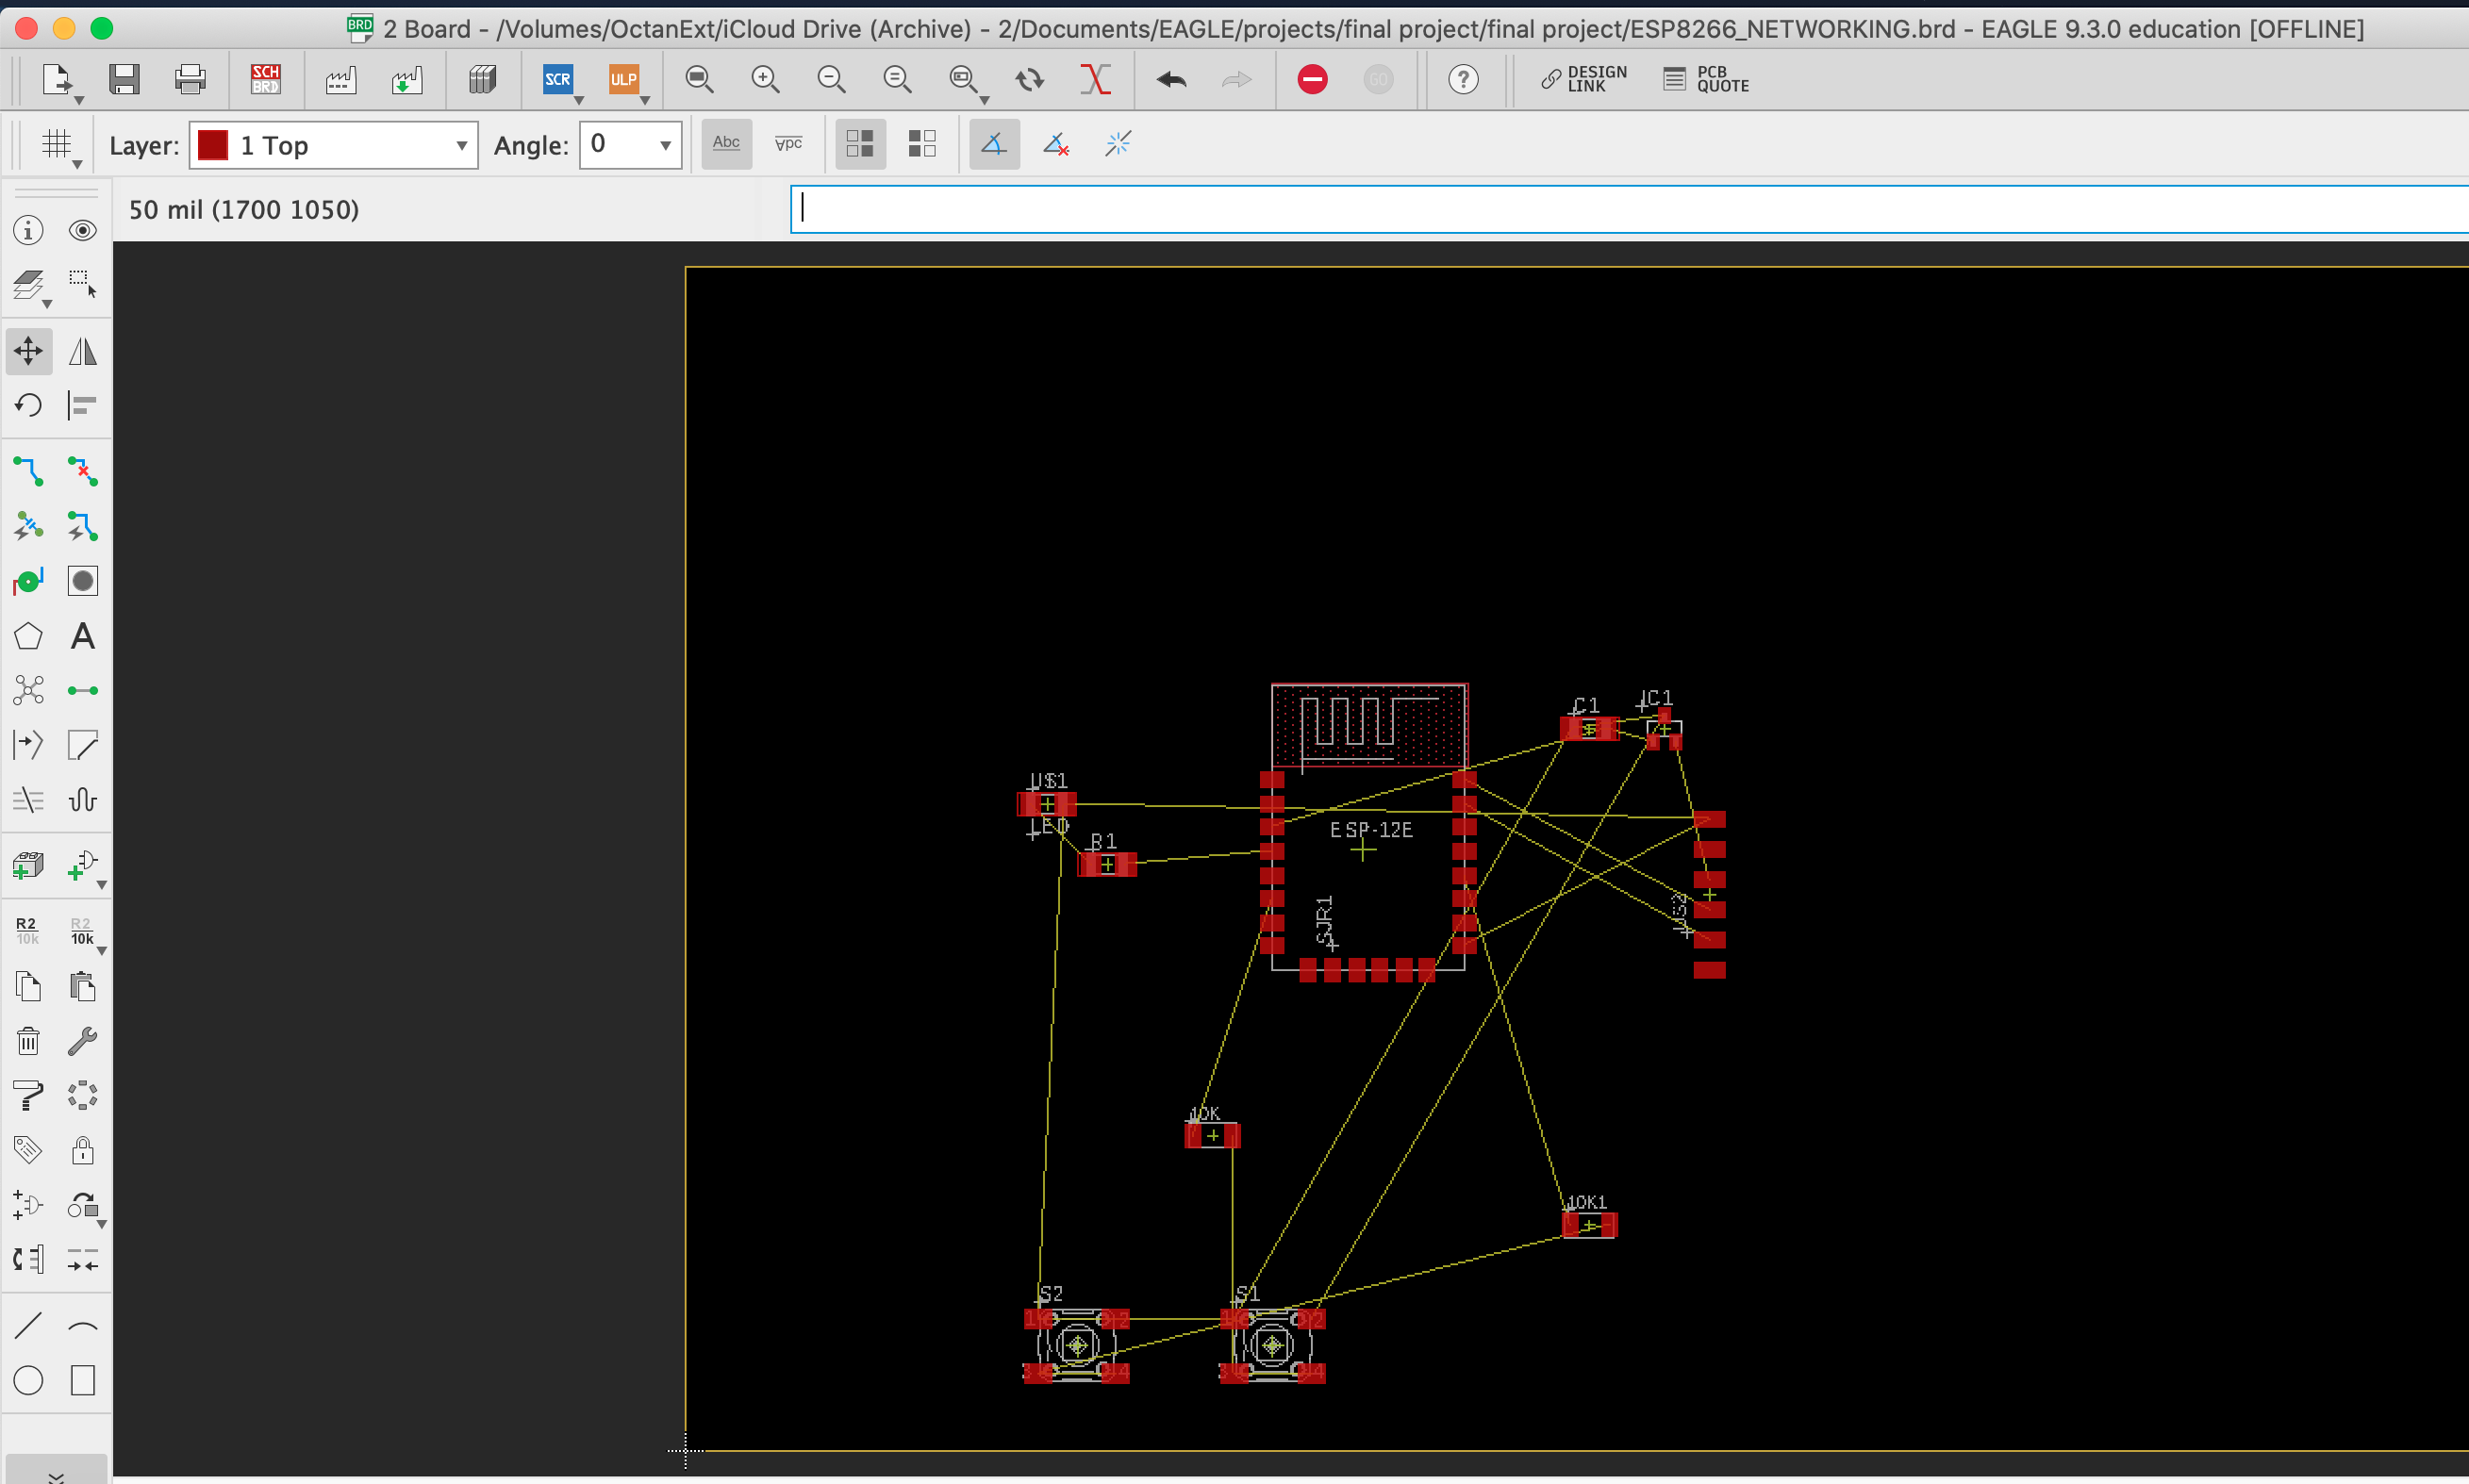
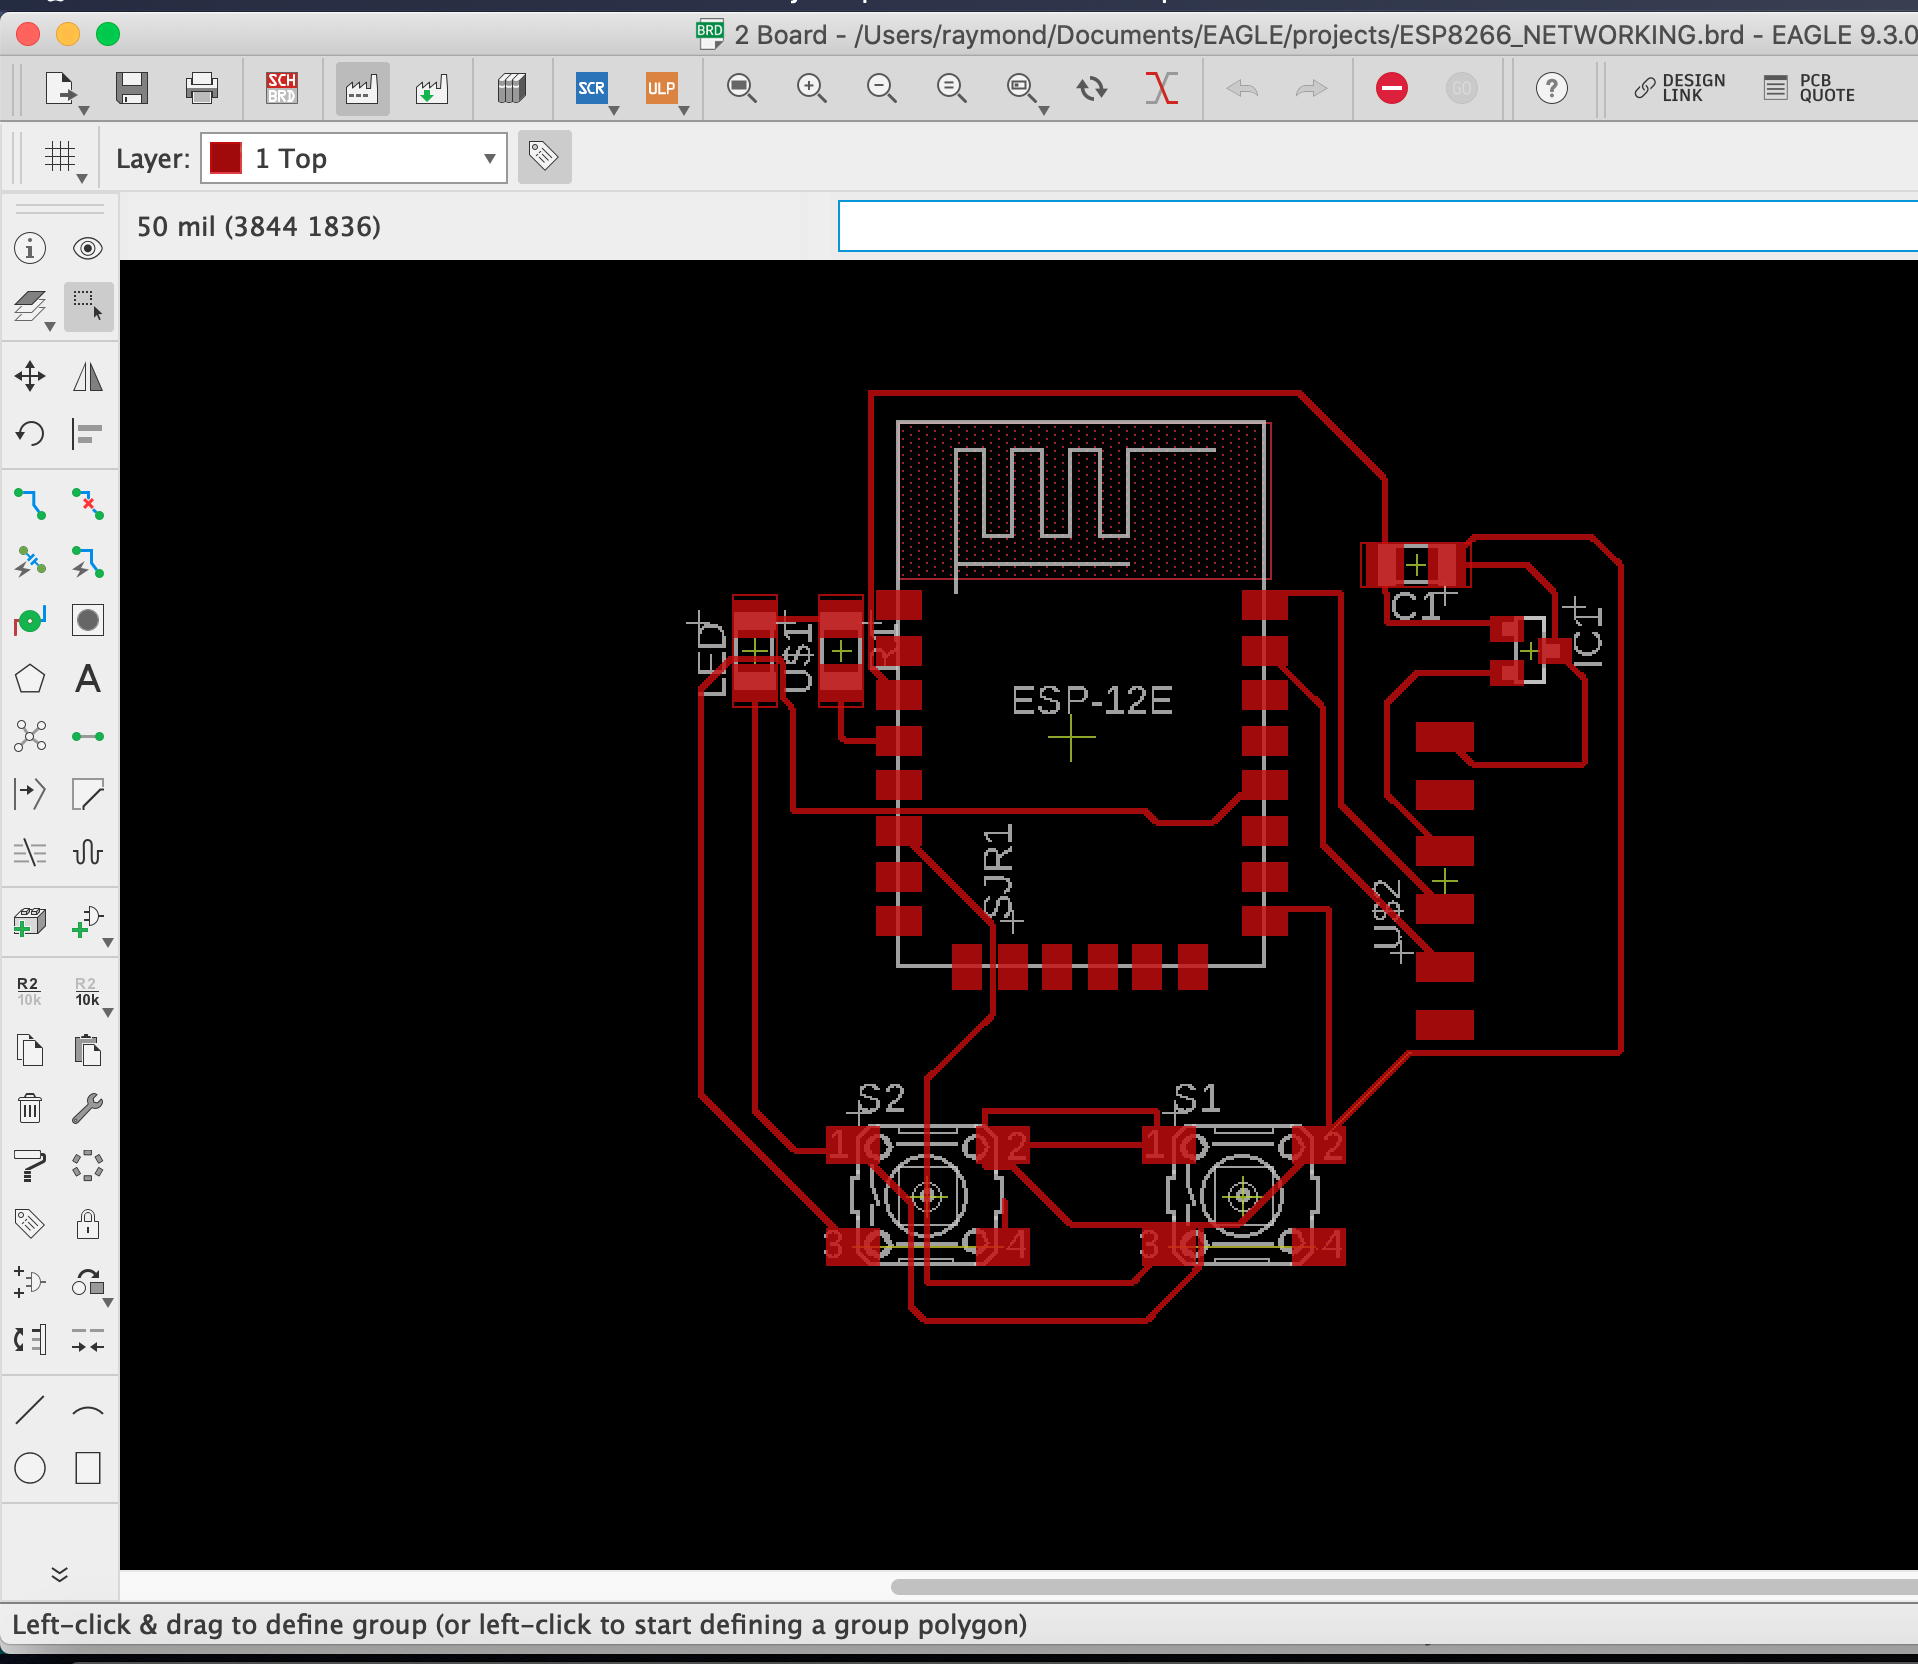
Design
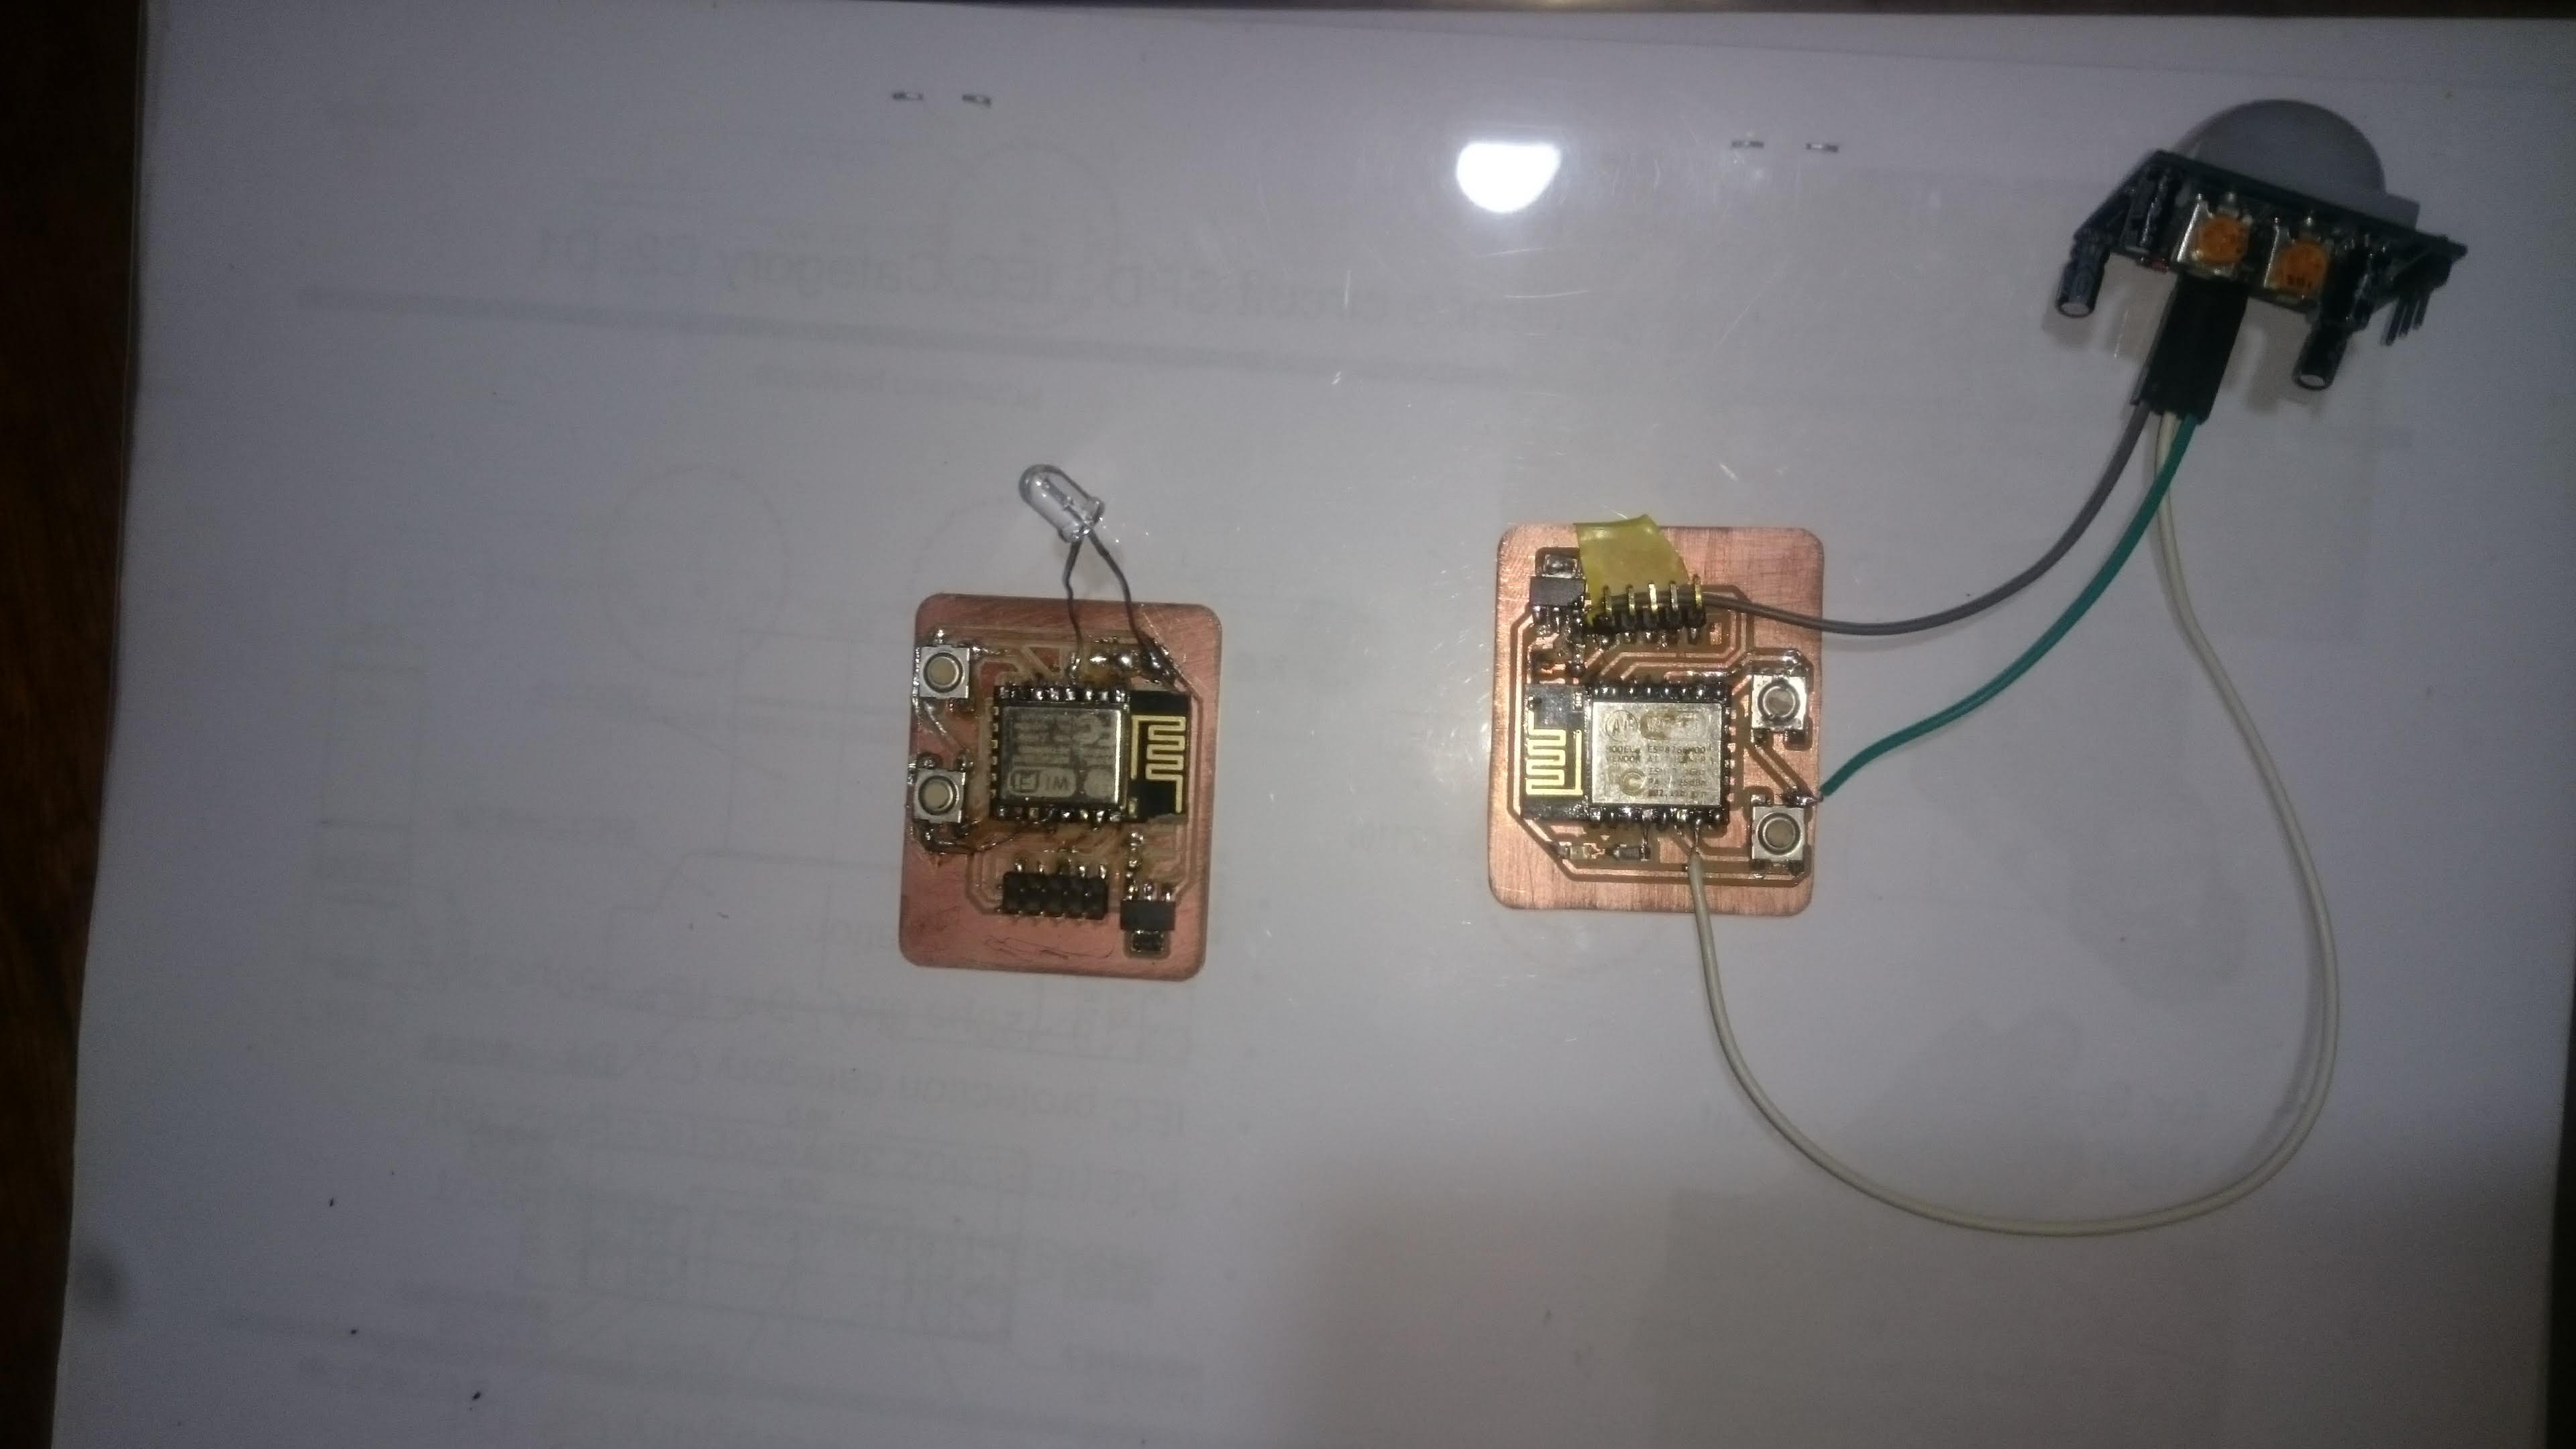
Implementation
Client source code
#include

const char* ssid     = "FABLAB2019"; //AP Name (Server Name)
const char* password = "gqgh7abe";
const char * host = "192.168.8.100";        // IP Server

const int httpPort = 80;

const char* Commands;                       // The command variable that is sent to the server

int PIR = 13;
bool btn_press = true;
int con = 0;

void setup() {
  // put your setup code here, to run once:
  pinMode(PIR, INPUT);
  Serial.begin(115200);

  Serial.println("");
  Serial.println("Client-------------------------------");
  Serial.print("Connecting to Network");
  WiFi.mode(WIFI_STA);                      // Mode Station
  WiFi.begin(ssid, password);               // Matching the SSID and Password
  delay(1000);

  // Waiting to connect to wifi
  while (WiFi.status() != WL_CONNECTED) {
    Serial.print(".");
    delay(500);
  }
  Serial.println("");
  Serial.println("Successfully Connecting");
  Serial.println("Status : Connected");
  Serial.print("IP address: ");
  Serial.println(WiFi.localIP());
  Serial.println("-------------------------------------");
  Serial.println("");
}

void loop() {
  // put your main code here, to run repeatedly:

  if (digitalRead(PIR) == LOW) {
    Serial.println("Client-------------------------------");
    Serial.print("Send Command = ");
    if (btn_press == true) {
      if (con >= 2) {
        con = 0;
      }
      con++;

      switch (con) {
        /*case 1:
          Commands="LED_Blink";
          Serial.println(Commands);
          send_commands();
          break;*/
        case 1:
          Commands = "LED_On";
          Serial.println(Commands);
          send_commands();
          break;
        case 2:
          Commands = "LED_Off";
          Serial.println(Commands);
          send_commands();
          break;
      }

      btn_press = false;
    }
  }
  else {
    btn_press = true;
  }
  delay(100);
}


void send_commands() {
  Serial.println("Sending command...");
  Serial.println("PIR sensor dont detect");
  Serial.println("");
  Serial.print("Connecting to ");
  Serial.println(host);

  // Use WiFiClient class to create TCP connections
  WiFiClient client;

  if (!client.connect(host, httpPort)) {
    Serial.println("Connection failed");
    return;
  }

  // We now create a URI for the request
  Serial.print("Requesting URL : ");
  Serial.println(Commands);

  // This will send the request to the server
  client.print(String("GET ") + Commands + " HTTP/1.1\r\n" + "Host: " + host + "\r\n" + "Connection: Close\r\n\r\n");
  unsigned long timeout = millis();
  while (client.available() == 0) {
    if (millis() - timeout > 5000) {
      Serial.println(">>> Client Timeout !");
      client.stop();
      return;
    }
  }

  Serial.print("Server Reply = ");
  // Read all the lines of the reply from server and print them to Serial
  while (client.available()) {
    String line = client.readStringUntil('\r');
    Serial.print(line);
  }
  Serial.println("PIR Sensor detect...");
  Serial.println("-------------------------------------");
  Serial.println("");
}
server source code
#include

int led = 16; // the pin the LED is connected to

const char* ssid     = "FABLAB2019"; //AP Name (Server Name)
const char* password = "gqgh7abe";  //Set wifi password
const char* Commands_Reply;                 // The command variable that is sent to the client

const char * host = "192.168.8.103";          // IP Client

WiFiServer server(80);

void setup() {
  // put your setup code here, to run once:
  pinMode(led, OUTPUT);                     // Declare the LED as an output
  Serial.begin(115200);                     // initialize serial:
  delay(10);

  Serial.println("");
  Serial.println("Server-------------------------------");
  Serial.print("Configuring access point");
  WiFi.begin(ssid, password);

  // Waiting to connect to wifi
  while (WiFi.status() != WL_CONNECTED) {
    delay(500);
    Serial.print(".");
  }
  Serial.println("");
  Serial.println("WiFi connected");

  // Start the server
  server.begin();
  Serial.println("Server started");

  // Print the IP address
  Serial.print("Use this URL to connect: ");
  Serial.print("http://");
  Serial.print(WiFi.localIP());
  Serial.println("/");
  Serial.println("-------------------------------------");
  Serial.println("");
}

void loop() {
  // put your main code here, to run repeatedly:
  // Check if a client has connected
  WiFiClient client = server.available();
  if (!client) {
    return;
  }

  // Wait until the client sends some data
  Serial.println("Server-------------------------------");
  Serial.println("New client");
  Serial.print("From client = ");
  while (!client.available()) {
    delay(1);
  }

  // Read the first line of the request -------------------------------------
  String req = client.readStringUntil('\r');
  Serial.println(req);
  client.flush();

  //Command LED -------------------------------------------------------------
/*if (req.indexOf("LED_Blink") != -1){
    Commands_Reply = "LED Status : Blinking";
    Serial.print("Server send = ");
    Serial.println(Commands_Reply);
    client.print(String("GET ") + Commands_Reply + " HTTP/1.1\r\n" + "Host: " + host + "\r\n" + "Connection: close\r\n\r\n");
    digitalWrite(led, HIGH);
    delay(500);
    digitalWrite(led, LOW);
    delay(500);
    digitalWrite(led, HIGH);
    delay(500);
    digitalWrite(led, LOW);
    delay(500);
    digitalWrite(led, HIGH);
    delay(500);
    digitalWrite(led, LOW);
    delay(500);
    } */

  if (req.indexOf("LED_On") != -1) {
    Commands_Reply = "LED Status : On";
    Serial.print("Server send = ");
    Serial.println(Commands_Reply);
    client.print(String("GET ") + Commands_Reply + " HTTP/1.1\r\n" + "Host: " + host + "\r\n" + "Connection: close\r\n\r\n");
    digitalWrite(led, HIGH);
  }
  else if (req.indexOf("LED_Off") != -1) {
    Commands_Reply = "LED Status : Off";
    Serial.print("Server send = ");
    Serial.println(Commands_Reply);
    client.print(String("GET ") + Commands_Reply + " HTTP/1.1\r\n" + "Host: " + host + "\r\n" + "Connection: close\r\n\r\n");
    digitalWrite(led, LOW);
  }
  else {
    Serial.println("invalid request");
    client.stop();
    return;
  }

  client.flush();
  Serial.println("Client disonnected");
  Serial.println("-------------------------------------");
  Serial.println("");
}
Results
According to the above source codes, when the PIR sensor connected to the client board detect the presence of the human being, the signal from the client will send to the server side through the TCP protocol. To enable communications between client and server GET method is used. The LED is not directly turned ON when the PIR sensor detect the infrared object, it delayed few seconds as you can see in the below video