Final Project
This is my final project and all in this site is under this licence:

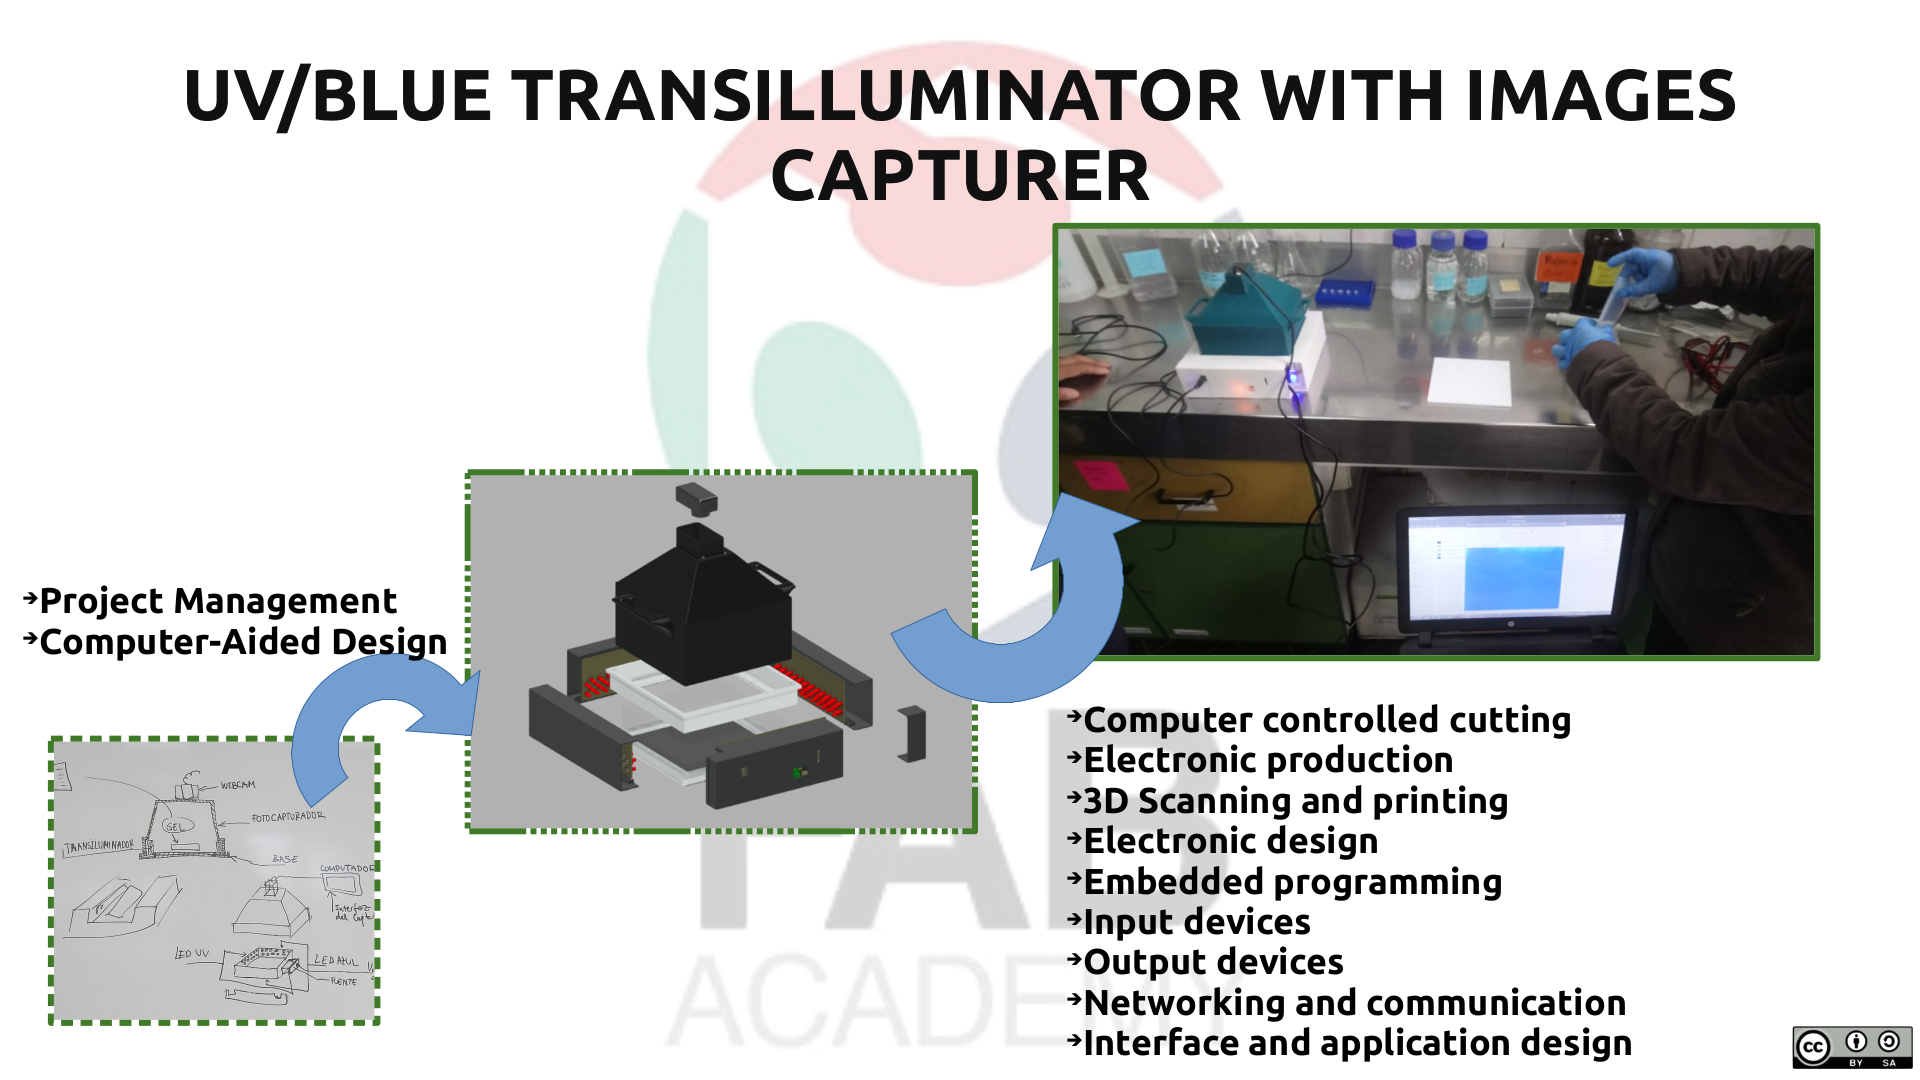
UV/blue transilluminator with image capturer.
This is the slide of my final project:
This is the video presentation of my final project:
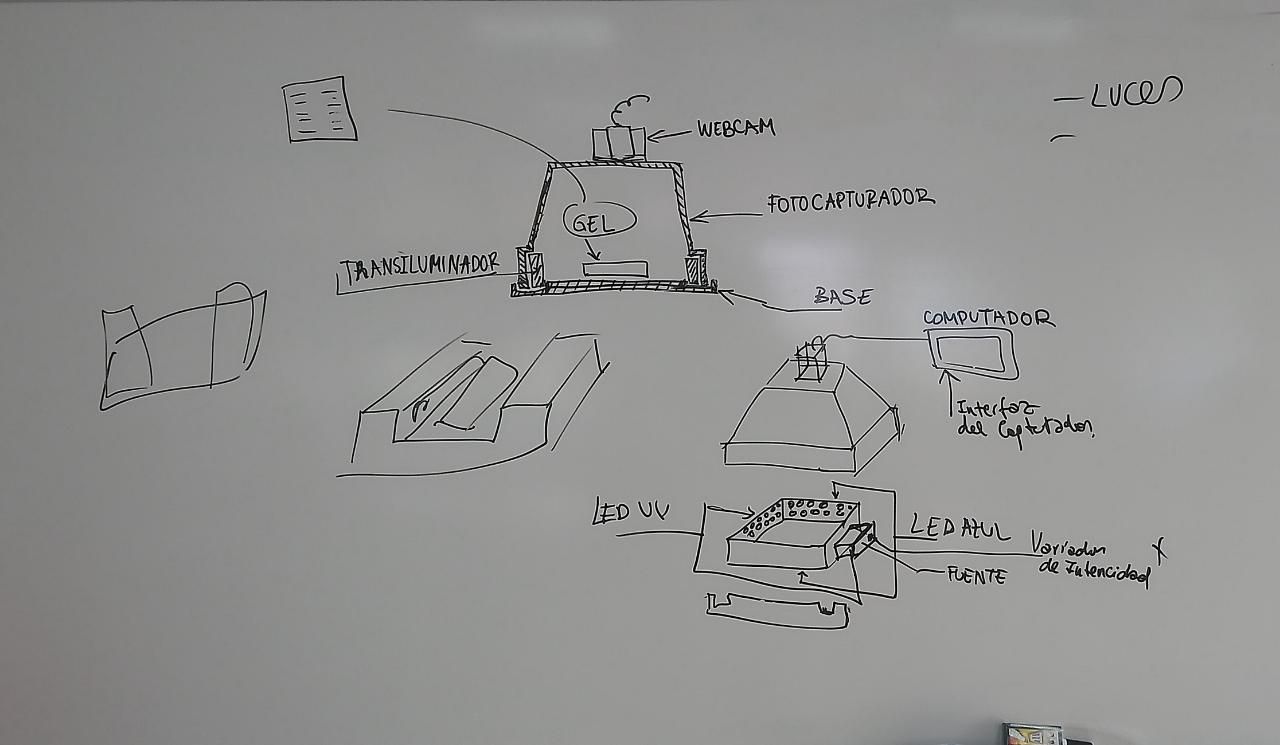
First sketch of the final project idea
What is?
This device is a UV/blue transilluminator with image capturer.
What it will do?
The UV/blue transilluminator works by emitting high levels of UV/blue light through the viewing surface. The key application for a UV/blue transilluminator is for the visualization of DNA and protein agarose and polyacrylamide gels after electrophoresis. Gels can be directly placed onto the UV/blue transilluminator; wavelength will vary on your particular application.
The UV/blue transilluminator has an image capture system, that is a webcam the takes pictures of your gel during the documentation process.
Who will use it?
A transilluminator is a standard piece of equipment used in biohacking laboratories for visualization of target DNAs and proteins.
Iterations of the finalproject before the Fab Academy
First iteration
This was my first model before the academy, it was designed to be used only with SYBR SAFE Fluorecent tag. To build this version I did not use any digital fabrication method.
Results of the first iteration
I was able to see clearly the bands, but it was not good enough for documentation.
Second iteration
This version it was the second version of the transilluminator before the academy, only the case was made using digital fabrication, the electronic and stuff do not.
Results of the second iteration
The results of this version we could see clearly the bands, just because I arranged the LED vertically. The problem in this version was that it was difficult to clean and it was limited for fluorescent tags with UV absorption spectrum.
Final project
3D assembled model
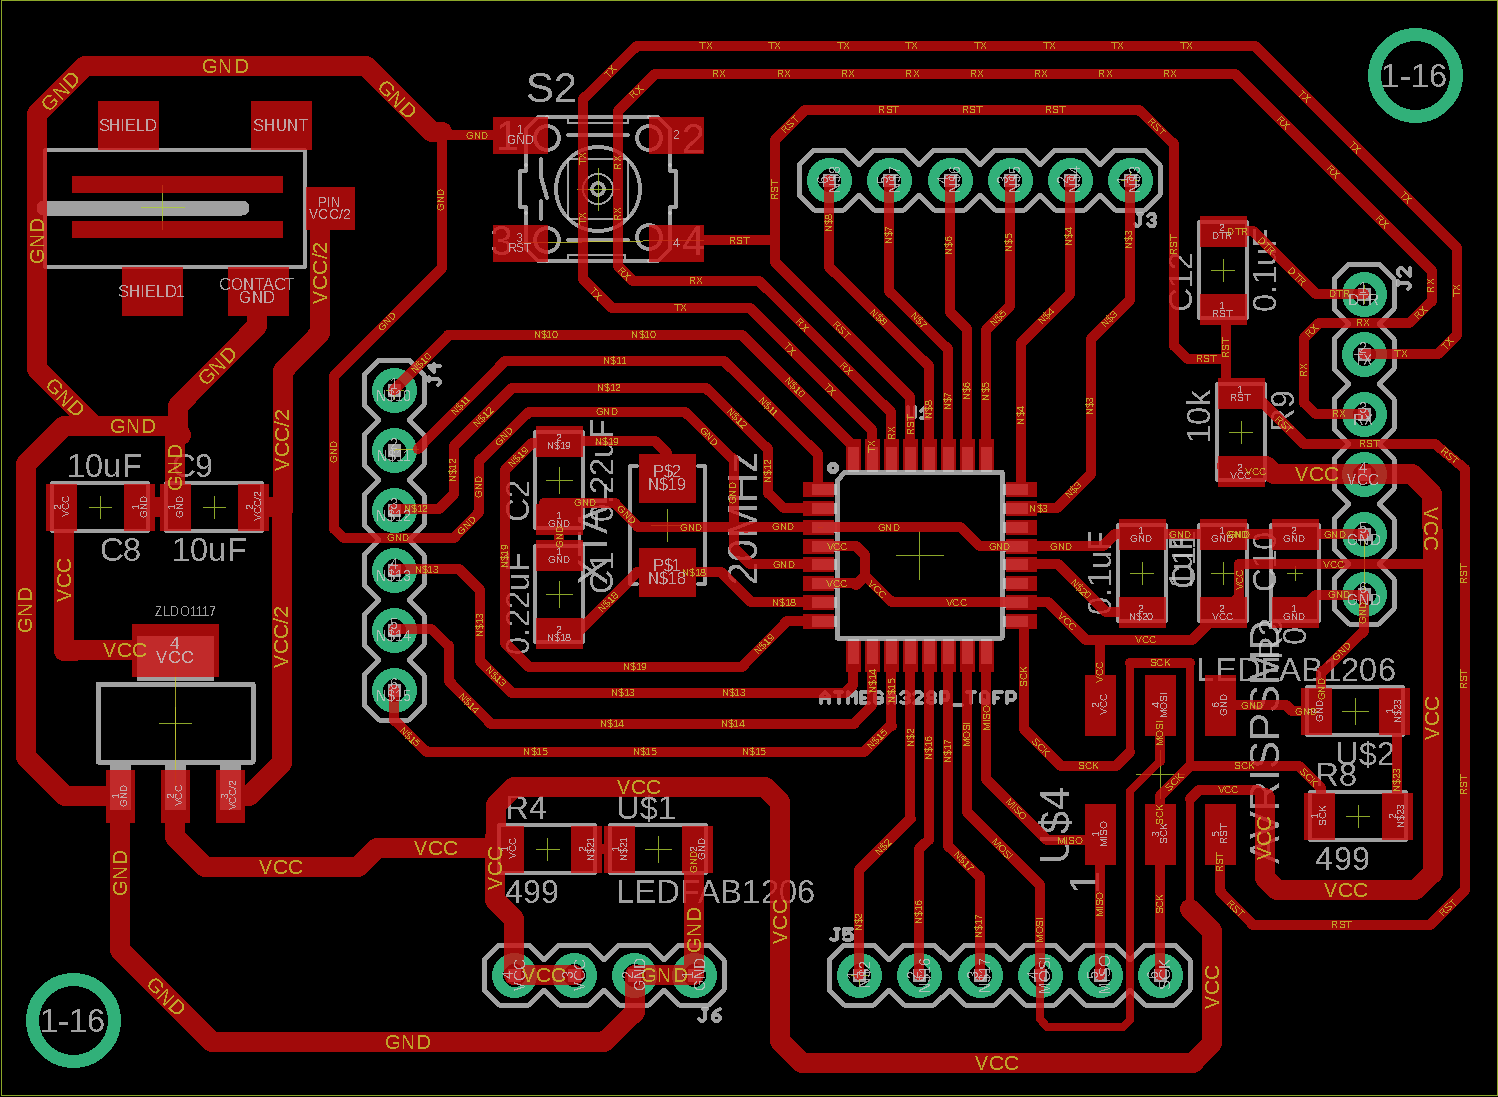
Electronics
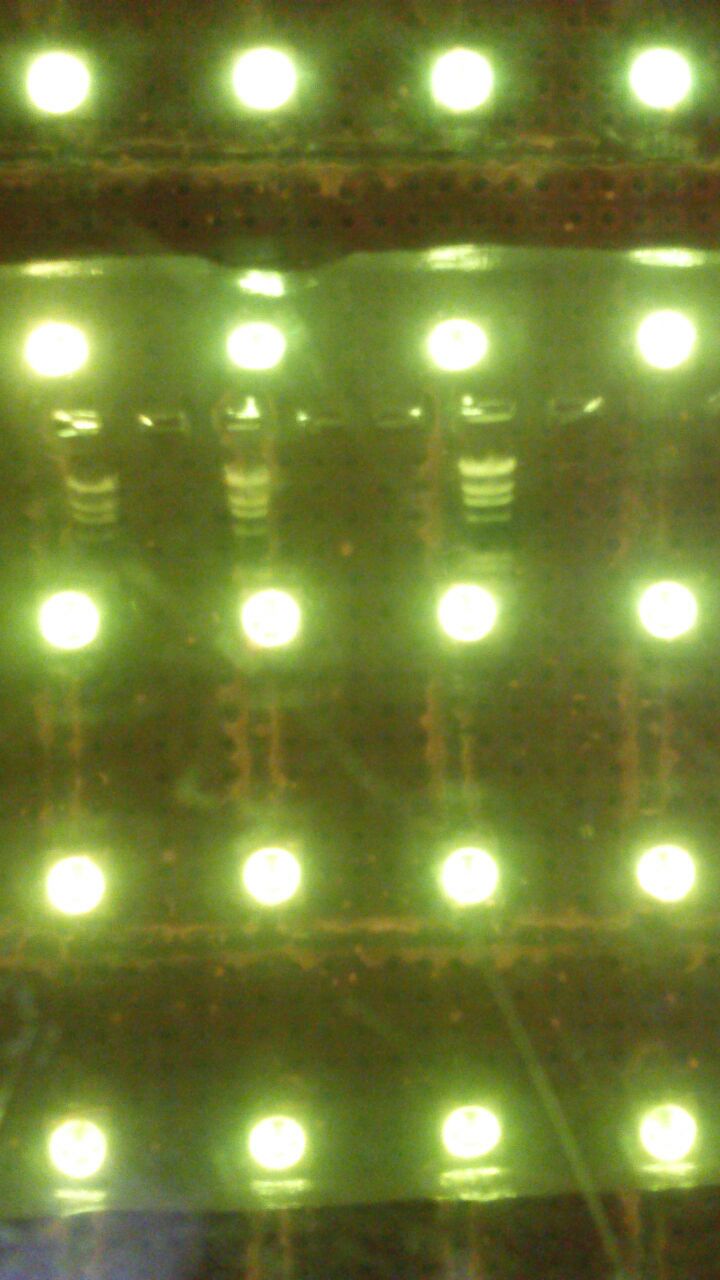
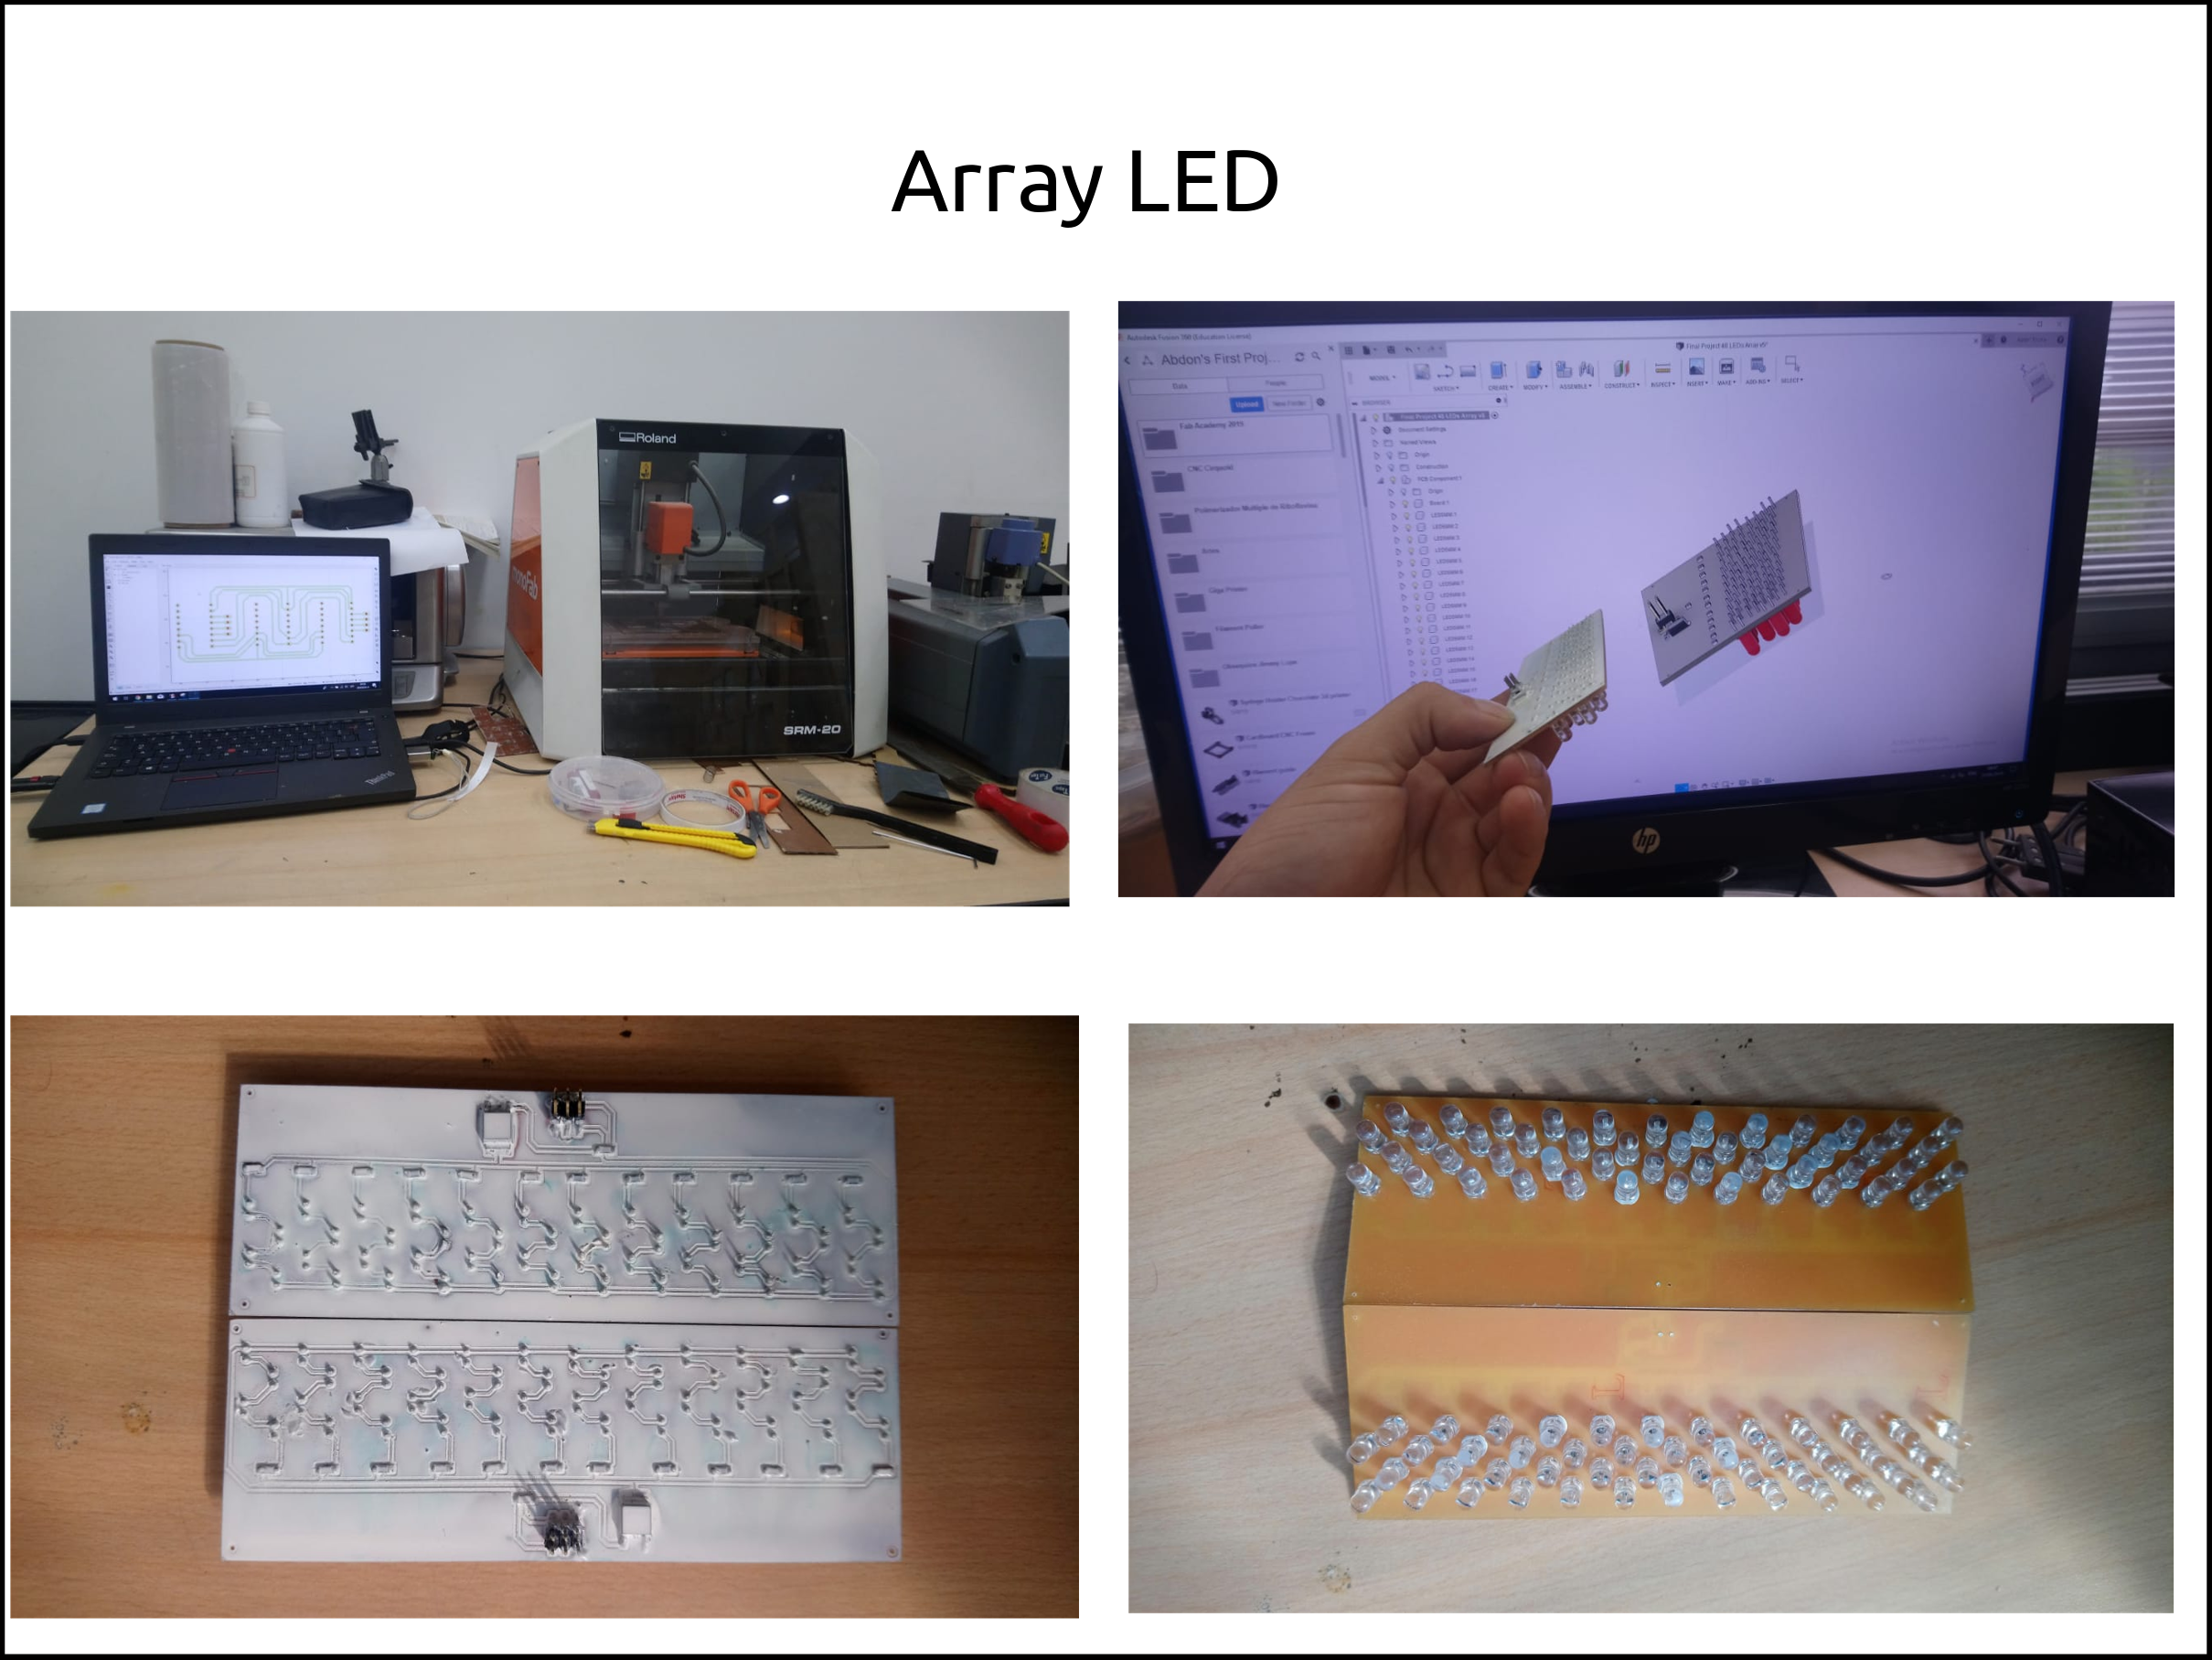
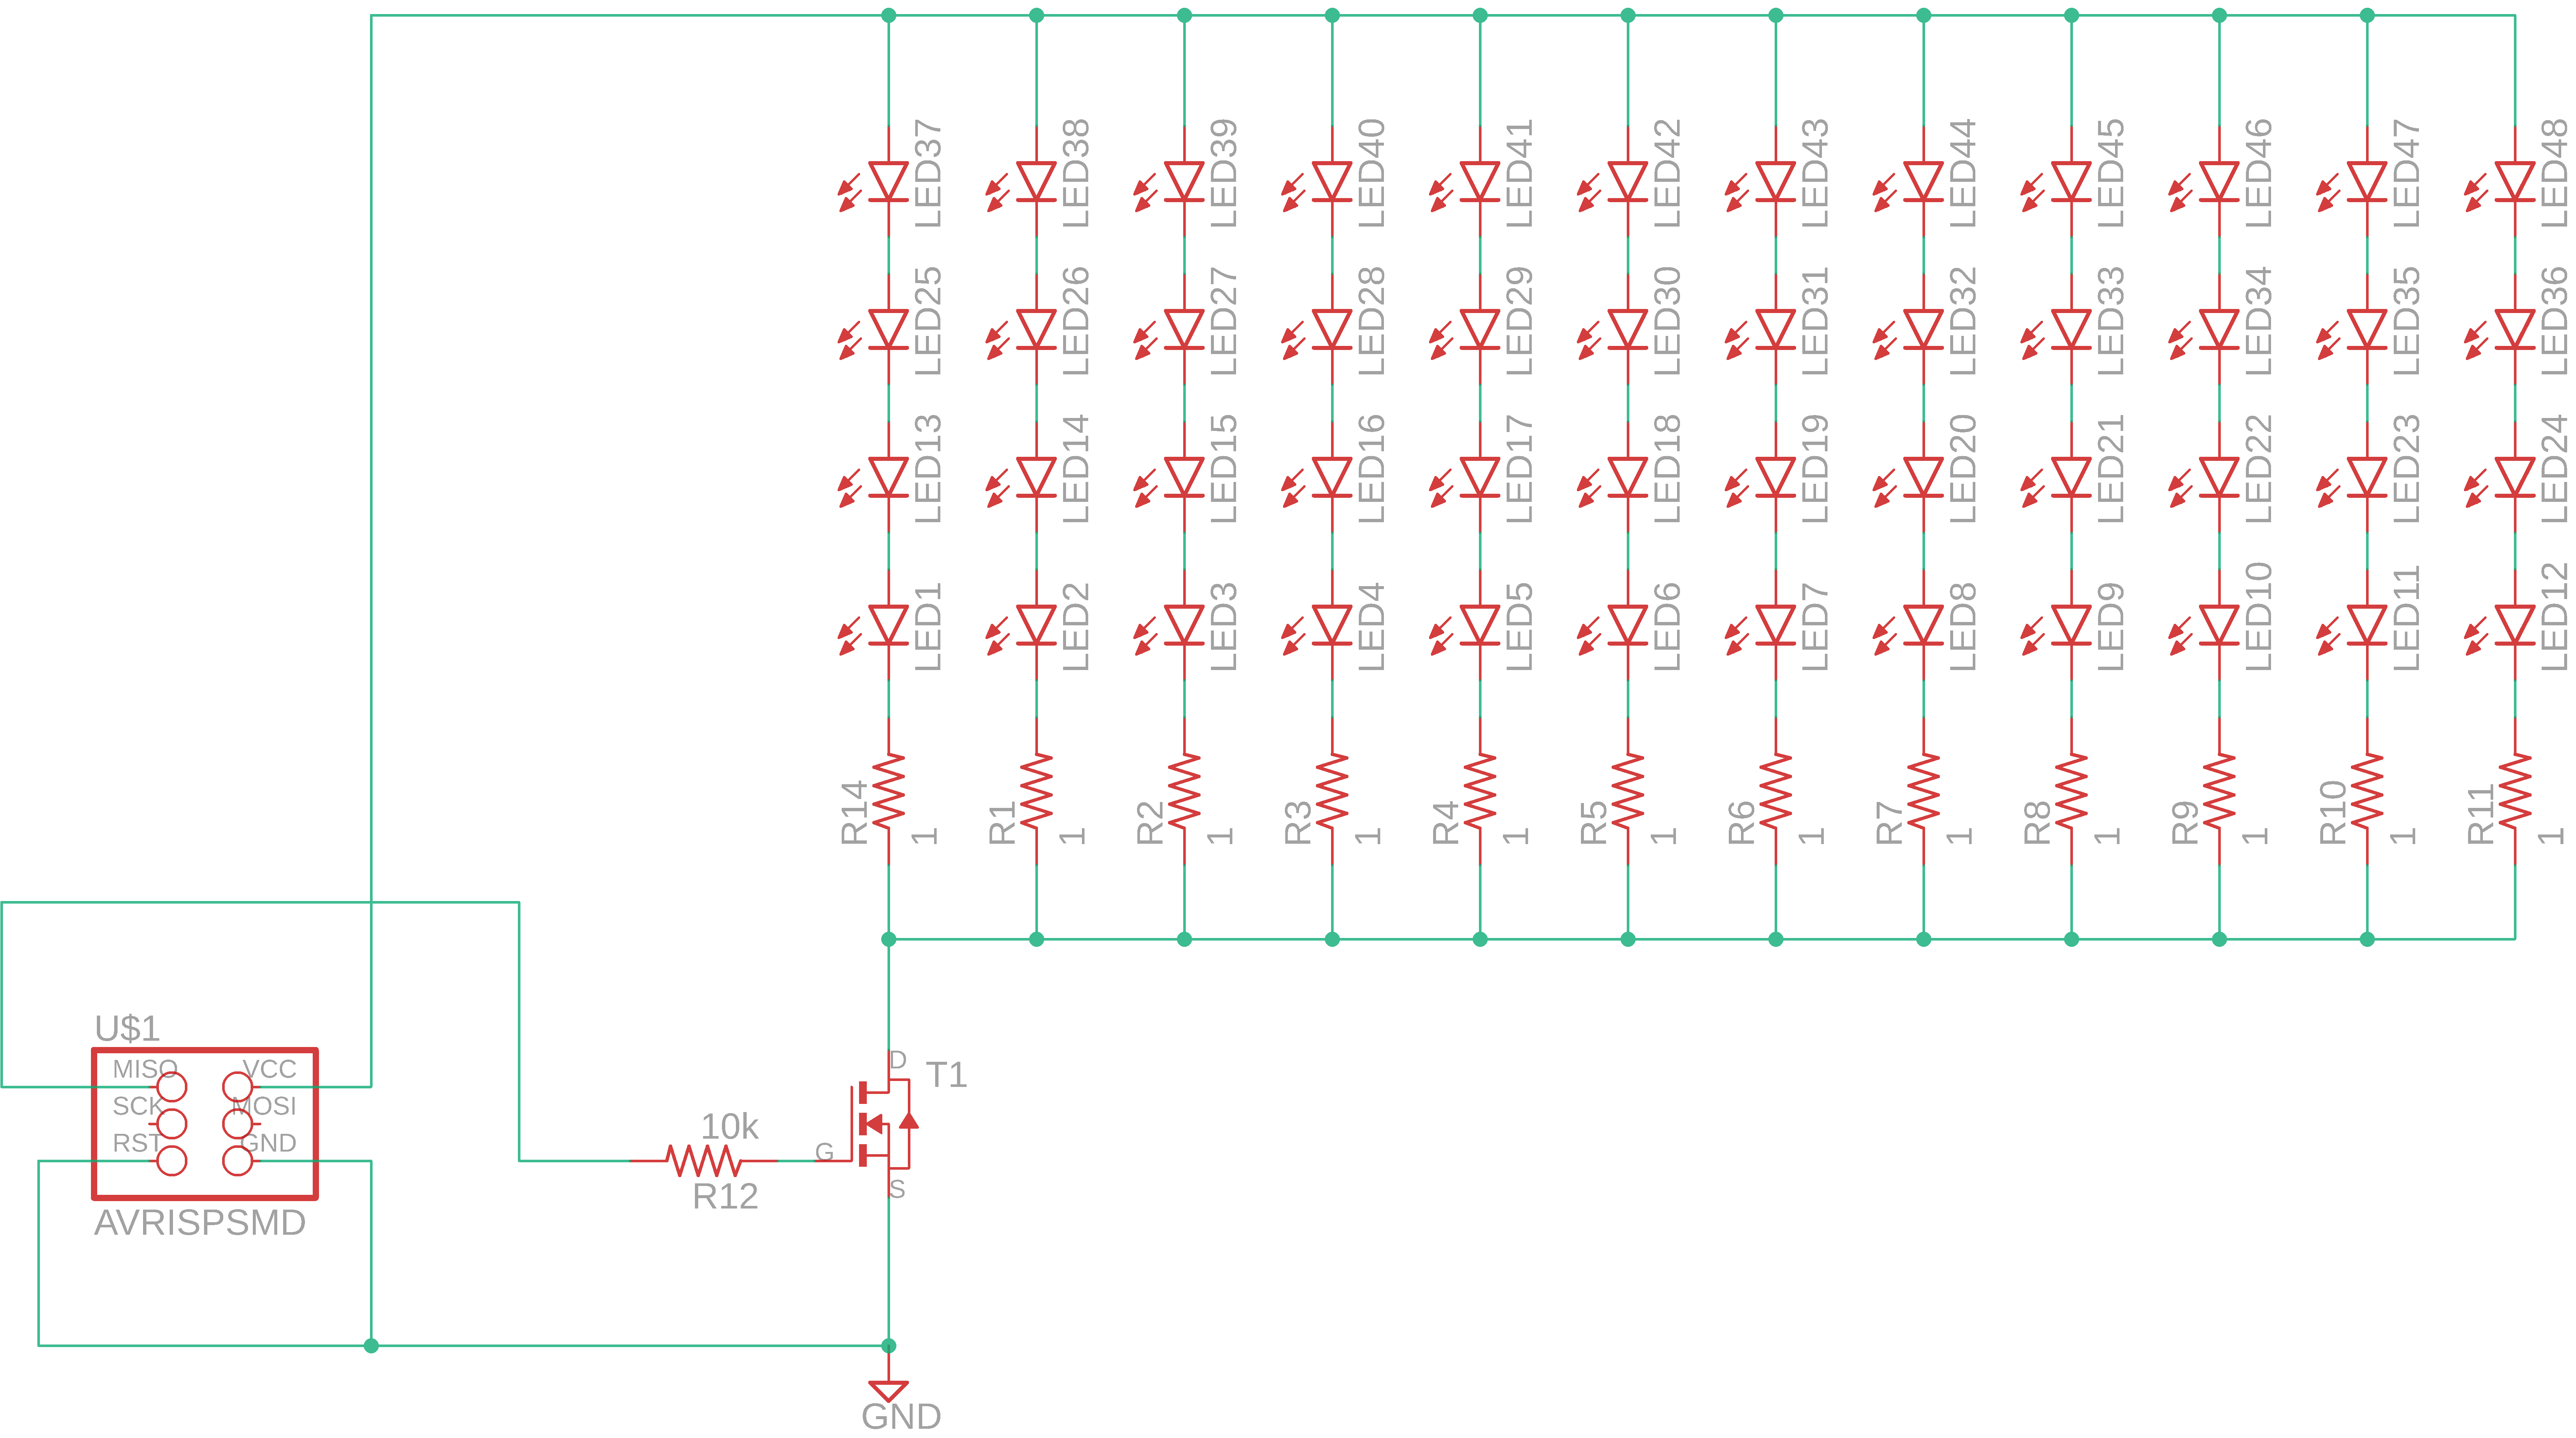
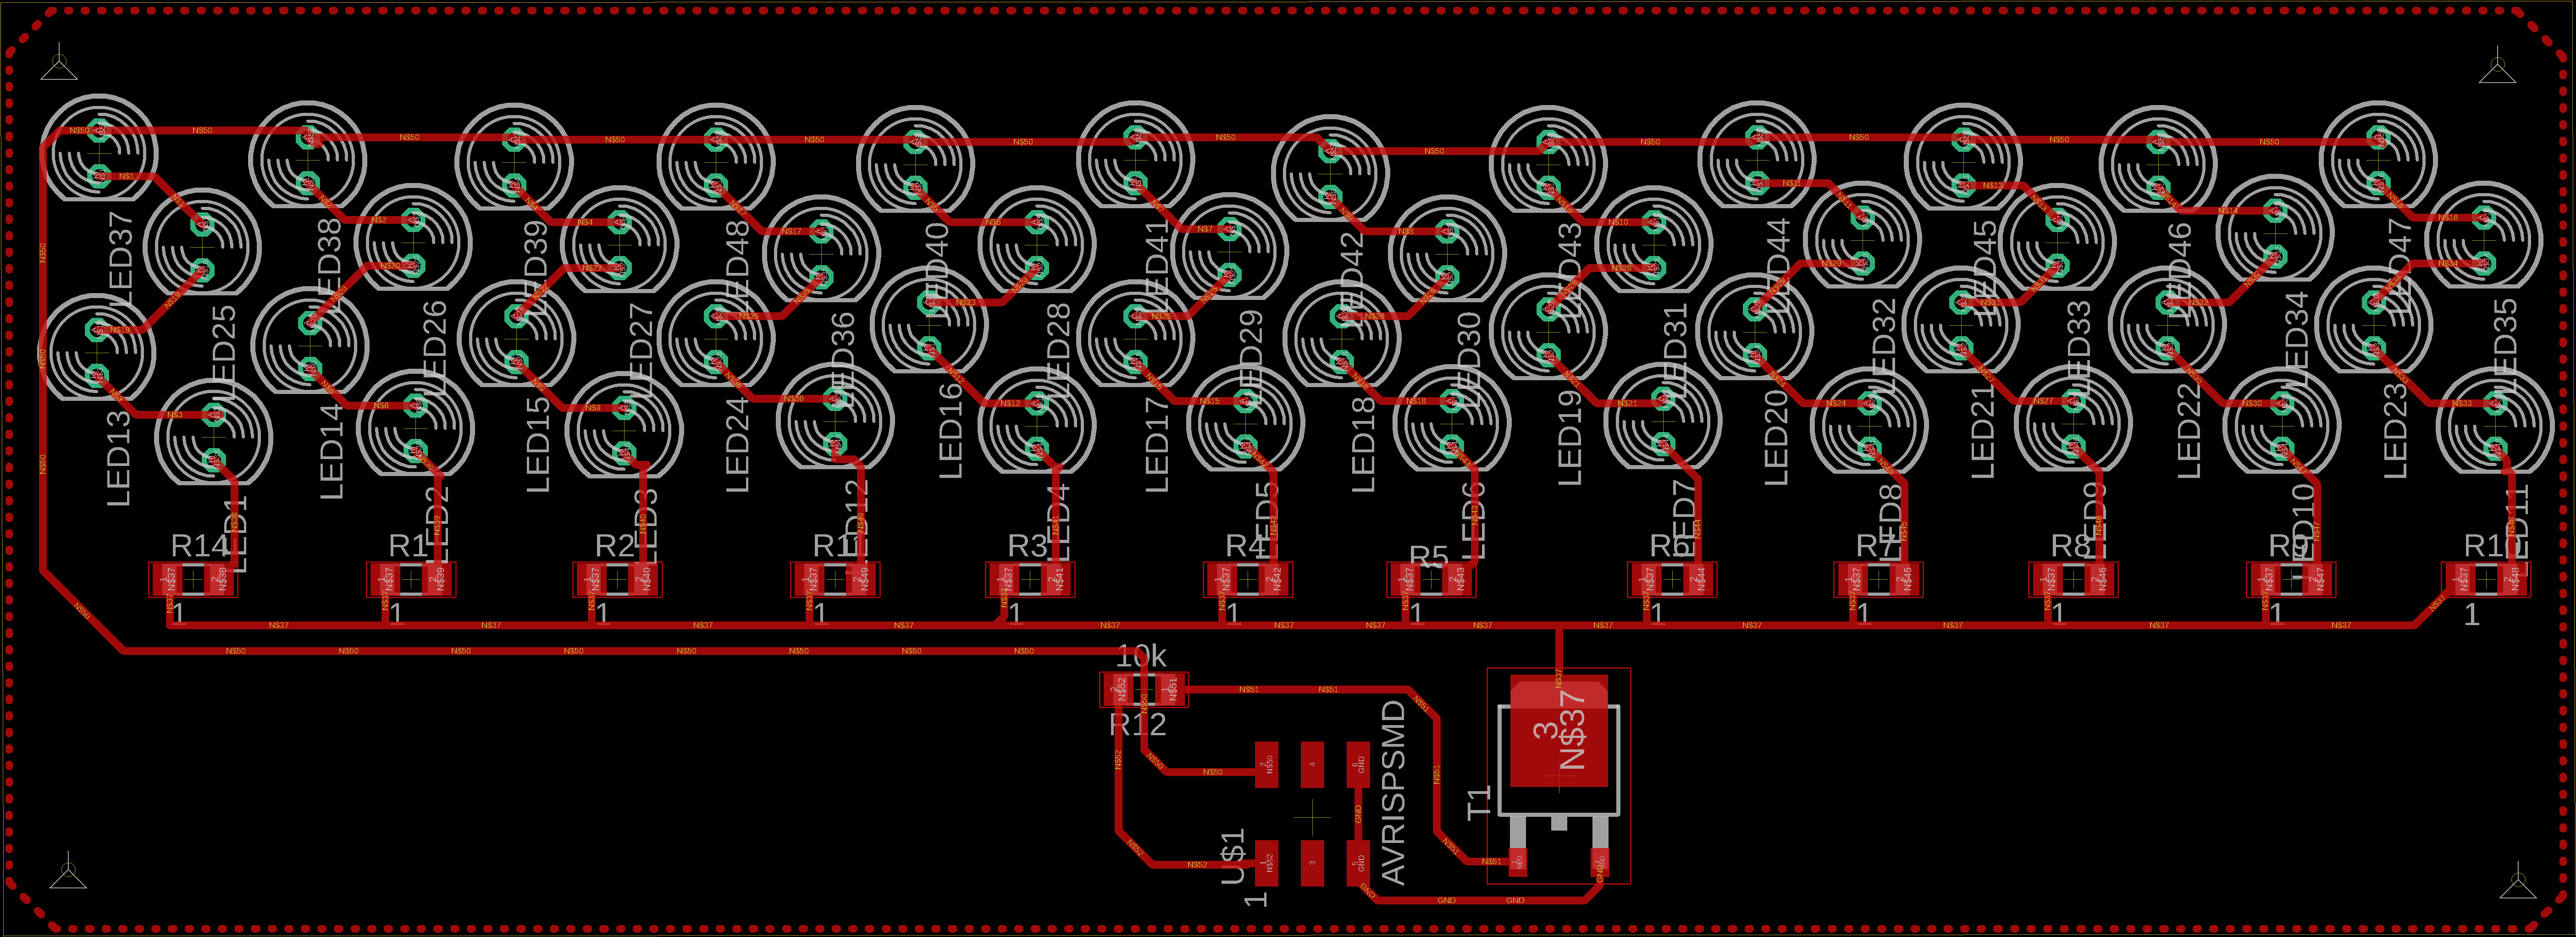
Array LED
3D model of the Array LED
Build the array LED
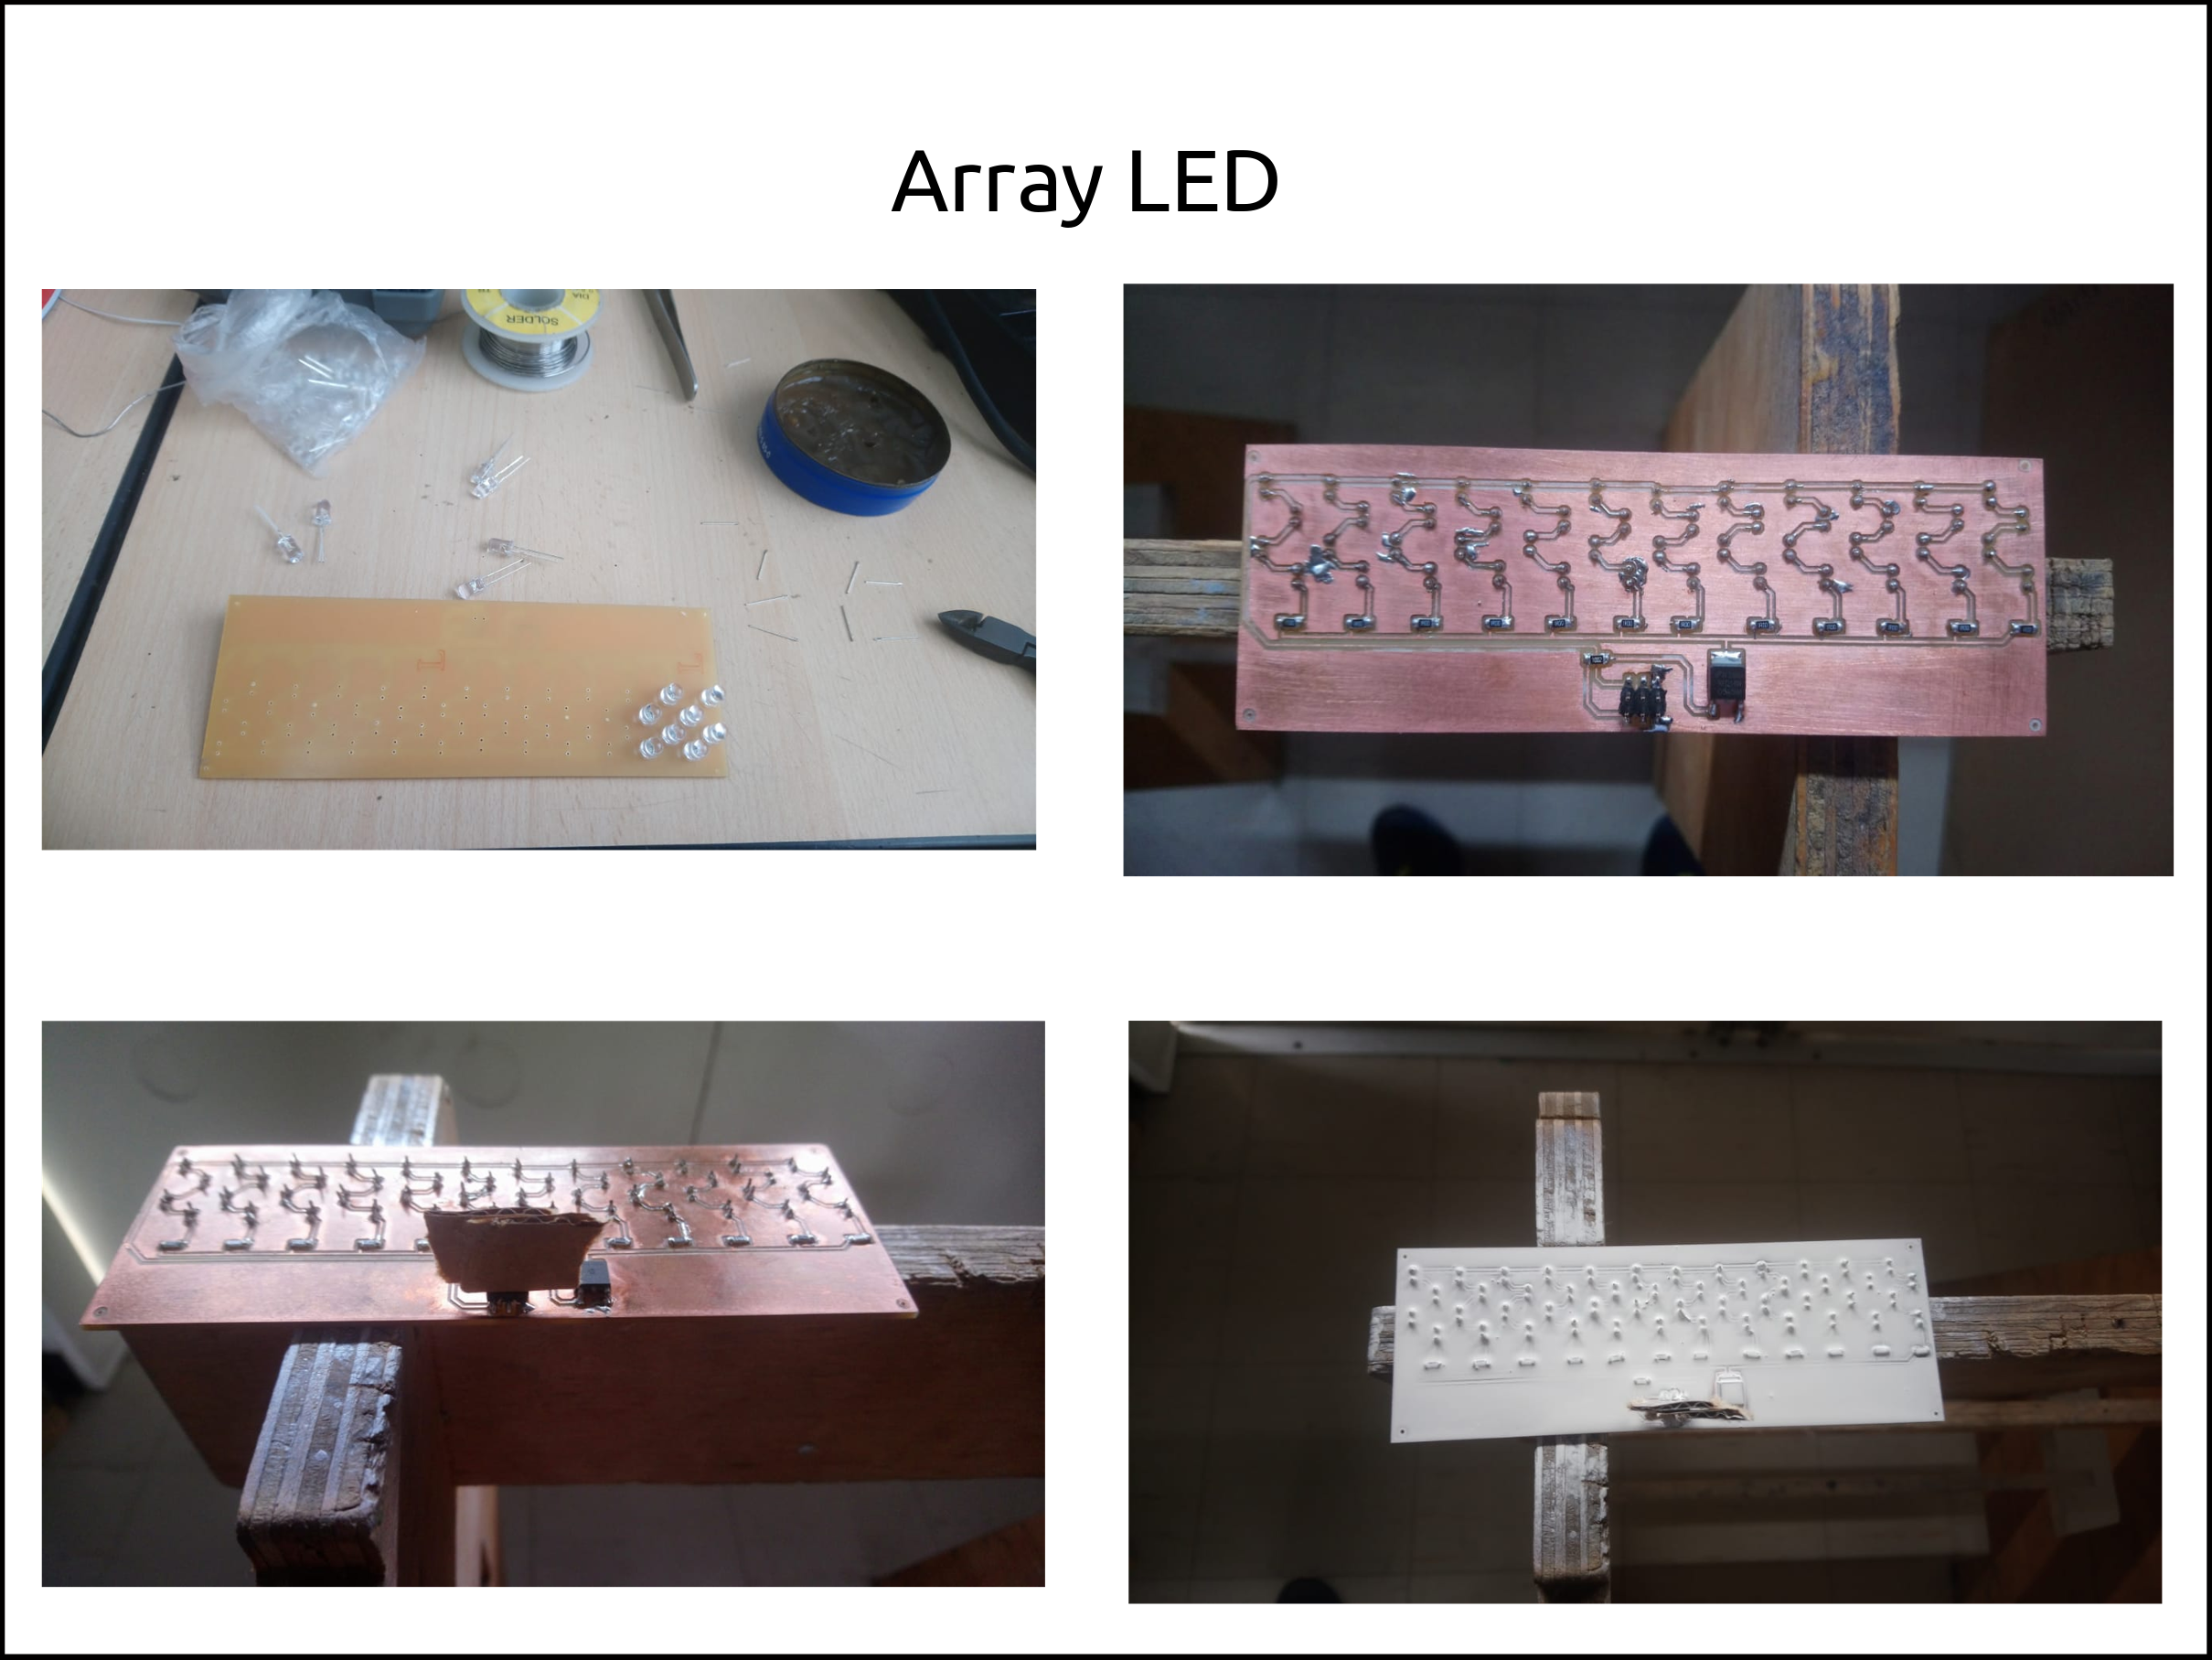
Video of the LED array soldering
This videos shows how to I soldered.
Files of Array LED
Schematic of the Array LED
Board of the Array LED
Fabduino
This is the 3D model of the Fabduino that was made with Autodesk Eagle with Autodesk Fusion 360 synchronization.
Files of Fabduino
Schematic of the FabDuino
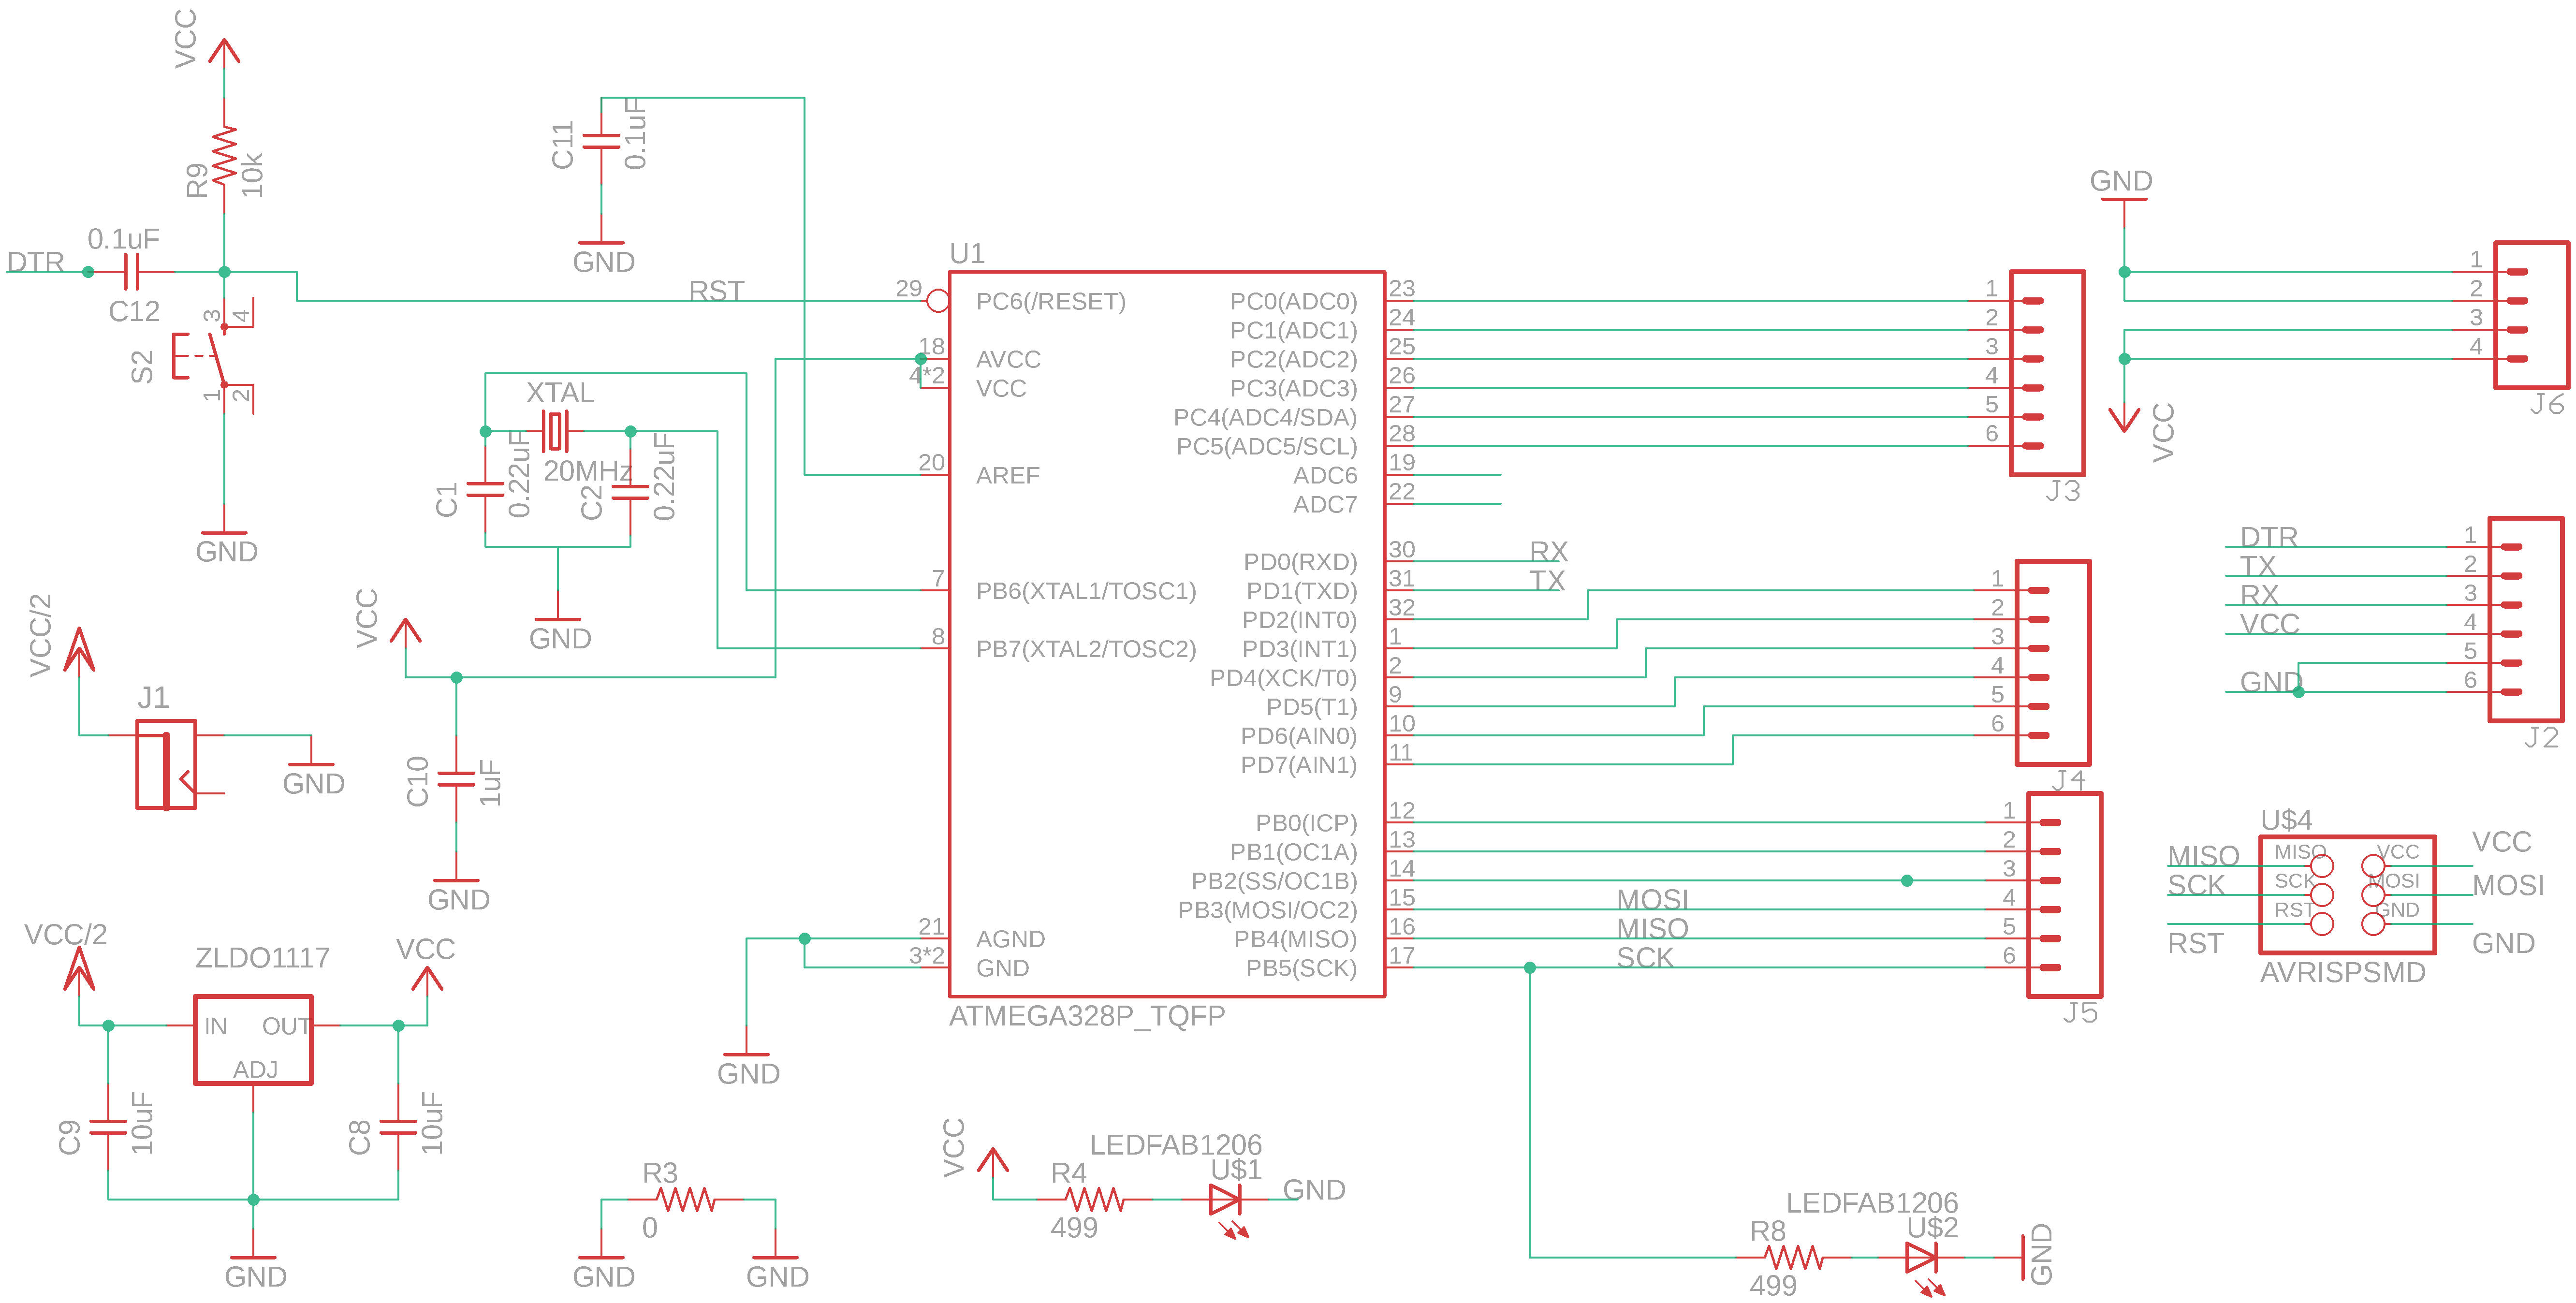
Board of the FabDuino
Programming
Fabduino firmware
int in = 0;                   // Variable to store the desired value
int pinOutBlue = 3;
int pinOutUV = 6;
int pinInPotenciometer = A5;
int lightup = 13;
int pwm = 0;
void setup() {                // This executes once
  Serial.begin(9600);             // Initialize serial port
  pinMode(pinOutBlue, OUTPUT);        // Prepare output pin
  pinMode(pinOutUV, OUTPUT);
  pinMode(pinInPotenciometer, INPUT);
}

void loop() {                 // This loops continuously
  while(Serial.available() > 0){         // Check if there's data

    in = Serial.read();           // Read said data into the variable "in"
    if (in == '+'){
      if(pwm < 256){
        pwm = pwm + 10;
      }

      analogWrite(pinOutBlue, pwm);
      analogWrite(pinOutUV, pwm);     // Pass the value of "in" to the pin
   }
   else if(in == '-'){
      if(pwm > -1){
        pwm = pwm - 10;
      }
      analogWrite(pinOutBlue, pwm);
      analogWrite(pinOutUV, pwm);
   }
  }

  int readValue = analogRead(pinInPotenciometer);
  int writeValue = (255./1023.) * readValue;
  analogWrite(pinOutBlue, writeValue);
  analogWrite(pinOutUV, writeValue);

}
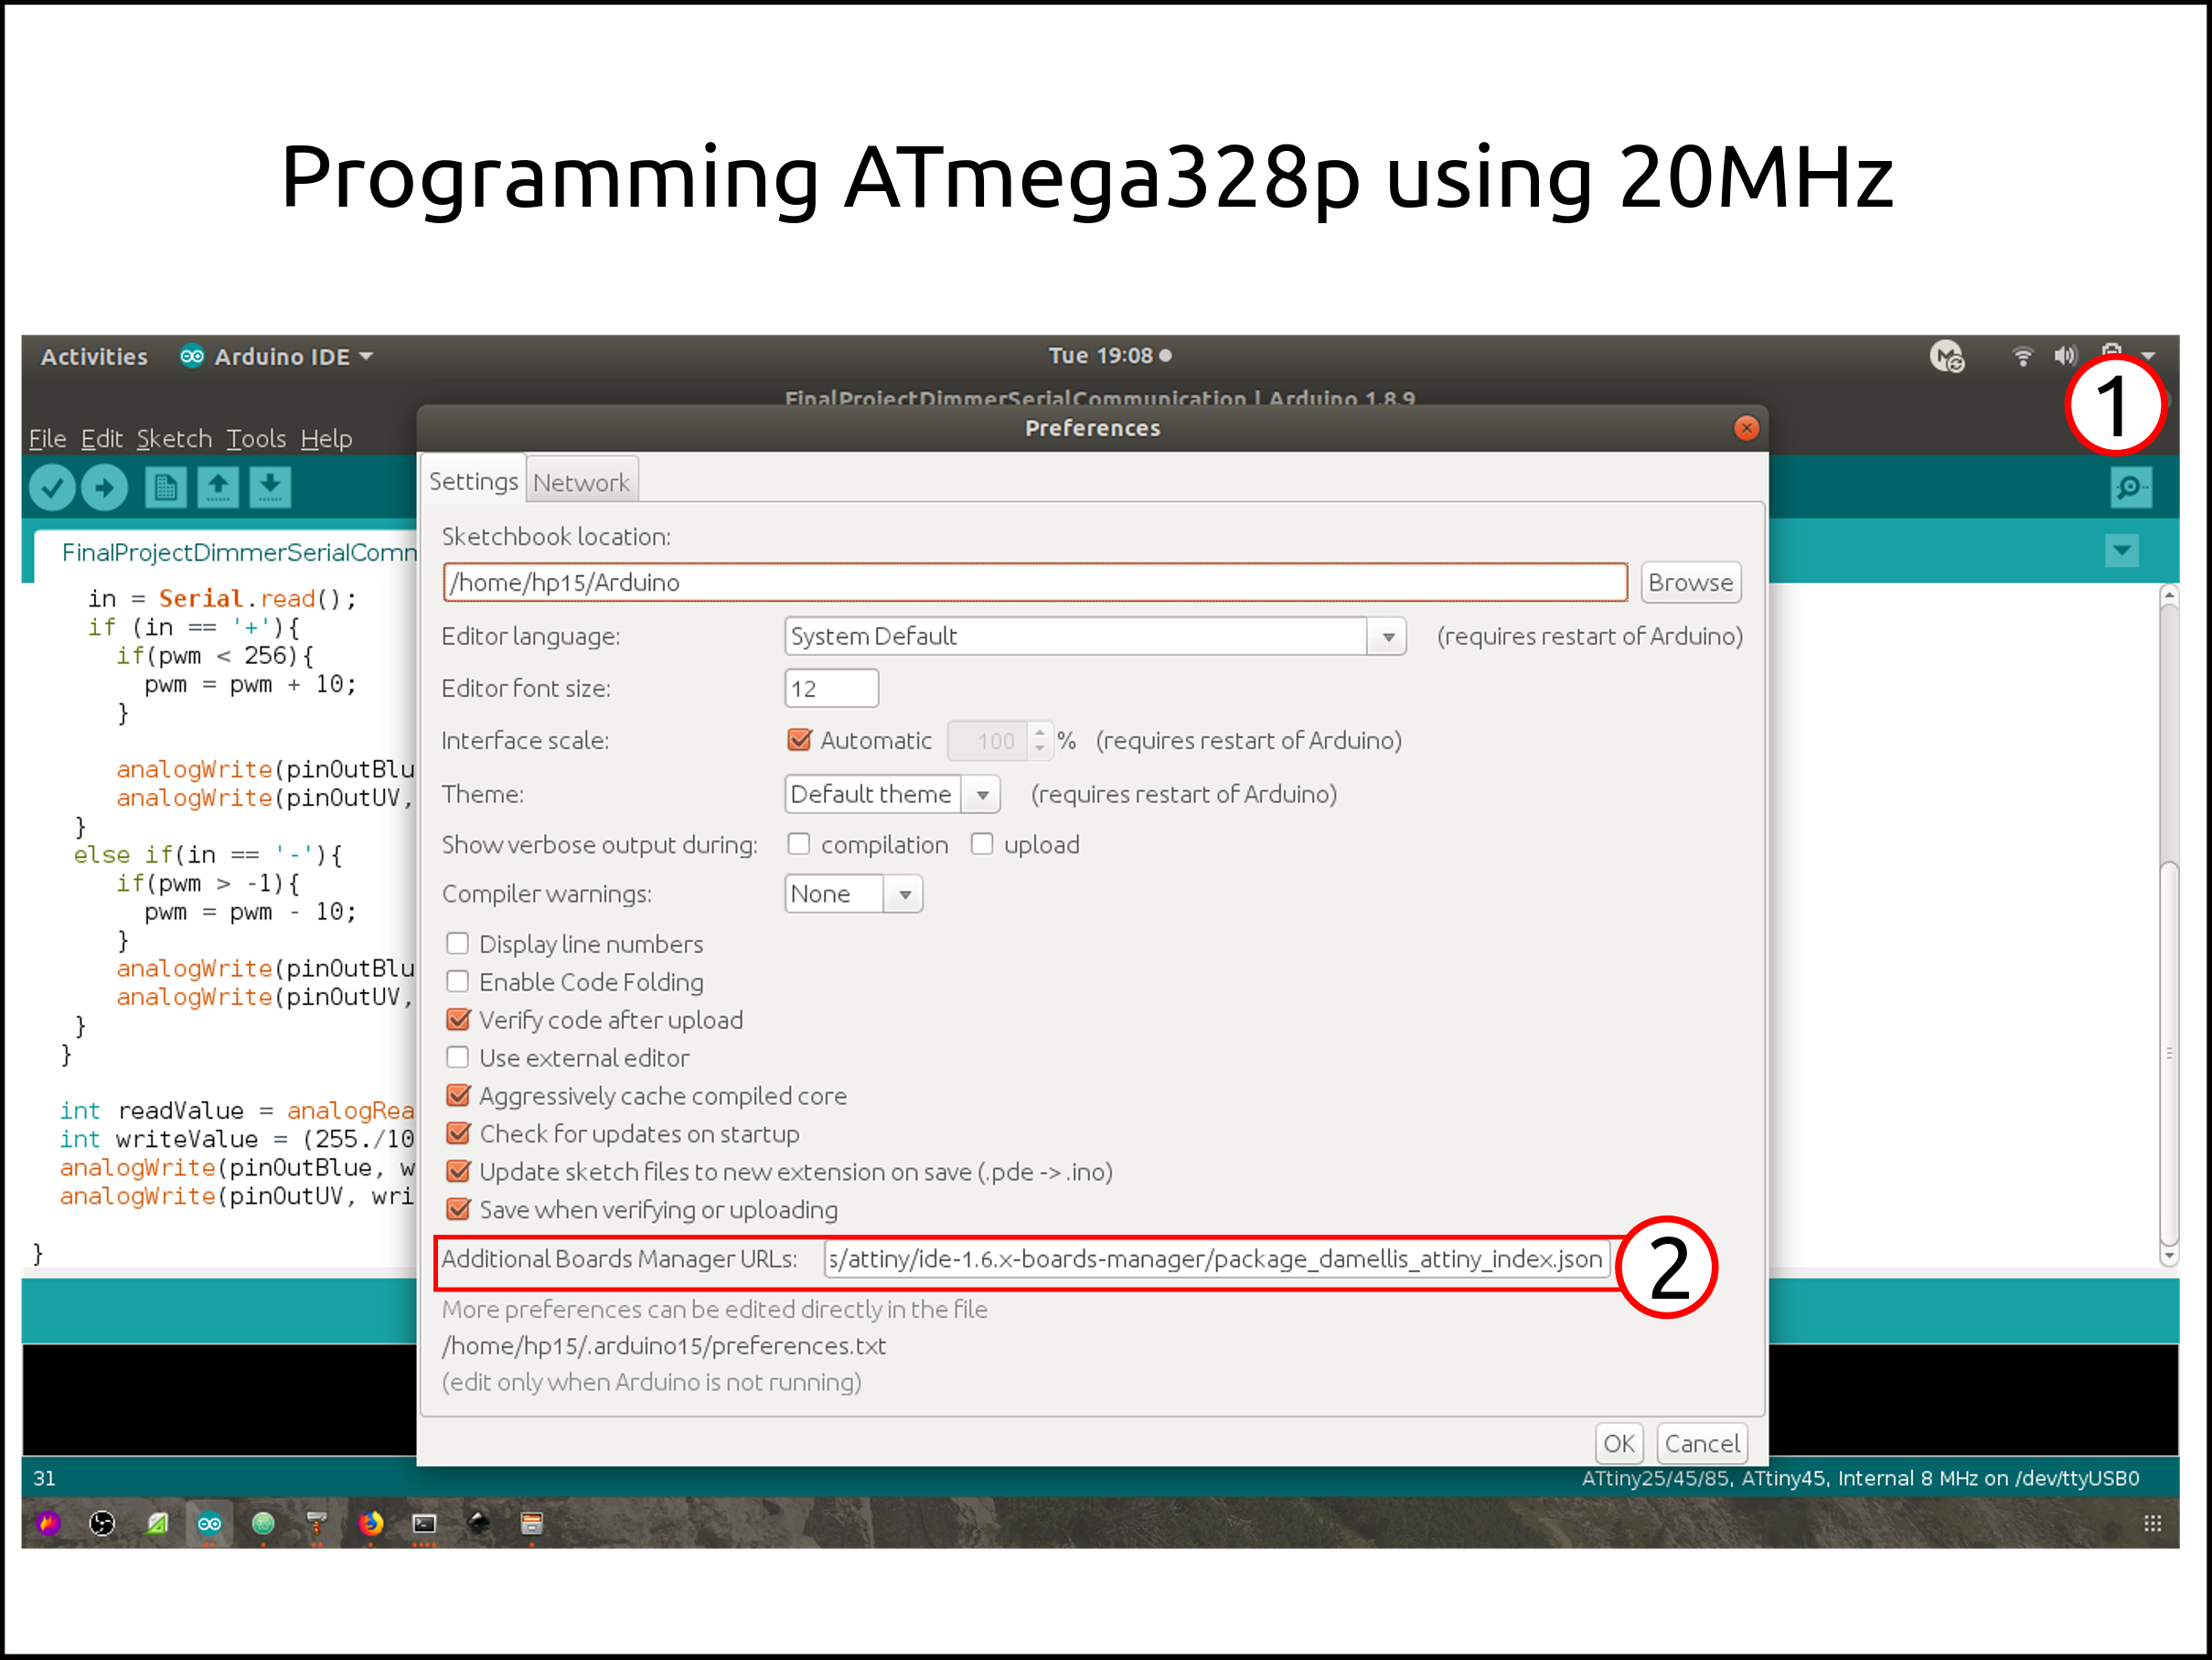
How to program ATmega328p with 20MHz?
This link below you have to copy in the preference section of the arduino IDE.
https://mcudude.github.io/MiniCore/package_MCUdude_MiniCore_index.json
-
First you have to open the IDE and the go to File>Preference
-
This is the text-box where you have to paste your link.
The GUI
Python code
from time import gmtime, strftime
import time,serial, sys
#Imports libraries for OpenCV Python3
import cv2
import numpy as np
#Imports libraries for Gtk3
import gi
gi.require_version('Gtk', '3.0')
from gi.repository import Gtk, Gdk, GLib, GdkPixbuf
#Serial Communication
global ser
ser = serial.Serial()
def mySerialport():

    if (len(sys.argv) != 3):
        print ("command line: Week16_using_Glade_GTK_and_Python_to_make_Terminal_GUI.glade.py serial_port speed")
        sys.exit()
    port = sys.argv[1]
    speed = int(sys.argv[2])
    ser.port = port
    #ser.port = "COM2"
    ser.baudrate = speed
    ser.bytesize = serial.EIGHTBITS #number of bits per bytes
    ser.parity = serial.PARITY_NONE #set parity check: no parity
    ser.stopbits = serial.STOPBITS_ONE #number of stop bits
    #ser.timeout = None          #block read
    ser.timeout = 1            #non-block read
    #ser.timeout = 2              #timeout block read
    ser.xonxoff = False     #disable software flow control
    ser.rtscts = False     #disable hardware (RTS/CTS) flow control
    ser.dsrdtr = False       #disable hardware (DSR/DTR) flow control
    ser.writeTimeout = 2     #timeout for write
                            #possible timeout values:
                            #    1. None: wait forever, block call
                            #    2. 0: non-blocking mode, return immediately
                            #    3. x, x is bigger than 0, float allowed, timeout block call

def myOpenSerialPort():
    ser.open()

def myCloseSerialPort():
        ser.close()

mySerialport()
#Captures the video from the camera
cap = cv2.VideoCapture(1)
#This section pull the front-end gladefile for showing it
builder = Gtk.Builder()
builder.add_from_file("test8.glade")
#This is a flag of the grayscale button
ethidiumbromide = False
sybrsafe = False
gelred = False
recordimage = False
#Makes a handler for toggle button
class Handler:
    def onDeleteWindow(self, *args):
        Gtk.main_quit(*args)

    def toggleEthidiumBromide(self, *args):
        global ethidiumbromide
        ethidiumbromide = ~ ethidiumbromide

    def toggleSYBRSafe(self, *args):
        global sybrsafe
        sybrsafe = ~ sybrsafe

    def toggleGelRed(self, *args):
        global gelred
        gelred = ~ gelred

    def on_CaptureButton_clicked(self, *args):
        global recordimage
        recordimage = ~ recordimage

    def on_less_light_clicked(self, *args):
        ser.write(b'-')     # write a string

    def on_more_light_clicked(self, *args):
        ser.write(b'+')     # write a string


window = builder.get_object("window1")
image = builder.get_object("image")
window.show_all()
builder.connect_signals(Handler())
myOpenSerialPort()

def show_frame(*args):
    ret, frame = cap.read()

    if ethidiumbromide:
        hsv = cv2.cvtColor(frame, cv2.COLOR_BGR2HSV)
        lower = np.array([17, 15, 100])
        upper = np.array([50, 56, 200])
        mask = cv2.inRange(frame, lower, upper)
        frame = cv2.bitwise_and(frame, frame, mask = mask)
    elif sybrsafe:
        hsv = cv2.cvtColor(frame, cv2.COLOR_BGR2HSV)
        lower = np.array([86, 31, 4])
        upper = np.array([220, 88, 50])
        mask = cv2.inRange(frame, lower, upper)
        frame = cv2.bitwise_and(frame, frame, mask = mask)
    elif gelred:
        hsv = cv2.cvtColor(frame, cv2.COLOR_BGR2HSV)
        lower = np.array([25, 146, 190])
        upper = np.array([62, 174, 250])
        mask = cv2.inRange(frame, lower, upper)
        frame = cv2.bitwise_and(frame, frame, mask = mask)

    global recordimage
    if recordimage:
        path = "Image Capture" + strftime("%Y-%m-%d %H:%M:%S", gmtime()) + ".png"
        cv2.imwrite(path, frame)
        recordimage = ~ recordimage

    frame = cv2.cvtColor(frame, cv2.COLOR_BGR2RGB)
    pb = GdkPixbuf.Pixbuf.new_from_data(frame.tostring(),
                                        GdkPixbuf.Colorspace.RGB,
                                        False,
                                        8,
                                        frame.shape[1],
                                        frame.shape[0],
                                        frame.shape[2]*frame.shape[1])
    image.set_from_pixbuf(pb.copy())
    return True

GLib.idle_add(show_frame)
Gtk.main()
Glade code
<?xml version="1.0" encoding="UTF-8"?>
<!-- Generated with glade 3.22.1 -->
<interface>
  <requires lib="gtk+" version="3.12"/>
  <object class="GtkWindow" id="window1">
    <property name="can_focus">False</property>
    <property name="resizable">False</property>
    <property name="window_position">center</property>
    <property name="gravity">center</property>
    <signal name="delete-event" handler="onDeleteWindow" swapped="no"/>
    <child>
      <placeholder/>
    </child>
    <child>
      <object class="GtkBox" id="box1">
        <property name="visible">True</property>
        <property name="can_focus">False</property>
        <property name="orientation">vertical</property>
        <child>
          <object class="GtkToggleButton" id="ethidiumbromideButton">
            <property name="label" translatable="yes">Ethidium bromide fluorescence detection</property>
            <property name="visible">True</property>
            <property name="can_focus">True</property>
            <property name="receives_default">True</property>
            <signal name="toggled" handler="toggleEthidiumBromide" swapped="no"/>
          </object>
          <packing>
            <property name="expand">False</property>
            <property name="fill">True</property>
            <property name="position">0</property>
          </packing>
        </child>
        <child>
          <object class="GtkToggleButton" id="SYBRSafeButton">
            <property name="label" translatable="yes">SYBR Safe fluorescence detection</property>
            <property name="visible">True</property>
            <property name="can_focus">True</property>
            <property name="receives_default">True</property>
            <signal name="toggled" handler="toggleSYBRSafe" swapped="no"/>
          </object>
          <packing>
            <property name="expand">False</property>
            <property name="fill">True</property>
            <property name="position">1</property>
          </packing>
        </child>
        <child>
          <object class="GtkToggleButton" id="GelRedButton">
            <property name="label" translatable="yes">GelRed fluorescence detection</property>
            <property name="visible">True</property>
            <property name="can_focus">True</property>
            <property name="receives_default">True</property>
            <signal name="toggled" handler="toggleGelRed" swapped="no"/>
          </object>
          <packing>
            <property name="expand">False</property>
            <property name="fill">True</property>
            <property name="position">2</property>
          </packing>
        </child>
        <child>
          <object class="GtkButton" id="CaptureButton">
            <property name="label" translatable="yes">Capture Image</property>
            <property name="visible">True</property>
            <property name="can_focus">True</property>
            <property name="receives_default">True</property>
            <signal name="clicked" handler="on_CaptureButton_clicked" swapped="no"/>
          </object>
          <packing>
            <property name="expand">False</property>
            <property name="fill">True</property>
            <property name="position">3</property>
          </packing>
        </child>
        <child>
          <object class="GtkBox">
            <property name="visible">True</property>
            <property name="can_focus">False</property>
            <child>
              <object class="GtkLabel">
                <property name="width_request">300</property>
                <property name="visible">True</property>
                <property name="can_focus">False</property>
                <property name="label" translatable="yes">Light control</property>
                <attributes>
                  <attribute name="font-desc" value="Sans Bold Italic 10"/>
                </attributes>
              </object>
              <packing>
                <property name="expand">False</property>
                <property name="fill">True</property>
                <property name="position">0</property>
              </packing>
            </child>
            <child>
              <object class="GtkButton" id="less_light">
                <property name="label" translatable="yes">less light</property>
                <property name="width_request">150</property>
                <property name="height_request">0</property>
                <property name="visible">True</property>
                <property name="can_focus">True</property>
                <property name="receives_default">True</property>
                <signal name="clicked" handler="on_less_light_clicked" swapped="no"/>
              </object>
              <packing>
                <property name="expand">False</property>
                <property name="fill">True</property>
                <property name="position">1</property>
              </packing>
            </child>
            <child>
              <object class="GtkButton" id="more_light">
                <property name="label" translatable="yes">more light</property>
                <property name="width_request">150</property>
                <property name="visible">True</property>
                <property name="can_focus">True</property>
                <property name="receives_default">True</property>
                <signal name="clicked" handler="on_more_light_clicked" swapped="no"/>
              </object>
              <packing>
                <property name="expand">False</property>
                <property name="fill">True</property>
                <property name="position">2</property>
              </packing>
            </child>
          </object>
          <packing>
            <property name="expand">False</property>
            <property name="fill">True</property>
            <property name="position">4</property>
          </packing>
        </child>
        <child>
          <object class="GtkImage" id="image">
            <property name="visible">True</property>
            <property name="can_focus">False</property>
            <property name="stock">gtk-missing-image</property>
          </object>
          <packing>
            <property name="expand">False</property>
            <property name="fill">True</property>
            <property name="position">5</property>
          </packing>
        </child>
      </object>
    </child>
  </object>
</interface>
Used libraries and their installations
pip install pyserial
sudo apt-get install libgtk-3-dev
sudo apt-get install glade-gnome
Install package python-opencv with following command in terminal (as root user).
sudo apt-get install python-opencv
Open Python IDLE (or IPython) and type following codes in Python terminal.
import cv2 as cv
print(cv.__version__)
If the results are printed out without any errors, congratulations !!! You have installed OpenCV-Python successfully.
If something goes wrong you have to build OpenCV from source
sudo apt install python-numpy
Check for the Numpy module version:
python -c "import numpy; print(numpy.__version__)"
1.13.3
Test of the Final Project GUI
Here we can see the test of the color filter working.
Files of GUI
All the python and glade Files
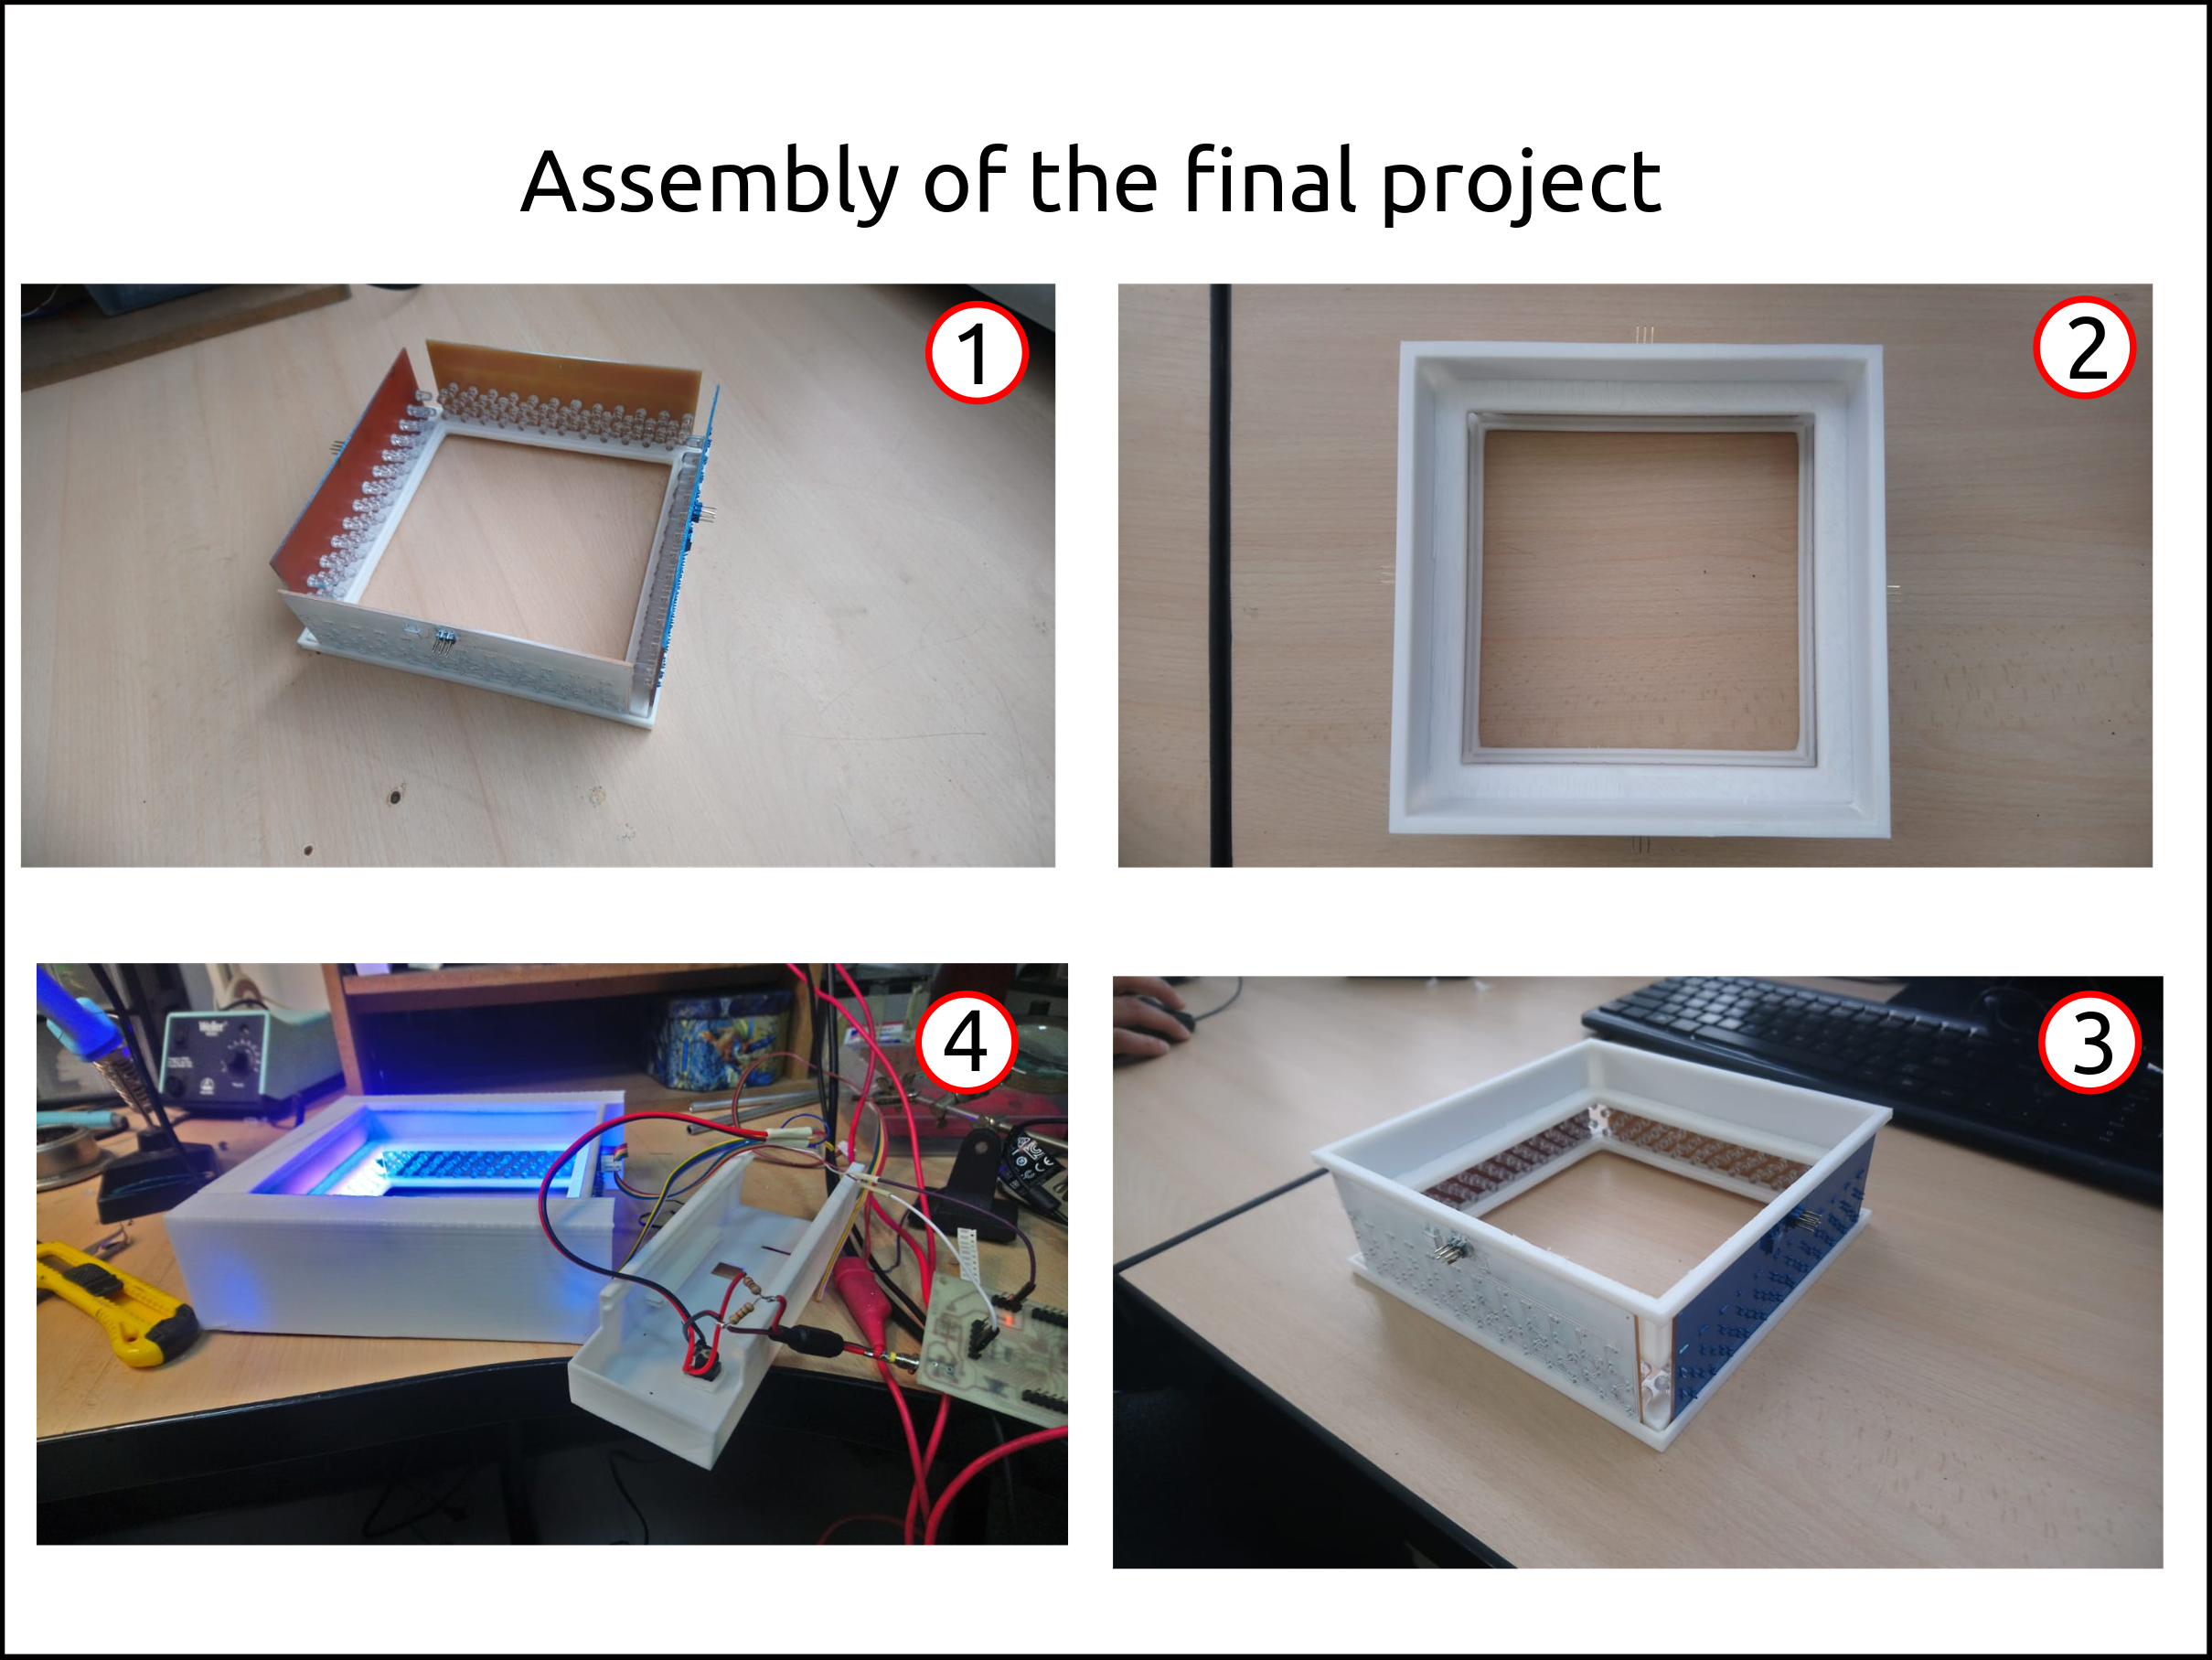
Assembly of the Final Project
- Here I show the 3D printed press-fit system for the transilluminator case. Is very interesting to notice that this project does not used any kind of screws

-
Here I show how the array of LED fits perfectly into the designed slot.
-
To fix the array of LED and its protection of acrylic I needed to pieces with its own slots, respectively.
-
This image shows how well fix the system without screws.
-
Finally we see how the electronics are into the system.
Parts review and test of the Final Project
You can see in the video what includes the final project parts and also see one of the modification of suggested by the researcher in the first test.
Results of the Final Project
Where I performed the tests?
Saint San Martín de Porres University (Universidad de San Martín de Porres)
The two tests was performed into the Genetics and Molecular Biology Center (Centro de Genética y Biología Molecular) of Faculty of Medicine (Facultad de Medicina), Saint San Martín de Porres University (Universidad de San Martín de Porres).
This place is located here:
The professor Ricardo Fujita Ph.D. is in charge of the Genetics and Molecular Biology Center.
Mg. Lina Laymito is an researcher who helped me performing the electroforesis and giving me excellent suggestion for the modifications witch I applied after to my final project.
First test
-
Here we can see the electrophoresis technique being performed.
-
In this case we can see on the left the device and on the right we can see the gel with electrophoresis performed with GelRed.
-
The researcher handling the gel to put into the transilluminator.
-
Here we see the gel into the transilluminator.
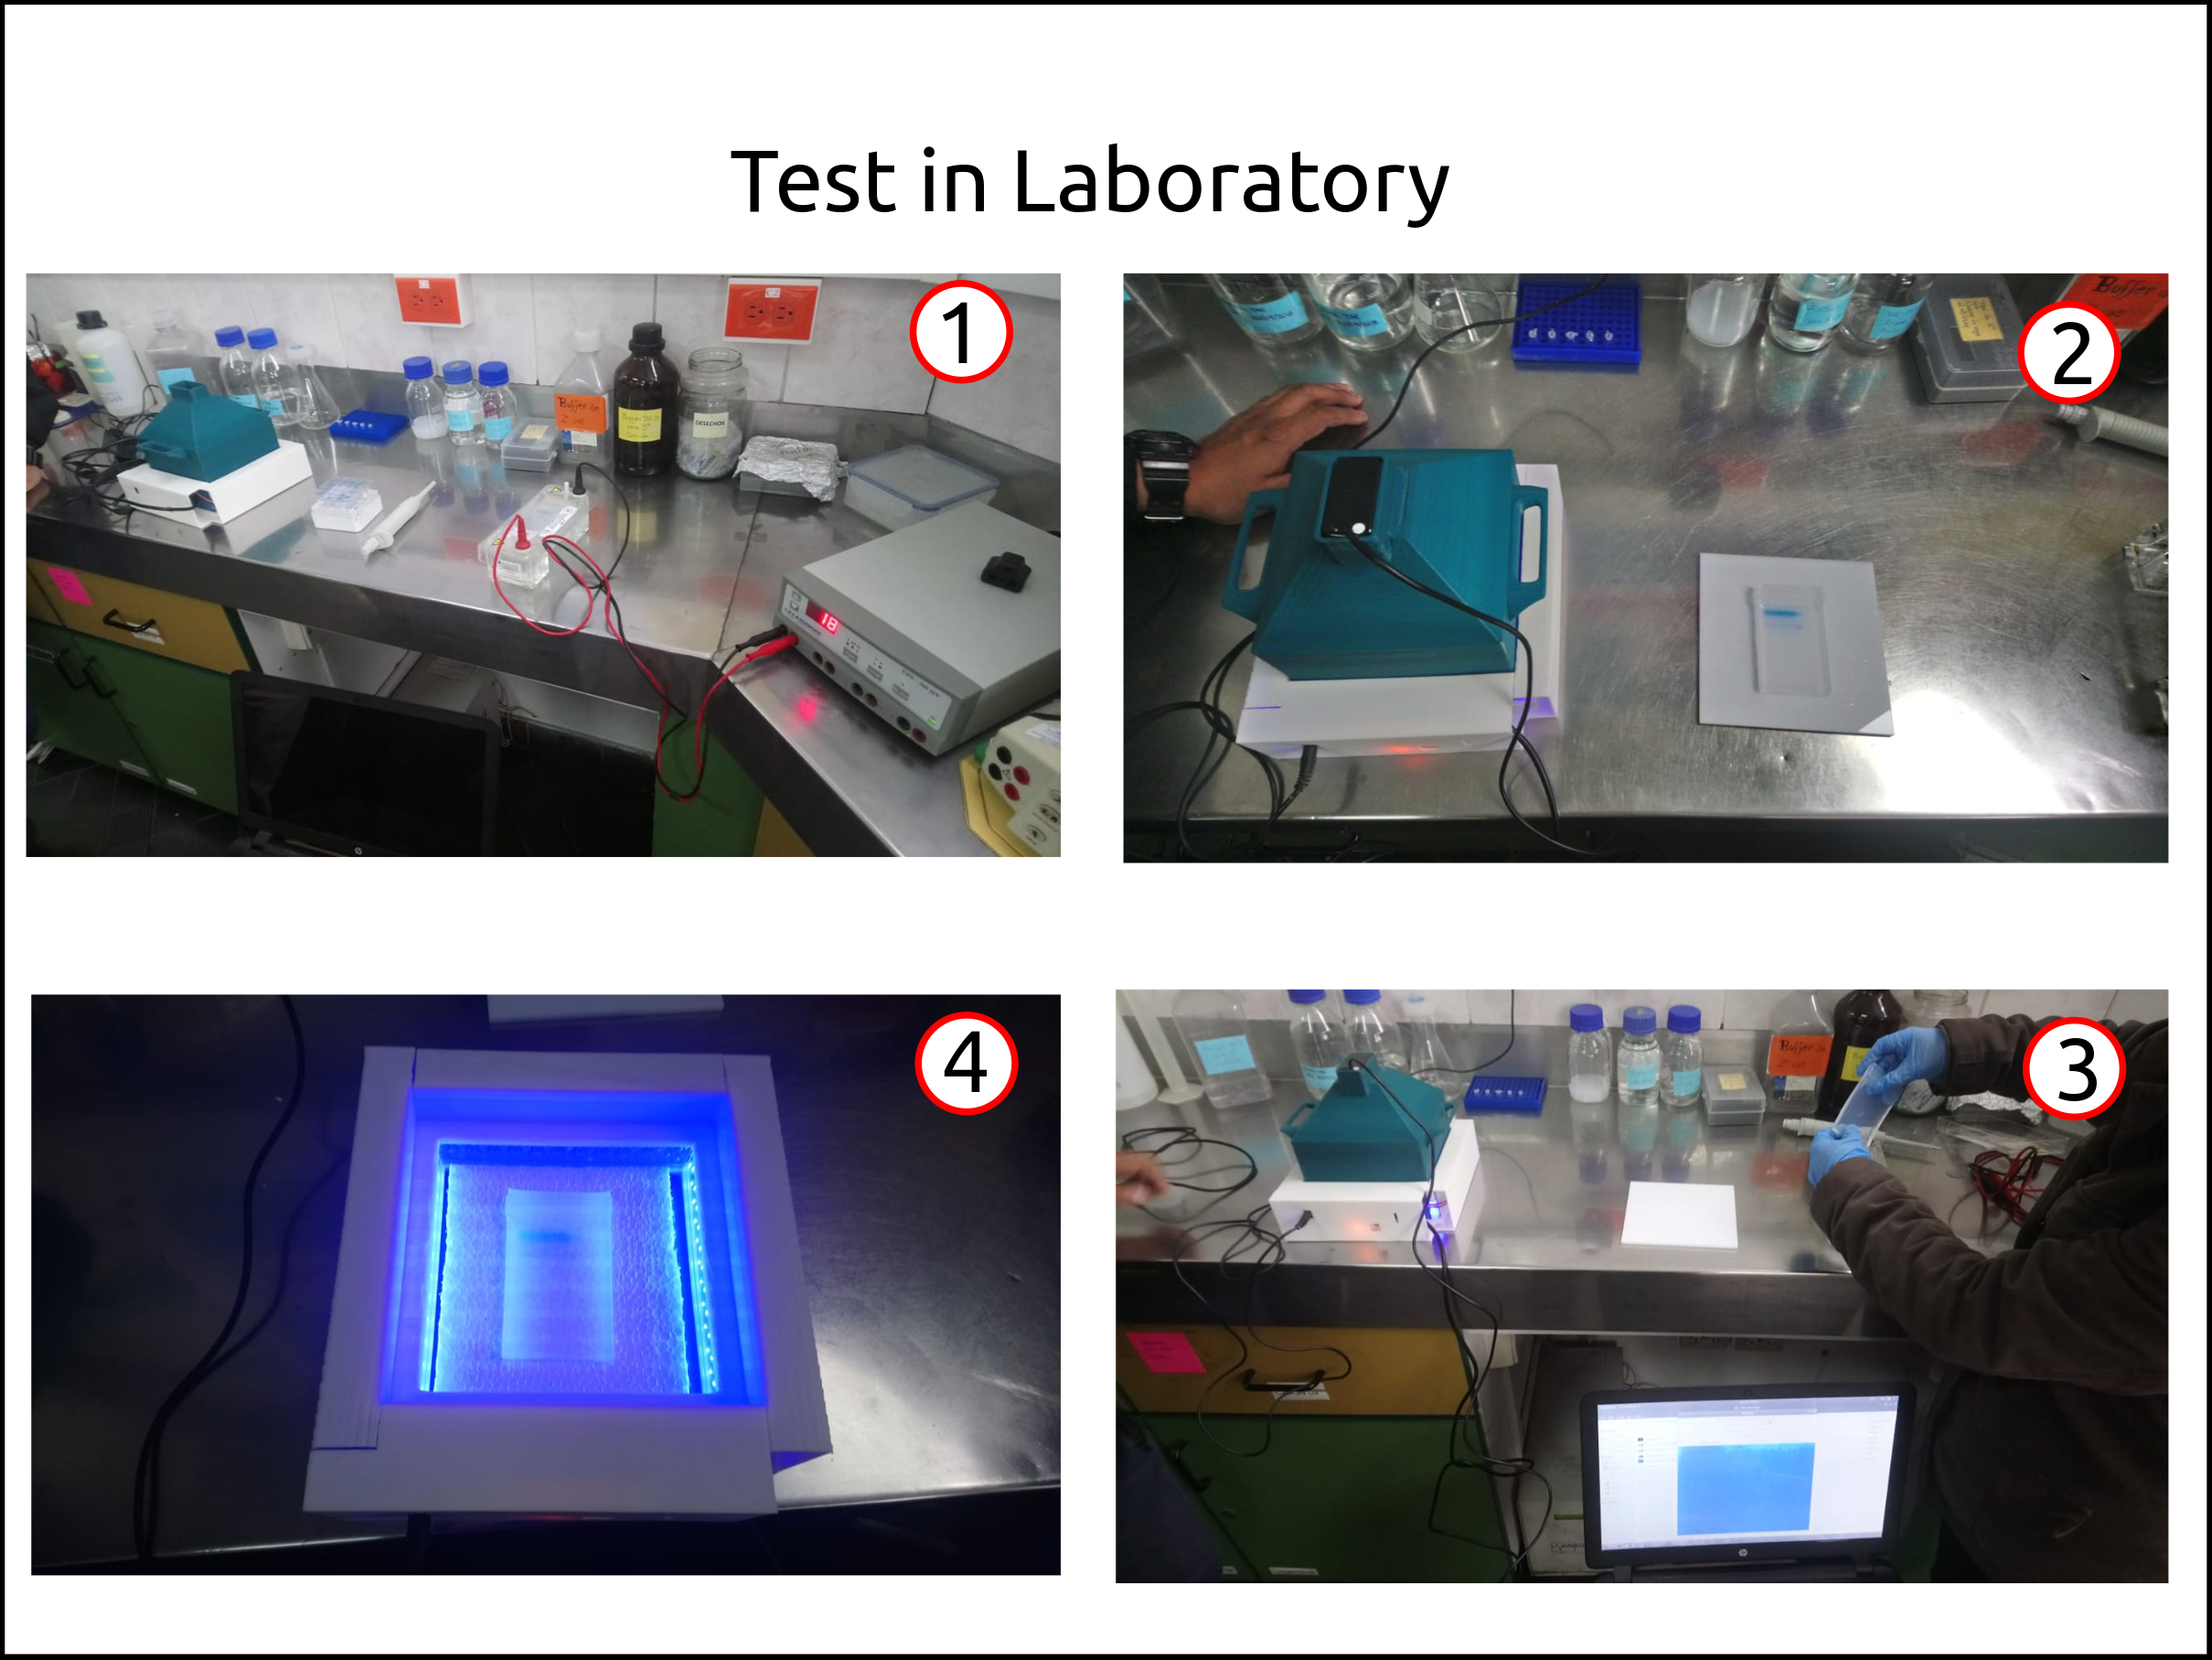
-
He we can see the photodocumenter working.
-
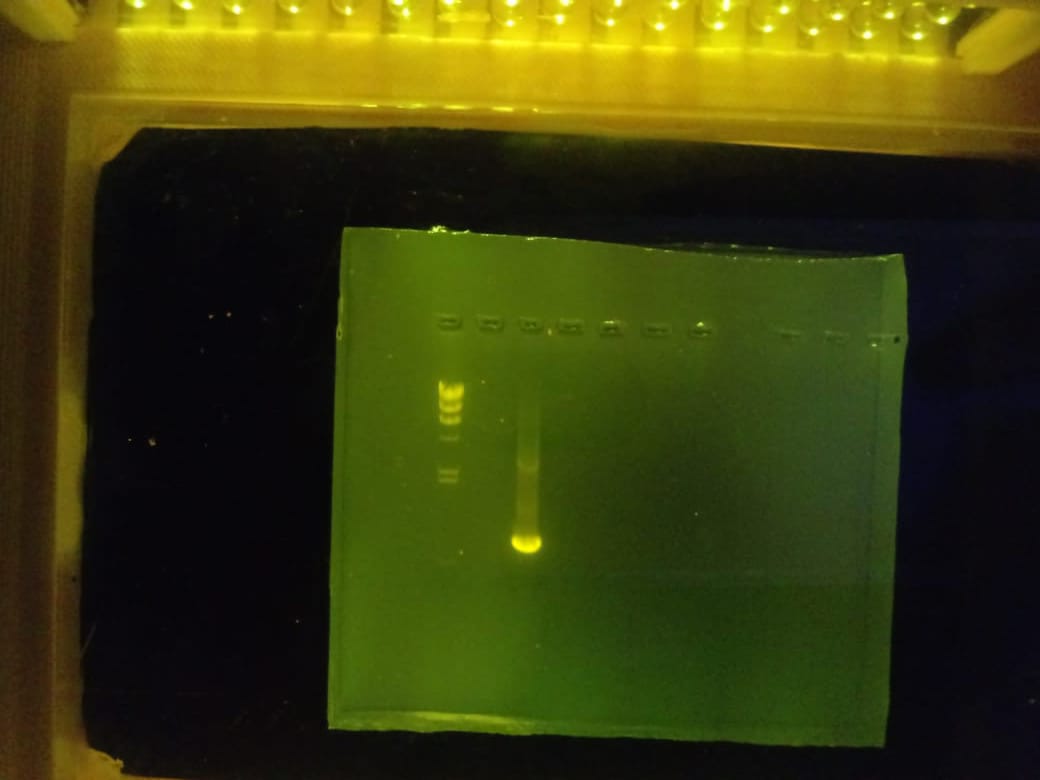
The transilluminator has UV light wavelength with low energy to excite the fluorescent tag.
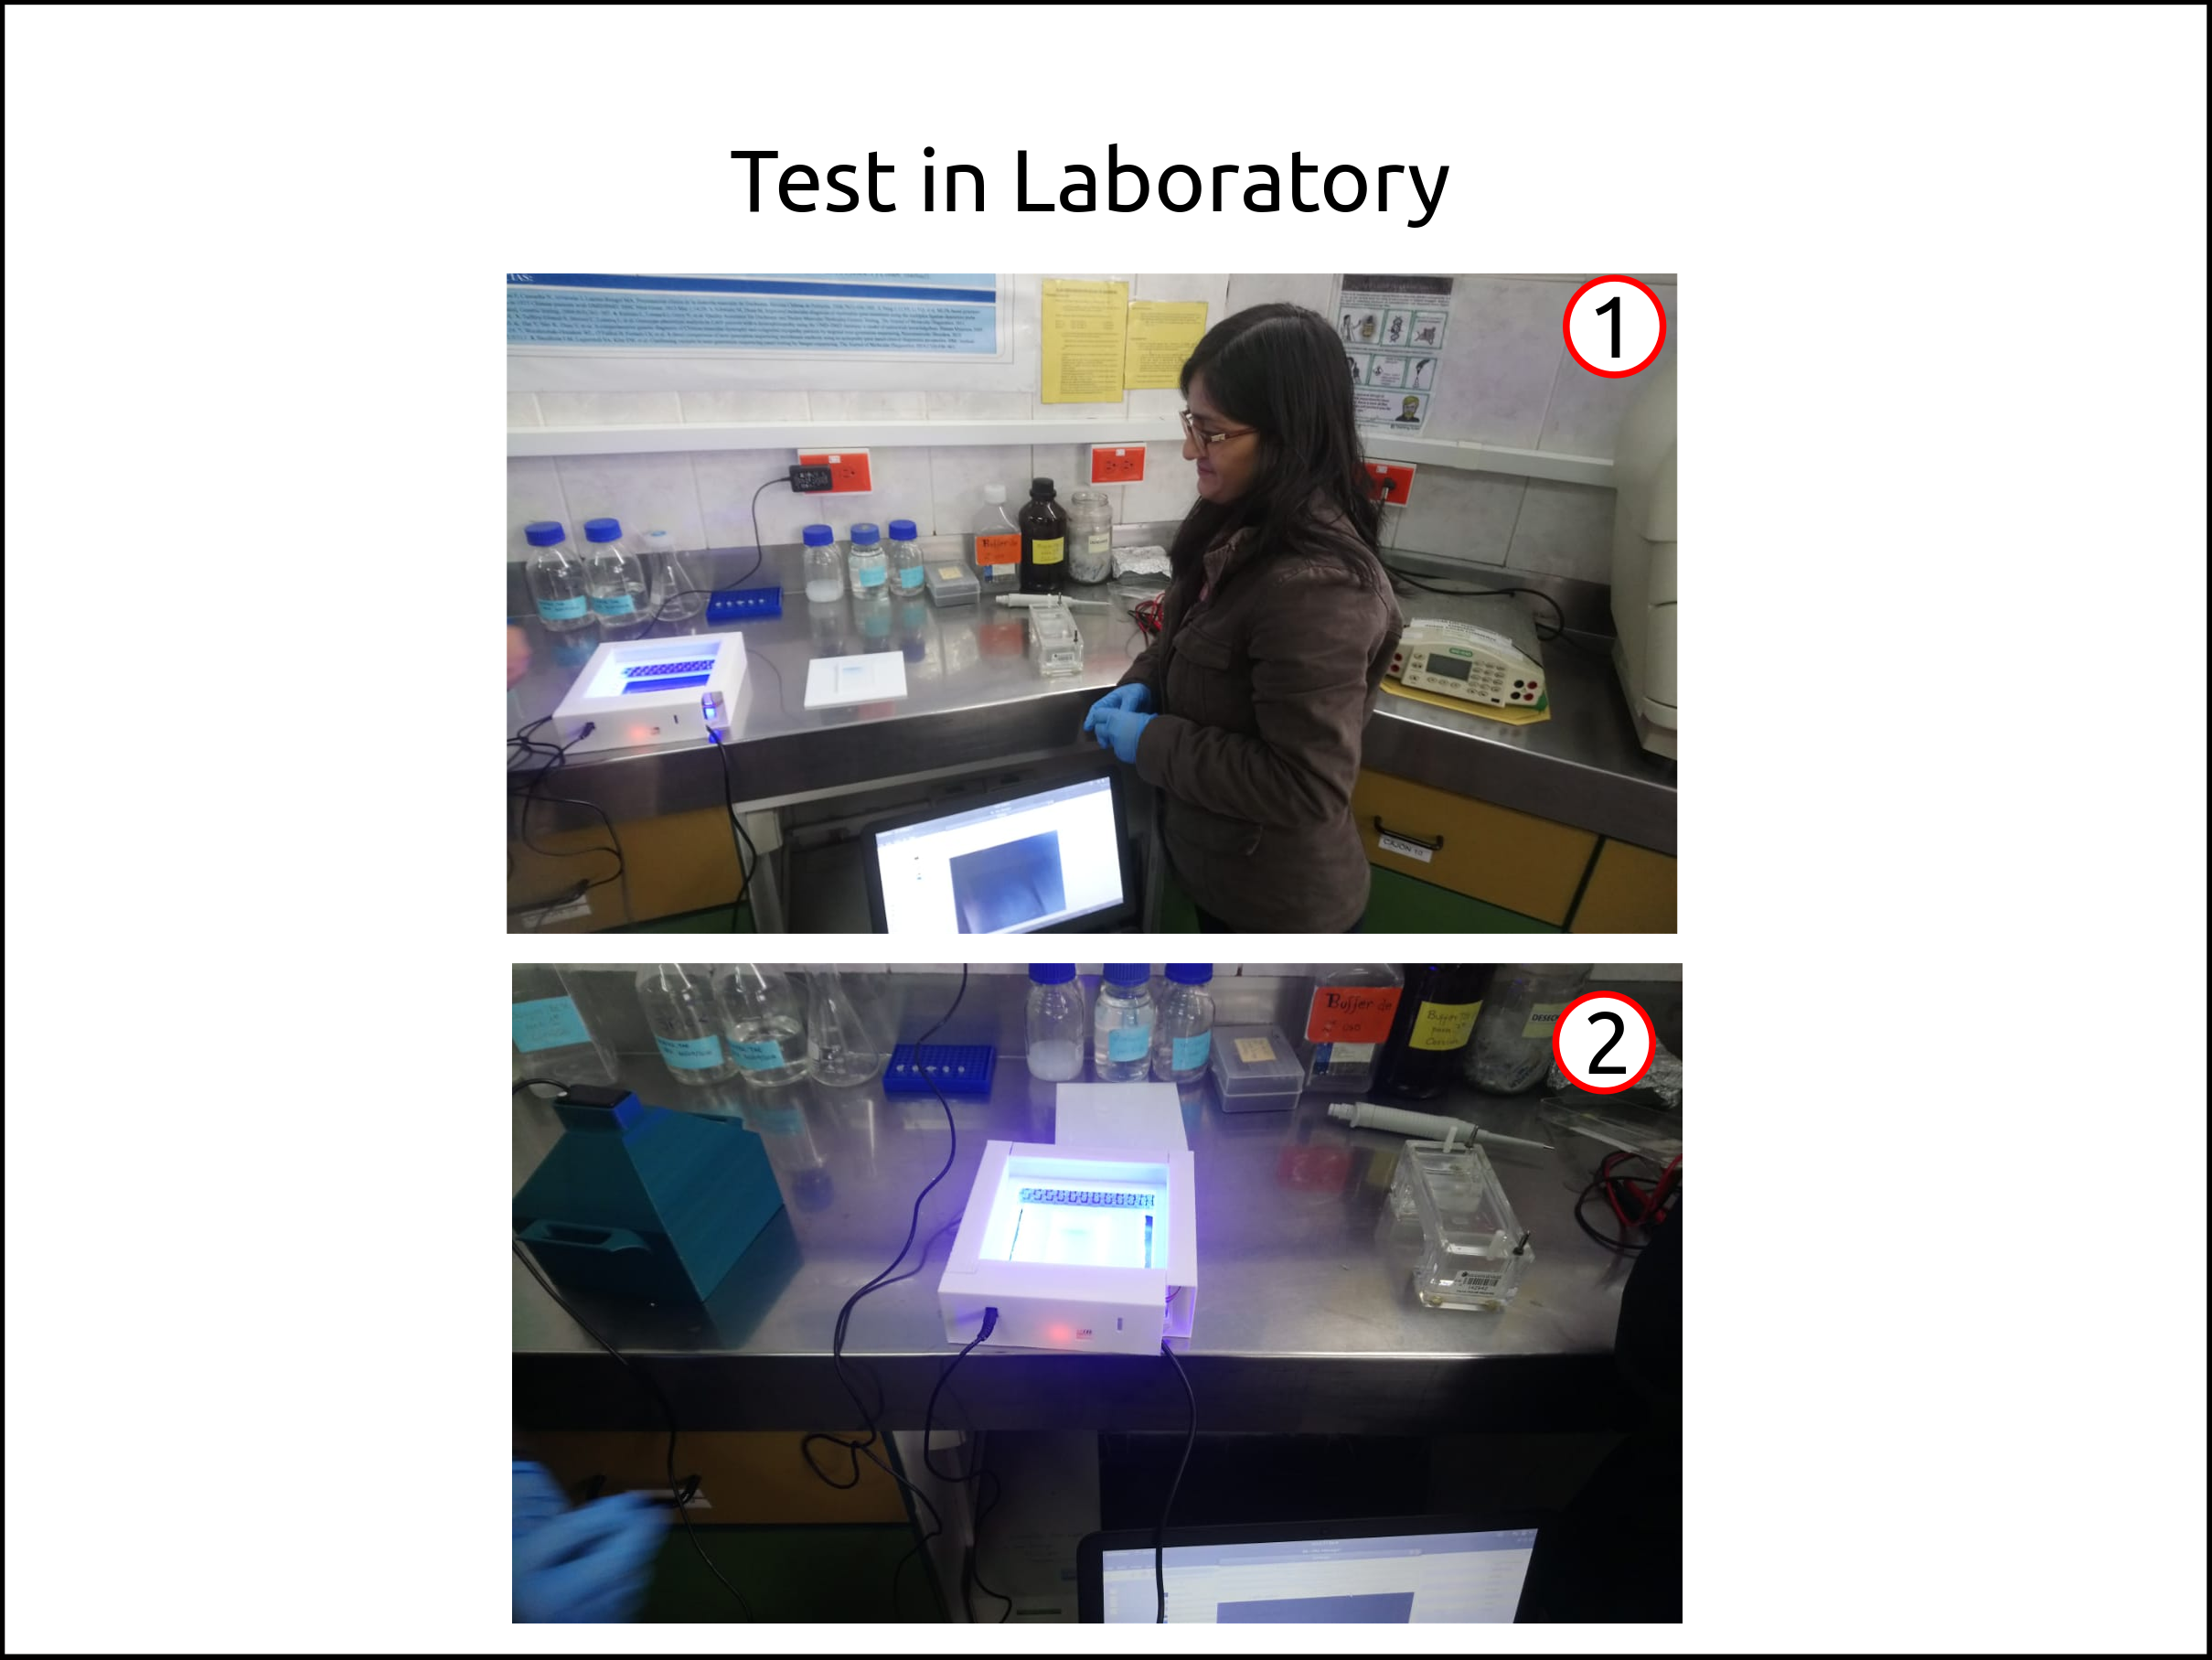
Final Test
In the first test the device had the light intensity controller in the GUI. And also the max intensity was low.
After added the modification to the device, I went for last time to the Lab for testing.
This is the video showing the last test.
National Agrarian University La Molina
I sent a few emails in order to find a place to test my device, and after I performed my test in the Saint Martín de Porres University I went to visit the Agrarian University La Molina.
This place is located here:
The professor Biologist Mg. Sc. Roberto Carlos Mansilla Samaniego who runs the Biology Department. Who gave me suggestions about my device.
I did not perform any test here because they used GelRed for fluorescent tag and I proved that my device UV emitter does not have the right wavelength to excite the fluorescent tag.
Conclusion of the final Project
-
I have to buy the UV LED from the manufacturer with all the intensification we need. Because in this project I bought from a local seller but they did not have how to demonstrate if the product is selling is what they say.
-
The device only will work with the SYBR Safe fluorescent tag because the blue light works.
-
The software filter will work with additional hardware, in other words, especial filters.
-
The researchers said that it will great to have a documenter with bands detectors witch add labels to the bands.
-
This project is excellent for educational purpose until my project has being certificated by some entity that test the device.