What you will find on this page:
-
What standards do I set for myself?
Getting to know the software
Getting to know the machine
The final design Remarques Reflection on this week
Manuals and files
What standards do I set for myself?
This is actually a good questions. From the FabAcademy out we already got some standards as Neil pointed out. It needs to incorporate computer-aided design, digital
manufacturing and non of it it can be covered in other assignments.
My original plan was to talk a bit about my boat, how I work on it, what products I use. but there is
no machining to it as I'm learning a trade, still, it's all done the old way, by hand. The only modern thing that I use are the materials e.g. the resin.
I thought about some other things that I could make with resin and polyester, lot's of ideas, but non of them would be made 100% digitally. Having the combination of the trade with the high end technology is in my blood.
There are however a lot of machines that haven't been mentioned for this week. CNC lathe, embroider machining, Kuka (robot arms), vacuum/thermoforming, rotation molding... The list goes on and on. But after a brainstorm, I decided that I wanted to work with the new embroider machine that we have in our lab.
insert drawing of brainstorms of possible things that I could makeBut, long story short, what do I want to learn this week? What's both fitting to learn within a week, interesting, challenging and useful?
- It needs to be designed with computer-aided design
- It needs to be digitally manufactured
- It can't have been covered/used in other assignments
- It is useful in later cases
- Preferably out of the comfort zone
- By the end of the week I'll show (basic) competence
- ...
To top
Getting to know the software
To make your files for the Brother embroider you need inkscape and inkstitch. Both are free to get and - easy in use once you know how it works. You can install inkscape on inkscape.org and find inkstitch on their website. Once you've installed both, you'll see that within the extensions of inkscape, you'll find inkstich back.
When you make your file, you need to delete and break apart all parts of your drawing. To see if this is correct you can go to: extentions -> inkstitch -> params. After that you can do a simulation and you can take out all mistakes. Sometimes the machine wants to go straight through, but needs to stop to make a bend or such.
In case there are mistakes in the simulation, you need to do a break apart on the drawing and maybe change the order of components. It depends on the part and is a trial and error process. This will be needed in for example letters like the D, A, O. Every letter with a white space in between.
When the simulation went ok, you can 'print out' the file. You're not actually sending it to the printer or embroider, but you'll get a sense of the size by seeing it on a A4 paper. We for example forgot to resize the drawing and ended up with a A4 sized logo of our lab.
Once everything is oke in the file, it's time to go to the machine itself, but not before saving the file as a .pes or .pec.
To top
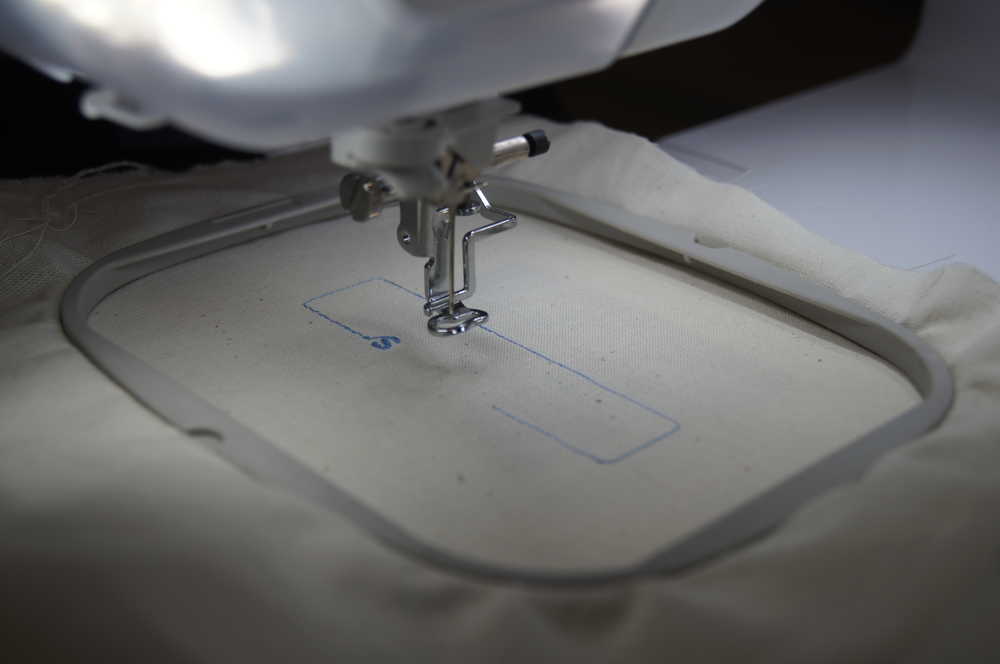
Getting to know the machine
The machine at first might look complicated. But once you get the hang of it, it's pretty easy. In other words, its a Brother machine.
The first step was to put on the wire. This is not that different as from a normal sewing machine, with the difference that the wire gets through the needle automatically. Place the foot down on the material and push the designed button to let the needle get wired automatically.
After that it's time to look at the file. We decided to transfer through USB. You can see all the folders on the USB stick and the file that you made. Select it and now you have a preview. In our case we needed to rotate the file 90° as it wouldn't fit on our textile otherwise.
Once that was done, we went to the textile itself. You take the 2 parts of the clamp and put the textile in between. Make sure the textile is really put under pressure to have good results later on. Now you can slide the clamp into the machine and lock it. Once that is done, you can start the machine and it will embroil your drawing.
To top
The final design
I didn't decide to do something crazy this week as I wanted to focus on my final project. I went with a basic design: the logo of our lab and my work.
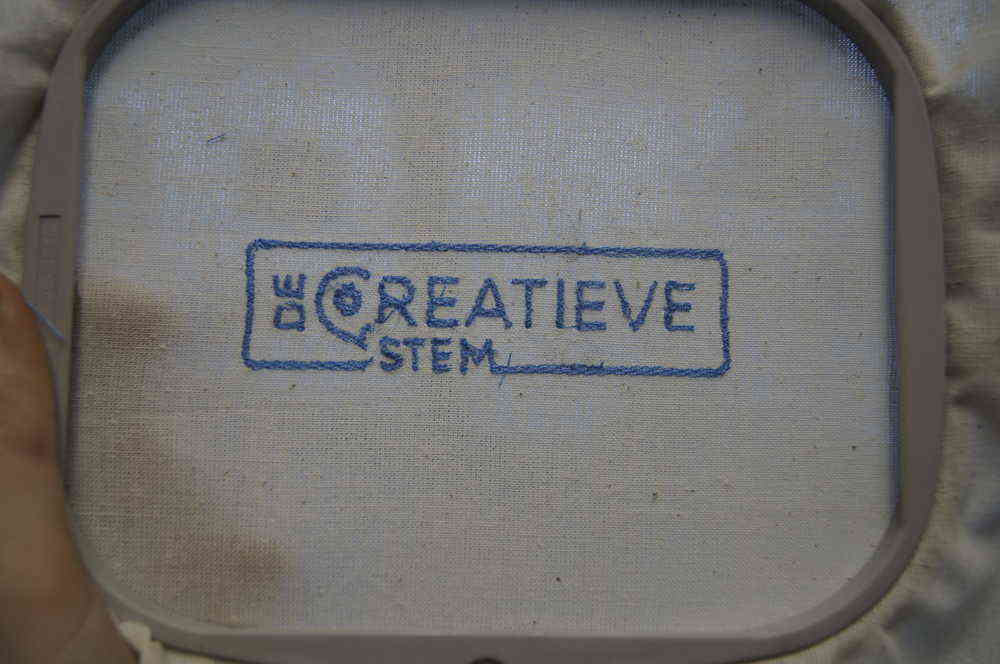 Hero shot
To top
Remarques
We did have problems with out wire. It kept breaking, and I had the same problem while sewing my final project though there the glue might have been the problem.
Next to that, we wouldbe the Ingegno makerspace/De creatieve stem without testing out several materials. So we put in the filt that I used for my final project and some coton.
 In filt
 In coton
To top
Reflection on this week
I liked this week as it was a more 'airy' assignment and more freedom in what we wanted to do. I would have loved to put something in about composites, but in the end that's my fulltime hobby, and already talked about it with the milling week. So a new machine it was. The good thing is that this brings the amount of people that know how to work with it to 2 in the lab. Or maybe 1.5. We're still all new to it and the manual is never far away.
To top
Manuals and files
Adjusted .svg file for the embroider