2. Project management
Assignment:
- [x] work through a git tutorial
- [x] build a personal site in the class archive describing myself and my final project.
Additionally, I worked on the installation of the different tools needed to have an up-to-date site together with required documentation
Summary:
Absolute beginner in this modern project world, no experience in any of the tools used here, I learned a lot, e.g. how to:
- use Git and Gitlab
- use Atom, Markdown and MkDocs (HTML5, CSS and Joomla are the basics of my experience writing webpages)
- use image compression with ImageMagick
Learning GIT - How to build a repository
In order to keep a correct versioning system, GIT software is installed on the PC (Windows 7), configured to work with the remote repository on the Fabcloud.
Step 1:
Install Gitbash for Windows from git for windows, with options default values
Step2:
create a local folder ( I called it fabacademy) and start GitBash (you can do this by right clicking on the folder, and select Git Bash here. Other option is to start GitBash from the Window menu and change to local folder (cd), once in the command window of GitBash)
Step3:
Setup GIT to sync with Fabcloud, following the Git simple cheat sheet:
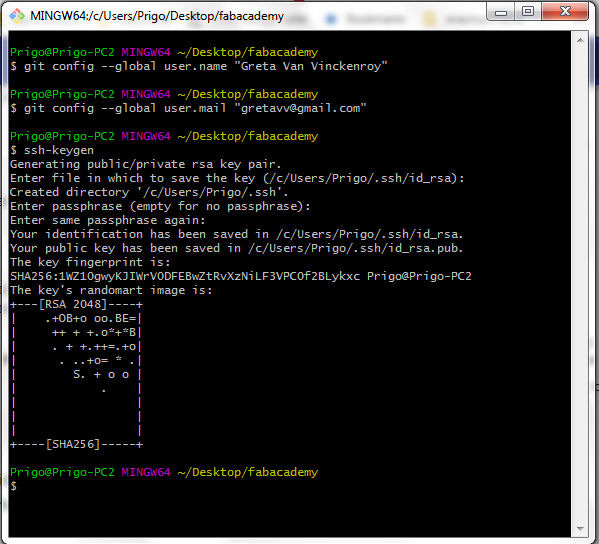
First configure git with name and mail:
git config –-global user.name “YOUR_USERNAME”
git config -–global user.email “YOUR_EMAIL”
Secondly, generate a SSH keys pair ( private and public) to allow a secure upload link with the Fab Fabcloud:
ssh-keygen
This generates a .ssh directory with two files: id_rsa, for the private key, and id_rsa.pub for the public key. The latest needs to be copied on the Fabcloud remote repository webpage (you need to login first!): profile>settings>SSHkeys.
Warning: in Windows, the .pub extension is by default, interpreted as a pu blisher file! You can change this in the file properties tab
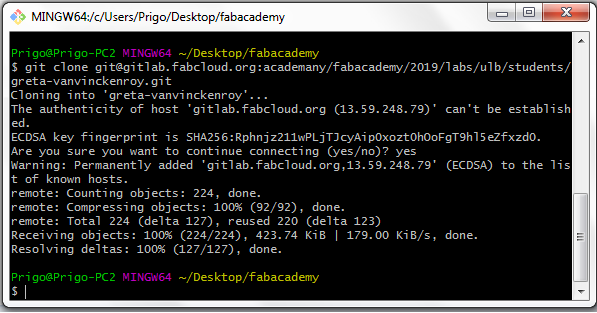
Finally, clone the Fabcloud remote repository to the local folder (The link address is found on the Fabcloud remote repository header):
git clone git@gitlab.fabcloud.org:academany/fabacademy/2019/labs/yourlabname/yourstudentname.git
Step4:
From here, changes to the local files can be done through a text editor on the local repository and further uploaded - when editing is complete - to the Fabcloud remote repository, with git (or Atom! - see below)
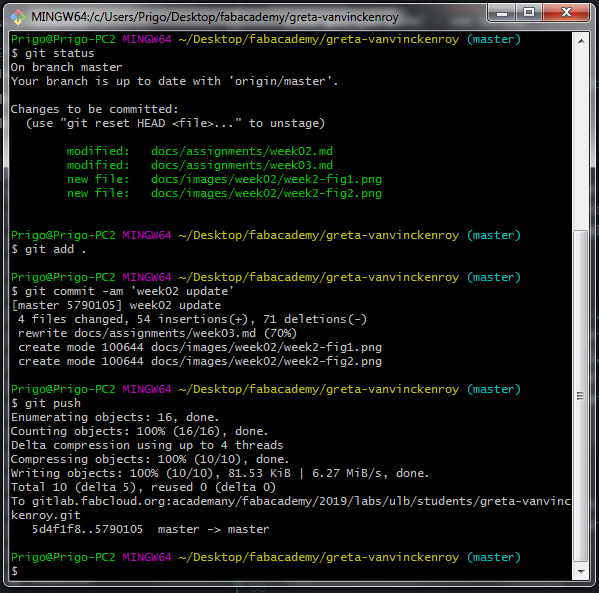
This is done through following commands:
- Add files changes in the local repository to your index
git add .
- Take all of the changes written in the index, create a new commit object pointing to it and set the branch to point to that new commit
git commit -am 'COMMIT_DESCRIPTION'
- Show the status of files in the index versus the repository. It will list out files that are untracked (only in the local repository), modified (tracked but not yet updated in the index), and staged (added to the index and ready for committing).
git status
- Push all the modified local objects to the remote repository and advances its branches
git push
Here are the results:
- To reset last commit ( without undoing the changes in the files) or a given commit
git reset HEAD
git reset COMMIT_NUMBER
- To reset last commit AND changes in files
git reset --hard COMMIT_NUMBER
I found a great tutorial in french here
Learning Atom - How to easily edit and view Markdown pages
In a first instance, I just clone the repository from the Fabcloud into the local drive, and have than no need to install Mkdocs and its defaults theme, Material. This will be done in a second instance. I use Atom to edit the files of the project: the complete project can be managed through Atom, that comes with the Github package already bundled with Atom!
A few useful commands in Atom :
- Open a Project
- Ctrl+Shift+M : shows the preview of the page under edition
- Ctrl+S : saves the file under edition ( blue point next to name disappears)
- (see other shortcuts in menu bar)
Learning ImageMagick - How to optimize images
In order to reduce images sizes before publishing them on the Web, the use of ImageMagick is recommended.
The version for Windows is quite intuitive to use, I didn’t encounter any difficulty.
Learning Mkdocs - How to manage the student website
MkDocs is a fast, simple static site generator that’s geared towards building project documentation. Documentation source files are written in Markdown, and configured with a single YAML configuration file.
To install Mkdocs, Python needs first to be downloaded and installed on the PC. pip, the Python package management system used to install and manage software packages written in Python, is already installed when using Python 3.7.
Just make sure to check the box to have Python added to the PATH (to launch the software from any point).
Check pip is properly installed (pip --version) and upgrade it (pip install --upgrade pip).
Pip is then used to install MkDocs ((py -m) pip install MkDocs)
Check MkDocs is properly installed (mkdocs --version)
The original theme - Material - can be installed with pip (pip install mkdocs-material)
To start a new project, we could use the command mkdocs new my-project, but by cloning the repository, we already have the structure:
* folder docs, containing the documentation source files
* configuration file named mkdocs.yml
MkDocs comes with a built-in dev-server that lets us preview our documentation as you work on it. Make sure we’re in the same directory as the mkdocs.yml configuration file, and then start the server by running the mkdocs serve command: mkdocs serve
Opening http://127.0.0.1:8000/ in the browser displays the default home page of our project. This allows us to view the local version of our site before setting it on the Fabcloud.
Learning Webpage style
The idea here is to add some global stylesheet, using class, embedded in the Markdown structure… First, add following line in mkdocs.yml:
extra_css: [extra.css]
Add the extra.css file in the docs directory.
In my extra.css file, I
- define a style for a class I call CAUTION
- define the style of my html tables
- modify the Markdown Material theme headers formats (to make them more visible)
Nice tool: use the “inspect function” (CTRL + MAJ + I) on your favorite navigator to play with styles and check visually the changes you make, online!....
Still to do if I had time....
Use branches
Working with two remote repository ( the local Fablab git repository and the Fabcloud…)