2 - Project Management
Well That Took Long
Tools & Assignment
 Updated for 2019 evaluation standards!
Tasks
- Build a personal site describing you and your final project.
- Upload it to the class archive.
- Work through a git tutorial.
Learning outcomes
- Explore and use website development tools
- Identify and utilise version control protocols
Have you?
- Made a website and described how you did it
- Introduced yourself
- Documented steps for uploading files to archive
- Pushed to the class archive
- Signed and uploaded Student Agreement
Notes
What size should my website be?
Answer
In the order of tens of megabytes (aka 99mb is the most?).
Ideally growing at an average rate of 1-2 Mb per week. (aka 20~40 mb total)
(Copy of my 2016 website, with spelling corrections :)
Preamble
I undergo my Fab Academy training at the Fab Lab of Amsterdam, which is part of the “Waag Society” (of which the logo can be seen as the icon of each of my sites pages) and where I met the rest of my work group before the first global lecture.
[All the tools, software and tutorials are explained in depth as a separate paragraph at the end of the page]
Our First Lecture
Our first lecture with Neil Gershenfeld was split in two parts: In the first half he introduced us to the driving concepts and ideology behind the Fab Academy and Fab Labs. In the second half he give us an overview and brief explanation of the tools for the completion of our (first) weekly assignment.
Working Through a Git tutorial
The day following the global lecture my work-group received a local lecture by Ivo de Kler. He gave us an introduction to basic HTML & CSS using Sublime Text, a word processor.
I had previously worked on building websites, having learned from sites like Codecademy, W3Schools, and a myriad of YouTube videos. I decided to settle for TextWrangler as word processor that I had been using for a longer period of time.
He also taught us how to use Git, which was extremely important for me, as I had never worked with it. At first it was daunting; it’s unusual to work through the Terminal, so I attempted to download and use Git Kraken, which is a Git GUI (Graphical User Interface) however I gave up on the idea pretty quickly seeing it was more complicated to set up then it was to learn how to use Git from the terminal.
I also worked through the first section of the CodeCadmey tutorial on Git; this was very useful to understand the logic behind Git’s function, however I did not complete it due to the fact it was either redundant with what Ivo had already thought us or it was outside the scope of what I need Git for (If I ever need more advanced use of Git I shall go back to it).
Git is the industry-standard version control for Web Developers.
A Git project is composed of three parts:
I. Working directory: where the work is done, created, edited, deleted and organized.
II. Staging area: where you list changes made and added files to working directory.
III. Repository: where Git permanently stores and saves the changes as different versions.
The repository in our case is managed by the Fab Lab of Amsterdam, which in turn is managed by a higher Fab Academy repository (I believe in Portugal for us). The access to the repository was complex, this process was mostly guided by Ivo during our lecture (fortunately, as I assume it would have taken a great deal of research to mange on my own).
The basics of Git can be distilled in 8 basic commands:
-> git status
Inspects the contents of the working directory & staging area
-> git add
Add files from the working directory to the staging area, so that changes are tracked
-> git diff
Shows the difference between files the current working directory and the staging area
-> git commit
Permanently stores file changes from the staging area in repository
-> git log
Shows a list of all previous commits
-> git push
Sends your changes to the global repository (Git Lab)
-> git pull
Updates your saved repository with the most recent changes from others
-> git init
Create new Git Repository (useless for the Fab Academy but necessary outside the course)
Build a Personal Site in the Class Archive Describing You & Your Final Project
Creating the site proved to be a challenge due to my obsession over form, taking me a while to get exactly the site I wanted and changing the design several times.
However the most important element behind the creation of my sight was Dreamweaver.
It made designing and visualizing my code easier, permitting me to view the results of changes directly, as well as apply them from the editor GUI.
I also used thought of using Bootstrap as a CSS style sheet, however I opted for a simple pre-existing style sheet since Bootstrap was overwhelming.
I then proceeded to build on that aforementioned template, which was lots of work, it required me adding several CSS classes as well as tweaking some of the already existing ones to fit my taste, therefore now the style sheet are rather different from the originals. I also added other outside CSS and HTML segments from the W3School examples.
I built the sight with simplicity in mind: the logo of the Waag Society can be seen as my icon on the title of the page.
The header of my page pridefully recites a phrase from the book “Artificial Intelligence a Modern Approach” 3rd edition by Russell & Norvig, which may be considered the fundamental text for anyone learning about Artificial Intelligence.
Since my project will hopefully be robotics oriented this phrase holds a double meaning; the first about machine learning and second about the value of education, reflecting the goal of the Fab Academy.
The “about me” page is integrated with my home page and tiny modules below the main image distribute the weeks, each linked to weeks’ page. At the bottom of the page there is a button linking to the page of my final project.
The assignment regarding the final project is completed on the Final Project page.
[13 March 2016] -> I have updated my site from the original; I present a home page with only the aforementioned quote from “Artificial Intelligence: A Modern Approach” and two links to my old “about me” (of which I changed the background and removed the quote and red header) and my final project, which remained mostly unchanged.
[29 March 2016] -> Adding links to Neil’s lectures to “Our Nth Lecture” headers at the top of the pages. Plan to improve Final Project section
Explanation of My Tools & Why I Use Them
-> Operating system: I use OS X, specifically El Captain. However I have access to Windows 7 Ultimate and Elementary OS Freya (a Linux distro) to juggle programs with different compatibilities.
-> Text Wrangler: Its lightweight, simple to install and use, its free and highly customizable. It can also be used with a great deal of programming languages. It does not have all the features that make it easier to code in sublime text, but sublime text is not free.
-> Codecademy: The vast variety of thought languages (HTML, CSS, Javascript, PHP, Ruby,etc.) makes it an invaluable resource to create a good interactive website, since it deals with both front and back end development, however since is interactive, it can be a bit slow for anyone who picks up coding quickly or knows how to code with more complex languages already, such as myself.
-> W3Schools: This is the holy grail of HTML, CSS and JavaScript problem solving. Listing virtually all html tags and how to use them, as well as examples of important websites features such as buttons and sliders, making designing your website a simple task. The speed and depth of what you learn is up reader and, making it my website of choice, and where I learned to do about 60% of my website design skills.
-> Google Docs & YouTube: I will use Google Docs and YouTube as
-> Dreamweaver: Is a word processor from Adobe, it is not free however I am currently taking advantage of its.30-day trial. Its fantastic because it lets you see the result of your changes instantaneously and makes designing your website more graphical. However a solid coding background is required for editing the code to your liking and don’t want to be stuck with boring pre-built templates, since most of the editor GUI is only useful to add text in paragraphs.
2019
Building a personal website
As can be noticed, most of the information above is not longer relevant. Most importantly, Fab Academy documentation is now paired with MkDocs, which, lets face it, it’s pure bliss.
Because I’ve proven my HTML & CSS prowess (or not) in 2016, I won’t go through excessive personalization, opting to stay with the pre-set Material Theme for MkDocs.
The structure of the site is as intuitive as I can make it
- About me section, which includes:
- an about me section (duh)
- the signed student agreement
- an assignment checklist, which basically keeps track of what we have to do (directly from the Assessment page)
- extension info, where I report all the Material Theme extensions I’ve got active (basically all of them)
- An assignments section
There are only a few things to note, MarkDown & HTML/CSS integration was a bit of a struggle.
This is particularly evident when one tries to change the layout:
the basic procedure is to add a stylesheet folder to your docs, within which you can add your own custom css.
You have to point to this file in your mkdocs.yml file:
extra_css:
  - 'stylesheets/extra.css'
Simple enough
Except there is no easy way to pin point particular use cases, because there are no <div>‘s you can give class type to.
Not simple enough
So how does one go about creating some simple image cards to avoid having a gigantic, left-aligned, image flopping on your website?
Well, basically, you must used <div>‘s, but the solution isn’t self-evident:
<!-- Image Card Divider --> <div class=image_card markdown="1"> <h3>Antimony 'graph window' preview</h3>  </div>
To-note, the  line MUST be spaced out.
Also, you need to include the markdown="1" part in the div description otherwise it’s a no-go.
Then you can add all the center-y goodness to your theme with css:
/* Image Card CSS */
div .image_card {
    max-width: 75%;
    margin-right: auto;
    margin-left: auto;
    margin-top: 20px;
    margin-bottom: 20px;
    background-color: rgb(245, 245, 250);
    border-radius: 10px;
}

div .image_card iframe {
    display: block;
    margin-left: auto;
    margin-right: auto;
}


div .image_card img {
    max-width: 95%;
    margin: 4px;
    border-radius: 5px;
}

div .image_card h3{
    margin-top: auto;
    margin-bottom: auto;
    text-align: center;
}

div .image_card p{
    font-size: 85%;
    margin-top: auto;
    margin-bottom: auto;
    text-align: center;
}
:)
Finally, tweaking the theme’s with extra css doesn’t always work… for example I’ve yet to find a way to change the color of the bold operation (done successfully with <em> but <b> doesn’t work)
If anyone out there knows the answer to this dilemma, Thou shalt be praised.
By the way, if all this in-line coding goodness is amazing you, there is CodeHilite to thank.
For good-measure I’ll add my customization to the mkdocs.yml:
theme:
  name: material
  palette:
    primary: "deep indigo"
    accent: "orange"
  favicon: 'images/de-waag-logo.png'
  logo:
    icon: 'watch'
extra_css:
  - 'stylesheets/extra.css'

markdown_extensions:
  - extra
  - smarty
  - admonition
  - codehilite:
      guess_lang: false
  - toc:
      permalink: true
  - footnotes
  - pymdownx.arithmatex
  - pymdownx.betterem:
      smart_enable: all
  - pymdownx.caret
  - pymdownx.critic
  - pymdownx.details
  - pymdownx.emoji:
      emoji_generator: !!python/name:pymdownx.emoji.to_svg
  - pymdownx.inlinehilite
  - pymdownx.magiclink
  - pymdownx.mark
  - pymdownx.smartsymbols
  - pymdownx.superfences
  - pymdownx.tasklist:
      custom_checkbox: true
  - pymdownx.tilde
Small thing to note, you can use the mkdocs build command to see the html output produced when your project is built on github,
as mkdocs serve isn’t a totally reliable benchmark of how things will look like (especially images).
Tools
Now, the only constant from 2016 in this section is my PC, in fact I still use my trusted Mac Book Pro from then, which is starting to feel his age (don’t ask, he’s self-conscious about it).
However with the advent of MkDocs the main advantage of Dreamweaver, which was live preview, can be basically thrown-out of the window.
Here a good mkdocs serve in the terminal (preferably iTerm2) will do the trick.
Also, if you have a Mac, get Brew, just do it. It makes life installing apps easy as 3.14159265…
As for editing my code, there is a strong case to be made for several text-editors (atom, sublime, etc.) & IDE (arduino-ide, anything jetbrains) particularly the IDE’s for the coding to be done later on.
For me, when it comes to text editors there is only one answer: Visual Studio Code
Why is that? Well it has all the features you might need, and boots quickly.
It’s easy to install extensions, and there is an extension for practically anything you might want an editor to do.
Anyway, more powerful tools like IDE’s are for a later date.
- Video compression -> HandBrake
- Image optimization -> ImageOptim
FFMPEG Useful Commands
Strip audio from video:
-> ffmpeg -i source.mp4 -c copy -an target.mp4
Speed up video by factor X:
-> ffmpeg -i source.mp4 -vf "setpts=(PTS-STARTPTS)/X" -crf 18 target.mp4
Crop video (this operation crops height):
-> ffmpeg -i source.mp4 -filter:v "crop=in_w:in_h-200" -c:a copy target.mp4
Video & Image Compression Workflow
In order to be able to upload videos to the repo, without destroying the size limit, videos should be used rarely. Additionally they should be highly optimized.
My standard is to cut the video using Shotcut to contain the essential, then I strip the audio, finally I use HandBrake to compress it until it’s small but watchable.
With images it’s just a question of cropping the image, scaling it down converting it to .jpg and using ImageOptim to remove residue data (lossless)
Git - Updated
My pervious account of git usage was lacking in breadth and insufficient in evidence, as such I will expand further on the concepts above, while providing more tangible results.
However, seeing this requires doing in the midst of my development (I already did all the steps above before realizing this was required) I will take a slightly different take on this.
Fixing My Repo Size
After adding several weeks to my repo I started to notice an increase in repo size, even when I had been careful to compress my images and videos.
After some digging around I found the likely culprit - the .git folder.
This guy holds the history of all the git files in your repo, and is responsible for your file history.
However if you push a large file, and then you delete it, it will still remain in the history of git, that’s not great.
We’re going to fix that, but before lets get some stats.
Automatic Repo Size Checker
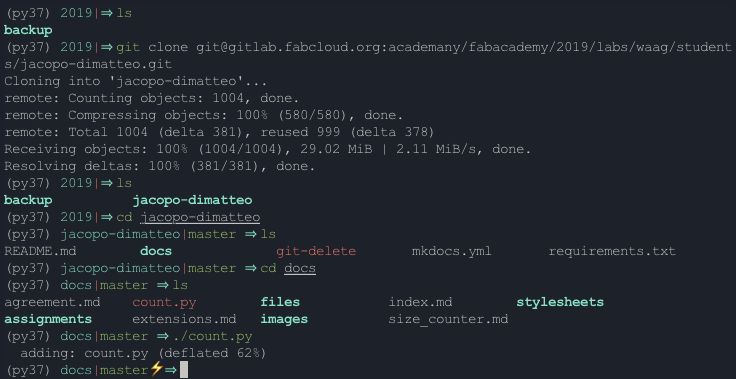
I created a very rough python 3 script called count.py.
It produces a Markdown .md file that is compatible with mkdocs material theme and admonition.
The result can be seen here.
-> Download the count.py code as .zip file
The purpose of this script is to highlight bloated repository folders.
It’s still very rough (code isn’t formatted), and is only useful if you have the exact same repository structure as me.
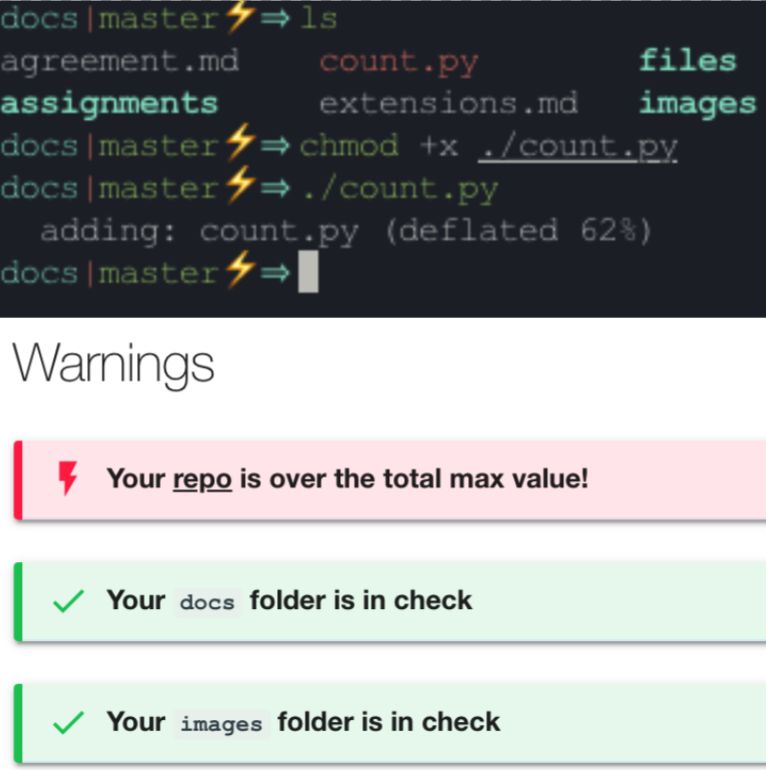
You can make the script runnable using the command chmod +x ./count.py, you only need to do this once.
After that you can run the script in the terminal with ./count.py.
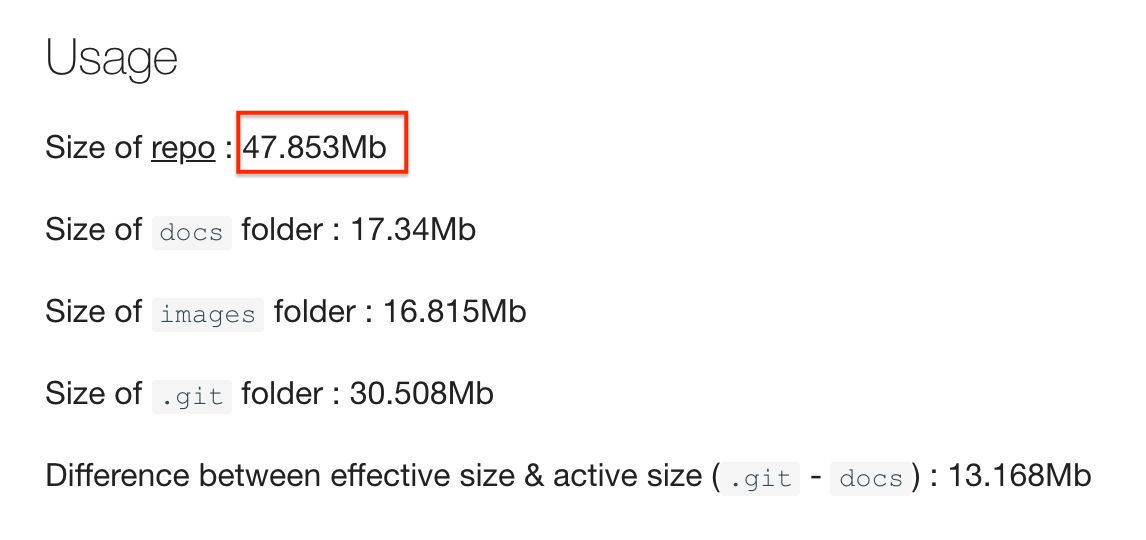
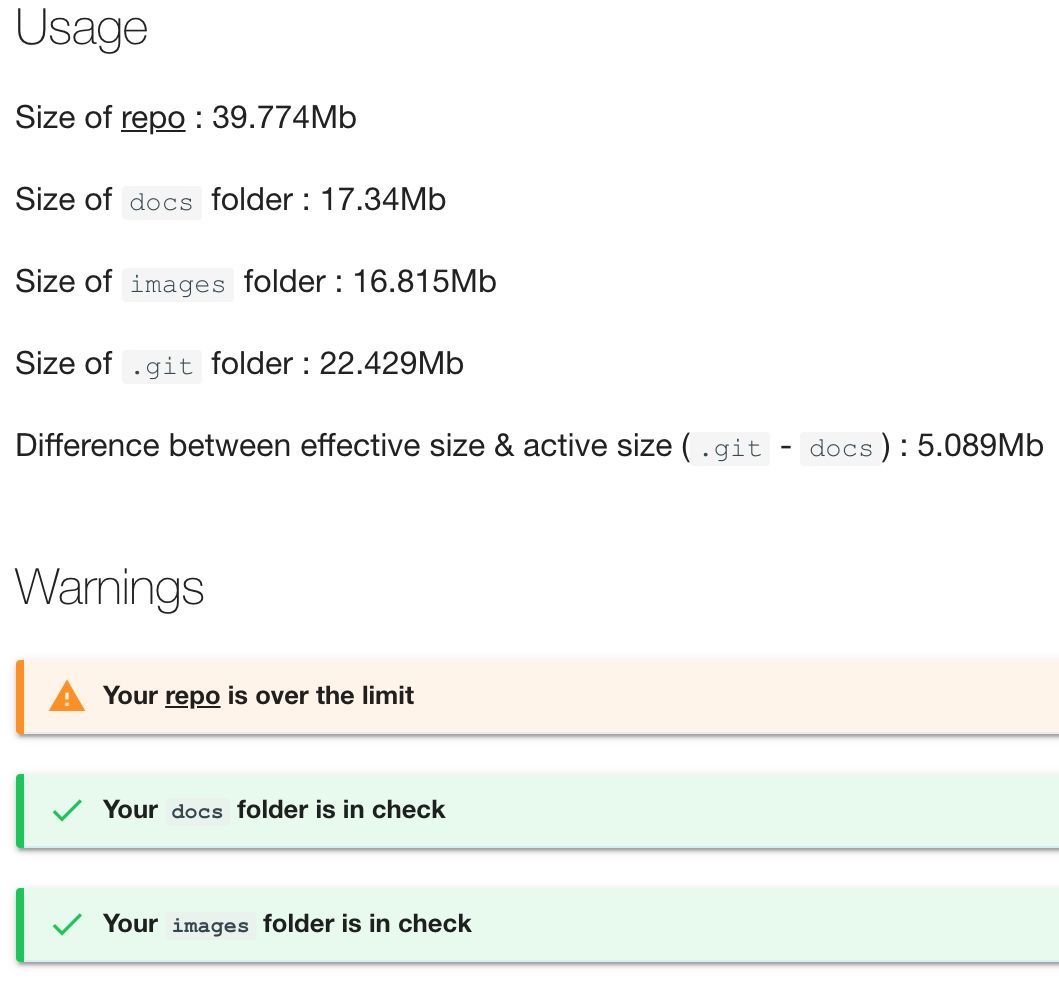
It produces some warnings indicating to possible issues in your repo, but not the extent I wish it did, for now I have:
- Excessive repo size warning (over total allowed value - hard limit)
- Total repo is over the limit warning (active weeks are over soft limit)
-
docsfolder is over the limit warning (docs are over soft limit) -
imagesfolder is over the limit warning (images are over soft limit)
I would like to add to the script :
- analytics about particular weeks/folders being over the limit (eg. images folder of a particular week)
- point out large weeks and files
- prompting for
.gitfolder optimization.
Let’s see my results.
The Big Friendly Giant (BFG)
If we have to remove big data out of our repository history we have to options:
The first option is very powerful but difficult, the second one is very fast and simple to use yet not as powerful. We are going to use the second (BFG stands for Big Files Git - not big friendly giant) since it’s more then enough for what we need.
Fist things first we got to download this bad boy, which is done by clicking on the download button on the BFG homepage.
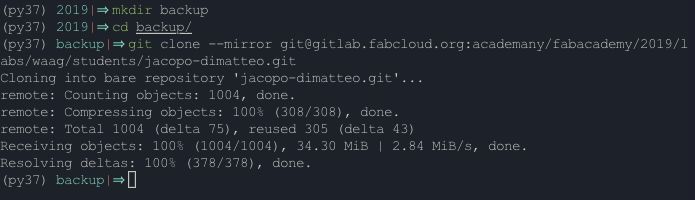
The next step is to open the terminal:
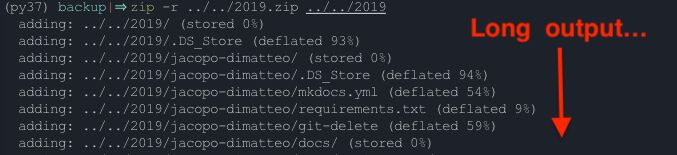
cd home/folder/for/your/project/directory/ # Open folder which contains your repo
mkdir backup # Create folder where we will store a backup
cd backup # Open backup folder
git clone --mirror git://example.com/some-big-repo.git # Clone your repo
zip -r ../../home-folder.zip ../../home-folder  # Backup your repo, -r for recursive
mv ~/Downloads/bfg-{your version}.jar # Move bfg to current directory
ls # Check file is there
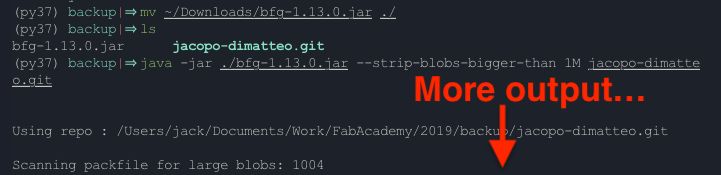
usage, we use the 1M command to remove anything larger then 1 Mb.
java -jar bfg.jar --strip-blobs-bigger-than 1M some-big-repo.git # Strip large files
Okay, before I go on let me actually push these notes....
Then I’ll do everything again 
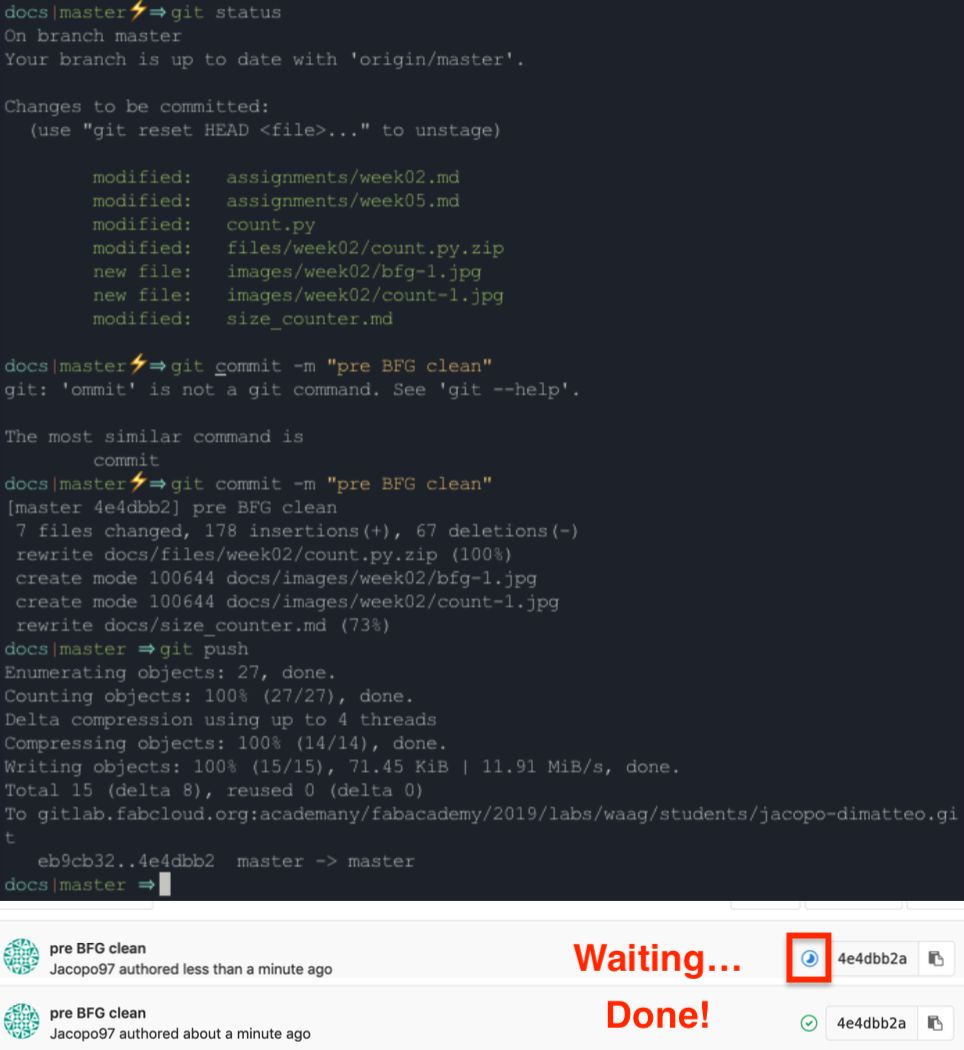
Next step we need to finalize the changes and push them:
cd your-repo.git
git reflog expire --expire=now --all && git gc --prune=now --aggressive
git push
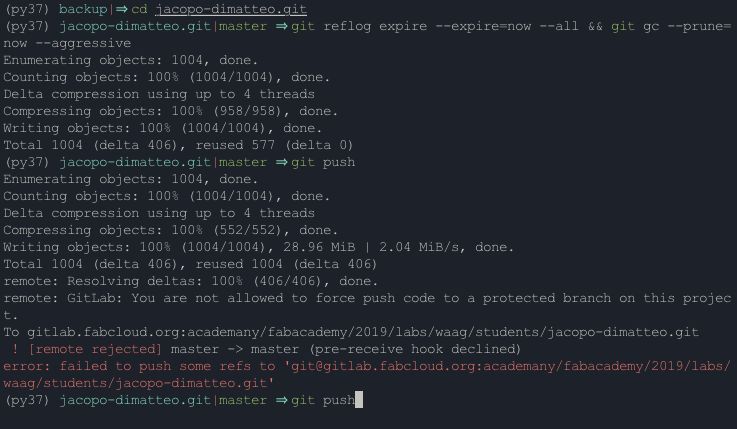
Okay, something went wrong.
This looks like some kind of permission issue.
Let’s copy paste the error on google and see what Stack Overflow has to say about it
-> Git push error pre-receive hook declined
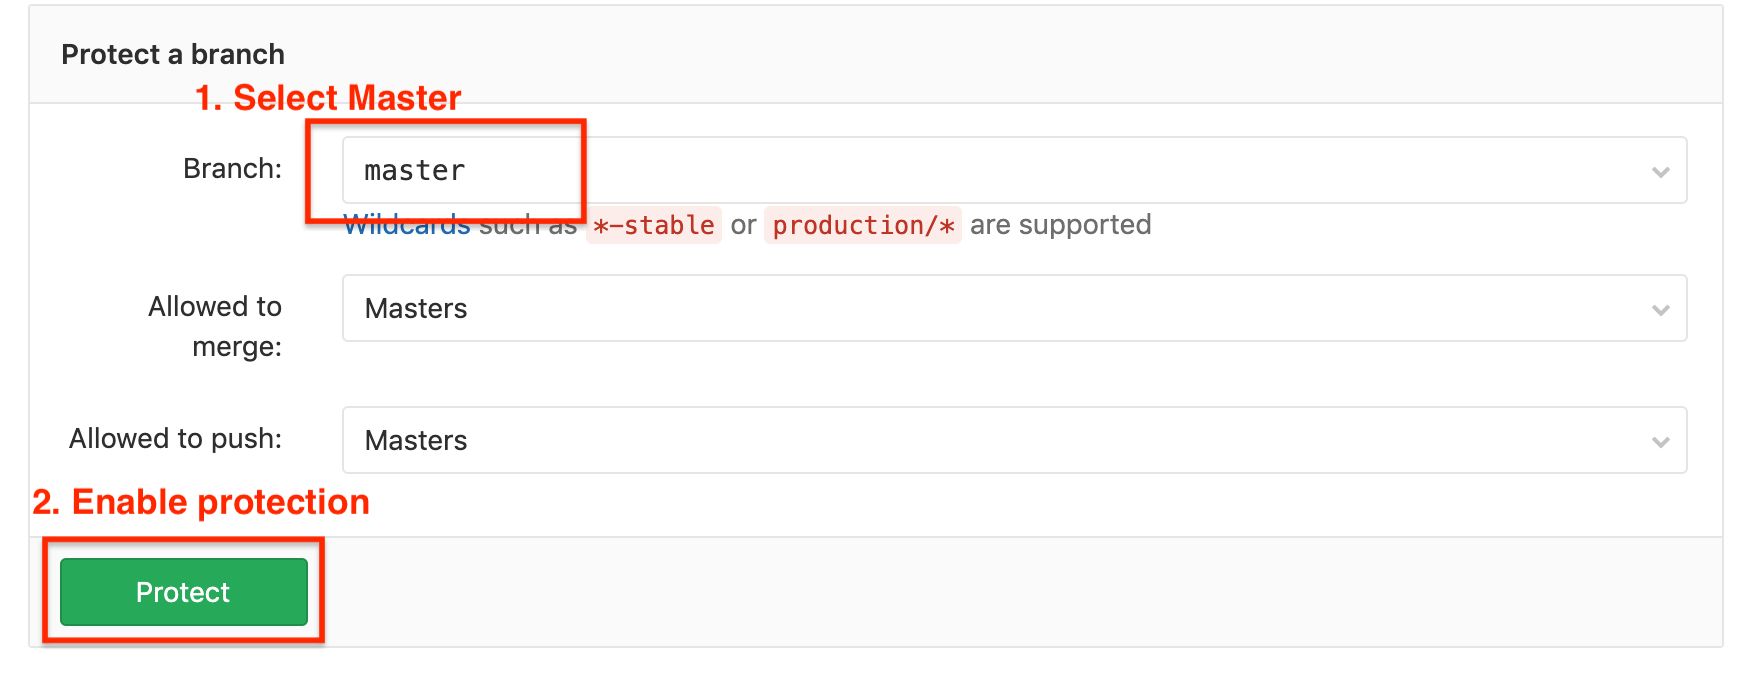
Easy enough, just disable branch protection for a little while…
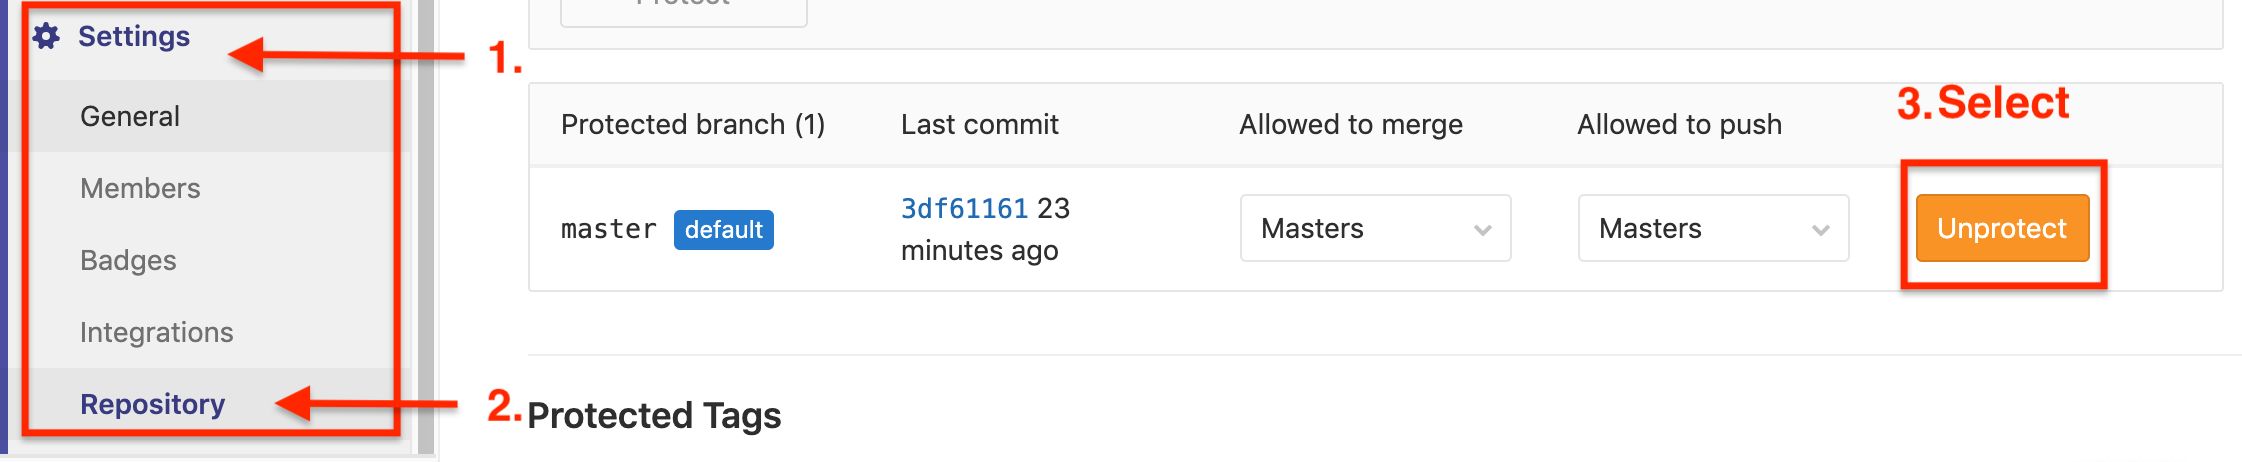
Try git push again
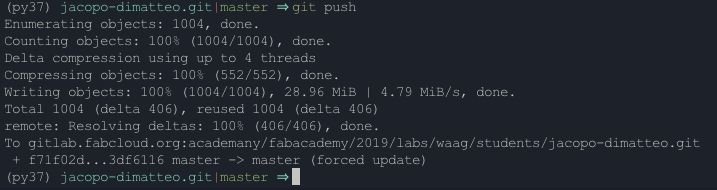
Amazing… Let’s reinstate branch security
First thing to do now is the delete your old folders & download the newest version of the repo:
sudo rm -r your-old-repo
git clone your-git-ssh-url.git
# after checking everything works
sudo rm -r backup
WHAT! IT BARELY CHANGED 
Okay, I did say I was careful about compressing images, and it looks like the biggest files are still sub-1Mb.
We are going to have to be smarter about this.
Firstly, no more .jar downloads, let go with something more… repeatable
We will use brew, I told you it was going to come in handy
(I knew about this before, just wanted to show two different ways to do it)
brew install bfg
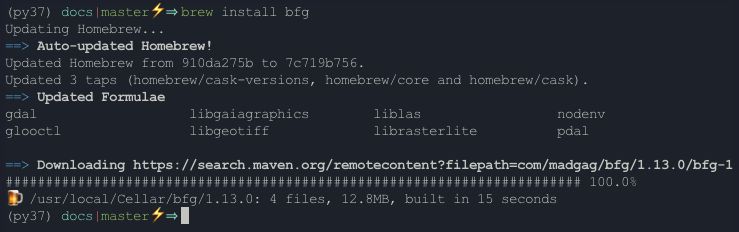
We then repeat:
cd home/folder/for/your/project/directory/ # Open folder which contains your repo
mkdir backup # Create folder where we will store a backup
cd backup # Open backup folder
git clone --mirror git://example.com/some-big-repo.git # Clone your repo
zip -r ../../home-folder.zip ../../home-folder  # Backup your repo, -r for recursive
mv ~/Downloads/bfg-{your version}.jar # Move bfg to current directory
ls # Check file is there
But then, we introduce a twist, using the following command we can find out more information about BFG, well actually it raises Error: Unknown option --help but close enough:
bfg --help
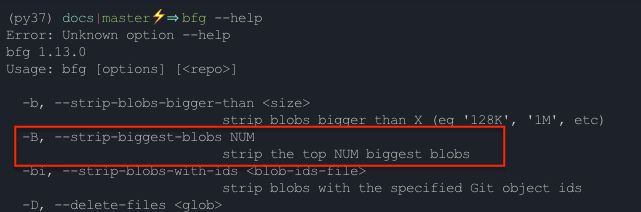
Amongst all the junk we see our salvation, the -B option, this will remove NUM number of the largest (committed but not present in HEAD) files, meaning we don’t have to worry about setting a max value like we did before with 1M.
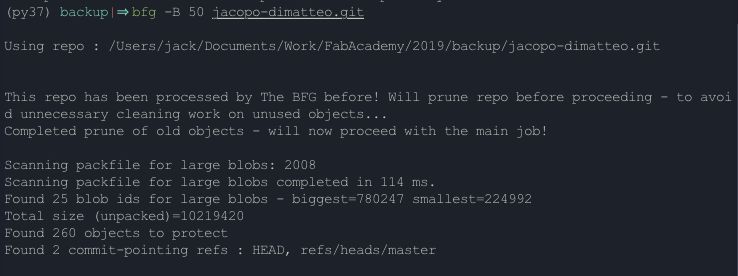
(Except for this command everything remains identical to before)
Ahhh much better, well not perfect but better.
Let’s go look at my GitLab home page… * insert ‘wild pokemon appeared’ sound *
Well, this doesn’t look good on my cv.
It looks like GitLab has to run it’s own garbage collection, let’s see if we can force it’s hand.
After running the commands on the page linked above, for git-filter-branch (because I don’t have the GitLab BFG option) it still didn’t do anything.
Looks like running git gc can be done by running housekeeping, as explained on this page.
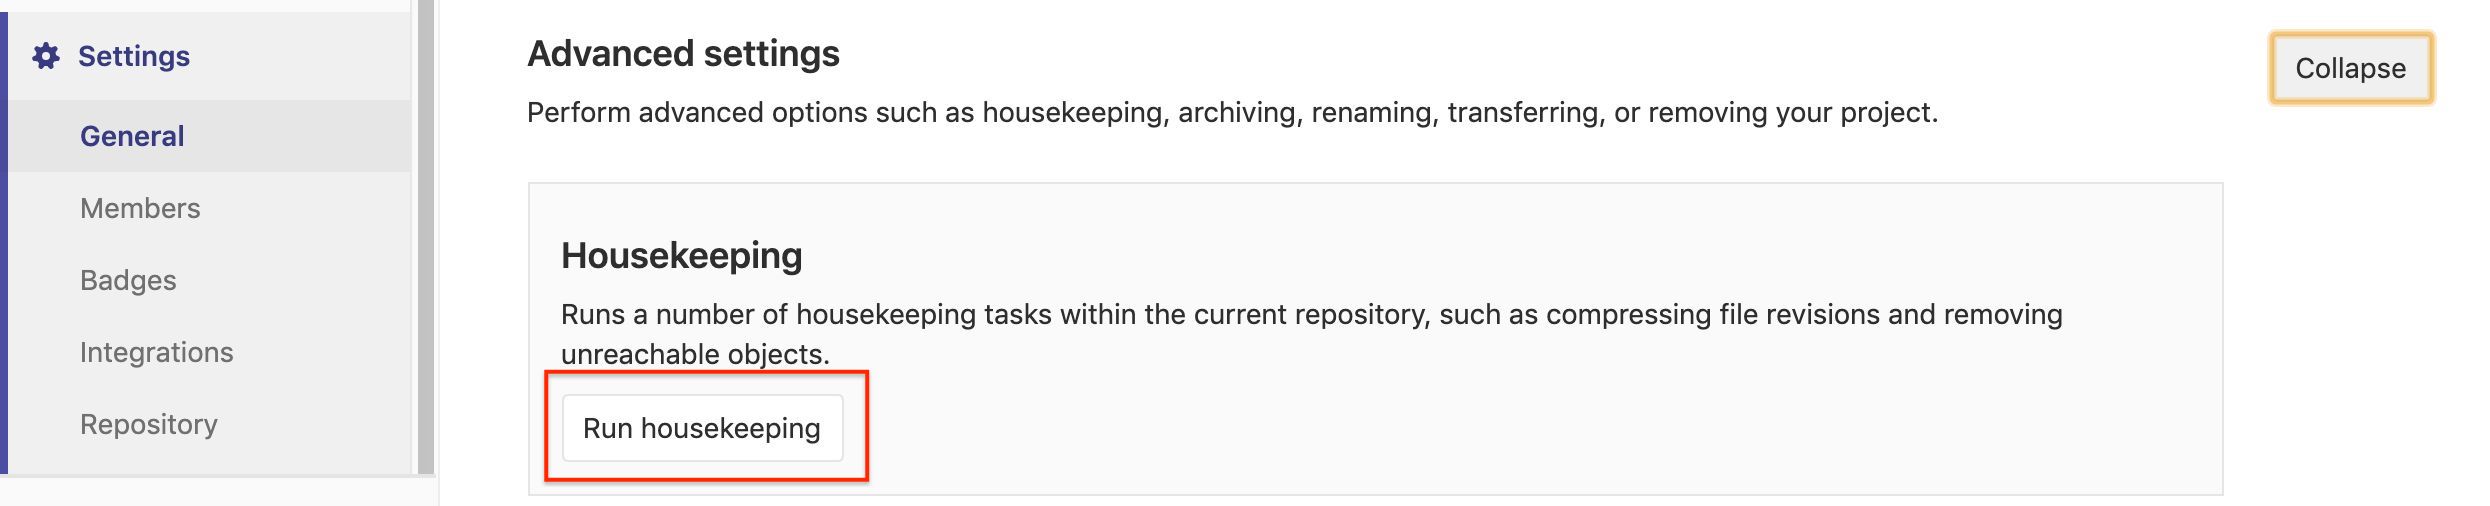
Still nothing. If anything it made things worse, the local repo is small enough, yet the GitLab Repo is far larger, let the search continue.

Okay so, after attempting everything I found on google, nothing worked.
I added, committed and pushed my latest changes:
git add * # Yes I know I shouldn't use the star operator
git commit -m "your sensible comment"
git push

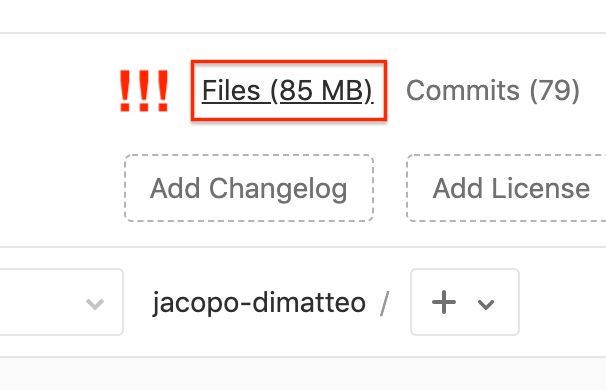
I was seriously desperate at this point, when I open the home page of GitLab and I see:
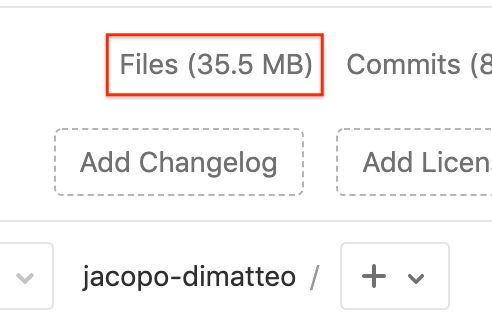

I’ve no idea what exactly happened, my guess is that the housekeeping function took a while to run, even better, the count.py page decreased to : 35.389Mb
Truly beautiful.
The only warning left is:
Your repo is over the soft limit, which means that my project size is larger then it should be, with respects to the number of weeks active (currently 12 weeks).
That isn’t great, but it’s to be expected that certain weeks will be larger then others.
Also I’m only 4Mb away from being over the 40Mb limit, but I’ll face these problems in the future.
Conclusion
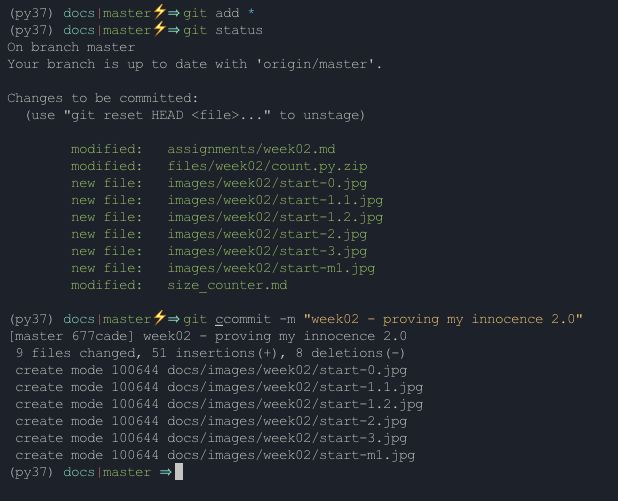
In the above I showed and documented all the required (and more) git features required to work on a GitLab repository, but perhaps this isn’t sufficient to prove I’m working with git so let me show you screen-shot by screen-shot.
-1. Start by saving your current changes to repository
0. Remove your existing repository
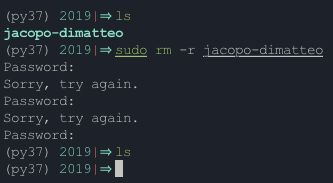
ls shows contents of current directory
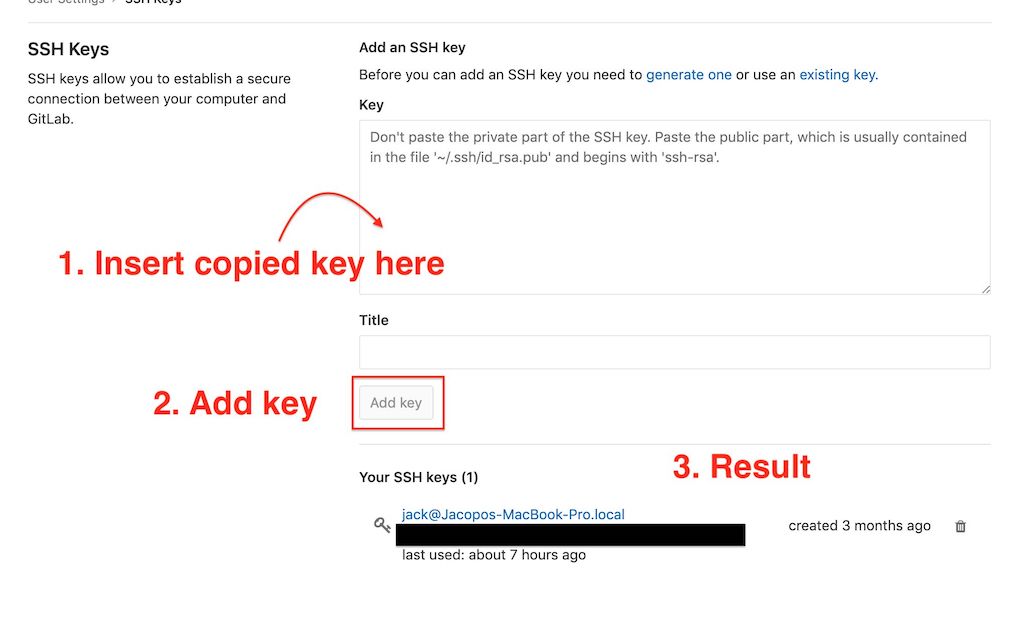
1.1 Add your ssh key to your GitLab project
-> Follow these instructions for generating one, I got one already and I won’t be overwriting it to prove I did it.
Then copy it to your clipboard using pbcopy < ~/.ssh/id_ed25519.pub
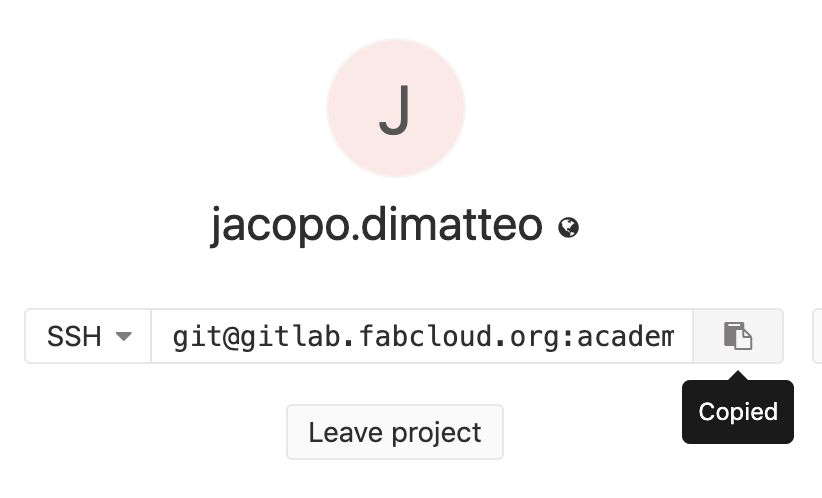
1.2 Copy your repo’s ssh URL
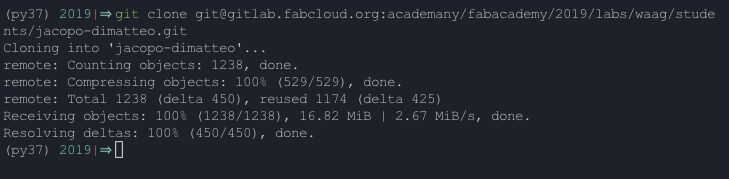
2. Clone your repo using git clone {ssh url}
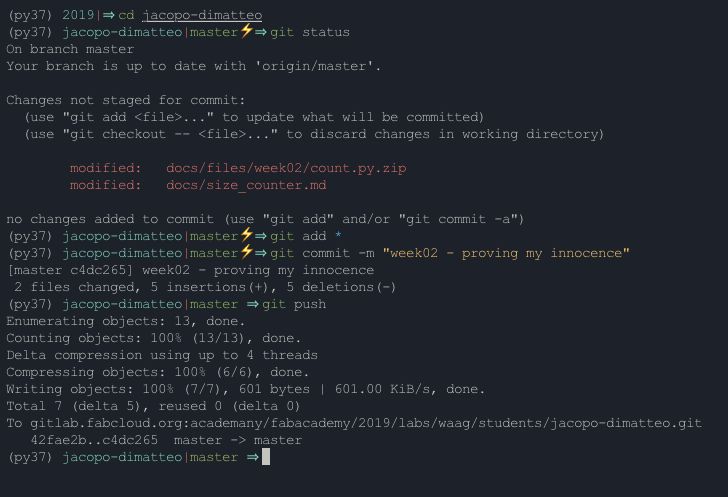
3. Make a change in your repo & check if it registered with git status
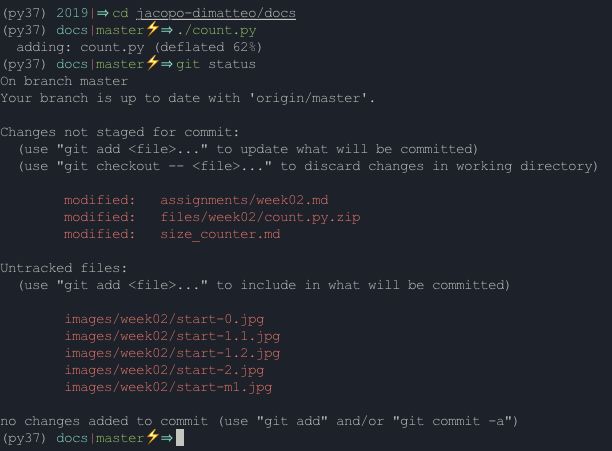
4. Add changes & commit changes with git add & git commit -m "your comment"
5. Update the remote refs with git push
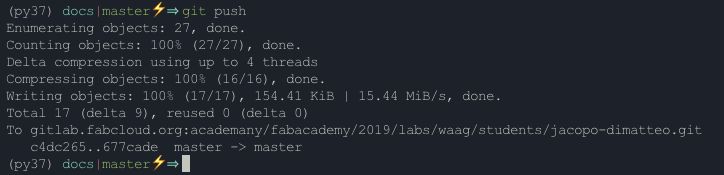
You’re all done, you’ve successfully downloaded and made your “first” changes to your repository using git :)