Assignments
add an output device to a microcontroller board you've designed,and program it to do something.I designed my board with an Atmega 328p processor using Eagle software.

After producing the board, as we did in the previous week of electrical production.

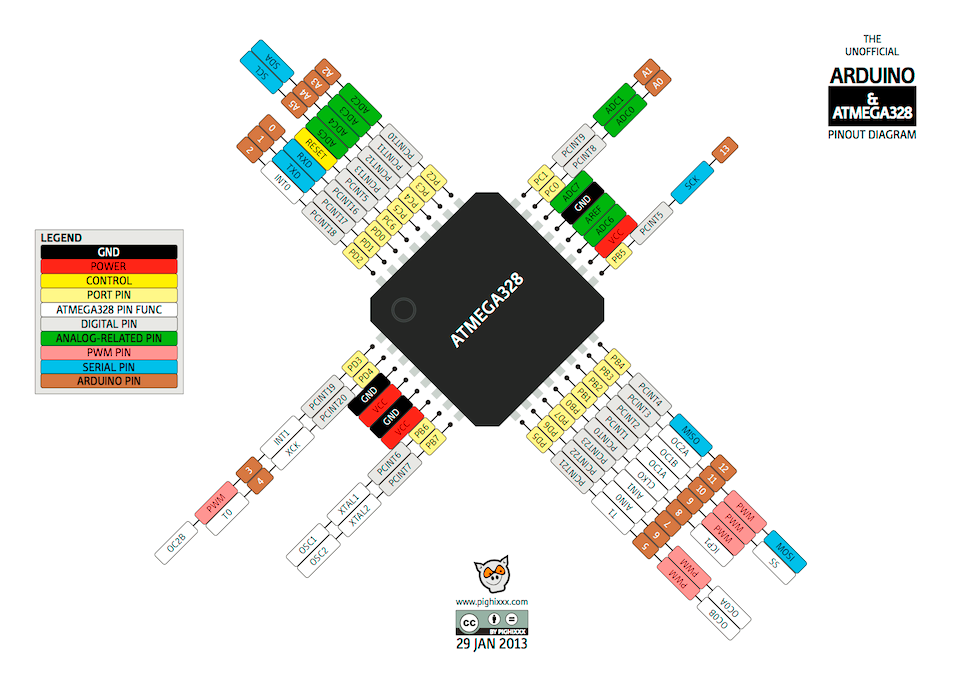
ATmega328_Pinout I'll use it to help me connect the pieces I want to work on.< br>
Micro servo 9g sg90
is a rotary actuator or linear actuator that allows for precise control of angular or linear position, velocity and acceleration. It consists of a suitable motor coupled to a sensor for position feedback. ... Servomotors are used in applications such as robotics, CNC machinery or automated manufacturing.

Tiny and lightweight with high output power. Servo can rotate approximately 180 degrees (90 in each direction), and works just like the standard kinds but smaller.
You can use any servo code, hardware or library to control these servos.
Good for beginners who want to make stuff move without building amotor controller with feedback & gear box, especially since it will fit in small places.
It comes with a 3 horns (arms) and hardware.

Servo motors have three wires: power, ground, and signal. The power cord is usually red, and it should be plugged into a 5V port on the Arduino board. The ground wire is usually black or brown and should be connected to a ground pin on the Arduino board. The signal pin is usually yellow, orange, or white and should be attached to a digital pin on the Arduino board.
Communication is very easy.
We will use Sweep Arduino example, just press "Run on Arduino" button to program your Arduino board.
From the tool palette> File> Examples> servo> sweep

int pos = 0; This variable represents the value of the angle of rotation of the engine.
myservo.attach (9); a function to identify the port connected to the servo drive and here we see that the connected port is the ninth port.
for (pos = 0; pos <= 180; pos + = 1) { myservo.write (pos); delay (15); } for (pos = 180; pos> = 0; pos - = 1) { myservo.write (pos); delay (15); }
Function for its function is to change the value of the angle of rotation after 15 milliseconds.
for (pos = 0; pos <= 180; pos + = 1) { myservo.write (pos); delay (15); } In this function, the angle is changed from 0 to 180 degrees by 1 degree every 15 milliseconds
myservo.write (pos); a function that contains the value of the nook that sends the value of the nook to the engine.
for (pos = 180; pos> = 0; pos - = 1) { myservo.write (pos); delay (15); } Here, the angle is changed from 180 to 0 degrees, opposite the first function by one degree every 15 milliseconds.
I can make my own modifications to my code by clicking on the "Edit" button.
For example, you can change the delay time and learn how to change the program.
This is the result found inside the video below:
RGB
The colored LED has four ends, there is a outlet for each negative electrode of 3 LEDS

RGB color scheme, builds all colors from red, green and blue color combination.
Red, green, and blue use 8 bits each, which have integer values from 0 to 255. This makes 256 * 256 * 256 = 16777216 colors possible.
The colored LED looks like the normal LED but inside the 3 LEDS colorful LED, red LED green LED and blue LED we can get the colors by controlling the luster of each of these lights.
Each pixel in the LED display displays colors in this way, by combining red, green and blue LED lights (LEDs).
When the red pixel is set to 0, the LED is turned off. When the red pixel is set to 255, the LED is fully turned on.
Any value between them sets the LED to partial light emission.
The unified negative electrode is the second electrode and it is also the longest between the four electrodes. We will connect the other three electrodes with a resistance of 220 ohms in order to prevent the passage of a large electric current and link the resistance electrode on the other side with Arduino with GND.

After that we write the code

This is how the result will appear in the video below
This is the site for group assignments:Press here
This is the code file: