

Week 8
read a microcontroller data sheet
program your board to do something,
with as many different programming languages
and programming environments as possible
To be honest it was a hard time for me coping up with this week because it was electronics, and as mentioned before i have least idea in electronics. it was indeed challenging for me to understand what really it is, i am still on the process of learning including the basics of electronics. we were asked to program the board that we had made in previous week using different environments. and we were asked to read a microcontroller data sheet, and experiment with different architectures. In the group assignment we need to compare the performance and development workflows for different microcontroller families. So lets begin!
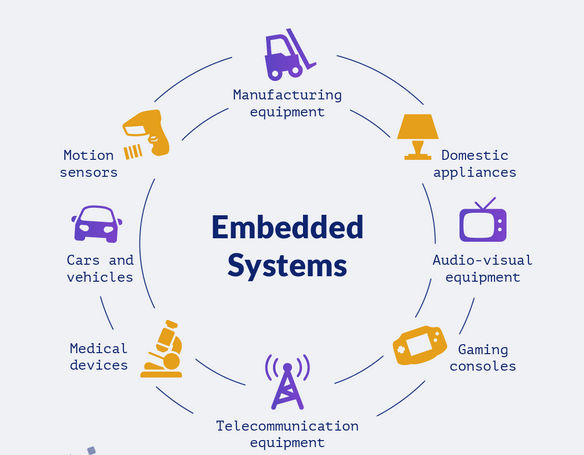
WHAT IS AN EMBEDDED SYSTEM?
An embedded system is a computer system—a combination of a computer processor, computer memory, and input/output peripheral
devices—that has a dedicated function within a larger mechanical or electrical system. It is embedded as part of a complete device
often including electrical or electronic hardware and mechanical parts. Because an embedded system typically controls physical
operations of the machine that it is embedded within, it often has real-time computing constraints. Embedded systems control many
devices in common use today. In 2009 it was estimated that ninety-eight percent of all microprocessors manufactured were used in
embedded systems.
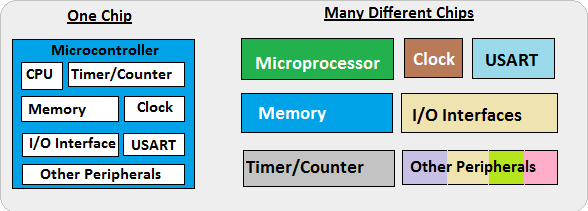
MICRO PROCESSOR VS MICRO CONTROLLER.
Microprocessor is a central processing unit (CPU) on a single chip. but in Microcontrollers it consist of CPU,Memmory Unit (RAM , ROM )and I/O's .
but Microcontrollers is extremely slow when comparing Microprocessor . Here we are using microcontroller.
ARCHITECTURES.
1.HARVARD ARCHITECTURE - The Harvard architecture is a computer architecture with physically separate storage and signal pathways for instructions and data.
so it can simultaneously use both busses.
2.VON NEUMANN ARCHITECTURE- The design of a von Neumann architecture machine is simpler than that of a Harvard architecture machine, which is also a stored-program system
but has one dedicated set of address and data buses for reading data from and writing data to memory, and another set of address and data buses for instruction fetching.
Harvard architecture has separate data and instruction busses, allowing transfers to be performed simultaneously on both busses. A von Neumann architecture has only one bus which
is used for both data transfers and instruction fetches, and therefore data transfers and instruction fetches must be scheduled - they can not be performed at the same time.
3.CISC-A complex instruction set computer processor has complex instructions that take up multiple clocks for execution. The average clock cycle per instruction (CPI) is in the range of 2 and 15.
it's Performance is optimized with more focus on hardware. also It has a memory unit to implement complex instructions.CISC mainly used in Microprocessor.
4.RISC-A reduced instruction set computer is a computer which only uses simple commands that can be divided into several instructions which achieve low-level operation within a single CLK cycle,
as its name proposes “Reduced Instruction Set”.it's performance is optimized with more focus on software. RISC mainly Used in Microcontroller.
Microcontroller Architecture Family.
PIC-PIC(peripheral interface controller) is Initially this was developed for supporting PDP computers to control its peripheral devices, and therefore, named as a peripheral interface device. These microcontrollers are very fast and easy to execute a program compared with other microcontrollers. PIC Microcontroller architecture is based on Harvard architecture. PIC microcontrollers are very popular due to their ease of programming, wide availability, easy to interfacing with other peripherals, low cost, large user base and serial programming capability (reprogramming with flash memory), etc. AVR-AVR is a family of microcontrollers developed by Atmel.These are modified Harvard architecture 8-bit RISC single-chip microcontrollers. AVR was one of the first microcontroller families to use on-chip flash memory for program storage, as opposed to one-time programmable ROM, EPROM, or EEPROM used by other microcontrollers at the time.
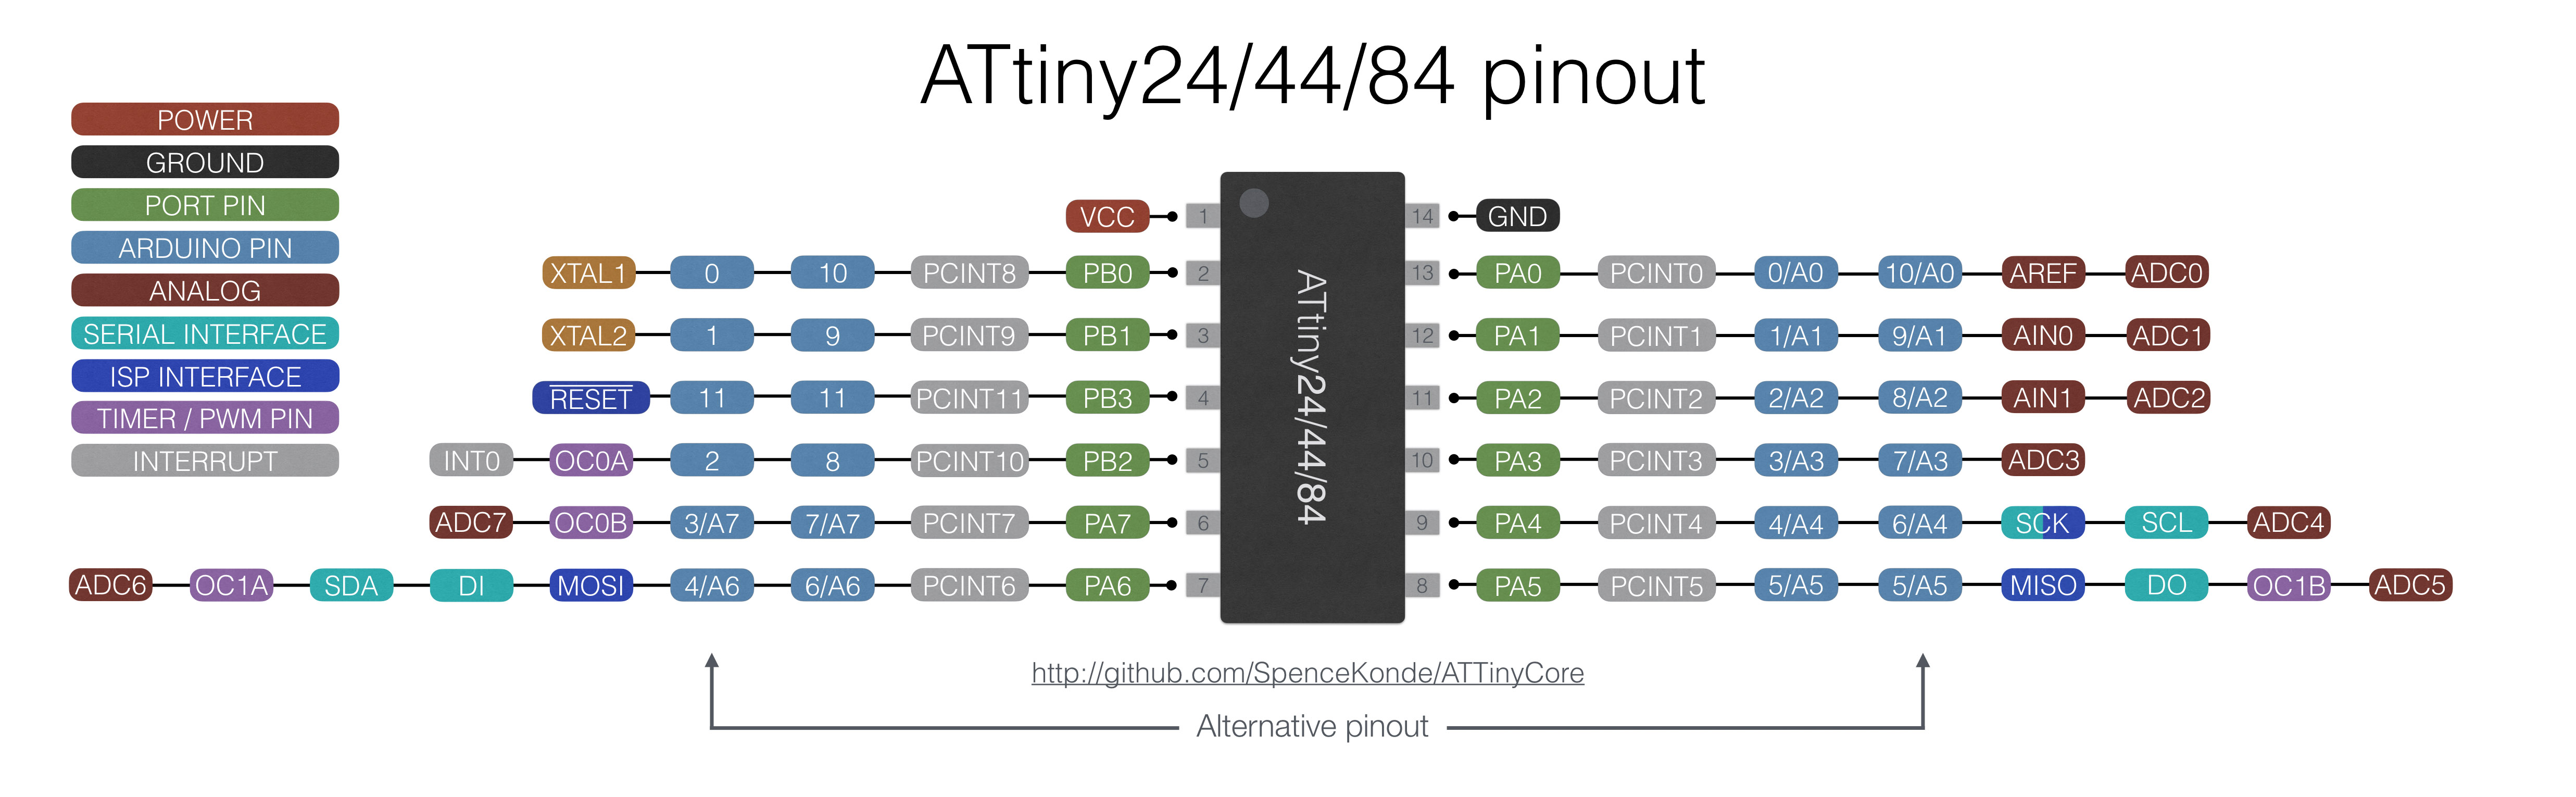
ATTINY44
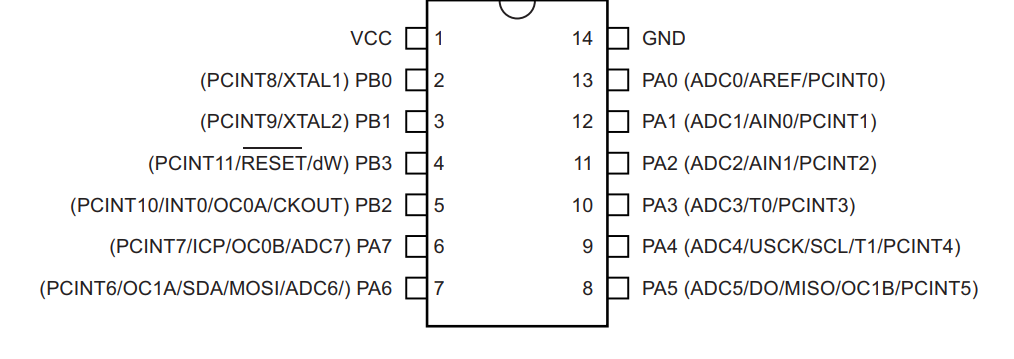
ATtiny44 is high-performance and packed with Microchip's picoPower technology in an 8-bit AVR RISC architecture based Microcontroller unit that has 14 pins, out of which 12 pins can be used as I/O pins.
For more information its better to take a look at the DATA SHEET.
BASIC DETAILS OF ATTINY44

PIN DESCRIPTIONS.
VCC-Supply voltage
GND-Ground
Port B (PB3...PB0)-Port B is a 4-bit bi-directional I/O port with internal pull-up resistors
(selected for each bit). As inputs, Port B pins that are externally pulled low will source current if
the pull-up resistors are activated.so we don't need to add a pull-up resistor externaly for button's and
other purpose.
RESET-Reset input. A low level on this pin for longer than the minimum pulse length will generate a reset,
even if the clock is not running.a reset will just reset the programm that currently runnig .
Port A (PA7...PA0)-Port A is a 8-bit bi-directional I/O port with internal pull-up resistors (selected for each bit).
As inputs, Port A pins that are externally pulled low will source current if the pull-up resistors are activated
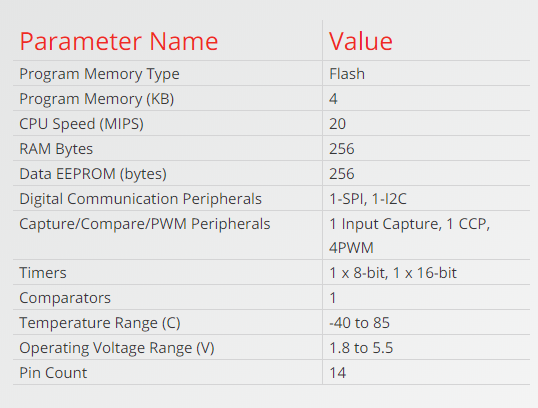
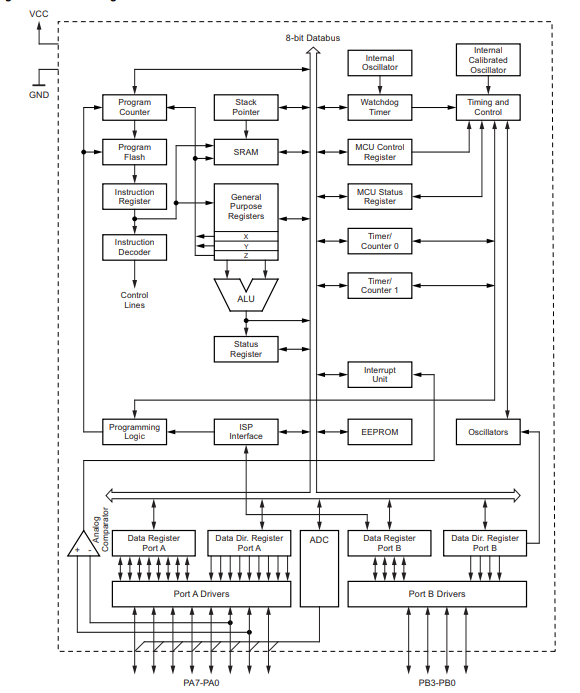
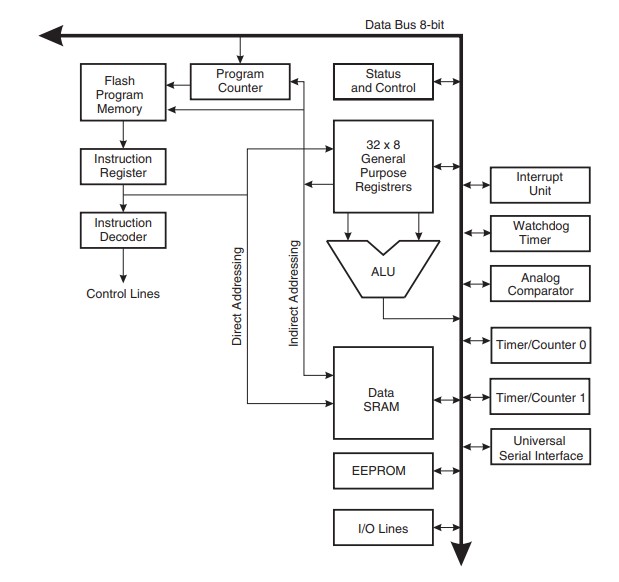
Datasheet is the biography and manual of any electronic component. They explain exactly what a component does and how to use it. Before you start doing anything or even designing any circuit, looking at the datasheet is crucial. It holds important information like Power supply requirements, Pins Configurations and descriptions, Electrical ratings and Schematic of the IC circuit. Block Diagram will explain Architecture of the Microcontroller.The AVR uses a Harvard architecture, with separate memories and buses for program and data. Instructions in the program memory are executed with a single-level pipelining. While one instruction is being executed, the next instruction is pre-fetched from the program memory. The ALU supports arithmetic and logic operations between registers or between a constant and a register. Single-register operations can also be executed in the ALU. After an arithmetic operation, the status register is updated to reflect information about the result of the operation.
Memory and Registers.
Memory is an area where code and instructions are stored.There are normally 3 types of memory present in a microcontroller.
These are SRAM, FLASH, and EEPROM memories.
1.SRAM-is the type of memory where data must be read and written to repeatedly. This is the data will change the different code being
uploaded to the AVR microcontroller circuit. By default, this is the most common and used type of memory.
2.Flash memory is the memory that normally stores data that does not change. This is the program memory. It stores the part of the microcontroller
program that is fixed and will always stay permanent. This is similar to the BIOS of a general-purpose computer.
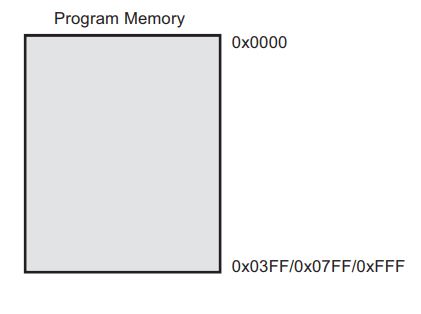
The Flash memory has an endurance of at least 10,000 write/erase cycles. The ATtiny24A/44A/84A Program Counter (PC) is 10/11/12 bits wide, thus addressing the 1024/2048/4096 Program memory locations.
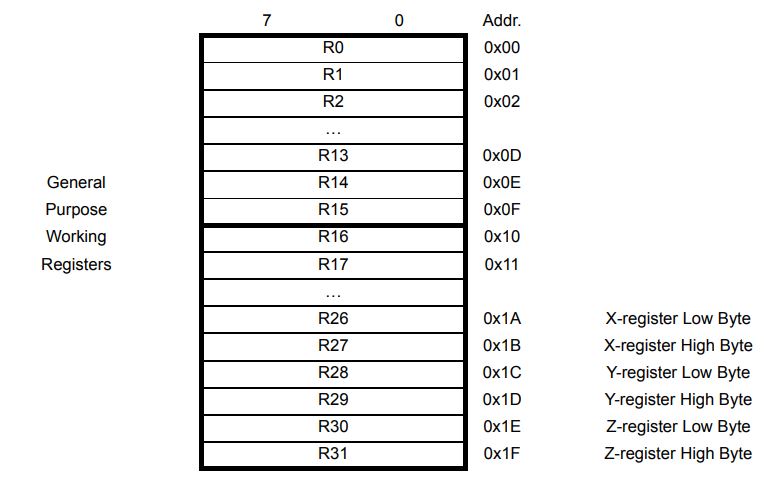
REGISTER are small memory elements in microcontrollers with 8 bits capacity. Registers can be accessed quickly by the ALU (Arithmetic and Logic Unit) of microcontrollers.
AVR Architecture Block Diagram
Arduino is an open source computer hardware and software company, project, and user community that designs and manufactures single-board microcontrollers
and microcontroller kits for building digital devices and interactive objects that can sense and control objects in the physical and digital world.
Since I have an exposure to Arduino IDE during my undergraduate studies, I found this compartively easier. To start with, the IDE doesn't Support
ATTiny 84/44 so the first step is to add the board directories to the Arduino environment. The steps to add the directory is as follows:
ATTiny 44/84 to Arduino Pin Map.
Programming ATtiny84 with Arduino IDE
Hello Eco Board.
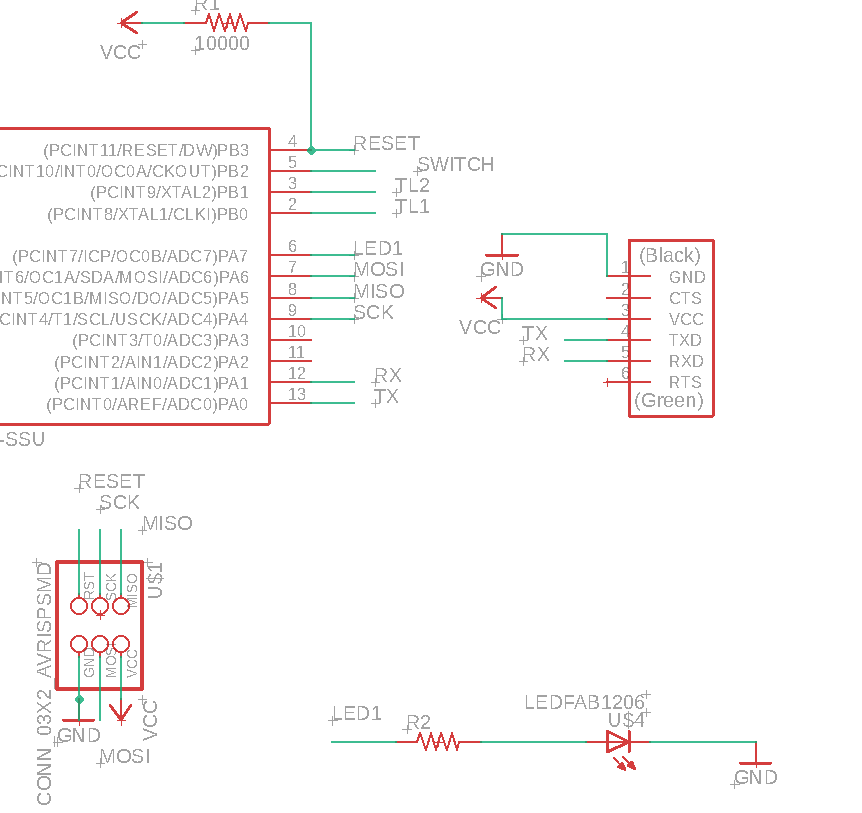
This week we need to progarmme the Hello-echo board that we designed in the Electronics Design week. Echo board is based on the Microchip ATtiny44 . It's a 8-bit RISC based microcontroller.The Originla Design have only the UART Port and I added e a Programmable Button connected to pin PA2 with a Pull-down Resistor and LED connectd to PA3 also it's have 20hz External Resonator.
Programming ATtiny44 with ARDUINO IDE
The original arduino software does not support Attint series. So we have to add some udates for that.
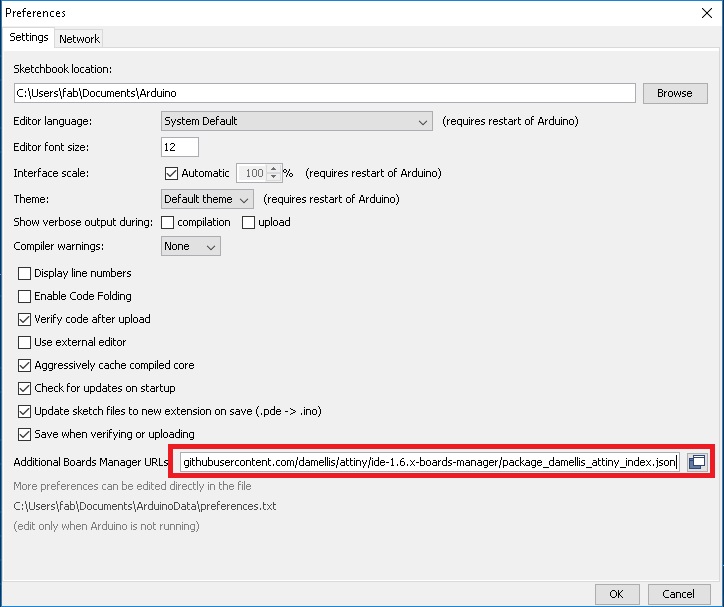
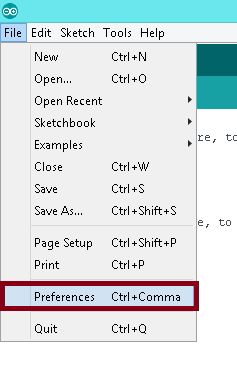
Go to "file" and click "preference".

Add following address to the "Additional Board Manager URL"
https://raw.githubusercontent.com/damellis/attiny/ide-1.6.x-boards-manager/package_damellis_attiny_index.json
click "OK"
Now to set up the attiny boards, Go to "Tools". Then you can see "Boards". Then click "Board Manager"
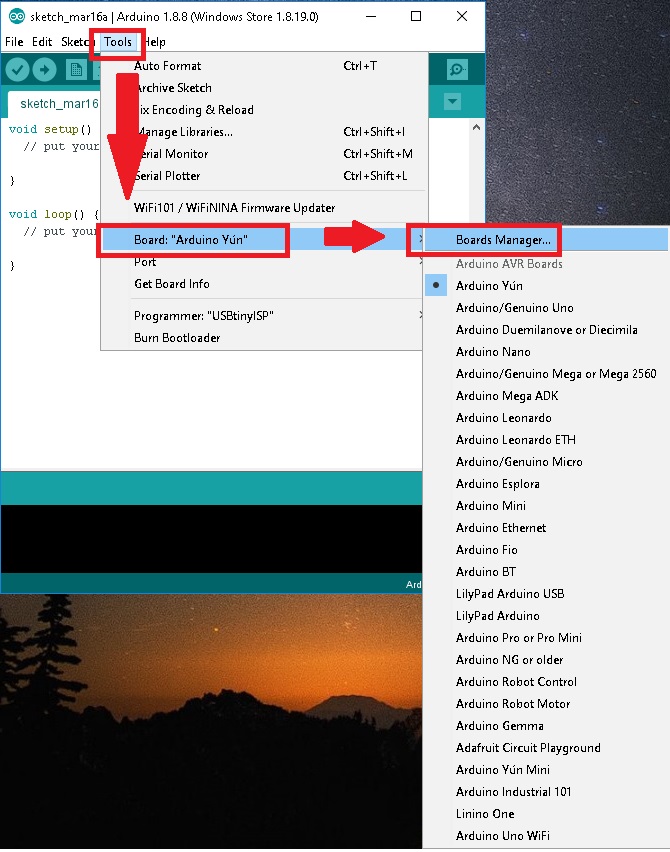
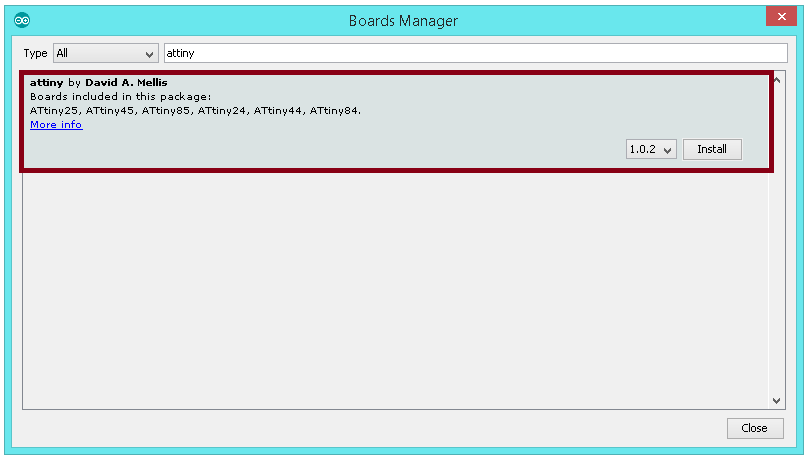
Now search for attiny file in the manager.
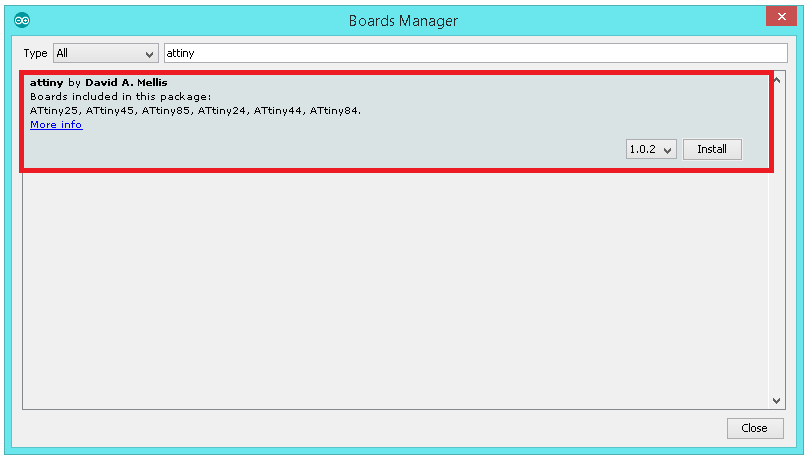 Now you can easily select ATtiny44 under the ATtiny Microcontrollers in board Selection.
Programming the Board:
For Programming Echo Hello Board I mainly used Arduino IDE ARDUINO
Arduino is an open-source electronics platform based on easy-to-use hardware and software.we can tell your board what to do by sending a set of instructions to the microcontroller on the board.
To do so you use the Arduino programming language (based on Wiring), and the Arduino Software (IDE), based on Processing.I felt more easy to use Arduino since i am new to programming. The Arduino system is based on the avr-gcc compiler and makes use of the standard AVR libc libraries, which are open-source C libraries, specifically written for Atmel hardware.
By default the arduino software doesnt contain Attiny 44 chip librarys. We need to include the deatils manually.
Install and Open Arduino IDE
Open File.Select Preference
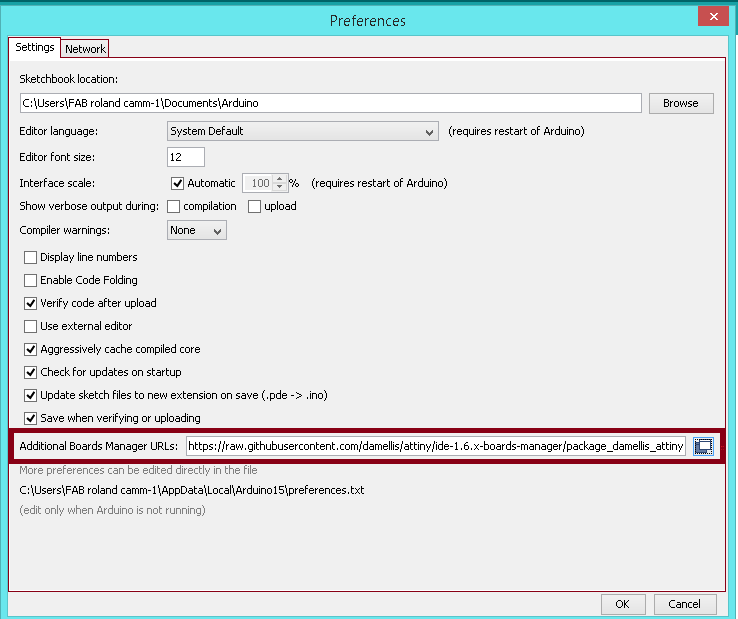
After adding the URL
open Board Manager by clicking Tools > Board >Board Manager

Search for ATtiny44 in the Window and select ATtiny44 under the ATtiny Microcontrollers in board Selection.
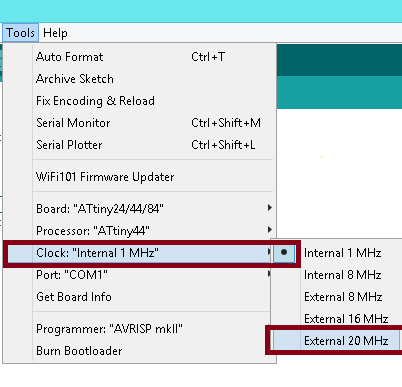
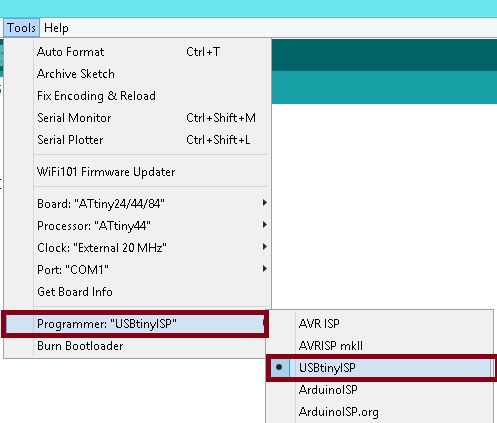
Select appropriate Clock and Programmer.
We are using Fab ISP to programme the Hello-Echo board so Select the Programmer as USBtinyISP.
Now we can programm the hello board.
I used my fab isp which was made in electronic production week for programming the helo board.