Week14 : Networking and Communications
Group Work
Group assignmet is here
I2C Communication
Master-Slave(LCD board)
I will use LCD in the final project. So, I wanted try the LCD board as slave. For example, it is like something that if the master board send a value, then slave LCD board will display that value. I decided to try I2C communication at first.
Board Design
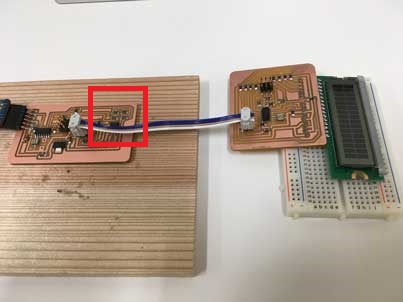
Master board was designed referring the Neil's example. Slave board is designed by changing LCD board that I made in output device week.Master board use Attiny45 and slave board used Attiny44.
master board (Attiny45)
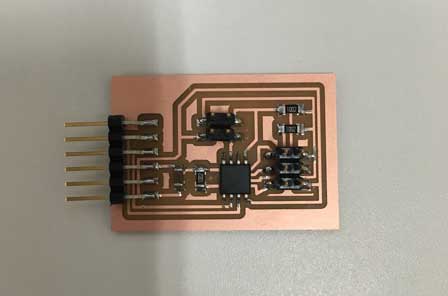
slave board (Attiny44)
connect master and slave board
master board (Attiny45)
slave board (Attiny44)
connect master and slave board
Problem of I2C Library for Attiny
I wrote program by using I2C library(TinyWireM and TinyWireS) with Arduino IDE. This page is referred. But slave program was not compiled at first. The reason was that TinyWireS on this page does not support Attiny 44..... You should use the TinyWireS on this page when your board is used Attiny44 or Attiny84.
Code: Data send form master by using Transmission
The program written on the master board.
The program written on the slave board.
#include <TinyWireM.h>
#include <USI_TWI_Master.h>
#define I2C_SLAVE_ADDRESS 0x4 // Address of the slave

#include <SoftwareSerial.h>

SoftwareSerial mySerial(3, 4); // RX, TX

int i;
void setup(){

  TinyWireM.begin();      // init I2C Master mode, PC
  mySerial.begin(9600);
  mySerial.println("Hello world!");
  }

void loop(){

      i=i+1;
      TinyWireM.beginTransmission(I2C_SLAVE_ADDRESS);
      TinyWireM.send(i);
      TinyWireM.endTransmission();

      if(i>=10){
        i=0;
      }
      delay(1000);
}#include "LiquidCrystal.h"
#include "TinyWireS.h"
#define I2C_SLAVE_ADDR 0x4
LiquidCrystal lcd(8,7,3,2,1,0);
//LiquidCrystal(rs, enable, d4, d5, d6, d7)
void setup() {
TinyWireS.begin(I2C_SLAVE_ADDR);
lcd.begin(16,2);
lcd.clear();
}
void loop() {
byte byteRcvd = 0;
if (TinyWireS.available()>0){ // got I2C input!
byteRcvd = TinyWireS.receive(); // get the byte from master
lcd.clear();
lcd.setCursor(0,0);//(col,row)
lcd.print("Get");
lcd.setCursor(0,1);//(col,row)
lcd.print(byteRcvd);
}
}Code: Request from master to slave by using requestFrom
The program written on the master board.
The program written on the slave board.
#include <TinyWireM.h>
#include <USI_TWI_Master.h>
#include <SoftwareSerial.h>

#define I2C_SLAVE_ADDRESS 0x4 // Address of the slave

SoftwareSerial mySerial(3, 4); // RX, TX

int pdata;
void setup(){

  TinyWireM.begin();
  mySerial.begin(9600);
  mySerial.println("Hello world!");
  pdata=100;
  }

void loop(){
      TinyWireM.requestFrom(I2C_SLAVE_ADDRESS, 1); // Request 1 byte from slave
      delay(100);
      if (TinyWireM.available())
      {
        int data = TinyWireM.read();
          if (data!=pdata){
          mySerial.print("return:");
          mySerial.println(data);
          pdata=data;
        }
      }
      delay(600);
}#include "LiquidCrystal.h"
#include "TinyWireS.h" // wrapper class for I2C slave routines
#define I2C_SLAVE_ADDR 0x4 // i2c slave address (38)
int i;
LiquidCrystal lcd(8,7,3,2,1,0);
//LiquidCrystal(rs, enable, d4, d5, d6, d7)
void setup() {
TinyWireS.begin(I2C_SLAVE_ADDR);
TinyWireS.onRequest(requestEvent);
lcd.begin(16,2);//LCDの列数と行数を指定する
lcd.clear();
delay(1000);
i=0;
}
void loop() {
}
void requestEvent()
{
i++;
lcd.clear();
lcd.setCursor(0,0);//(col,row)
TinyWireS.send(i); //send to master
lcd.print("Request");
lcd.setCursor(0,1);//(col,row)
lcd.print(i);
}
Communication for Final Project
Failure (I2C with SPI)
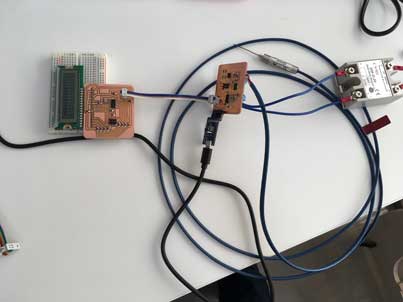
The main board that I will use in final project obtain the two chip, one is Attiny, other is MAX31855 amplifier chip of thermocouple. I use SPI communication between Attiny and MAX31855 because there is a library using SPI for MAX31855. And the voltage for MAX31855 is 3.3V.
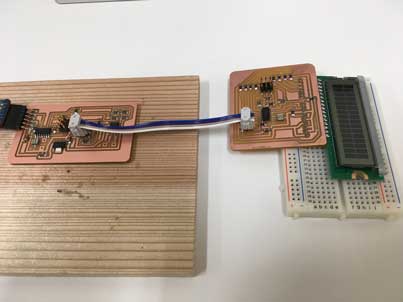
First, I tried I2C communication between LCD board and main board that is not installed MAX31855. That is work well.
before installing the MAX31855
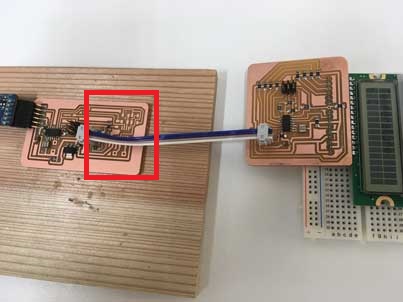
But after installing MAX31855, it did not worked because both of SPI and I2C used MOSI and MISO pin. The resistances used for the dividing the voltage are affected. I could not fix that probrem with the inventory I had.
before installing the MAX31855
Therefor, I decided to use serial communication in the final project.
First, I tried I2C communication between LCD board and main board that is not installed MAX31855. That is work well.
before installing the MAX31855
But after installing MAX31855, it did not worked because both of SPI and I2C used MOSI and MISO pin. The resistances used for the dividing the voltage are affected. I could not fix that probrem with the inventory I had.
before installing the MAX31855
Therefor, I decided to use serial communication in the final project.
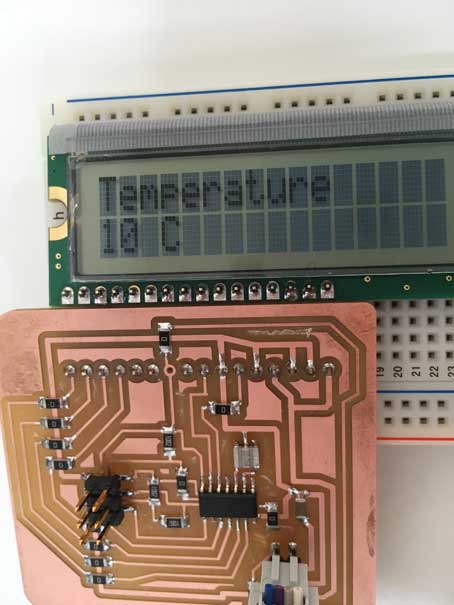
Serial Communication for Final Project
I maked circuit board for serial communication and it worked well. The LCD displayed the temperature that is send from main board.
The program written on the main board.
The program written on the LCD board.
The program written on the main board.
#include <Adafruit_MAX31855tiny.h>
#include <SoftwareSerial.h>

#define MAXDO   5
#define MAXCS   3
#define MAXCLK  4

Adafruit_MAX31855 thermocouple(MAXCLK, MAXCS, MAXDO);

const int rx=1;
const int tx=0;
const int outp=8;
int set_temp=300;
SoftwareSerial mySerial(rx,tx);

void setup() {
  pinMode(outp,OUTPUT);
  mySerial.begin(9600);

  delay(500);
}

void loop() {
  int t= int(thermocouple.readCelsius());

  mySerial.write('H'); // ヘッダの送信
  mySerial.write(t >> 8);
  mySerial.write(t & 255);
  if (t<set_temp){
    digitalWrite(outp,HIGH);
  }else{
    digitalWrite(outp,LOW);
  }

   delay(500);
}#include <SoftwareSerial.h>
#include "LiquidCrystal.h"
SoftwareSerial mySerial(6, 5); // RX, TX
LiquidCrystal lcd(8,7,3,2,1,0);
//LiquidCrystal(rs, enable, d4, d5, d6, d7)
int t=0;
void setup() {
mySerial.begin(9600);
lcd.begin(16,2);
lcd.setCursor(0,0);//(col,row)
//text to print
lcd.print("Temperature");
delay(100);
t=0;
lcd.setCursor(0,1);//(col,row)
lcd.print(t);
}
void loop()
{
if ( mySerial.available()>=3) {
if ( mySerial.read() == 'H' ) {
int val_high = mySerial.read();
int val_low = mySerial.read();
int t=(val_high<<8)+ val_low;
lcd.clear();
lcd.setCursor(0,0);//(col,row)
lcd.print("Temperature");
lcd.setCursor(0,1);//(col,row)
lcd.print(t);
lcd.print(" C");
//mySerial.clear();
}
}
delay(500);
}Files
Files can be downloaded from here