Week 13. interface and application programming
Assignment
- group project: compare as many tool options as possible
- individual assignment: write an application that interfaces with an input &/or output device that you made
group assignment
see FabLab Kamakura's group assignment page.
introduction
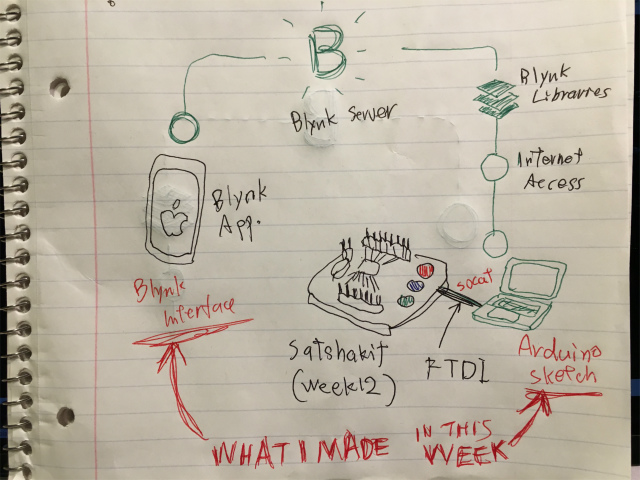
Last week, I designed a satshakit board with LEDs. At first, I supposed that LEDs would change colors and blinking pattern depending on the reading values from sensors. On the second thought, it might be nice if I could tune them from a smartphone.
I have tinkered actuators connected to ESP-WROOM-32 before. Controlloing actuators wirelessly were a quite fantastic experience. An application I used was Blynk. So, in this week assignment, I wrote an Arduino program and controlled LEDs with Blynk interface.
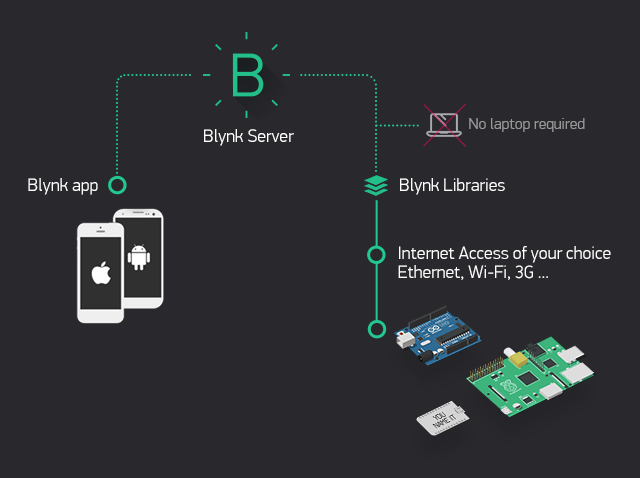
(#1)control Arduino(satshakit) with Blynk over USB
I could control ESP-WROOM-32 from Blynk via wi-fi which Arduino and satshakit didn't have. How can I connect an Arduino from Blynk without a wireless connection? I found that I could control an Arduino with Blynk over USB.
So, What I made this week are an application interface with Blynk and an Arduino sketch which would control LEDs blinking in response to a Blynk interface.
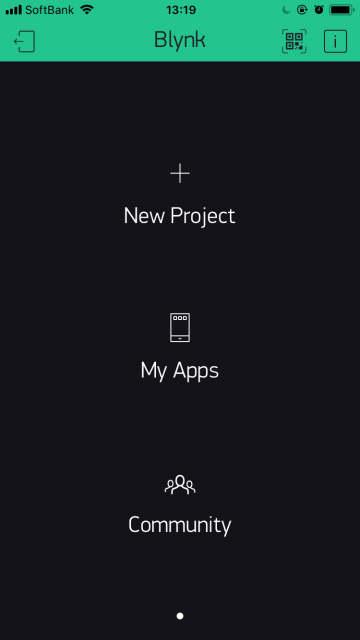
I am an iPhone user, so I downloaded the Blynk application from here.
Before following instructions, I downloaded blynk libraries and included it from Arduino IDE.
After that, I ran a script in "scripts" folder.
KWHRJN:~ kwhrjn$ cd Documents/Arduino/libraries/blynk/scripts/KWHRJN:scripts kwhrjn$ sudo sh ./blynk-ser.sh
This script uses socat utility, but could not find it.
Try installing it using: brew install socatSocat is a multi-purpose relay tool to communicate with remote Serial over TCP/IP. I typed the following command and installed it.
KWHRJN:scripts kwhrjn$ brew install socat
Updating Homebrew...
==> Auto-updated Homebrew!
Updated 1 tap (homebrew/core).
==> New Formulae
annie                                    libdazzle
apache-arrow-glib                        llvm@5

   .
   .
   .
(omitted)
   .
   .
   .


lean-cli                                 zsh
ledger                                   zstd
==> Renamed Formulae
php56 -> php@5.6           php70 -> php@7.0           php71 -> php@7.1
==> Deleted Formulae
arm             mal4s           monotone        picolisp        voltdb
llvm@3.8        mimetic         nazghul         ufoai

==> Installing dependencies for socat: openssl
==> Installing socat dependency: openssl
==> Downloading https://homebrew.bintray.com/bottles/openssl-1.0.2o_1.sierra.bot
######################################################################## 100.0%
==> Pouring openssl-1.0.2o_1.sierra.bottle.tar.gz
==> Caveats
A CA file has been bootstrapped using certificates from the SystemRoots
keychain. To add additional certificates (e.g. the certificates added in
the System keychain), place .pem files in
  /usr/local/etc/openssl/certs

and run
  /usr/local/opt/openssl/bin/c_rehash

This formula is keg-only, which means it was not symlinked into /usr/local,
because Apple has deprecated use of OpenSSL in favor of its own TLS and crypto libraries.

If you need to have this software first in your PATH run:
  echo 'export PATH="/usr/local/opt/openssl/bin:$PATH"' >> ~/.bash_profile

For compilers to find this software you may need to set:
    LDFLAGS:  -L/usr/local/opt/openssl/lib
    CPPFLAGS: -I/usr/local/opt/openssl/include
For pkg-config to find this software you may need to set:
    PKG_CONFIG_PATH: /usr/local/opt/openssl/lib/pkgconfig

==> Summary
🍺  /usr/local/Cellar/openssl/1.0.2o_1: 1,791 files, 12.3MB
==> Installing socat
==> Downloading https://homebrew.bintray.com/bottles/socat-1.7.3.2_2.sierra.bott
######################################################################## 100.0%
==> Pouring socat-1.7.3.2_2.sierra.bottle.tar.gz
🍺  /usr/local/Cellar/socat/1.7.3.2_2: 9 files, 649.7KB
I ran a script again and type a serial port found (depnding on your condition; here example "/dev/tty.usbmodem141221")
KWHRJN:scripts kwhrjn$ sudo sh ./blynk-ser.sh
       1 ports found. You can specify port manually using -c option
-n Select serial port [ /dev/tty.usbmodem141221 ]:
/dev/tty.usbmodem141221
Resetting device /dev/tty.usbmodem141221...
[ Press Ctrl+C to exit ]
Connecting: GOPEN:/dev/tty.usbmodem141221,raw,echo=0,clocal=1,cs8,nonblock=1,ixoff=0,ixon=0,ispeed=9600,ospeed=9600,crtscts=0 <-> openssl-connect:blynk-cloud.com:8441,cafile=/Users/kwhrjn/Documents/Arduino/libraries/blynk-library-master/scripts/certs/server.crt,nodelay
2018/04/19 22:30:24 socat[12056] N opening character device "/dev/tty.usbmodem141221" for reading and writing
2018/04/19 22:30:24 socat[12056] N opening connection to LEN=16 AF=2 188.166.206.43:8441
2018/04/19 22:30:24 socat[12056] N successfully connected from local address LEN=16 AF=2 192.168.0.13:56737
2018/04/19 22:30:25 socat[12056] N trusting certificate, commonName matches
2018/04/19 22:30:25 socat[12056] N SSL connection using ECDHE-RSA-AES128-GCM-SHA256
2018/04/19 22:30:25 socat[12056] N SSL connection compression "none"
2018/04/19 22:30:25 socat[12056] N SSL connection expansion "none"
2018/04/19 22:30:25 socat[12056] N starting data transfer loop with FDs [5,5] and [8,8]
blynk interface
basic blink example
First I tested an LED on arduino. If you don't have Blynk, install and create an account.
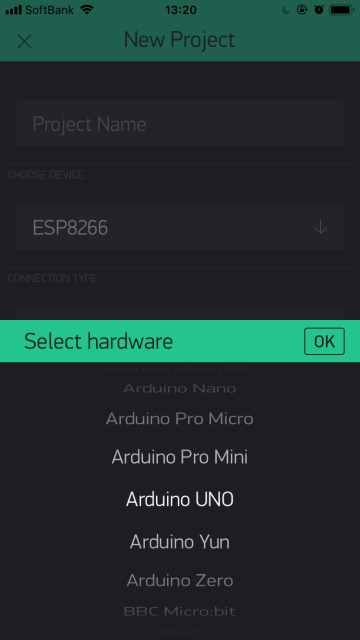
Create a new project
select hardware: "Arduino UNO"
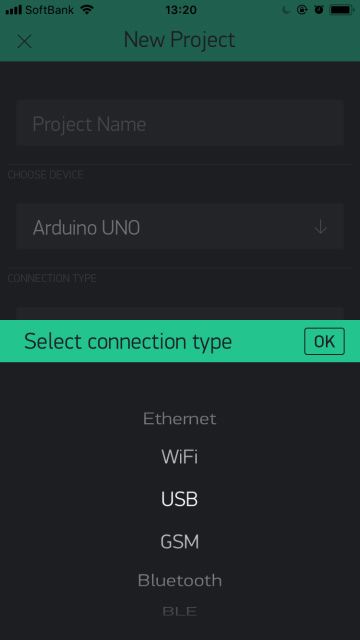
select connection type: "USB"
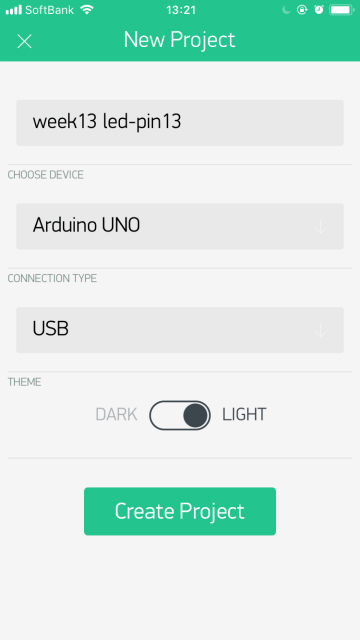
name a project name whatever you like and push "create project" button.
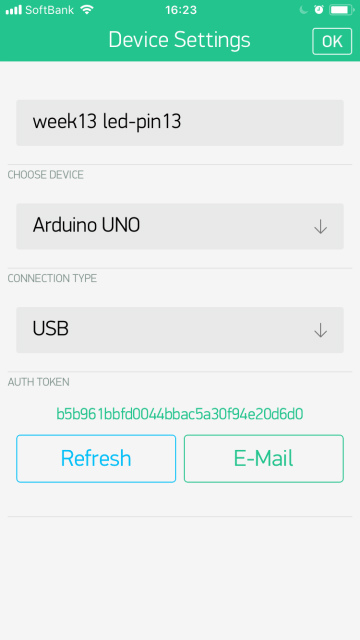
E-mail AUTH TOKEN. It will be needed inside Arduino sketch.
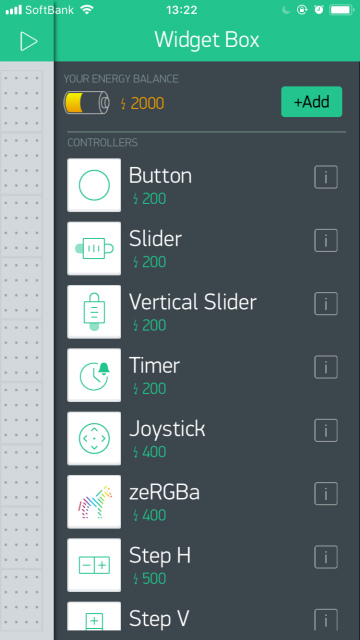
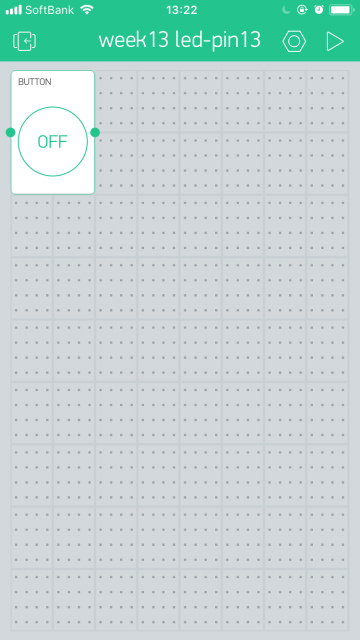
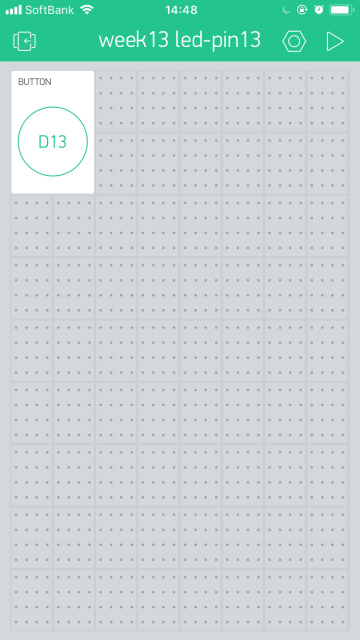
Here is a virtual breadboard. If you touch a board, "Widget Box" will appear.
Touch "Button" to place on a virtual breadboard.
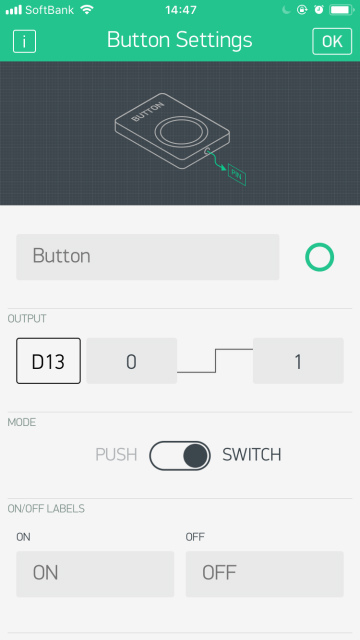
Touch "Button" component to modify a pin assignment.
touch "PIN" to modify it.
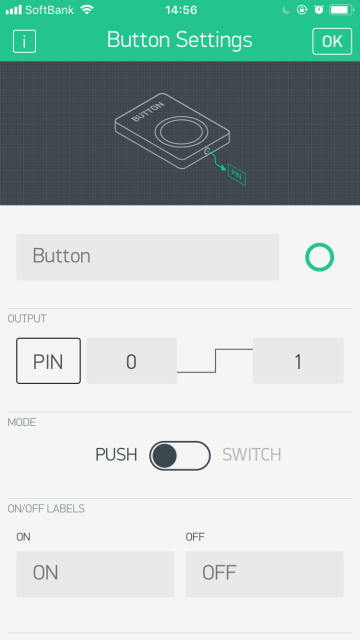
Select Pin "Digital" and "D13" and press "OK"
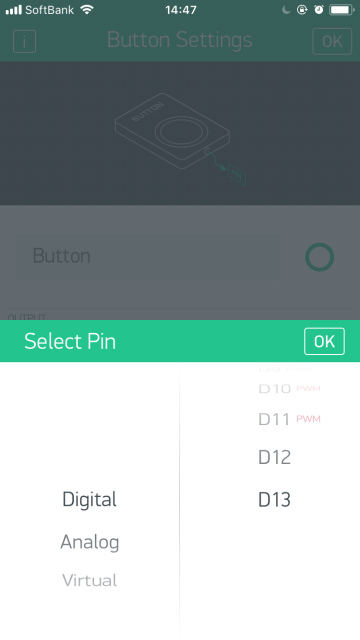
press "OK" again
Touch "Play" button at the upper left side.
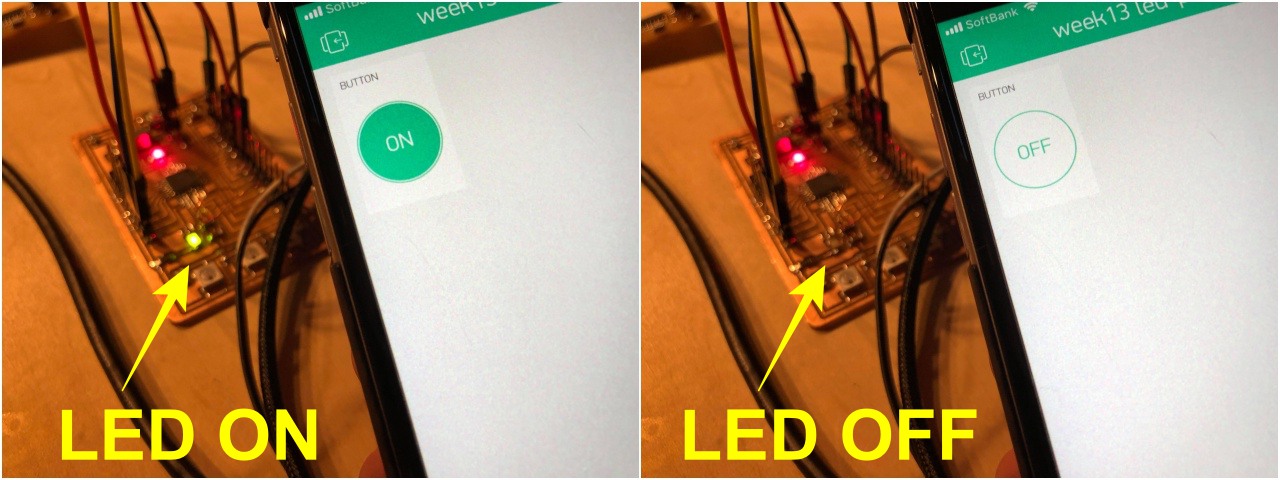
I connected my satshakit to a laptop via FabISP and FTDI cable and uploaded a basic blink example sketch. I found an LED blink depending on ON/OFF button.
controlling color LED
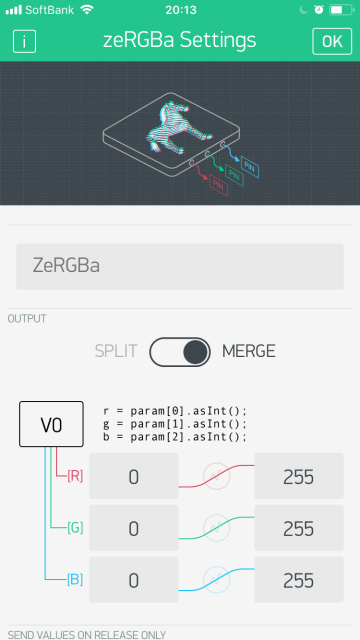
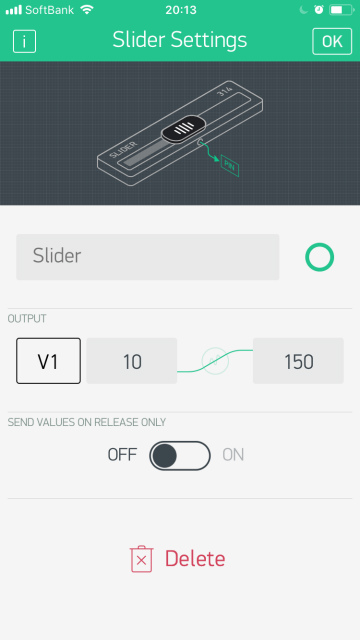
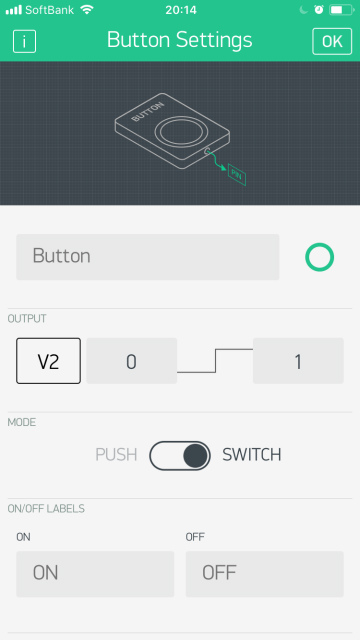
I modified Blynk interface as shown below.
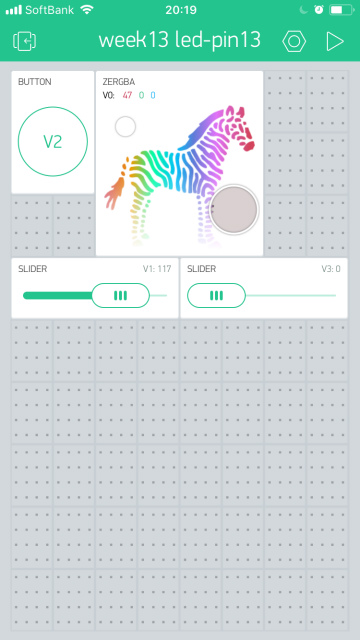
zeRGBa Settings: a component to control LEDs color. select a virtual pin "V0" and "MERGE" as output
Slider Settings: a component to control brightness. select a virtual pin "V1" and "SWITCH" as a mode.
Button Settings: a component to select a color change pattern. select a virtual pin "V2" and "SWITCH" as a mode.
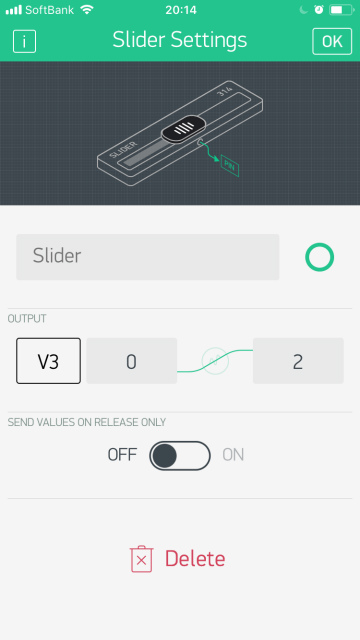
Slider Settings: a component to control the speed of color change. select a virtual pin "V3"
I wrote an Arduino sketch with reference to NeoPixel strandtest sketch to respond to the change of virtual pins (V0, V1, V2, and V3)'s values.
#include <BlynkSimpleStream.h>
#include <Adafruit_NeoPixel.h>

char auth[] = "b5b961bbfd0044bbac5a30f94e20d6d0";

#define PIN 19
#define NUMPIXELS 3

Adafruit_NeoPixel strip = Adafruit_NeoPixel(NUMPIXELS, PIN, NEO_GRB + NEO_KHZ800);

uint32_t Wheel(byte WheelPos) {
  if (WheelPos < 85) {
    return strip.Color(WheelPos * 3, 255 - WheelPos * 3, 0);
  } else if (WheelPos < 170) {
    WheelPos -= 85 ;
    return strip.Color(255 - WheelPos * 3, 0, WheelPos * 3);
  } else {
    WheelPos -= 170 ;
    return strip.Color(0, WheelPos * 3, 255 - WheelPos * 3);
  }
}


int ledR = 0;
int ledG = 0;
int ledB = 0;
int pixelBrightness = 50;
int Mode = 0, j = 0, Speed = 20;


BLYNK_WRITE(V0) //pick a color of LED
{
  ledR = param[0].asInt();
  ledG = param[1].asInt();
  ledB = param[2].asInt();
   for(int i=0; i < NUMPIXELS;i++){
    strip.setPixelColor(i, strip.Color(ledR, ledG, ledB));
  }
  strip.show();
}

BLYNK_WRITE(V1) // parameter of LED brightness
{
  pixelBrightness = param.asInt();
  strip.setBrightness(pixelBrightness);
  strip.show();
}

BLYNK_WRITE(V2) //parameter of the pattern of blinking
{
  Mode = param.asInt();
}


BLYNK_WRITE(V3) //parameter of the speed of color change
{
  Speed = param.asInt();
}

//a function of changing the color of LEDs like a rainbow
void rainbowCycle(uint8_t wait, uint8_t j) {
  uint16_t i;
  for(i=0; i < strip.numPixels(); i++) {
    strip.setPixelColor(i, Wheel(((i * 256 / strip.numPixels()) + j) & 255));
  }
  strip.show();
  delay(wait);
}

void setup()
{
  Serial.begin(9600);
  Blynk.begin(Serial, auth);
  Blynk.syncAll();
  strip.begin();
  strip.setBrightness(pixelBrightness);
  strip.show();
}

void loop()
{
  Blynk.run();
  strip.setBrightness(pixelBrightness);

  if(Mode == 0){
    //normal mode
    for(int i=0; i < NUMPIXELS;i++){
      strip.setPixelColor(i, strip.Color(ledR, ledG, ledB));
    }
    strip.show();
  }else{
    //rainbow mode
    j++;
    if(j >256){
      j = 0;
    }
    rainbowCycle(Speed, j);
  }
}
After uploading the sketch to my satshakit board, I could change the color of LEDS from blynk interface.
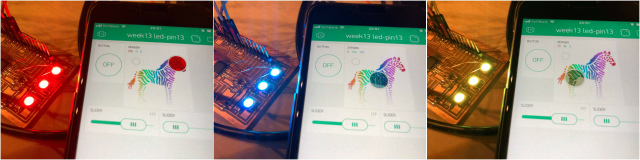
This week's hero shot.
files
- Blynk
- Github: blynkkk/blynk-library
- arduino sketch
(#2)control Arduino(satshakit) with Processing
I'm a little bit confused that people doubted that using Blynk met for a rubric to the assignment.
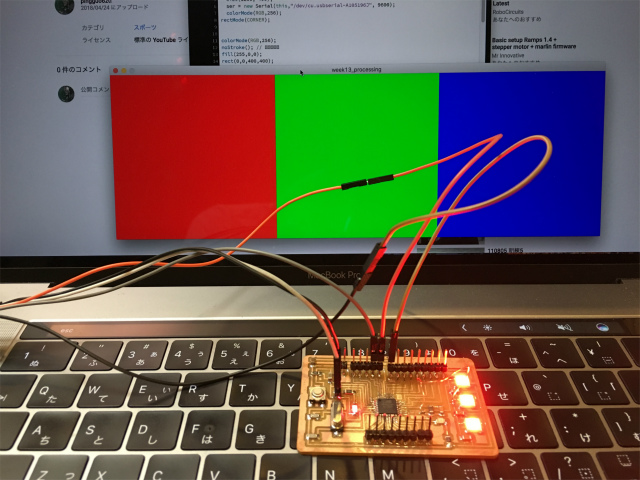
So, I did another assignment with Processing as everyone did. What I did was that LEDs emitted the color when the mouse was clicked on a color. I used a satshakit board with LEDs which I designed last week.
Processing
import processing.serial.*;
Serial ser;

void setup(){
  size(1200, 400);
  ser = new Serial(this,"/dev/cu.usbserial-A105196J", 9600);
  colorMode(RGB,256);
rectMode(CORNER);

colorMode(RGB,256);
noStroke();
fill(255,0,0);
rect(0,0,400,400);

fill(0,255,0);
rect(400,0,400,400);

fill(0,0,255);
rect(800,0,400,400);

}

void draw(){
 if (mouseX>=0 && mouseX <=400 && mouseY>=0 && mouseY<=400){
   if(mousePressed){
     ser.write(1);
   }
 }
  if (mouseX>=400 && mouseX <=800 && mouseY>=0 && mouseY<=400){
   if(mousePressed){
     ser.write(2);
   }
 }
   if (mouseX>=800 && mouseX <=1200 && mouseY>=0 && mouseY<=400){
   if(mousePressed){
     ser.write(3);
   }
 }

}
Arduino
#include <Adafruit_NeoPixel.h>
#ifdef __AVR__
  #include %lt;avr/power.h>
#endif

#define PIN 19
Adafruit_NeoPixel strip = Adafruit_NeoPixel(3, PIN, NEO_GRB + NEO_KHZ800);

int ledR = 0;
int ledG = 0;
int ledB = 0;
int pixelBrightness = 50;
int Mode = 0, j = 0, Speed = 20;


void setup() {
  // This is for Trinket 5V 16MHz, you can remove these three lines if you are not using a Trinket
  #if defined (__AVR_ATtiny85__)
    if (F_CPU == 16000000) clock_prescale_set(clock_div_1);
  #endif
  // End of trinket special code
  Serial.begin(9600);
  pinMode(13, OUTPUT);

  strip.begin();
  strip.show(); // Initialize all pixels to 'off'
}

void loop(){
  if(Serial.available()>0){
    int input = Serial.read();
    if(input == 1 ){
       colorWipe(strip.Color(255, 0, 0), 0); // Red
    } else if (input ==2){
        colorWipe(strip.Color(0, 255, 0), 0); // Green
    }  else if(input ==3){
  colorWipe(strip.Color(0, 0, 255), 0); // Blue
    }
    strip.show();
    }}

  // Fill the dots one after the other with a color
void colorWipe(uint32_t c, uint8_t wait) {
  for(uint16_t i=0; i<strip.numPixels(); i++) {
    strip.setPixelColor(i, c);
    strip.show();
    delay(wait);
  }
}
This week's another hero shot.
files
Processing code: Processing format (.pde)
Arduino IDE sketch: Arduino IDE format (.ino)