16. Interface and application programming
All this information is refered to Interface and application programming class.
Comunicating Python with Arduino
To learn how to comunicate Python with Arduino, for that I followed TopTechBoy_Tutorials.
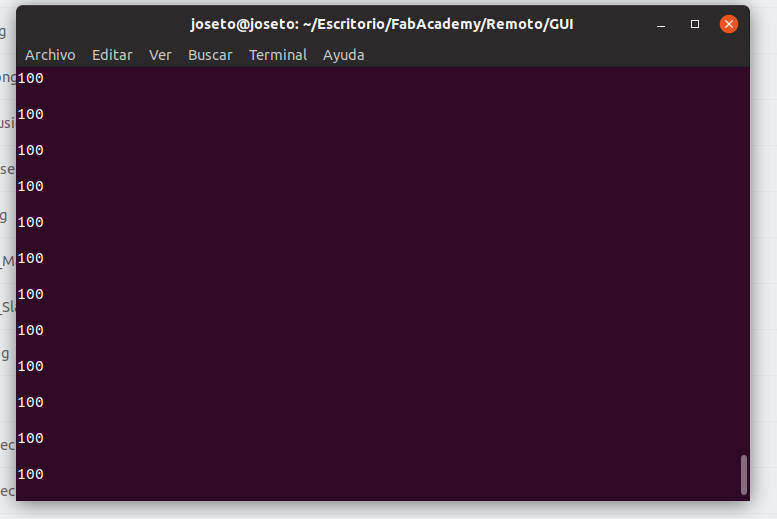
The first step I did was to send a serial message from the Board to my code in python:
Arduino Code
void setup() {
Serial.begin(9600); // set the baud rate
//Serial.println("Ready"); // print "Ready" once
}
void loop() {
Serial.println(100);
delay(100); // delay for 1/10 of a second
}
Python Code
import serial #Import Serial Library

arduinoSerialData = serial.Serial('/dev/ttyACM0',9600) #Create Serial port object called arduinoSerialData


while (1==1):
    if (arduinoSerialData.inWaiting()>0):
        myData = arduinoSerialData.readline()
        print (myData)
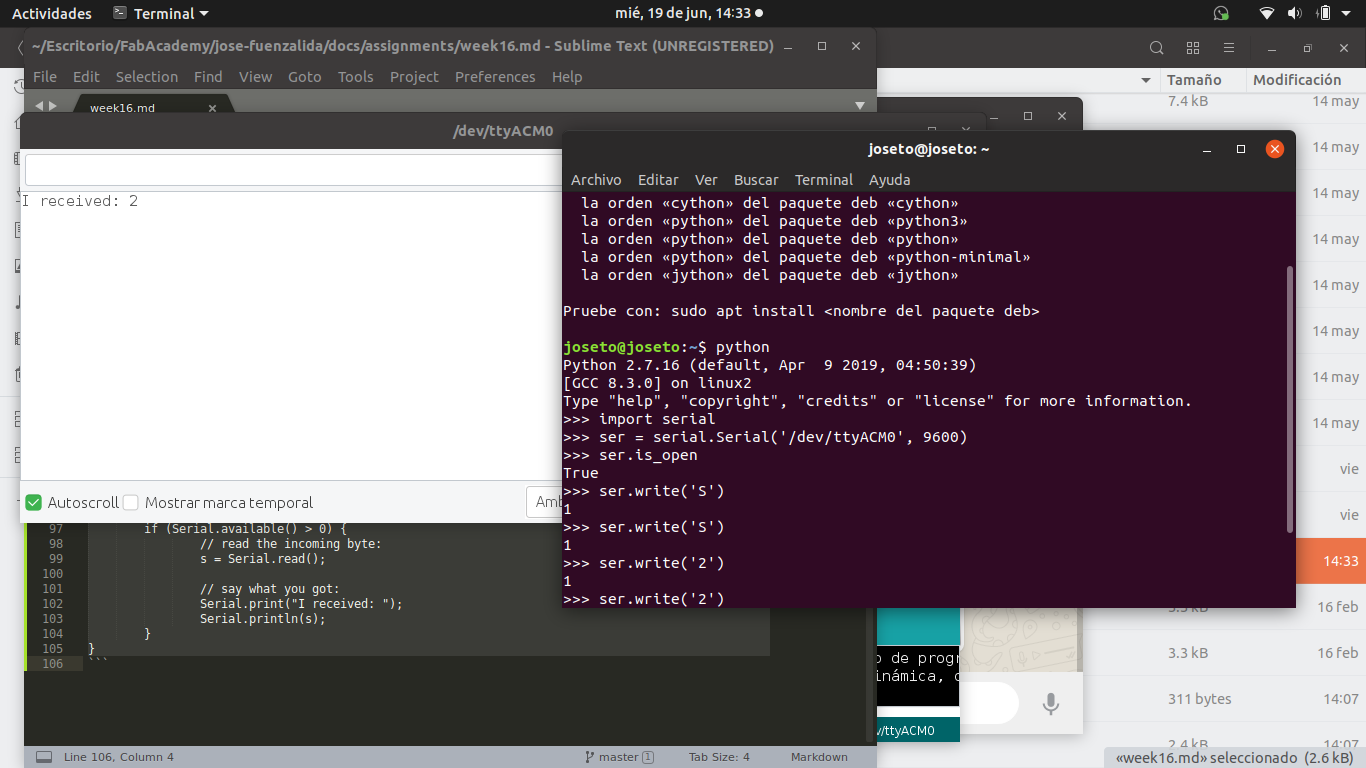
The second step was to send information from python to arduino:
I runed python directly form the terminal, this is how it went: Python Code:
joseto@joseto:~$ python 3
python: can't open file '3': [Errno 2] No such file or directory
joseto@joseto:~$ Python 3

Orden «Python» no encontrada. Quizá quiso decir:

  la orden «cython» del paquete deb «cython»
  la orden «python» del paquete deb «python3»
  la orden «python» del paquete deb «python»
  la orden «python» del paquete deb «python-minimal»
  la orden «jython» del paquete deb «jython»

Pruebe con: sudo apt install <nombre del paquete deb>

joseto@joseto:~$ python
Python 2.7.16 (default, Apr  9 2019, 04:50:39)
[GCC 8.3.0] on linux2
Type "help", "copyright", "credits" or "license" for more information.
>>> import serial
>>> ser = serial.Serial('/dev/ttyACM0', 9600)
>>> ser.is_open
True
>>> ser.write('S')
1
>>> ser.write('S')
1
>>> ser.write('2')
1
>>> ser.write('2')
1
Basically the code is:
import serial
ser = serial.Serial('/dev/ttyACM0', 9600) #change for your serial port
ser.write('S')
Arduino Code:
char s;   // for incoming serial data

void setup() {
        Serial.begin(9600);     // opens serial port, sets data rate to 9600 bps
}

void loop() {

        // send data only when you receive data:
        if (Serial.available() > 0) {
                // read the incoming byte:
                s = Serial.read();

                // say what you got:
                Serial.print("I received: ");
                Serial.println(s);
        }
}
Building the GUI
To build the button GUI I started with the Hello World program:
import tkinter as tk

class Application(tk.Frame):
    def __init__(self, master=None):
        super().__init__(master)
        self.master = master
        self.pack()
        self.create_widgets()

    def create_widgets(self):
        self.hi_there = tk.Button(self)
        self.hi_there["text"] = "Hello World\n(click me)"
        self.hi_there["command"] = self.say_hi
        self.hi_there.pack(side="top")

        self.quit = tk.Button(self, text="QUIT", fg="red",
                              command=self.master.destroy)
        self.quit.pack(side="bottom")

    def say_hi(self):
        print("hi there, everyone!")

root = tk.Tk()
app = Application(master=root)
app.mainloop()
Wich give me 2 buttons like this:
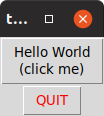
Its important to be sure you are working with Python3, and not one of the previous versions, that one didn worked for me.
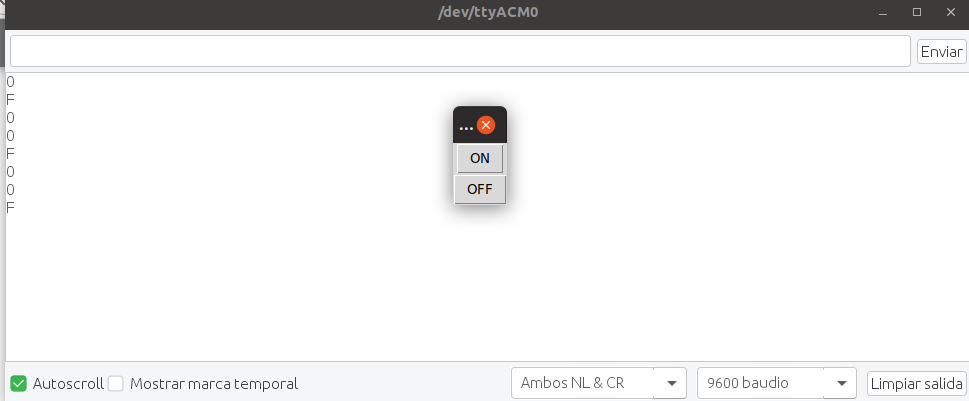
The next step was to modify the Hello World to send a string to the arduino, I changed the two buttons to turn on and off an LED:
import serial
import tkinter as tk
s = serial.Serial('/dev/ttyACM0', 9600)

class Application(tk.Frame):
    def __init__(self, master=None):
        super().__init__(master)
        self.master = master
        self.pack()
        self.create_widgets()

    def create_widgets(self):
        self.on = tk.Button(self)
        self.on["text"] = "ON"
        self.on["command"] = self.send_on
        self.on.pack(side="top")
        self.off = tk.Button(self)
        self.off["text"] = "OFF"
        self.off["command"] = self.send_off
        self.off.pack(side="bottom")

    def send_on(self):
        s.write(str.encode('O'))
    def send_off(self):
        s.write(str.encode('F'))

root = tk.Tk()
app = Application(master=root)
app.mainloop()
Here you can see how they are comunicating:
Then I modified the code of the arduino, this way the char would turn on the LED in pin 13:
char s;   // for incoming serial data

void setup() {
        Serial.begin(9600);
        pinMode(13,OUTPUT);
}

void loop() {

        // send data only when you receive data:
        if (Serial.available() > 0) {
                // read the incoming byte:
                s = Serial.read();
                Serial.println(s);
        }
        if(s=='O'){
          digitalWrite(13,HIGH);
        }
        else{
          digitalWrite(13,LOW);
        }

}
The Result
The Board
Finally I had to design my own board to work with the GUI.
I build a simple board with Serial Comunication and a LED attached to Pin 3.
If you are looking for the files you can download them from here:
To do this, I had to change a little the code:
char s;

#include <SoftwareSerial.h>

#define rxPin 0
#define txPin 1


SoftwareSerial mySerial( rxPin,txPin);
void setup() {
  mySerial.begin(9600);
        pinMode(3,OUTPUT);
}

void loop() {

        // send data only when you receive data:
        if (mySerial.available() > 0) {
                // read the incoming byte:
                s = mySerial.read();

        }
        if(s=='O'){
          digitalWrite(3,HIGH);
          mySerial.println(s);
        }
        else{
          digitalWrite(3,LOW);
        }

}