.png)
Hi! Welcome to My Final Project.
Here you can learn all about the steps I took to make my final project.
Here you can learn all about the steps I took to make my final project.
My final project was originally supposed to be an educational arcade game, a built body and game and all, but unfortunately, I had spent too much time on the game design and I couldn’t get it to work, and so I started brain storming for a new project. I finally settled down on this project.
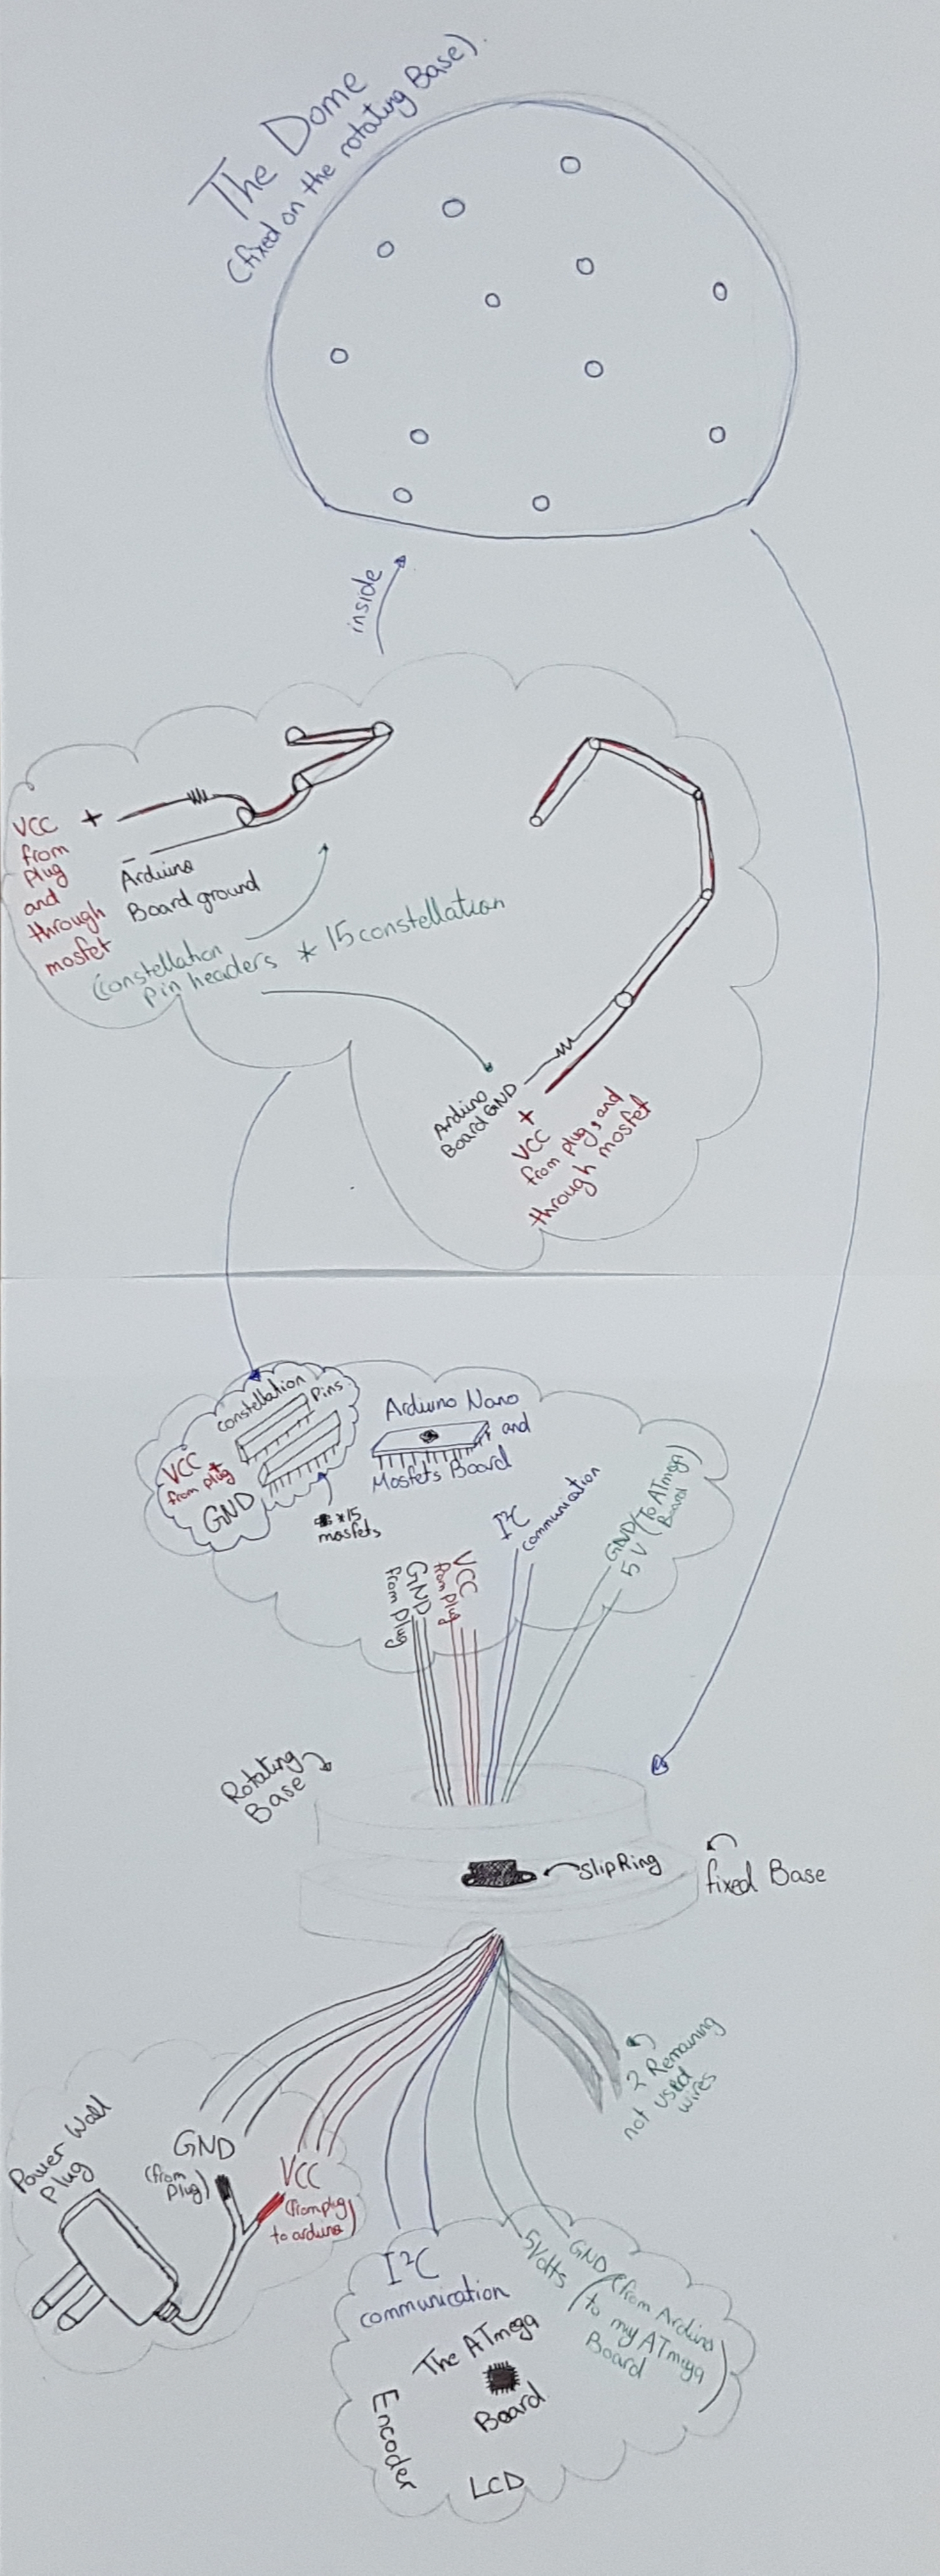
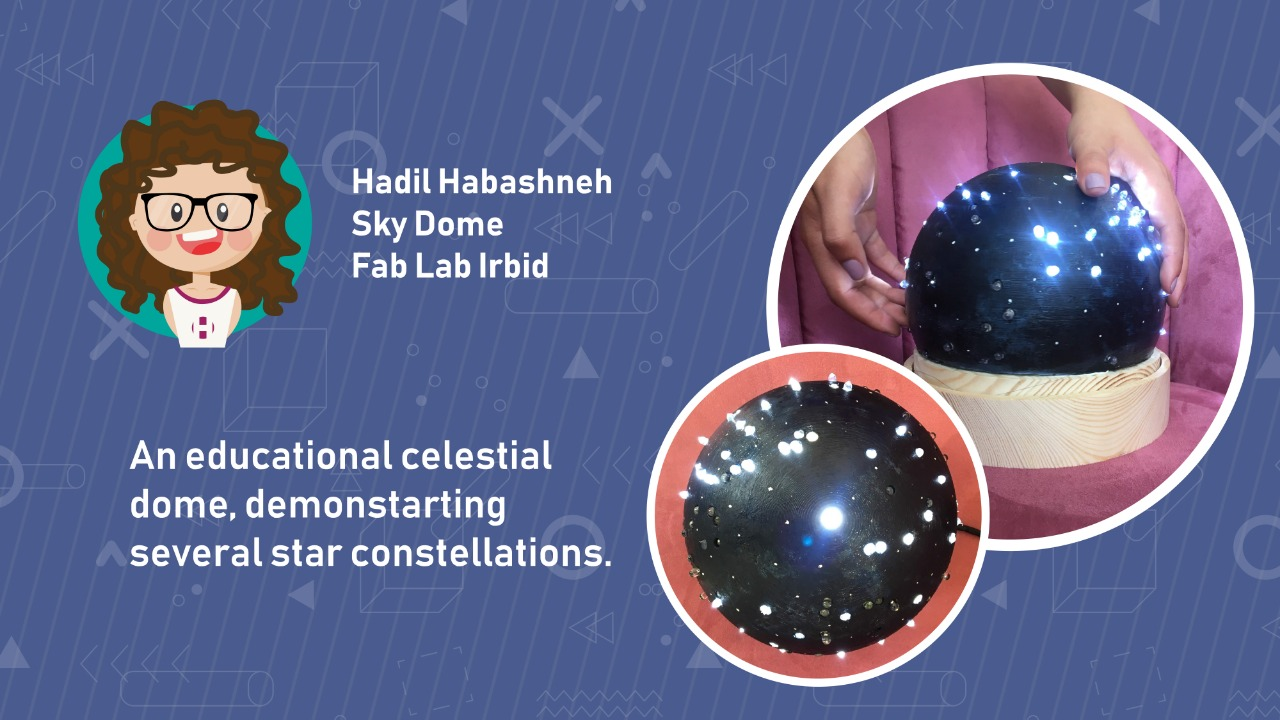
My final project is a table lamp with the stars’ constellations on it, the user could pick a choose any constellation they would like to light as an educational tool about astronomy. The cover of the lamp is manually rotatable so the user could choose where they would like to show.
| PLA Filament | 0.07 JD/gram |
| Swedish Wood (4cm thick) | 28 jd |
| atmega 328p | 4 JD |
| LED | 0.1JD*117 |
| Wires | - |
| LCD | 3.5jd |
| Rotary Encoder | 2 jd |
| Ardiono Nano | 4jds |
| SLIPRING CONDUCTIVE | 16JD |
| Mosfets | 2JD*unit |
| Pin Headers | - |
| miscellaneous components | - |


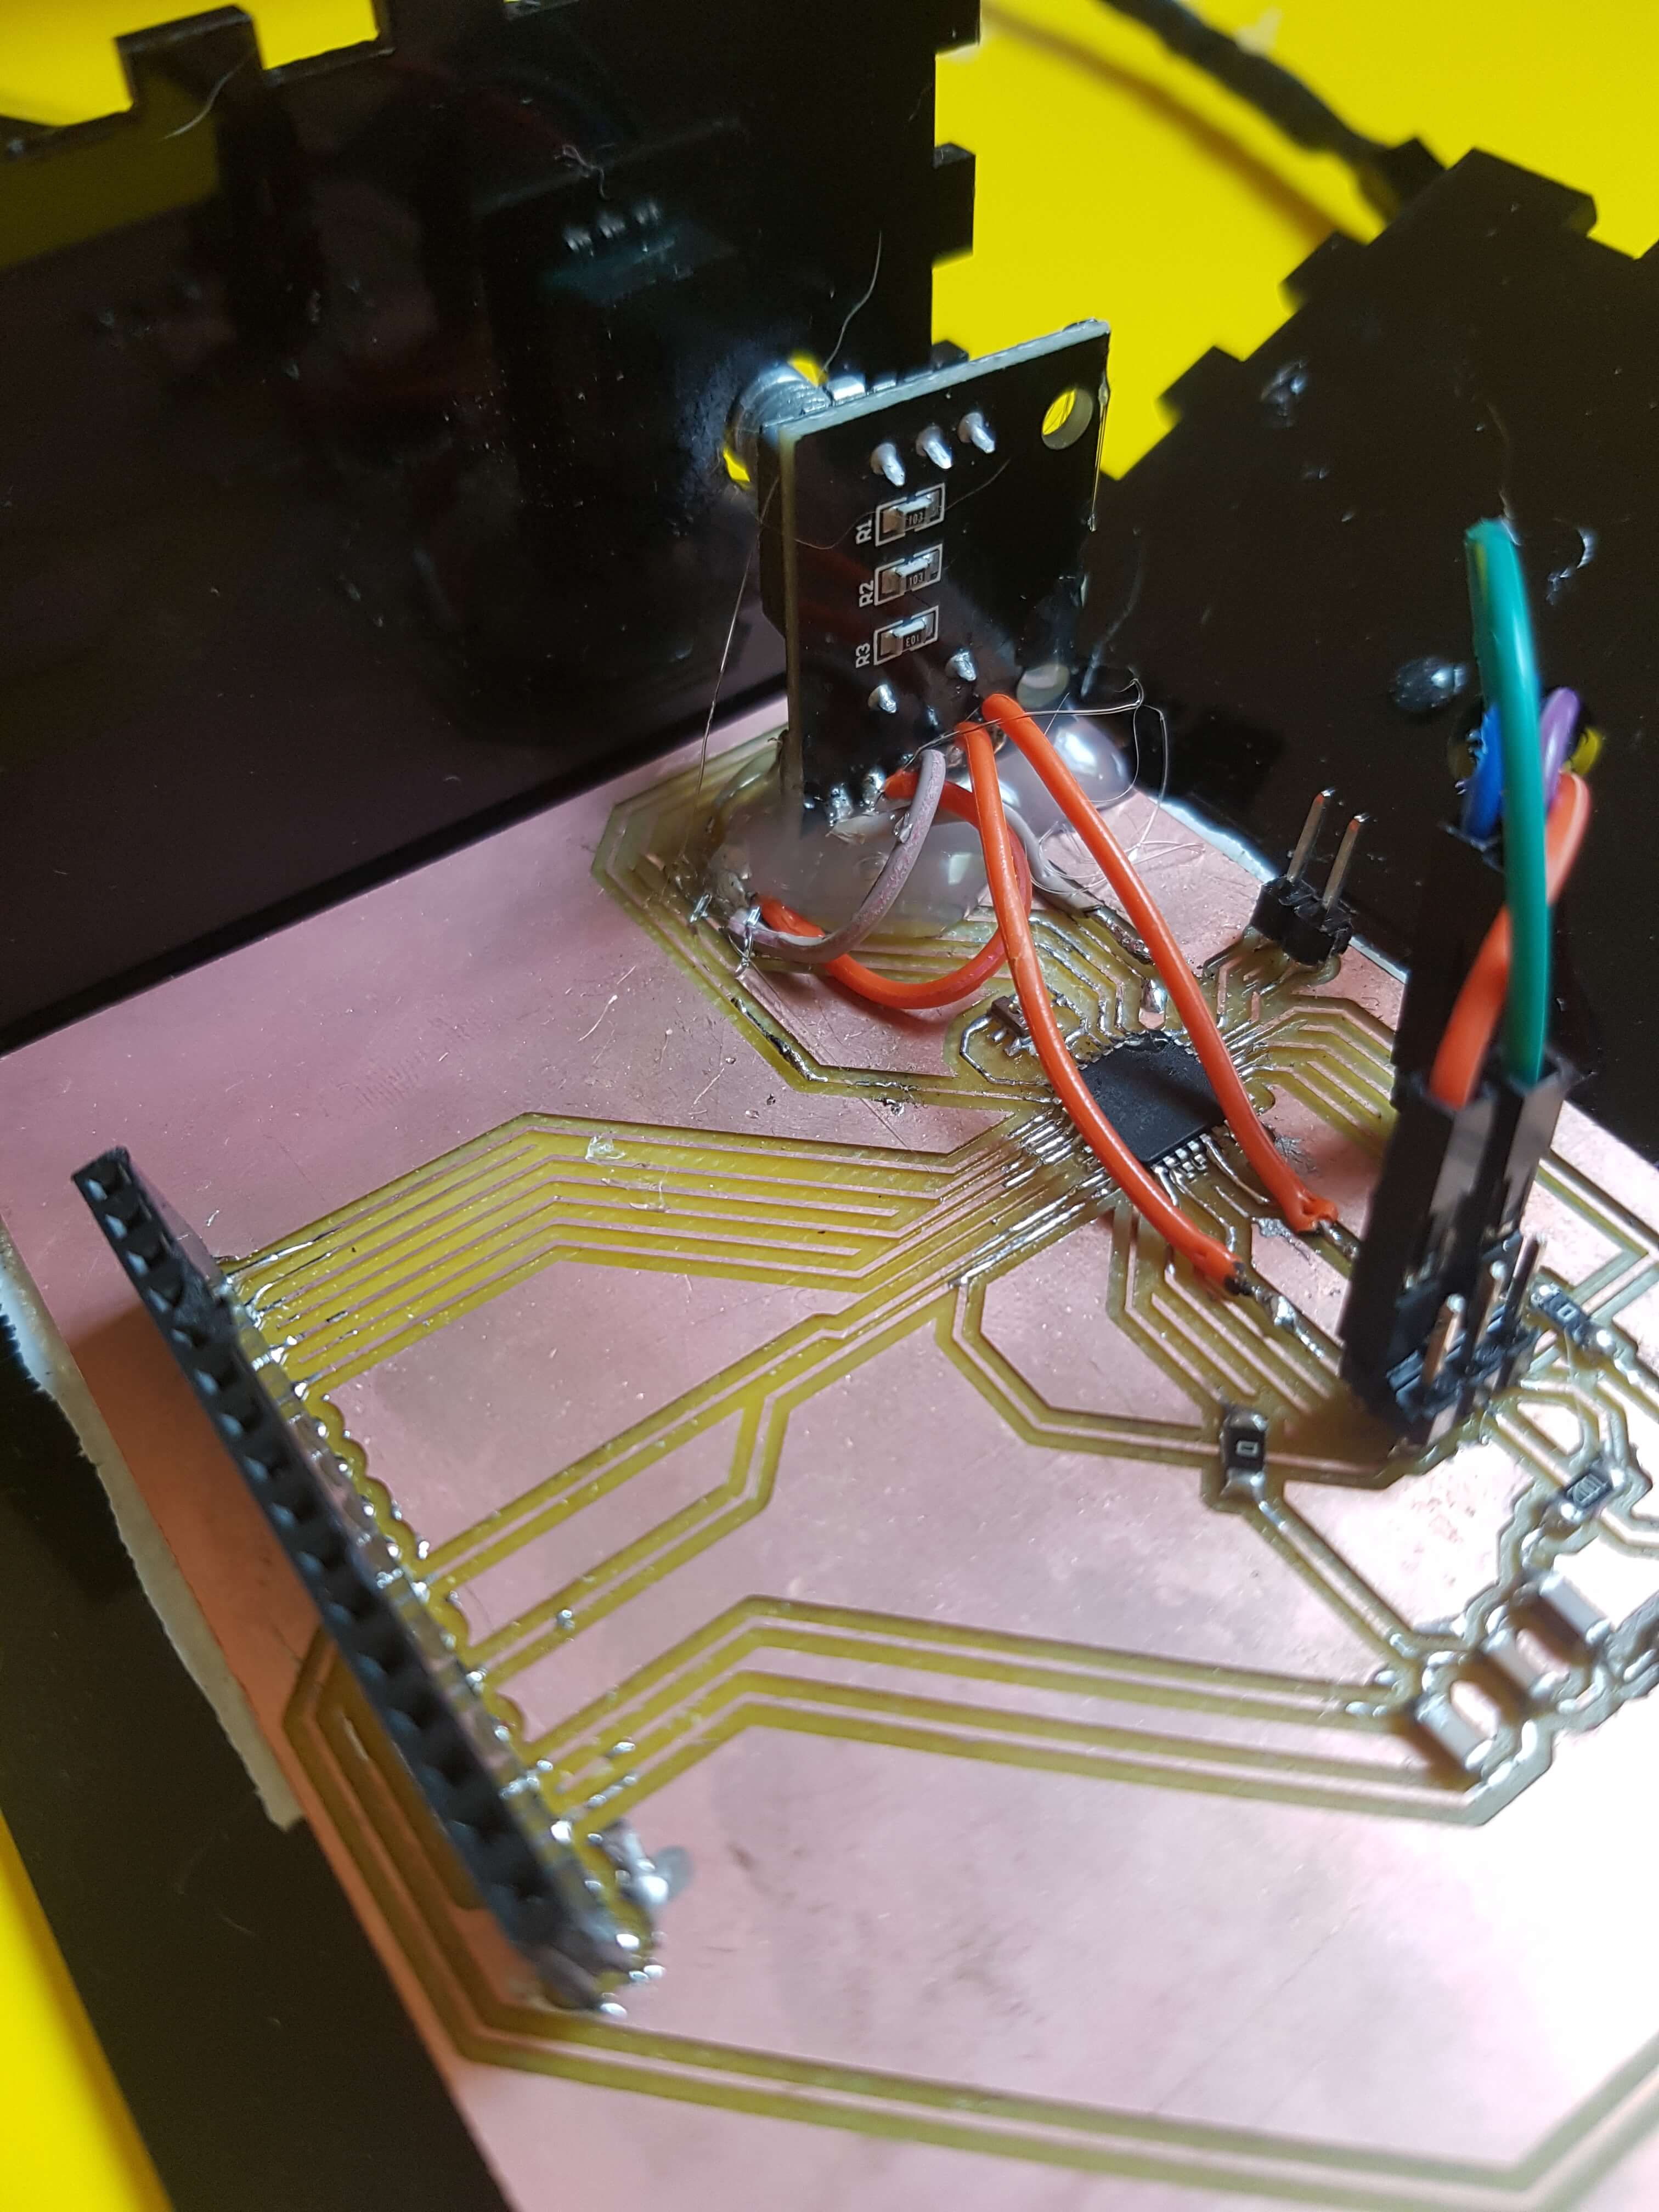
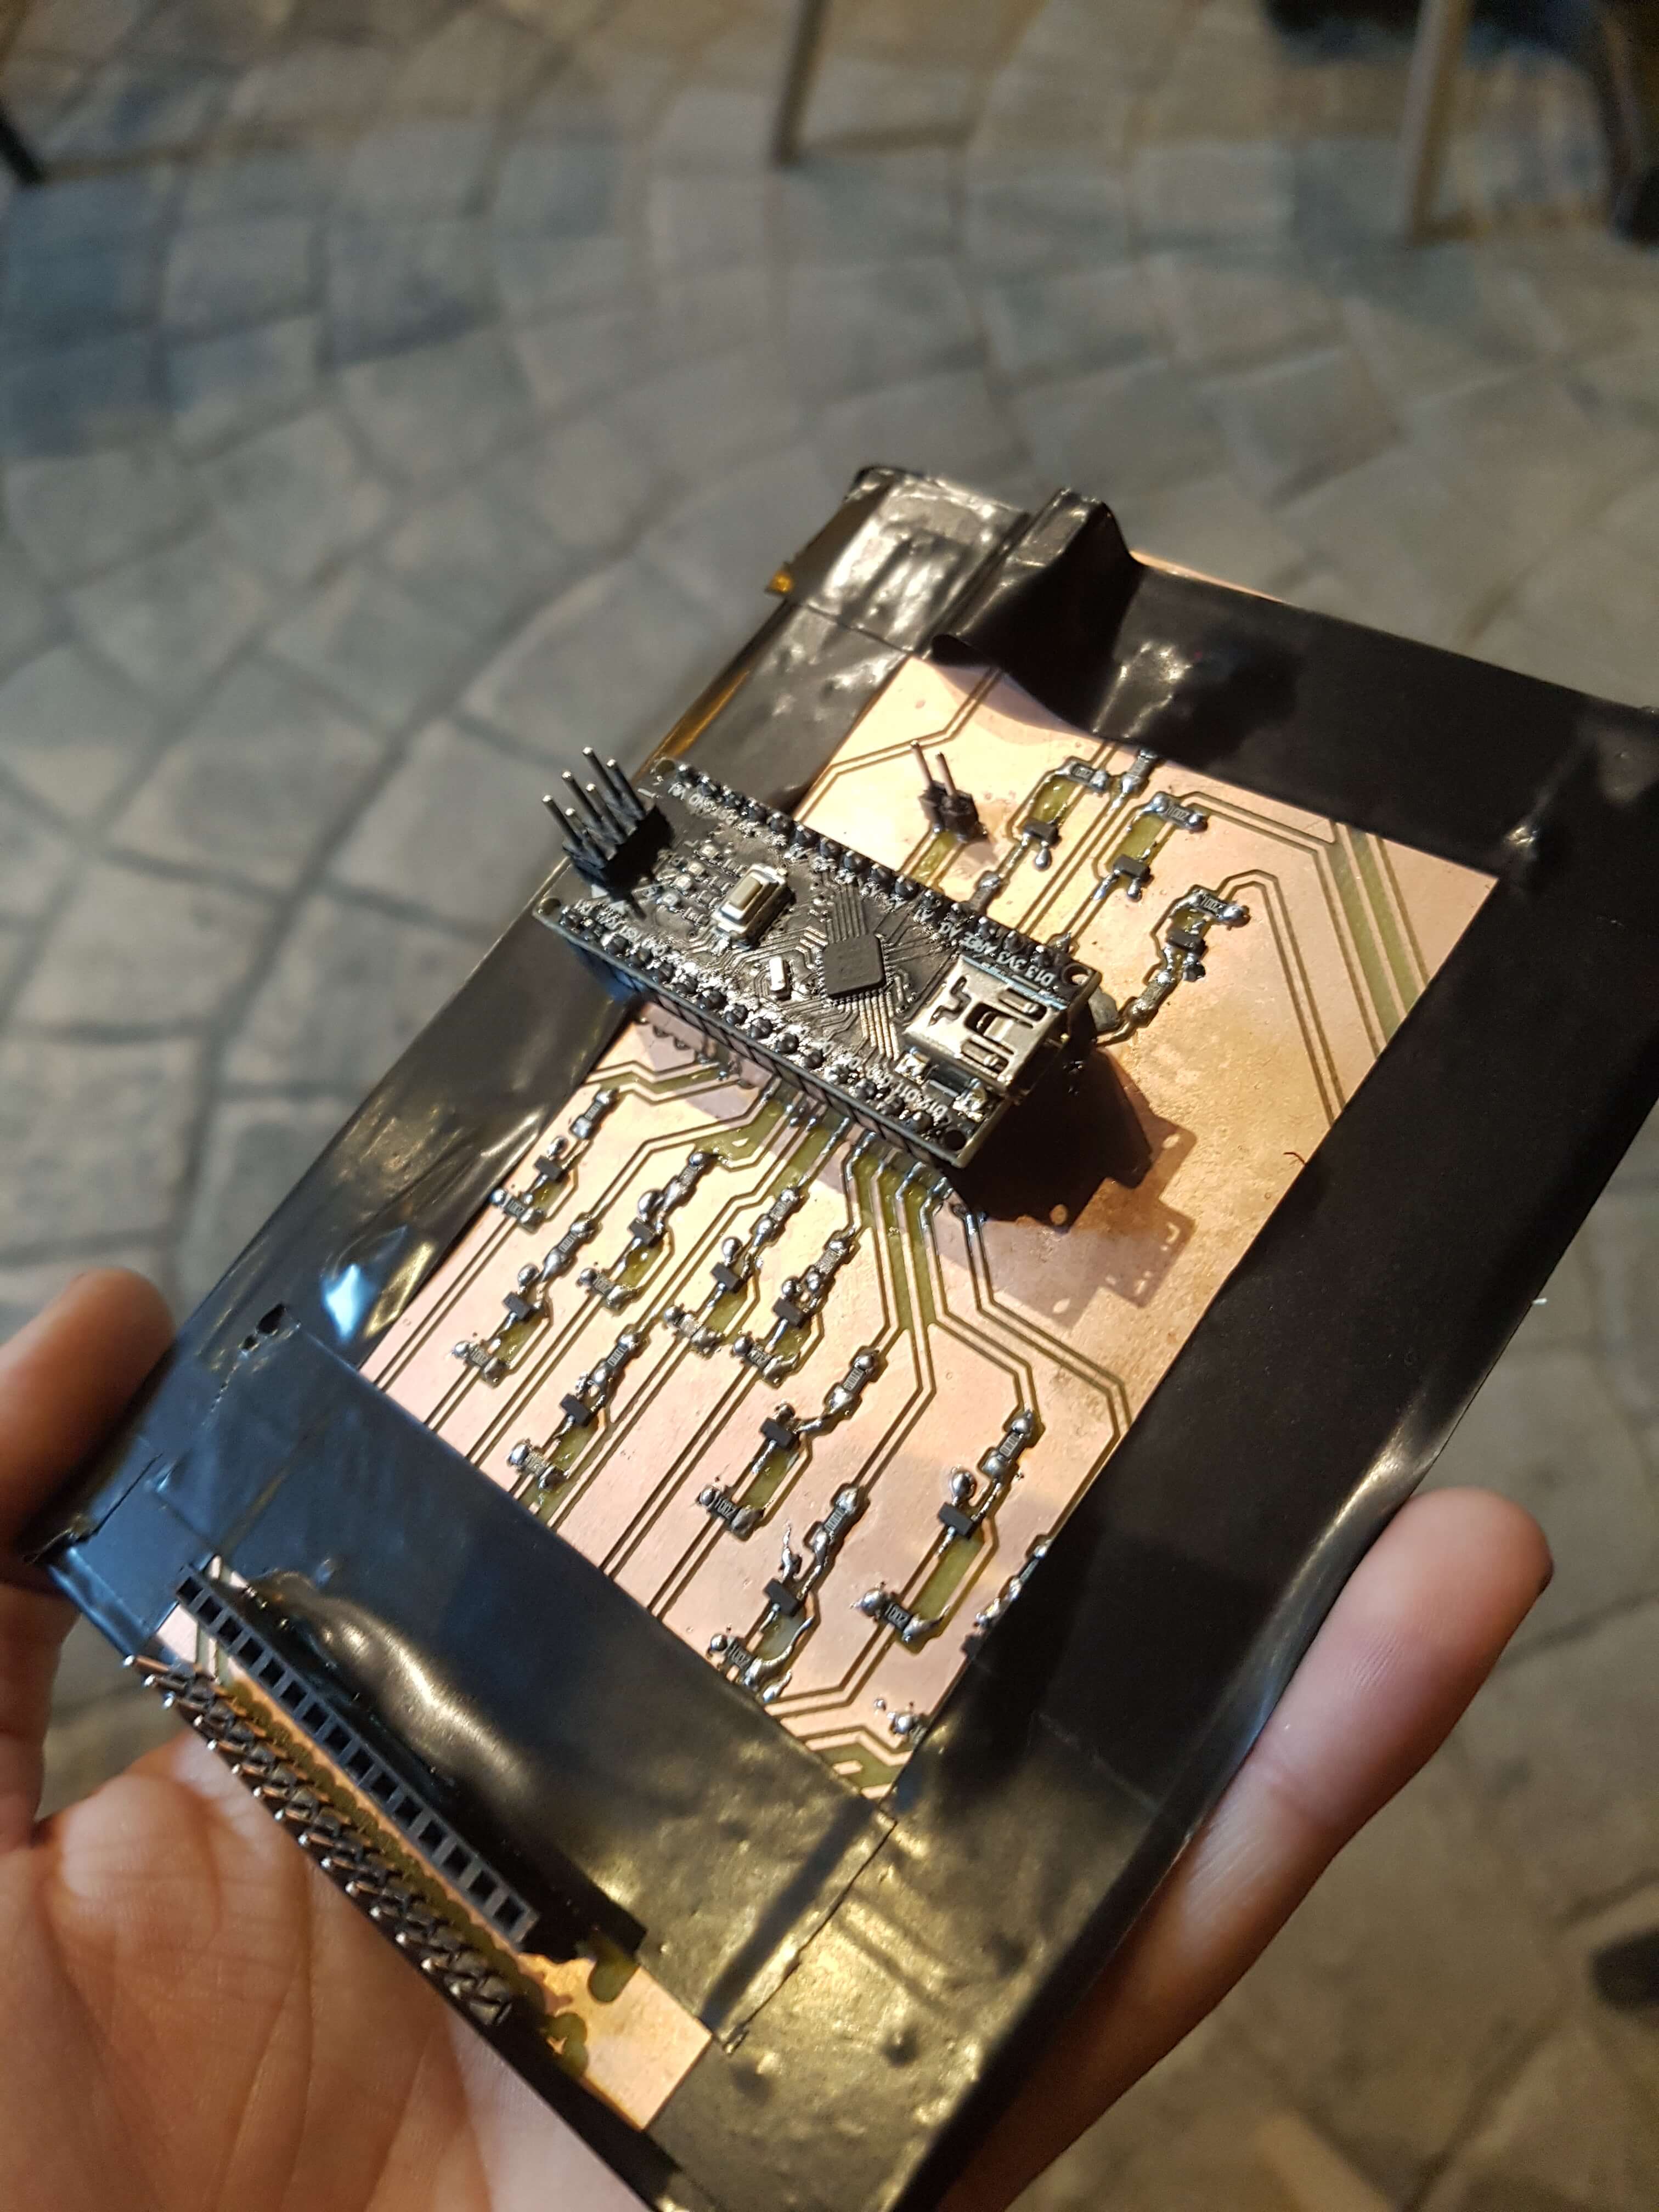
 I then soldered the parts on each board,

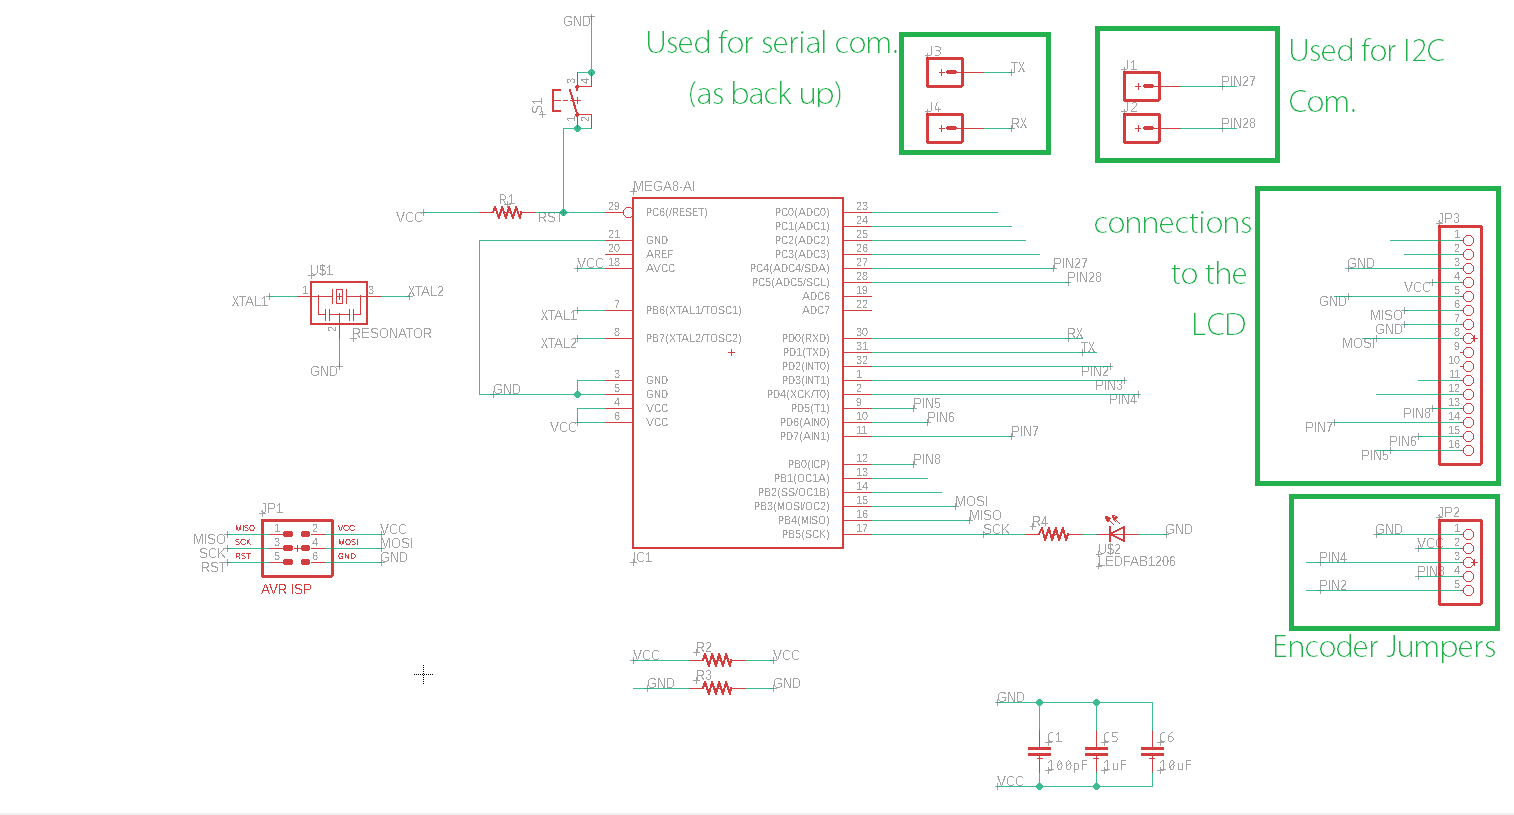
| Pin Number | Constellation Name | Code Assigned Letter | Corresp. Hex Number | Number of LEDs | Resistor Value OHM |
|---|---|---|---|---|---|
| A2 | LYNX | A | 65 | 7 | 16 |
| A1 |
Leo Minor | B | 66 | 1 | 100 |
| A0 | Aries | C | 67 | 4 | 25 |
| D13 | Pisces | D | 68 | 2 | 50 |
| D12 | Pegasus | E | 69 | 18 | 16 |
| D11 | Lyra | F | 70 | 5 | 20 |
| D10 | Camelopardalis | G | 71 | 4 | 25 |
| D9 | Draco | H | 72 | 15 | 16 |
| D8 | Cephus | I | 73 | 5 | 20 |
| D7 | Ursa Minor | J | 74 | 7 | 16 |
| D6 | Hercules | K | 75 | 14 | 16 |
| D5 | Ursa Major | L | 76 | 15 | 16 |
| D4 | Corona Borealis | M | 77 | 7 | 16 |
| D3 | Bootes | O | 79 | 8 | 16 |
| D2 | Cassiopeia | P | 80 | 5 | 20 |
#include <OneButton.h>
#include <Encoder.h>
#include <Wire.h>
#include <LCD.h>
#include <LiquidCrystal.h>
#include <Wire.h>

const int rs = 12, en = 11, d4 = 8, d5 = 7, d6 = 6, d7 = 5;
LiquidCrystal lcd(rs, en, d4, d5, d6, d7);

// ROTARY ENCODER
long oldPosition  = 0;
int encoderDTpin = 3;
int encoderCLKpin = 2;
Encoder myEnc(encoderDTpin, encoderCLKpin);

int buttonPin = 4;
OneButton button0(buttonPin, true);


// MENU ARRAY
// First number in array = amount of menu items in root layer. Same goes for next layer. (Example: first value in array is 4. This means Layer 0 has 4 menu items. Layer 1 has only 2 menu items.)
// First number infront of menu text is the layer number that item points to. (Example: 1_Rotation points to Layer 1)
// Second number infront of menu text is the number of the value connected to that menu item in the values array. (Example: 15Direction points to position 5 in the values array)

String menu[] = {"15","056Lynx","056Leo Minor","056Aries","056Pisces","056Pegasus","056Lyra","056Camelopardalis","056Draco","056Cephus","056Ursa Minor","056Hercules","056Ursa Major","056CronaBorealis","056Bootes","056Cassiopeia"};


// VALUES ARRAY
// TYPES, 1 numeric / 2 character value range
// 1 - type,value,increments,min,max
// 2 - type,starting value in options array,lowest value options array,max value options array
int values[] = {1,11,25,50,1450, //0-4 WATCH1
                2,2,0,2,         //5-8
                1,600,25,75,600, //9-13

                1,11,25,50,1450, //14-18 WATCH2
                2,2,0,2,         //19-22
                1,600,25,75,600, //23-27

                1,11,25,50,1450, //28-32 WATCH3
                2,2,0,2,         //33-36
                1,600,25,75,600, //37-41

                1,11,25,50,1450, //42-46 WATCH4
                2,2,0,2,         //47-50
                1,600,25,75,600, //51-55

                2,4,3,4,         //56-59 WATCH1 ACTIVE
                2,4,3,4,         //60-63 WATCH2 ACTIVE
                2,4,3,4,         //64-67 WATCH3 ACTIVE
                2,4,3,4};        //68-71 WATCH4 ACTIVE


String options[] = {"CW","CCW","MIX",
                    "Y","N"};

// Custom character for LCD.
byte cursor[8] = {
  0b10000,
  0b10000,
  0b01000,
  0b00110,
  0b01000,
  0b10000,
  0b10000,
  0b00000
};

byte watch[8] = {
  0b01110,
  0b01110,
  0b11011,
  0b10001,
  0b10001,
  0b11011,
  0b01110,
  0b01110
};


int currentType = 0;
int value = 0;
int numIncr = 0;
int Min = 0;
int Max = 0;

int currentLayer = 0;
int lastLayer = 99;
int currentLength = menu[0].toInt();
int currentPosition = 0;
int currentSelect = 1;
int currentChange = 0;
String currentPress = "";
float currentlcdLayerFloat = 0;
int currentlcdLayer = 0;
int lastlcdLayer = 0;
int lcdUpdated = 0;
int currentLine = 0;
int cursorLayer = 0;
int cursorPosition = 0;
int valueLength = 0;


void setup() {
  Serial.begin(9600);

  Wire.begin(); // join i2c bus (address optional for master)


  // Map rotary button to actions single and doubleclick.
  button0.attachClick(singleClick);


  lcd.begin (16,2);
  lcd.setBacklightPin(3,POSITIVE);
  lcd.setBacklight(HIGH);
  lcd.home();

  // Create the custom character.
  lcd.createChar(0, cursor);
  lcd.createChar(1, watch);

  lcd.setCursor (2,0);
  lcd.print("Hello stars!");
  delay(1000);
  clearLine(0);

  // Set the select cursor on the first line.
  cursorLayer = 0;
  lcd.setCursor (0,cursorLayer);
  writeCursor();

}

void loop() {

    // Listen to button presses.
    button0.tick();

    // Listen if the rotary encoder moves.
    rotary_check();

    // Print the LCD menu.
    lcdMenu();

}

void singleClick() {

  // IF current layer number is the same as redirect layer number, we stay on the same layer
  // AND no item is selected in the menu
  // AND the selected item has a redirect to another layer
  if(currentLayer == menu[currentPosition + currentSelect].substring(0,1).toInt() && menu[currentPosition + currentSelect].substring(1,3) != "__" && currentPress == ""){

    currentPress = menu[currentPosition + currentSelect].substring(3);
    currentChange = menu[currentPosition + currentSelect].substring(1,3).toInt();

    Serial.println("Currentpress: " + currentPress); // send every constellation's assigned letter to the Arduino board


   if(currentPress == "Lynx")
   {
     Wire.beginTransmission(8); // transmit to device #8
  Wire.write("A");        // sends 1 byte
  Wire.endTransmission();
   }

   if(currentPress == "Leo Minor")
   {
     Wire.beginTransmission(8); // transmit to device #8
  Wire.write("B");        // sends 1 byte
  Wire.endTransmission();
   }

      if(currentPress == "Aries")
   {
     Wire.beginTransmission(8); // transmit to device #8
  Wire.write("C");        // sends 1 byte
  Wire.endTransmission();
   }

  if(currentPress == "Pisces")
   {
     Wire.beginTransmission(8); // transmit to device #8
  Wire.write("D");        // sends 1 byte
  Wire.endTransmission();
   }

   if(currentPress == "Pegasus")
   {
     Wire.beginTransmission(8); // transmit to device #8
  Wire.write("E");        // sends 1 byte
  Wire.endTransmission();
   }

    if(currentPress == "Lyra")
   {
     Wire.beginTransmission(8); // transmit to device #8
  Wire.write("F");        // sends 1 byte
  Wire.endTransmission();
   }
  if(currentPress == "Camelopardalis")
   {
     Wire.beginTransmission(8); // transmit to device #8
  Wire.write("G");        // sends 1 byte
  Wire.endTransmission();
   }

 if(currentPress == "Draco")
   {
     Wire.beginTransmission(8); // transmit to device #8
  Wire.write("H");        // sends 1 byte
  Wire.endTransmission();
   }

if(currentPress == "Cephus")
   {
     Wire.beginTransmission(8); // transmit to device #8
  Wire.write("I");        // sends 1 byte
  Wire.endTransmission();
   }

   if(currentPress == "Ursa Minor")
   {
     Wire.beginTransmission(8); // transmit to device #8
  Wire.write("J");        // sends 1 byte
  Wire.endTransmission();
   }

   if(currentPress == "Hercules")
   {
     Wire.beginTransmission(8); // transmit to device #8
  Wire.write("K");        // sends 1 byte
  Wire.endTransmission();
   }

   if(currentPress == "Ursa Major")
   {
     Wire.beginTransmission(8); // transmit to device #8
  Wire.write("L");        // sends 1 byte
  Wire.endTransmission();
   }

   if(currentPress == "CronaBorealis")
   {
     Wire.beginTransmission(8); // transmit to device #8
  Wire.write("M");        // sends 1 byte
  Wire.endTransmission();
   }

   if(currentPress == "Bootes")
   {
     Wire.beginTransmission(8); // transmit to device #8
  Wire.write("O");        // sends 1 byte
  Wire.endTransmission();
   }

   if(currentPress == "Cassiopeia")
   {
     Wire.beginTransmission(8); // transmit to device #8
  Wire.write("P");        // sends 1 byte
  Wire.endTransmission();
   }


    currentType = values[currentChange];
    value = values[currentChange + 1];

    // Type select change is numeric
    if(currentType == 1){
      Min = values[currentChange + 3];
      Max = values[currentChange + 4];
      numIncr = values[currentChange + 2];

      Serial.println("Currentvalue: " + String(value));
      Serial.println("Increments: " + String(numIncr));
      Serial.println("Min: " + String(Min));
      Serial.println("Max: " + String(Max));


      valueLength = String(value).length();

    // Type select change is character range
    } else if(currentType == 2){
      Min = values[currentChange + 2];
      Max = values[currentChange + 3];

      Serial.println("Currentvalue: " + options[value]);
      Serial.println("Options: ");

      Wire.beginTransmission(8); // transmit to device #8
  Wire.write(options[value].c_str());              // sends one byte
  Wire.endTransmission();


      for (int i=Min; i <= Max; i++){
        Serial.println(options[i]);
      }

      valueLength = options[value].length();

    }

    clearSelect();
    cursorPosition = 15 - valueLength;
    lcd.setCursor(cursorPosition,cursorLayer);
    writeCursor();

  // ELSE IF something is selected in the menu, and the button is pressed again. We deselect the item.
  } else if(currentPress != ""){

    currentValues();
    currentPress = "";
    currentChange = 0;

    clearChar(cursorPosition,cursorLayer);
    lcd.setCursor(0,cursorLayer);
    writeCursor();

  // IF nothing is selected and nothing will be deselected, move to the redirect layer listed in the first position of the array.
  } else {

    currentLayer = menu[currentPosition + currentSelect].substring(0,1).toInt();
    currentSelect = 1;
    currentlcdLayerFloat = 0;
    currentlcdLayer = 0;
    lastlcdLayer = 0;

    clearSelect();
    cursorLayer = 0;
    lcd.setCursor (0,cursorLayer);
    writeCursor();

  }

}


void rotary_check(){

  // Constantly read the position of the rotary encoder
  long newPosition = myEnc.read() / 4;

  // IF the new position of the encoder is different then the old position
  if (newPosition != oldPosition) {

    // IF nothing has been selected in the menu
    if(currentPress == ""){

      if(newPosition > oldPosition && currentSelect < currentLength){
        clearSelect();
        currentSelect++;
        currentlcdLayerFloat = currentlcdLayerFloat + 0.5;
        currentlcdLayer = currentlcdLayerFloat;

        cursorSelect();

        lcd.setCursor (0,cursorLayer);
        writeCursor();
        Serial.println("> " + menu[currentPosition + currentSelect].substring(3));

      } else if (newPosition < oldPosition && currentSelect != 1){
        clearSelect();
        currentSelect--;
        currentlcdLayerFloat = currentlcdLayerFloat - 0.5;
        currentlcdLayer = currentlcdLayerFloat;

        cursorSelect();

        lcd.setCursor (0,cursorLayer);
        writeCursor();
        Serial.println("> " + menu[currentPosition + currentSelect].substring(3));

      }

      if(lastlcdLayer != currentlcdLayer){
        lcdUpdated = 0;
      }

      lastlcdLayer = currentlcdLayer;
      oldPosition = newPosition;


    // IF something has been selected in the menu, we are going to change the value of a menu item.
    } else if(currentPress != ""){


      lcd.setCursor(cursorPosition + 1,cursorLayer);
      // IF the new position is HIGHER then the old position
      if(newPosition > oldPosition){
        clearChar(cursorPosition,cursorLayer);

        // IF the selected item has a change type that is NUMERIC.
        // AND the MAXIMUM of the selected item has not been reached.
        // We change the value UPWARDS with the icrements listed in the array.
        // SAME applies for next ELSE IF, just for the change type character. And the next ELSE IF we just go down.
        if(currentType == 1 	&& value < Max){
            value = value + numIncr;
            values[currentChange + 1] = value;
            Serial.println(value);

            clearValue();
            valueLength = String(value).length();
            cursorPosition = 15 - valueLength;
            lcd.setCursor(cursorPosition + 1,cursorLayer);
            lcd.print(value);
          }

        if(currentType == 2 	&& value < Max){
            value++;
            values[currentChange + 1] = value;
            Serial.println(options[value]);

            clearValue();
            valueLength = options[value].length();
            cursorPosition = 15 - valueLength;
            lcd.setCursor(cursorPosition + 1,cursorLayer);
            lcd.print(options[value]);
          }
          lcd.setCursor(cursorPosition,cursorLayer);
          writeCursor();

      } else {
        clearChar(cursorPosition,cursorLayer);

        if(currentType == 1 	&& value > Min){
          value = value - numIncr;
          values[currentChange + 1] = value;
          Serial.println(value);

          clearValue();
          valueLength = String(value).length();
          cursorPosition = 15 - valueLength;
          lcd.setCursor(cursorPosition + 1,cursorLayer);
          lcd.print(value);
        }

        if(currentType == 2 && value > Min){
            value--;
            values[currentChange + 1] = value;
            Serial.println(options[value]);

            clearValue();
            valueLength = options[value].length();
            cursorPosition = 15 - valueLength;
            lcd.setCursor(cursorPosition + 1,cursorLayer);
            lcd.print(options[value]);
          }
          lcd.setCursor(cursorPosition,cursorLayer);
          writeCursor();

      }


      oldPosition = newPosition;
    } else {
      oldPosition = newPosition;
    }


  }
}

void lcdMenu(){
  if (lastLayer != currentLayer || lcdUpdated == 0){

    currentLength = menu[0].toInt();
    currentPosition = 0;

    for (int i=0; i < currentLayer; i++){
      currentPosition = (menu[currentPosition].toInt() + 1) + currentPosition;
      currentLength = menu[currentPosition].toInt();
    }

    clearMenu();
    int tempPosition = currentPosition;

    if(currentlcdLayer != 0){

      currentPosition = currentPosition + (currentlcdLayer * 2);
    }

    Serial.println("LCD-------------");

    for (int i=1; i <	= 2; i++){
      lcd.setCursor (1,i - 1);
      lcd.print(menu[currentPosition + i].substring(3));

      currentType = 0;
      value = values[menu[currentPosition + i].substring(1,3).toInt() + 1];
      String tempvalue = "";

      if(menu[currentPosition + i].substring(1,3) != "__" && menu[currentPosition + i].substring(1,3) != ""){
        currentType = values[menu[currentPosition + i].substring(1,3).toInt()];
        if(currentType == 1){
          lcd.setCursor (16 - String(value).length(),i - 1);
          lcd.print(value);
          tempvalue = " "+ String(value);
        }else if(currentType == 2){
          lcd.setCursor (16 - options[value].length(),i - 1);
          lcd.print(options[value]);
          tempvalue = " "+ options[value];
        }

      }

      Serial.println(menu[currentPosition + i].substring(3) + tempvalue);
    }
    Serial.println("----------------");

    currentPosition = tempPosition;
    lastLayer = currentLayer;
    lcdUpdated = 1;

    /**
    Serial.println("Layer " + String(currentLayer + 1));
    Serial.println("Layer length " + String(currentLength));
    Serial.println("Layer position " + String(currentPosition));
    **/

  }
}


void currentValues(){

  Serial.println("Currentpress: " + currentPress);

  if(currentType == 1){
      Serial.println("Currentvalue: " + String(value));
      Serial.println("Increments: " + String(numIncr));
      Serial.println("Min: " + String(Min));
      Serial.println("Max: " + String(Max));

    } else if(currentType == 2){
      Serial.println("Currentvalue: " + options[value]);
      Serial.println("Options: ");

      for (int i=Min; i <= Max; i++){
        Serial.println(options[i]);
      }
    }
}

void clearChar(int charPosition, int line){
  lcd.setCursor (charPosition,line);
  lcd.print(" ");
}

void clearLine(int line){
  lcd.setCursor (0,line);
  lcd.print("                ");
}

void clearMenu(){
  lcd.setCursor (1,0);
  lcd.print("               ");
  lcd.setCursor (1,1);
  lcd.print("               ");
}

void clearSelect(){
  lcd.setCursor (0,0);
  lcd.print(" ");
  lcd.setCursor (0,1);
  lcd.print(" ");
}

void cursorSelect(){
  switch (currentSelect){  // here You choose how you want the cruiser to move in each page, as in to move to each choice
          case 1:
            cursorLayer = 0;
            break;
          case 2:
            cursorLayer = 1;
            break;
          case 3:
            cursorLayer = 0;
            break;
          case 4:
            cursorLayer = 1;
            break;
          case 5:
            cursorLayer = 0;
            break;
          case 6:
            cursorLayer = 1;
            break;
          case 7:
            cursorLayer = 0;
            break;
          case 8:
            cursorLayer = 1;
            break;
          case 9:
            cursorLayer = 0;
            break;
          case 10:
            cursorLayer = 1;
            break;
          case 11:
            cursorLayer = 0;
            break;
          case 12:
            cursorLayer = 1;
            break;
          case 13:
            cursorLayer = 0;
            break;
          case 14:
            cursorLayer = 1;
            break;
          case 15:
            cursorLayer = 0;
            break;
        }
}

void writeCursor(){
  lcd.write(byte(0));
}

void clearValue(){
  for (int i = 16 - valueLength; i <= 16; i++){
        lcd.setCursor (i,cursorLayer);
        lcd.print(" ");
      }


}
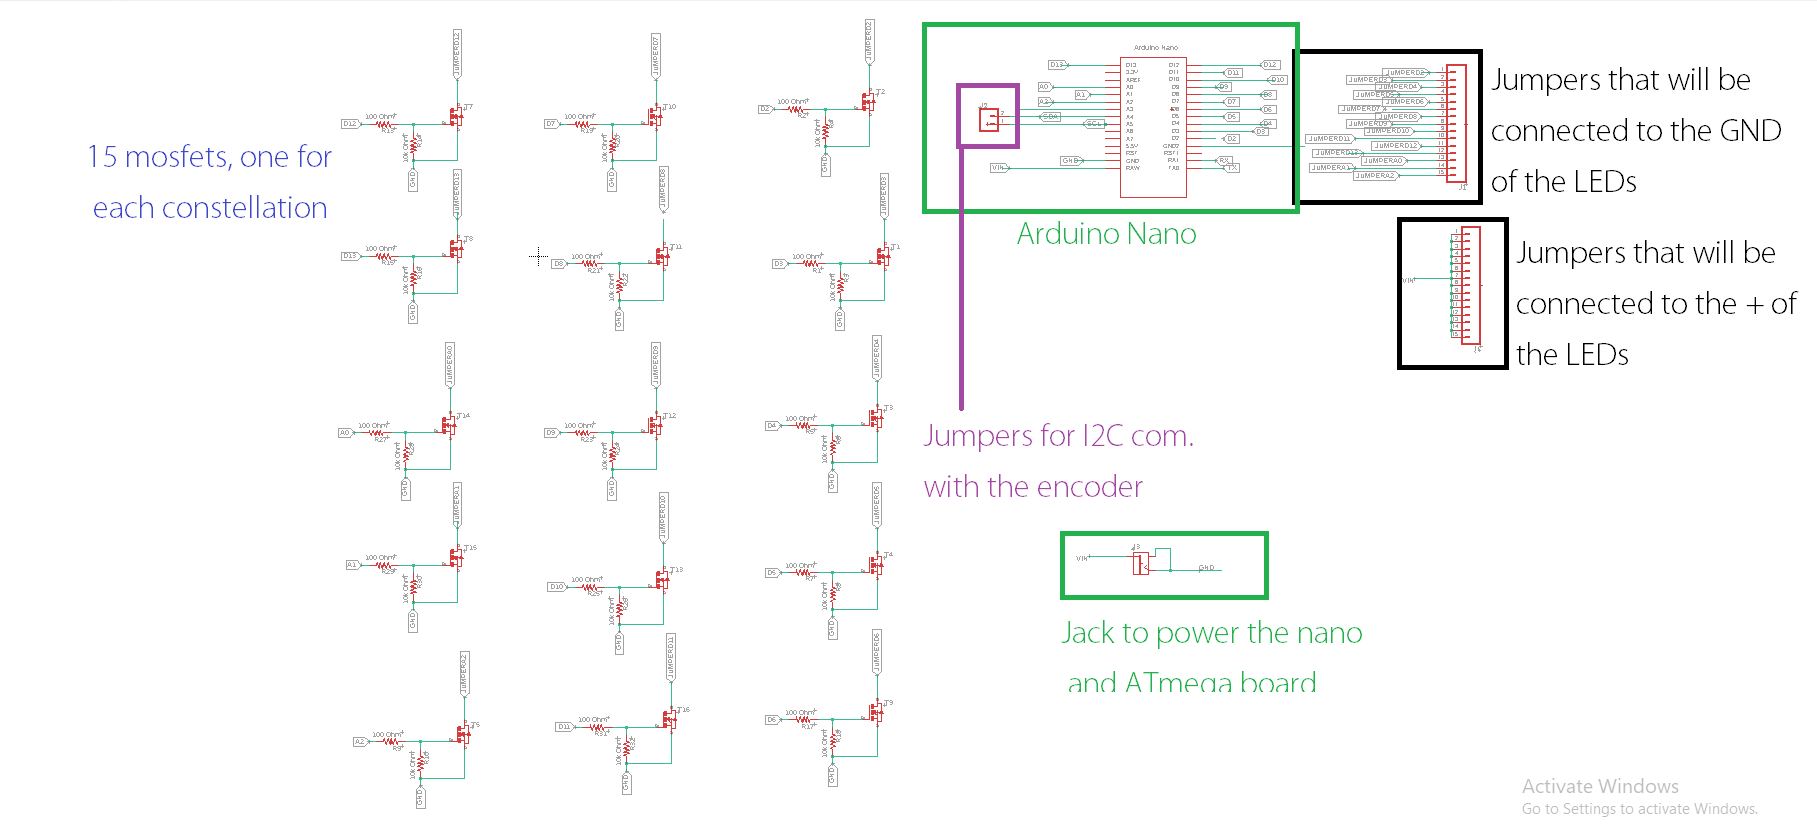
and this one is the code I uploaded on the Arduino nano. I found a code online that shows how to use I2C communication, and I edited it according to my needs, going back to the previous table, I aasigned the numbers of each group to a certain pin, and added the Y and N (yes and no) as on and off, and they Had the numbers 89 and 78 respectively. I also defined the pins from 2 to 16 as outputs, with each one connected to a certain constellation. This board Is called a slave reciever because it gets the signals from the master, which is the ATmega board with the encoder.
    // Wire Slave Receiver
// by Nicholas Zambetti <http://www.zambetti.com>

// Demonstrates use of the Wire library
// Receives data as an I2C/TWI slave device
// Refer to the "Wire Master Writer" ekample for use with this

// Created 29 March 2006

// This ekample code is in the public domain.


#include <Wire.h>
int k;
  int con;
int onoff;

void setup() {
  Wire.begin(8);                // join i2c bus with address #8
  Wire.onReceive(receiveEvent); // register event
  Serial.begin(9600);           // start serial for output
 pinMode(2, OUTPUT);
 pinMode(3, OUTPUT);
 pinMode(4, OUTPUT);
 pinMode(5, OUTPUT);
 pinMode(6, OUTPUT);
 pinMode(7, OUTPUT);
 pinMode(8, OUTPUT);
 pinMode(9, OUTPUT);
 pinMode(10, OUTPUT);
 pinMode(11, OUTPUT);
 pinMode(12, OUTPUT);
 pinMode(13, OUTPUT);
 pinMode(14, OUTPUT);
 pinMode(15, OUTPUT);
 pinMode(16, OUTPUT);

}

void loop() {
  delay(100);


}

// function that ekecutes whenever data is received from master
// this function is registered as an event, see setup()
void receiveEvent(int howMany) {
  while (1 < Wire.available()) { // loop through all but the last
  char c = Wire.read(); // receive byte as a character
 // Serial.print(c);         // print the character
}
 int x  = Wire.read();    // receive byte as an integer
//Serial.println(k);         // print the integer

k=x;
test1();
}


void test1()
{

if ((k >=65 && k<=77 )|| k==79 || k == 80)
{  con = k;
}
else if (k ==89 || k == 78)
{  onoff = k;
}
else
{

}


if (con == 65 && onoff == 89)
{ digitalWrite(16, HIGH);
}

if (con == 65 && onoff == 78)
{ digitalWrite(16, LOW);
}


if (con == 66 && onoff == 89)
{ digitalWrite(15, HIGH);
}

if (con == 66 && onoff == 78)
{ digitalWrite(15, LOW);
}


if (con == 67 && onoff == 89)
{ digitalWrite(14, HIGH);
}

if (con == 67 && onoff == 78)
{ digitalWrite(14, LOW);
}


if (con == 68 && onoff == 89)
{ digitalWrite(13, HIGH);
}

if (con == 68 && onoff == 78)
{ digitalWrite(13, LOW);
}


if (con == 69 && onoff == 89)
{ digitalWrite(12, HIGH);
}

if (con == 69 && onoff == 78)
{ digitalWrite(12, LOW);
}


if (con == 70 && onoff == 89)
{ digitalWrite(11, HIGH);
}

if (con == 70 && onoff == 78)
{ digitalWrite(11, LOW);
}


if (con == 71 && onoff == 89)
{ digitalWrite(10, HIGH);
}

if (con == 71 && onoff == 78)
{ digitalWrite(10, LOW);
}


if (con == 72 && onoff == 89)
{ digitalWrite(9, HIGH);
}

if (con == 72 && onoff == 78)
{ digitalWrite(9, LOW);
}


if (con == 73 && onoff == 89)
{ digitalWrite(8, HIGH);
}

if (con == 73 && onoff == 78)
{ digitalWrite(8, LOW);
}


if (con == 74 && onoff == 89)
{ digitalWrite(7, HIGH);
}

if (con == 74 && onoff == 78)
{ digitalWrite(7, LOW);
}


if (con == 75 && onoff == 89)
{ digitalWrite(6, HIGH);
}

if (con == 75 && onoff == 78)
{ digitalWrite(6, LOW);
}


if (con == 76 && onoff == 89)
{ digitalWrite(5, HIGH);
}

if (con == 76 && onoff == 78)
{ digitalWrite(5, LOW);
}


if (con == 77 && onoff == 89)
{ digitalWrite(4, HIGH);
}

if (con == 77 && onoff == 78)
{ digitalWrite(4, LOW);
}


if (con == 79 && onoff == 89)
{ digitalWrite(3, HIGH);
}

if (con == 79 && onoff == 78)
{ digitalWrite(3, LOW);
}


if (con == 80 && onoff == 89)
{ digitalWrite(2, HIGH);
}

if (con == 80 && onoff == 78)
{ digitalWrite(2, LOW);
}

Serial.print(con);
Serial.print("                  ");
Serial.println(onoff);
  int con=0;
int onoff=0;
k=0;
}