
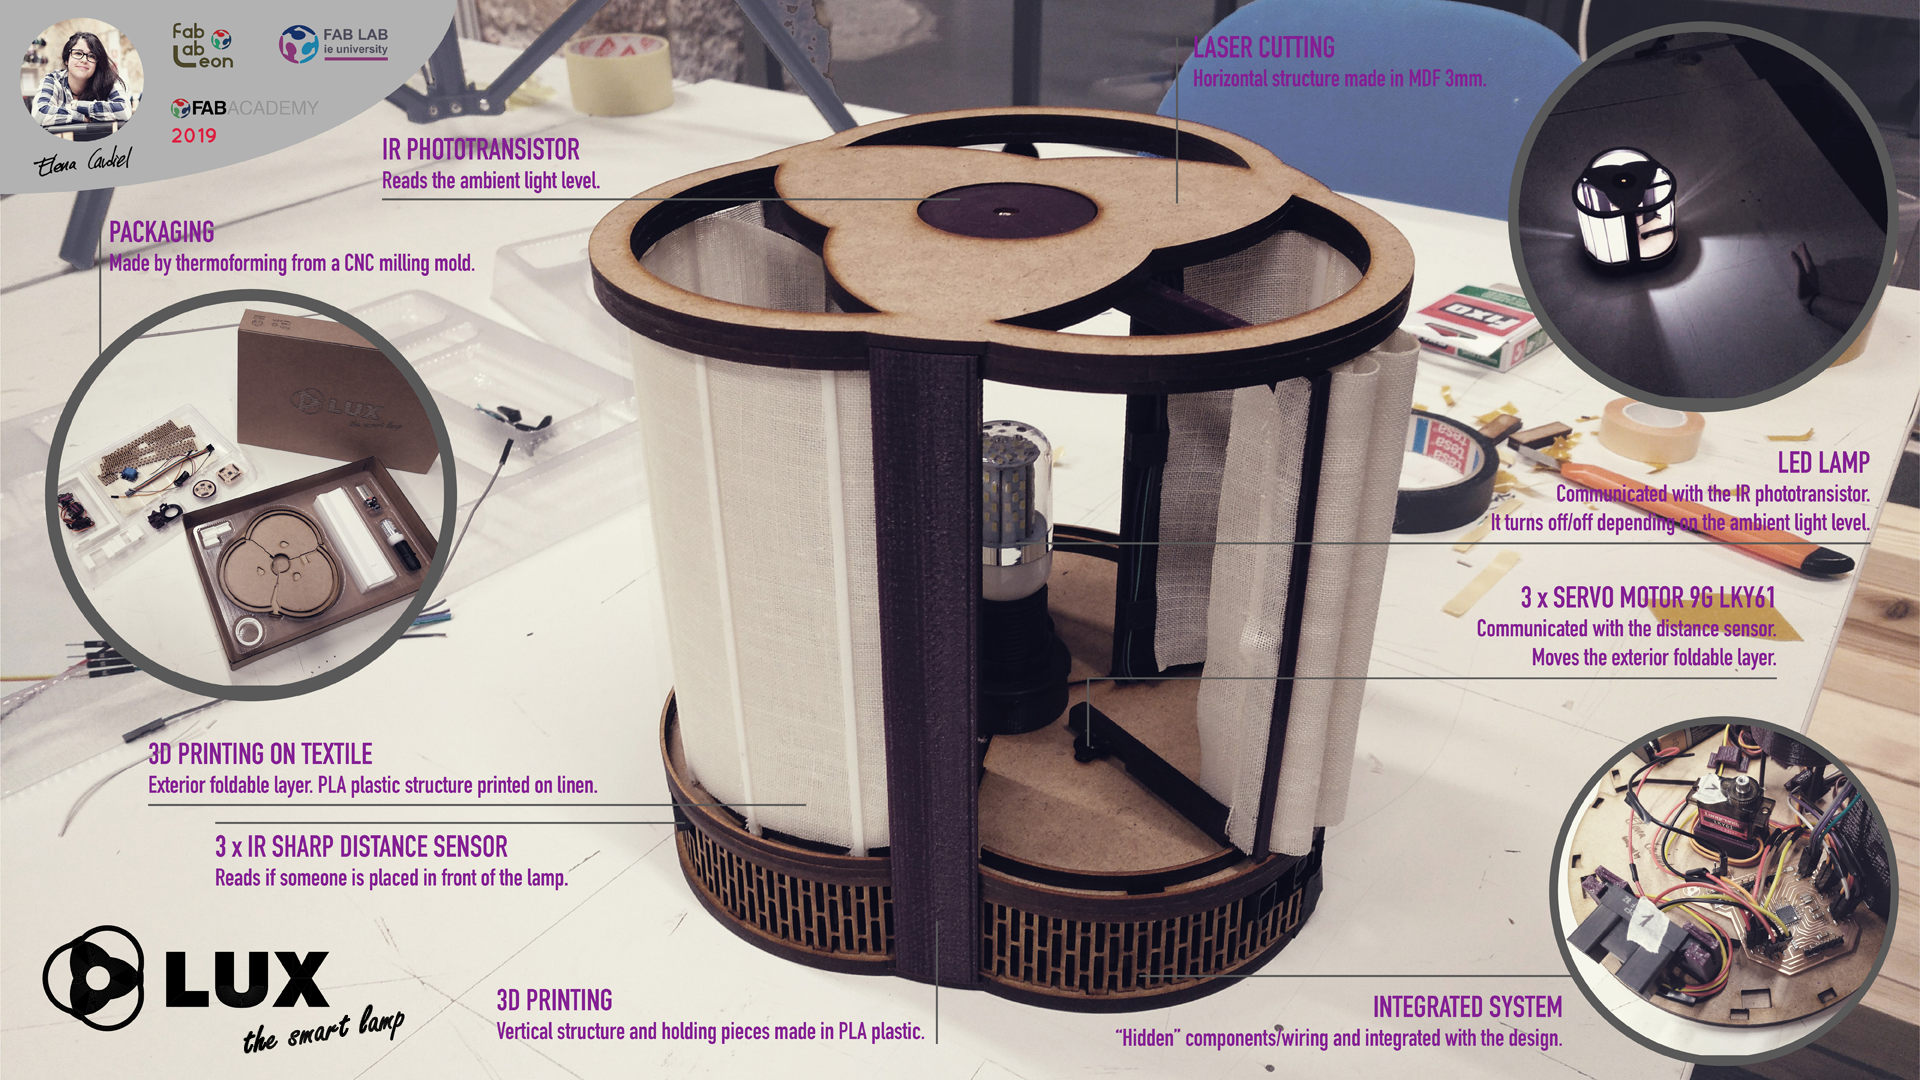
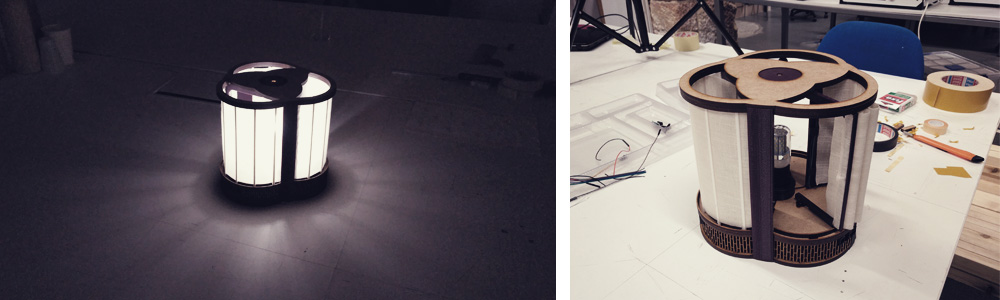
Lux is an interactive piece of furniture which is able to recognize the ambient light level and the presence of the user. It can be used to personalize the light of small-medium spaces, illuminating just the part of the room/table that is being used without disturbing the rest of the people in that same room/table, improving the quality of the ambient and saving energy. It has been designed as a kit of components and pieces that you can assemble, so the packaging is fundamental in this project. The idea is to distribute it in order to learn and teach about design, digital fabrication, and electronics.
During the development, I used cutting, additive, and subtractive processes as well as electronic design and production. One of the main goals was to have a design as integrated as possible so most of the electronics, devices, and wiring are "hidden" in the base of the lamp. For this prototype, the lamp is divided into three different sections which work in the same way but independently.
If you want to watch the full session please go to: Fab-20190612B_Final01 from Academany on Vimeo.
This page is just the result of a lot of work done for several months. Please visit Project development to know all the steps that I have followed while developing this project.
Fabrication processes
The design of the lamp has been developed in Rhinoceros 3D. The final prototype of the lamp has a size of Ø225x204(h) mm.
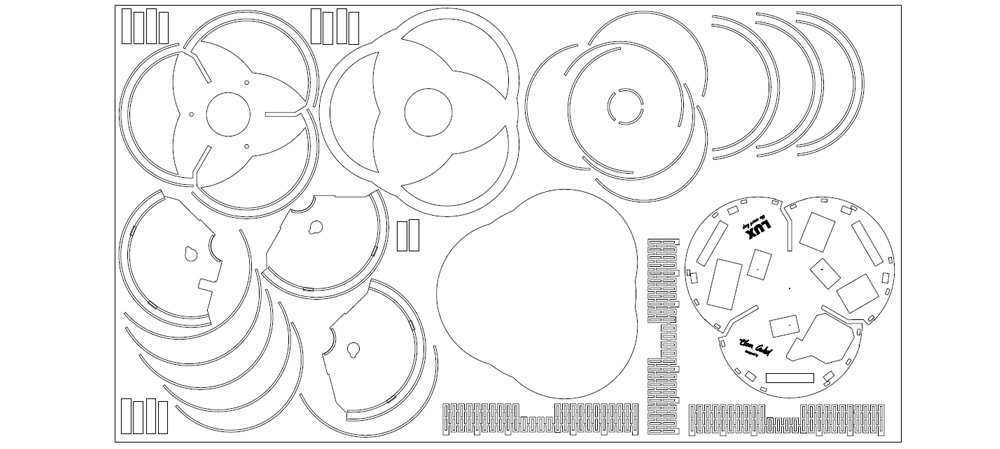
Laser cutting - Horizontal structure
The horizontal structure is made by laser cutting in MDF of 3mm. I decided to use this material because is strong and easy to cut and glue.
The bottom of the base is made up of two layers, the first one is just the bottom and in the second one I included and cut the footprint of the vertical structure, the main PCB and the supports that I have created to hold the different devices (sensors, motors, relay, batteries...) so everything is organized and in place.
Moving up, we have the vertical covers of the base of the lamp. This "walls" are designed applying the living hinges technique, that allows you to bend the wood and created curved walls using the laser cutter. They are attached to the base through four points and they have a cut for the "eyes" of the distance sensor. These last pieces don't need to be glued to the base, they work by press-fit.
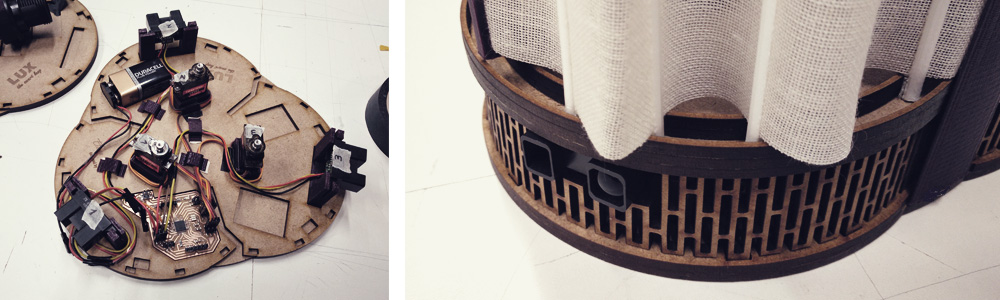
Then we have the horizontal covers of the base. These pieces are made up of three layers of MDF, one for the cover and two more for the lower rail (where the exterior foldable layer goes). It also has a hole that fits on the head of the servo. That makes possible to have access to the servo from outside of the base.
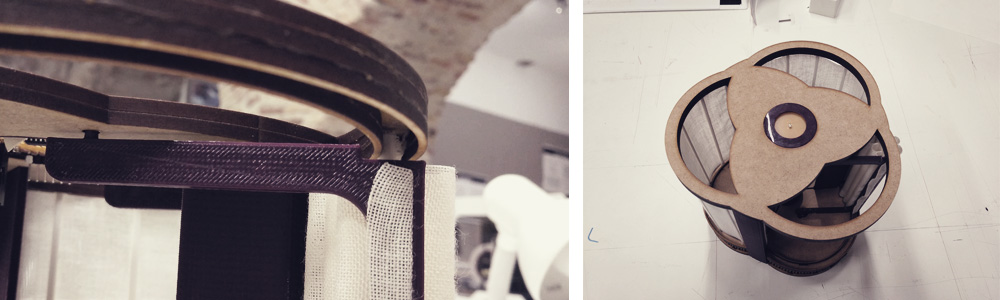
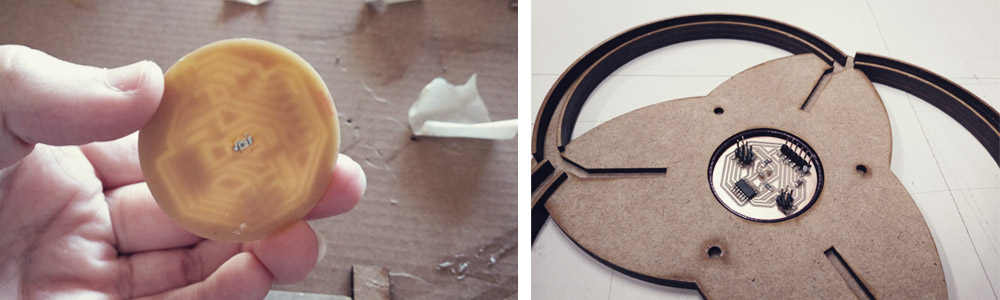
And finally we have the top part of the lamp, that is made up of three layers of MDF. In this case, we have one layer for the top which has a central circular hole to place the phototransistor so it can read the ambient light level; the second layer adds one layer for the top rail and has another central hole for housing the phototransistor PCB, and then the third layer is only for adding more hight to the rail.
All outlines, all pieces that need to be laser cut, fit in a board of 810x450mm. (the maximum of a Universal Laser System machine, model VLS6.60). It takes 40 minutes with the following settings: cutting > 100% power / 11% speed / 500 ppi ; engraving > 60% power / 100% speed / 1000 ppi.
3D Printing - Vertical structure + support pieces + exterior foldable layer
The vertical structure and the support pieces are made by 3D Printing in PLA 1,75mm. I decided to use this technique due to the irregular shapes that I needed for the different pieces.
The height of the vertical structure (and the height of the lamp) was limited by the maximum zeta that the 3D Printer that I used, a BQ Witbox 2, can support: 198mm. In the bottom part, I made a hole to have the possibility to cross wires from one side to another if it was needed and I added a tab to support the horizontal cover of the base. In one of the vertical elements, I added a "pipe" to hide the wires for the serial bus networking which go from the main PCB in the base of the lamp to the phototransistor PCB in the top. For the rest of the pieces, I designed them according to the size and shape of each device. I also made a linear hole in the vertical pieces and the crosses (the ones which go attached to the servo and moves the exterior foldable layer) to fit the linen. The exterior foldable layer was also made by 3D Printing on textiles. This part was developed during the wildcard week.
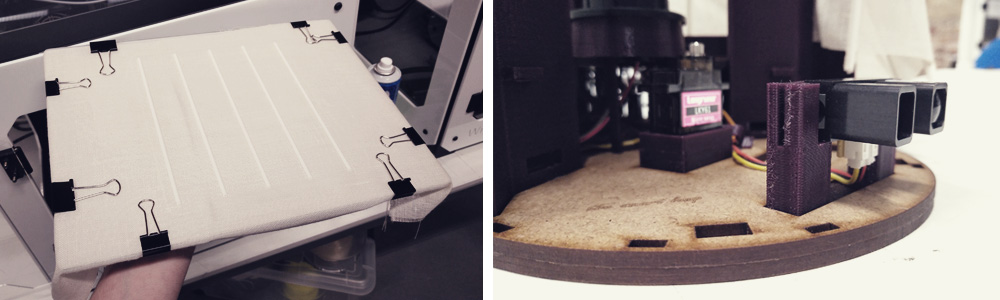
In total it took around 9 hours to print everything, with the following main settings: layer height: 0,3 mm. / wall thickness: 1,2 mm. / top&bottom thickness: 0,9mm. / infill density: 12% / speed: 60mm/s..
Electronics design and production
I designed, milled and soldered my own PCBs for this project, two in total. The main PCB is placed in the base of the lamp. It controls with an Atmega328 the 3 servo motors and 3 distance sensors (one couple for each section of the lamp), the relay, and the networking to receive the data from the phototransistor's PCB. The system is powered up with a 9V battery.
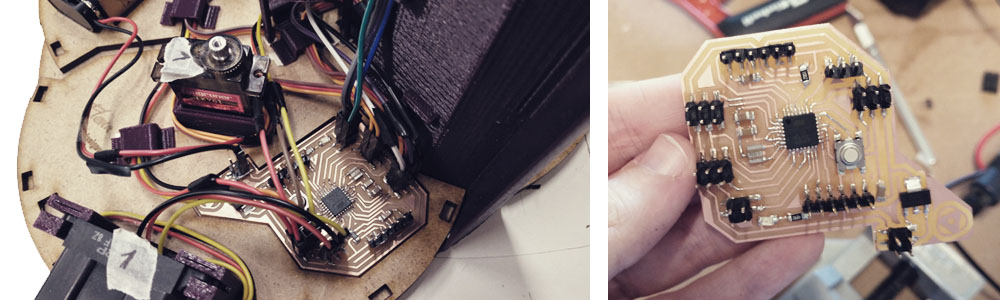
The phototransistor's PCB is placed in the top of the lamp. It is controlled through an Attiny44. On the face of the plate that goes inwards, we have all the components and connections, while on the outside face we have the phototransistor. This is the only visible electronic component of the whole lamp since the rest is hidden and integrated with the design.
Please find below the completed BOM for these two PCBs:
Main PCB |
Where to buy? | Amount | Price | Total price |
| Proto Board FR1 | Digikey | 1/4 board | 1,24 €/unit | 0,31 € |
| Atmega328P | Digikey | 1 | 1,85 €/unit | 1,05 € |
| 10kΩ resistor | Digikey | 1 | 0,09 €/unit | 0,09 € |
| 499Ω resistor | Digikey | 1 | 0,09 €/unit | 0,09 € |
| 0,1uF capacitor 250V | Digikey | 2 | 0,39 €/unit | 0,78 € |
| 10uF capacitor 35V | Digikey | 1 | 0,75 €/unit | 0,75 € |
| 1uF capacitor 50V | Digikey | 1 | 0,18 €/unit | 0,18 € |
| Switch | Digikey | 1 | 0,95 €/unit | 0,95 € |
| Xtal 8MHz | Digikey | 1 | 0,35 €/unit | 0,35 € |
| LED | Digikey | 1 | 0,35 €/unit | 0,35 € |
| Regulator 5V 1A ZLDO1117 | Digikey | 1 | 0,45 €/unit | 0,45 € |
| Pin header | Amazon | 41 | 0,01 €/unit | 0,41 € |
| Total cost Main PCB | 6,59 € |
Photransistor PCB |
Where to buy? | Amount | Price | Total price |
| Proto Board FR1 | Digikey | 1/4 board | 1,24 €/unit | 0,31 € |
| ATtiny44 | Digikey | 1 | 0,71 €/unit | 0,71 € |
| 10kΩ resistor | Digikey | 2 | 0,09 €/unit | 0,18 € |
| 1uF capacitor 50V | Digikey | 1 | 0,18 €/unit | 0,18 € |
| IR phototransistor | Digikey | 1 | 0,37 €/unit | 0,37 € |
| Pin header | Amazon | 16 | 0,01 €/unit | 0,17 € |
| Total cost Phototransistor PCB | 1,92 € |
Embedded microcontroller interfacing and programming
I programmed both PCBs through the Arduino IDE. The lamp works with two integrated systems: first of all, we have the lines of code that let us know the ambient light level, using a phototransistor, and send that information to the main PCB that turns on/off the relay, and this one the LED bulb, according to that information. Secondly, we have the code that controls the distance sensor, which will read if someone is in front of the lamp, and the servo motor, that will open or close the exterior foldable layer according to the sensor distance data.
In the code for the phototransistor, I filter the data of the ambient light level so networking communication is more stable. In the part of the code that controls the motors and sensors, I used a couple of libraries which makes the code much easier to edit and understand: VarSpeedServo.h and SharpIR.h
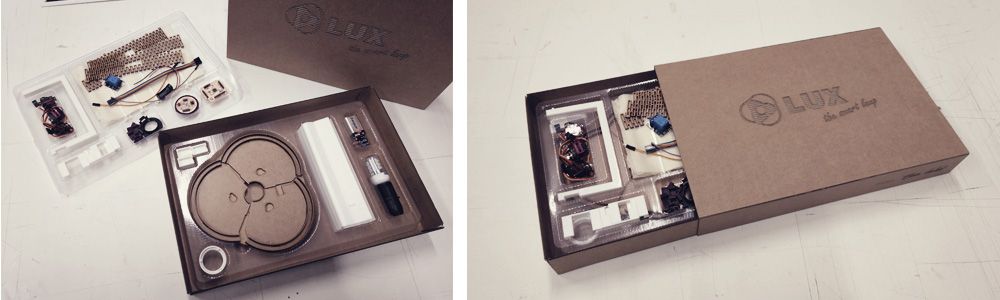
System integration and packaging
As I already have said, one of the main goals was to have a design as integrated as possible. In order to do that, most of the devices and wiring are placed in the base of the lamp and the rest of then are hidden or integrated with the design.
Apart from that, Lux is more than just a smart piece of furniture, Lux is a kit of components and pieces that can be developed, modified and assembled in order to learn and teach about design, digital fabrication and electronic. Due to that, I also created a cardboard box, with two plastic trays inside, to save everything and distribute it in those places where, for some reason, people don't have access to the necessary resources to fabricate it.
The packaging was developed during the wildcard week.
BOM
Please find below the completed list of devices and materials that I used to make Lux. For those components that I bought online, you will find the link clicking on the resource's name.
Lamp |
Where to buy? | Amount | Price | Total price |
| MDF 3mm. (laser cutting) | Locally | 1 (810x450mm.) | 2,45 €/unit | 2,45 € |
| PLA 1,75mm. filament (3D Printing) | Amazon | 215 gr. | 14,45 €/kg. | 3,11 € |
| LED bulb | Amazon | 1 | 6,05 €/unit | 6,05 € |
| Battery 12V x2 | Amazon | 1 | 2,14 €/pair | 2,14 € |
| Battery 9V | Amazon | 1 | 2,90 €/unit | 2,90 € |
| Battery clip | Amazon | 1 | 1,50 €/unit | 1,50 € |
| Sharp GP2Y0A02YK0F ID distance sensor | Amazon | 3 | 14,97 €/unit | 44,91 € |
| Servo motor MG996R | Amazon | 3 | 3,98 €/unit | 11,94 € |
| Relay module 5V | Amazon | 1 | 1,80 €/unit | 1,80 € |
| Linen | Locally | 0,18 m2 | 3,95 €/m2 | 0,71 € |
| Bulb cap | Locally | 1 | 0,75 €/unit | 0,75 € |
| Main PCB | Digikey | 1 | 6,59 €/unit | 6,59 € |
| Phototransistor PCB | Digikey | 1 | 1,92 €/unit | 1,92 € |
| Others (wood glue, tape, soldering tin, DuPont cables…) | - | - | - | 1,50 € |
| Total cost/lamp | 89,77 € |
Packaging |
Where to buy? | Amount | Price | Total price |
| Fir planked wood board 30mm. (CNC milling mold) | Locally | 0,25 m2 | 29,73 €/m2 | 7,43 € |
| PVC sheet 0,5mm. (Vacuum thermoforming) | Locally | 1 | 3,50 €/unit | 3,50 € |
| Corrugated cardwoard 3mm. | Locally | 1 (1000x700mm.) | 3,60 €/unit | 3,60 € |
| Total cost/packaging (first time) | 14,53 € |
Please note that for the packaging you only need to fabricate the mold once. After that, you can make as many copies as you want.
Files
Please feel free to download the files and make your own LUX. Remember to share your prototype with the rest of the community!!
LUX_TheSmartLamp_ElenaCardiel

This work is licensed under a Creative Commons Attribution-NonCommercial-ShareAlike 4.0 International License
