Group Assignment:
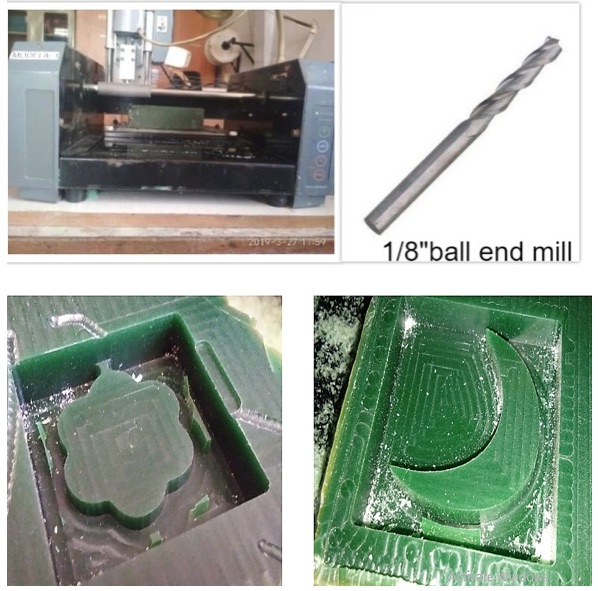
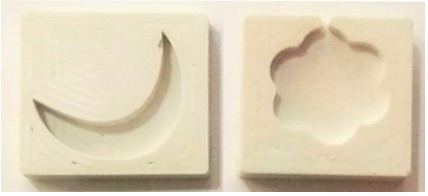
Review the safety data sheets for each of your molding and casting materials, and then make and compare test casts with each of them. I have teamed up with Pooja for this assignment. In the molding process, we have designed this flower in AutoDesk Fusion 360. After the rough cut milling, we did a finish cut for proper borders of the mold in Modella MDX 20 Milling Machine. Later we saved an .rml file using the offline Fab Module.
In the second step, we reviewed the material available in our lab for casting.
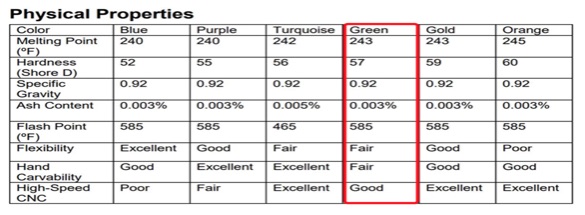
We have checked the physical properties of the raw material Flex Wax to be used from this table.
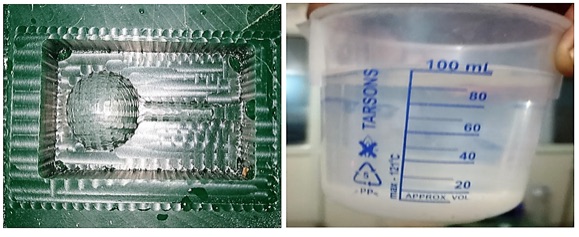
You can see the finished cut mold made in Flex wax.
Molding or Mold making is the act of creating the cavity / form that carries a negative or reverse impression of an original model. Casting is a manufacturing process in which a liquid material is usually poured into a mold, which contains a hollow cavity of the desired shape, and then allowed to solidify. The solidified part is also known as a casting, which is ejected or broken out of the mold to complete the process.
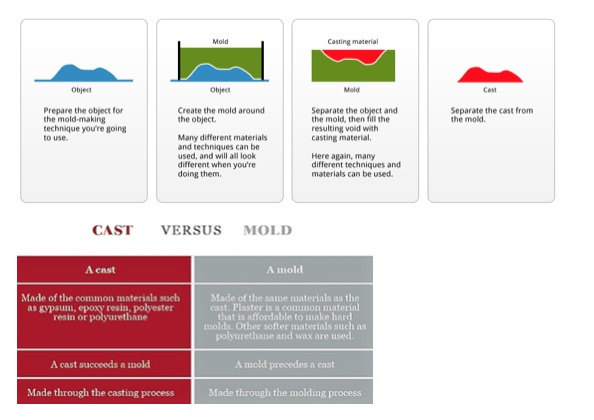
Now I got the clarity that Mold making is the process of creating a hollow, usually rigid vessel around an object. Once a mold is made around an object and when the object is removed, it leaves a hollow void in the mold, which is exactly similar to the size and shape of the said object. Casting is the process of filling this resulting hollow space in the mold with any preferred liquid or molten material to secure the desired object.
Mold making techniques -
Open face (1-part)
Two part mold
Multi-part mold
Vacuum forming
Direct 3D-printed ABS / PLA
CNC Milling
Slump / hump / drape molds
Note - I have used a two-part mold technique for my individual assignment.
Casting techniques -
Lost wax
Direct pour
Investment casting
Sand casting
Compression / press-molding
Injection molding
Blow molding
Transfer molding
Life casting
Slip casting
After the Positive Mold making in Flex Wax, we have followed the process as shown below in the Negative Mold using silicon rubber with hardener.
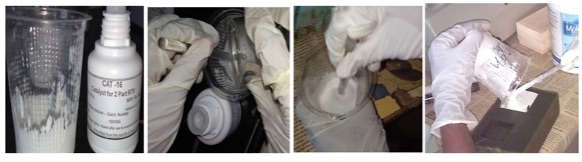
Initially we have poured water in the mold to measure the quantity and took the same quantity of silicon rubber by trying ratios of 1:10 and 1: 20 to start with. Just ensure that there are no air bubbles by stirring the mixture continuously.
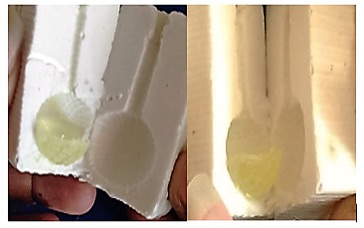
As you can see the Negative mold ready with a slight cut in the flower design,so we went ahead for casting the same.

The hardener we used was less in the ratio. Hence it was not set properly even though we let it dry for 48 hours.
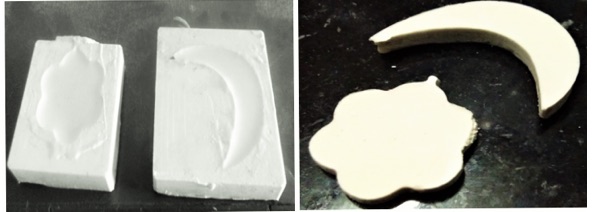
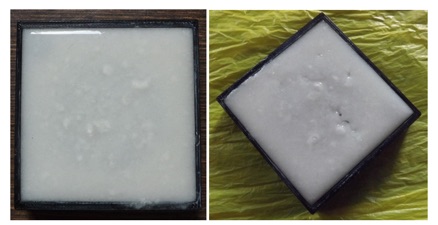
Now this is how it looks in a Hydro stone material casting.
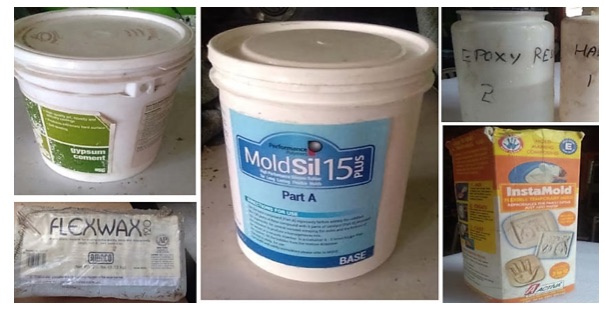
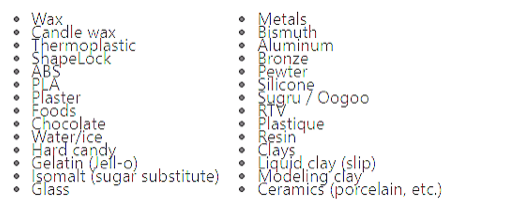
The Different Materials used in Mold making and Casting can be seen as under -
There is an exhaustive list of materials which can be used with various mold-making and casting techniques. But I am sharing a few of them here.
Note – For casting my mold, I have poured the silicon rubber mixed with the curing agent directly, into my mold.
The Different Materials used in Mold making and Casting can be seen as under -
There is an exhaustive list of materials which can be used with various mold-making and casting techniques. But I am sharing a few of them here.
In industrial mold making, thermoplastics like ABS and HDPE are very popular, but require special machinery. In professions like special effects, silicone RTV, fiberglass and resins are very popular. In the fine arts world, materials like bronze, plaster, wax and silicone are favorites. Each of these materials have their pros and cons and work best with certain types of objects and application techniques.
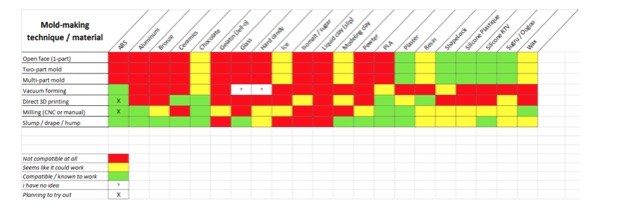
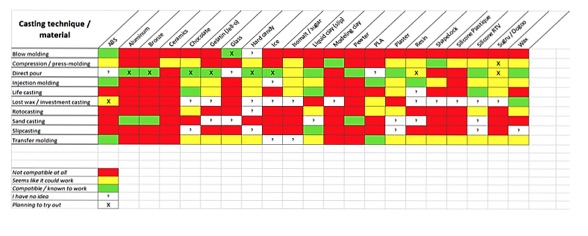
The Techniques and Materials Compatibility Table -
The Casting Techniques and Materials Compatibility Table –
After researching, I got started with designing a 3D mold to get casted in silicon.
Silicon Rubber Datasheet - https://www.momentive.com/es-mx/products/tds/siltrust-tse3660-potting?productid=eb6c4468-ef99-4d04-965a-5e3fef6f9577
Curing Agent Data Sheet -
http://www.plasticareinc.com/Merchant2/MSDS_POLYESTER%20RESINS/EasyCast_Resin_MSDS.pdf
Silicon rubber features -
Low Viscosity
Transparent
No grinding or sanding after casting
Can cure in 30 minutes if heated at 65 degree centigrade and poured
Part A 100 parts: Part B 50 parts mixing ratio
Non-Yellowing
Technical Properties -
Viscosity - .10000 Pi
Curing Agent / Hardener Ratio 4 %
Curing Time - 6 Hours
Color – Milky
Individual Assignment - Design a mould around the stock and tooling that you'll be using, mill it (rough cut + (at least) three-axis finish cut) and use it to cast.
3D Design of my Mold –
 Design file -
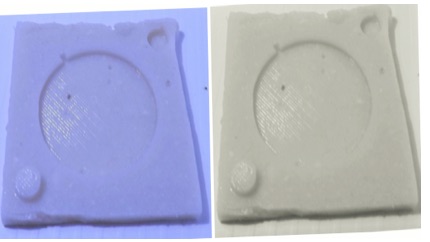
I have 3D printed the mold to cast in silicon as seen below.
This is how the 3D printed 2 parts of the mold look like.

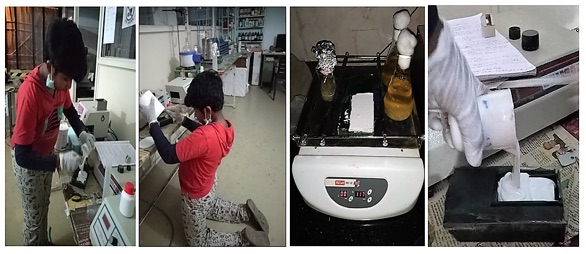
I have used the available material in the fab lab as shown below for casting my mold.
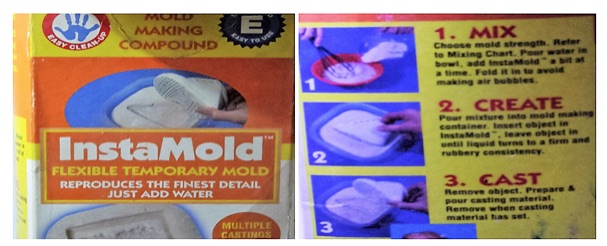
And followed the directions as mentioned on the cartoon. Tried out with one part first.
Initially, when I poured the mixture into the mold, it was perfect, but when I let it dry, I saw the cracks. Then I understood that there were air bubbles, which caused this mess.
This assignment left me completely exhausted. I kept trying on different molds with different designs as my instructor was busy.
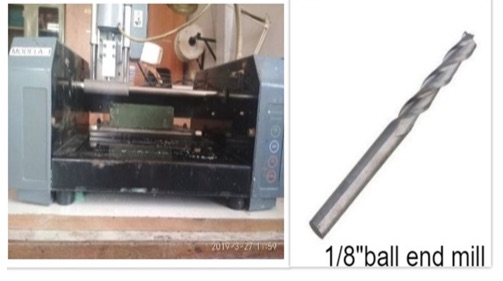
I tried with the wax and wooden molds. I have used a 1/8”ball end mill on Modella.
The Designing Steps for my mold in AutoDesk Fusion 360 -
First, Import the Image in Fusion360.
Go to Insert –>Attach Canvas.
Then calibrate the size of the canvas by right clicking on the canvas in the browser and select Calibrate.
I selected 30mm length for the mold.
Then designed a 2D sketch using spline, line, arc and circle tools.
And extruded the sketch to 9mm.
Go to Create –> Pattern –>
Here, Split the body into two halves as I wanted to make 2 piece mold.
Go to Modify –> split body, then selected the body and plane along which I wanted to split.
Created a box around the model.
Added one circle at each corner and extrude them to 3 mm to make registration marks.
Used fillet tool to smoothen the edges.
Repeated the last two steps for the other half of the body to extrude the model in reverse direction.
My first design was a Chess King pawn.
Design File -
Done but not done, as it failed because the hardener was less.I couldn’t click the image, as my mobile was knocked off.
Then, I realized that I should use a camera instead and bought a Fuji good resolution one to click good pictures.
So I thought for a second and I wanted to do another cast, so I did.
Later, I made this design of a Key chain with My Fab Academy Number.
Design File - final assignments\Assignment 10 Moulding and Casting _files\hemang.stl
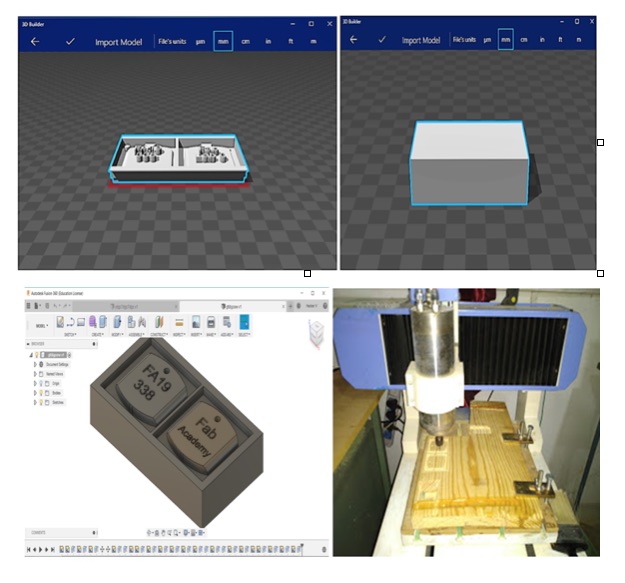
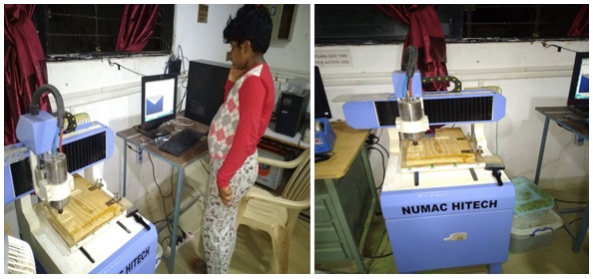
I thought that wooden mould would work. Hence I have tried with Numac Hitech machine in the lab.
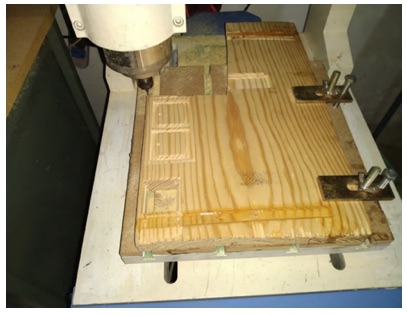
But it had a problem as the mould was not deep enough to hold the cast. So it failed. But I didn’t give up and loose hope.
My first TEDx Talk was ‘Aspiring Mindfully – Never Give Up’. BTW I’m 3 TEDx Talks down.
Design File - Assignment 10 Moulding and Casting _files\moulding and casting.stl
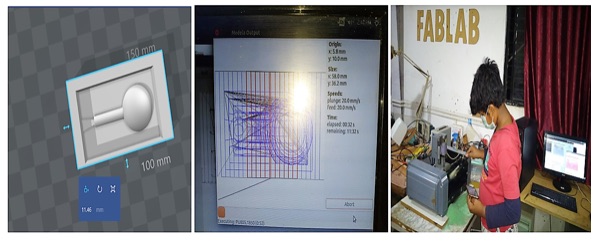
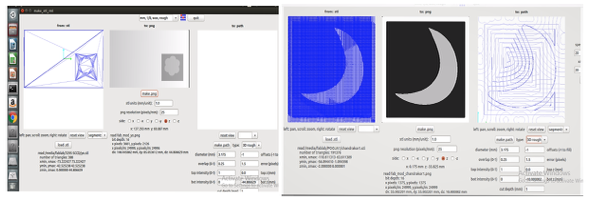
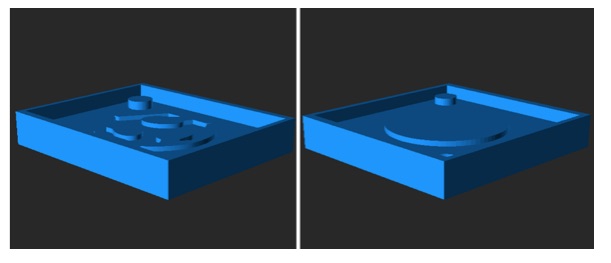
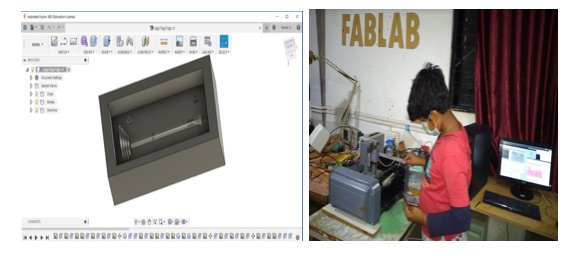
This is how it looks after creating the toolpath for milling. Now it’s time for Molding.
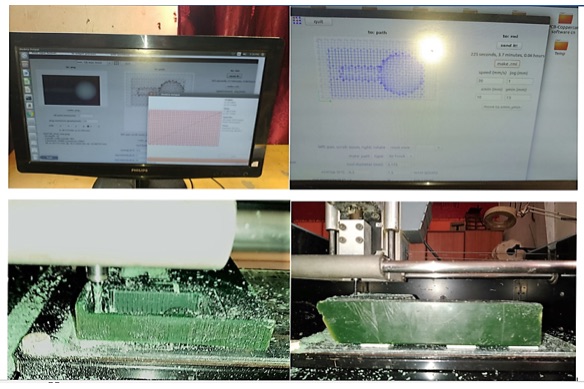
And this is how it looks after moulding.
It looks ok. It’s time to cast now. This time I added 5ml hardner extra.
My birthday 28th March this year went for a toss, as I’ve spent the whole day, infact 3 days of sleepless nights spent on this task.
After casting the mould, I kept it in the lab get set to solidify. While cleaning the lab and this shook off. So this is the result.
I need to cast another one now. The hardner got exhausted as all of us were using it. So waiting for the same till date.
Points to Ponder -
Fab Modules Settings (Both Rough and Finishing Cuts)
| SL.No |
Subject |
Setting Control |
Rough Cut Default |
Finishing Cut Default |
| 1 |
Diameter |
The diameter of your tool in milimeters.
If using a different size bit, make sure to change this value to match your bit diameter in milimeters. |
1/8" or 3.175mm |
1/8" or 3.175mm |
| 2 |
Offset |
How much material is removed around the model. |
The default setting removes all material around your model: -1 |
The default is 1.
Change this to -1 if you want the box around your model to get a finishing path applied to it. |
| 3 |
Overlap |
How closely the toolpaths overlap each other. |
0.25 |
0.5 |
| 4 |
Speed |
How fast the machine moves.
This setting is under "Maker RML".
Make sure to crank it up to 20.
The default is 20 for both rough and finish cuts if using a STL.
If using a PNG - Make sure to change this to 20. |
STL: The default is 20 If using a PNG - make sure to change this to 20. |
STL: The default is 20 If using a PNG - make sure to change this to 20. |
In 3D Setting Windows
| SL.No |
Subject |
Setting Control |
Rough Cut Default |
Finishing Cut Default |
| 1 |
Top Height |
This setting tells the Modela where to begin milling your material.
The default setting is: 0 for both rough and finish cuts
Starting at zero will begin milling your model at the very top of the wax, where you zeroed the Z axis.
I highly recommend starting out -1mm below the surface in order to ensure that you have a smooth top of your model. |
The default setting is blank.
Hence, recommend to start at -1 mm. |
The default setting is blank.
Hence, recommend to start at -1 mm. |
| 2 |
Bottom Height |
This must be a negative value lest, will result in an error.
STL: If you are using a .stl file - this setting should be the height of the model in milimeters.
For example: If the height of your .stl model is 31.75, you enter -31.75 into the z bottom field. This "should" come up by default when you import your model, but double check it.
PNG: If you are using an image (.png file) set the z bottom to how deep you want the bottom of the object to be. |
Need to set this manually. |
Need to set this manually. |
| 3 |
Cut Depth |
This setting determines how deep each individual cutting pass will be.
You can make this smaller (for a finer cut) or bigger (for a rougher cut), depending on your model.
The finer the cut, it will take a bit longer to mill the model. |
The default settings should be fine for a rough cut. |
The default settings should be fine. |
| 4 |
Path |
This tells the Fab Modules as to which plane is to be used to create the toolpaths for milling.
You only need to change this if you have modeled a 3D object on a different plane. |
STL: The default selection is the xy path. PNG: The default selection is the z path. |
STL: The default selection is the xz finish and yz finish paths.
PNG: The default selection is the xz finish and yz finish paths. |
Selecting The Appropate Bit -
For curvy models - use ballnose bits.
For mostly flat parts / straight angles - use endmill bits.
Bit Diameters in Milimeters-
| SL.No |
Bit Diameter |
Bit Diameter (MM) |
Max Cutting Depth |
Max Plunging Depth |
| 1 |
1/16 |
1.5875 |
measure cutting depth |
measure shank depth |
|
| 2 |
3.175 |
This must be a negative value lest, will result in an error.
STL: If you are using a .stl file - this setting should be the height of the model in milimeters.
For example: If the height of your .stl model is 31.75, you enter -31.75 into the z bottom field. This "should" come up by default when you import your model, but double check it.
PNG: If you are using an image (.png file) set the z bottom to how deep you want the bottom of the object to be. |
measure cutting depth |
measure shank depth |
| 3 |
3.175 |
This setting determines how deep each individual cutting pass will be.
You can make this smaller (for a finer cut) or bigger (for a rougher cut), depending on your model.
The finer the cut, it will take a bit longer to mill the model. |
measure cutting depth |
Tmeasure shank depth |
My tryst with Moulding and Casting at Thanks Giving Point in Provo, Utah in The Museum of Ancient Life
I welcome you to enjoy the video on fossil preperation and molding and casting.
https://youtu.be/C9iJ0NzDpPg

 Learning Outcome:
 I have understood about the various moulding and casting techniques. Designed my molds in AutoDesk Fusion 360. I can say that different techniques can result in very different results, from finely detailed to rough and heavy. However, every technique has its pros and cons, and works better with some materials than others. Finally now I can say that I’ve learnt how not to mould and cast.
I’ve learnt a few tips and tricks too. Found that the bubbles form at the right angles. So next time, I have to bear this in mind during designing. I have also noticed that lots of 'local minimum' probably lend themselves to bubbles; so have to be cautious.
I have also observed that the walls of a flexible mold approx 0.3" thick can bow outwards, when the material is poured in. This can give the final piece slightly rounded edges especially when I tried with the 3D mold cast, so hence can consider the other options too in different suitable materials.
Point to be noted - .stl not .STL
Reference – Internet and Fab Modules
https://www.smooth-on.com/tutorials/
https://jasonwebb.io/2012/09/overview-of-mold-making-and-casting-techniques-and-materials/
https://www.makeyourownmolds.com/shop/copyflex/