Week 8
Embedded Programming
For this week's individual assignment we had to program the board we made previously, read a micro controller data sheet, and experiment with different architectures. For the group assignment we need to compare the performance and development workflows for different micro controller families.
Individual Assignment
This week was a bit challenging as I had to do a lot of studying and research before starting. I started off by referring a few tutorials and other videos to understand more about boars, micro controllers and programming. I also learned about the architecture of micro controllers and how to use them.
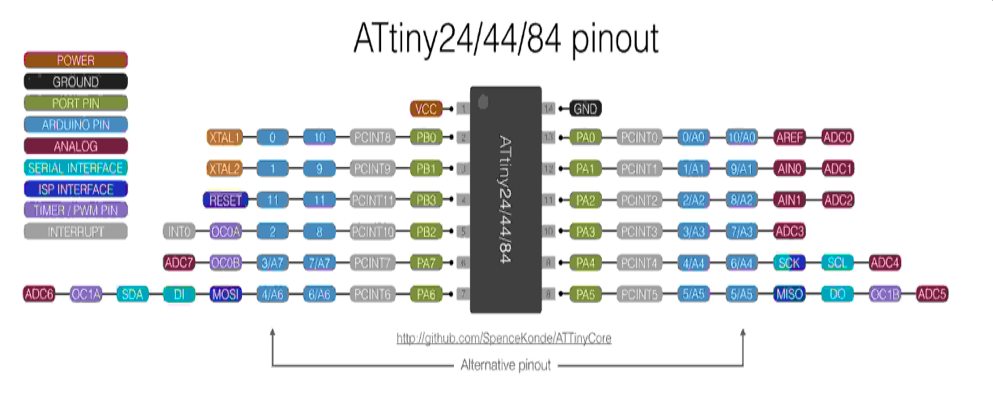
The ATtiny44 is a high-performance, low-power Microchip AVR RISC-based CMOS 8-bit micro controller. It combines 4KB ISP flash memory, 256-Byte EEPROM, 256B SRAM, 12 general purpose I/O lines .The ATtiny44 consist of 32 general purpose working registers, an 8-bit timer/counter with two PWM channels, a 16-bit timer/counter with two PWM channels, internal and external interrupts, an 8-channel 10-bit A/D converter and a programmable gain stage (1x, 20x) for 12 differential ADC channel pairs. It has a programmable watchdog timer with internal oscillator.The a internal calibrated oscillator and three software selectable power saving modes makes it suitable for small embedded products .
This is the link to the data sheet. You can use it to understand more about ATtiny.
Programming using AVR C
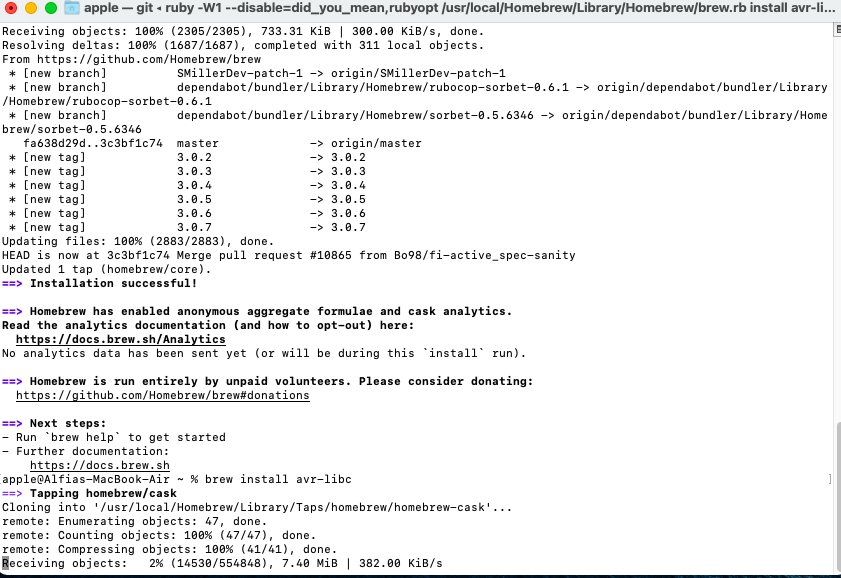
Before starting, I installed the AVR tool chain using HomeBrew. I installed avrdude, gcc-avr, and avr-libr. The gcc-avr is the cross compiler collection. The avrdude is a command line program for reading, writing and manipulating AVRs. The avr-libr files provide similar functions found in a standard C library for specifically the AVR. Needless to say, all of these files are essential in programming the ATTiny.
Programming using Arduino IDE
Arduino is an open source computer hardware and software company, project, and user community that designs and manufactures single-board microcontrollers and microcontroller kits for building digital devices and interactive objects that can sense and control objects in the physical and digital world.
To do this, I first downloaded and installed Arduino IDE on my laptop.
Once that was done, I went to preferences, added the board to the board manager. I pasted the link below to add the board.
https://raw.githubusercontent.com/damellis/attiny/ide-1.6.x-boards-manager/package_damellis_attiny_index.json
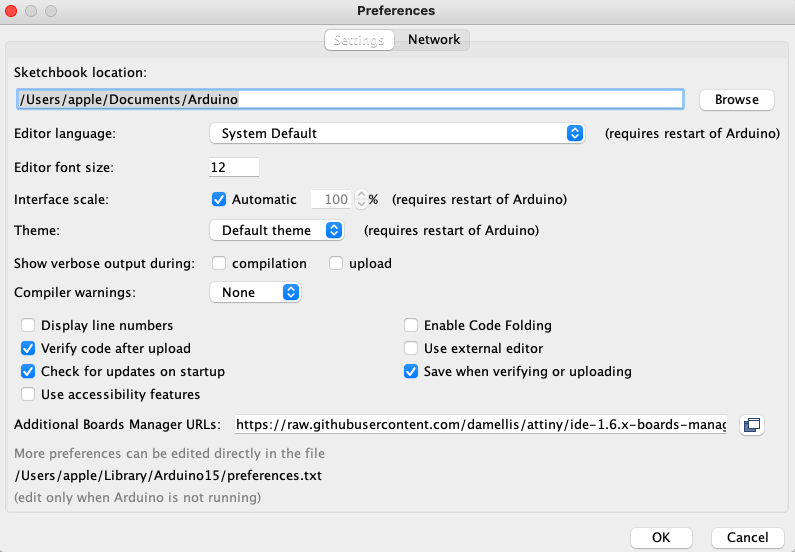
On clicking OK, I went ahead and added the board and checked all the required options.
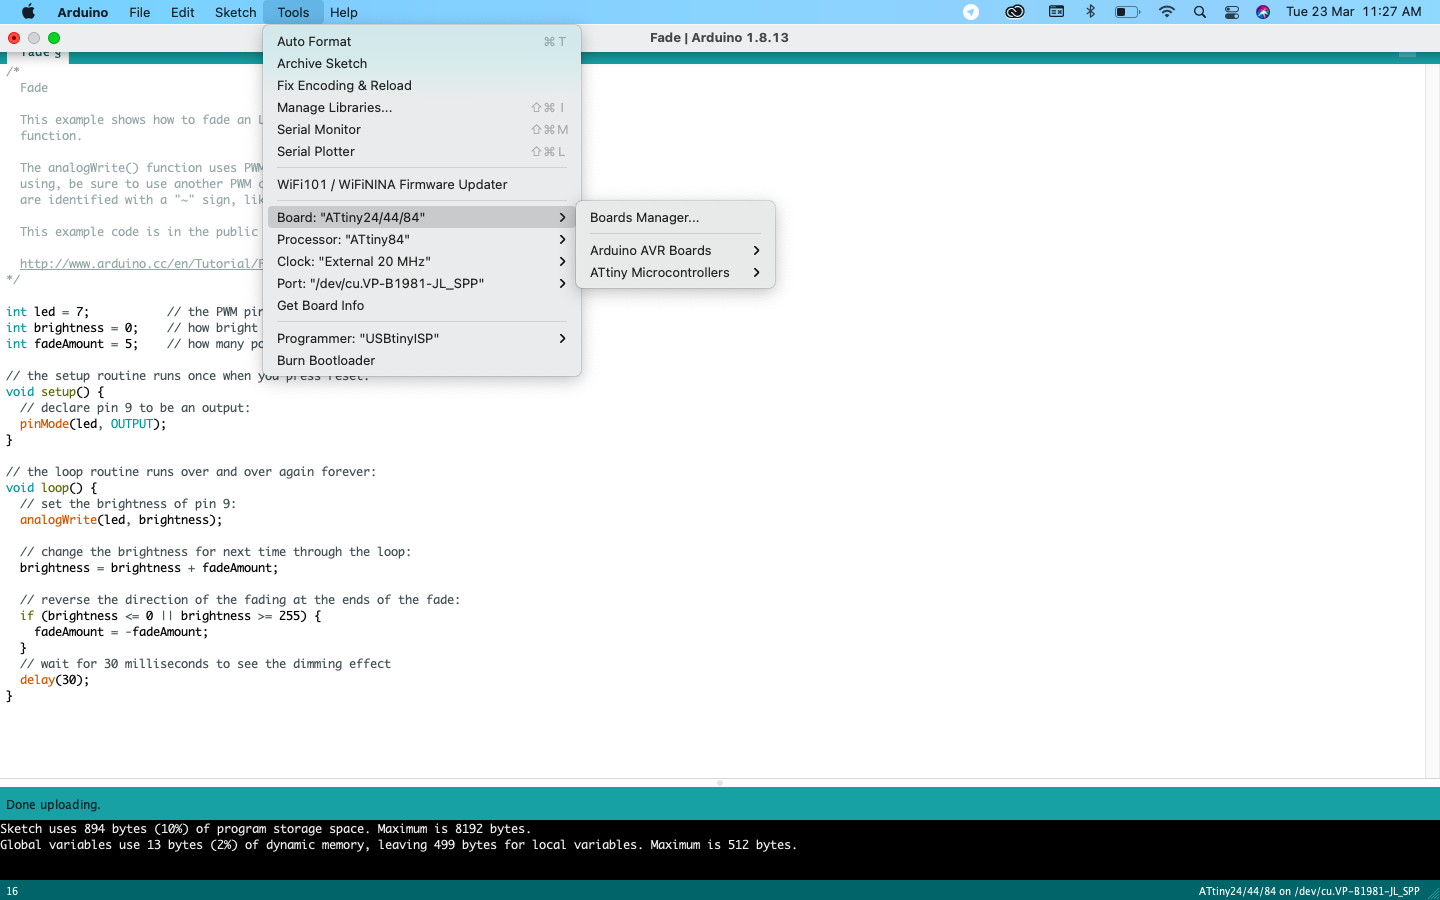
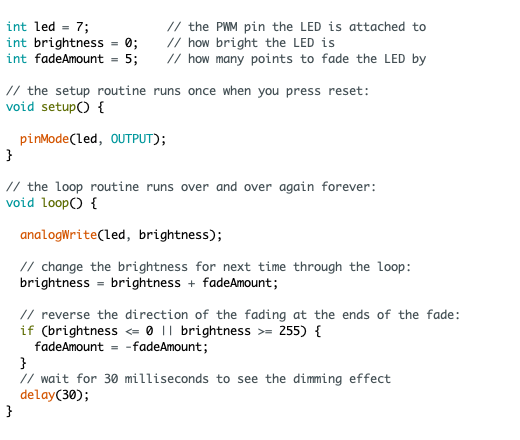
As this was done, I went ahead and used the program to fade the LED. The program I used is given below
On clicking upload, my program was uploaded to the board.
Lessons Learnt
In this week, I learned a lot about Microcontrollers. Some of the details I learnt includes:
-Ateml and some of their chips including, AtTiny 44, AtTiny 88, AtTiny 84, AtTiny 45, and AtMega 8.
-PinOut diagrams and how to use different pins.
-Architecture of micro-controller
-Understanding AVR
-Basics of Atmel studio
Programming using Arduino IDE
Group Assignment
This week's group assignment was to compare the performance and development workflows for other architectures. For the comparison we had used the following Boards
Raspberry Pi 4: ARM Architecture
NodeMCU ESP8266: Harvard Architecture
NodeMCU ESP32S: Harvard Architecture
Nucleo STM32F401: ARM Architecture
Lattice Ice Stick: FGPA
Raspberry Pi
ARM, previously Advanced RISC Machine, originally Acorn RISC Machine, is a family of reduced instruction set computing (RISC) architectures for computer processors, configured for various environments.Processors that have a RISC architecture typically require fewer transistors than those with a complex instruction set computing (CISC) architecture (such as the x86 processors found in most personal computers), which improves cost, power consumption, and heat dissipation. These characteristics are desirable for light, portable, battery-powered device-including smartphones, laptops and tablet computers, and other embedded systems.] For supercomputers, which consume large amounts of electricity, ARM could also be a power-efficient solution. Most of our mobile phones are based on ARM and now it used on server's and super controllers.Raspberry Pi is Single board computer that based on ARM.
For more details check my friend Abel's webpage
Nucleo STM32F401
STM32 is a family of 32-bit microcontroller integrated circuits by STMicroelectronics. The STM32 chips are grouped into related series that are based around the same 32-bit ARM processor core, such as the Cortex-M7F, Cortex-M4F, Cortex-M3, Cortex-M0+, or Cortex-M0. Internally, each microcontroller consists of the processor core, static RAM memory, flash memory, debugging interface, and various peripherals. In here Fablab Kochi we have the STM32F401 series Nucleo development boards.it's a part of the STM32 Dynamic Efficiency™ device range. These devices offer the best balance of dynamic power consumption (in run mode) and processing performance, while integrating a high number of added-value features in packages as small as 3 x 3 mm. The MCUs deliver the performance of Cortex®-M4 core with floating point unit, running at 84 MHz, while achieving outstandingly low power consumption values in run and stop modes. STM32 has more pin functions, flash memory and features compared to other boards available and it also a 32-bit microcontroller. It is cheap and functional board to work on compared to all other boards we had tested. For more details visit my friend Saheen's webpage
Lattice ICEstick Evaluation Board 40HX1K
This was the board which allows to set it to any architectures. This is called FPGA board meaning Field Programmable Gate Array. Field Programmable Gate Arrays (FPGAs) are semiconductor devices that are based around a matrix of configurable logic blocks (CLBs) connected via programmable interconnects. FPGAs can be reprogrammed to desired application or functionality requirements after manufacturing.
ICEstick Evaluation Board features the following on-board components:
High-performance, low-power iCE40HX1K FPGA
FTDI 2232H USB device allows iCE device programming and UART interface to a PC
Vishay TFDU4101 IrDA transceiver
2 x 6 position Diligent PmodTM compatible connector enables many other peripheral connections
Discera 12Mhz MEMS oscillator
Micron 32Mbit N25Q32 SPI flash
16 LVCMOS/LVTTL (3.3V) digital I/O connections on 0.1†through-hole connections
USB connector provides the power supply
The beauty of this board is that we can arange this board in such any way we can. We can test any schematic and architecture in this board. This is a perfect device in which you can use to prototype the PCB and controllers. It contains array or electronic components which is connected according to your input and requirement without hassle of making newboard. You need two softwares to run it. First to arrange the array of the electronic components according to your requirement. We can use "iCEcube-2" to perform this operation. Then we can use other embedded programing language to flash the board.
For more details visit my friend Pallab's webpage
NodeMCU ESP32S
The NodeMCU ESP-32S is one of the development board created by NodeMcu to evaluate the ESP-WROOM-32 module. It is based on the ESP32 microcontroller that boasts Wifi, Bluetooth, Ethernet and Low Power support all in a single chip. The link to the NodeMCY ESP32S is given here. There are essentially three ways to build your NodeMCU firmware: cloud build service, Docker image, dedicated Linux environment (possibly VM). The Node MCU ESP32S can be programmed using Arduino IDE. You can also use Micropython Online, it has a terminal, editor, circuit. Now comparing Node MCU ESP32S with tested ESP8266 For more details check my friend Jai's webpage
NodeMCU ESP8266
The NodeMCU (Node MicroController Unit) is an open-source software and hardware development environment built around an inexpensive System-on-a-Chip (SoC) called the ESP8266. The ESP8266, designed and manufactured by Espressif Systems, contains the crucial elements of a computer: CPU, RAM, networking (WiFi), and even a modern operating system and SDK. That makes it an excellent choice for the Internet of Things (IoT) projects of all kinds. However, as a chip, the ESP8266 is also hard to access and use. You must solder wires, with the appropriate analog voltage, to its pins for the simplest tasks such as powering it on or sending a keystroke to the “computer” on the chip. You also have to program it in low-level machine instructions that can be interpreted by the chip hardware. This level of integration is not a problem using the ESP8266 as an embedded controller chip in mass-produced electronics. It is a huge burden for hobbyists, hackers, or students who want to experiment with it in their own IoT projects. You can find more details on my friend Abhinav's webpage
Files
The ino file can be downloaded from here