TASK
- Read a microcontroller data sheet
-Program your board to do something,
with as many different programming languages
and programming environments as possible
File .. Example select Arduino as ISP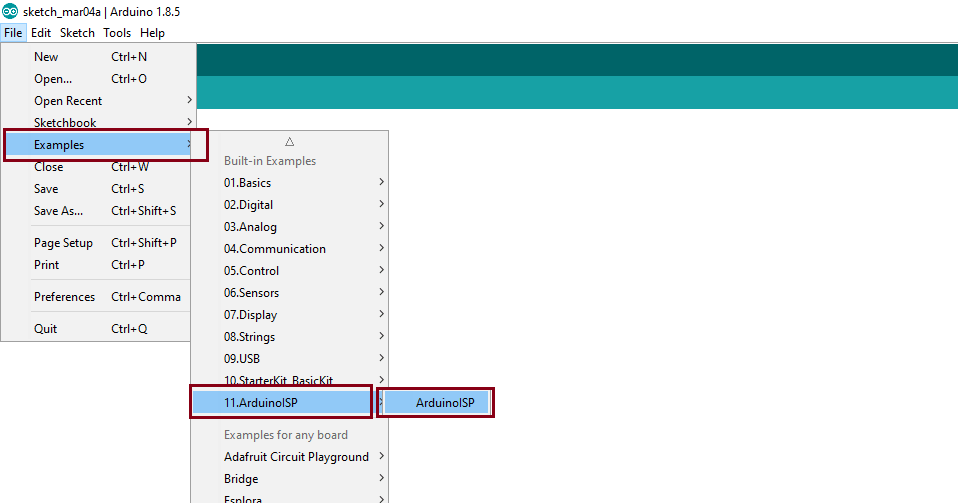
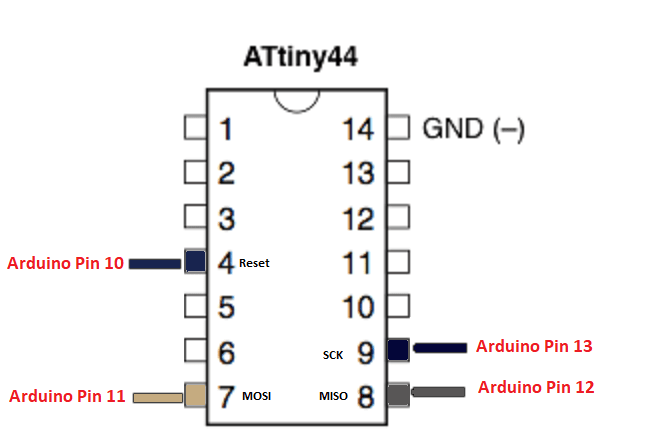
tool menu and chose the -Processor,Board and Clock- ATtiny24/44/84, ATtiny44,External 20Mhz.
Power supply requirements, Pins Configurations and descriptions, Electrical ratings and Schematic
of the IC circuit.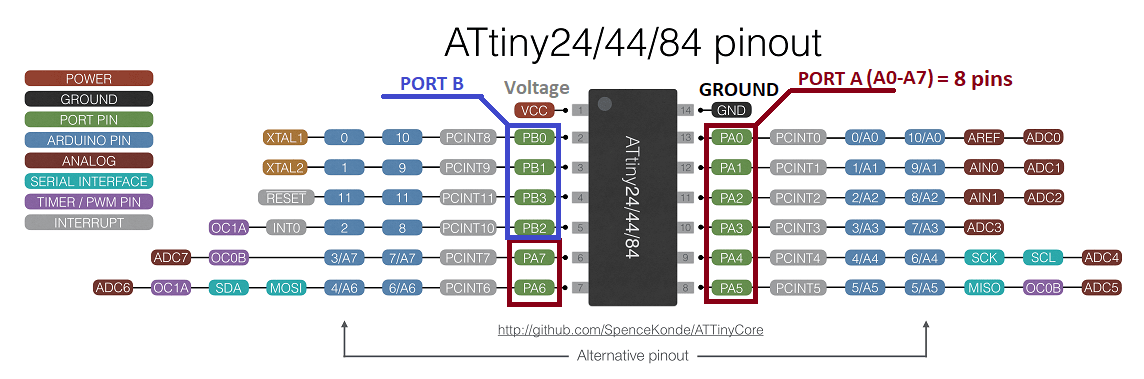
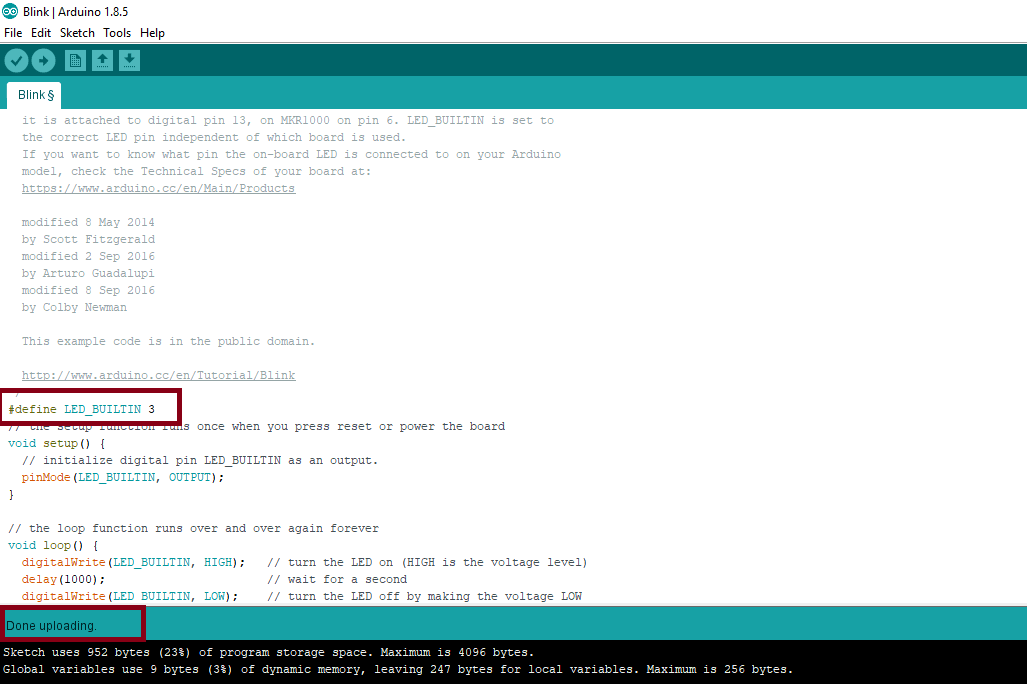
-min.png)
DDRxn, PORTxn and PINxn direction of the pin. If logic 1 is written on DDRxn, Pxn is configured as an output pin.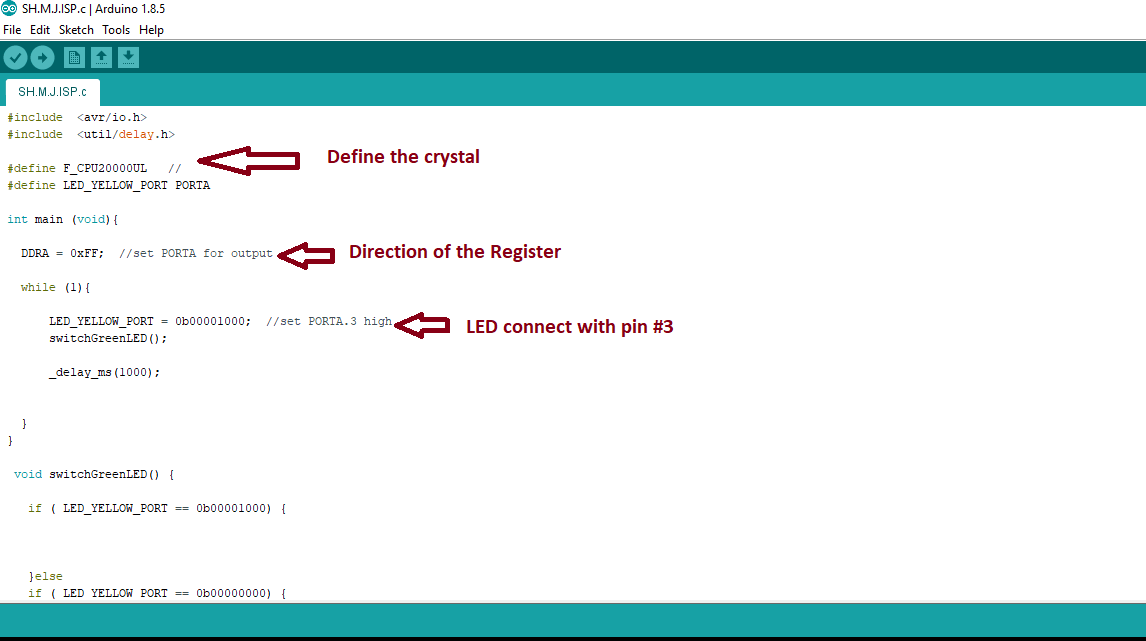
list of rules.
PROJECT=shefa // the name of the file
SOURCES=$(PROJECT).c
MMCU=attiny44 // define the microcontroller
F_CPU = 20000000 // define the crystal
CFLAGS=-mmcu=$(MMCU) -Wall -Os -DF_CPU=$(F_CPU)
$(PROJECT).hex: $(PROJECT).out
avr-objcopy -O ihex $(PROJECT).out $(PROJECT).c.hex;\
avr-size --mcu=$(MMCU) --format=avr $(PROJECT).out // the size of the file
$(PROJECT).out: $(SOURCES)
avr-gcc $(CFLAGS) -I./ -o $(PROJECT).out $(SOURCES) // to compile the file
program-fabISP: $(PROJECT).hex
avrdude -p t44 -P usb -c usbtiny -U flash:w:$(PROJECT).c.hex // to upload the file
program-fabISP-fuses: $(PROJECT).hex
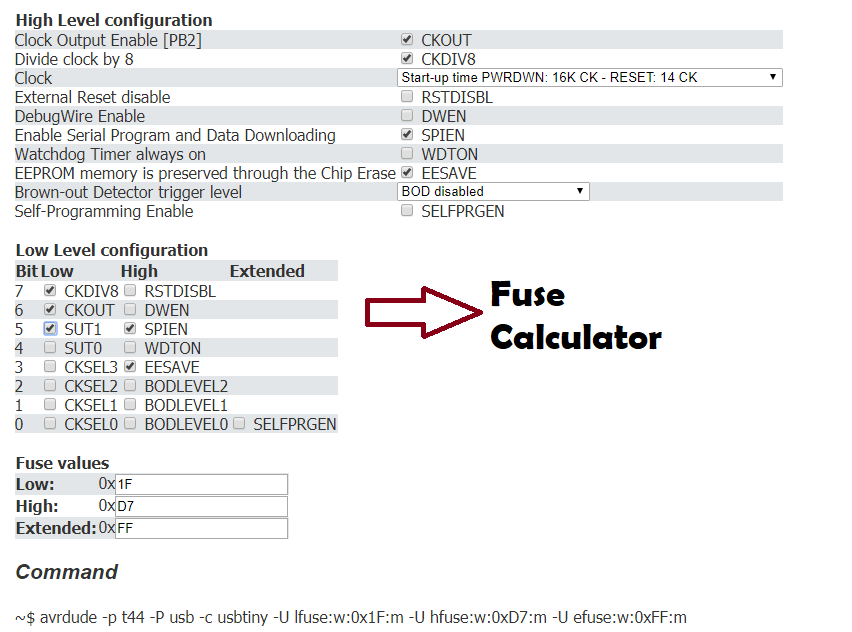
avrdude -p t44 -P usb -c usbtiny -U lfuse:w:0x1F:m // to upload the settings of the fuses
ubuntu@ubuntu:~$ cd Desktop
ubuntu@ubuntu:~/Desktop$ ls
examples.desktop nadine shifa
files Screenshot from 2018-03-20 15-44-12.png ubiquity.desktop
ubuntu@ubuntu:~/Desktop$ cd shifa
ubuntu@ubuntu:~/Desktop/shifa$ ls
Makefile SH.M.J.ISP.c.ino
ubuntu@ubuntu:~/Desktop/shifa$ ls
Makefile SH.M.J.ISP.c
ubuntu@ubuntu:~/Desktop/shifa$ lsusb
Bus 002 Device 001: ID 1d6b:0003 Linux Foundation 3.0 root hub
Bus 001 Device 006: ID 138a:0011 Validity Sensors, Inc. VFS5011 Fingerprint Reader
Bus 001 Device 005: ID 04f2:b5c0 Chicony Electronics Co., Ltd
Bus 001 Device 004: ID 0cf3:e500 Atheros Communications, Inc.
Bus 001 Device 045: ID 045e:0797 Microsoft Corp. Optical Mouse 200
Bus 001 Device 044: ID 1781:0c9f Multiple Vendors USBtiny
Bus 001 Device 002: ID 058f:6387 Alcor Micro Corp. Flash Drive
Bus 001 Device 001: ID 1d6b:0002 Linux Foundation 2.0 root hub
ubuntu@ubuntu:~/Desktop/shifa$ lsusb
Bus 002 Device 001: ID 1d6b:0003 Linux Foundation 3.0 root hub
Bus 001 Device 006: ID 138a:0011 Validity Sensors, Inc. VFS5011 Fingerprint Reader
Bus 001 Device 005: ID 04f2:b5c0 Chicony Electronics Co., Ltd
Bus 001 Device 004: ID 0cf3:e500 Atheros Communications, Inc.
Bus 001 Device 045: ID 045e:0797 Microsoft Corp. Optical Mouse 200
Bus 001 Device 048: ID 1781:0c9f Multiple Vendors USBtiny
Bus 001 Device 002: ID 058f:6387 Alcor Micro Corp. Flash Drive
Bus 001 Device 001: ID 1d6b:0002 Linux Foundation 2.0 root hub
ubuntu@ubuntu:~/Desktop/shifa$ make
make: *** No rule to make target 'Sh.M.JISP.c', needed by 'Sh.M.JISP.out'. Stop.
ubuntu@ubuntu:~/Desktop/shifa$ cd ..
ubuntu@ubuntu:~/Desktop$ cd files
ubuntu@ubuntu:~/Desktop/files$ make
make: *** No rule to make target 'Sh.M.JISP.c', needed by 'Sh.M.JISP.out'. Stop.
ubuntu@ubuntu:~/Desktop/files$ ls
Makefile Q_BOARD.c qusai
ubuntu@ubuntu:~/Desktop/files$ make
make: *** No rule to make target 'Sh.M.JISP.c', needed by 'Sh.M.JISP.out'. Stop.
ubuntu@ubuntu:~/Desktop/files$ make
avr-gcc -mmcu=attiny44 -Wall -Os -DF_CPU=20000000 -I./ -o Q_BOARD.out Q_BOARD.c
avr-objcopy -O ihex Q_BOARD.out Q_BOARD.c.hex;\
avr-size --mcu=attiny44 --format=avr Q_BOARD.out
AVR Memory Usage
----------------
Device: attiny44
Program: 104 bytes (2.5% Full)
(.text + .data + .bootloader)
Data: 0 bytes (0.0% Full)
(.data + .bss + .noinit)
ubuntu@ubuntu:~/Desktop/files$ make program-fabISP
avr-objcopy -O ihex Q_BOARD.out Q_BOARD.c.hex;\
avr-size --mcu=attiny44 --format=avr Q_BOARD.out
AVR Memory Usage
----------------
Device: attiny44
Program: 104 bytes (2.5% Full)
(.text + .data + .bootloader)
Data: 0 bytes (0.0% Full)
(.data + .bss + .noinit)
avrdude -p t44 -P usb -c usbtiny -U flash:w:Q_BOARD.c.hex
avrdude: initialization failed, rc=-1
Double check connections and try again, or use -F to override
this check.
avrdude done. Thank you.
Makefile:17: recipe for target 'program-fabISP' failed
make: *** [program-fabISP] Error 1
ubuntu@ubuntu:~/Desktop/files$ cd..
cd..: command not found
ubuntu@ubuntu:~/Desktop/files$ cd ..
ubuntu@ubuntu:~/Desktop$ cd shifa
ubuntu@ubuntu:~/Desktop/shifa$ make
make: *** No rule to make target 'shefa.c', needed by 'shefa.out'. Stop.
ubuntu@ubuntu:~/Desktop/shifa$ make
avr-gcc -mmcu=attiny44 -Wall -Os -DF_CPU=20000000 -I./ -o shefa.out shefa.c
shefa.c: In function ‘main’:
shefa.c:14:7: warning: implicit declaration of function ‘switchGreenLED’ [-Wimplicit-function-declaration]
switchGreenLED();
^
shefa.c: At top level:
shefa.c:22:7: warning: conflicting types for ‘switchGreenLED’
void switchGreenLED() {
^
shefa.c:14:7: note: previous implicit declaration of ‘switchGreenLED’ was here
switchGreenLED();
^
avr-objcopy -O ihex shefa.out shefa.c.hex;\
avr-size --mcu=attiny44 --format=avr shefa.out
AVR Memory Usage
----------------
Device: attiny44
Program: 96 bytes (2.3% Full)
(.text + .data + .bootloader)
Data: 0 bytes (0.0% Full)
(.data + .bss + .noinit)
ubuntu@ubuntu:~/Desktop/shifa$ make program-fabISP
avr-objcopy -O ihex shefa.out shefa.c.hex;\
avr-size --mcu=attiny44 --format=avr shefa.out
AVR Memory Usage
----------------
Device: attiny44
Program: 96 bytes (2.3% Full)
(.text + .data + .bootloader)
Data: 0 bytes (0.0% Full)
(.data + .bss + .noinit)
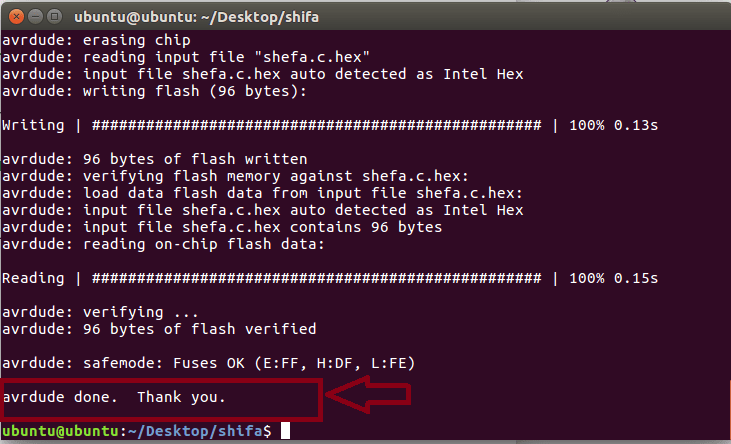
avrdude -p t44 -P usb -c usbtiny -U flash:w:shefa.c.hex
avrdude: AVR device initialized and ready to accept instructions
Reading | ################################################## | 100% 0.00s
avrdude: Device signature = 0x1e9207 (probably t44)
avrdude: NOTE: "flash" memory has been specified, an erase cycle will be performed
To disable this feature, specify the -D option.
avrdude: erasing chip
avrdude: reading input file "shefa.c.hex"
avrdude: input file shefa.c.hex auto detected as Intel Hex
avrdude: writing flash (96 bytes):
Writing | ################################################## | 100% 0.13s
avrdude: 96 bytes of flash written
avrdude: verifying flash memory against shefa.c.hex:
avrdude: load data flash data from input file shefa.c.hex:
avrdude: input file shefa.c.hex auto detected as Intel Hex
avrdude: input file shefa.c.hex contains 96 bytes
avrdude: reading on-chip flash data:
Reading | ################################################## | 100% 0.15s
avrdude: verifying ...
avrdude: 96 bytes of flash verified
avrdude: safemode: Fuses OK (E:FF, H:DF, L:FE)
avrdude done. Thank you.
ubuntu@ubuntu:~/Desktop/shifa$
Problem :
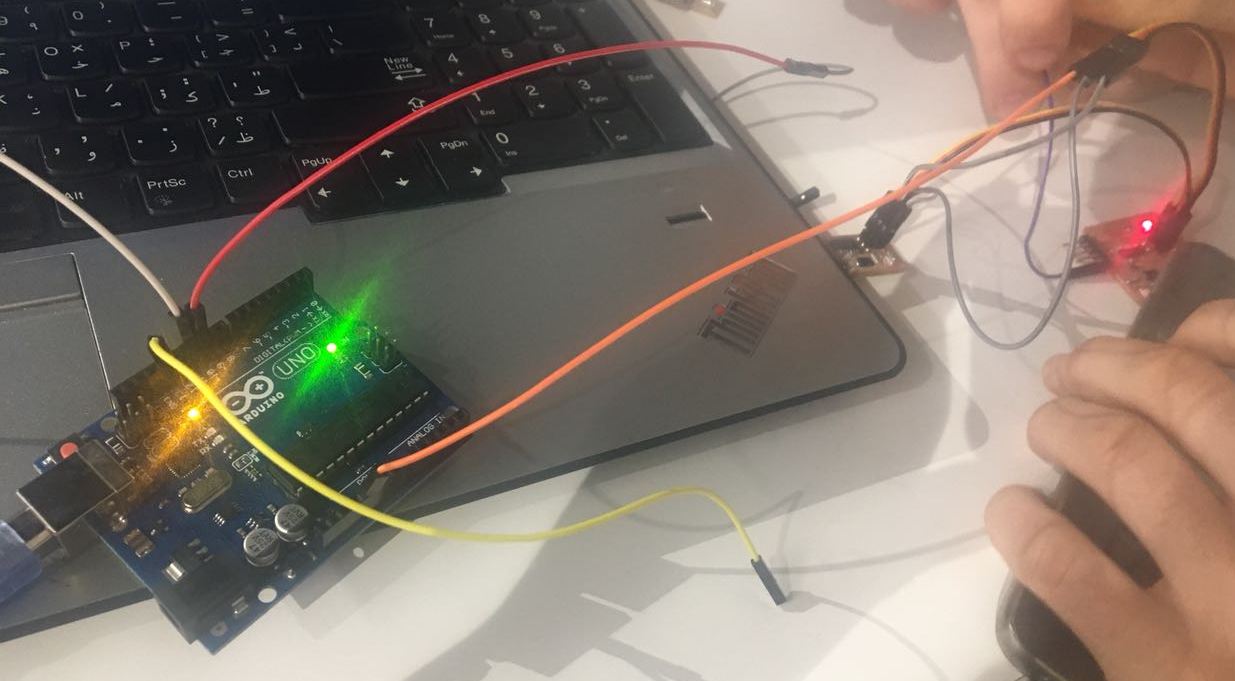
The problem I had a problem with uploading the code and I didn't know why. I spent a couple of hours before I decided to power my board from another source that is not the FabISP and it worked. So appparently the problem was the FabISP didn't have sufficeint power to supply the board.
	 #include < avr/io.h >
#include < util/delay.h >           // for _delay_ms()

#define led_pin PA2               // pin for LED
#define button_pin PA3           // pin for button

#define blink_fast 100             // delay for fast blink
#define blink_slow 2000             // delay for slow blink

int main(void)
{

  DDRA |= (1 << led_pin);         // set LED pin as output
  PORTB |= (1 << button_pin);     // set pullup resistor for button pin

  while(1)
  {
    if(PINA & (1 << button_pin))  // if button is not pressed
    {
      PORTA |= (1 << led_pin);    // turn LED on
      _delay_ms(blink_slow);     // wait 500 milliseconds

      //LED off
      PORTA &= ~(1 << led_pin);   // turn LED off
      _delay_ms(blink_slow);     // wait 500 milliseconds
    } else {
      PORTA |= (1 << led_pin);    // turn LED on
      _delay_ms(blink_fast);     // wait 500 milliseconds

      //LED off
      PORTA &= ~(1 << led_pin);   // turn LED off
      _delay_ms(blink_fast);     // wait 500 milliseconds
    }
  }
}
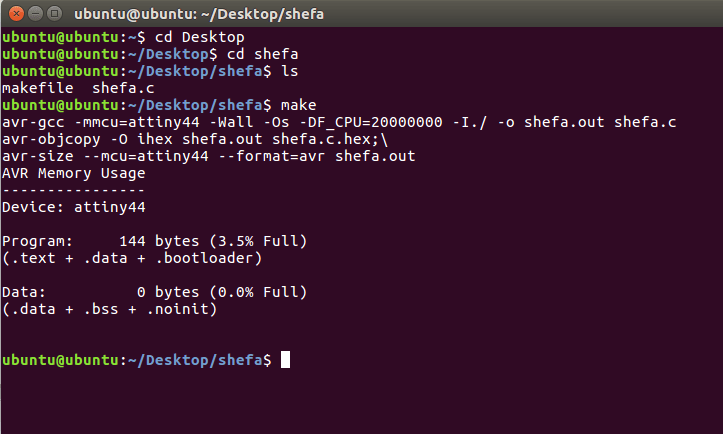
ubuntu@ubuntu:~$ cd Desktop
ubuntu@ubuntu:~/Desktop$ cd shefa
ubuntu@ubuntu:~/Desktop/shefa$ ls
makefile shefa.c
ubuntu@ubuntu:~/Desktop/shefa$ make
avr-gcc -mmcu=attiny44 -Wall -Os -DF_CPU=20000000 -I./ -o shefa.out shefa.c
avr-objcopy -O ihex shefa.out shefa.c.hex;\
avr-size --mcu=attiny44 --format=avr shefa.out
AVR Memory Usage
----------------
Device: attiny44
Program: 144 bytes (3.5% Full)
(.text + .data + .bootloader)
Data: 0 bytes (0.0% Full)
(.data + .bss + .noinit)
ubuntu@ubuntu:~/Desktop/shefa$ make program-shefa
avr-objcopy -O ihex shefa.out shefa.c.hex;\
avr-size --mcu=attiny44 --format=avr shefa.out
AVR Memory Usage
----------------
Device: attiny44
Program: 144 bytes (3.5% Full)
(.text + .data + .bootloader)
Data: 0 bytes (0.0% Full)
(.data + .bss + .noinit)
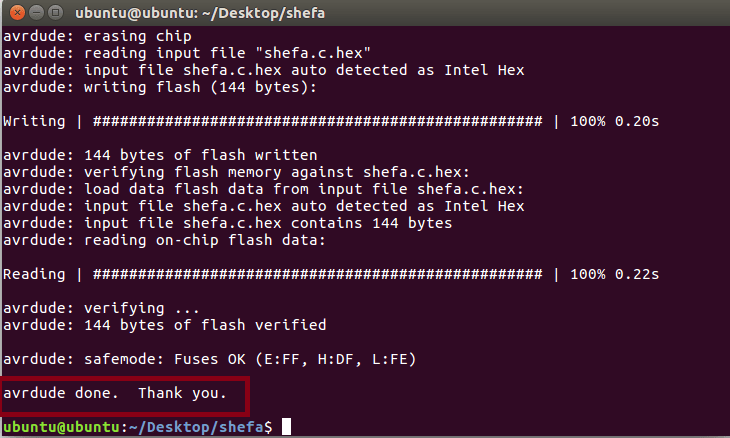
avrdude -p t44 -P usb -c usbtiny -U flash:w:shefa.c.hex
avrdude: AVR device initialized and ready to accept instructions
Reading | ################################################## | 100% 0.00s
avrdude: Device signature = 0x1e9207 (probably t44)
avrdude: NOTE: "flash" memory has been specified, an erase cycle will be performed
To disable this feature, specify the -D option.
avrdude: erasing chip
avrdude: reading input file "shefa.c.hex"
avrdude: input file shefa.c.hex auto detected as Intel Hex
avrdude: writing flash (144 bytes):
Writing | ################################################## | 100% 0.20s
avrdude: 144 bytes of flash written
avrdude: verifying flash memory against shefa.c.hex:
avrdude: load data flash data from input file shefa.c.hex:
avrdude: input file shefa.c.hex auto detected as Intel Hex
avrdude: input file shefa.c.hex contains 144 bytes
avrdude: reading on-chip flash data:
Reading | ################################################## | 100% 0.22s
avrdude: verifying ...
avrdude: 144 bytes of flash verified
avrdude: safemode: Fuses OK (E:FF, H:DF, L:FE)
avrdude done. Thank you.
ubuntu@ubuntu:~/Desktop/shefa$
	 int ledPin = 13; //define pin 13 as LED

void setup() {
pinMode(ledPin, OUTPUT); //Pin mode is output

Serial.begin(9600); //Start Seial
}

void loop() {

int photocell = analogRead(A0); // Read from analoge A0


Serial.println(photocell);
if (photocell> 300)   // compare statment  (if statement)
  digitalWrite (ledPin,1); // LED will be on


if (photocell < 300) // compare statment  (if statement)
  digitalWrite(ledPin,0); // LED will be off


delay(200);

}