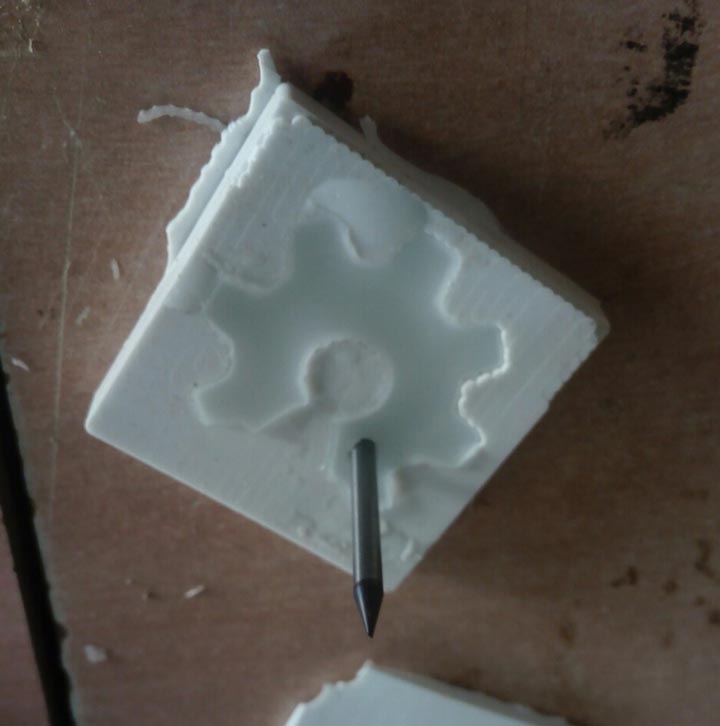
Rohan Rege

Fab Lab Zero
Vigyan Ashram


<- Home

We are using the old version of FAB modules. Although the newer mods are better, it takes more steps to accomplish the same task when compared with the older modules.
This week were tasked with:

  1: Group assignment:

   review the safety data sheets for each of your molding and casting materials, then make and compare test casts with each of them

  2: Individual assignment:

   design a 3D mold around the stock and tooling that you'll be using, machine it, and use it to cast parts


The materials I used for molding/casting were:
This could very well be the most tough assignment for me.
From what I had learned in my mechanical engg. course, casting is quite tough. You need to set various reliefs, make sure you have the right sand and the packing is also perfect.
We had also visited a local school in Pune, where they taught various types of casting. The food there was very delicious, my colleague Komal enjoyed it a lot.
Below, the local professor is explaining us basics of casting.


There we spent almost one whole day learning about aluminum casting.
They did not use any form of digital tools. They bought the sand from waste casting industries in Chakan (Industrial hub).
Below you can see the sand used


Arefin mixing sand with help of local kids


Then we keep the first pattern a flat surface.


Then start packing the sand, this will create the lower half also called as drag.
While packing it is necessary to apply pressure so that there are no air gaps.
Normally a shaker and compacter is used level and pack.


The output looks like this


It is important to apply silica powder or something similar so that the core doesn't stick to the sand.


For core, we are using a turtle. Press the turtle in between.


Then keep the upper half of the pattern and pack the remaining sand.


They simply pack the sand in two boxes firmly.


Keeping a hole for relief and vapor.


The next step is separate the two parts, remove the core and align the two parts again.


Then pour molten Aluminum through the hole.
Then set it for cooling
We couldn't see the output as we couldn't wait for the idol to cool as we had to return back to Pabal the same day.


I wanted to make something awesome in molding/casting. I was facing something similar to a artist's block.
I had just finished break week. Instead of overflowing with ideas. I was stumped with what to make.
Making something like a keychain was one of my ideas.
For inspiration I decided to browse thingiverse website. When I came across a product which looked like somebody had played April Fools' joke on me. It was a 'Carabiner'. For the uninitiated, carabiner is a shackle with spring loaded gate.
If we make the 3D printed part thin enough we can flex it (Even PLA and ABS). I never could have imagined a person designing a freaking carabiner using this, Using a living hinge instead of the spring.
If you want to know more about the design or print it is available for free download here
This one of those few 3D printed hardware stuffs that I like. It is so AWESOME!.
We are lucky that now a days these such designs are freely available on the internet. Te design is free and open. Anyone can 'remix it' and reuse it by following the license.
Which brings me to the next part, open design.

Open design is one of the ways of the development of physical products, machines and systems. Open design involves the making of both free and open-source software (FOSS) as well as open-source hardware. The process is generally facilitated by the Internet and often performed without monetary compensation. The goals and philosophy are identical to that of the open-source movement, but are implemented for the development of physical products rather than software. Open design is a form of co-creation, where the final product is designed by the users, rather than an external stakeholder such as a private company.

I'm a big fan of open design. After the aggressive patenting era formed various barriers in knowledge sharing,
Open Design led people to share/transfer knowledge freely. It is foundation of various sites like Thingiverse, GRABCAD etc. and is an integral part of DIY and maker culture
In this spirit I decided to make the Logo of OSH (Open source hardware).
It will look good on my project.
the OSH logo is heavily inspired from the open-source logo, and like it OSH logo is maintains the simplicity.


I decided to make this.
The wax blocks we are given are 160mm x 90mm x 40mm
To make a mold in modela, we need first create a block of same size.
Next, Everything we wanted to be molded, had to be created as a pattern inside the block.
I wanted 1 positive, 1 negative mold. I still had space left, after drawing those two, I still had some same space left for a third pattern of similar size.
I wanted to try something fun, but what exactly was not fixed, so I made made an empty cylinder block.(Later I filled this with my favorite number.
I 'extrude cut' three squares one with positive one with negative and the bonus one.


When I initially loaded my drawing in FAB modules, I made a few observations...
1:The axis were wrong, the x and Y had interchanged. This is trivial and easily fixed by mounting the wax plate on the block the horizontal direction.
This would mean setting the wax in vertical direction.
It barely fit the bed surface of the machine

2:While molding the machine cleans/machines all the surface (the total area defined in the CAD file. This is useful for the machine so that it will level all the surface, machining the area. due to my CAD design, modela will level all the surface of the wax (waste). Also the time taken to do this is like shitty large.
To overcome this. I removed (extrude cut) the remaining unneeded part. saved as STL.
So that modela will only level the required part.

Molding casting by Rohan Rege on Sketchfab


The SW (editable) and the STL files are available here to download.


Then I opened the STL file in 3D builder. Where I changed the orientation of the file to my liking.
When I opened my file in fab modules it had perfect orientation.
The next steps are pretty basic:


The milling process took almost ~30 mins the end result is as expected, but as seen in the image below, my extra square block did not go as planned.


But this will work for the purpose of my assignment.
I decided to make a pattern for casting from silicone.
The The Data sheet for Silicone is available here.
We tried different ratios to make test casts of silicone
There a few tried and tested ratios. We tried with 1:2 1:5 and 1:10.
Of the various test casts, I found that a ratio of 1:10 was excellent
Hence for my mold I used 1:10 (by weight). To calculate the approx silicone required first fill the mold with water, pour the water in a glass. Now remove water and take silicone upto that level. Now weigh it on a balance. Then add equivalent amount (1:10) of hardner


Mix it fast and well then pour the silicone into the mold


I used glass rod to remove air bubbles but it was very time consuming.


Being lazy instead of removing the bubbles manually I used the shaker available in the microbiology lab.


I let it set overnight

Next step is remove the casted part! one of my favorites


Probe the cast to check if the it has set. Looks like it has!
Now carefully peel the mold such that it does not tear


A quick visual inspection and I decided to just go with my current mold.
There were things that I wanted to try


Metal Casting

I wanted to try casting with metals because it sounds awesome. Also its not everyday you get to play with molten metals.
There are two options available currently available in Vigyan Ashram:
  1. Bismuth alloy
  2. Aluminum
Bismuth
The complete SDS for this alloy is available here. I thought this was pure Bismuth, but upon reading data sheet, I came to know that this not the case.
Both Sn and Bi have low melting points (<300°C). A quick look at the important points of the data sheets gives an basic idea of the required temperature to heat the alloy to.


It can be observed that Bismuth has a melting temperature of 271°C and Tin of 232°C.
A quick google search reveals that this alloy is not a Eutectic alloy.
Hence it will not melt at a single temperature below the melting points of both Tin and Bismuth.
Luckily this is alloy fuses easily so we can melt is multiple times with worrying about mixing them together.
Logically, while melting the alloy the Tin would melt first at ~232°C and then at ~271°C bismuth would melt turning the whole alloy into a pourable liquid.
I used a simple crucible and hot plate from the chemistry lab.
As per my logic I set it to 273°C and waited for a few minutes.
Once the metal was completely molten, With the help of tongs I took it off the plate and started to pour it.


I observed that, the metal would solidify instantly.
I could not even pour it, to overcome this I raised the temperature to 280 and tried again, Now i could pour it but not the whole crucible.
It would solidify mid way and didn't fill the mold completely.

In my photos, you can see I have inserted a broken 1/64 end mill. This because such high temperature the silicon would expand and deform, Hence to lift the metal casted job easily without damaging the mold, I have inserted it.

I went on increasing the temperature. I found at 300°C the metal remained molten for a long time and I could pour it easily.


I had seen the size of the crucibles hence I had created the molds/casts of similar volume.
So I could fill the whole mold in 1 crucible.
This alloy has some properties to solder metal, so I tried applying flux to the silicon to improve flowability but the effect was negligible.


Once I was able to successfully pour after (2-3 tries) into the mold, and it got solid, I made my first test cast.
I compared the test cast with the data sheet given.
Next time I melted and recasted again but this time I quenched it immediately. I found that the quenched cast was more in line of the datasheet than the one before
I subsequently melted and recasted bismuth 2-3 more times with quenching
It also helped to cool the material faster.
Silicon unlike sand is not porous, hence there is no way for gases to escape, if they get trapped between mold and metal.
This will and did cause small puddle like pattern.
Professionally, this would be not acceptable, but here I think it gives my cast a unique identity and a nice texture.


I plan to keep it.


Aluminium
Pure aluminum ingots are costly in India, its generally in alloy with zinc. In vigyan ashram we had strips of aluminum (99%). The SDS sheet of this is available here. Unlike the above, aluminum is not a low melt metal. I had general idea that aluminum mets at lower ~700°C, because we had melted it before. A quick look at the data sheet we can see it melts at 660°C.


The standard chemistry lab hot plate goes upto 350°C.
It was time to shift gears, The chemistry lab also has a muffle furnace.
It is a local made furnace mainly to test volatility of various chemical compounds.
I kept the crucible with aluminium strips into the centre of the furnace, closed the lid
While setting the temperature, I found that the maximum temperature the furnace could go was 670°C.
None the less, I set the temperature and waited.
It took almost 1 hour for the furnace to reach the temperature (mostly due to unstable power source, and power outages).
From the small hole provided in the furnace, I could see the all the aluminum had melted.

Aluminium melts at 660°C, calcium (from which bones are made) at 842°C very close. Safety is must. Do not attempt to remove molten product from skin because skin will tear easily


The next problem I came across was that, whenever I opened the door of the furnace, the temperature would fall by ~20°C instantly. A temperature of ~720°C would have been better.
The muffle furnace had a small ~100X100mm opening and it was ~ 1 feet deep.
I had to keep the crucible at the very end on the platform.
Here I found that we did not have the required tools to remove the hot crucible.
This is problematic. I turned off the furnace and waited for it to cool.
I would call this a failure.
We can still get the right tools, right furnace and then cast aluminium but given the time limit of fab academy, the availability of tools and safety hazards I have decided to drop casting aluminium.


Epoxy Resin

Epoxy is one of the most beautiful materials I know. Its transparent like glass but easily moldable like clay.
One can create beautiful things with epoxy like below


Almost all epoxy resins contain the highly reactive epoxide group. The ring is a cyclic ether which approximates to a equilateral triangle making it unstable due to van der Waals' forces. This makes it react with large amounts of reactants (co-reactants) and itself.


The co-reactants cause often cause cross-linking, which is also known as curing.Hence they are called hardeners or curatives.
When buying Epoxy, it is generally sold with a suitable hardener.
The ratio of epoxy to hardener also depends on chemical composition of both epoxy and hardener and setting time.
It is important not to vary the ratios to achieve different cure times, the mixing proportions are important to achieve a product with all the physical characteristics intended.
The bottles for both Epoxy and hardener are unlabeled, that is how you get them in Pabal. So I had to rely on previous years' academy students and the retailer from which our instructor bought it. The recommended ratio is 1:2 i.e. for 1 parts of hardener we use 2 part epoxy.
While working with epoxy is is also important to take care of the following terms: For test cast, I poured the epoxy and hardener into a small business card holder with a plant root in the middle. Given the higher ambient temperature at Pabal, it set in 3 hours only.
I tested for surface finish, stiffness. I did not have a data sheet to compare the hence I compared with the objects made in the previous fab academy.
Luckily for me, they were similar.
My mold are quite small, so are everyone's. It would be hard make the mixture for such a small amount. Mixtures with small volumes are known to harder to make accurately.
Hence, Me and Kamleshji decided to make our mixtures together.
Together we needed a poured epoxy of ~44g, and added hardener of 22g.
A picture of me pouring epoxy


I then mixed it with a glass rod and started pouring it in our molds.


The setting time is about 4 to 5 hours.
Given Pabals' weather I think it will take only 2-3 hours. Anyways I let it set over night Just in case


The next day, my cast was ready.


Flexwax

Wax used for casting not of my favorite materials.
I still needed to try casting it.
The complete data sheet for flex wax is available here.
Wax is used in lost-wax casting. Although I won't be doing any lost wax casting here, Simply using wax will help me learn about it.
Lost-wax casting is an important skill
Flexible wax also called as Flexwax is a very common tool to make 3D objects by simply melting and applying.
The recommended way to apply is by brushing with a brush.
The most common application for this is making mold of body parts.
People generally melt it and then apply it on bare skin with a simple brush.
There are many videos available online, I don't think I can undergo such level of pain.
Being lazy I for my test cast I decided to directly melt pieces of wax in the mold itself Big Mistake
It caused the mold to over flow, and turned ugly.
My made my next I approximated the amount of wax and then put in a disposable crucible
Then heated and poured it.
I tested it against the flexibility, This time the data sheet was not very useful hence I used the internet for more information.
I used a hot gun present in the lab to heat the wax in a disposable crucible, till it melted.
Then with a help of a nose plier I poured it in the mold


It freezes almost instantly.
Casting with wax is so much simpler and faster than traditional materials as they require lot of setting time.